


最近项目需要用到springboot整合es搜索引擎,我查了一下资料从简单的demo开始使用springboot编写一个提供快捷搜索的数据中心。
一、Spring Boot是什么?
Spring Boot makes it easy to create stand-alone, production-grade Spring based Applications that you can “just run”. We take an opinionated view of the Spring platform and third-party libraries so you can get started with minimum fuss. Most Spring Boot applications need very little Spring configuration.
查看官方文档,我们可以了解到SpringBoot是为了简化在开发基于 Spring的项目的难度,减少了哪些繁杂的配置,从而让开发基于 Spring的项目变成一个相当简单容易的事。
SpringBoot其本身没有添加什么新的技术,就是整合了一些现有的框架,并提供了一些默认的配置,就是这些默认的配置,极大的提高了我们的开发效率。所以,学习使用 SpringBoot之前,建议最好要有一些 Spring相关知识为基础。
Springboot 的入门非常简单,接下来是一个入门demo。
二、入门案例
1.创建一个maven工程
2.在pom.xml中导入需要的依赖:spring-boot-starter-web
<dependency>
    <groupId>org.springframework.boot</groupId>
    <artifactId>spring-boot-starter-web</artifactId>
    <version>1.5.9.RELEASE</version>
  </dependency>
添加完成后,更新maven工程,我们会发现在maven dependencies中引入了很多依赖,如图:
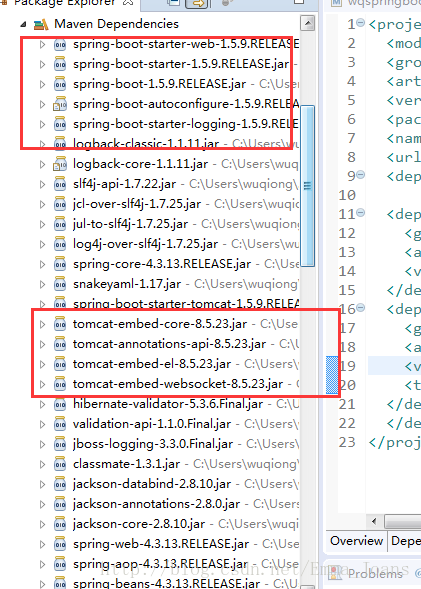
我们可以看到,这里加载和很多jar包,这是因为spring-boot-starter-web 中整合了springMvc,spring,甚至还有tomcat。一个项目完整运行所以来的环境,springboot-start都帮我们封装好了。
3.编写application.java类
package com.es.controller;

import org.springframework.beans.factory.annotation.Value;
import org.springframework.boot.SpringApplication;
import org.springframework.boot.autoconfigure.EnableAutoConfiguration;
import org.springframework.web.bind.annotation.RequestMapping;
import org.springframework.web.bind.annotation.RestController;

@RestController
@EnableAutoConfiguration
public class Application {


    public static void main(String[] args) {
        SpringApplication.run(Application.class, args);
    }

    @RequestMapping("/")
    public String hello() {
        return "Hello SpringBoot" ;
    }
}
类上面这里运用了两个注解,一个是@RestController,另一个是@EnableAutoConfiguration,Appli
①@RestController是spring4新出现的注解,相当于 @Controller 和 @ResponseBody 的组合使用。
②@EnableAutoConfiguration是springboot的注解,他的作用是借助@Import的帮助,将所有符合自动配置条件的bean定义加载到IoC容器。
③SpringApplication类是springboot提供的,在Spring应用的入口类中的main()方法中,通过简单地调用Spring Boot的SpringApplication类的run()方法,启动该Spring应用。
spring的run方法返回的是ConfigurableApplicationContext 对象。
/**
     * Static helper that can be used to run a {@link SpringApplication} from the
     * specified source using default settings.
     * @param source the source to load
     * @param args the application arguments (usually passed from a Java main method)
     * @return the running {@link ApplicationContext}
     */
    public static ConfigurableApplicationContext run(Object source, String... args) {
        return run(new Object[] { source }, args);
    }
4.右键run as 以普通的java项目启动main方法,控制台打印结果:

5.在地址栏输入:localhost:8080:浏览器返回结果:
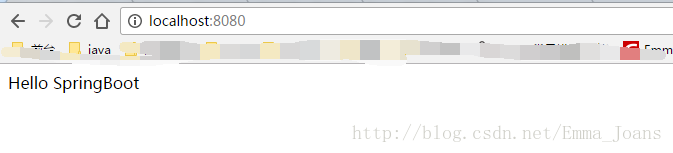
项目的成功访问说明springboot有两个默认的初始化配置:
①默认的监听端口:8080,
②应用的contextPath为”/”。
这样一个简单的springboot入门案例就完成了。


 5976
5976


 被折叠的 条评论
为什么被折叠?
被折叠的 条评论
为什么被折叠?
 到【灌水乐园】发言


