


本文使用的ConstraintLayout版本为
implementation "androidx.constraintlayout:constraintlayout:2.0.0-beta6"
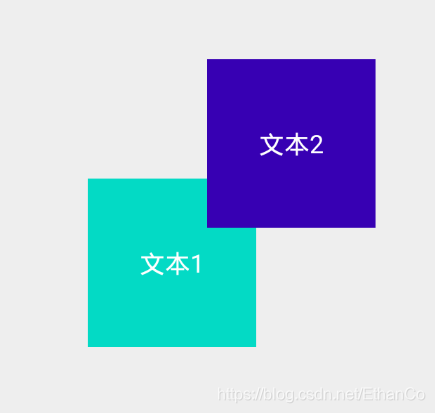
角度
按照角度来约束一个View
app:layout_constraintCircle: 参照物的idapp:layout_constraintCircleAngle: 与参照物的角度app:layout_constraintCircleRadius: 与参照物的距离
<?xml version="1.0" encoding="utf-8"?>
<androidx.constraintlayout.widget.ConstraintLayout
xmlns:android="http://schemas.android.com/apk/res/android"
xmlns:app="http://schemas.android.com/apk/res-auto"
xmlns:tools="http://schemas.android.com/tools"
android:layout_width="match_parent"
android:layout_height="match_parent"
tools:context=".MainActivity">
<TextView
android:id="@+id/tv_01"
android:layout_width="120dp"
android:layout_height="120dp"
android:layout_marginTop="200dp"
android:background="@color/colorAccent"
android:gravity="center"
android:text="文本1"
android:textColor="@android:color/white"
android:textSize="18sp"
app:layout_constraintLeft_toLeftOf="parent"
app:layout_constraintRight_toRightOf="parent"
app:layout_constraintTop_toTopOf="parent" />
<TextView
android:id="@+id/tv_02"
android:layout_width="120dp"
android:layout_height="120dp"
android:layout_marginTop="200dp"
android:background="@color/colorPrimaryDark"
android:gravity="center"
android:text="文本2"
android:textColor="@android:color/white"
android:textSize="18sp"
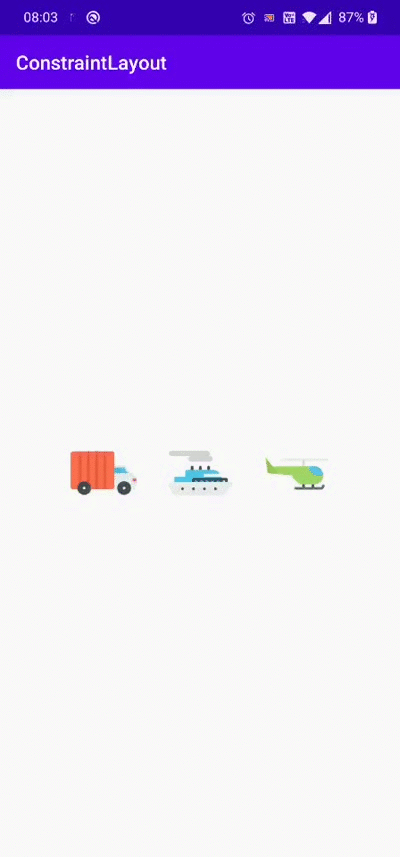
app:layout_constraintCircle="@id/tv_01"
app:layout_constraintCircleAngle="45"
app:layout_constraintCircleRadius="120dp" />
</androidx.constraintlayout.widget.ConstraintLayout>
效果如下所示
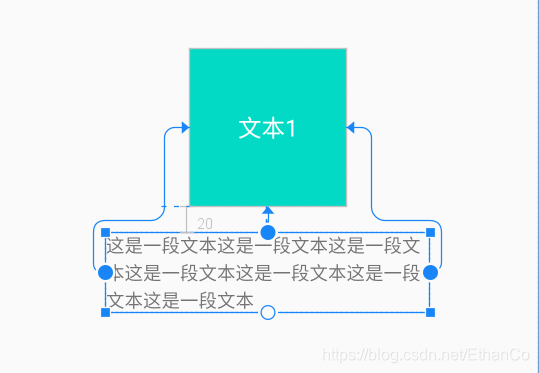
constraintWidth_default
app:layout_constraintWidth_default只有在View的宽度定义为0dp的时候才生效,其余情况下设置这个属性是不起任何作用的。它有三个值:wrap、spread和percent。
- wrap:相当于
android:layout_width="wrap_content" - spread:相当于
android:layout_width="match_parent" - percent:设置View的宽度为parent的比例值,比例值默认是100%,即宽度是match_parent。这个比例值通过属性
app:layout_constraintWidth_percent设置。
我们来尝试一下
<?xml version="1.0" encoding="utf-8"?>
<androidx.constraintlayout.widget.ConstraintLayout
	xmlns:android="http://schemas.android.com/apk/res/android"
    xmlns:app="http://schemas.android.com/apk/res-auto"
    xmlns:tools="http://schemas.android.com/tools"
    android:layout_width="match_parent"
    android:layout_height="match_parent"
    tools:context=".MainActivity">

    <TextView
        android:id="@+id/tv_01"
        android:layout_width="120dp"
        android:layout_height="120dp"
        android:layout_marginTop="200dp"
        android:background="@color/colorAccent"
        android:gravity="center"
        android:text="文本1"
        android:textColor="@android:color/white"
        android:textSize="18sp"
        app:layout_constraintLeft_toLeftOf="parent"
        app:layout_constraintRight_toRightOf="parent"
        app:layout_constraintTop_toTopOf="parent" />

    <TextView
        android:layout_width="0dp"
        android:layout_height="wrap_content"
        android:layout_marginTop="20dp"
        app:layout_constraintWidth_default="percent"
        app:layout_constraintWidth_percent="0.6"
        android:text="这是一段文本这是一段文本这是一段文本这是一段文本这是一段文本这是一段文本这是一段文本"
        app:layout_constraintEnd_toEndOf="@+id/tv_01"
        app:layout_constraintStart_toStartOf="@+id/tv_01"
        app:layout_constraintTop_toBottomOf="@+id/tv_01" />

</androidx.constraintlayout.widget.ConstraintLayout>
效果如下图所示
goneMargin
目标为gone的时候的margin
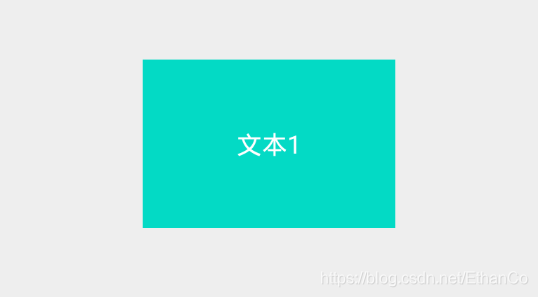
DimensionRatio约束
可以约束宽和高的比例,width或height必须有一个为0dp
constraintDimensionRatio="2:1"
如果width和height都是0dp,那么需要指定H或W`
高度计算出来,宽度充满约束
constraintDimensionRatio="H,2:1"
宽度计算出来,高度充满约束
constraintDimensionRatio="W,2:1"
我们来尝试一下
<?xml version="1.0" encoding="utf-8"?>
<androidx.constraintlayout.widget.ConstraintLayout xmlns:android="http://schemas.android.com/apk/res/android"
    xmlns:app="http://schemas.android.com/apk/res-auto"
    xmlns:tools="http://schemas.android.com/tools"
    android:layout_width="match_parent"
    android:layout_height="match_parent"
    tools:context=".MainActivity">

    <TextView
        android:id="@+id/tv_01"
        android:layout_width="0dp"
        android:layout_height="120dp"
        android:layout_marginTop="200dp"
        android:background="@color/colorAccent"
        android:gravity="center"
        android:text="文本1"
        app:layout_constraintDimensionRatio="1.5"
        android:textColor="@android:color/white"
        android:textSize="18sp"
        app:layout_constraintLeft_toLeftOf="parent"
        app:layout_constraintRight_toRightOf="parent"
        app:layout_constraintTop_toTopOf="parent" />

</androidx.constraintlayout.widget.ConstraintLayout>
效果如下图所示
百分比
需要对应方向的宽或者高为0dp
在屏幕适配中很有用,但是在约束布局中用的并不多,因为在约束布局中,实现百分比的方式不只有这一种。
constraintWidth_percent="0.3"
还可以用Guide_percent,需要和Guideline配合使用。
constraintGuide_percent="0.3"
Layer
可多个控件一起移动。
和 Group 类似,同样通过引⽤的⽅式来避免布局嵌套,可以为⼀组控件统⼀设置旋转/缩放/ 位移。
androicx.constraintLayout.heper.widget.Layer
Barrier
通过设置⼀组控件的某个⽅向的屏障,来 避免布局嵌套 。
<?xml version="1.0" encoding="utf-8"?>
<androidx.constraintlayout.widget.ConstraintLayout
	xmlns:android="http://schemas.android.com/apk/res/android"
    xmlns:app="http://schemas.android.com/apk/res-auto"
    xmlns:tools="http://schemas.android.com/tools"
    android:layout_width="match_parent"
    android:layout_height="match_parent"
    tools:context=".BarrierActivity">

    <TextView
        android:id="@+id/text1"
        android:layout_width="wrap_content"
        android:layout_height="wrap_content"
        android:layout_marginTop="20dp"
        android:text="dfafdfdfsdf"
        app:layout_constraintLeft_toLeftOf="parent"
        app:layout_constraintTop_toTopOf="parent" />

    <TextView
        android:id="@+id/text2"
        android:layout_width="wrap_content"
        android:layout_height="wrap_content"
        android:layout_marginTop="35dp"
        android:text="ghghjghjghghhhggh"
        app:layout_constraintLeft_toLeftOf="parent"
        app:layout_constraintTop_toBottomOf="@id/text1" />

    <androidx.constraintlayout.widget.Barrier
        android:layout_width="wrap_content"
        android:layout_height="wrap_content"
        app:barrierDirection="end"
        app:constraint_referenced_ids="text1,text2" />

</androidx.constraintlayout.widget.ConstraintLayout>
显示效果如下
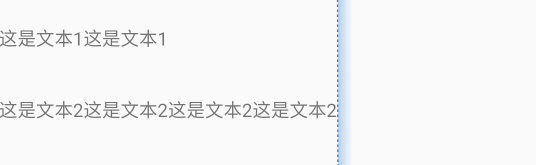
barrier永远在text1、text2最长的长度之后,实际显示中,barrier不会显示出来。
Guideline
在 ConstraintLayout 中,Guideline 是一个虚拟的视图,它可以作为一个参考线来对齐其他视图。它有水平参考线和竖直参考线两种。Guideline 的作用是提供一个参考点,使其他视图可以相对于它进行布局。它不会在屏幕上显示出来,但是通过设置约束,可以影响其他视图的布局。
Guideline 引导线 属性 :
-
方向属性 :
android:orientation="horizontal",取值horizontal / vertical -
开始尺寸定义 :
app:layout_constraintGuide_begin="22dp",取值dp尺寸值 ; 距离 顶部 ( 水平 ) , 左侧 ( 垂直 ) 位置 -
结束尺寸定义 :
app:layout_constraintGuide_end="20dp",取值dp尺寸值 ; 距离 底部 ( 水平 ) , 右侧 ( 垂直 ) 位置 -
百分比位置定义 :
app:layout_constraintGuide_percent="0.5",取值0 ~ 1.0之间的小数
代码示例
<androidx.constraintlayout.widget.Guideline
    android:id="@+id/guideline"
    android:layout_width="wrap_content"
    android:layout_height="wrap_content"
    android:orientation="vertical"
    app:layout_constraintGuide_percent="0.5" />
效果如下所示,那个虚线就是Guideline所在的位置

Placeholder
通过 setContentId 来将指定控件放到占位符中
override fun onCreate(savedInstanceState: Bundle?) {
    super.onCreate(savedInstanceState)
    setContentView(R.layout.activity_main)

    findViewById<ImageView>(R.id.imageView).setOnClickListener(this)
    findViewById<ImageView>(R.id.imageView2).setOnClickListener(this)
    findViewById<ImageView>(R.id.imageView3).setOnClickListener(this)
}

override fun onClick(v: View) {
    val findViewById = findViewById<Placeholder>(R.id.placeholder)
    findViewById.setContentId(v!!.id)
}
这样,就可以将指定控件显示到PlaceHolder中,如果要有动画效果,我们还可以这样设置
override fun onClick(v: View) {
    val placeholder = findViewById<Placeholder>(R.id.placeholder)
    placeholder.setContentId(v!!.id)
    val constraintLayout = findViewById<ConstraintLayout>(R.id.constraintLayout)
    TransitionManager.beginDelayedTransition(constraintLayout, ChangeBounds().apply {
        interpolator = OvershootInterpolator()
        duration = 1000
    })
}
效果如下
这个暂时在constraintlayout:1.1.3能生效,constraintlayout:2.0.0-beta6没有反应,可能和beta版本有关系
自定义ConstraintHelper
渐变的动画,新建CircularRevealHelper类
class CircularRevealHelper(context: Context, attrs: AttributeSet) :
    ConstraintHelper(context, attrs) {

    //当回调,表示我们所有控件的布局完成了
    override fun updatePostLayout(container: ConstraintLayout) {
        super.updatePostLayout(container)

        //可以在这里对View播放动画
        referencedIds.forEach {
            val view = container.getViewById(it)
            val radius = hypot(view.width.toDouble(),view.height.toDouble()).toInt()

            ViewAnimationUtils.createCircularReveal(view,0,0,0F,radius.toFloat())
                .setDuration(2000L)
                .start()
        }
    }
}
在xml中进行声明,constraint_referenced_ids关联需要的ImageView
<com.heiko.constraintlayouttest.CircularRevealHelper
        android:layout_width="wrap_content"
        android:layout_height="wrap_content"
        app:constraint_referenced_ids="imageView,imageView2,imageView3" />
效果如下图所示
代码中动态改变约束
class Linear(context: Context, attrs: AttributeSet) : VirtualLayout(context, attrs) {
    private val constraintSet: ConstraintSet by lazy {
        ConstraintSet().apply {
            isForceId = false
        }
    }

    //在布局之前
    override fun updatePreLayout(container: ConstraintLayout?) {
        super.updatePreLayout(container)

        constraintSet.clone(container)

        val viewIds = referencedIds

        for (i in 1 until mCount) {
            val current = viewIds[i]
            val before = viewIds[i - 1]

            constraintSet.connect(current, ConstraintSet.START, before, ConstraintSet.START)
            constraintSet.connect(current, ConstraintSet.TOP, before, ConstraintSet.BOTTOM)

            constraintSet.applyTo(container)
        }
    }
}
但这个也不用自己去写,已经有相应的组件了。
<androidx.constraintlayout.helper.widget.Flow
        android:id="@+id/flow"
        android:layout_width="0dp"
        android:layout_height="wrap_content"
        android:layout_marginTop="16dp"
        android:orientation="vertical"
        app:flow_wrapMode="chain"
        app:flow_verticalGap="16dp"
        app:flow_horizontalGap="16dp"
        app:constraint_referenced_ids="image,image2,image3,image4"
        app:layout_constraintLeft_toLeftOf="parent"
        app:layout_constraintRight_toRightOf="parent"
        app:layout_constraintTop_toTopOf="parent" />
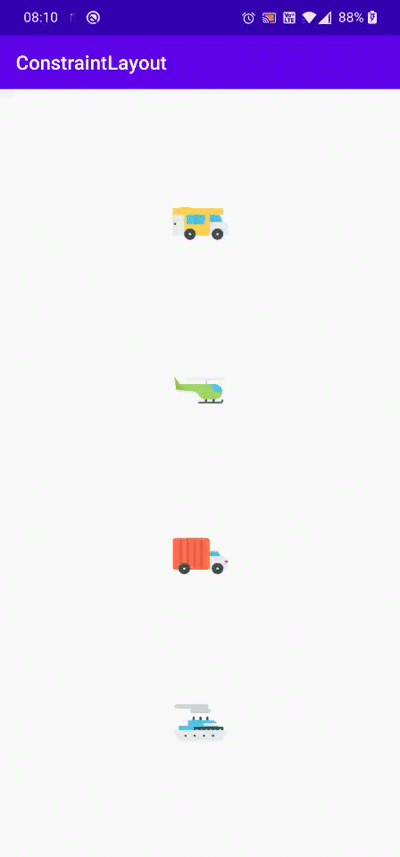
Flow 就是类似于LinearLayout
效果如图所示 :

同时,还可以设置flow_wrapMode,会有不同的效果。
动态替换整个布局
对于一些经布局排布方式有差异,要动态替换的情况,非常有用。
首先定义初始化状态下的activity_constraint_1.xml
<?xml version="1.0" encoding="utf-8"?>
<androidx.constraintlayout.widget.ConstraintLayout xmlns:android="http://schemas.android.com/apk/res/android"
    xmlns:app="http://schemas.android.com/apk/res-auto"
    android:layout_width="match_parent"
    android:layout_height="match_parent"
    android:onClick="onClick">

    <ImageView
        android:id="@+id/image_01"
        android:layout_width="wrap_content"
        android:layout_height="wrap_content"
        android:src="@mipmap/ic_01"
        app:layout_constraintBottom_toTopOf="@+id/image_02"
        app:layout_constraintEnd_toEndOf="parent"
        app:layout_constraintHorizontal_bias="0.5"
        app:layout_constraintStart_toStartOf="parent"
        app:layout_constraintTop_toTopOf="parent" />

    <ImageView
        android:id="@+id/image_02"
        android:layout_width="wrap_content"
        android:layout_height="wrap_content"
        android:src="@mipmap/ic_02"
        app:layout_constraintBottom_toTopOf="@+id/image_03"
        app:layout_constraintEnd_toEndOf="@+id/image_01"
        app:layout_constraintHorizontal_bias="0.5"
        app:layout_constraintStart_toStartOf="@+id/image_01"
        app:layout_constraintTop_toBottomOf="@+id/image_01" />

    <ImageView
        android:id="@+id/image_03"
        android:layout_width="wrap_content"
        android:layout_height="wrap_content"
        android:src="@mipmap/ic_03"
        app:layout_constraintBottom_toTopOf="@+id/image_04"
        app:layout_constraintEnd_toEndOf="@+id/image_02"
        app:layout_constraintHorizontal_bias="0.5"
        app:layout_constraintStart_toStartOf="@+id/image_02"
        app:layout_constraintTop_toBottomOf="@+id/image_02" />

    <ImageView
        android:id="@+id/image_04"
        android:layout_width="wrap_content"
        android:layout_height="wrap_content"
        android:src="@mipmap/ic_04"
        app:layout_constraintBottom_toBottomOf="parent"
        app:layout_constraintEnd_toEndOf="@+id/image_03"
        app:layout_constraintHorizontal_bias="0.5"
        app:layout_constraintStart_toStartOf="@+id/image_03"
        app:layout_constraintTop_toBottomOf="@+id/image_03" />

</androidx.constraintlayout.widget.ConstraintLayout>
接着定义替换后的activity_constraint_2.xml
<?xml version="1.0" encoding="utf-8"?>
<androidx.constraintlayout.widget.ConstraintLayout xmlns:android="http://schemas.android.com/apk/res/android"
    xmlns:app="http://schemas.android.com/apk/res-auto"
    android:layout_width="match_parent"
    android:layout_height="match_parent"
    android:onClick="onClick">

    <ImageView
        android:id="@+id/image_01"
        android:layout_width="wrap_content"
        android:layout_height="wrap_content"
        android:src="@mipmap/ic_01"
        app:layout_constraintBottom_toTopOf="@+id/image_02"
        app:layout_constraintEnd_toEndOf="parent"
        app:layout_constraintHorizontal_bias="0.5"
        app:layout_constraintStart_toStartOf="parent"
        app:layout_constraintTop_toTopOf="parent" />

    <ImageView
        android:id="@+id/image_02"
        android:layout_width="wrap_content"
        android:layout_height="wrap_content"
        android:src="@mipmap/ic_02"
        app:layout_constraintBottom_toTopOf="@+id/image_03"
        app:layout_constraintEnd_toEndOf="@+id/image_01"
        app:layout_constraintHorizontal_bias="0.5"
        app:layout_constraintStart_toStartOf="@+id/image_01"
        app:layout_constraintTop_toBottomOf="@+id/image_01" />

    <ImageView
        android:id="@+id/image_03"
        android:layout_width="wrap_content"
        android:layout_height="wrap_content"
        android:src="@mipmap/ic_03"
        app:layout_constraintBottom_toTopOf="@+id/image_04"
        app:layout_constraintEnd_toEndOf="@+id/image_02"
        app:layout_constraintHorizontal_bias="0.5"
        app:layout_constraintStart_toStartOf="@+id/image_02"
        app:layout_constraintTop_toBottomOf="@+id/image_02" />

    <ImageView
        android:id="@+id/image_04"
        android:layout_width="wrap_content"
        android:layout_height="wrap_content"
        android:src="@mipmap/ic_04"
        app:layout_constraintBottom_toBottomOf="parent"
        app:layout_constraintEnd_toEndOf="@+id/image_03"
        app:layout_constraintHorizontal_bias="0.5"
        app:layout_constraintStart_toStartOf="@+id/image_03"
        app:layout_constraintTop_toBottomOf="@+id/image_03" />

</androidx.constraintlayout.widget.ConstraintLayout>
然后,在代码中,实现其替换效果
fun onCLick(view:View){
    val constraintSet = ConstraintSet().apply {
        isForceId = false //控件没有Id的时候也不会报错
		clone(this@ConstraintSetActivity, R.id.activity_constraint_2)
    }
	//使用过渡动画
    TransitionManager.beginDelayedTransition(constraintLayout, ChangeBounds().apply {
            interpolator = AccelerateDecelerateInterpolator()
            duration = 1000
        })
    constraintSet.applyTo(constraintLayout)
}
效果如下所示:
减少布局嵌套的作用 :
除了提升性能以外,还可以更加方便地做过渡动画,可以让view之间,更加方便地引用,约束。
示例代码下载
文中示例代码下载
其他
更多ConstraintLayout特性详见
ConstraintLayout 约束布局 2.0
ConstraintLayout,看完一篇真的就够了么?
文中图标源自 阿里巴巴图库


 719
719


 被折叠的 条评论
为什么被折叠?
被折叠的 条评论
为什么被折叠?
 到【灌水乐园】发言


