


林炳文Evankaka原创作品。转载请注明出处http://blog.csdn.net/evankaka
本文主要讲解了Spring中constructor注入的4种不同写法和sette的3种不同写法
一、constructor注入4种不同写法
通过构造方法注入,就相当于给构造方法的参数传值set注入的缺点是无法清晰表达哪些属性是必须的,哪些是可选的,构造注入的优势是通过构造强制依赖关系,不可能实例化不完全的或无法使用的bean。
第1种方法:直接传值
	<!-- constructor方式注入写法1,直接传值 -->
	<bean id="student1" class="com.mucfc.beanfactory.Student">
		<constructor-arg value="小明" />
		<constructor-arg value="2001" />
</bean>第2种方法:根据索引赋值,索引都是以0开头的:
<!-- constructor方式注入写法2,根据索引赋值 -->
	<bean id="student2" class="com.mucfc.beanfactory.Student">
		<constructor-arg index="0" value="阿狗" />
		<constructor-arg index="1" value="2002" />
</bean>这种方法基本上不怎么适用,因为一个类里可以有好几个相同基本类型的变量,很容易就混淆值传给哪一个参数了所以做好不要使用这种方法:
<!-- constructor方式注入写法3,根据所属类型传值 -->
	<bean id="student3" class="com.mucfc.beanfactory.Student">
		<constructor-arg type="String" value="大白" />
		<constructor-arg type="int" value="2003" />
</bean> <!-- constructor方式注入写法4,根据参数的名字传值:记得传入名是构造器的参数名(推荐用法) -->
<bean id="student4" class="com.mucfc.beanfactory.Student">
<constructor-arg name="name" value="大地" />
<constructor-arg name="id" value="4503" />
</bean>在这几种方法里我感觉这种方法是最实用的,他是根据名字来传值的,所以基本上只要名字对了,这个值就可以获取到
二、setter注入3种不同写法
1、
<!-- setter方式注入写法1,记得要有无参构造函数 -->
<bean id="student5" class="com.mucfc.beanfactory.Student">
<property name="std_name">
<value>天天</value>
</property>
<property name="std_id">
<value>2005</value>
</property>
</bean>2、
<!-- setter方式注入写法2,记得要有无参构造函数 -->
<bean id="student6" class="com.mucfc.beanfactory.Student">
<property name="std_name" value="水水" />
<property name="std_id" value="3009" />
</bean>3、
<!-- setter方式注入写法7,记得要有无参构造函数 -->
<bean id="student7" class="com.mucfc.beanfactory.Student"
p:std_name="针地" p:std_id="3445" />三、使用范例
新建一个java project工程,名字自已取吧,然后把Spring的jar文件 和commons-logging的jar文件加载进来就行
不懂看这里【Spring】Spring配置及第个Spring HelloWorld
新建一个包,添加一个Student.java,代码如下:
/**
*功能 测试constructor和setter注入的不同写法
*作者 林炳文(ling20081005@126.com 博客:http://blog.csdn.net/evankaka)
*时间 2015.4.4
*/
package com.mucfc.beanfactory;
public class Student {
private String std_name;
private int std_id;
public Student(){
}
public Student(String name,int id) {
std_name=name;
std_id=id;
}
public String getStd_name() {
return std_name;
}
public void setStd_name(String std_name) {
this.std_name = std_name;
}
public int getStd_id() {
return std_id;
}
public void setStd_id(int std_id) {
this.std_id = std_id;
}
public String toString(){
return "学生姓名:"+std_name+" 学生学号:"+std_id;
}
}
在当前工程的src文件夹下添加文件ApplicationContext.xml,就是工程-》右键-》new->other->xml.......
代码如下:
<?xml version="1.0" encoding="UTF-8"?>
<beans xmlns="http://www.springframework.org/schema/beans"
xmlns:xsi="http://www.w3.org/2001/XMLSchema-instance" xmlns:p="http://www.springframework.org/schema/p"
xsi:schemaLocation="http://www.springframework.org/schema/beans
http://www.springframework.org/schema/beans/spring-beans-3.0.xsd">
<!-- constructor方式注入写法1,直接传值 -->
<bean id="student1" class="com.mucfc.beanfactory.Student">
<constructor-arg value="小明" />
<constructor-arg value="2001" />
</bean>
<!-- constructor方式注入写法2,根据索引赋值 -->
<bean id="student2" class="com.mucfc.beanfactory.Student">
<constructor-arg index="0" value="阿狗" />
<constructor-arg index="1" value="2002" />
</bean>
<!-- constructor方式注入写法3,根据所属类型传值 -->
<bean id="student3" class="com.mucfc.beanfactory.Student">
<constructor-arg type="String" value="大白" />
<constructor-arg type="int" value="2003" />
</bean>
	<!-- constructor方式注入写法4,根据参数的名字传值:记得传入名是构造器的参数名(推荐用法) -->
    <bean id="student4" class="com.mucfc.beanfactory.Student">
		<constructor-arg name="name" value="大地" />
		<constructor-arg name="id" value="4503" />
	</bean>
	<!-- setter方式注入写法1,记得要有无参构造函数 -->
	<bean id="student5" class="com.mucfc.beanfactory.Student">
		<property name="std_name">
			<value>天天</value>
		</property>
		<property name="std_id">
			<value>2005</value>
		</property>
	</bean>
<!-- setter方式注入写法2,记得要有无参构造函数 -->
	<bean id="student6" class="com.mucfc.beanfactory.Student">
		<property name="std_name" value="水水" />
		<property name="std_id" value="3009" />
	</bean>
<!-- setter方式注入写法7,记得要有无参构造函数  -->
	<bean id="student7" class="com.mucfc.beanfactory.Student"
		p:std_name="针地" p:std_id="3445" />
</beans>/**
*功能 测试constructor和setter注入的不同写法
*作者 林炳文(ling20081005@126.com 博客:http://blog.csdn.net/evankaka)
*时间 2015.4.4
*/
package com.mucfc.beanfactory;
import org.springframework.beans.factory.xml.XmlBeanFactory;
import org.springframework.core.io.ClassPathResource;
public class Test {
public static void main(String[] args) {
XmlBeanFactory bFactory = new XmlBeanFactory(new ClassPathResource("ApplicationContext.xml"));
Student stu1 = (Student) bFactory.getBean("student1");
Student stu2 = (Student) bFactory.getBean("student2");
Student stu3 = (Student) bFactory.getBean("student3");
Student stu4 = (Student) bFactory.getBean("student4");
Student stu5 = (Student) bFactory.getBean("student5");
Student stu6 = (Student) bFactory.getBean("student6");
Student stu7 = (Student) bFactory.getBean("student7");
System.out.println("-------------constructor方式注入写法-------------");
System.out.println(stu1);
System.out.println(stu2);
System.out.println(stu3);
System.out.println(stu4);
System.out.println("-------------setter方式注入写法,记得要有无参构造函数-------------");
System.out.println(stu5);
System.out.println(stu6);
System.out.println(stu7);
}
}
输出结果:
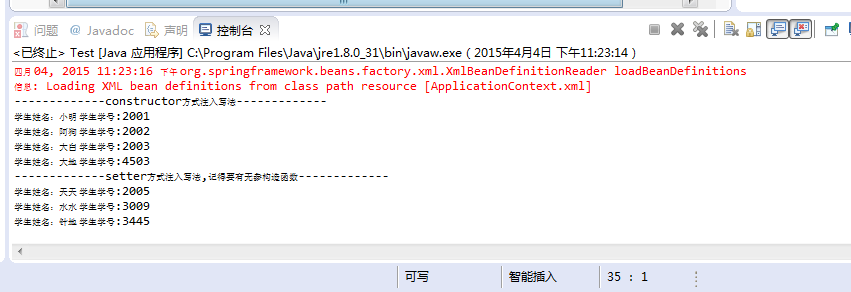
这就是最后的结果,是不是很简单?若你觉得此文对你有用,那就帮我顶一票~~谢谢~~
林炳文Evankaka原创作品。转载请注明出处http://blog.csdn.net/evankaka


 432
432


 被折叠的 条评论
为什么被折叠?
被折叠的 条评论
为什么被折叠?
 到【灌水乐园】发言


