


如果我们想要自己在云服务器上部署Stable Diffusion模型,但是又不想自动扩容造成成本激增,我们可以设计排队使用的模式。stable-diffusion-webui已经很好用了,支持了自定义模型及Lora模型的加载、排队生成、完善的UI和各种插件功能,但是缺点在于无法支持多人场景,会存在一个人加载了新模型B后,一个人的界面上虽然显示的还是模型A,但是点击生成却是用的模型B生成,这是因为sd-webui的模型加载不是用户维度的,而是全局的。
要想实现支持多人排队使用的sd-webui,最好的方式还是hack原先的sd-webui的代码,找到模型接收请求参数并进行计算的核心代码,然后自己写前端,手动将这些请求参数传递到这段核心函数中去。
ps:如果想要部署支持自动扩缩容无需排队的stable diffusion自定义模型,可以文末领取!
StableDiffusionProcessingTxt2Img
首先我们来看最重要的txt2img的代码,核心的类就是modules.processing中的StableDiffusionProcessingTxt2Img类,它的init函数接收以下的参数:
def __init__(self, enable_hr: bool = False, denoising_strength: float = 0.75, firstphase_width: int = 0, firstphase_height: int = 0, hr_scale: float = 2.0, hr_upscaler: str = None, hr_second_pass_steps: int = 0, hr_resize_x: int = 0, hr_resize_y: int = 0, **kwargs)
代码中的缩写hr代表的就是webui中的"Hires.fix",相关的参数对应的是webui中的这些选项:

接下来,可以看到还有很多其他的参数没有看到,其实这些参数都是在StableDiffusionProcessingTxt2Img的父类:StableDiffusionProcessing类的init中指定的:
def __init__(self, sd_model=None, outpath_samples=None, outpath_grids=None, prompt: str = "", styles: List[str] = None, seed: int = -1, subseed: int = -1, subseed_strength: float = 0, seed_resize_from_h: int = -1, seed_resize_from_w: int = -1, seed_enable_extras: bool = True, sampler_name: str = None, batch_size: int = 1, n_iter: int = 1, steps: int = 50, cfg_scale: float = 7.0, width: int = 512, height: int = 512, restore_faces: bool = False, tiling: bool = False, do_not_save_samples: bool = False, do_not_save_grid: bool = False, extra_generation_params: Dict[Any, Any] = None, overlay_images: Any = None, negative_prompt: str = None, eta: float = None, do_not_reload_embeddings: bool = False, denoising_strength: float = 0, ddim_discretize: str = None, s_churn: float = 0.0, s_tmax: float = None, s_tmin: float = 0.0, s_noise: float = 1.0, override_settings: Dict[str, Any] = None, override_settings_restore_afterwards: bool = True, sampler_index: int = None, script_args: list = None):

    self.outpath_samples: str = outpath_samples # 生成的图片的保存路径,和下面的do_not_save_samples配合使用
    self.outpath_grids: str = outpath_grids
    self.prompt: str = prompt # 正向提示词
    self.prompt_for_display: str = None
    self.negative_prompt: str = (negative_prompt or "") # 反向提示词
    self.styles: list = styles or []
    self.seed: int = seed # 种子,-1表示使用随机种子
    self.sampler_name: str = sampler_name # 采样方法,比如"DPM++ SDE Karras"
    self.batch_size: int = batch_size # 每批生成的数量?
    self.n_iter: int = n_iter
    self.steps: int = steps # UI中的sampling steps
    self.cfg_scale: float = cfg_scale # UI中的CFG Scale,提示词相关性
    self.width: int = width # 生成图像的宽度
    self.height: int = height # 生成图像的高度
    self.restore_faces: bool = restore_faces # 是否使用面部修复
    self.tiling: bool = tiling # 是否使用可平铺(tilling)
    self.do_not_save_samples: bool = do_not_save_samples
我们对应UI界面来看这些参数的含义(我直接注释在代码里了),父类中有一些参数不是在txt2img中用到的,我就忽略了

通过将我注释的这些参数传进去,我们就可以指定sd-webui中提供的参数了,示例代码如下:
from modules.api.api import encode_pil_to_base64
from modules import shared
from modules.processing import StableDiffusionProcessingTxt2Img, process_images
args = {
    "outpath_samples": "C:\\Users\\wolvz\\Desktop",
    "prompt": "lora:koreanDollLikeness_v15:0.66, best quality, ultra high res, (photorealistic:1.4), 1girl, beige sweater, black choker, smile, laughing, bare shoulders, solo focus, ((full body), (brown hair:1), looking at viewer",
    "negative_prompt": "paintings, sketches, (worst quality:2), (low quality:2), (normal quality:2), lowres, normal quality, ((monochrome)), ((grayscale)), skin spots, acnes, skin blemishes, age spot, glans, (ugly:1.331), (duplicate:1.331), (morbid:1.21), (mutilated:1.21), (tranny:1.331), mutated hands, (poorly drawn hands:1.331), blurry, 3hands,4fingers,3arms, bad anatomy, missing fingers, extra digit, fewer digits, cropped, jpeg artifacts,poorly drawn face,mutation,deformed",
    "sampler_name": "DPM++ SDE Karras",
    "steps": 20,
    "cfg_scale": 8,
    "width": 512,
    "height": 768,
    "seed": -1,
}
p = StableDiffusionProcessingTxt2Img(sd_model=shared.sd_model, **args)
processed = process_images(p)
single_image_b64 = encode_pil_to_base64(processed.images[0]).decode('utf-8')
指定模型进行加载
现在还差最后一个参数,就是在sd-webui的顶部,可以指定模型,而我们现在的示例代码中,模型其实是从shared.sd_model取的,就会造成模型不是用户维度而是全局共享的问题。我们需要做的其实是当处理用户请求的时候,如果模型和当前使用的模型不一致,需要重新加载新的模型。
重新加载模型可以直接使用modules/sd_models.py中的reload_model_weights(sd_model=None, info=None)函数,而我们只需要传入info这个参数就行,用info参数来指定我们想要加载的模型,而在这个函数中,会自动判断我们想要加载的模型和当前模型是否一致,一致的话则不会重新加载。
从函数签名很难看出来info字段是一个什么样的参数,但是,经过我对代码的研究,我发现info其实就是下面这个类:
class CheckpointInfo:
    def __init__(self, filename):
        self.filename = filename
        abspath = os.path.abspath(filename)

        if shared.cmd_opts.ckpt_dir is not None and abspath.startswith(shared.cmd_opts.ckpt_dir):
            name = abspath.replace(shared.cmd_opts.ckpt_dir, '')
        elif abspath.startswith(model_path):
            name = abspath.replace(model_path, '')
        else:
            name = os.path.basename(filename)

        if name.startswith("\\") or name.startswith("/"):
            name = name[1:]

        self.name = name
        self.name_for_extra = os.path.splitext(os.path.basename(filename))[0]
        self.model_name = os.path.splitext(name.replace("/", "_").replace("\\", "_"))[0]
        self.hash = model_hash(filename)

        self.sha256 = hashes.sha256_from_cache(self.filename, "checkpoint/" + name)
        self.shorthash = self.sha256[0:10] if self.sha256 else None

        self.title = name if self.shorthash is None else f'{name} [{self.shorthash}]'

        self.ids = [self.hash, self.model_name, self.title, name, f'{name} [{self.hash}]'] + ([self.shorthash, self.sha256, f'{self.name} [{self.shorthash}]'] if self.shorthash else [])
init里的一大串其实都不用管,我们只需要指定filename就行了。所以用如下的示例代码就可以手动重新加载一个指定的模型:
from modules import sd_models

checkpoint_info = sd_models.CheckpointInfo("chilloutmix_NiPrunedFp32Fix.safetensors")
sd_models.reload_model_weights(info=checkpoint_info)
排队、显示进度
首先,支持多人排队使用,这个其实我们自己来实现就行,在内存里自己定义一个锁。比如定义一个变量queue_lock = threading.Lock(),在生成之前使用with queue_lock:就行。这样当多个请求到达时,会先处理先到达的请求,后面的请求等前面处理完之后才会开始处理。
还有一个问题是需要在模型生成过程中实时显示生成进度以及支持中断操作,这两个我们可以直接参考modules/api.py中的progressapi和interruptapi,可以看到获取剩余时间其实就是对modules.shared.state中的job_count、sampling_step、sampling_steps、time_start等变量进行了一些计算得到的:

而这些变量的赋值其实是在上面说的核心函数process_image中进行的。
可能有人会问,这里获取进度是从shared中的变量获取之后计算的,而shared是全局共享的,假设有多人同时请求,每个人需要获取各自的进度,不就没法实现了吗?其实,当多人请求时,因为前面实现的排队机制,只有一个请求会进入处理状态,其他都是等待状态,也就是只有处理中的请求才需要来获取进度和剩余时间;其余请求都是等待中的状态。我们可以在shared中记录一个task_id,来请求进度的时候,先判断请求的task_id和shared.task_id是否相等,相等说明该请求在处理中,否则说明在等待中。
至于中断操作,也很简单:
def interruptapi(self):
    shared.state.interrupt()
    return {}
以上就是实现stable diffusion txt2img多人排队使用的最简单的代码解读,我们hack了一部分sd-webui的源码,在此基础上,我们可以实现自己的UI,并且在上面加上我们自定义的各种功能,比如账号登录注册,充值会员,社区分享,多台GPU机器负载均衡等等。
最后,关于部署,可以文末领取一键安装包!!!
写在最后
感兴趣的小伙伴,赠送全套AIGC学习资料,包含AI绘画、AI人工智能等前沿科技教程和软件工具,具体看这里。

AIGC技术的未来发展前景广阔,随着人工智能技术的不断发展,AIGC技术也将不断提高。未来,AIGC技术将在游戏和计算领域得到更广泛的应用,使游戏和计算系统具有更高效、更智能、更灵活的特性。同时,AIGC技术也将与人工智能技术紧密结合,在更多的领域得到广泛应用,对程序员来说影响至关重要。未来,AIGC技术将继续得到提高,同时也将与人工智能技术紧密结合,在更多的领域得到广泛应用。

一、AIGC所有方向的学习路线
AIGC所有方向的技术点做的整理,形成各个领域的知识点汇总,它的用处就在于,你可以按照下面的知识点去找对应的学习资源,保证自己学得较为全面。
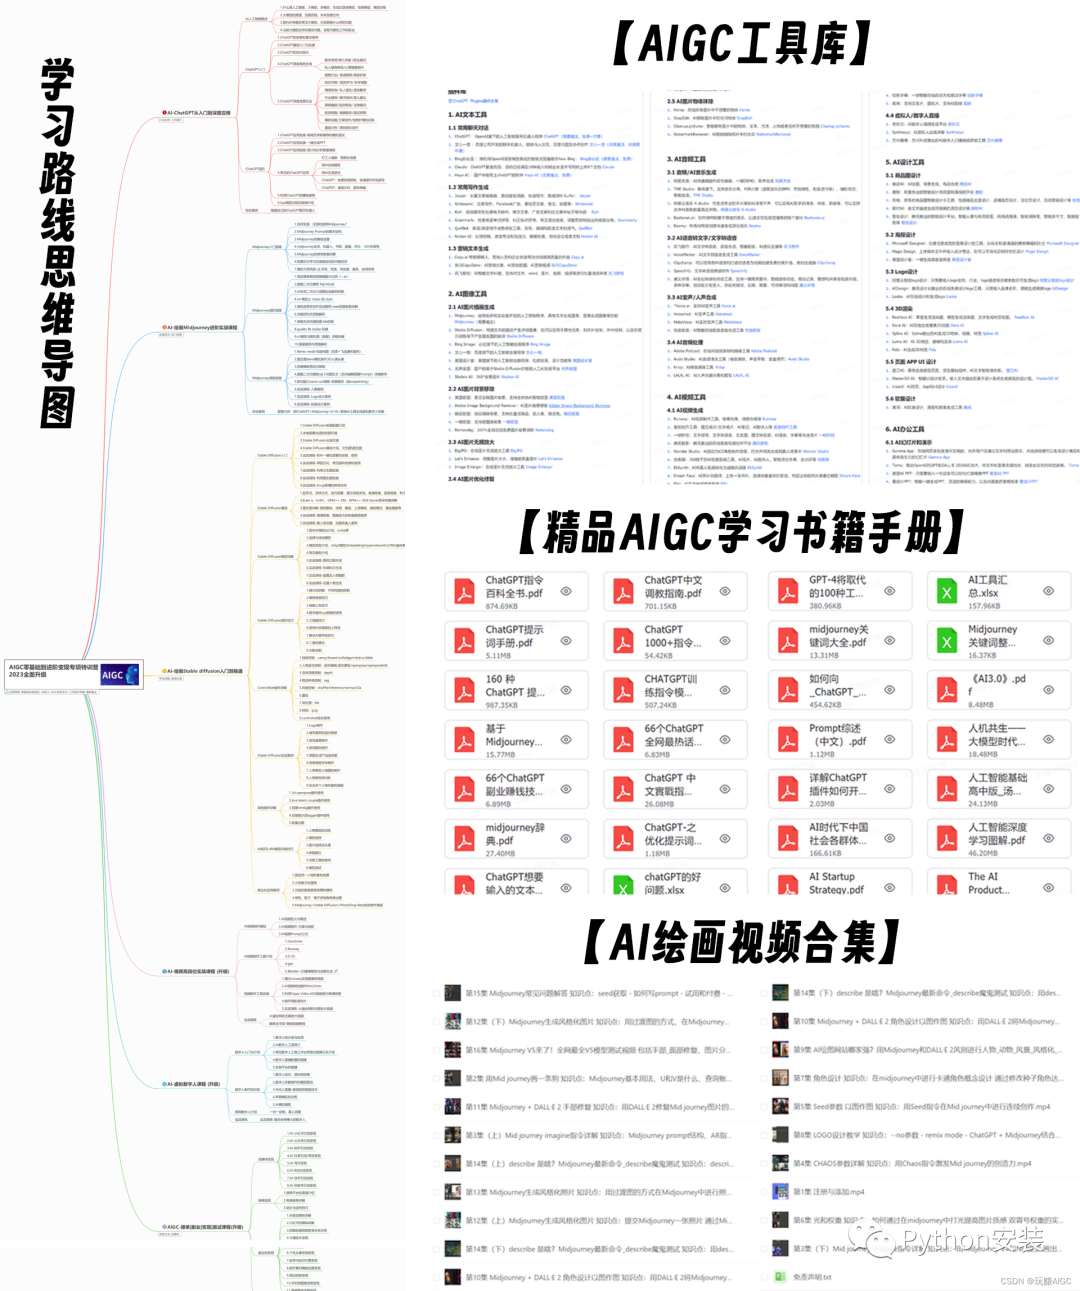

二、AIGC必备工具
工具都帮大家整理好了,安装就可直接上手!

三、最新AIGC学习笔记
当我学到一定基础,有自己的理解能力的时候,会去阅读一些前辈整理的书籍或者手写的笔记资料,这些笔记详细记载了他们对一些技术点的理解,这些理解是比较独到,可以学到不一样的思路。


四、AIGC视频教程合集
观看全面零基础学习视频,看视频学习是最快捷也是最有效果的方式,跟着视频中老师的思路,从基础到深入,还是很容易入门的。
五、实战案例
纸上得来终觉浅,要学会跟着视频一起敲,要动手实操,才能将自己的所学运用到实际当中去,这时候可以搞点实战案例来学习。


 1798
1798

 被折叠的 条评论
为什么被折叠?
被折叠的 条评论
为什么被折叠?
 到【灌水乐园】发言


