链接:https://pan.baidu.com/s/1KkkM1rLfyiMPtYLycpnxmg?pwd=j2rd
提取码:j2rd
--来自百度网盘超级会员V2的分享
采用数据集: https://aistudio.baidu.com/datasetdetail/130647
采用代码:
https://github.com/jfzhang95/pytorch-deeplab-xception
本文会讲解两种方法:一种是使用开源数据集(不是deeplab支持的数据集)完成在deeplab上训练,另一种是通过标注自定义数据集来完成训练
第一种用开源数据集训练
将carvana image masking challenge数据集转化为Pascal VOC 格式
以下讲述你需要更改的一些地方以及怎么更改
首先要看你的模型支持什么样的数据集,一般通过train.py文件或者通过github文档查看
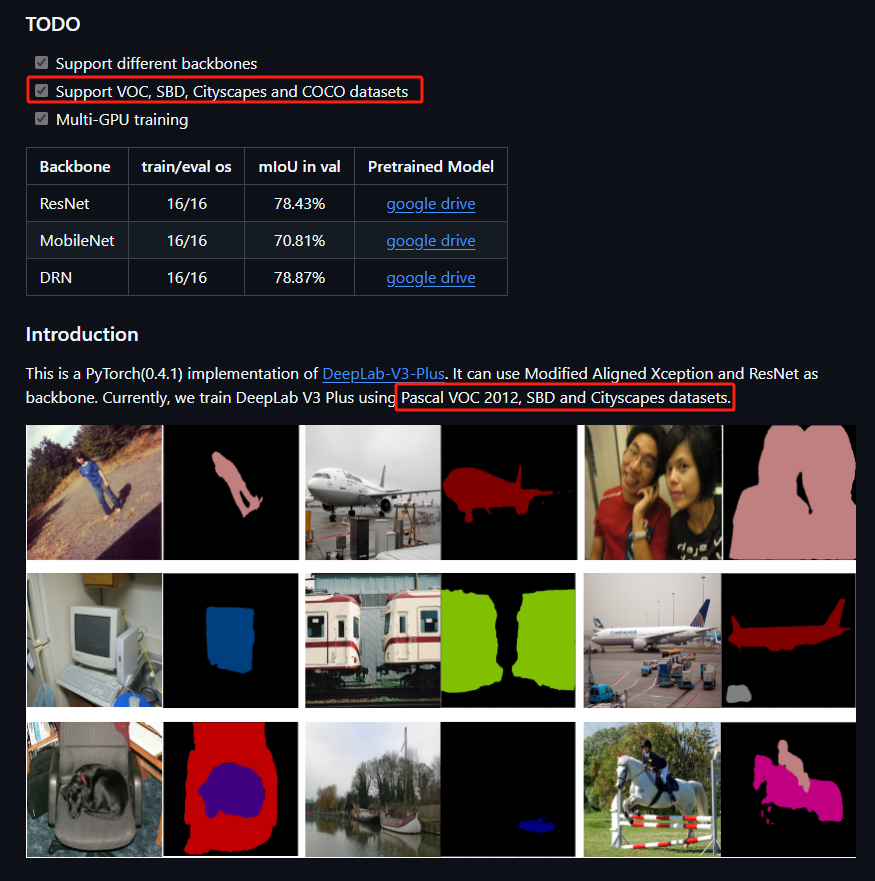
或者通过train.py
可见deeplab支持这4种VOC, SBD, Cityscapes and COCO datasets
要自定义数据集就需要把你的数据集转化以上4种即可,本文是将数据集转化为VOC 格式
下载数据集https://aistudio.baidu.com/datasetdetail/130647后,结构如下
也就是这个数据集只有train_mask和train_hq,test一般都是没有模板的,在语义分割中test是不需要模板的,其他的数据集也是这样,test只用来看最后的效果。
VOC 格式如下:
也就是需要提供JPEGImages、SegmentationClass、ImageSets
或者你可以查看代码中
通过这个代码也大概知道需要提供什么文件夹
整理好需求,然后直接跟deepseek进行沟通:
将需求拆解开来一步一步来,
1、首先将carvana image masking challenge的train_mask中的git后缀改成png
2、因为VOC 格式的标签和图像的名称是对应的,所以需要将carvana image masking challenge的_mask.gif改为.png
然后他会生成一个代码,你可以跑一下,看是否解决问题了,如果这个问题解决了就解决下一个需求
也就是目前解决了SegmentationClass,接下来需要解决JPEGImages
因为carvana image masking challenge的train_hq的图片格式也是jpg,所以你只需要将train_hq文件夹的名称改成JPEGImages即可
也就是解决了SegmentationClass、JPEGImages,接下来解决ImageSets
然后生成新的代码,就完成了数据集的格式转化。
也就是这个过程你主要做的是怎么将需求转化成多个步骤,一步一步完成需求就可以,以后不管是要转化成coco格式还是Cityscapes 都可以用这种方法。
比如Cityscapes 我可能先将train_hq拆分成train文件夹、val文件夹、test文件夹,train_masks也是拆分成3个文件夹,并且图片和标签的路径需要一致,名称需要根据Cityscapes 定义。然后我们知道Cityscapes 的train、val下还会有城市名称,我们随便起一个城市名称北京,路径格式对应就可以
最后我的carvana image masking challenge就转化成这种Cityscapes 风格
说话carvana image masking challenge转化为VOC 格式,我们已经完成了所有步骤,我把这个程序命名为了拆分.py,运行我们的程序“拆分.py”
第二种方法通过标注训练自定数据集
一、准备数据集
1. 数据集文件夹目录
-
ImageSets 文件夹内还有一个文件夹Segmentation,里面存放的是训练集、测试集txt文件
-
JPEGImages 存放原图image
-
SegmentationClass 存放原图对应的mask,要和JPEGImages里的图片一一对应
2. yolo格式转json格式
我使用的标注方式是: Sign in to Roboflow ,大大减少了标注时间,推荐!!!
导出yolo格式之后进行转json格式,代码如下
import json
import os
# 输入TXT标注文件夹路径
txt_folder_path = "E:/VScode project/pytorch-deeplab-xception-master111/Seg552/txt/"
# 输出JSON文件夹路径
json_folder_path = "E:/VScode project/pytorch-deeplab-xception-master111/Seg552/json/"
# 确保输出文件夹存在
os.makedirs(json_folder_path, exist_ok=True)
# 类别ID映射(如有需要可以修改)
label_mapping = {1: "ripe fruits", 0: "branch"}
# 遍历TXT文件夹
for txt_file in os.listdir(txt_folder_path):
if txt_file.endswith('.txt'):
txt_file_path = os.path.join(txt_folder_path, txt_file)
json_file_path = os.path.join(json_folder_path, txt_file.replace('.txt', '.json'))
# JSON模板
json_data = {
"version": "5.2.1",
"flags": {},
"shapes": [],
"imagePath": txt_file.replace('.txt', '.jpg'), # 假设图像名与TXT文件名相同
"imageHeight": 1080,
"imageWidth": 1920
}
# 解析TXT文件并构造JSON结构
with open(txt_file_path, 'r') as file:
for line in file:
# 分割类别ID和坐标数据
parts = line.strip().split()
class_id = int(parts[0]) # 类别ID
label = label_mapping.get(class_id, "unknown") # 类别名称
coordinates = list(map(float, parts[1:])) # 坐标数据
# 将坐标数据转换为(x, y)点对,并按比例转换为实际像素位置
points = []
for i in range(0, len(coordinates), 2):
x = coordinates[i] * json_data["imageWidth"]
y = coordinates[i + 1] * json_data["imageHeight"]
points.append([x, y])
# 添加标注信息到JSON
shape_data = {
"label": label,
"points": points,
"group_id": None,
"description": "",
"shape_type": "polygon",
"flags": {}
}
json_data["shapes"].append(shape_data)
# 保存为JSON文件
with open(json_file_path, 'w') as json_file:
json.dump(json_data, json_file, indent=2)
print(f"已成功将 {txt_file} 转换为 JSON 文件:{json_file_path}")
3. 文件夹重命名
虽然用网页标注导出来的image和TXT文件的名称是一致的,但为了避免在后续格式转换中出现冲突,现在需要将image图片和txt文件重新命名。相应代码:
import os
# 文件夹路径
folder1 = 'E:/VScode project/pytorch-deeplab-xception-master111/Seg552/txt/' # 替换为您的文件夹路径
folder2 = 'E:/VScode project/pytorch-deeplab-xception-master111/Seg552/img/' # 替换为您的文件夹路径
# 获取文件名列表
files1 = os.listdir(folder1)
files2 = os.listdir(folder2)
# 对文件进行排序,确保顺序一致
files1.sort()
files2.sort()
# 确保两个文件夹的文件数相同
if len(files1) != len(files2):
print("警告:两个文件夹的文件数量不同!")
# 重命名第一个文件夹的文件
for idx, filename in enumerate(files1):
new_name = f"{idx:03d}{os.path.splitext(filename)[1]}" # 保留后缀
os.rename(os.path.join(folder1, filename), os.path.join(folder1, new_name))
# 重命名第二个文件夹的文件
for idx, filename in enumerate(files2):
new_name = f"{idx:03d}{os.path.splitext(filename)[1]}"
os.rename(os.path.join(folder2, filename), os.path.join(folder2, new_name))
print("重命名完成。")
4. json格式转mask图片
import argparse
import base64
import json
import os
import os.path as osp
import imgviz
import PIL.Image
from labelme.logger import logger
from labelme import utils
import glob
import yaml
def main():
logger.warning(
"This script is aimed to demonstrate how to convert the "
"JSON file to a single image dataset."
)
logger.warning(
"It will handle multiple JSON files to generate a "
"real-use dataset."
)
parser = argparse.ArgumentParser()
parser.add_argument("--json_dir", required=True)
parser.add_argument("-o", "--out", required=True)
args = parser.parse_args()
json_dir = args.json_dir
output_dir = args.out
if osp.isfile(json_dir):
json_list = [json_dir] if json_dir.endswith('.json') else []
else:
json_list = glob.glob(os.path.join(json_dir, '*.json'))
for json_file in json_list:
logger.info(f"Processing file: {json_file}")
json_name = osp.basename(json_file).split('.')[0]
out_dir = osp.join(output_dir, json_name)
if not osp.exists(out_dir):
os.makedirs(out_dir)
try:
data = json.load(open(json_file))
except Exception as e:
logger.error(f"Error loading JSON file {json_file}: {e}")
continue # Skip to the next file
imageData = data.get("imageData")
if not imageData:
image_filename = osp.basename(data["imagePath"])
imagePath = osp.join("E:/VScode project/pytorch-deeplab-xception-master111/Seg552/JPEGImages", image_filename)
try:
with open(imagePath, "rb") as f:
imageData = f.read()
imageData = base64.b64encode(imageData).decode("utf-8")
except FileNotFoundError:
logger.error(f"File not found: {imagePath}")
continue # Skip to the next JSON file
except Exception as e:
logger.error(f"Error reading image file {imagePath}: {e}")
continue
try:
img = utils.img_b64_to_arr(imageData)
label_name_to_value = {"_background_": 0}
for shape in sorted(data["shapes"], key=lambda x: x["label"]):
label_name = shape["label"]
if label_name in label_name_to_value:
label_value = label_name_to_value[label_name]
else:
label_value = len(label_name_to_value)
label_name_to_value[label_name] = label_value
lbl, _ = utils.shapes_to_label(img.shape, data["shapes"], label_name_to_value)
label_names = [None] * (max(label_name_to_value.values()) + 1)
for name, value in label_name_to_value.items():
label_names[value] = name
lbl_viz = imgviz.label2rgb(lbl, imgviz.asgray(img), label_names=label_names, loc="rb")
# Save files to corresponding subdirectory
PIL.Image.fromarray(img).save(osp.join(out_dir, "img.png"))
utils.lblsave(osp.join(out_dir, "label.png"), lbl)
PIL.Image.fromarray(lbl_viz).save(osp.join(out_dir, "label_viz.png"))
with open(osp.join(out_dir, "label_names.txt"), "w") as f:
for lbl_name in label_names:
f.write(str(lbl_name if lbl_name is not None else "unknown") + "\n")
yaml_data = {
"label_name_to_value": label_name_to_value,
"label_names": label_names
}
with open(osp.join(out_dir, "labels.yaml"), "w") as yaml_file:
yaml.dump(yaml_data, yaml_file)
logger.info(f"Saved to: {out_dir}")
except Exception as e:
logger.error(f"Error processing file {json_file}: {e}")
if __name__ == "__main__":
main()
运行指令为:
python My_json_to_dataset.py --json_dir "E:/VScode project/pytorch-deeplab-xception-master111/Seg552/json" -o "E:/VScode project/pytorch-deeplab-xception-master111/Seg552/labelme_json"
生成的文件为
需要将labelme_json文件下的每个文件中的label.png文件重新命名,相应代码:
import os
# 替换为你的json文件夹所在的目录
json_dir = "E:/VScode project/pytorch-deeplab-xception-master111/Seg552/labelme_json"
for root, dirs, files in os.walk(json_dir):
for dr in dirs:
file_dir = os.path.join(root, dr)
# 确认label.png文件存在
label_file = os.path.join(file_dir, 'label.png')
if os.path.exists(label_file):
# 将文件夹名分割,得到原图名
original_name = dr.split('_')[0] + '.png'
new_file_name = os.path.join(file_dir, original_name)
# 执行重命名操作
os.rename(label_file, new_file_name)
print(f"Renamed '{label_file}' to '{new_file_name}'")
最后将提取出所有文件夹中的000.png ,
并放在指定目录中,相应代码:
import os
from shutil import copyfile
for root, dirs, names in os.walk(
"E:/VScode project/pytorch-deeplab-xception-master111/Seg552/labelme_json"): # 改成你自己的json文件夹所在的目录
for dr in dirs:
file_dir = os.path.join(root, dr)
print(dr)
file = os.path.join(file_dir, dr + '.png')
print(file)
new_name = dr.split('_')[0] + '.png'
new_file_name = os.path.join(file_dir, new_name)
print(new_file_name)
tar_root = 'E:/VScode project/pytorch-deeplab-xception-master111/Seg552/Segmentationclass' # 目标路径
tar_file = os.path.join(tar_root, new_name)
copyfile(new_file_name, tar_file)
该代码运行得到的文件,就是我们所需要的SegmentationClass
5. 生成txt文件
生成的训练集txt和验证集txt,里面的图片名称( 去掉后缀 )的分配是随机的。相应代码:
import os
import random
# 设置图像目录和输出目录
image_dir = 'E:/VScode project/pytorch-deeplab-xception-master111/Seg552/JPEGImages' # 替换为你的图像目录
output_dir = 'E:/VScode project/pytorch-deeplab-xception-master111/Seg552/ImageSets/Segmentation' # 替换为输出目录
# 获取所有图像文件名(去掉后缀)
image_files = [f.split('.')[0] for f in os.listdir(image_dir) if f.endswith(('.jpg', '.png'))]
# 随机打乱图像文件名
random.shuffle(image_files)
# 分割训练集和验证集
train_files = image_files[:int(len(image_files) * 0.8)] # 80% 为训练集
val_files = image_files[int(len(image_files) * 0.8):] # 20% 为验证集
# 写入 train.txt
with open(os.path.join(output_dir, 'train.txt'), 'w') as f:
for file in train_files:
f.write(f"{file}\n")
# 写入 val.txt
with open(os.path.join(output_dir, 'val.txt'), 'w') as f:
for file in val_files:
f.write(f"{file}\n")
print("train.txt 和 val.txt 已生成。")
修改deeplab代码
然后就是改代码,train.py中的dataset改成我们自定义的llmCver数据集,名称随便起
修改训练层数和学习率,当然这个可能不需要修改,因为在上面parser.add_argument也有个层数和学习率,但是我看到了以防万一也改动了。
修改mypath.py,加入你的路径
修改dataloaders\utils.py,因为我自定义的数据集只有两个类别
def decode_segmap(label_mask, dataset, plot=False):我们加入了label_colours = get_llmCver_labels(),
也就是我们调用了get_llmCver_labels()函数,我们需要在下面把get_llmCver_labels()的定义写清楚。
怎么定义你可以get_cityscapes_labels和get_pascal_labels函数怎么写的,你模仿着写。
我看到carvana image masking challenge只有两个类别,车和背景,也就是模板里面只有[0, 0, 0]和[255, 255, 255]两个颜色,所以我的get_llmCver_labels函数里就定义了这两个颜色,[0, 0, 0]存储第一位,所以他是对应类别0,[255, 255, 255]存储第二位对应类别1。这样代码就区分出了两种类别。
carvana image masking challenge数据集有多少个类别可以直接问ai,这种信息类的ai一般通过网络信息整理会找的比人快。或者根据经验判断。
dataloaders\datasets\llmCver.py在这个路径下加入llmCver.py,用于代码解析自定义数据集路径信息。这个代码怎么写?可以参考pascal.py(因为我们模仿的是pascal voc,所以voc有什么代码我们跟着做就可以)
复制pascal.py后将改一下文件名称,我改成了llmCver.py
下面的if name == '__main__':里的函数也需要改一下,但是不改也可以。
顺便讲一下if name == '__main__',假如我们在做一个机器人项目,那么我们会将这个项目手.py、脚.py、头.py等等还有一个整体调用.py。我做到最后肯定是调用整体调用.py就能完成整个机器人的运动,这时候只会用到整体调用.py里的if name == '__main__',而手.py、脚.py、头.py里面的if name == '__main__'是不会执行,因为此时整体调用.py是主函数。
当我们的手部出现异常了,为了调试手部的一些功能我们就只会调用手.py,这个时候我们的手.py是主函数,所以手.py里面的if name == '__main__'会生效,也就是我们每次运行程序最多只有一个程序能调用if name == '__main__'。你运行哪个程序,哪个程序里的if name == '__main__'就会生效。
dataloaders\__init__.py中加入
修改完基本就差不多了
然后修改train.py里面的参数,根据自己想要用什么主干网,多少学习率这些都不是固定,可以根据自己想法来,配置完直接按下右上角的运行键就可以跑起来了。
我的程序有个bug,不知道是本来就有的还是,就是训练的时候看不到进度,但是不影响训练。
File "d:\YOLO\pytorch-deeplab-xception-master\train.py", line 305, in <module> main() File "d:\YOLO\pytorch-deeplab-xception-master\train.py", line 298, in main trainer.training(epoch) File "d:\YOLO\pytorch-deeplab-xception-master\train.py", line 115, in training self.summary.visualize_image(self.writer, self.args.dataset, image, target, output, global_step) File "d:\YOLO\pytorch-deeplab-xception-master\utils\summaries.py", line 18, in visualize_image grid_image = make_grid(decode_seg_map_sequence(torch.max(output[:3], 1)[1].detach().cpu().numpy(), File "D:\APP\conda\envs\yolov5prune\lib\site-packages\torch\utils\_contextlib.py", line 115, in decorate_context return func(*args, **kwargs) TypeError: make_grid() got an unexpected keyword argument 'range'
如果报了这个错误是因为你的torch版本太高,修改一下程序就可以了
修改pytorch-deeplab-xception-master\utils\summaries.py
把range去掉就可以了
# 处理输出图像
grid_image = make_grid(
decode_seg_map_sequence(torch.max(output[:3], 1)[1].detach().cpu().numpy(), dataset=dataset),
nrow=3, normalize=False, scale_each=False
)
writer.add_image('Predicted label', grid_image, global_step)
# 处理目标图像
grid_image = make_grid(
decode_seg_map_sequence(torch.squeeze(target[:3], 1).detach().cpu().numpy(), dataset=dataset),
nrow=3, normalize=False, scale_each=False
)