


<1>
加载组UI组件的方式

<pre name="code" class="javascript"><%@ Page Language="C#" AutoEventWireup="true" CodeBehind="加载组UI组件的方式.aspx.cs" Inherits="EasyUI.加载组UI组件的方式" %>
<!DOCTYPE html PUBLIC "-//W3C//DTD XHTML 1.0 Transitional//EN" "http://www.w3.org/TR/xhtml1/DTD/xhtml1-transitional.dtd">
<html xmlns="http://www.w3.org/1999/xhtml">
<head runat="server">
<title>加载组UI组件的方式.</title>
<script src="jquery-1.11.2.js" type="text/javascript"></script>
<script src="jquery.easyui.min.js" type="text/javascript"></script>
<script src="easyui-lang-zh_CN.js" type="text/javascript"></script>
<link href="easyui.css" rel="stylesheet" type="text/css" />
<link href="icon.css" rel="stylesheet" type="text/css" />
<script type="text/javascript">
// 加载UI组件的方式 js调用加载方式 --也是我们推荐的方式。
$(function () {
$("#box2").dialog();
})
</script>
</head>
<body>
<form id="form1" runat="server">
<%--加载UI组件的方式--class加载方式--%>
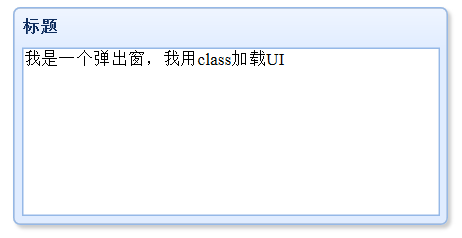
<%--class的命名有规定格式的,以easyui开头,中间用-隔开,后面是UI的组键名称。--%>
<div class="easyui-dialog" id="box1" title="标题" style="width:300px; height:150px">我是一个弹出窗</div>
<div id="box2" title="标题" style="width:300px; height:150px">我是一个弹出窗,我用jquery加载UI</div>
</form>
</body>
</html>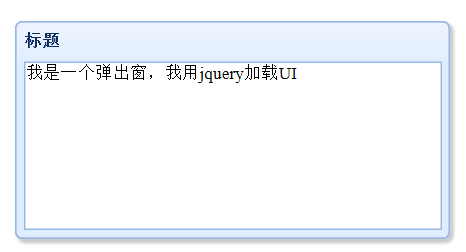
拖动组件Draggable (将控件设为可以拖动的)
<!DOCTYPE html PUBLIC "-//W3C//DTD XHTML 1.0 Transitional//EN" "http://www.w3.org/TR/xhtml1/DTD/xhtml1-transitional.dtd">
<html xmlns="http://www.w3.org/1999/xhtml">
<head>
    <title>Draggable拖动组件</title>

    <script src="jquery-1.11.2.js" type="text/javascript"></script>
    <script src="jquery.easyui.min.js" type="text/javascript"></script>
    <script src="easyui-lang-zh_CN.js" type="text/javascript"></script>
    <link href="easyui.css" rel="stylesheet" type="text/css" />
    <link href="icon.css" rel="stylesheet" type="text/css" />

    <style type="text/css">
        div{ width:200px; height:150px; background:Orange; margin:20px}
    </style>

    <script type="text/javascript">
        $(function () {
            $("#box1").draggable(); //如果你这样写的话,默认这个#box1是可以拖动的

            //但是draggable这个组件还有属性。下面我们来看看

            //revert 有两个值,false 和true 如果设为true,则拖动停止时返回起始位置。否则不返回

            //cursor 是表示拖动时候,说鼠标的样式。text表示 拖动#box2的时候鼠标是 I 这个样子的
            $("#box2").draggable({ revert: true, cursor: 'text' });

            //handle 是表示只有你把鼠标移动#pox这个组件那里才能拖动。即:只能拖动#box3里面的#pox控件时,才能拖动这个#box3
            $("#box3").draggable({ handle: '#pox' });


            //disabled 表示这个#box4不能拖动。它有两个值false 和true表示不能拖动,false能拖动
            $("#box4").draggable({ disabled: true });

            //edge 表示可以拖动#box5这个控件的位置 设为0的时候表示 只有将鼠标移动到#box5上都可以拖动
            //设为10,表示包裹在#box5控件四周10px宽度,即便鼠标移动过去进行拖动也是不能拖动的
            //设为20,表示包裹在#box5控件四周20px宽度,即便鼠标移动过去进行拖动也是不能拖动的,以此类推。这个数值是可以随便设的。
            $("#box5").draggable({ edge: 0 });


            //axis 表示#box6 这个控件只能垂直(上下)拖动,不能水平拖动
            $("#box6").draggable({ axis: 'v' });

            //axis 表示#box6 这个控件只能水平拖动,不能垂直(上下)拖动
            $("#box7").draggable({ axis: 'h' });


            //proxy 表示在准备拖动#box8元素的时候,克隆一个#box8的元素来进行拖动,这个拖动的过程,#box8元素不懂,我们就只看到#box8的克隆元素(影子)在拖动,当这个克隆元素拖动停止后,连个#box8这个元素就马上移动到这个克隆元素的位置来了。其实页面只有这个#box8元素,这个克隆元素只不过是在拖动的时候#box8元素的影子而已。(其实就是一个影子的视觉效果)
            $("#box8").draggable({ proxy: 'clone' });

            //proxy: 'clone' 还可以配合deltaX ,deltaY使用,deltaX ,deltaY表示在拖动元素的时候,鼠标的位置是在 元素的具体位置,就X,Y坐标
            //$("#box8").draggable({ proxy: 'clone', deltax: 50, deltay: 50 });

            $("#box9").draggable({
                proxy: function (source) { //其实这个source就是 “#box9”这个元素本身
                    /*
                    //这个s 一个jquery对象 一个动态的div
                    var s = $('<div id="dd" style="width:40px;height:20px; border:1px solid Red"></div>');
                    s.appendTo("body"); //将这个div添加到body元素中。注意:前面已经说了 这个proxy仅仅是一个影子效果。所以不会真正有s这个元素。这个s元素同样也是 在拖动过程中的影子而已,只是这个影子与#box9长的不一样,它是#dd这个样子的
                    return s; //返回 s

                    */

                    var s = $('<div style="width:40px;height:20px; border:1px solid Red"></div>');
                    s.html($(source).html()).appendTo("body"); //$(source).html()即$("#box8").html();
                    return s;

                }
            })


            //==========================以上是拖动组件的属性。下面是事件

            $("#box10").draggable({
                onBeforeDrag: function (e) {
                    //return false 如果返回false表示不能再拖动了。一般用在一些逻辑判断的时候。如在某些情况下不能拖动。等等。
                    alert("拖动之前触发");
                }
            })

            $("#box10").draggable({
                onStartDrag: function (e) {
                    alert("拖动开始触发")
                }
            })

            $("#box10").draggable({ //不能乱用,只要移动每一个像素点都会触发。
                onDrag: function (e) {
                    alert("拖动过程中触发,不能拖动时返回false")
                }
            })

            $("#box10").draggable({
                onStopDrag: function (e) {
                    alert("拖动停止后触发");
                }
            })


            //==========================以上是拖动组件的事件, 下面是拖动组件的方法

            $("#box11").draggable("disable"); //将#box11设置禁止拖动。用在的场合就是在某个逻辑判断后,将它设为禁止拖动

            $("#box11").draggable("enable"); //将#box11设为可以拖动,与disable是相对应的。

            //可以查看#box11组件的属性值
            console.log($("#box11").draggable("options")); //打开火狐,firebug-(控制台-ALL) 或者DOM


        })
    </script>

</head>
<body>
<div id="box1"></div>
<div id="box2"></div>
<div id="box3"><span id="pox">我是内容部分</span></div>

<div id="box4"></div>

<div id="box5"></div>

<div id="box6"></div>

<div id="box7"></div>
<div id="box8"></div>

<div id="box9">内容</div>

<div id="box10">内容2</div>

<div id="box11">内容3</div>
</body>
</html>
Droppable放置组件
<!DOCTYPE html PUBLIC "-//W3C//DTD XHTML 1.0 Transitional//EN" "http://www.w3.org/TR/xhtml1/DTD/xhtml1-transitional.dtd">
<html xmlns="http://www.w3.org/1999/xhtml">
<head>
    <title></title>
    <script src="jquery-1.11.2.js" type="text/javascript"></script>
    <script src="jquery.easyui.min.js" type="text/javascript"></script>
    <script src="easyui-lang-zh_CN.js" type="text/javascript"></script>
    <link href="easyui.css" rel="stylesheet" type="text/css" />
    <link href="icon.css" rel="stylesheet" type="text/css" />

   <!-- Droppable组件有四个事件
    onDragEnter  在被拖拽元素到放置区内的时候触发
    onDragOver  在被拖拽元素经过放置区的时候触发
    onDragLeave 在被拖拽元素离开放置区的时候触发
    onDrop 在被拖拽元素放入到放置区的时候触发-->
    <style type="text/css">
        div{ width:200px; height:150px; background:black; margin:20px}
    </style>

    <script type="text/javascript">
        $(function () {
            $("#Div1").draggable({}); //将#Div1设为可以拖动

            $("#dd").droppable({
                accept: '#Div1', // 指定哪些元素被接受,即指定哪些元素可以拖动到#dd元素中。这里指定#Div1,和#Div2元素可以拖动到#dd中。 accept的默认值为null
                //disabeld:true, //如果是true,则表示禁止接收拖入。默认为false
                onDragEnter: function (e, source) { //这个source其实就是 被拖近去的那个元素(如果将#Div1拖到#dd中,那么这儿source就是#Div1)
                    $(this).css("background", "blue"); //当#Div1拖到#dd中来的时候,将#dd的颜色设为蓝色。
                    //alert("enter");
                },

                onDragOver: function (e, source) { //这个source其实就是 被拖近去的那个元素(如果将#Div1拖到#dd中,那么这儿source就是#Div1)
                    $(this).css("background", "yellow"); //当#Div1拖到#dd中来的时候,将#dd的颜色设为黄色。
                    //alert("over");
                },


                //onDragEnter 会比onDragOver先前触发,但是onDragEnter只触发一次,而onDragOver会在拖动的过程中,不停的触发

                onDragLeave: function (e, source) { //这个source其实就是 被拖近去的那个元素(如果将#Div1拖到#dd中,那么这儿source就是#Div1)
                    $(this).css("background", "Orange"); //当#Div1从#dd中移出去的时候,将#dd的颜色设为橙色。
                },

                onDrop: function (e, source) { //这个source其实就是 被拖近去的那个元素(如果将#Div1拖到#dd中,那么这儿source就是#Div1)
                    $(this).css("background", "Violet"); //当#Div1放入到#dd中的时候,将#dd的颜色设为紫色。
                    //注意:onDrop是放入到放置区,松开鼠标左键,丢下的操作。而前三个只是拖动,
                }
            })


            //=================================以上是draggable事件,下面是方法
            //options 返回属性的对象
            console.log($("#dd").droppable("options")); // 启用fireBug -(控制台-ALL),或者DOM可以看到$("#dd").droppabel()的默认属性

            $("#dd").droppable("disable"); //将#dd设置禁止放置。用在的场合就是在某个逻辑判断后,将它设为禁止拖动

            $("#dd").droppable("enable"); //将#dd设为可以放置,与disable是相对应的。


        })
    </script>
</head>
<body>
<div id="dd" style="width:600px; height:400px; background:red"></div>

<div id="Div1"><span>内容部分</span></div>
<div id="Div2">我是div2</div>


</body>
</html>
进度条Progressbar
<!DOCTYPE html>
<html xmlns="http://www.w3.org/1999/xhtml">
<head>
<meta http-equiv="Content-Type" content="text/html; charset=utf-8"/>
    <title></title>
    <script src="JS/jquery.min.js"></script>  <!--注意js的顺序,否则会报问题-->
    <script src="JS/jquery.easyui.min.js"></script>
    <script src="JS/easyui-lang-zh_CN.js"></script>
    <link href="CSS/easyui.css" rel="stylesheet" />
    <link href="CSS/icon.css" rel="stylesheet" />
    <script type="text/javascript">
        $(function () {
            $("#dd").progressbar({
                width: 800,
                height: 15,
                value: 50, //默认值为0 当这个值设为50的时候进度条就显示为50%
                text: '{value}%', //text接收的是一个字符串。我们一般不写text 让它默认就可以了

                //onChange事件:在值更改的时候触发
                onChange: function (newValue, oldValue) {
                    //我们可以按F12 进入控制台来查看新旧值。控制台输出:新70 旧50
                    console.log('新:' + newValue + '旧:' + oldValue);
                }
            })
            //setTimeout只运行一次,也就是说设定的时间到后就触发运行指定代码,运行完后即结束。
            setTimeout(function () {
                $("#dd").progressbar('setValue', 70); //2000毫秒后将$("#dd").progressbar这个组件的value值更新为70
            },2000)

            //setinterval是循环运行的,即每到设定时间间隔就触发指定代码。这是真正的定时器。
            setInterval(function () {

                //每隔一秒就将$("#dd").progressbar组件的value值增加1
                $("#dd").progressbar('setValue', $("#dd").progressbar('getValue') + 1);
            }, 1000);


            //===================================用方法来设置进度条的长度
            //$("#dd").progressbar("resize", 600); //将进度条的长度谁600
            console.log($("#dd").progressbar("options"));//在控制台输出$("#dd").progressbar组件的属性值


        })


        //$("#dd").progressbar('getValue')获取progressbar组件的当前值
        //$("#dd").progressbar('setValue',50)设置progressbar组件的当前值
    </script>
</head>
<body>
   <!--<div class="easyui-progressbar" style="width:800px; height:15px" ></div>-->
    <div id="dd"></div>
</body>
</html>

Resizable拖动调整控件大小(将控件设为可以拖动来调整它的大小的)
<pre name="code" class="javascript"><!DOCTYPE html>
<html xmlns="http://www.w3.org/1999/xhtml">
<head>
<meta http-equiv="Content-Type" content="text/html; charset=utf-8"/>
    <title></title>
    <script src="JS/jquery.min.js"></script>  <!--注意js的顺序,否则会报问题-->
    <script src="JS/jquery.easyui.min.js"></script>
    <script src="JS/easyui-lang-zh_CN.js"></script>
    <link href="CSS/easyui.css" rel="stylesheet" />
    <link href="CSS/icon.css" rel="stylesheet" />
    <script type="text/javascript">
        $(function () {
            $("#dd").resizable({
                minWidth: 200, //能够拖拉调整大小到的 最小宽度
                minHeight: 100,//能够拖拉调整大小到的 最小高度
                maxWidth: 800, //能够拖拉调整大小到的 最大宽度
                maxHeight: 600,//能够拖拉调整大小到的 最大高度

                //disabled: true,// 单disabled的值为true的时候则禁用调整大小 ,默认为false
                //handles:'s'//声明可以拖拉调整大小的方向,s表示只能往南拖拉调整大小(如果设为s 那么就只能向下垂直调整大小了)(默认为n,e,s,w,ne,se,sw,nw,all,声明调整的方位,n 表示北、e 表示东、s 表示南、w 表示西、还有ne、se、sw、nw 和all)
                handles: 's,se', //当然,调整的方向还可以同时设多个值。

                edge:20,//(打个比方:假如有一个盒子,padding=20,那么鼠标在这个20的范围内才能拖动调整大小)


                //开始改变大小的时候触发
                onStartResize: function (e) {
                    //alert("开始调整大小的时候触发");
                    console.log('调整大小的时候触发');
                },

                onResize:function(e){
                    //alert('调整大小的时候触发');//会不停的弹出对话框
                    console.log('调整的时候触发'); //只要是调整的过程中就会不停的触发事件
                },

                onStopResize: function (e) {
                    alert('停止调整大小的时候触发')
                }


            })

            console.log($('#dd').resizable('options'));//在控制台打印出$("#dd").resizable组件的所有属性值
            //$("#dd").resizable('disable')//禁用拖拉调整大小
            $('#dd').resizable('enable'); //启用拖拉调整大小
        })
    </script>
</head>
<body>
    <!--<div class="easyui-resizable" style="width:50px;height:50px; background-color:orange" data-options="maxWidth:800,maxHeight:600,minWidth:200,minHeight:100"></div>-->
    <div id="dd" style="width:50px;height:50px; background-color:orange"></div>
</body>
</html>
LinkButton按钮 与Splitbutton按钮
linkButton按钮
<!DOCTYPE html>
<html xmlns="http://www.w3.org/1999/xhtml">
<head>
    <meta http-equiv="Content-Type" content="text/html; charset=utf-8" />
    <title></title>
    <script src="JS/jquery.min.js"></script>  <!--注意js的顺序,否则会报问题-->
    <script src="JS/jquery.easyui.min.js"></script>
    <script src="JS/easyui-lang-zh_CN.js"></script>
    <link href="CSS/easyui.css" rel="stylesheet" />
    <link href="CSS/icon.css" rel="stylesheet" />
    <script type="text/javascript">
        $(function () {

            $("#zz").linkbutton({
                text: '我是一个禁用的按钮控件',
                disabled: true
            })
            //------------------radio效果,即分组 单选按钮

            $("#aa").linkbutton({
                text: "我是按钮A",
                plain: true, //将设个按钮设为简洁模式。(其实就是将按钮设为和文字一样,只是当鼠标移动过去的时候显示为按钮的样子)
                group: 'sex', //当几个按钮控件的group属性一样的时候,那么他们就是一组的。其实就是html的radio控件(单选控件)
                toggle: true,
                iconCls: "icon-add", //这里也可以给按钮设置图标
                iconAlign:"right",  //设定图标是放到文字的左边还是右边。这里设为右边

            })

            $("#bb").linkbutton({
                text: "我是按钮B",
                plain: true,
                group: 'sex',
                toggle:true,
            })

            $("#cc").linkbutton({
                text: "我是按钮C",
                plain: true,
                group: 'sex',
                toggle: true,
            })


            //--------- CheckBox效果 下面是复选案例
            $("#ee").linkbutton({
                text: '篮球',
                toggle: true //toggle的值为true的时候表示允许用户切换其选中状态,可实现checkbox复选效果。默认为false
            })

            $("#ff").linkbutton({
                text: '羽毛球',
                toggle: true,
                selected: true  //默认就将羽毛球设为选中状态

            })

            $("#gg").linkbutton({
                text: '乒乓球',
                toggle: true  //toggle设置为true则允许用户切换其状态是否被选中
            });


            //================= 以上是属性,以下是方法
            console.log($("#zz").linkbutton("options"));

            //$('#gg').linkbutton('select'); //将#gg设为选中状态
            //$('#gg').linkbutton('unselect');//将#gg设为“取消选中状态”
            //$('#gg').linkbutton('enable');//将#gg设为启用状态
            //$('#gg').linkbutton('disable');//将#gg设为禁用状态
        })

    </script>
</head>
<body>
    <!--<a class="easyui-linkbutton">我是一个按钮</a>
    <div class="easyui-linkbutton">我也是一个按钮</div>-->
    <a id="zz"></a>
    <a id="aa"></a>
    <a id="bb"></a>
    <a id="cc"></a>
    <a id="ee"></a>
    <a id="ff"></a>
    <a id="gg"></a>
</body>
</html>

Splitbutton按钮
其实linkbutton与splitbbutton按钮功能都是一样的,唯一不同的仅仅是样子长的稍微不一样。写法也是和linkbutton一样的,仅仅是将linkbutton改成splitbutton而已
            $("#gg").splitbutton({
                text: '我是splitbutton按钮',
                iconCls:"icon-add",
                toggle: true  //toggle设置为true则允许用户切换其状态是否被选中
            });
两种按钮对比一下,其实仅仅是界面稍微有点不同而已

tooltip提示框
<!DOCTYPE html>
<html xmlns="http://www.w3.org/1999/xhtml">
<head>
<meta http-equiv="Content-Type" content="text/html; charset=utf-8"/>
<title></title>
<script src="JS/jquery.min.js"></script> <!--注意js的顺序,否则会报问题-->
<script src="JS/jquery.easyui.min.js"></script>
<script src="JS/easyui-lang-zh_CN.js"></script>
<link href="CSS/easyui.css" rel="stylesheet" />
<link href="CSS/icon.css" rel="stylesheet" />
<script type="text/javascript">
$(function () {
$("#aa").tooltip({
//content: '这里写提示内容'。
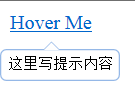
content:'<b>这里写提示内容</b>',//提示内容还可以放HTML标签的。
position: 'right', //将提示框显示在文本的右边
//trackMouse: true,//true 表示允许提示框跟随鼠标移动。默认为false
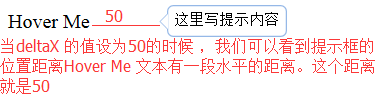
deltaX: 50,//水平方向提示框的位置。默认为0
deltaY: 50, //垂直方向提示框的位置。默认为0
//showDelay: 2000, //当我们将鼠标移动到文本的时候就会出现一个提示框,但这里我们将提示框延迟2秒显示。默认为200毫秒
//hideDelay: 2000,//单我们离开文本的时候提示框就会隐藏。但这里我们将提示框延迟2秒隐藏。默认为200毫秒
showEvent: 'click', //当我们将鼠标移动到文本上,就会弹出提示框了。因为我们设置了当鼠标移入的时候就激发了显示提示框的事件。即:showEvent:'mouseenter' 这是默认的。我们也可以修改它的触发事件,如这,我们就将它触发显示提示框的事件设为"click" 单击。只有单击文本框的时候才会显示提示框。
hideEvent:'dblclick', //将触发隐藏提示框的事件设为双击。只有双击文本框的时候才会隐藏提示框 默认值是mouseleave
onShow:function(e){
alert('提示框显示的时候触发');
},
onHide: function (e) {
alert('隐藏提示框的时候触发'); //触发后再隐藏提示框的
},
onUpdate:function(content){
alert("内容改变为" + content);
},
})
$("#aa").click(function () {
$(this).tooltip('update', '这里为新的提示框的提示内容'); //将提示内容更新为“这里为新的提示框的提示内容”
})
$('#aa').tooltip("show"); //默认情况下就让它显示提示框
$("#aa").tooltip("hide");//默认情况下就是隐藏提示框的
})
</script>
</head>
<body>
<!--<a href="##" class="easyui-tooltip" title="这里写提示内容">Hover Me</a>-->
<a id="aa">Hover Me</a>
</body>
</html>

Dialog 对话框 (类似于alert)
@{
    Layout = null;
}

<!DOCTYPE html>
<html xmlns="http://www.w3.org/1999/xhtml">
<head>
    <meta http-equiv="Content-Type" content="text/html; charset=utf-8" />
    <title></title>
    <script src="JS/jquery.min.js"></script>  <!--注意js的顺序,否则会报问题-->
    <script src="JS/jquery.easyui.min.js"></script>
    <script src="JS/easyui-lang-zh_CN.js"></script>
    <link href="CSS/easyui.css" rel="stylesheet" />
    <link href="CSS/icon.css" rel="stylesheet" />
    <script type="text/javascript">
        $(function () {
            $("#dd").dialog({
                title: '对话框',
                width: 300,
                height: 200,


                //要将从Easyui官网上下载的文件包里面的images文件夹放到项目的CSS文件夹下,
                //否则,折叠,最小化,最大化,关闭会不显示图片。因为找不到图片

                collapsible: true,// 在对话框右上角显示一个折叠按钮,默认是false 不显示
                minimizable: true,// 在对话框右上角显示一个最小化按钮,默认是false 不显示
                maximizable: true,//在对话框右上角显示一个最大化按钮,默认是false 不显示
                resizable: true, //可以拖动对话框调整对话框的大小。

                //toolbar: [{ text: "编辑", iconCls: "icon-edit" }, { text: "确定", iconCls: "icon-ok" }],

                //当然,如果你在点击这个编辑的时候,需要触发事件就这样这样来写
                toolbar: [{ text: "编辑", iconCls: "icon-edit", handler: function () {alert("编辑") }}, { text: "确定", iconCls: "icon-ok" }],

                //plain:true表示让按钮扁平化显示。不要显示为凸起的。
                buttons: [{ text: "编辑", iconCls: "icon-edit", plain: true }, { text: "确定", iconCls: "icon-ok", handler: function () { alert("确定") } }],

                onClose: function () {
                    alert('对话框关闭的时候触发');
                }
                //还有其他的事件,这些事件继承了window(窗口) 和Panel(面板)的事件。如果需要的话,可以将那些事件写在这里。
            });
        })
    </script>
</head>
<body>
    <!--class加载方式-->
    <div id="ww" class="easyui-dialog" style="width:300px;height:200px" data-options="toolbar:'#aa',title:'对话框'">
        <!--其实这样写也可以实现toolbar的效果-->
        <a href="###" id="aa" class="easyui-linkbutton" data-options="iconCls:'icon-edit',plain:true">编辑</a>
    </div>


    <!--js加载方式-->
    <div id="dd">我是一个对话框</div>


</body>
</html> 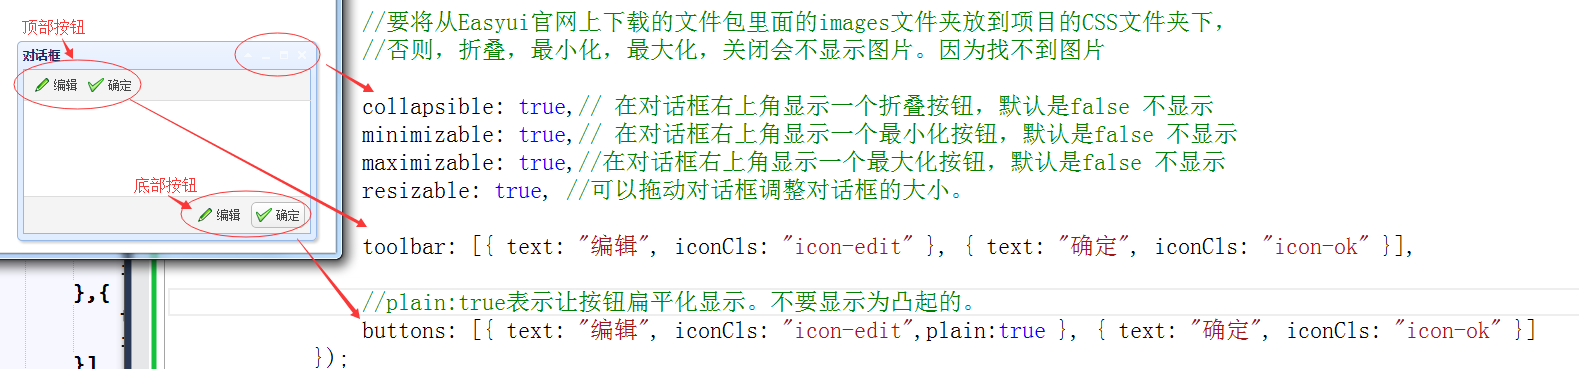
Messager 消息窗口
它没有class加载方式,只能js加载方式
<pre name="code" class="html"><!DOCTYPE html>
<html xmlns="http://www.w3.org/1999/xhtml">
<head>
<meta http-equiv="Content-Type" content="text/html; charset=utf-8"/>
<title></title>
<script src="JS/jquery.min.js"></script> <!--注意js的顺序,否则会报问题-->
<script src="JS/jquery.easyui.min.js"></script>
<script src="JS/easyui-lang-zh_CN.js"></script>
<link href="CSS/easyui.css" rel="stylesheet" />
<link href="CSS/icon.css" rel="stylesheet" />
<script type="text/javascript">
$(function () {
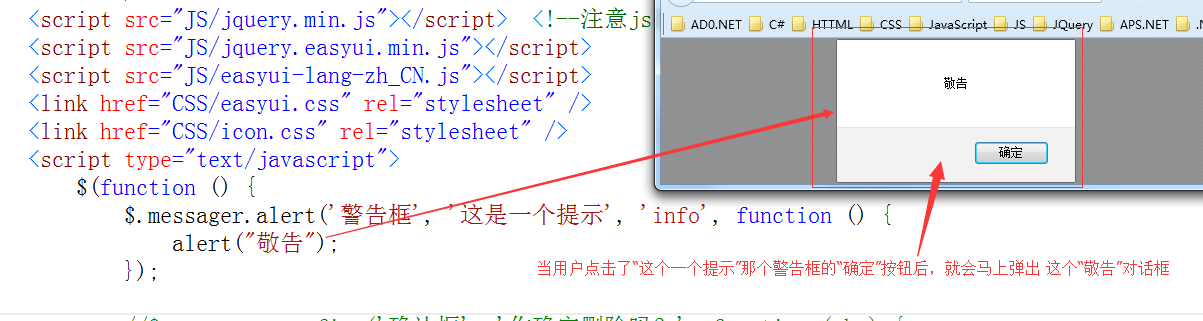
$.messager.alert('警告框', '这是一个提示', 'info', function () {
alert("敬告");
});
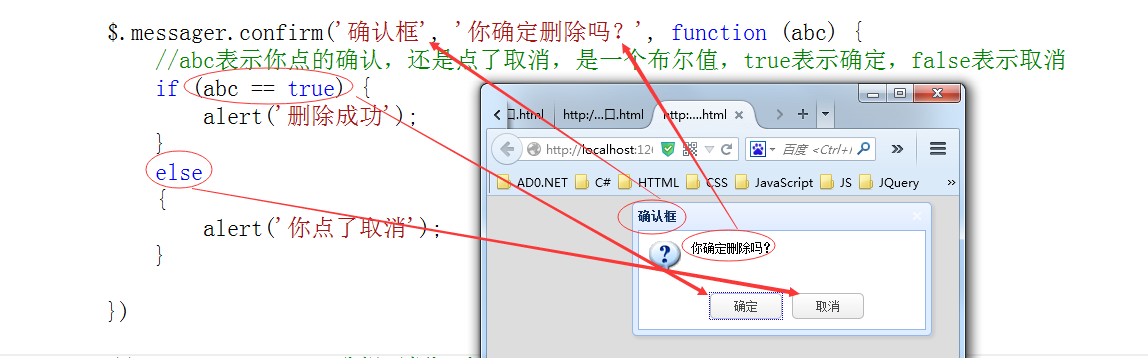
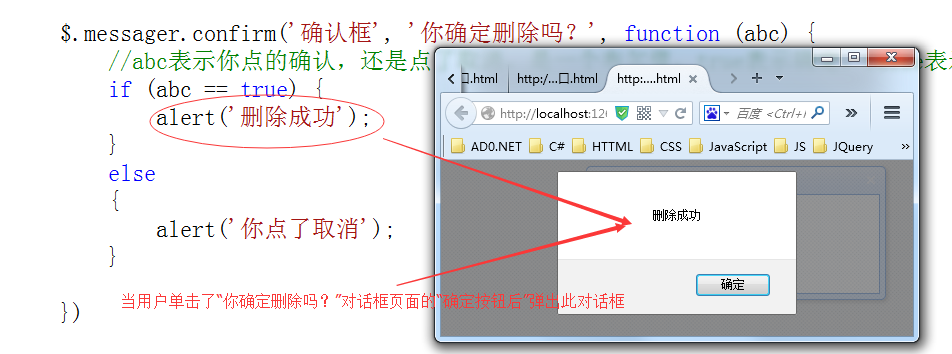
$.messager.confirm('确认框', '你确定删除吗?', function (abc) {
//abc表示你点的确认,还是点了取消,是一个布尔值,true表示确定,false表示取消
if (abc == true) {
alert('删除成功');
}
else
{
alert('你点了取消');
}
})
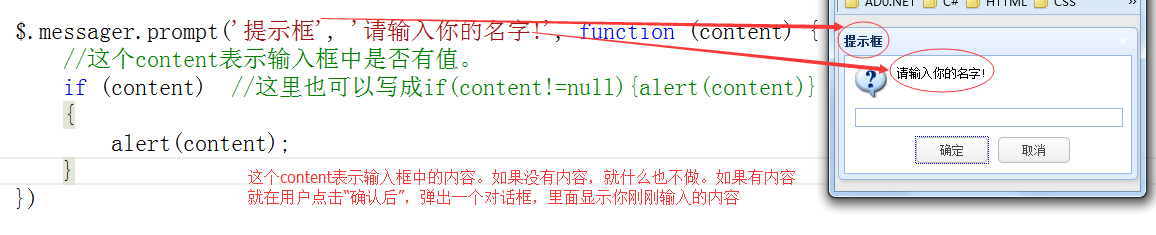
$.messager.prompt('提示框', '请输入你的名字!', function (content) {
//这个content表示输入框中是否有值。
if (content) //这里也可以写成if(content!=null){alert(content)}
{
alert(content);
}
})
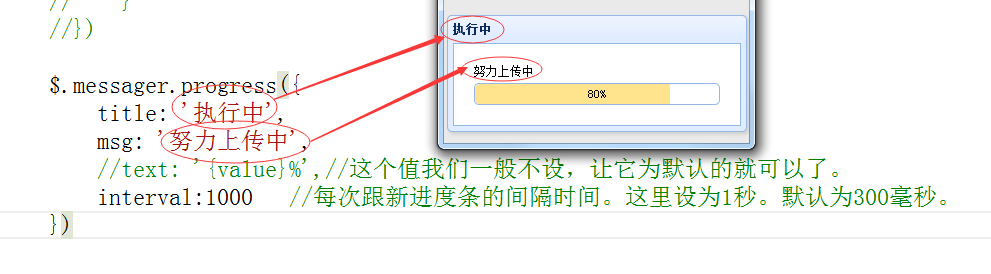
$.messager.progress({
title: '执行中',
msg: '努力上传中',
//text: '{value}%',//这个值我们一般不设,让它为默认的就可以了。
interval:1000 //每次跟新进度条的间隔时间。这里设为1秒。默认为300毫秒。
})
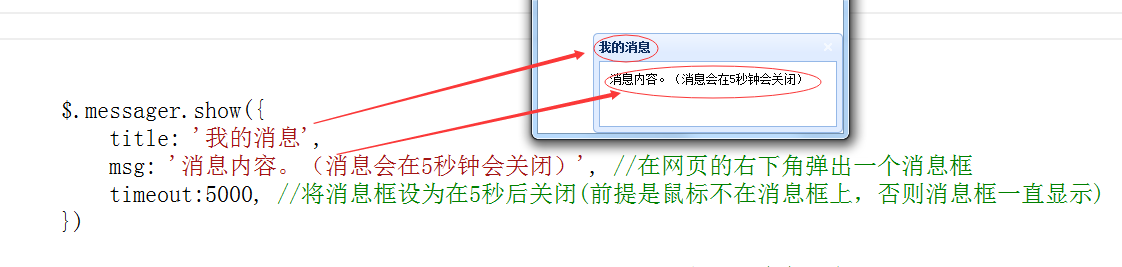
$.messager.show({
title: '我的消息',
msg: '消息内容。(消息会在5秒钟会关闭)', //在网页的右下角弹出一个消息框
timeout:5000, //将消息框设为在5秒后关闭(前提是鼠标不在消息框上,否则消息框一直显示)
})
//console.log("AB", $.messager.progress('bar'));// 获取进度条对象
//$.messager.progress('colse');//关闭进度窗口。比如上传文件完毕,或者数据加载完毕,就关闭进度窗口
})
</script>
</head>
<body>
</body>
</html>

Panel面板
<!DOCTYPE html>
<html xmlns="http://www.w3.org/1999/xhtml">
<head>
<meta http-equiv="Content-Type" content="text/html; charset=utf-8" />
<title></title>
<script type="text/javascript">
$(function () {
$('#dd').panel({
//id:'pox',//将id为dd这个div的id重新设为pox
title: '面板',
width: 500,
height: 300,
closable: true,//定义是否显示关闭按钮 true表示显示
collapsible: true,// 定义是否显示可折叠按钮 true表示显示
minimizable: true, //定义是否显示最小化按钮。默认为false
maximizable: true,//定义是否显示最大化按钮。默认为false。
iconCls: 'icon-search',// 在面板左上角显示一个查找图标(一个放大镜)
//要想left和top起作用,需要与$("#dd").panel('panel').css('position', 'absolute');这条语句配合使用。
left: 200,//设置面板距离左边的位置(即x轴位置),默认为null
top: 200,//设置面板距离顶部的位置(即Y轴位置)默认为null
//cls: 'a' //添加一个css类Id到面板。查看源码:我们看到 $('#dd').panel这个面板组件的class属性值为: class="panel a" 如果不加cls: 'a'这句代码的话class="panel"
//headerCls: 'b', //添加一个CSS 类ID 到面板头部。查看源码:我们看到面板头部的class="panel-header b" 如果不加这段代码面板头部的 class="panel-header"
//bodyCls: 'c', //添加一个CSS 类ID 到面板正文部分。查看源码:我们看到面板正文的class="panel-body c" 如果不加这段代码,面板正文的 class="panel-body"
style: { 'min-height': '200px' },//添加一个当前指定的样式到面板。(很少用。主要是很多时候优先级不够)
//fit: true, //当设为true的时候面板大小将自适应父容器。将父容器填充满 100%填充满(我感觉相当于最大化)
//border: false, //定义面板是否显示边框。false表示不显示。true表示显示
//doSize: true,//面板创建的时候是默认值,当创建的时候会载入上面设置的属性,所以如果你不想载入这些属性就将doSize设为false。(如果设置为true,在面板被创建的时候将按照上面的属性值来重置大小和重新布局。默认为true。)
//noheader:true, //设置为true的时候将不会创建面板标题
content: '我是新内容', //面板主体内容
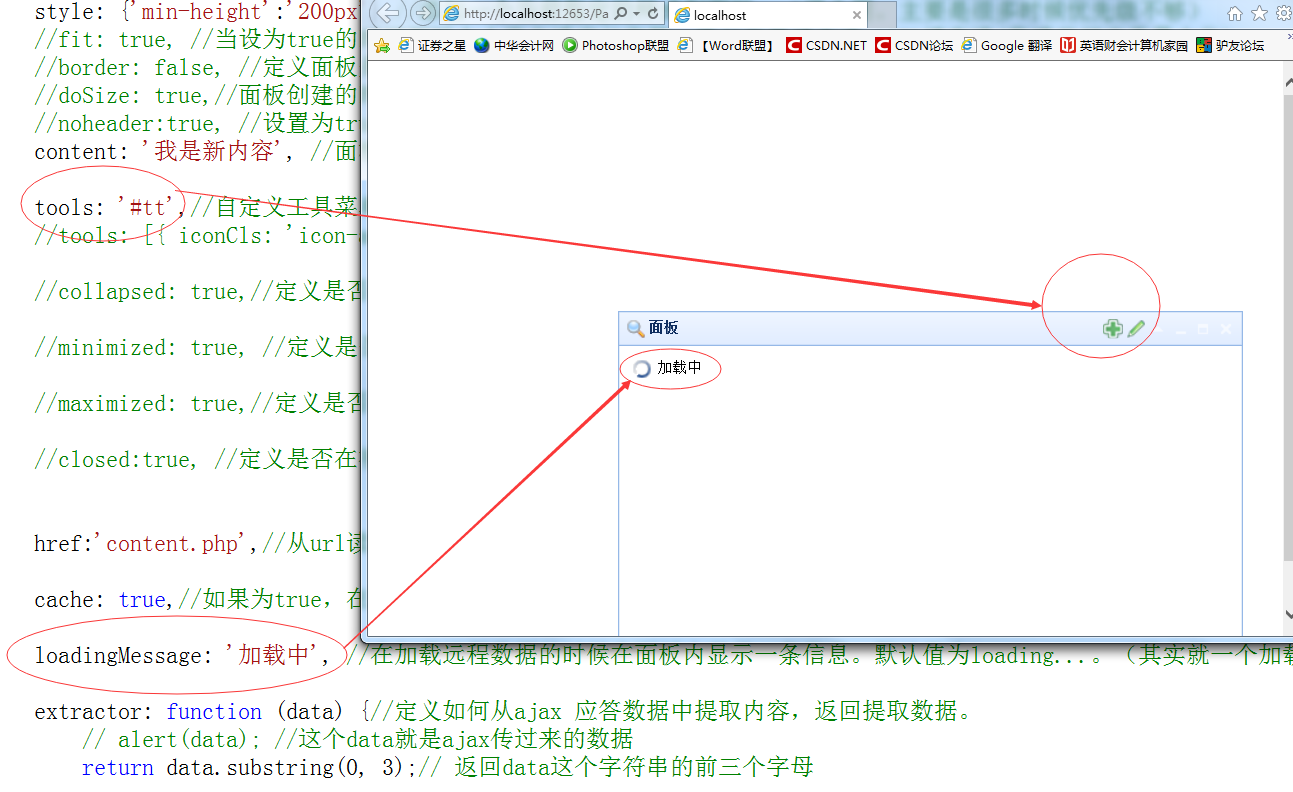
tools: '#tt',//自定义工具菜单 (这种是用 选择器的方法来自定义工具菜单)
tools: [{ iconCls: 'icon-add', handler: function () { alert('添加') } }, {
iconCls: 'icon-reload',
handler: function () {
$("#dd").panel("refresh"); //当点击这个刷新按钮的时候,就会重重新刷新数据
}
}], //自定义工具菜单 (这种是用数组的方法来自定义工具菜单)
//collapsed: true,//定义是否在初始化的时候折叠面板。true表示打开网页时候,面板就是折叠起来的。默认为false
//minimized: true, //定义是否在初始化的时候最小化面板(打开网页的时候面板是最小化的)。默认值为false
//maximized: true,//定义是否在初始化的时候最大化面板(打开网页的时候面板是最大化的)。默认值为false。
//closed:true, //定义是否在初始化的时候关闭面板(默认情况下面板是关闭的)默认为false
href: '/Home/Content',//从url读取远程数据并且显示到面板。默认为null
cache: true,//如果为true,在超链接载入时缓存面板内容。默认为true (即:第一次加载了数据,先缓存起来,第二次再加载的时候就直接读缓存)
loadingMessage: '加载中', //在加载远程数据的时候在面板内显示一条信息。默认值为loading...。(其实就一个加载等待过程中的效果图)
extractor: function (data) {//定义如何从ajax 应答数据中提取内容,返回提取数据。(比如: href:'content.php' ,即面板从这个content.php文件中读取数据,并显示到面板,此时这个data就是content.php返回的数据内容。然后我们可以在这里对这个内容进行处理 )
// alert(data); //这个data就是ajax传过来的数据
return data.substring(0, 3);// 返回data这个字符串的前三个字母
},
/*
onBeforeLoad:function(){
alert("远程加载之前触发!(注意:远程加载是以异步的形式来加载的)");
//return false //--如果这里return false 就表示不再加载数据了
},
onLoad:function(){
alert("远程加载之后触发!(注意:远程加载是以异步的形式来加载的)");
},
onBeforeOpen: function () {
alert("面板打开之前触发!(面板打开,并不是指页面不显示,页面本身是div,本身也是要被显示的)。");
//return false; //--如果这里return false就表示取消打开这个面板,其实此时这个面板已经显示了,所以它的作用仅仅是后面的那个onOpen()方法不再执行了而已。
},
onOpen: function () {
alert("面板打开后前触发");
},
onBeforeClose: function () {
alert("面板关闭之前触发!")
//return false; //--表示取消关闭(取消关闭后onClose事件将不会被执行,)
},
onClose: function () {
alert("面板关闭之后触发!")
},
onBeforeDestroy: function () {
alert("面板销毁之前触发"); //关闭面板并不是销毁;销毁是这样销毁的: $('#dd').panel("destroy");
//return false; //--表示取消销毁(取消关闭后onDestroy事件将不会被执行,)
},
onDestroy: function () {
alert("面板销毁之后触发")
},
onBeforeCollapse:function(){
alert("面板折叠之前触发!");
//return false; 取消折叠,取消折叠后onCollapse事件将不会被触发
},
onCollapse: function () {
alert("面板折叠之后触发!")
},
onBeforeExpand: function () {
alert("面板展开之前触发!");
//return false; 取消展开,取消展开后 事件将不会被触发
},
onExpand: function () {
alert("面板展开之后触发!");
},
onMaximize: function () {
alert("面板窗口最大化的时候触发!");
},
onRestore: function () {
alert("面板窗口还原的时候触发")
},
onMinimize:function(){
alert("窗口最小化的时候触发!")
},
onResize: function (width,height) { //它可以接收两个参数,一个是面板的宽度,一个是面板的高度
alert(width +'|'+height)
}
*/
})
//$('#dd').panel("destroy"); //销毁这个面板
$("#dd").panel('panel').css('position', 'absolute');
//------------------------------------------------------------------面板的方法
console.log("面板的属性对象",$("#dd").panel("options")); //返回面板的属性对象 可以通过 console.log($("#dd").panel("options"));来输出这些属性对象
$("#dd").panel("panel"); //返回面板的对象
$("#dd").panel("header"); //返回面板头对象
$("#dd").panel("body"); //返回面板主体对象
$("#dd").panel("setTitle", "我是面板的名字"); //设置面板的Title
$("#dd").panel("refresh"); //刷新 (比如我们要载入输入到面板,设置了: href:content.php, 或者说请求本地数据,如MVC: href: '/Home/Content',那么这个刷新的意思就是重新请求一下这个url地址,即重新请求content.php页面,或者说重新请求一下/Home/Content这个方法)
//一般用法是这样的:定义在tools里
//tools: [{
// iconCls: 'icon-reload',
// handler: function () {
// $("#dd").panel("refresh"); //当点击这个刷新按钮的时候,就会重重新刷新数据
// }
//}],
$(document).click(function () { //当我在document中点击任何一处就将panel面板的宽度设为600px,高度设为500px
$("#dd").panel("resize", {
"width": 600,
"height": 500
})
})
$(document).click(function () {
$("#dd").panel("open"); //当我在document中点击任何一处将panel面板打开(如果关闭了的情况下,就打开)
$("#dd").panel("open", true);//这个true就表示,如果在面板事件中设置了onBeforeOpen事件,那么就会跳过这个onBeforeOpen事件(即:不执行onBeforeOpen事件)
})
$(document).click(function () {
$("#dd").panel("close"); //当我在document中点击任何一处将panel面板关闭(如果关打开了的情况下,就关闭)
$("#dd").panel("close", true);//这个true就表示,如果在面板事件中设置了onBeforeClose事件,那么就会跳过这个onBeforeClose事件(即:不执行onBeforeClose事件)
})
$(document).click(function () {
$("#dd").panel("destroy"); //当我在document中点击任何一处将panel面板销毁
$("#dd").panel("close", true);//这个true就表示,如果在面板事件中设置了onBeforeDestroy事件,那么就会跳过这个onBeforeDestroy事件(即:不执行onBeforeDestroy事件)
})
$(document).click(function () {
$("#dd").panel("maximize"); //最大化面板
})
$(document).click(function () {
$("#dd").panel("minimize"); //最小化面板
})
$(document).click(function () {
$("#dd").panel("restore"); //恢复面板(如果之前已经最小化了,将会恢复原来的样子)
})
$(document).click(function () {
$("#dd").panel("collapse"); //折叠面板
})
$(document).click(function () {
$("#dd").panel("expand"); //展开面板
})
})
</script>
</head>
<body>
<!--closable:定义是否显示关闭按钮;collapsible:定义是否显示可折叠按钮; maximizable:定义是否显示最大化按钮-->
<!-- <div class="easyui-panel" data-options="closable:true,title:'面板',collapsible:true,maximizable:true" style="width:400px;height:300px"></div>-->
<div id="dd">
<p>内容区域</p>
</div>
<div id="tt">
<a class="icon-add" οnclick="javascript:alert('add')"></a>
<a class="icon-edit" οnclick="javascript:alert('edit')"></a>
</div>
</body>
</html> 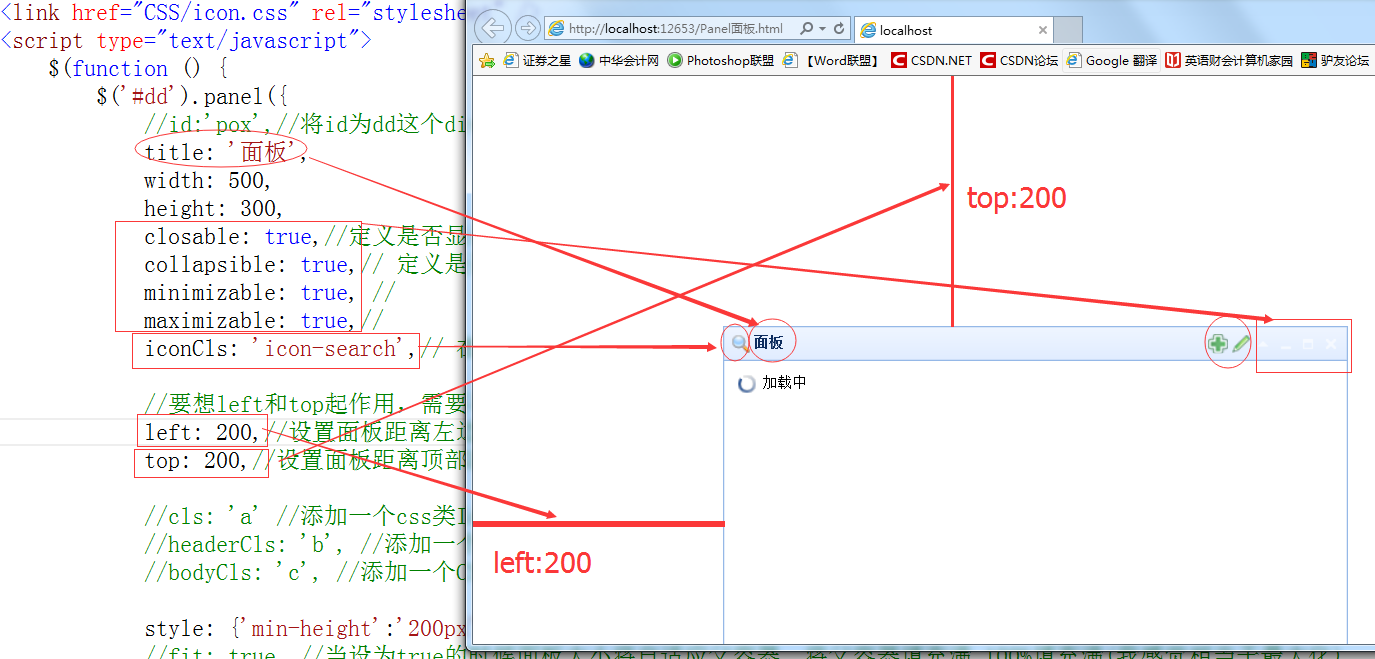
Tabs选项卡
<!DOCTYPE html>
<html xmlns="http://www.w3.org/1999/xhtml">
<head>
<meta http-equiv="Content-Type" content="text/html; charset=utf-8"/>
<title></title>
<script src="JS/jquery.min.js"></script> <!--注意js的顺序,否则会报问题-->
<script src="JS/jquery.easyui.min.js"></script>
<script src="JS/easyui-lang-zh_CN.js"></script>
<link href="CSS/easyui.css" rel="stylesheet" />
<link href="CSS/icon.css" rel="stylesheet" />
</head>
<body>
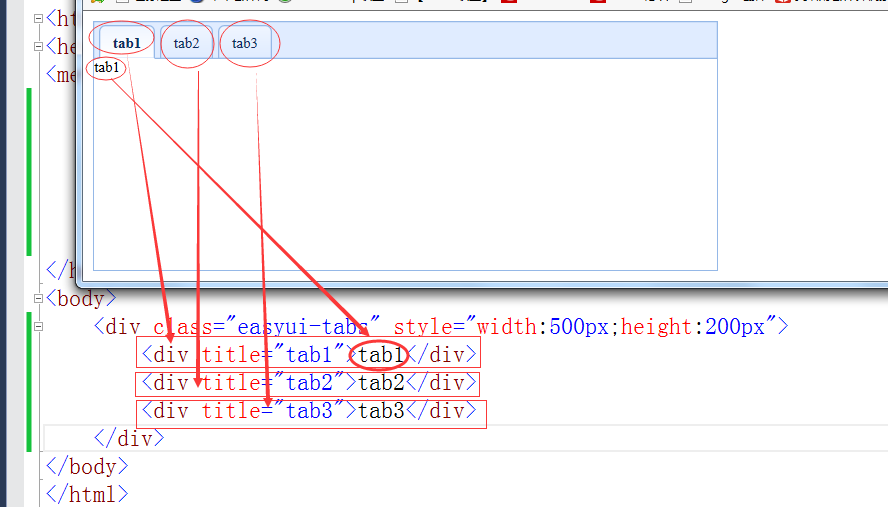
<div class="easyui-tabs" style="width:500px;height:200px">
<div title="tab1">tab1</div>
<div title="tab2">tab2</div>
<div title="tab3">tab3</div>
</div>
</body>
</html>
<!DOCTYPE html>
<html xmlns="http://www.w3.org/1999/xhtml">
<head>
<meta http-equiv="Content-Type" content="text/html; charset=utf-8"/>
<title></title>
<script src="JS/jquery.min.js"></script> <!--注意js的顺序,否则会报问题-->
<script src="JS/jquery.easyui.min.js"></script>
<script src="JS/easyui-lang-zh_CN.js"></script>
<link href="CSS/easyui.css" rel="stylesheet" />
<link href="CSS/icon.css" rel="stylesheet" />
<script type="text/javascript">
$(function () {
$('#dd').tabs({
width: 500,
height: 300,
//plain: true, //设置为true 时,将不显示控制面板背景。
//fit: true,//设置为true 时,选项卡的大小将铺满它所在的容器。默认值false。(我感觉相当于最大化)
//border: true,//设置为true 时表示“显示选项卡容器边框” false表示不显示选项卡容器边框
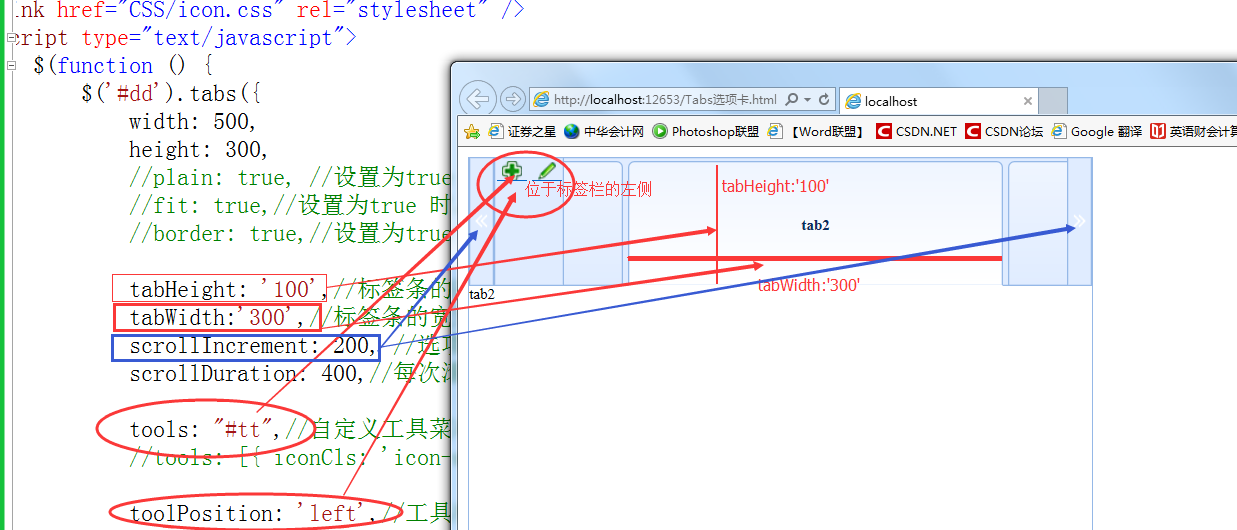
//tabHeight: '100',//标签条的高度。默认值:27。
tabWidth:'300',//标签条的宽度。默认值:auto。
scrollIncrement: 200, //选项卡滚动条每次滚动的像素值。默认值100 (只有设定了tabWidth后才有效果)
scrollDuration: 400,//每次滚动动画持续的时间,单位:毫秒。默400 (只有设定了tabWidth后才有效果)
tools: "#tt",//自定义工具菜单 (这种是用 选择器的方法来自定义工具菜单)
//tools: [{ iconCls: 'icon-add', handler: function () { alert('add')}}],自定义工具菜单 (这种是用数组的方法来自定义工具菜单)
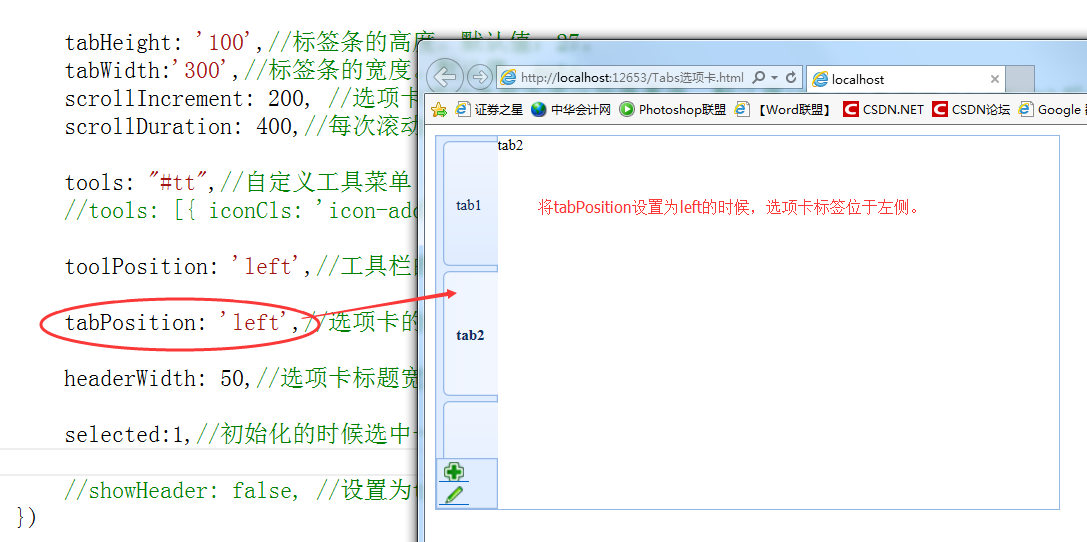
toolPosition: 'left',//工具栏的位置。设置工具栏显示在标签栏的左侧。默认是right 。
//tabPosition: 'left',//选项卡的位置。可用值 top,bottom,left,right默认值top
headerWidth: 50,//选项卡标题宽度,在tabPosition 属性设置为'left'或'right'的时候才有效。默认值:150。
selected: 1,//初始化的时候选中一个tab页。,这里设置为初始化的时候显示第二页。默认值为0
//showHeader: false, //设置为true 时,显示tab 页标题。默认值为true。
//事件
/*
onSelect: function (title,index) {//title表示它的标题名称,index是索引值
alert(title); //弹出标签名(因为我之前将selected设为了1 即初始化的时候显示第二页,所以这里弹出第二页的标签名 tab2) 用户在选择一个选项卡面板的时候触发
alert(index); //因为第二页的索引号是1 所以这里弹出1
},
*/
/*
onUnselect:function(title,index){ //既然有一个被选中了,那么被取消选中的是哪一个呢?
alert(title); //当我点击tab1标签的时候,这里弹出tab2 (因为我之前将selected设为了1 即初始化的时候显示第二页,即最初时候第二页是被选中的),当我再点tab3的时候这里又弹出tab1,因为我刚刚点击了tab1,就已经将tab1置为选中状态了
alert(index);//因为第二页的索引号是1 所以这里弹出1
}
*/
/*
onBeforeClose: function (title, index) {//关闭选项卡的时候触发(此时选项卡还没关闭,只是在关闭的过程中),既然是关闭选下卡,那我们选中就给选项卡添加一个关闭按钮先(其实给选项卡单独添加一个x)表选项卡div中加上这么一句代码:data-options="closable:true"
alert(title); //当我点击tab2选项卡标签的关闭按钮后,弹出tab2
alert(index); //tab2选项卡标签的索引是1,所以这里弹出1
}
*/
/*
onClose: function (title,index) { //关闭选项卡后触发。(触发的时候,选项卡已经关闭了)
alert(title); //当我点击tab2选项卡标签的关闭按钮后,弹出tab2
alert(index); //tab2选项卡标签的索引是1, 所以这里弹出1
}*/
/*
onAdd: function (title, index) {//新增选项卡的时候触发
alert('新增选项卡的时候触发。');
}
*/
/*
onUpdate: function (title,index) {//跟新选项卡的时候触发。
}
*/
/*
onContextMenu: function (e, title, index) {//在右键点击一个选项卡面板的时候触发。
alert(e.type); //e是一个事件对象。这里弹出contextmenu
alert(title); //当我右键tab3的时候,此时弹出tab3
alert(index); //tab3的索引是2 所以这里弹出2
}
*/
})
//}).css('display', 'none'); //.css('display', 'none')的意思是将选显卡面板隐藏
//方法
console.log($("#dd").tabs("tabs")); //返回所有选项卡面板
/*
$(document).click(function () { //假如说选项卡面板之前已经是隐藏状态,或者说由于其他的原因再显示出来的时候,你发现面板可能已经变形,或者错位了(比如一选项卡面版底部不显示,或者其他)
$("#dd").tabs().css("display", "block"); //点击document 显示选项卡面板
$("#dd").tabs().resize(); // 所以此时我们就需要 调整选项卡容器大小和布局(即按照面前的属性来重置选项卡面板)。 这样选项卡会正常显示了
})
*/
//新增一个选项卡面板
$("#dd").tabs('add', {
//以下属性是继承自panel面板的
id: 'bbb', //新增的选项卡面板的id属性。默认值为null
title: '新选项卡', //选项卡标题文本
content: '我是一个新的选项卡', //选项卡面板内容
href: 'content.html', //从url加载远程数据内容填充到选项卡面板。默认值为null
cache: true,//在href属性设置了有效值的时候缓存 选项卡面板。默认值为true
iconCls: 'icon-add',//定义一个css类id显示到选项卡面板标题。默认值为null
height: 100, //一般是看不到什么效果的。因为tab1,2,3已经将这个面板撑开了。
width: 100, //一般是看不到什么效果的。因为tab1,2,3已经将这个面板撑开了。
collapsible: true, //选项卡是否可以折叠。true表示可以折叠。false表示不能折叠
//一下属性是tabs独有的
closable: true, //设置为true时,选项卡mainboard将显示一个关闭按钮。在点击的时候会关闭选项卡面板。默认为false
selected:true ,//设置为true时候。选项卡面板会被选中。默认为false
})
//关闭一个选项卡。
//$("#dd").tabs('close', 1); //关闭第二个选项卡 第二个参数表示选项卡的索引值。1表示第二个选项卡。
//获取指定的选项卡面板
// console.log('AB', $("#dd").tabs('getTab', 3));
//获取指定选项卡面板的索引
//console.log($("#dd").tabs('getTabIndex', $('#tab1'))); //获取#tab1这个选项卡的索引
//console.log($("#dd").tabs('getTabIndex', '#tab1')); //上面那句也可以写成这样。
//获取已经被选中的选项卡面板。
console.log($("#dd").tabs("getSelected"));
//$("#dd").tabs("select", 1); //将第二个选项卡设为选中项。
//$("#dd").tabs("unselect", 1); //取消选择一个选项卡面板(比如第二个选项卡默认是显示的(即;默认是显示内容的)。我这里让它不显示)
//$("#dd").tabs("hideHeader");// 隐藏选项卡的标签头。
//$('#dd').tabs("showHeader"); //显示选项卡的标签头。
console.log($("#dd").tabs("exists", 3));// 表明指定的面板是否存在 ,如果索引为3的选项卡存在。则返回true 否则返回false
/*
$("#dd").tabs('update', { //更新指定的选项卡面板,'param'参数包含2个属性:tab:要更新的选项卡面板。options:面板的属性。
tab: $("#tab1"),
options: {
title:'我要修改#tab1的标题'
},
})
*/
//$("#dd").tabs("disableTab", 1); //禁用第二个选项卡。 第二个选项卡的索引是1
// $("#dd").tabs("enableTab", 1); //启用第二个选项卡。 第二个选项卡的索引是1
// $("#dd").tabs("scrollBy", -100); //滚动选项卡标题指定的像素数量,负值则向右滚动,正值则向左滚动。 //使用它必须要设置选项卡面板的tabWidth属性
})
</script>
</head>
<body>
<!--<div class="easyui-tabs" style="width:500px;height:200px">
<div title="tab1">tab1</div>
<div title="tab2">tab2</div>
<div title="tab3">tab3</div>
</div>-->
<div id="dd">
<div title="tab1" id="tab1">tab1</div>
<div title="tab2" data-options="closable:true">tab2</div> <!--data-options="closable:true"表示给tab2这个选项卡标签添加一个关闭按钮-->
<div title="tab3">tab3</div>
</div>
<div id="tt">
<!--如果你在tabs选项卡里添加工具栏,就必须设计 href属性 ,并在a标签里写 空格符,否则工具栏没地方显示啊-->
<a href="##" class="icon-add" οnclick="javascript:alert('添加')"> </a>
<a href="##" class="icon-edit" οnclick="javascript:alert('编辑')"> </a>
</div>
</body>
</html>
menu 菜单
只有一个级的菜单
<html>
<head>
    <meta name="viewport" content="width=device-width" />
    <title>Index3</title>
    <script src="~/Scripts/jquery-1.8.2.js"></script>
    <script src="~/jquery-easyui/jquery.easyui.min.js"></script>
    <script src="~/jquery-easyui/locale/easyui-lang-zh_CN.js"></script>
    <link href="~/jquery-easyui/themes/default/easyui.css" rel="stylesheet" />
    <link href="~/jquery-easyui/themes/icon.css" rel="stylesheet" />
</head>
<body>
  <div id="box" class="easyui-menu">
      <div>新建</div>
      <div>打开</div>
      <div>保存</div>
      <div>退出</div>
  </div>
</body>
</html>
<script type="text/javascript">
    $(document).on("contextmenu", function (e) { //给document绑定一个contextmen事件
        e.preventDefault()//阻止系统默认的“点击鼠标右键弹出菜单”
        $("#box").menu("show", {
            left: e.pageX,
            top:e.pageY   //通过设置给meun的shaow属性设置值left,和top值的方式,这样你在document的哪里点击鼠标右键,就在哪里弹出自定义的菜单
        })
    })
</script>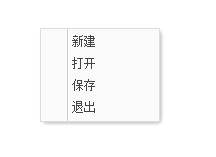
有2个级的菜单 (给菜单选项设定图片,设定禁用状态)
<html>
<head>
    <meta name="viewport" content="width=device-width" />
    <title>Index3</title>
    <script src="~/Scripts/jquery-1.8.2.js"></script>
    <script src="~/jquery-easyui/jquery.easyui.min.js"></script>
    <script src="~/jquery-easyui/locale/easyui-lang-zh_CN.js"></script>
    <link href="~/jquery-easyui/themes/default/easyui.css" rel="stylesheet" />
    <link href="~/jquery-easyui/themes/icon.css" rel="stylesheet" />
</head>
<body>
  <div id="box" class="easyui-menu">
      <div>新建</div>
      <div>打开
          <div>
              <div>word</div>
              <div>Excel</div>
              <div>PowerPoint</div>
          </div>
      </div>
      <!--iconCls:'icon-save 是为保存这个选项设定一个图标,disabled:true表示禁用这个选项-->
      <div data-options="iconCls:'icon-save',disabled:true">保存</div>
      <div>退出</div>
  </div>
</body>
</html>
<script type="text/javascript">
    $(document).on("contextmenu", function (e) { //给document绑定一个contextmen事件
        e.preventDefault()//阻止系统默认的“点击鼠标右键弹出菜单”
        $("#box").menu("show", {
            left: e.pageX,
            top:e.pageY   //通过设置给meun的shaow属性设置值left,和top值的方式,这样你在document的哪里点击鼠标右键,就在哪里弹出自定义的菜单
        })
    })
</script>
详细 方法,事件,属性
@{
    Layout = null;
}

<!DOCTYPE html>

<html>
<head>
    <meta name="viewport" content="width=device-width" />
    <title>Index3</title>
    <script src="~/Scripts/jquery-1.8.2.js"></script>
    <script src="~/jquery-easyui/jquery.easyui.min.js"></script>
    <script src="~/jquery-easyui/locale/easyui-lang-zh_CN.js"></script>
    <link href="~/jquery-easyui/themes/default/easyui.css" rel="stylesheet" />
    <link href="~/jquery-easyui/themes/icon.css" rel="stylesheet" />
</head>
<body>
    <!--minWidth表示菜单的最小宽度;hideOnUnhover表示鼠标离开菜单,菜单会不会自动消失,如果鼠标离开菜单不需要菜单自动消失,就可以设置这个属性为false,这样鼠标离开菜单的时候菜单就不会自动消失,只有点击一下才会消失-->
    <div id="box" class="easyui-menu" data-options="left:10,top:10,minWidth:520,hideOnUnhover:false">
        <div id="new">新建</div>
        <div id="open">
            打开
            <div>
                <div>word</div>
                <div>Excel</div>
                <div>PowerPoint</div>
            </div>
        </div>
        <!--iconCls:'icon-save 是为保存这个选项设定一个图标,disabled:true表示禁用这个选项-->
        <div data-options="iconCls:'icon-save',disabled:true" id="save">保存</div>
        <div id="out">退出</div>
    </div>
</body>
</html>
<script type="text/javascript">
    /*---------------------------显示菜单show   隐藏菜单hide*/

    $(document).on("contextmenu", function (e) { //给document绑定一个contextmen事件
        e.preventDefault()//阻止系统默认的“点击鼠标右键弹出菜单”
        $("#box").menu("show", {
            left: e.pageX,
            top: e.pageY   //通过设置给meun的shaow属性设置值left,和top值的方式,这样你在document的哪里点击鼠标右键,就在哪里弹出自定义的菜单
        })

        //menu的方法

        //console.log("菜单的所有属性", $("#box").menu("options"));
        //[object Object]{align: "left", alignTo: null, duration: 100, fit: false, hideOnUnhover: true, inline: false, itemHeight: 22, left: 846, minWidth: 120, noline: false, top: 276, zIndex: 110000}


        /*
        $(document).on("contextmenu", function (e) {
            e.preventDefault()
            $("#box").menu("hide"); //隐藏菜单
        })

        $(document).on("contextmenu", function (e) {
            e.preventDefault()
            $("#box").menu("destroy"); //销毁菜单
        })
        */

        //--------根据id获取指定菜单项

        console.log($("#box").menu("getItem", "#open").text); //获取菜单中id为open的那一项,并输出它的Text值

        var selectItem = $("#box").menu("getItem", "#new");
        console.log(selectItem); //[object Object]{disabled: false, href: undefined, id: "new", name: undefined, onclick: undefined, target: "#new", text: ""}
        //alert(selectItem.id);
        //alert(selectItem.text);

        //--------根据id修改菜单项
        $("#box").menu("setText", {
            target: "#new", // 要修改菜单的项(即id为new的那项)
            text: "增加",
        })

        //---------根据id修改菜单项的图标
        $("#box").menu("setIcon", {
            target: "#new", // 要修改菜单的项(即id为new的那项)
            iconCls: "icon-add",
        })


        //---------根据菜单项的Text值也可以找到指定的菜单项
        var selectItem1 = $("#box").menu("findItem", "打开");
        //alert(selectItem1.text); //输出:打开


        //-------------新增菜单项
        $("#box").menu("appendItem", {
            id:"add",
            text: "新增",
            iconCls: 'icon-add',
            href:"/Home/Index",  //跳转到Home控制器的Index页面
            onclick: function () {
                console.log("新增后的数据",$("#box").menu("findItem", "新增"));
            }
        });

        //------------根据Id来移除菜单项
        $("#box").menu("removeItem", "#new"); //移除id为new的菜单项

        $("#box").menu("disableItem", "#open"); //禁用id为open的菜单项

        $("#box").menu("enableItem", "#open");//启用id为open的菜单项


        //-------------菜单事件
        $("#box").menu({
            onShow: function () {
                alert("菜单显示时触发");
            },
            onHide: function () {
                alert("隐藏的时候触发");
            },
            onClick: function (item) { //item表示你点击的菜单项
                alert(item.text);
            }


        })

    })


</script>
menubutton 按钮
<html>
<head>
    <meta name="viewport" content="width=device-width" />
    <title>Index4</title>
    <script src="~/Scripts/jquery-1.8.2.js"></script>
    <script src="~/jquery-easyui/jquery.easyui.min.js"></script>
    <script src="~/jquery-easyui/locale/easyui-lang-zh_CN.js"></script>
    <link href="~/jquery-easyui/themes/default/easyui.css" rel="stylesheet" />
    <link href="~/jquery-easyui/themes/icon.css" rel="stylesheet" />

</head>
<body>
    <a href="javaScript:void(0)"
       id="edit"
       class="easyui-menubutton"
       data-options="iconCls:'icon-edit',menu:'#box'">编辑</a>
    <div id="box" style="width:150px">
        <div data-options="iconCls:'icon-cut'">剪切</div>
        <div data-options="iconCls:'icon-undo'">复制</div>
        <div data-options="iconCls:'icon-redo'">粘贴</div>
        <div data-options="iconCls:'icon-remove'">删除</div>
    </div>
</body>

</html>
也可以用js来生成
<html>
<head>
    <meta name="viewport" content="width=device-width" />
    <title>Index4</title>
    <script src="~/Scripts/jquery-1.8.2.js"></script>
    <script src="~/jquery-easyui/jquery.easyui.min.js"></script>
    <script src="~/jquery-easyui/locale/easyui-lang-zh_CN.js"></script>
    <link href="~/jquery-easyui/themes/default/easyui.css" rel="stylesheet" />
    <link href="~/jquery-easyui/themes/icon.css" rel="stylesheet" />

</head>
<body>
    <a href="javaScript:void(0)"
       id="edit"
       @*class="easyui-menubutton"*@
       data-options="iconCls:'icon-edit',menu:'#box'">编辑</a>
    <div id="box" style="width:150px">
        <div data-options="iconCls:'icon-cut'">剪切</div>
        <div data-options="iconCls:'icon-undo'">复制</div>
        <div data-options="iconCls:'icon-redo'">粘贴</div>
        <div data-options="iconCls:'icon-remove'">删除</div>
    </div>
</body>

</html>
<script type="text/javascript">
    $(function () {

        $("#edit").menubutton({
            menu: '#box',
            iconCls: 'icon-edit',
            plain: false,
            duration: 500, //鼠标移上去500毫秒后弹出剪切,复制粘贴删除这些菜单项
            //disabled:true,  //禁用
        })
        /*
        console.log($("#edit").menubutton("options"));// 打印出属性值
        $("#edit").menubutton("disable");//通过方法禁用
        $("#edit").menubutton("enable"); //通过方法启用
        $("#edit").menubutton("destroy"); //通过方法销毁
        */
    })

</script>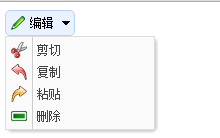
分页pagination
介绍
<html>
<head>
    <meta name="viewport" content="width=device-width" />
    <title>Index6</title>
    <script src="~/Scripts/jquery-1.8.2.js"></script>
    <script src="~/jquery-easyui/jquery.easyui.min.js"></script>
    <script src="~/jquery-easyui/locale/easyui-lang-zh_CN.js"></script>
    <link href="~/jquery-easyui/themes/default/easyui.css" rel="stylesheet" />
    <link href="~/jquery-easyui/themes/icon.css" rel="stylesheet" />
</head>
<body>
    <!--total:2000表示总共有2000条数据,pageSize:10表示每页显示10条数据-->
    <div class="easyui-pagination" data-options="total:2000,pageSize:10" style="border:1px solid #ccc"> </div>
</body>
</html>
详细 (js加载方式)
<html>
<head>
    <meta name="viewport" content="width=device-width" />
    <title>Index7</title>
    <script src="~/Scripts/jquery-1.8.2.js"></script>
    <script src="~/jquery-easyui/jquery.easyui.min.js"></script>
    <script src="~/jquery-easyui/locale/easyui-lang-zh_CN.js"></script>
    <link href="~/jquery-easyui/themes/default/easyui.css" rel="stylesheet" />
    <link href="~/jquery-easyui/themes/icon.css" rel="stylesheet" />
</head>
<body>
    <div id="box" style="border:1px solid #ccc"> </div>
</body>
</html>
<script type="text/javascript">
    $(function () {
        $("#box").pagination({
            total: 200, //数据总条数
            pageSize: 10,//页大小,即每页显示多少条数据
            pageNumber: 1,//当前页
            pageList: [5, 10, 15, 20], //5表示页显示5条数据。10条是每页显示10条数据  15表示每页显示15条数据,20表示每页显示20条数据

            //showPageList:false, //如果不想要pageList: [5, 10, 15, 20]这个功能,就将showPageList设为false 表示隐藏
            //showRefresh:false,  //分页栏上本身有一个刷新按钮,如果不需要刷新按钮,就将showRefresh设为false,表示隐藏

            //这里我们还可以在分页栏中显示一些按钮.'-'的意思是一个分割竖线。即这两个按钮用竖线隔离
            buttons: [{ iconCls: 'icon-add' },'-' ,{iconCls:'icon-remove'}],

            //用户选择一个新的页面的时候触发此事件,可以传递2个惨(pageNumber, pageSize)分别表示当前页,和页大小
            onSelectPage: function (pageNumber, pageSize) {
                alert("更换页面的时候触发")
            },

            //如果分页栏中的刷新按钮没有被隐藏,这个事件就是在用户点击刷新按钮的时候被触发(即刷新前被触发)
            onBeforeRefresh: function (pageNumber,pageSize) { //参数(当前页,页大小)
                alert("刷新之前被触发")
            },

            //如果分页栏中的刷新按钮没有被隐藏,这个事件就是在用户点击刷新按钮的时候被触发(即刷新后被触发)
            onBeforeRefresh: function (pageNumber, pageSize) { //参数(当前页,页大小)
                alert("刷新之后被触发")
            },

            //每页显示的条数被改变的时候触发 ,即当用户在分页栏中选择每页显示5条,或者10条,获取15条,或者20条数据的时候,会触发此事件
            onChangePageSize: function () {
                //pageList: [5, 10, 15, 20]
                alert("每页显示的条数被改变的时候触发")
            }

        })
    })
</script>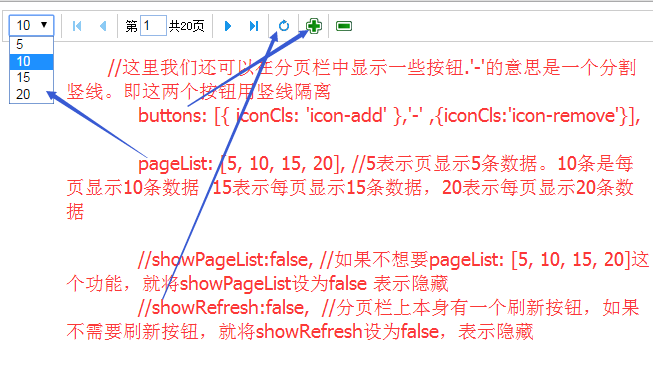
数据验证 validatebox
介绍
<html>
<head>
    <meta name="viewport" content="width=device-width" />
    <title>Index8</title>
    <script src="~/Scripts/jquery-1.8.2.js"></script>
    <script src="~/jquery-easyui/jquery.easyui.min.js"></script>
    <script src="~/jquery-easyui/jquery.easyui.min.js"></script>
    <script src="~/jquery-easyui/locale/easyui-lang-zh_CN.js"></script>
    <link href="~/jquery-easyui/themes/default/easyui.css" rel="stylesheet" />
    <link href="~/jquery-easyui/themes/icon.css" rel="stylesheet" />
</head>
<body>
    <div>
        <!--required:true表示不能为空-->
        <!--validType:'email表示数据格式必须是一个email-->
        <input id="email" class="easyui-validatebox" data-options="required:true,validType:'email'" />
    </div>
</body>
</html>
详细
@{
    Layout = null;
}

<!DOCTYPE html>

<html>
<head>
    <meta name="viewport" content="width=device-width" />
    <title>Index8</title>
    <script src="~/Scripts/jquery-1.8.2.js"></script>
    <script src="~/jquery-easyui/jquery.easyui.min.js"></script>
    <script src="~/jquery-easyui/jquery.easyui.min.js"></script>
    <script src="~/jquery-easyui/locale/easyui-lang-zh_CN.js"></script>
    <link href="~/jquery-easyui/themes/default/easyui.css" rel="stylesheet" />
    <link href="~/jquery-easyui/themes/icon.css" rel="stylesheet" />
</head>
<body>
    <div>用户名:<input id="UserName" name="username"/></div>
    <div>密  码:<input id="Password" /></div>
    <div>年  龄:<input id="Age" /></div>
    <div>邮  箱:<input id="email"  /></div>
    <div>URL地址:<input id="url" /></div>
</body>
</html>
<script type="text/javascript">
    $(function () {
        $("#UserName").validatebox({
            required: true,
            validType: 'remote["/Home/CheckUserName", "username"]', //注意/Home/CheckUserName的返回值必须是字符串的“true”或“false”(如果这里发现返回的是false,那么它就会认为验证错误,如果为true它就会认为验证成功了)

            //当文本框未填写信息的时候出现提示信息
            // missingMessage:"请输入值!",

            //当文本框的内容验证为无效的时候出现提示信息
            invalidMessage: "这个用户名已经存在",

            //tipPosition: 'right', //表示提示框出现先表单的右边还是左边(值可以有right,和left)

            //deltaX: 100, //表示提示框离表示的水平距离(即X轴)

            //novalidate: true,//novalidate的值为true的时候表示不验证这个表单
        })


        $("#email").validatebox({
            required: true, //表示已不能为空
            //validType: 'email', //示数据格式必须是一个email
            validType: ['email', 'length[5,10]'],//示数据格式必须是一个email,并且长度在5到10之间

        });

        $("#url").validatebox({
            required: true,
            validType: ['url', 'length[10,30]'],
        })

        //禁用表单验证
        $(document).click(function () {
           $("#UserName").validatebox('disableValidation');
        });


        //启用表单验证
        $(document).click(function () {
           $("#UserName").validatebox('enableValidation');
        });

    })
</script>
用于检测用户名是否可以的方法
        public string CheckUserName(string username)
        {
            salesEntities db = new salesEntities();
            bool b = db.Set<T_UserInfo>().Any(r => r.UserName == username);
            if (b)
            {
                return "false";
            }
            else
            {
                return "true";
            }
        }
自定义验证
<html>
<head>
    <meta name="viewport" content="width=device-width" />
    <title>Index8</title>
    <script src="~/Scripts/jquery-1.8.2.js"></script>
    <script src="~/jquery-easyui/jquery.easyui.min.js"></script>
    <script src="~/jquery-easyui/jquery.easyui.min.js"></script>
    <script src="~/jquery-easyui/locale/easyui-lang-zh_CN.js"></script>
    <link href="~/jquery-easyui/themes/default/easyui.css" rel="stylesheet" />
    <link href="~/jquery-easyui/themes/icon.css" rel="stylesheet" />
</head>
<body>
    <div>用户名:<input id="UserName" name="username" /></div>

    <div>密码: <input id="password" name="password" type="password" value="" /></div>
    <div>确认密码:<input type="password" name="repassword" id="repassword" /> </div>

    <div>电  话:<input id="Phone" /></div>

    <div>年  龄:<input id="Age" /></div>

</body>
</html>
<script type="text/javascript">
    $(function () {
        //自定义验证,首先使用jquery的插件方案(以下写法)
        $.extend($.fn.validatebox.defaults.rules, {

            //验证最小长度 ;这里要验证最小的数据长度(minLength这个名字是自己定义的)
            minLength: {

                //这个不是自己定义的这个方法里面含有2个参数,
                //第一个参数value 表示你在表单中输入的字符
                //第二个参数param 表示你规定minLength的长度,即validType: 'minLength[5]'中的5 到时候这个5会传递给param
                validator: function (value, param) {
                    return value.length >= param;  //如果成立就返回true,否则返回false
                },
                message: '请输入不小于{0}的字符'
            },


            //验证两次密码输入是否一致(equalTo的名字为自己定义)
            equalTo: {
                validator: function (value, param) {
                    if ($("#" + param[0]).val() != "" && value != "") { //validType: 'equalTo["password"]',   其实这个param[0]就是指中括号中的password
                        return $("#" + param[0]).val() == value;
                    } else {
                        return true;
                    }
                },
                message: '两次输入的密码不一致!'
            },


            //验证手机号码   (Mymobile是自己定义的。这里写好验证。用的时候validType: 'Mymobile ', 这样用就可以)
            Mymobile: {
                validator: function (value) {
                    return /^(13|15|18)\d{9}$/i.test(value);
                },
                message: '手机号码格式不正确'
            },

            //验证年龄
            age: {
                validator: function (value) {
                    return /^(?:[1-9][0-9]?|1[01][0-9]|120)$/i.test(value);
                },
                message: '年龄输入有误'
            }

        })

        //----------------------------------------------------------------------

        $(function () {
            $("#UserName").validatebox({
                required: true,
                validType: 'minLength[5]'
            })

            $("#password").validatebox({
                required: true,
                validType: 'length[6,12]', //密码的长度为6到12位之间
            })

            $("#repassword").validatebox({
                validType: 'equalTo["password"]',
            })

            $("#Phone").validatebox({
                required: true,
                validType: 'Mymobile ',
            })

            $("#Age").validatebox({
                required: true,
                validType: 'age',
            })

        })
    })
</script>
以下是验证扩展
$.extend($.fn.validatebox.defaults.rules, {
  idcard : {// 验证身份证
        validator : function(value) {
            return /^\d{15}(\d{2}[A-Za-z0-9])?$/i.test(value);
        },
        message : '身份证号码格式不正确'
    },
      minLength: {
        validator: function(value, param){
            return value.length >= param[0];
        },
        message: '请输入至少(2)个字符.'
    },
    length:{validator:function(value,param){
        var len=$.trim(value).length;
            return len>=param[0]&&len<=param[1];
        },
            message:"输入内容长度必须介于{0}和{1}之间."
        },
    phone : {// 验证电话号码
        validator : function(value) {
            return /^((\(\d{2,3}\))|(\d{3}\-))?(\(0\d{2,3}\)|0\d{2,3}-)?[1-9]\d{6,7}(\-\d{1,4})?$/i.test(value);
        },
        message : '格式不正确,请使用下面格式:020-88888888'
    },
    mobile : {// 验证手机号码
        validator : function(value) {
            return /^(13|15|18)\d{9}$/i.test(value);
        },
        message : '手机号码格式不正确'
    },
    intOrFloat : {// 验证整数或小数
        validator : function(value) {
            return /^\d+(\.\d+)?$/i.test(value);
        },
        message : '请输入数字,并确保格式正确'
    },
    currency : {// 验证货币
        validator : function(value) {
            return /^\d+(\.\d+)?$/i.test(value);
        },
        message : '货币格式不正确'
    },
    qq : {// 验证QQ,从10000开始
        validator : function(value) {
            return /^[1-9]\d{4,9}$/i.test(value);
        },
        message : 'QQ号码格式不正确'
    },
    integer : {// 验证整数
        validator : function(value) {
            return /^[+]?[1-9]+\d*$/i.test(value);
        },
        message : '请输入整数'
    },
    age : {// 验证年龄
        validator : function(value) {
            return /^(?:[1-9][0-9]?|1[01][0-9]|120)$/i.test(value);
        },
        message : '年龄必须是0到120之间的整数'
    },

    chinese : {// 验证中文
        validator : function(value) {
            return /^[\Α-\¥]+$/i.test(value);
        },
        message : '请输入中文'
    },
    english : {// 验证英语
        validator : function(value) {
            return /^[A-Za-z]+$/i.test(value);
        },
        message : '请输入英文'
    },
    unnormal : {// 验证是否包含空格和非法字符
        validator : function(value) {
            return /.+/i.test(value);
        },
        message : '输入值不能为空和包含其他非法字符'
    },
    username : {// 验证用户名
        validator : function(value) {
            return /^[a-zA-Z][a-zA-Z0-9_]{5,15}$/i.test(value);
        },
        message : '用户名不合法(字母开头,允许6-16字节,允许字母数字下划线)'
    },
    faxno : {// 验证传真
        validator : function(value) {
//            return /^[+]{0,1}(\d){1,3}[ ]?([-]?((\d)|[ ]){1,12})+$/i.test(value);
            return /^((\(\d{2,3}\))|(\d{3}\-))?(\(0\d{2,3}\)|0\d{2,3}-)?[1-9]\d{6,7}(\-\d{1,4})?$/i.test(value);
        },
        message : '传真号码不正确'
    },
    zip : {// 验证邮政编码
        validator : function(value) {
            return /^[1-9]\d{5}$/i.test(value);
        },
        message : '邮政编码格式不正确'
    },
    ip : {// 验证IP地址
        validator : function(value) {
            return /d+.d+.d+.d+/i.test(value);
        },
        message : 'IP地址格式不正确'
    },
    name : {// 验证姓名,可以是中文或英文
            validator : function(value) {
                return /^[\Α-\¥]+$/i.test(value)|/^\w+[\w\s]+\w+$/i.test(value);
            },
            message : '请输入姓名'
    },
    date : {// 验证姓名,可以是中文或英文
        validator : function(value) {
         //格式yyyy-MM-dd或yyyy-M-d
            return /^(?:(?!0000)[0-9]{4}([-]?)(?:(?:0?[1-9]|1[0-2])\1(?:0?[1-9]|1[0-9]|2[0-8])|(?:0?[13-9]|1[0-2])\1(?:29|30)|(?:0?[13578]|1[02])\1(?:31))|(?:[0-9]{2}(?:0[48]|[2468][048]|[13579][26])|(?:0[48]|[2468][048]|[13579][26])00)([-]?)0?2\2(?:29))$/i.test(value);
        },
        message : '清输入合适的日期格式'
    },
    msn:{
        validator : function(value){
        return /^\w+([-+.]\w+)*@\w+([-.]\w+)*\.\w+([-.]\w+)*$/.test(value);
    },
    message : '请输入有效的msn账号(例:abc@hotnail(msn/live).com)'
    },
    same:{
        validator : function(value, param){
            if($("#"+param[0]).val() != "" && value != ""){
                return $("#"+param[0]).val() == value;
            }else{
                return true;
            }
        },
        message : '两次输入的密码不一致!'
    }
});
搜索框searchbox
<html>
<head>
    <meta name="viewport" content="width=device-width" />
    <title>Index10</title>
    <script src="~/Scripts/jquery-1.8.2.js"></script>
    <script src="~/jquery-easyui/jquery.easyui.min.js"></script>
    <script src="~/jquery-easyui/locale/easyui-lang-zh_CN.js"></script>
    <link href="~/jquery-easyui/themes/default/easyui.css" rel="stylesheet" />
    <link href="~/jquery-easyui/themes/icon.css" rel="stylesheet" />
</head>
<body>
    <div class="easyui-searchbox" style="width:250px"></div>
</body>
</html>

详细点的
<html>
<head>
<meta name="viewport" content="width=device-width" />
<title>Index10</title>
<script src="~/Scripts/jquery-1.8.2.js"></script>
<script src="~/jquery-easyui/jquery.easyui.min.js"></script>
<script src="~/jquery-easyui/locale/easyui-lang-zh_CN.js"></script>
<link href="~/jquery-easyui/themes/default/easyui.css" rel="stylesheet" />
<link href="~/jquery-easyui/themes/icon.css" rel="stylesheet" />
</head>
<body>
<!--是输入框中默认的提示信息,鼠标点击输入框后自动消失。searcher是指定一个函数名称,当点击搜索框中的搜索图标的时候就触发这个函数-->
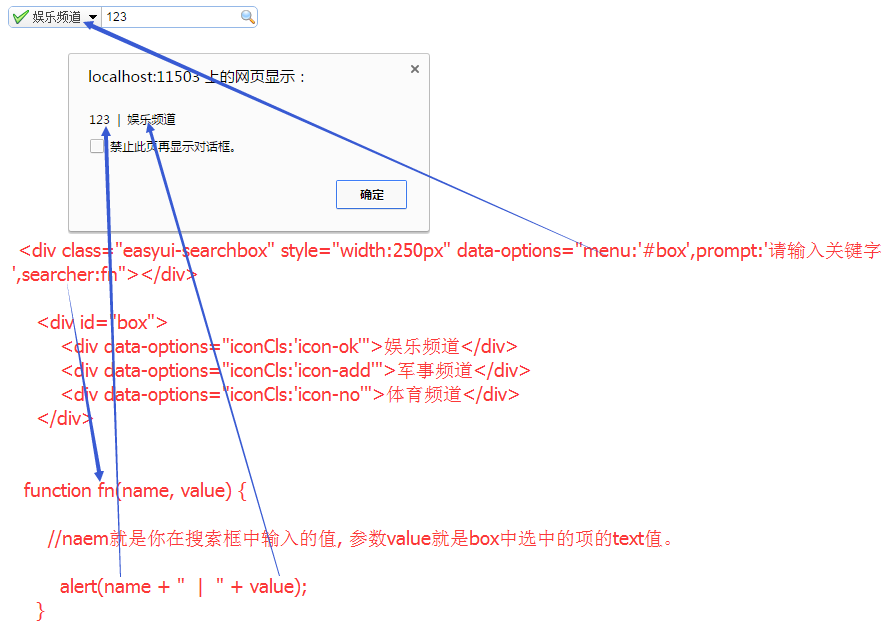
<div class="easyui-searchbox" style="width:250px" data-options="menu:'#box',prompt:'请输入关键字',searcher:fn"></div>
<div id="box">
<div data-options="iconCls:'icon-ok'">娱乐频道</div>
<div data-options="iconCls:'icon-add'">军事频道</div>
<div data-options="iconCls:'icon-no'">体育频道</div>
</div>
</body>
</html>
<script type="text/javascript">
//这个方是searcher指定的方法(方法名可以随便起。但是它里面只能接收2个参数,一个是name,一个是value)
function fn(name, value) {
//naem就是你在搜索框中输入的值, 参数value就是box中选中的项的text值。
alert(name + " | " + value);
}
</script>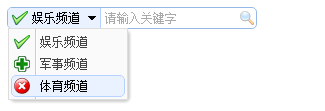
js加载方式
<html>
<head>
    <meta name="viewport" content="width=device-width" />
    <title>Index10</title>
    <script src="~/Scripts/jquery-1.8.2.js"></script>
    <script src="~/jquery-easyui/jquery.easyui.min.js"></script>
    <script src="~/jquery-easyui/locale/easyui-lang-zh_CN.js"></script>
    <link href="~/jquery-easyui/themes/default/easyui.css" rel="stylesheet" />
    <link href="~/jquery-easyui/themes/icon.css" rel="stylesheet" />
</head>
<body>
    <!--是输入框中默认的提示信息,鼠标点击输入框后自动消失。searcher是指定一个函数名称,当点击搜索框中的搜索图标的时候就触发这个函数-->
    <div id="ss"></div>

    <div id="box">
        <div data-options="iconCls:'icon-ok'">娱乐频道</div>
        <div data-options="iconCls:'icon-add'">军事频道</div>
        <div name="sports" data-options="iconCls:'icon-no'">体育频道</div>
    </div>
</body>
</html>
<script type="text/javascript">
    //这个方是searcher指定的方法(方法名可以随便起。但是它里面只能接收2个参数,一个是name,一个是value)
    function fn(name, value) {

        //naem就是你在搜索框中输入的值, 参数value就是box中选中的项的text值。

        alert(name + "  |  " + value);
    }


    $(function () {
        $("#ss").searchbox({
            menu: '#box',
            prompt: '请输入关键字', //提示信息
            width: 250,
            height: 22,

            value:'给输入写入一个初始值', //这里是输入框中的值(内容)
            //disabled:false  是否禁用

            //searcher: fn, 也可以用下面这种方式
            searcher: function (name,value) {
                alert(name + "  |  " + value);
            }

        })


        //-------------------------方法

        console.log("AA", $("#ss").searchbox('textbox'));  //返回文本框对象

        console.log("AA", $("#ss").searchbox('getValue'));  //获取搜索框中的值(内容)

        $("#ss").searchbox('setValue','123');  //设置搜索框中的值(内容)将它的值设为123

        console.log($("#ss").searchbox('getName'));  //返回担起搜索的类型名称(即#box中的项,如:娱乐频道,军事频道,体育频道)

        $("#ss").searchbox('selectName', 'sports');//选择当前搜索的类型名(这个sports是体育频道的name值) 这里表示将当前搜索的类型设为体育频道

        $("#ss").searchbox("clear") //清空搜索框中的内容

    })

</script>
数字输入框NumberBox 数字输入框 (依赖validatebox控件,即可以在里面写验证)
<html>
<head>
    <meta name="viewport" content="width=device-width" />
    <title>Index11</title>
    <script src="~/Scripts/jquery-1.8.2.js"></script>
    <script src="~/jquery-easyui/jquery.easyui.min.js"></script>
    <script src="~/jquery-easyui/locale/easyui-lang-zh_CN.js"></script>
    <link href="~/jquery-easyui/themes/default/easyui.css" rel="stylesheet" />
    <link href="~/jquery-easyui/themes/icon.css" rel="stylesheet" />
</head>
<body>
    <!--min:5表示这个数字输入框能输入的最小值是5,例如你输入一个1,那么它会自动变成5-->
    <!--max:120表示这个数字输入框能输入的最大值是120,例如你输入一个130,它会自动变成120-->
    <input type="text"  class="easyui-numberbox" style="width:250px" value="" data-options="min:5" max="120"/>

</body>
</html>
js加载方式
@{
    Layout = null;
}

<!DOCTYPE html>

<html>
<head>
    <meta name="viewport" content="width=device-width" />
    <title>Index11</title>
    <script src="~/Scripts/jquery-1.8.2.js"></script>
    <script src="~/jquery-easyui/jquery.easyui.min.js"></script>
    <script src="~/jquery-easyui/locale/easyui-lang-zh_CN.js"></script>
    <link href="~/jquery-easyui/themes/default/easyui.css" rel="stylesheet" />
    <link href="~/jquery-easyui/themes/icon.css" rel="stylesheet" />
</head>
<body>
 <div id="box"></div>
</body>
</html>
<script type="text/javascript">
    $(function () {
        $("#box").numberbox({
            //此数字输入框依赖validatebox控件。(其实就是支持表单验证)
            required: true, //此输入框不能为空

            min: 5,//min:5表示这个数字输入框能输入的最小值是5,例如你输入一个1,那么它会自动变成5
            //max: 120,//max:120表示这个数字输入框能输入的最大值是120,例如你输入一个130,它会自动变成120

            precision: 2, //输入的数组精确到2个小数点
            decimalSeparator: ',', //整数与小数点之间的分割。这里表示整数与小数之间用,逗号来分割。默认是用.点来分割
            groupSeparator: ',', //大数字之间用什么符号类分割。比如999,999,888,00 这样的大数字

            //prefix: '$', //数字的前缀符号(比如金额¥或者$)

            //formatter: function (value) { //这个value是你输入的值
            //    return '123' + value;  //这样的话输入框的数值就变成‘123’加上你输入的值了(注意:这仅仅是格式化,但是你的值依然是value没有变,仅仅是显示的样子变成‘123’+value了而已)
            //},

            //parser: function (value) {
            //    return '111' + value; //value就是你在输入框中输入的值。这样输入框的值就变成'111'+value的值了。此时你输入框的value值是回真正的改变,它的value值真正的变成了'111'+value了
            //},

            onChange: function (newValue, oldValue) { //newValue表示改变后的值。oldValue表示改变前的值
                alert("输入框元素改变的时候触发!")
            }
        })

        //------------------方法
        $("#box").numberbox("setValue", 550); //将输入框的值设为550
        alert($("#box").numberbox("getValue")); //获取输入框的值
        $("#box").numberbox("clear");//清除输入框中的值
        $("#box").numberbox("reset");//重置输入框中的值

        $("#box").numberbox("disable");//禁用输入框
        $("#box").numberbox("enable");//启用输入框

        $(document).keyup(function () {  //注意,这里绑定的是keyup事件,当键盘弹起的时候就立刻修正数据为有效的值(比如我们设置了输入可以输入的最小值,或最大值,如果用户在输入错误的数据时候,在键盘弹起的时候,就立刻将数据修正为有效的数据。)
            $("#box").numberbox("fix");
        })

    })
</script>
日历calendar
<html>
<head>
    <meta name="viewport" content="width=device-width" />
    <title>Index12</title>
    <script src="~/Scripts/jquery-1.8.2.js"></script>
    <script src="~/jquery-easyui/jquery.easyui.min.js"></script>
    <script src="~/jquery-easyui/locale/easyui-lang-zh_CN.js"></script>
    <link href="~/jquery-easyui/themes/default/easyui.css" rel="stylesheet" />
    <link href="~/jquery-easyui/themes/icon.css" rel="stylesheet" />
</head>
<body>
    <!--fit表示日历控件是否自适应父容器的大小。值为布尔值。firstDay表示定义一周的第一天是星期几。0=星期
日、1=星期一等。-->
    <div id="box" class="easyui-calendar" data-options="fit:false,firstDay:'1'"></div>
</body>
</html>
js加载方式
<html>
<head>
    <meta name="viewport" content="width=device-width" />
    <title>Index12</title>
    <script src="~/Scripts/jquery-1.8.2.js"></script>
    <script src="~/jquery-easyui/jquery.easyui.min.js"></script>
    <script src="~/jquery-easyui/locale/easyui-lang-zh_CN.js"></script>
    <link href="~/jquery-easyui/themes/default/easyui.css" rel="stylesheet" />
    <link href="~/jquery-easyui/themes/icon.css" rel="stylesheet" />
</head>
<body>

    <div id="box"></div>

</body>
</html>
<script type="text/javascript">
    $("#box").calendar({
        width: 300,
        height: 300,
        firstDay: 1, //定义一周的第一天是星期几。0=星期日、1=星期一等。

        // year: 2015 ,//当日历控件初始化的时候,界面显示哪一年的日历。比如这里指定2015年(一般不需要设)
        //month:6,//当日历控件初始化的时候,界面显示哪一月的日历。比如这里指定6月份(一般不需要设)

        current:new Date(2015,11,18), //将2015年12月18日设为当前日期(为什么明明写的2015,11,18,怎么就变成了设定2015年12月18日为当前日期呢?那是因为这个月份在js中是从0开始的。所以写11就代表数字12)

        //日期格式化(其实这个formatter会遍历日历中显示那一页的的每个日期)
        formatter: function (date) {
            /*
            Js获取当前日期时间及其它操作


            var myDate = new Date();
            myDate.getYear();        //获取当前年份(2位)
            myDate.getFullYear();    //获取完整的年份(4位,1970-????)
            myDate.getMonth();       //获取当前月份(0-11,0代表1月)
            myDate.getDate();        //获取当前日(1-31)
            myDate.getDay();         //获取当前星期X(0-6,0代表星期天)
            myDate.getTime();        //获取当前时间(从1970.1.1开始的毫秒数)
            myDate.getHours();       //获取当前小时数(0-23)
            myDate.getMinutes();     //获取当前分钟数(0-59)
            myDate.getSeconds();     //获取当前秒数(0-59)
            myDate.getMilliseconds();    //获取当前毫秒数(0-999)
            myDate.toLocaleDateString();     //获取当前日期
            var mytime=myDate.toLocaleTimeString();     //获取当前时间
            myDate.toLocaleString( );        //获取日期与时间

            */
            if (date.getFullYear() == new Date().getFullYear()) {  //如果日历中年等于当前的年份
                if (date.getMonth() == new Date().getMonth()) { //如果日历中的月份等于当前月份
                    if (date.getDate() == new Date().getDate())  //如果日历中个天(几号)等于当前的日期(几号),例如:今天是18号
                    {
                        return "#" + date.getDate();  //那么就将当前日期的前面加一个#号,显示在日历的界面
                    }
                    return date.getDate();
                } return date.getDate();
            } return date.getDate();
        },

        //styler: function (date) { //设置指定日期的样式
        //    if (date.getDate() == 1) { //如果date.getDate()是每个月的1号,就将它颜色设为灰色

        //        return "background-color:#ccc"
        //    }
        //    if (date.getDay() == 1) {
        //        return "background-color:red"; //给星期一的背景颜色都设为红色
        //    }
        //},
        //validator: function (date) {
        //    if (date.getDay() == 1) { //将每个月的星期一设为可用状态。其他设为不可用状态。
        //        return true;
        //    }
        //    else {
        //        return false;
        //    }
        //},

        validator: function (date) { //validator设置指定日期是否可以选择 (参数date是日历显示界面中的每一天)
            //if (date.getDay() == 1) {    //如果是星期一就可以选择
            //    return true;
            //}
            //return true;

            var d1 = formatterDate(date);
            var d2 = formatterDate(new Date()); //获取当前的日期
            if (Date.parse(d1) >= Date.parse(d2)) { //将当前日期及当前日期以后的日期设为启用(可以选择)
                return true;
            }
            return false; //将昨天,即以前的日期都禁用(不能选择)

        },
        onSelect: function (date) {
            //在用户选择一天的时候触发
            //alert(date)

        },
        onChange: function (newDate, oldDate) {
            //在用户改变选择的时候触发。

            var formatDate = formatterDate(newDate);//date为Mon Nov 09 2015 00:00:00 GMT+0800(中国标准时间)格式的数据,将它转化成2015-10-12这样的数据

            alert(formatDate);//打印出改变后并经过格式化的日期(打印出;2015-12-20)
        }

    })

    function formatterDate(date) {
        var y = date.getFullYear();
        var m = date.getMonth() + 1;
        m = m < 10 ? '0' + m : m;
        var d = date.getDate();
        d = d < 10 ? ('0' + d) : d;
        return y + '-' + m + '-' + d;
    }
</script>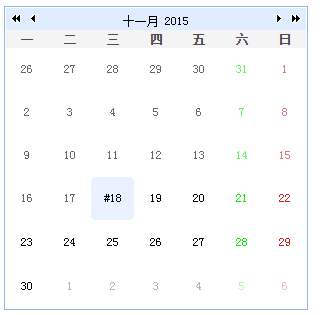
日期datebox控件(Datebox日期控件也是依赖与validatebox的(即可以做验证))
<html>
<head>
    <meta name="viewport" content="width=device-width" />
    <title>Index13</title>
    <script src="~/Scripts/jquery-1.8.2.js"></script>
    <script src="~/jquery-easyui/jquery.easyui.min.js"></script>
    <script src="~/jquery-easyui/locale/easyui-lang-zh_CN.js"></script>
    <link href="~/jquery-easyui/themes/default/easyui.css" rel="stylesheet" />
    <link href="~/jquery-easyui/themes/icon.css" rel="stylesheet" />
</head>
<body>
    <div class="easyui-datebox"></div>
</body>
</html>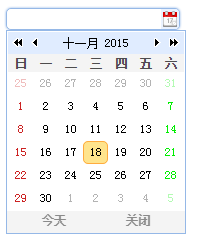
js加载方式 (其实这个Datebox日期控件也是依赖与validatebox的(即可以做验证))
<html>
<head>
    <meta name="viewport" content="width=device-width" />
    <title>Index13</title>
    <script src="~/Scripts/jquery-1.8.2.js"></script>
    <script src="~/jquery-easyui/jquery.easyui.min.js"></script>
    <script src="~/jquery-easyui/locale/easyui-lang-zh_CN.js"></script>
    <link href="~/jquery-easyui/themes/default/easyui.css" rel="stylesheet" />
    <link href="~/jquery-easyui/themes/icon.css" rel="stylesheet" />
</head>
<body>
    <div id="box"></div>
    <div id="abc"></div>
</body>
</html>
<script type="text/javascript">
    $(function () {
        //为日历增加按钮的插件
        var Mybuttons = $.extend([], $.fn.datebox.defaults.buttons);
        Mybuttons.splice(1, 0, {
            text: '明天',
            handler: function (target) {
                //$.each(target, function (key, value) {
                //    alert(key);
                //})
                alert('点击了明天按钮'); //这里自己定义
            }
        })


        $("#box").datebox({
            required: "true",
            missingMessage: "必填项", //鼠标移入就提示“必填项”

            panelWidth: 300, //设置下拉日历面板宽度
            panelHeigth: 300, //设置下拉日历面板高度
            buttons: Mybuttons, //为下拉日历面板添加一个'明天'的按钮

            //formatter: function (date) {
            //    var year = date.getFullYear(); //获取选中日期的年
            //    var month = parseInt(date.getMonth()) + 1; //获取选中日期的月。为什么这里要加上1呢?那是因为这个月份在js中是从0开始的。为了在时间按钮中显示正确的日期,就应该加上1
            //    var da = date.getDate(); //获取选中日期的天

            //    return year+"/"+month+"/"+da//通过返回格式化后的日期。这样当你选中一个日期后,日期输入框中就显示了正确的日期了。例如:2015/11/18
            //},

            onSelect: function (date) {

                //alert("在用户选择一天的时候触发");

                var year = date.getFullYear(); //获取选中日期的年
                var month = parseInt(date.getMonth()) + 1; //获取选中日期的月。为什么这里要加上1呢?那是因为这个月份在js中是从0开始的。为了在时间按钮中显示正确的日期,就应该加上1
                var da = date.getDate(); //获取选中日期的天

                $("#abc").text(year + "/" + month + "/" + da);
            }
        })

        //--------------------------------------方法
        $("#box").datebox("setValue", "2015-10-12");//将日期控件的值设为2015年10月12日

        $(document).click(function () {
            alert($("#box").datebox("getValue")); //获取日期控件的值
        })

    })
</script>
日期datetimebox控件 (与datebox控件没什么区别,仅仅是界面稍微有点不一样而已)
<html>
<head>
    <meta name="viewport" content="width=device-width" />
    <title>Index14</title>
    <script src="~/Scripts/jquery-1.8.2.js"></script>
    <script src="~/jquery-easyui/jquery.easyui.min.js"></script>
    <script src="~/jquery-easyui/locale/easyui-lang-zh_CN.js"></script>
    <link href="~/jquery-easyui/themes/default/easyui.css" rel="stylesheet" />
    <link href="~/jquery-easyui/themes/icon.css" rel="stylesheet" />
</head>
<body>
    <div id="box"></div>
</body>
</html>
<script type="text/javascript">
    $("#box").datetimebox({
        required: true,
        missingMessage: "必填项", //鼠标移入就提示“必填项”

        //value:'2015-10-12 19:30:00',//给时间控件赋初始值。一般不设,让用户自己选择
        //showSeconds: false, // 定义日历面板上是否显示秒钟信息。默认值为true。

    })

    //-----------------------方法
    //$("#box").datetimebox("setValue", "2018-10-12 12:26:13"); //设置日期控件的值

    $(document).click(function () {
        //alert($("#box").datetimebox("getValue")); //获取日期控件的值
    })
</script>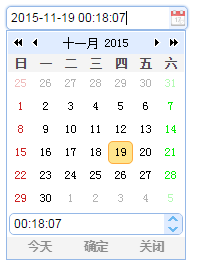
布局 Layout
<html>
<head>
    <meta name="viewport" content="width=device-width" />
    <title>Index17</title>
    <script src="~/Scripts/jquery-1.8.2.js"></script>
    <script src="~/jquery-easyui/jquery.easyui.min.js"></script>
    <script src="~/jquery-easyui/locale/easyui-lang-zh_CN.js"></script>
    <link href="~/jquery-easyui/themes/default/easyui.css" rel="stylesheet" />
    <link href="~/jquery-easyui/themes/icon.css" rel="stylesheet" />
</head>
<body>
    <div id="box" class="easyui-layout" style="width:800px;height:500px">
        <div data-options="region:'north',title:'上北'" style="height:100px"></div>
        <div data-options="region:'south',title:'下南'" style="height:100px"></div>
        <div data-options="region:'west',title:'左西'" style="width:100px"></div>
        <div data-options="region:'east',title:'右东'" style="width:100px"></div>
        <div data-options="region:'center',title:'中间'" style="width:auto"></div>

    </div>
</body>
</html>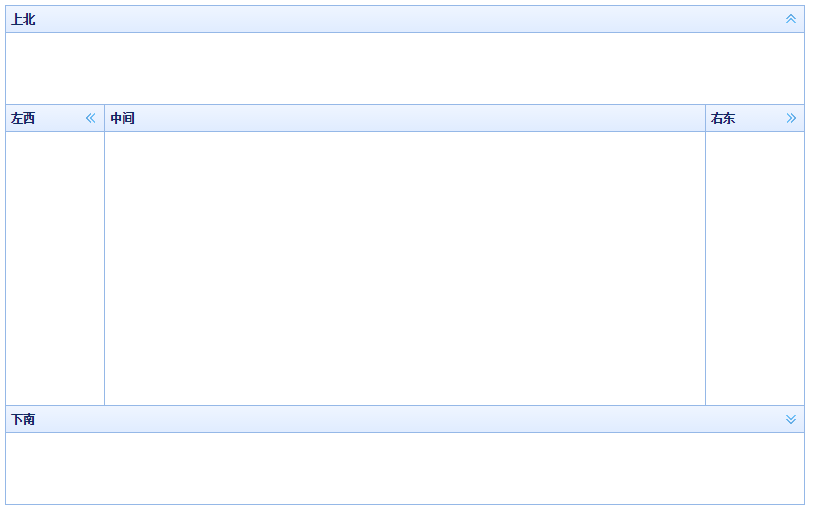
Js加载。详细
<html>
<head>
    <meta name="viewport" content="width=device-width" />
    <title>Index17</title>
    <script src="~/Scripts/jquery-1.8.2.js"></script>
    <script src="~/jquery-easyui/jquery.easyui.min.js"></script>
    <script src="~/jquery-easyui/locale/easyui-lang-zh_CN.js"></script>
    <link href="~/jquery-easyui/themes/default/easyui.css" rel="stylesheet" />
    <link href="~/jquery-easyui/themes/icon.css" rel="stylesheet" />
</head>
<body>
    <!--region:'north'表示上北这个面板-->
    <!--split:true,表示面板可以拖拉-->
    <!--iconCls:'icon-save'表示给面板加一个保存的图标-->
    <!--href:'/Home/CheckUserInfo' 表示这个面板将会从/Home/Index中请求数据-->
    <!--collapsible:false,定义这个面板是否显示折叠按钮。默认值true。-->
    <!--maxHeight:200,表示面板的最大宽度为200px-->
    <!--minHeight:80,表示面板的最小宽度为80px-->
	<!--noheader:true, 表示:不显示头标记吗?true就表示不显示。其中意义相当于去掉title-->
    <div id="box" style="width:800px;height:500px">
        <div data-options="
             region:'north',
             title:'上北',
             split:true,
             iconCls:'icon-save',
             href:'/Home/CheckUserInfo',
             collapsible:false,
             maxHeight:200,
             minHeight:80,
	     noheader:true
             "
             style="height:100px"></div>
        <div data-options="region:'south',split:true,title:'下南'" style="height:100px"></div>
        <div data-options="region:'west',split:true,title:'左西'" style="width:100px"></div>
        <div data-options="region:'east',split:true,title:'右东'" style="width:100px"></div>
        <div data-options="region:'center',split:true,title:'中间'" style="width:auto"></div>

    </div>
</body>
</html>
<script type="text/javascript">
    $(function () {
        $("#box").layout({
            fit: false, //如果设置为true,布局组件将自动适应父容器。当使用body标签创建布局的时候整个页面会自动最大化。默认为false
        })

        //--------------方法

        //----返回一个面板
        console.log($("#box").layout("panel", 'north'));//返回上北的面板(即:获取上北的面板)
        $('#box').layout('collapse', 'south'); //折叠‘下南’的那个面板
        $('#box').layout('expand', 'south'); //展开‘下南’的那个面板

        //------手工添加面板(假设之前我们没有添加中间这个面板,那现在就现在就来添加一下)
        //$("#box").layout('add', {
        //    title: '右东',
        //    region: 'east',
        //    maxWidth: 100,
        //    minWidth:100,
        //});

        //$("#box").layout("remove", "west"); //删除右东的这个面板(不能删除上北和中间的面板,否则不能用)
    })

</script>


 543
543

 被折叠的 条评论
为什么被折叠?
被折叠的 条评论
为什么被折叠?
 到【灌水乐园】发言


