


源码用到的最多的特性就是多态,一个基础类可能有2到3层继承关系,甚至可能更多,所以在看的时候要弄清楚当前这个变量究竟是哪一个类,是子类还是父类,也有可能是内部类,这样每个地方所执行的代码逻辑就比较清晰了。
1. 网络操作抽象类 Channel
Channel是Netty对网络操作的抽象类,通过Channel可以进行I/O操作。客户端成功连接,服务端会创建一个Channel与客户端进行绑定。
比较常用的Channel接口实现类有:
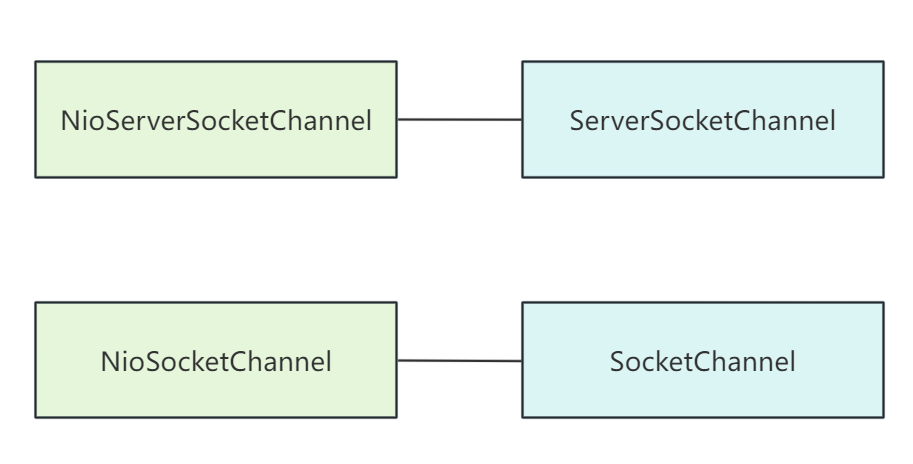
- NioServerSocketChannel用于服务端
- NioSocketChannel用于客户端
这两个实现类在底层与JDK的ServerSocketChannel,SocketChannel相对应,是一对一的关系,是对JDK中的再次包装。
客户端和服务端在启动的过程中会调用channel方法:
服务端:
public class Server {

    public static void main(String[] args) {
        EventLoopGroup bossGroup = new NioEventLoopGroup();
        EventLoopGroup workGroup = new NioEventLoopGroup();
        try {
            ServerBootstrap serverBootstrap = new ServerBootstrap();
            serverBootstrap.group(bossGroup, workGroup)
                    .channel(NioServerSocketChannel.class)
                    .option(ChannelOption.SO_BACKLOG, 100)
                    .handler(new LoggingHandler(LogLevel.INFO))
                    .childHandler(new ChannelInitializer<SocketChannel>() {
                        @Override
                        protected void initChannel(SocketChannel socketChannel) throws Exception {
                            ChannelPipeline cp = socketChannel.pipeline();
                            cp.addLast(new LoggingHandler(LogLevel.INFO));
                        }
                    });
            Channel serverChannel = serverBootstrap.bind().sync().channel();
            serverChannel.closeFuture().sync();
        } catch (Exception e) {
            System.out.println(e.getMessage());
        }
    }
}
客户端:
public class Client {
    public static void main(String[] args) {
        EventLoopGroup group = new NioEventLoopGroup();
        try {
            Bootstrap bootstrap = new Bootstrap();
            bootstrap.group(group)
                    .channel(NioSocketChannel.class)
                    .option(ChannelOption.TCP_NODELAY, true)
                    .handler(new ChannelInitializer<SocketChannel>() {
                        @Override
                        protected void initChannel(SocketChannel socketChannel) throws Exception {
                            ChannelPipeline cp = socketChannel.pipeline();
                            cp.addLast(new LoggingHandler(LogLevel.INFO));
                        }
                    });
            Channel clientChannel = bootstrap.connect().sync().channel();
            clientChannel.closeFuture().sync();
        } catch (Exception e) {
            System.out.println(e.getMessage());
        }
    }
}
对于客户端中,首先实例化了netty中的任务线程池EventLoopGroup,像它的类名称一样,事件循环组,用来执行一组指定任务。接下来就是实例化netty的核心启动类BootStrap(服务端是ServerBootStrap),并向其中注册事件循环器,channel,handler,childHandler。
下面分析客户端整个启动过程是怎样的。
首先看.channel()方法,它的参数是NioSocketChannel.class,我们点进去这个方法可以看到:
public B channel(Class<? extends C> channelClass) {
      return channelFactory(new ReflectiveChannelFactory<C>(
                ObjectUtil.checkNotNull(channelClass, "channelClass")
      ));
}
这里创建了一个工厂类ReflectiveChannelFactory,并将channelClass传递进去,点击进去查看这个工厂类的构造方法:
    private final Constructor<? extends T> constructor;

    public ReflectiveChannelFactory(Class<? extends T> clazz) {
        ObjectUtil.checkNotNull(clazz, "clazz");
        try {
            this.constructor = clazz.getConstructor();
        } catch (NoSuchMethodException e) {
            throw new IllegalArgumentException("Class " + StringUtil.simpleClassName(clazz) +
                    " does not have a public non-arg constructor", e);
        }
    }
这里通过放射获取到传入的channelClass的空参构造方法,并赋值给了自己的成员变量constructor,到这里传递进去的NioSocketChannel.class并没有被创建,仅仅是获取到了它的无参构造方法,那什么被实例化呢?可以继续看到ReflectiveChannelFactory中有一个方法newChannel()方法。代码如下:
    @Override
    public T newChannel() {
        try {
            return constructor.newInstance();
        } catch (Throwable t) {
            throw new ChannelException("Unable to create Channel from class " + constructor.getDeclaringClass(), t);
        }
    }
这里通过newInstantce()反射创建了传递进去的NioSocketChannel实例,那么肯定有地方调用了这个方法,我们继续向下看。
接着将一些变量和handler赋值给了bootstrap的成员变量,下面调用了.connect()方法进行连接服务端的一系列操作,这里是重点,涉及到整个客户端启动过程都干了什么事情。
进入connect()方法,看到源码:
    public ChannelFuture connect() {
        validate();
        SocketAddress remoteAddress = this.remoteAddress;
        if (remoteAddress == null) {
            throw new IllegalStateException("remoteAddress not set");
        }

        return doResolveAndConnect(remoteAddress, config.localAddress());
    }
这里的validate()方法是检查事件循环器和channel工厂是否创建,继续进入doResolveAndConnect()方法中看:
private ChannelFuture doResolveAndConnect(final SocketAddress remoteAddress, final SocketAddress localAddress) {
        // 这一步很关键
        final ChannelFuture regFuture = initAndRegister();
        final Channel channel = regFuture.channel();

        if (regFuture.isDone()) {
            if (!regFuture.isSuccess()) {
                return regFuture;
            }
            return doResolveAndConnect0(channel, remoteAddress, localAddress, channel.newPromise());
        } else {
            // Registration future is almost always fulfilled already, but just in case it's not.
            final PendingRegistrationPromise promise = new PendingRegistrationPromise(channel);
            regFuture.addListener(new ChannelFutureListener() {
                @Override
                public void operationComplete(ChannelFuture future) throws Exception {
                    // Directly obtain the cause and do a null check so we only need one volatile read in case of a
                    // failure.
                    Throwable cause = future.cause();
                    if (cause != null) {
                        // Registration on the EventLoop failed so fail the ChannelPromise directly to not cause an
                        // IllegalStateException once we try to access the EventLoop of the Channel.
                        promise.setFailure(cause);
                    } else {
                        // Registration was successful, so set the correct executor to use.
                        // See https://github.com/netty/netty/issues/2586
                        promise.registered();
                        doResolveAndConnect0(channel, remoteAddress, localAddress, promise);
                    }
                }
            });
            return promise;
        }
    }
进入第一行代码的initAndRegister()方法,看看都干了什么:
    final ChannelFuture initAndRegister() {
        Channel channel = null;
        try {
            channel = channelFactory.newChannel();
            init(channel);
        } catch (Throwable t) {
            if (channel != null) {
                // channel can be null if newChannel crashed (eg SocketException("too many open files"))
                channel.unsafe().closeForcibly();
                // as the Channel is not registered yet we need to force the usage of the GlobalEventExecutor
                return new DefaultChannelPromise(channel, GlobalEventExecutor.INSTANCE).setFailure(t);
            }
            // as the Channel is not registered yet we need to force the usage of the GlobalEventExecutor
            return new DefaultChannelPromise(new FailedChannel(), GlobalEventExecutor.INSTANCE).setFailure(t);
        }

        ChannelFuture regFuture = config().group().register(channel);
        if (regFuture.cause() != null) {
            if (channel.isRegistered()) {
                channel.close();
            } else {
                channel.unsafe().closeForcibly();
            }
        }

        // If we are here and the promise is not failed, it's one of the following cases:
        // 1) If we attempted registration from the event loop, the registration has been completed at this point.
        //    i.e. It's safe to attempt bind() or connect() now because the channel has been registered.
        // 2) If we attempted registration from the other thread, the registration request has been successfully
        //    added to the event loop's task queue for later execution.
        //    i.e. It's safe to attempt bind() or connect() now:
        //         because bind() or connect() will be executed *after* the scheduled registration task is executed
        //         because register(), bind(), and connect() are all bound to the same thread.

        return regFuture;
    }
哦,我们可以看到这行代码 channel = channelFactory.newChannel()`这里调用了newChannel方法进行实例化NioSocketChannel,我们知道这个方法是通过调用NioSocketChannel的无参构造方法进行创建的,那么NioSocketChannel的无参构造方法都做了什么?我们先跳到这里看一下:
我们一路从NioSocketChannel的无参构造方法点进去,最终进去了它的父类的父类AbstractChannel的构造方法:
    protected AbstractChannel(Channel parent) {
        this.parent = parent;
        id = newId();
        unsafe = newUnsafe();
        pipeline = newChannelPipeline();
    }
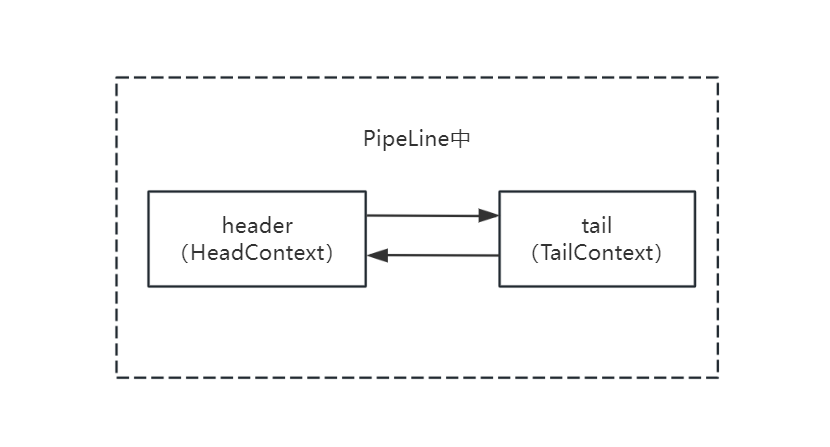
这里为channel生成了一个新的id,实例化了UnSafe实例,创建了一个管道pipeline ,管道是netty处理事件传播的核心。newChannelPipeline方法在管道里面生成了一个head和一个tail,分别对应的是DefaultChannelPipeline的两个内部类HeadContext,TailContext,这两个类在后续事件传播处理上起到关键作用。创建并生成了一个双向链表的结构,此时管道中是这样的:
除了这三件事,在构造方法的调用过程中还实例化了底层SocketChannel(NioSocketChannel实例化之前、实例化了内部的 NioSocketChannelConfig 实例,它用于保存 channel 的配置信息、还设置了 SocketChannel 的非阻塞模式,代码如下:
    public NioSocketChannel(SelectorProvider provider, InternetProtocolFamily family) {
        this(newChannel(provider, family));//调用本身的newChannel方法
    }

	   private static SocketChannel newChannel(SelectorProvider provider, InternetProtocolFamily family) {
        try {
		        // 实例化socketChannel
            SocketChannel channel = SelectorProviderUtil.newChannel(OPEN_SOCKET_CHANNEL_WITH_FAMILY, provider, family);
            return channel == null ? provider.openSocketChannel() : channel;
        } catch (IOException e) {
            throw new ChannelException("Failed to open a socket.", e);
        }
    }

    public NioSocketChannel(Channel parent, SocketChannel socket) {
        super(parent, socket);
        // 初始化配置信息,保存socket,channel作为成员变量
        config = new NioSocketChannelConfig(this, socket.socket());
    }

   protected AbstractNioChannel(Channel parent, SelectableChannel ch, int readInterestOp) {
        super(parent);
        this.ch = ch;
        this.readInterestOp = readInterestOp;
        try {
		        // 设置为非阻塞模式
            ch.configureBlocking(false);
        } catch (IOException e) {
            try {
                ch.close();
            } catch (IOException e2) {
                logger.warn(
                            "Failed to close a partially initialized socket.", e2);
            }

            throw new ChannelException("Failed to enter non-blocking mode.", e);
        }
    }
OK,这些大致就是NioSocketChannel初始化干的一些事情。现在回去initAndRegister方法继续向下看。
下面调用了init(channel);方法,进入这个方法,看看做了什么事情,这里调用的是AbstractBootstrap的子类Bootstrap 的init方法毕竟一开始new的是BootStrap(多态)。
    @Override
    void init(Channel channel) {
        ChannelPipeline p = channel.pipeline();
        p.addLast(config.handler());

        setChannelOptions(channel, newOptionsArray(), logger);
        setAttributes(channel, newAttributesArray());
    }
这里首先获取到NioSocketChannel初始化时创建的pipeline,然后调用config中的handler()方法。这里调用的handler方法获取到的是哪一个handler呢?我们进入handler()这个方法中可以看到时调用的BootstrapConfig的父类AbstractBootstrap的hander()方法:
    public final ChannelHandler handler() {
        return bootstrap.handler();
    }
可以看出这里时调用的bootStrap的handler方法,我们看一下bootstrap的handler方法:
    final ChannelHandler handler() {
        return handler;
    }
这里的hander就是第一开始创建bootstrap时传入的handler
            bootstrap.group(group)
                    .channel(NioSocketChannel.class)
                    .option(ChannelOption.TCP_NODELAY, true)
                    // 这里赋值的handler
                    .handler(new ChannelInitializer<SocketChannel>() {
                        @Override
                        protected void initChannel(SocketChannel socketChannel) throws Exception {
                            ChannelPipeline cp = socketChannel.pipeline();
                            cp.addLast(new LoggingHandler(LogLevel.INFO));
                        }
                    });
                    //对应的hander方法
               public B handler(ChannelHandler handler) {
					        this.handler = (ChannelHandler)ObjectUtil.checkNotNull(handler, "handler");
					        return this.self();
						    }
由此可见config.handler()这里返回的是ChannelInitializer。所以在init方法中pipeline加入的是ChannelInitializer。此时的pipeline:
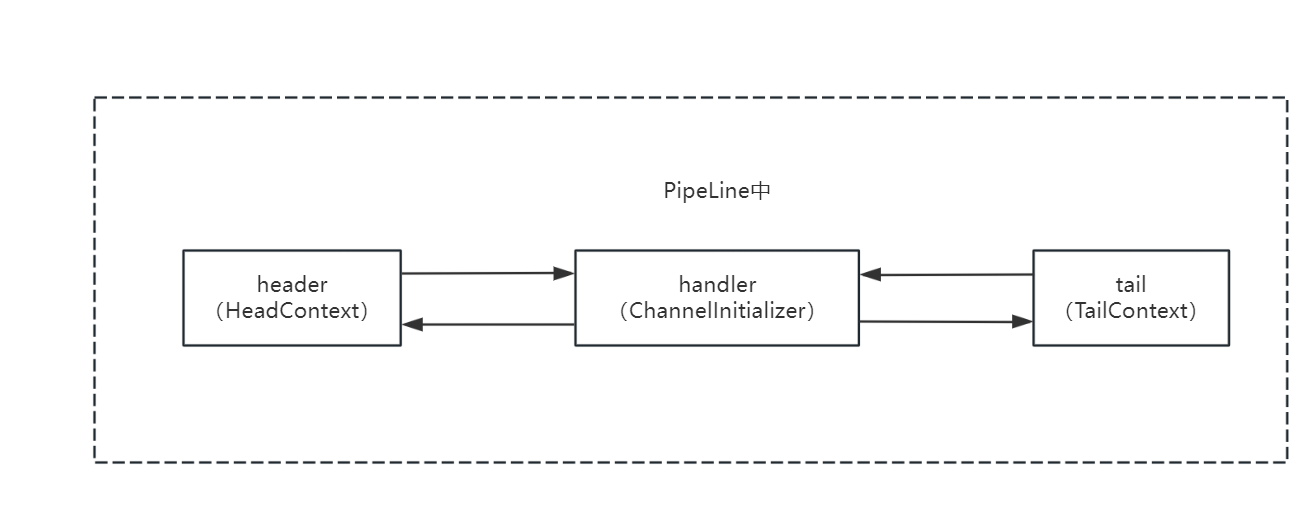
至于它为什么在中间,感兴趣的可以从addLast方法一路点下去看pipleline的addLast0方法,这里贴出代码就不做说明了。从这里也可以看出实际pipeline每次在add的时候添加的都是一个将channel包装后的context,而不是channel本身。实际后面说的pipeline中的hander也是说的AbstractChannelHandlerContext 。
    private void addLast0(AbstractChannelHandlerContext newCtx) {
        AbstractChannelHandlerContext prev = tail.prev;
        newCtx.prev = prev;
        newCtx.next = tail;
        prev.next = newCtx;
        tail.prev = newCtx;
    }
至此init方法结束,下面到:
ChannelFuture regFuture = config().group().register(channel);
config().group()这里是拿到配置,然后调用group方法,group方法是调用bootstrap.group()方法获取第一开始注册进bootstrap中的事件循环器组NioEventLoopGroup然后调用它的register(channel)方法,这个方法是在它的父类MultithreadEventLoopGroup 中:
    @Override
    public ChannelFuture register(Channel channel) {
        return next().register(channel);
    }
next()方法:
    @Override
    public EventLoop next() {
        return (EventLoop) super.next();
    }
    // super.next()
    @Override
    public EventExecutor next() {
        return chooser.next();
    }
这里chooser.next()是从children EventExecutor数组中取得一个EventExecutor,然后调用它的register方法。chooser是MultithreadEventExecutorGroup类的一个成员属性,是在MultithreadEventExecutorGroup初始化的时候创建的,那么什么地方会触发MultithreadEventExecutorGroup它的初始化?这个类的一个子类我们很熟悉,就是一开始new的NioEventLoopGroup,那我们就可以从NioEventLoopGroup的空参构造方法一直向下点看看做了什么。一路点下去可以看到这么一大段代码:
protected MultithreadEventExecutorGroup(int nThreads, Executor executor,
                                            EventExecutorChooserFactory chooserFactory, Object... args) {
        checkPositive(nThreads, "nThreads");

        if (executor == null) {
            executor = new ThreadPerTaskExecutor(newDefaultThreadFactory());
        }
				// 创建了一个
        children = new EventExecutor[nThreads];

        for (int i = 0; i < nThreads; i ++) {
            boolean success = false;
            try {
		            // 重点看这里,给children数组赋值!!!
                children[i] = newChild(executor, args);
                success = true;
            } catch (Exception e) {
                // TODO: Think about if this is a good exception type
                throw new IllegalStateException("failed to create a child event loop", e);
            } finally {
                if (!success) {
                    for (int j = 0; j < i; j ++) {
                        children[j].shutdownGracefully();
                    }

                    for (int j = 0; j < i; j ++) {
                        EventExecutor e = children[j];
                        try {
                            while (!e.isTerminated()) {
                                e.awaitTermination(Integer.MAX_VALUE, TimeUnit.SECONDS);
                            }
                        } catch (InterruptedException interrupted) {
                            // Let the caller handle the interruption.
                            Thread.currentThread().interrupt();
                            break;
                        }
                    }
                }
            }
        }
				// 通过工厂创建chooser
        chooser = chooserFactory.newChooser(children);
        // 。。。。。。。。。
    }
重点看一下给children数组赋值的这行代码:
children[i] = newChild(executor, args);
这个newChild方法:
protected abstract EventExecutor newChild(Executor executor, Object... args) throws Exception;
我们在main函数中创建的是NioEventLoopGroup,而它重写了父类MultithreadEventExecutorGroup的newChild方法,所以这里调用的是NioEventLoopGroup的newChild方法:
    @Override
    protected EventLoop newChild(Executor executor, Object... args) throws Exception {
        SelectorProvider selectorProvider = (SelectorProvider) args[0];
        SelectStrategyFactory selectStrategyFactory = (SelectStrategyFactory) args[1];
        RejectedExecutionHandler rejectedExecutionHandler = (RejectedExecutionHandler) args[2];
        EventLoopTaskQueueFactory taskQueueFactory = null;
        EventLoopTaskQueueFactory tailTaskQueueFactory = null;

        int argsLength = args.length;
        if (argsLength > 3) {
            taskQueueFactory = (EventLoopTaskQueueFactory) args[3];
        }
        if (argsLength > 4) {
            tailTaskQueueFactory = (EventLoopTaskQueueFactory) args[4];
        }
        return new NioEventLoop(this, executor, selectorProvider,
                selectStrategyFactory.newSelectStrategy(),
                rejectedExecutionHandler, taskQueueFactory, tailTaskQueueFactory);
    }
我们可以看到最后返回的是NioEventLoop,所以这里最终调用的是NioEventLoop的register(channel)方法(long long的多态),而register(channel)又是在NioEventLoop的父类SingleThreadEventLoop中。
    @Override
    public ChannelFuture register(Channel channel) {
        return register(new DefaultChannelPromise(channel, this));
    }
		// 继续向下调用的register方法:
		@Override
    public ChannelFuture register(final ChannelPromise promise) {
        ObjectUtil.checkNotNull(promise, "promise");
        promise.channel().unsafe().register(this, promise);
        return promise;
    }
这里先创建了一个promise,然后将channel和eventLoop赋值进去,后面从promise中拿出channel获取到channel中的unsafe实例(NioSocketChannelUnsafe),调用它的register方法(将eventLoop和promise注册):
        @Override
        public final void register(EventLoop eventLoop, final ChannelPromise promise) {
            ObjectUtil.checkNotNull(eventLoop, "eventLoop");
            if (isRegistered()) {
                promise.setFailure(new IllegalStateException("registered to an event loop already"));
                return;
            }
            if (!isCompatible(eventLoop)) {
                promise.setFailure(
                        new IllegalStateException("incompatible event loop type: " + eventLoop.getClass().getName()));
                return;
            }

            AbstractChannel.this.eventLoop = eventLoop;

            if (eventLoop.inEventLoop()) {
                register0(promise);
            } else {
                try {
                    eventLoop.execute(new Runnable() {
                        @Override
                        public void run() {
                            register0(promise);
                        }
                    });
                } catch (Throwable t) {
                    logger.warn(
                            "Force-closing a channel whose registration task was not accepted by an event loop: {}",
                            AbstractChannel.this, t);
                    closeForcibly();
                    closeFuture.setClosed();
                    safeSetFailure(promise, t);
                }
            }
        }
对于我们前面过来的 register 操作,其实提交到 eventLoop 以后,就直接返回 promise 实例了,剩下的 register0 是异步操作,它由 NioEventLoop 实例来完成。
继续看一下register0方法:
        private void register0(ChannelPromise promise) {
            try {
                // check if the channel is still open as it could be closed in the mean time when the register
                // call was outside of the eventLoop
                if (!promise.setUncancellable() || !ensureOpen(promise)) {
                    return;
                }
                boolean firstRegistration = neverRegistered;
                doRegister();
                neverRegistered = false;
                registered = true;

                // Ensure we call handlerAdded(...) before we actually notify the promise. This is needed as the
                // user may already fire events through the pipeline in the ChannelFutureListener.
                pipeline.invokeHandlerAddedIfNeeded();

                safeSetSuccess(promise);
                pipeline.fireChannelRegistered();
                // Only fire a channelActive if the channel has never been registered. This prevents firing
                // multiple channel actives if the channel is deregistered and re-registered.
                if (isActive()) {
                    if (firstRegistration) {
                        pipeline.fireChannelActive();
                    } else if (config().isAutoRead()) {
                        // This channel was registered before and autoRead() is set. This means we need to begin read
                        // again so that we process inbound data.
                        //
                        // See https://github.com/netty/netty/issues/4805
                        beginRead();
                    }
                }
            } catch (Throwable t) {
                // Close the channel directly to avoid FD leak.
                closeForcibly();
                closeFuture.setClosed();
                safeSetFailure(promise, t);
            }
        }
doRegister();方法:
    @Override
    protected void doRegister() throws Exception {
        boolean selected = false;
        for (;;) {
            try {
                selectionKey = javaChannel().register(eventLoop().unwrappedSelector(), 0, this);
                return;
            } catch (CancelledKeyException e) {
               //.....
            }
        }
    }
我们可以看到,这里做了 JDK 底层的 register 操作,将 SocketChannel(或 ServerSocketChannel) 注册到 Selector 中,并且可以看到,这里的监听集合设置为了 0,也就是什么都不监听。肯定在某个地方进行了修改否则什么也做不了。
执行到这里:
pipeline.invokeHandlerAddedIfNeeded();
到这里也就意味着就算是 registered (registered = true)了,这里会将 ChannelInitializer 内部添加的 handlers 添加到 pipeline 中。一路点下去会发现这里最终调用的是ChannelInitializer 的handlerAdded方法:
    @Override
    public void handlerAdded(ChannelHandlerContext ctx) throws Exception {
        if (ctx.channel().isRegistered()) {
            // This should always be true with our current DefaultChannelPipeline implementation.
            // The good thing about calling initChannel(...) in handlerAdded(...) is that there will be no ordering
            // surprises if a ChannelInitializer will add another ChannelInitializer. This is as all handlers
            // will be added in the expected order.
            if (initChannel(ctx)) {

                // We are done with init the Channel, removing the initializer now.
                removeState(ctx);
            }
        }
    }
这里会调用initChannel方法也就是main函数中:
                    .handler(new ChannelInitializer<SocketChannel>() {
                        @Override
                        protected void initChannel(SocketChannel socketChannel) throws Exception {
                            ChannelPipeline cp = socketChannel.pipeline();
                            cp.addLast(new LoggingHandler(LogLevel.INFO));
                        }
                    });
我们这里的initChannel方法,这里会将ChannelInitializer中的hander加入到pipeline中。
    private boolean initChannel(ChannelHandlerContext ctx) throws Exception {
        if (initMap.add(ctx)) { // Guard against re-entrance.
            try {
		            // 自定义的initChannel方法
                initChannel((C) ctx.channel());
            } catch (Throwable cause) {

                exceptionCaught(ctx, cause);
            } finally {
		            // 将ChannelInitializer从pipeline中删除。
                if (!ctx.isRemoved()) {
                    ctx.pipeline().remove(this);
                }
            }
            return true;
        }
        return false;
    }
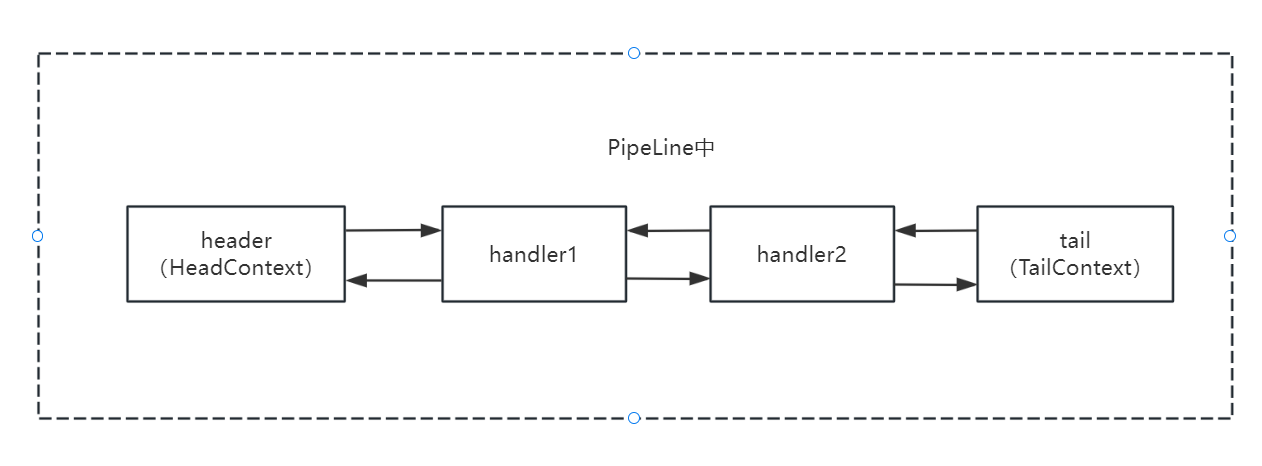
我们前面也说过,ChannelInitializer 的 initChannel(channel) 被执行以后,那么其内部添加的 handlers 会进入到 pipeline 中,然后上面的 finally 块中将 ChannelInitializer 的实例从 pipeline 中删除,那么此时 pipeline 就算建立起来了,此时的pipeline:
我们继续向下看:
pipeline.fireChannelRegistered();
这里是pipeline中事件传播的重要地方。fireXXX,
    @Override
    public final ChannelPipeline fireChannelRegistered() {
        AbstractChannelHandlerContext.invokeChannelRegistered(head);
        return this;
    }
从header开始向后执行,继续看invokeChannelRegistered的代码:
    static void invokeChannelRegistered(final AbstractChannelHandlerContext next) {
        EventExecutor executor = next.executor();
        if (executor.inEventLoop()) {
            next.invokeChannelRegistered();
        } else {
            executor.execute(new Runnable() {
                @Override
                public void run() {
                    next.invokeChannelRegistered();
                }
            });
        }
    }
继续看调用的invokeChannelRegistered方法:
    private void invokeChannelRegistered() {
        if (invokeHandler()) {
            try {
                ((ChannelInboundHandler) handler()).channelRegistered(this);
            } catch (Throwable t) {
                invokeExceptionCaught(t);
            }
        } else {
            fireChannelRegistered();
        }
    }
这里调用了hander方法,那这里是获取的哪里的hander呢?这里的参数head是AbstractChannelHandlerContext类,它是DefaultChannelPipeline的一个内部类,pipeLine在一开始NioSocketChannel在初始化的过程中通过newChannelPipeline 进行了实例化,最终调用的是DefaultChannelPipeline的构造方法:
    protected DefaultChannelPipeline(Channel channel) {
        this.channel = ObjectUtil.checkNotNull(channel, "channel");
        succeededFuture = new SucceededChannelFuture(channel, null);
        voidPromise =  new VoidChannelPromise(channel, true);

        tail = new TailContext(this);
        head = new HeadContext(this);

        head.next = tail;
        tail.prev = head;
    }
这里初始化的是TailContext和HeadContext是AbstractChannelHandlerContext的子类,他又对用的hander方法那么handler方法肯定是获取pipeline中加入的hander,那么pipeline是怎么把hander加入进去的呢?看一下addLast(hander)方法:
 @Override
    public final ChannelPipeline addLast(EventExecutorGroup group, String name, ChannelHandler handler) {
        final AbstractChannelHandlerContext newCtx;
        synchronized (this) {
            checkMultiplicity(handler);
						// 这行代码
            newCtx = newContext(group, filterName(name, handler), handler);

            addLast0(newCtx);

            // If the registered is false it means that the channel was not registered on an eventLoop yet.
            // In this case we add the context to the pipeline and add a task that will call
            // ChannelHandler.handlerAdded(...) once the channel is registered.
            if (!registered) {
                newCtx.setAddPending();
                callHandlerCallbackLater(newCtx, true);
                return this;
            }

            EventExecutor executor = newCtx.executor();
            if (!executor.inEventLoop()) {
                callHandlerAddedInEventLoop(newCtx, executor);
                return this;
            }
        }
        callHandlerAdded0(newCtx);
        return this;
    }
    // 对应代码
    private AbstractChannelHandlerContext newContext(EventExecutorGroup group, String name, ChannelHandler handler) {
        return new DefaultChannelHandlerContext(this, childExecutor(group), name, handler);
    }
这里每加入一个hander实际上是添加一个DefaultChannelHandlerContext(hander被context包装)
final class DefaultChannelHandlerContext extends AbstractChannelHandlerContext {

    private final ChannelHandler handler;

    DefaultChannelHandlerContext(
            DefaultChannelPipeline pipeline, EventExecutor executor, String name, ChannelHandler handler) {
        super(pipeline, executor, name, handler.getClass());
        this.handler = handler;
    }

    @Override
    public ChannelHandler handler() {
        return handler;
    }
}
实际上addLast(hander)最后将hander赋值给了context的成员变量,哦哦,所以handler()方法返回的是addLast方法传入的handler,然后这行代码:
((ChannelInboundHandler) handler()).channelRegistered(this);
调用了传入handler的channelRegistered方法。看一下我们传入的LoggingHandler 的channelRegistered方法:
    public void channelRegistered(ChannelHandlerContext ctx) throws Exception {
        if (this.logger.isEnabled(this.internalLevel)) {
            this.logger.log(this.internalLevel, this.format(ctx, "REGISTERED"));
        }

        ctx.fireChannelRegistered();
    }
继续 ctx.fireChannelRegistered();
    @Override
    public ChannelHandlerContext fireChannelRegistered() {
        invokeChannelRegistered(findContextInbound(MASK_CHANNEL_REGISTERED));
        return this;
    }
这里会继续向下找其他的inbound hander,重复上面的过程。
其他fireXXX也是差不多的原理。
OK,到这里register完毕了,回到initRegister方法了,继续后面的代码:
  	if (regFuture.cause() != null) {
            if (channel.isRegistered()) {
                channel.close();
            } else {
                channel.unsafe().closeForcibly();
            }
        }
      return regFuture;
我们要知道,不管是服务端的 NioServerSocketChannel 还是客户端的 NioSocketChannel,在 bind 或 connect 时,都会先进入 initAndRegister 这个方法,所以我们上面说的那些,对于两者都是通用的。
大家要记住,register 操作是非常重要的,要知道这一步大概做了哪些事情,register 操作以后,将进入到 bind 或 connect 操作中。
后续的connect操作也是pipeline的head中,通过unsafe实例,修改selector为connect事件完成的,会从tail开始调用每一个outbound handler的connect方法。可以从doResolveAndConnect0向下点,这里就不把全部代码贴出来了。
    @Override
    public ChannelFuture connect(SocketAddress remoteAddress, ChannelPromise promise) {
		    // 实际调用pipleline的connect方法
        return pipeline.connect(remoteAddress, promise);
    }

    @Override
    public final ChannelFuture connect(SocketAddress remoteAddress, ChannelPromise promise) {
	    // 从tail开始调用
        return tail.connect(remoteAddress, promise);
    }

    @Override
    public ChannelFuture connect(
            final SocketAddress remoteAddress, final SocketAddress localAddress, final ChannelPromise promise) {
        ObjectUtil.checkNotNull(remoteAddress, "remoteAddress");

        if (isNotValidPromise(promise, false)) {
            // cancelled
            return promise;
        }
				// 从tail开始寻找outbound的handler
        final AbstractChannelHandlerContext next = findContextOutbound(MASK_CONNECT);
        EventExecutor executor = next.executor();
        if (executor.inEventLoop()) {
        // 执行每一个outbound hander的connect方法
            next.invokeConnect(remoteAddress, localAddress, promise);
        } else {
            safeExecute(executor, new Runnable() {
                @Override
                public void run() {
                    next.invokeConnect(remoteAddress, localAddress, promise);
                }
            }, promise, null, false);
        }
        return promise;
    }
2. 自问问题
- 怎么知道一个handler是inbound handler还是outbound handler?
- 为什么子类的中要调用父类的fireXXX方法?
- inbound是从pipeline的头部处理还是尾部处理?


 5万+
5万+

 被折叠的 条评论
为什么被折叠?
被折叠的 条评论
为什么被折叠?
 到【灌水乐园】发言


