


目录
3.5 Activity向Fragment传信—— 构造 Fragment 时传递参数 (setArguments/getArguments)
3.6 Fragment向Activity传递信息——通过接口和回调
一、Animation(动画)
1、属性动画
1.1示例——旋转动画
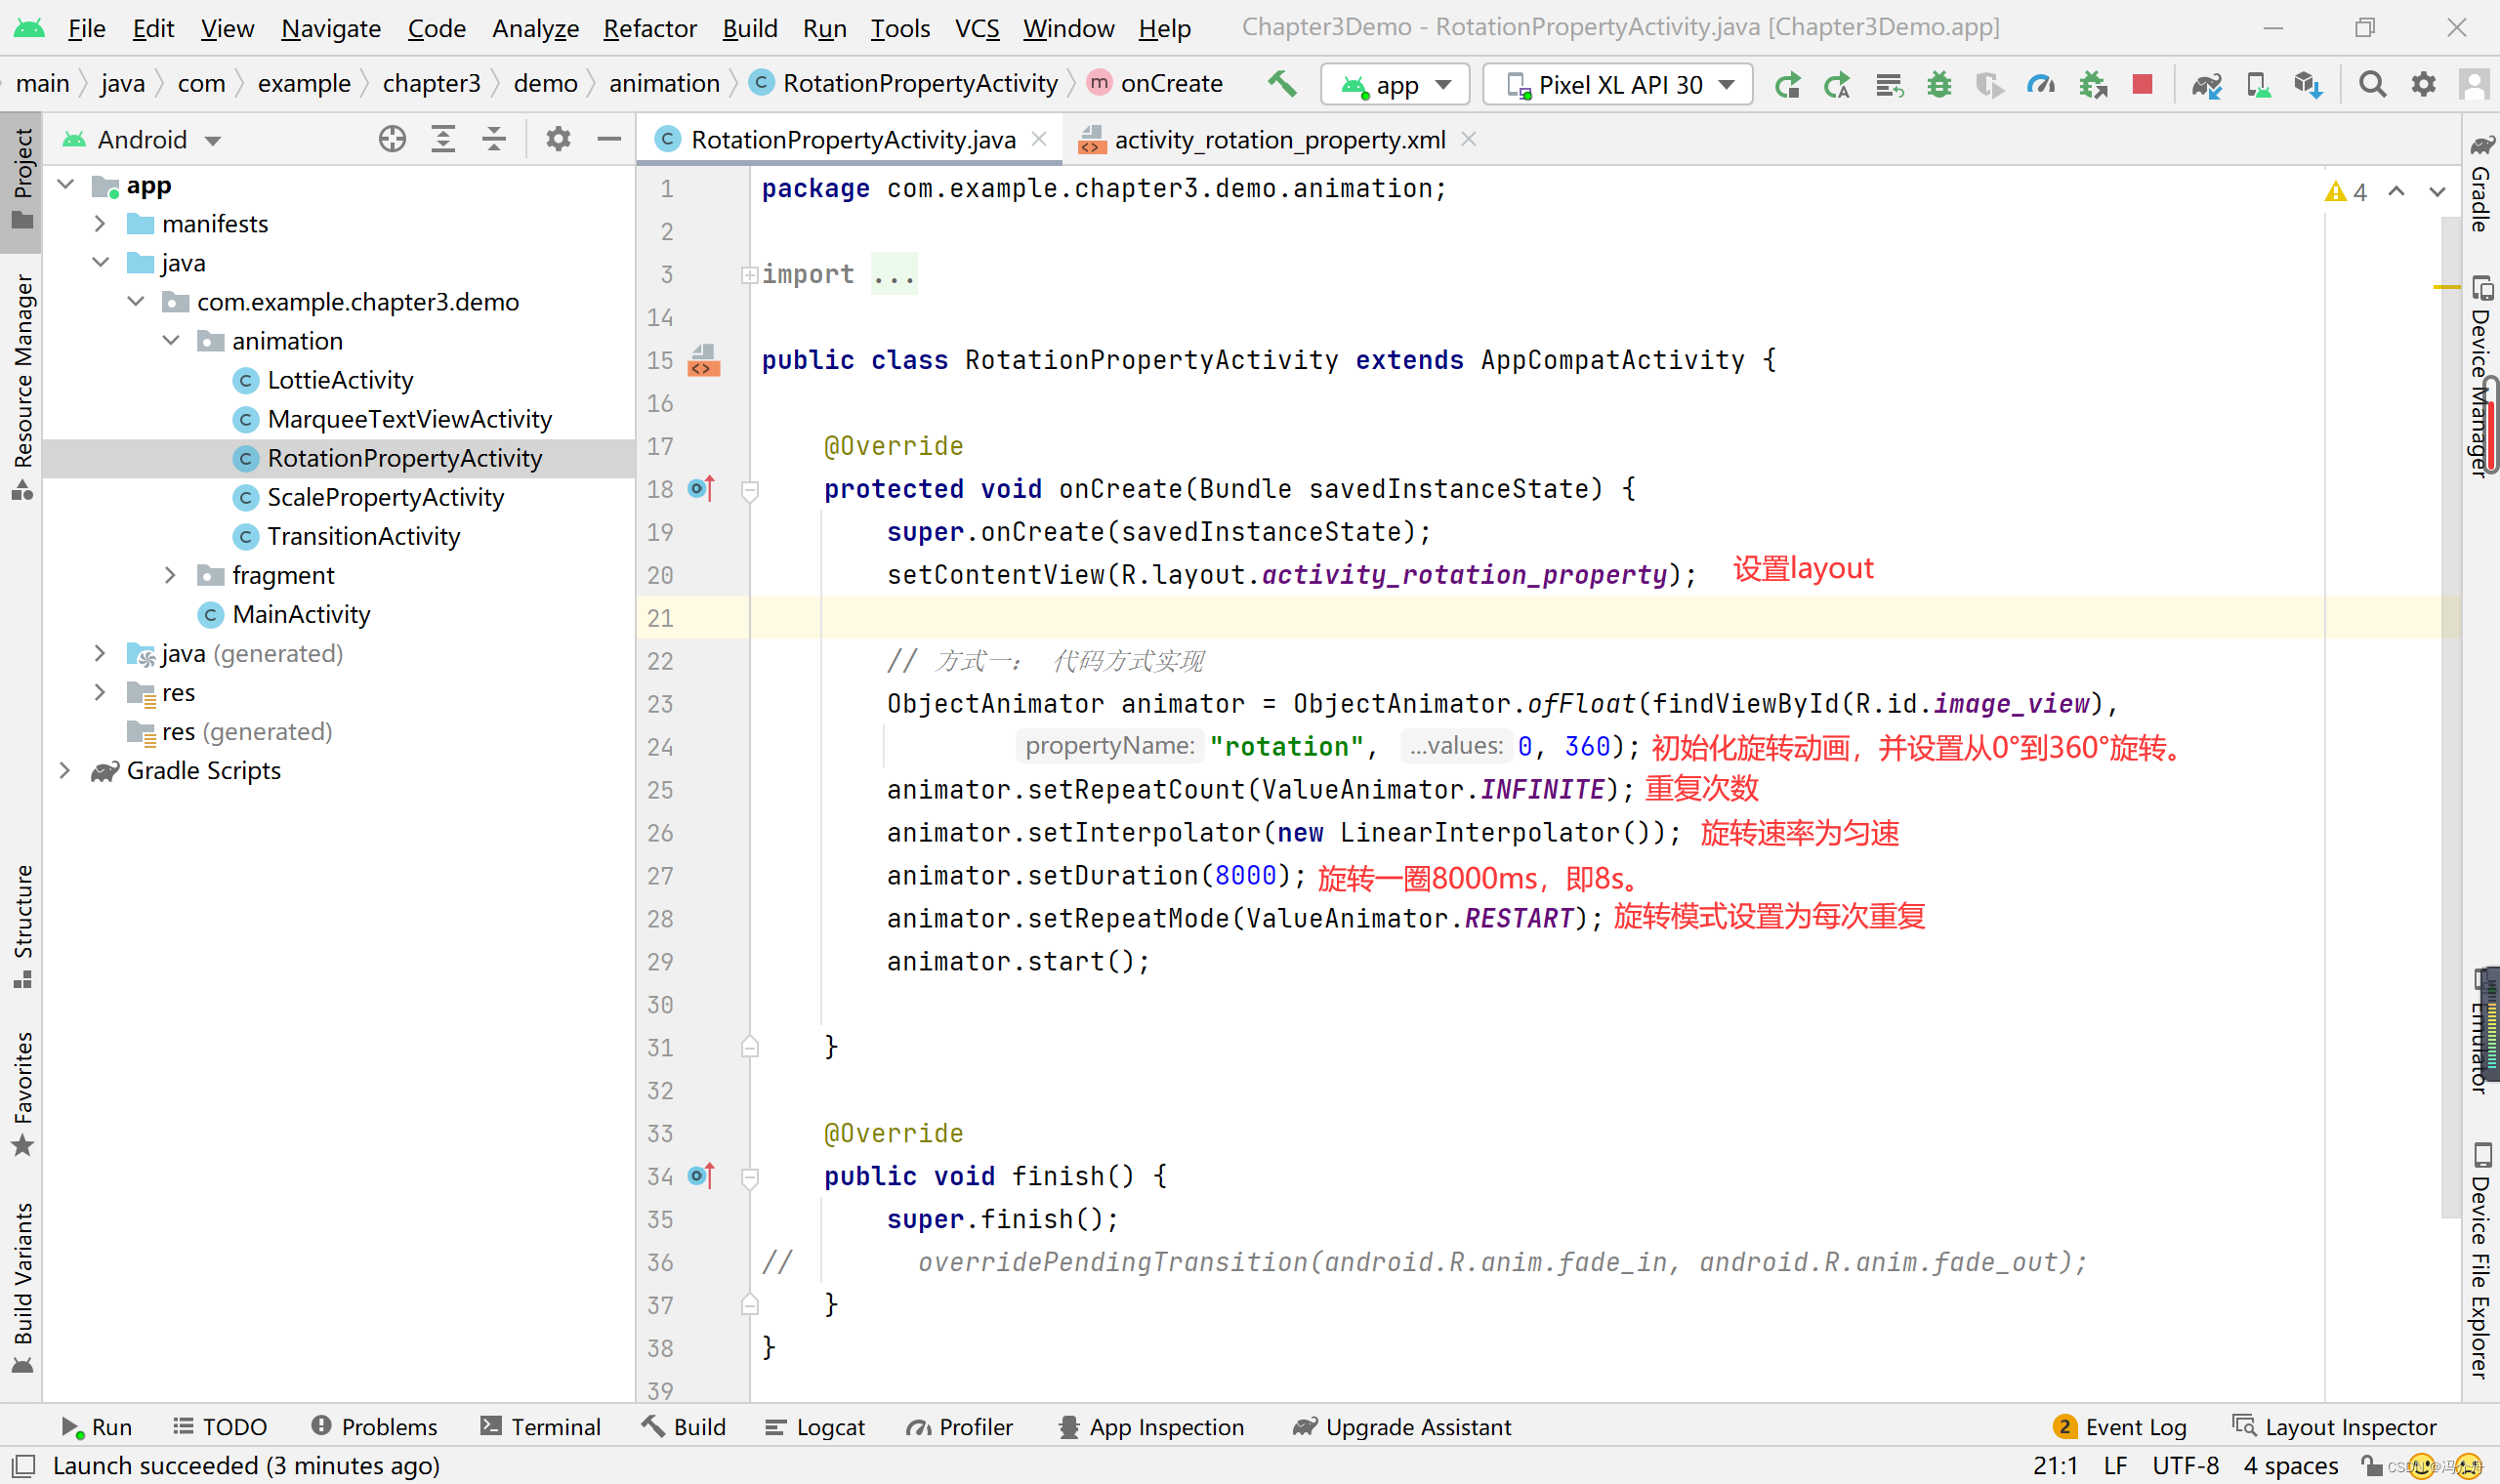
实现方式一:代码
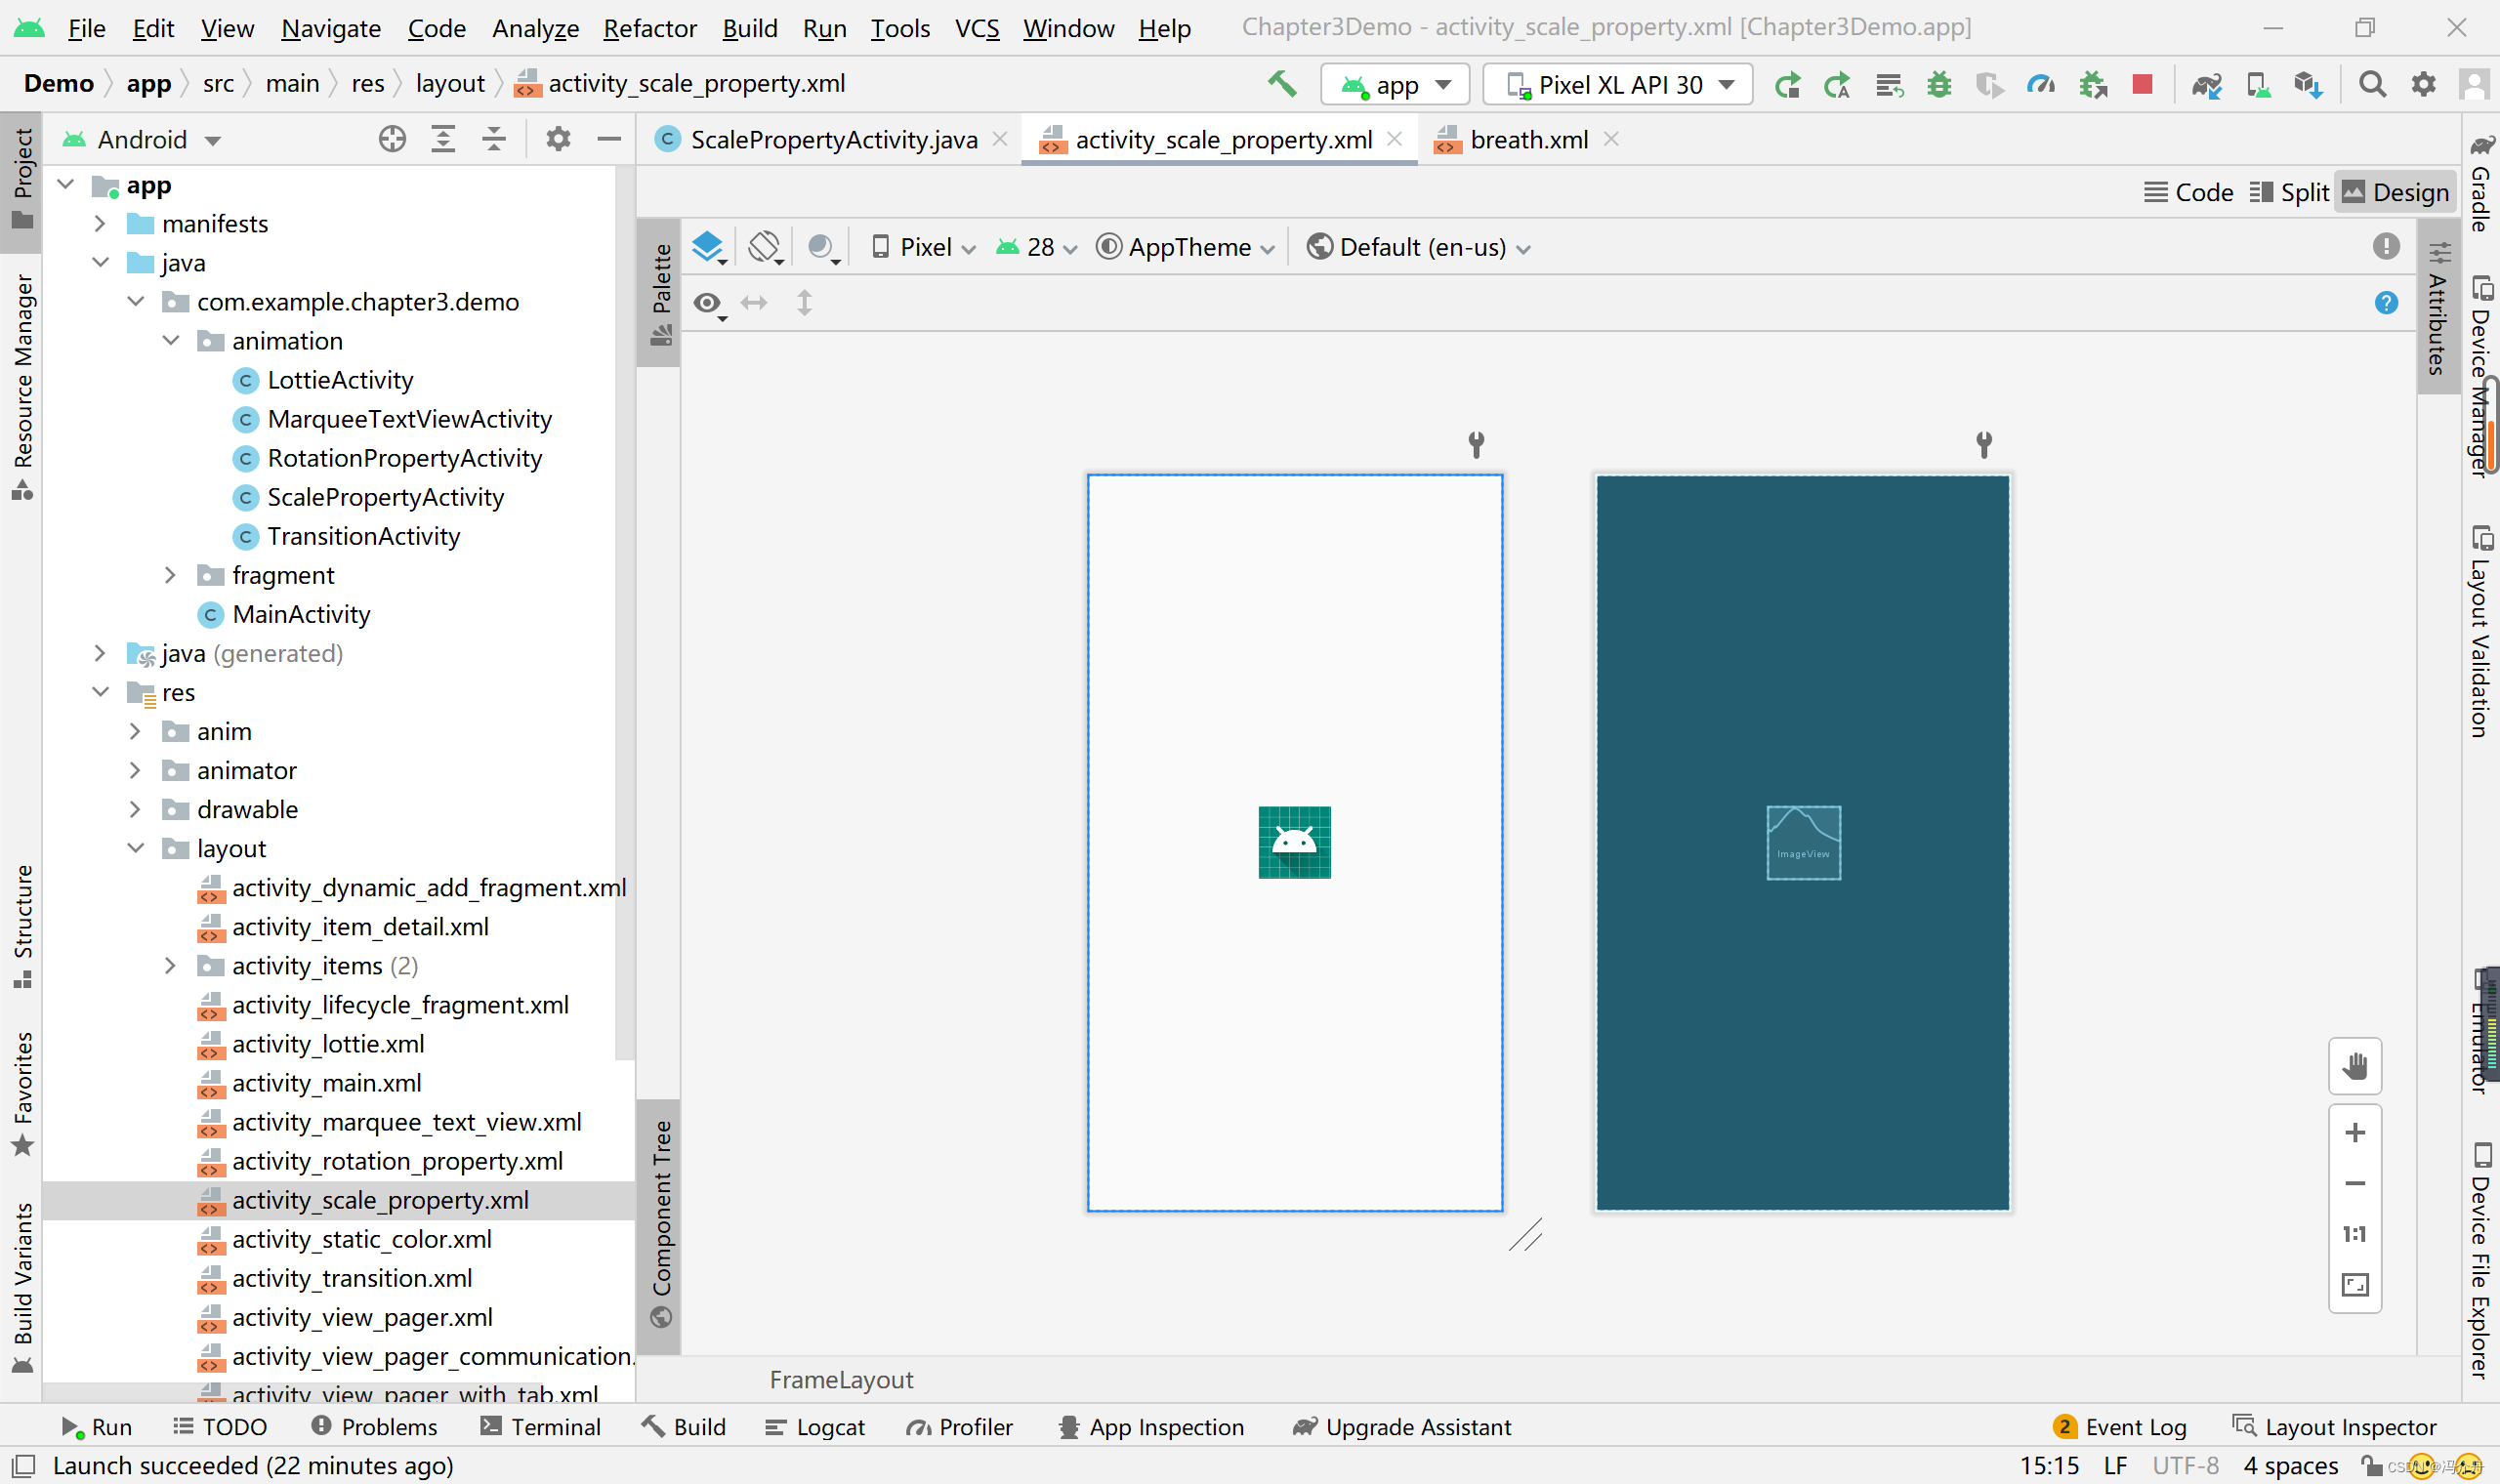
①页面布局
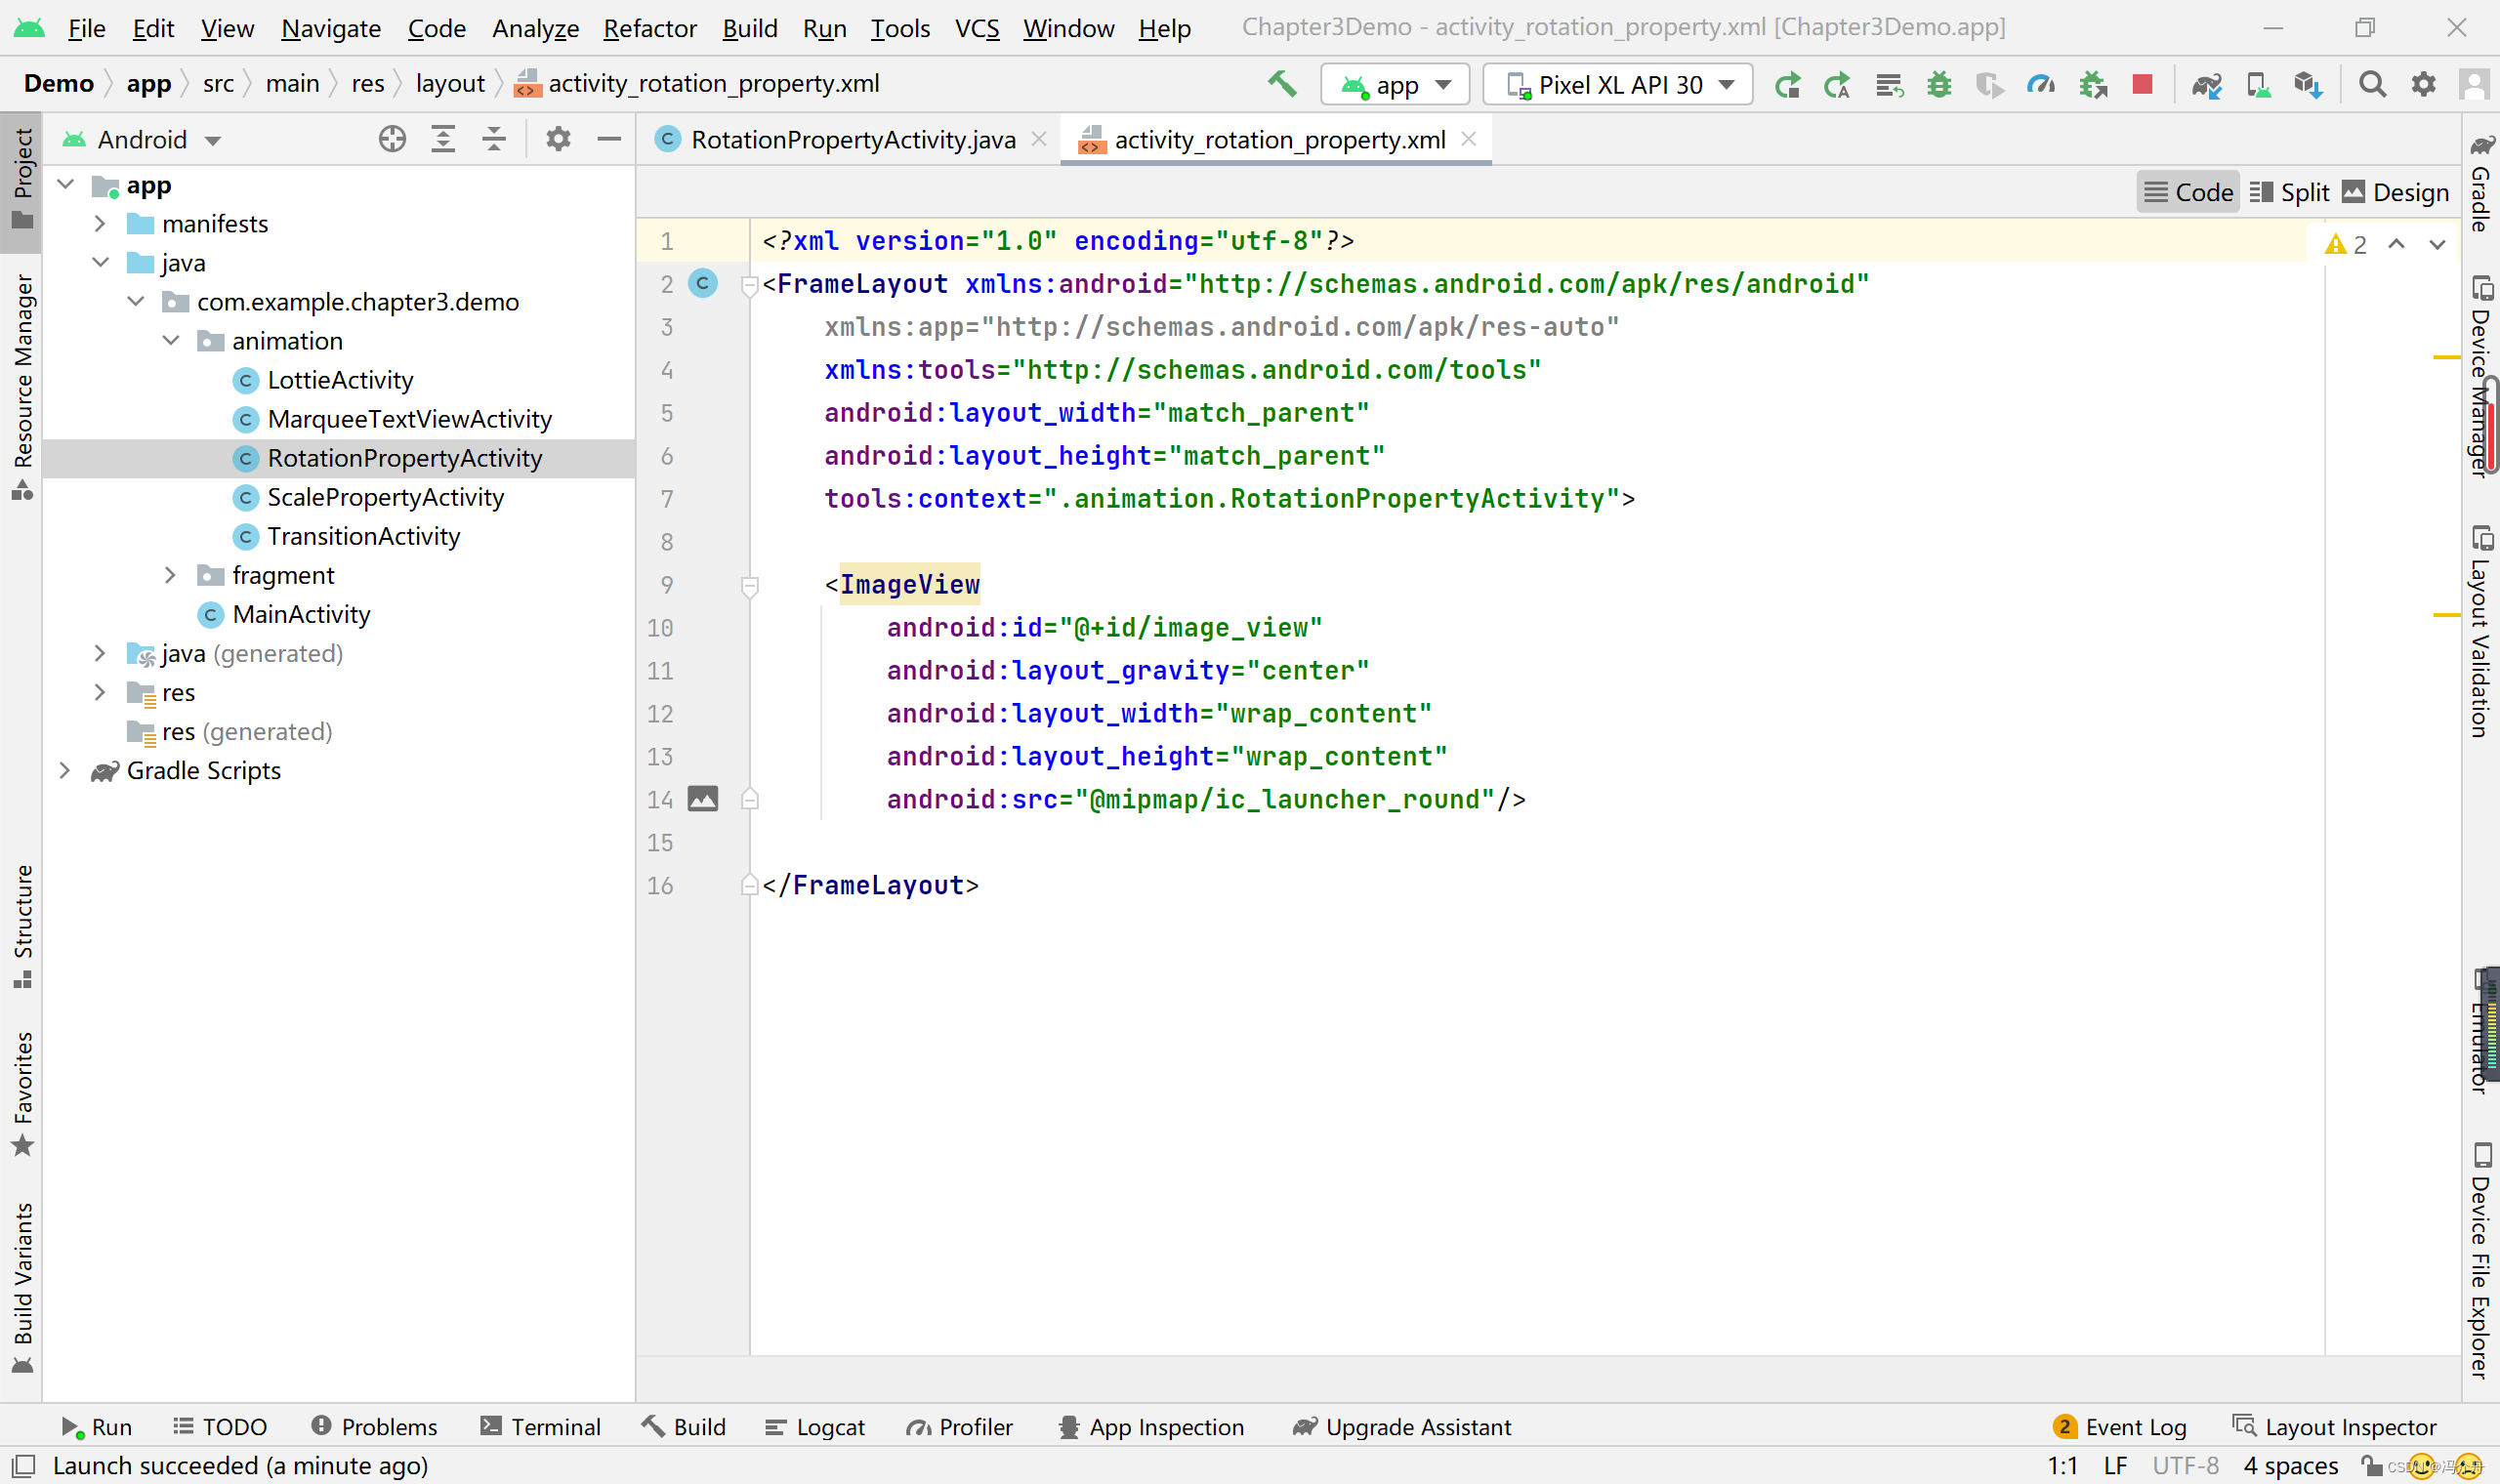
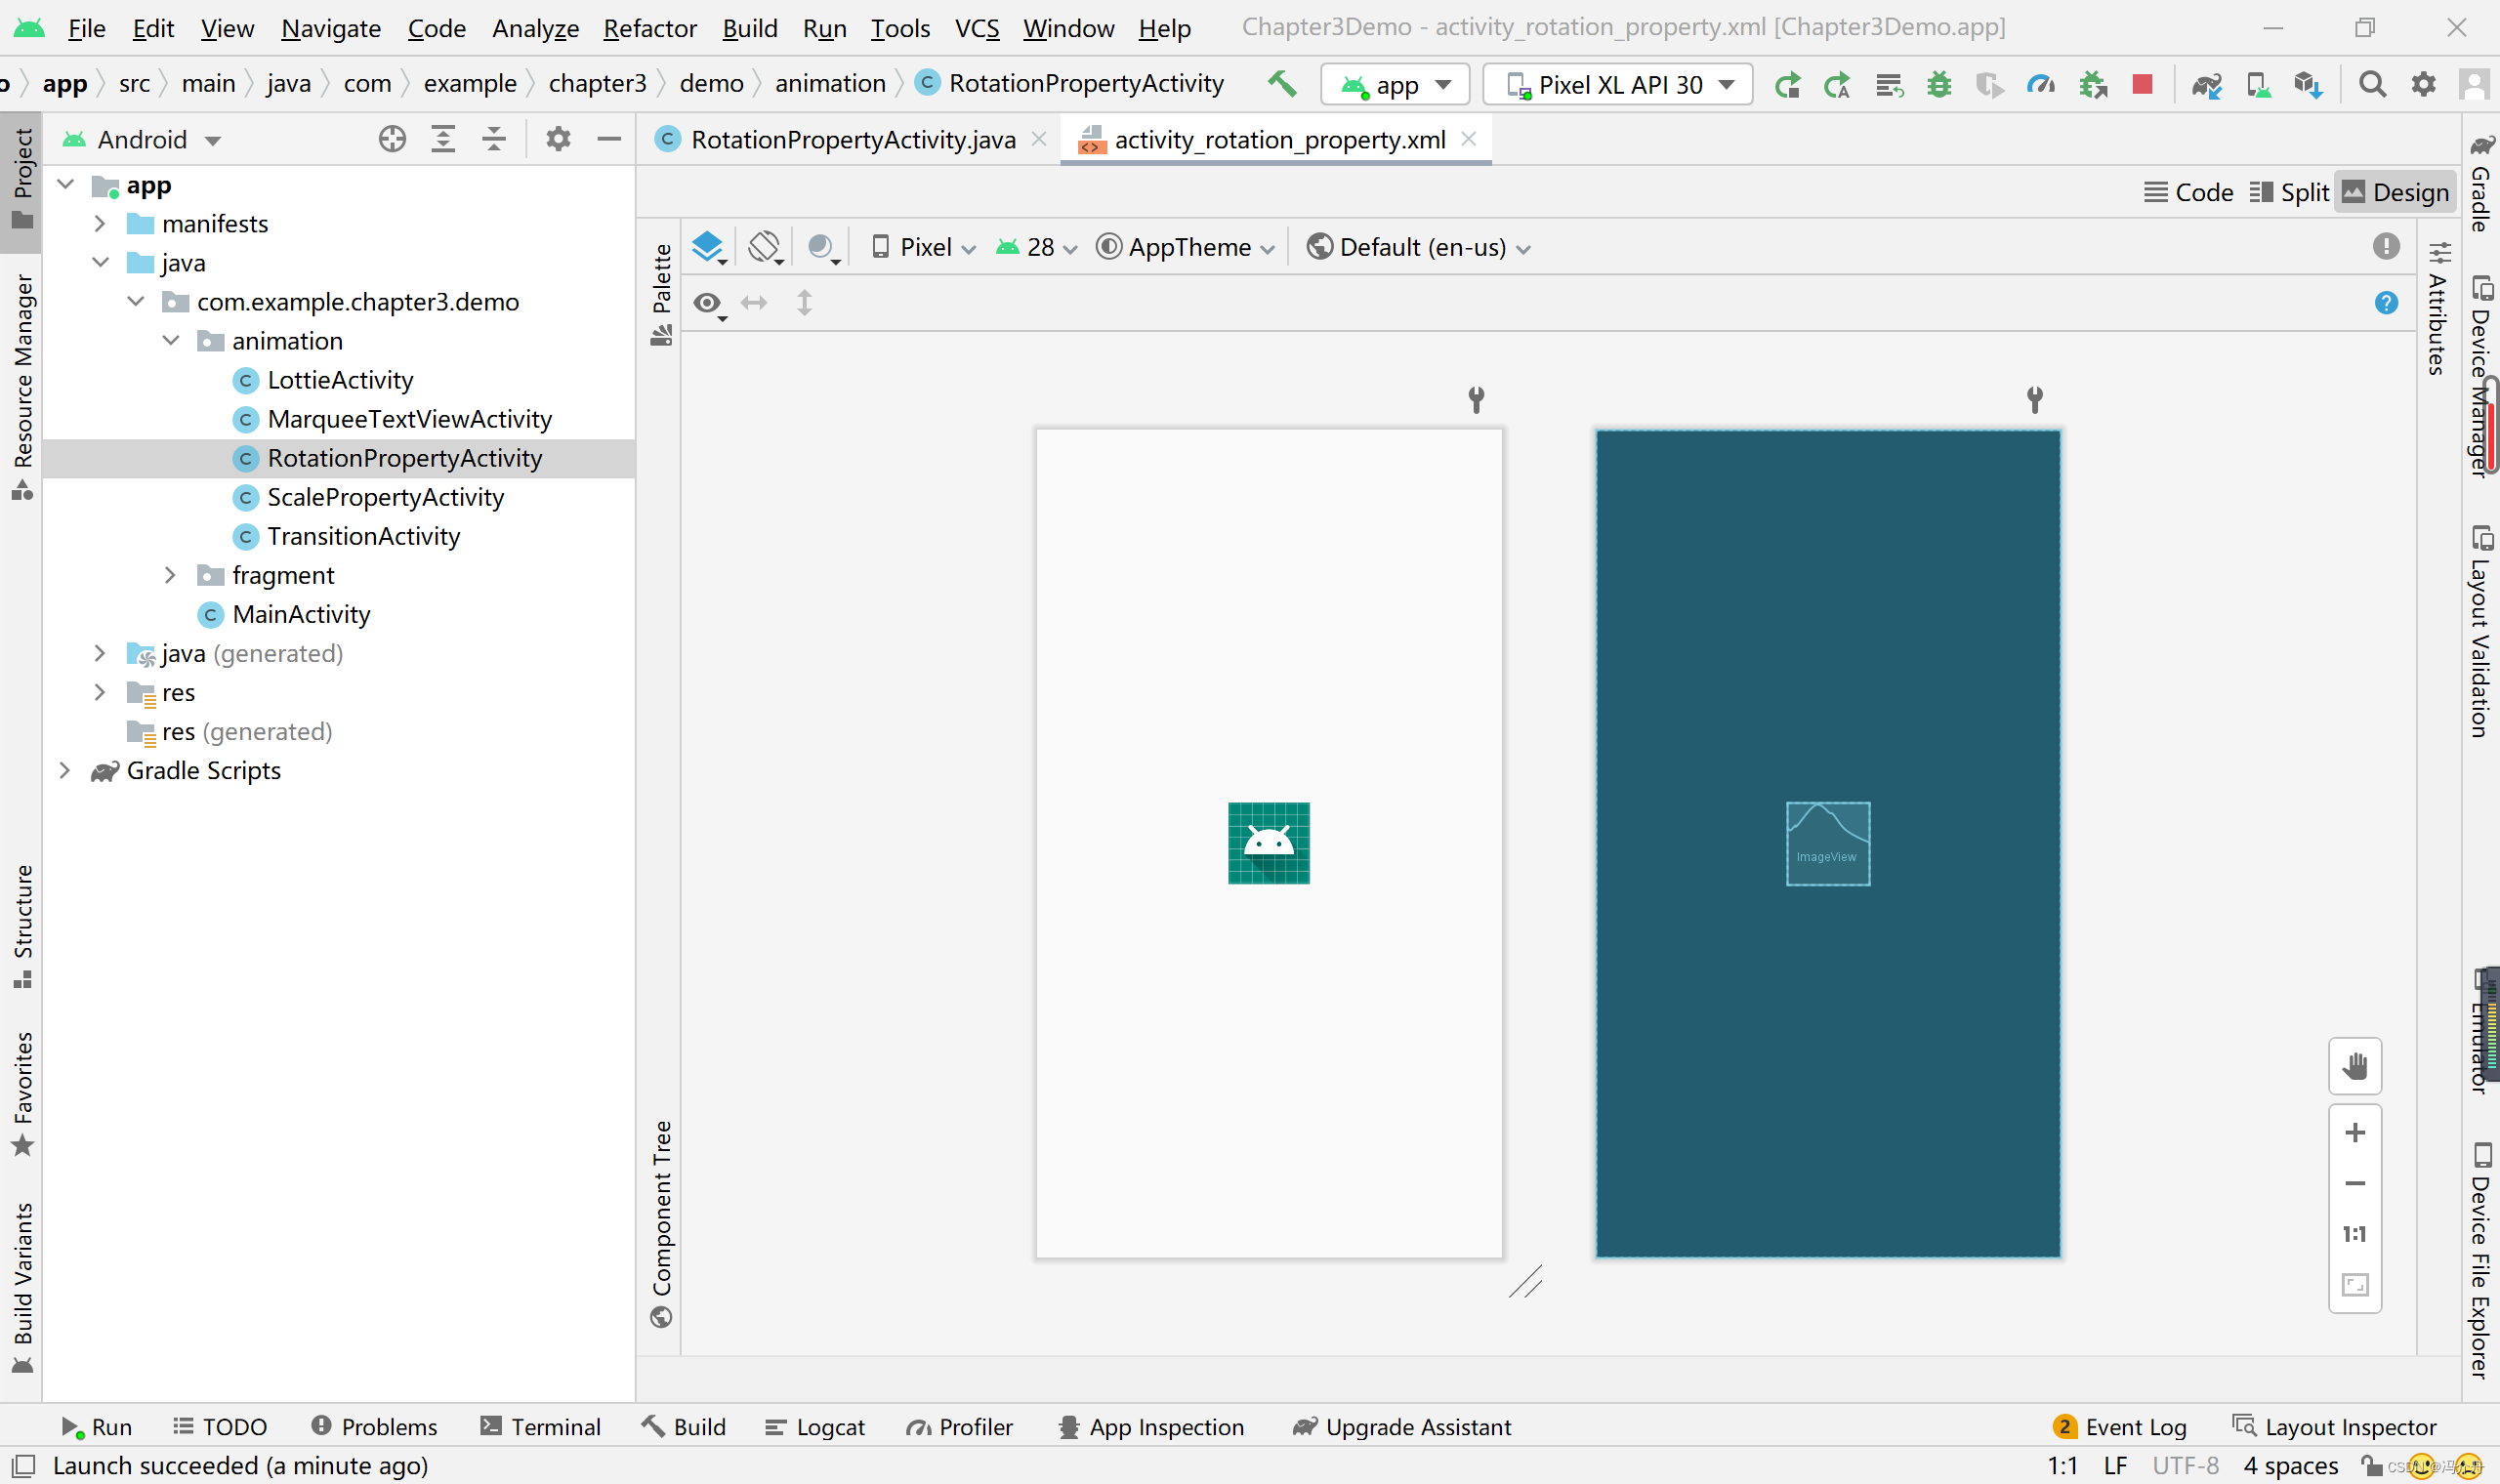
预览:
②动画实现
实现方式一:代码
实现方式二:xml
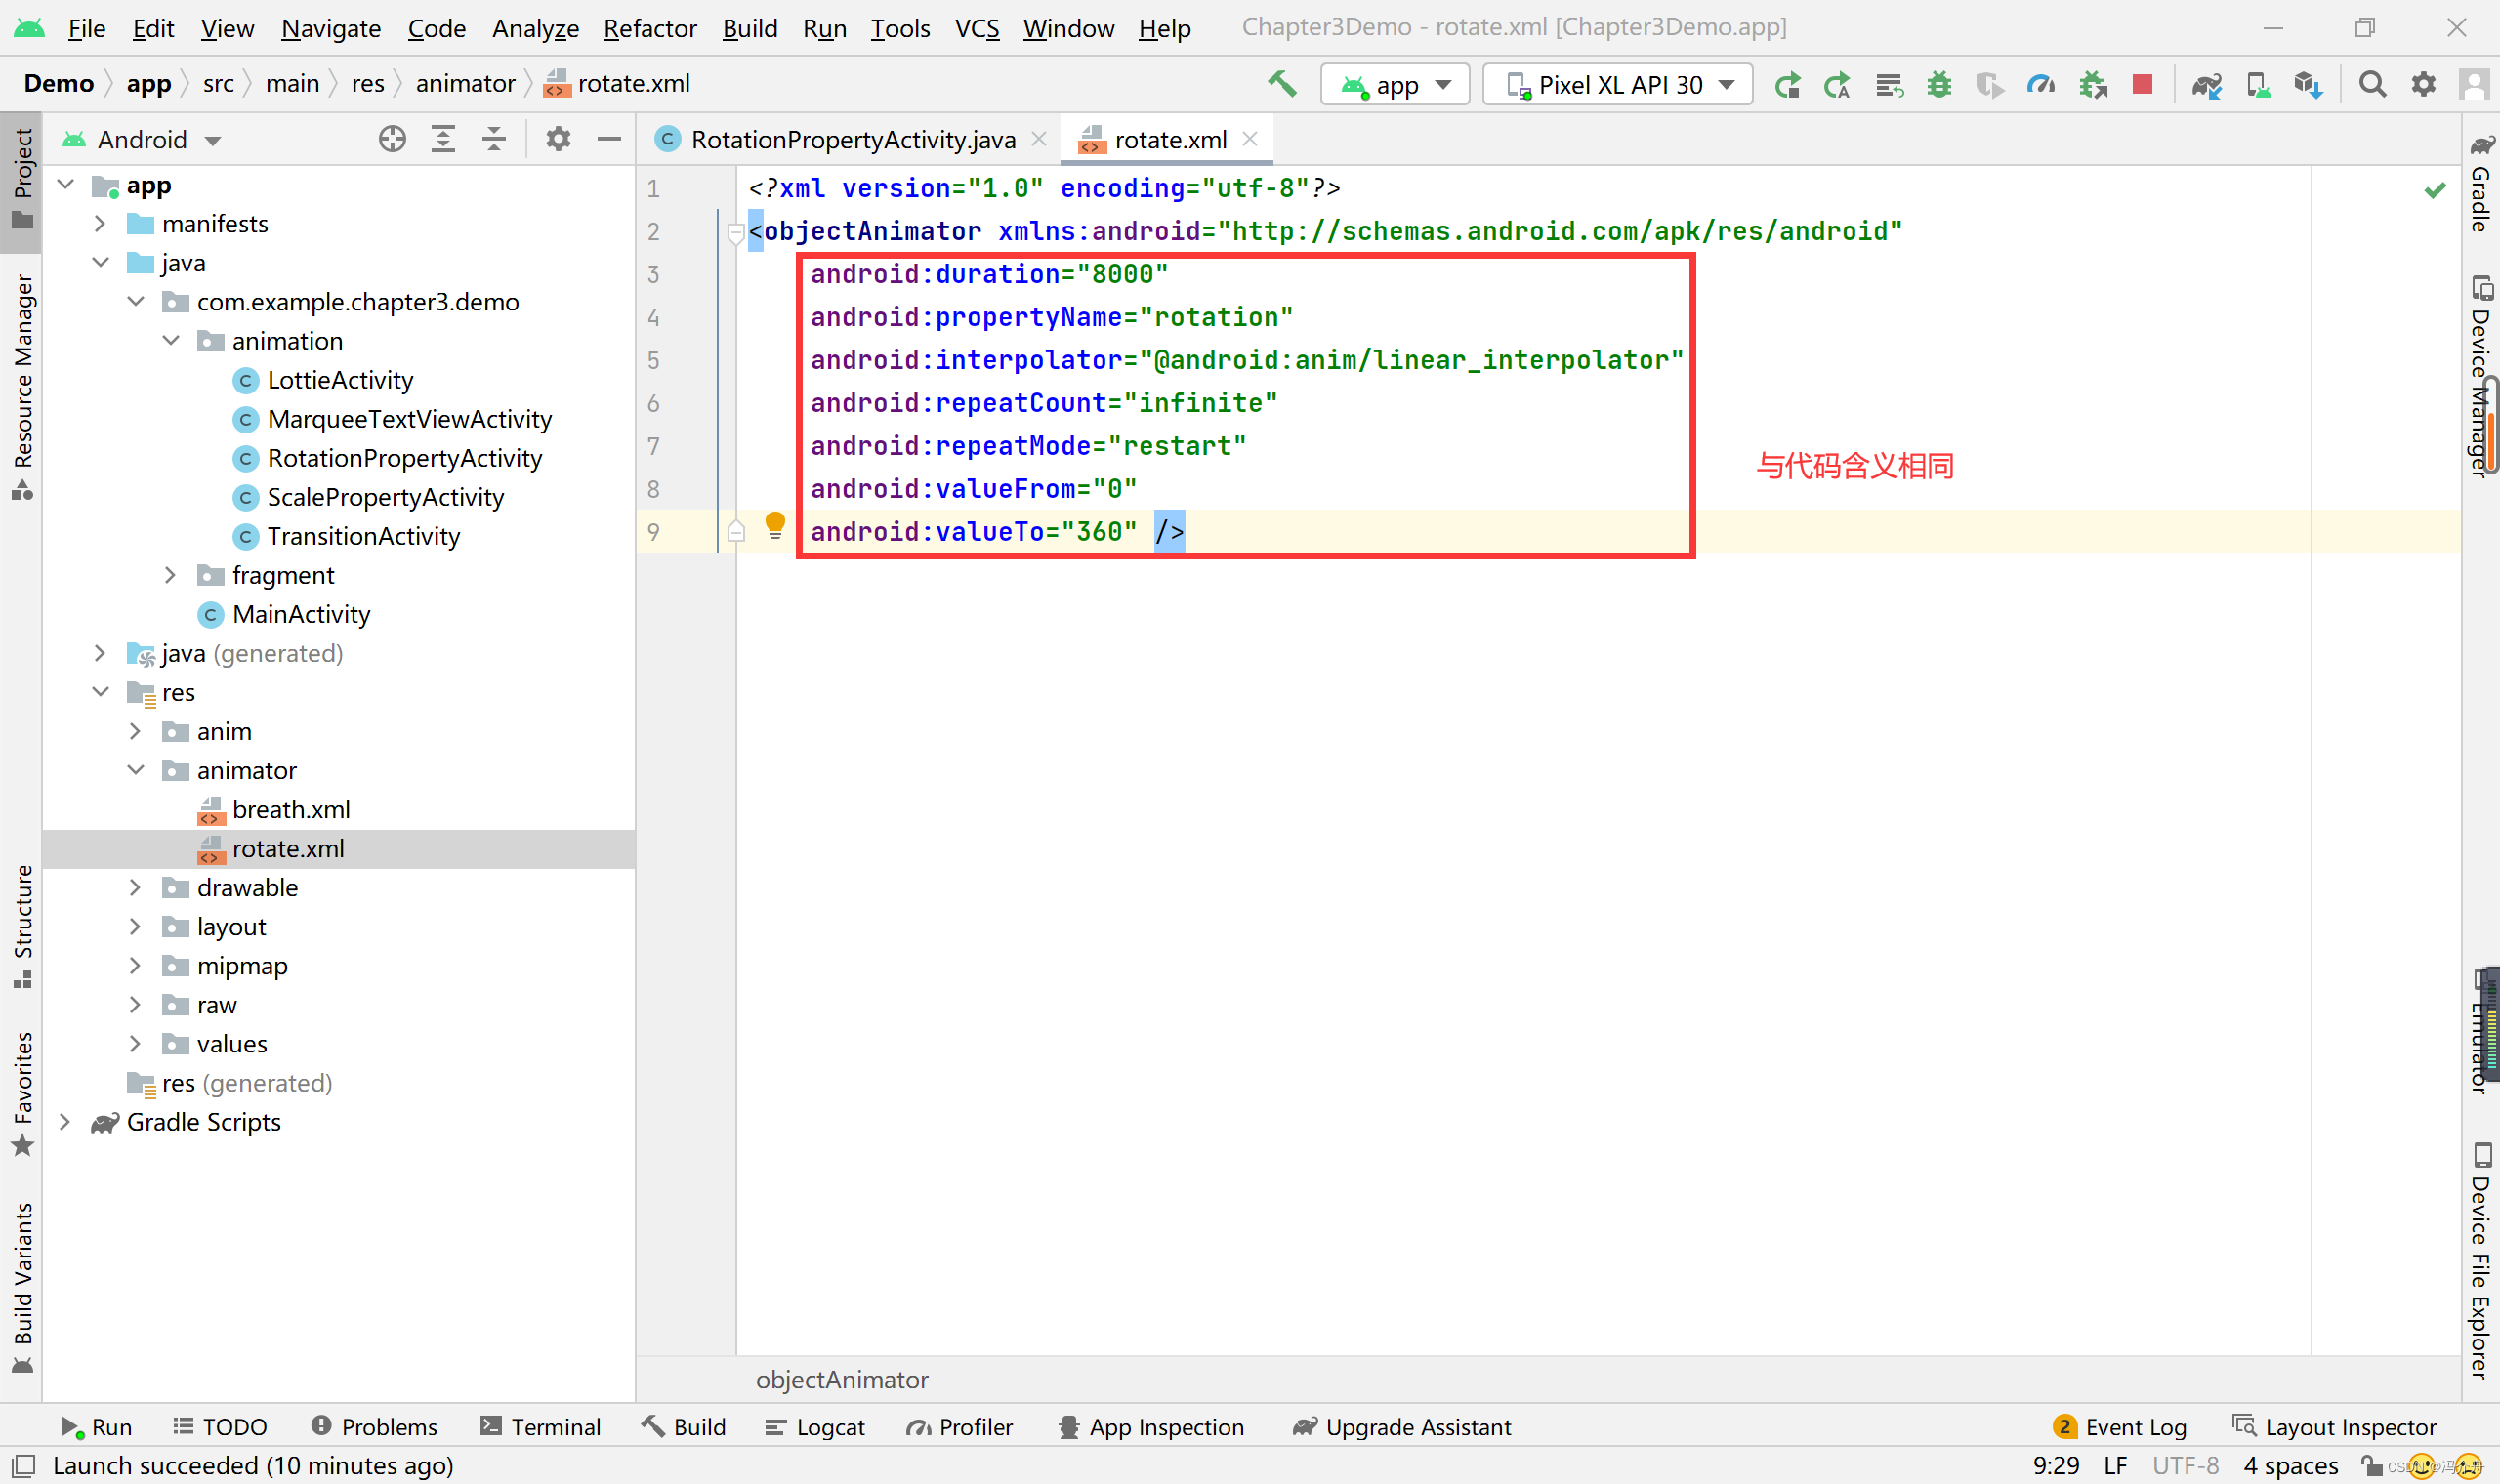

编写好xml后,通过AnimatorInflater的load方法初始化动画。
1.2示例——呼吸动画
①页面布局:

预览:
②动画实现
实现方式一:代码
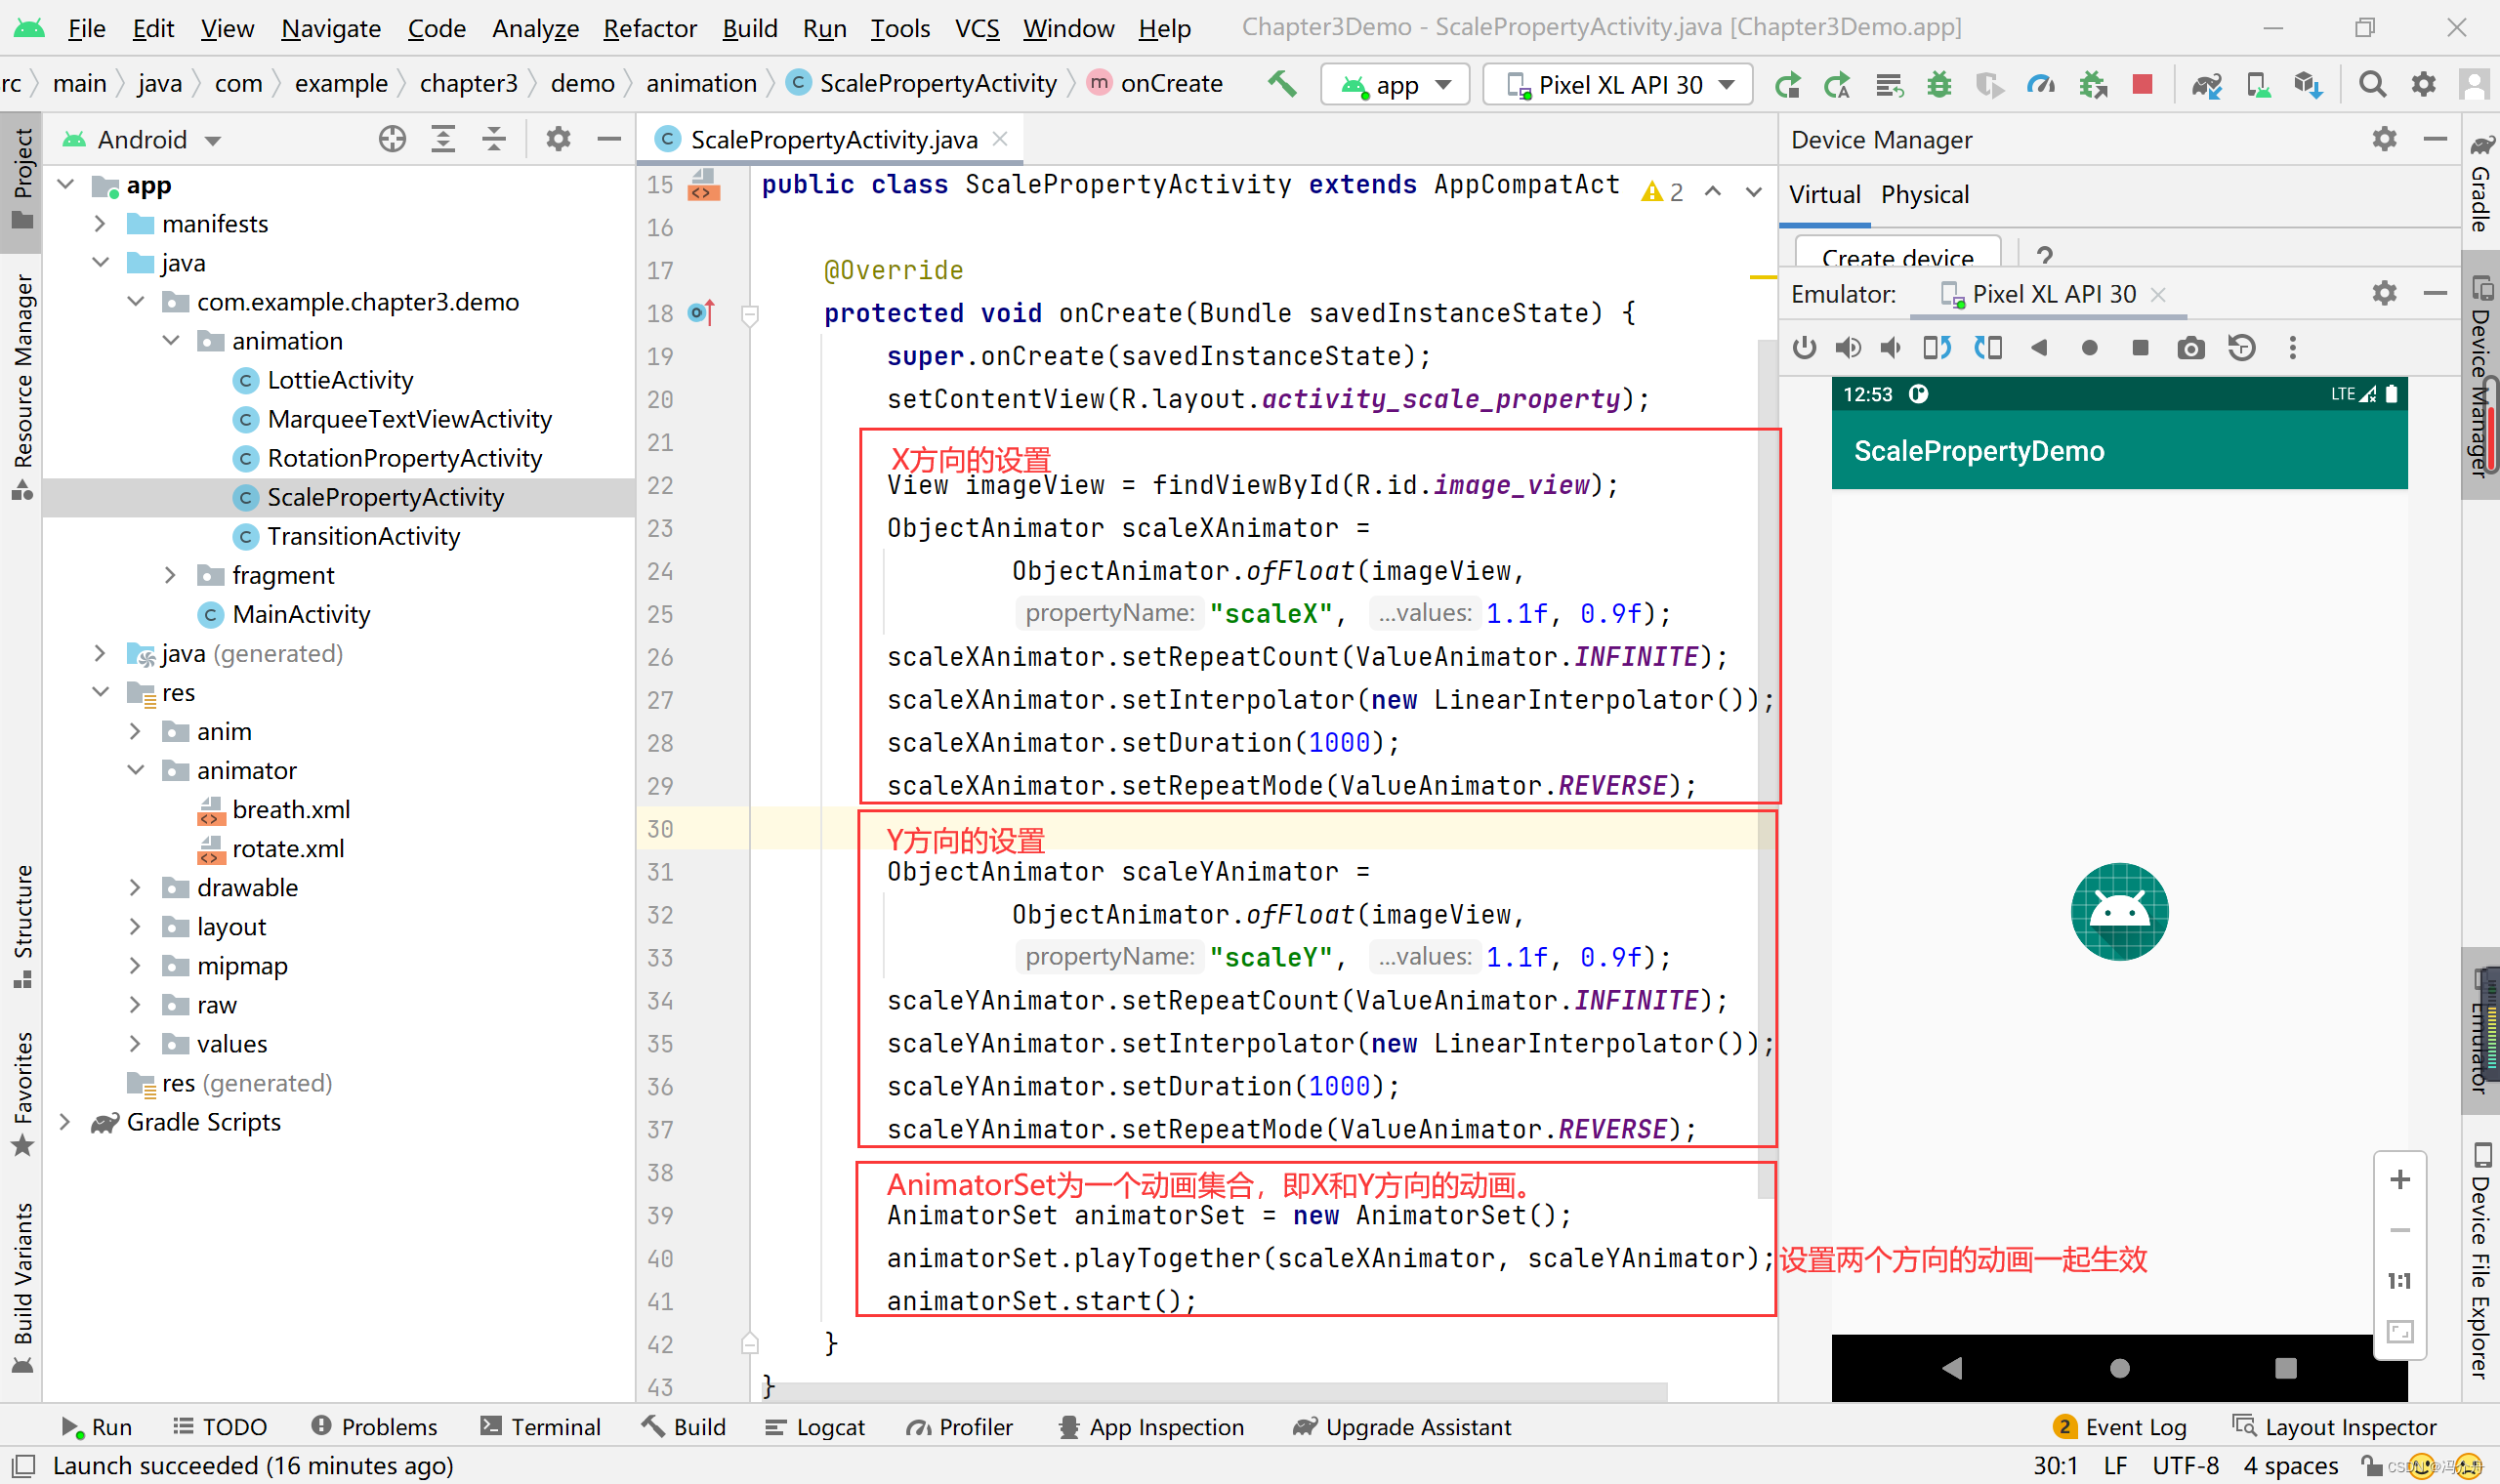
X和Y轴,动画的大小分别从1.1倍到0.9倍循环变化。
实现方式二:xml
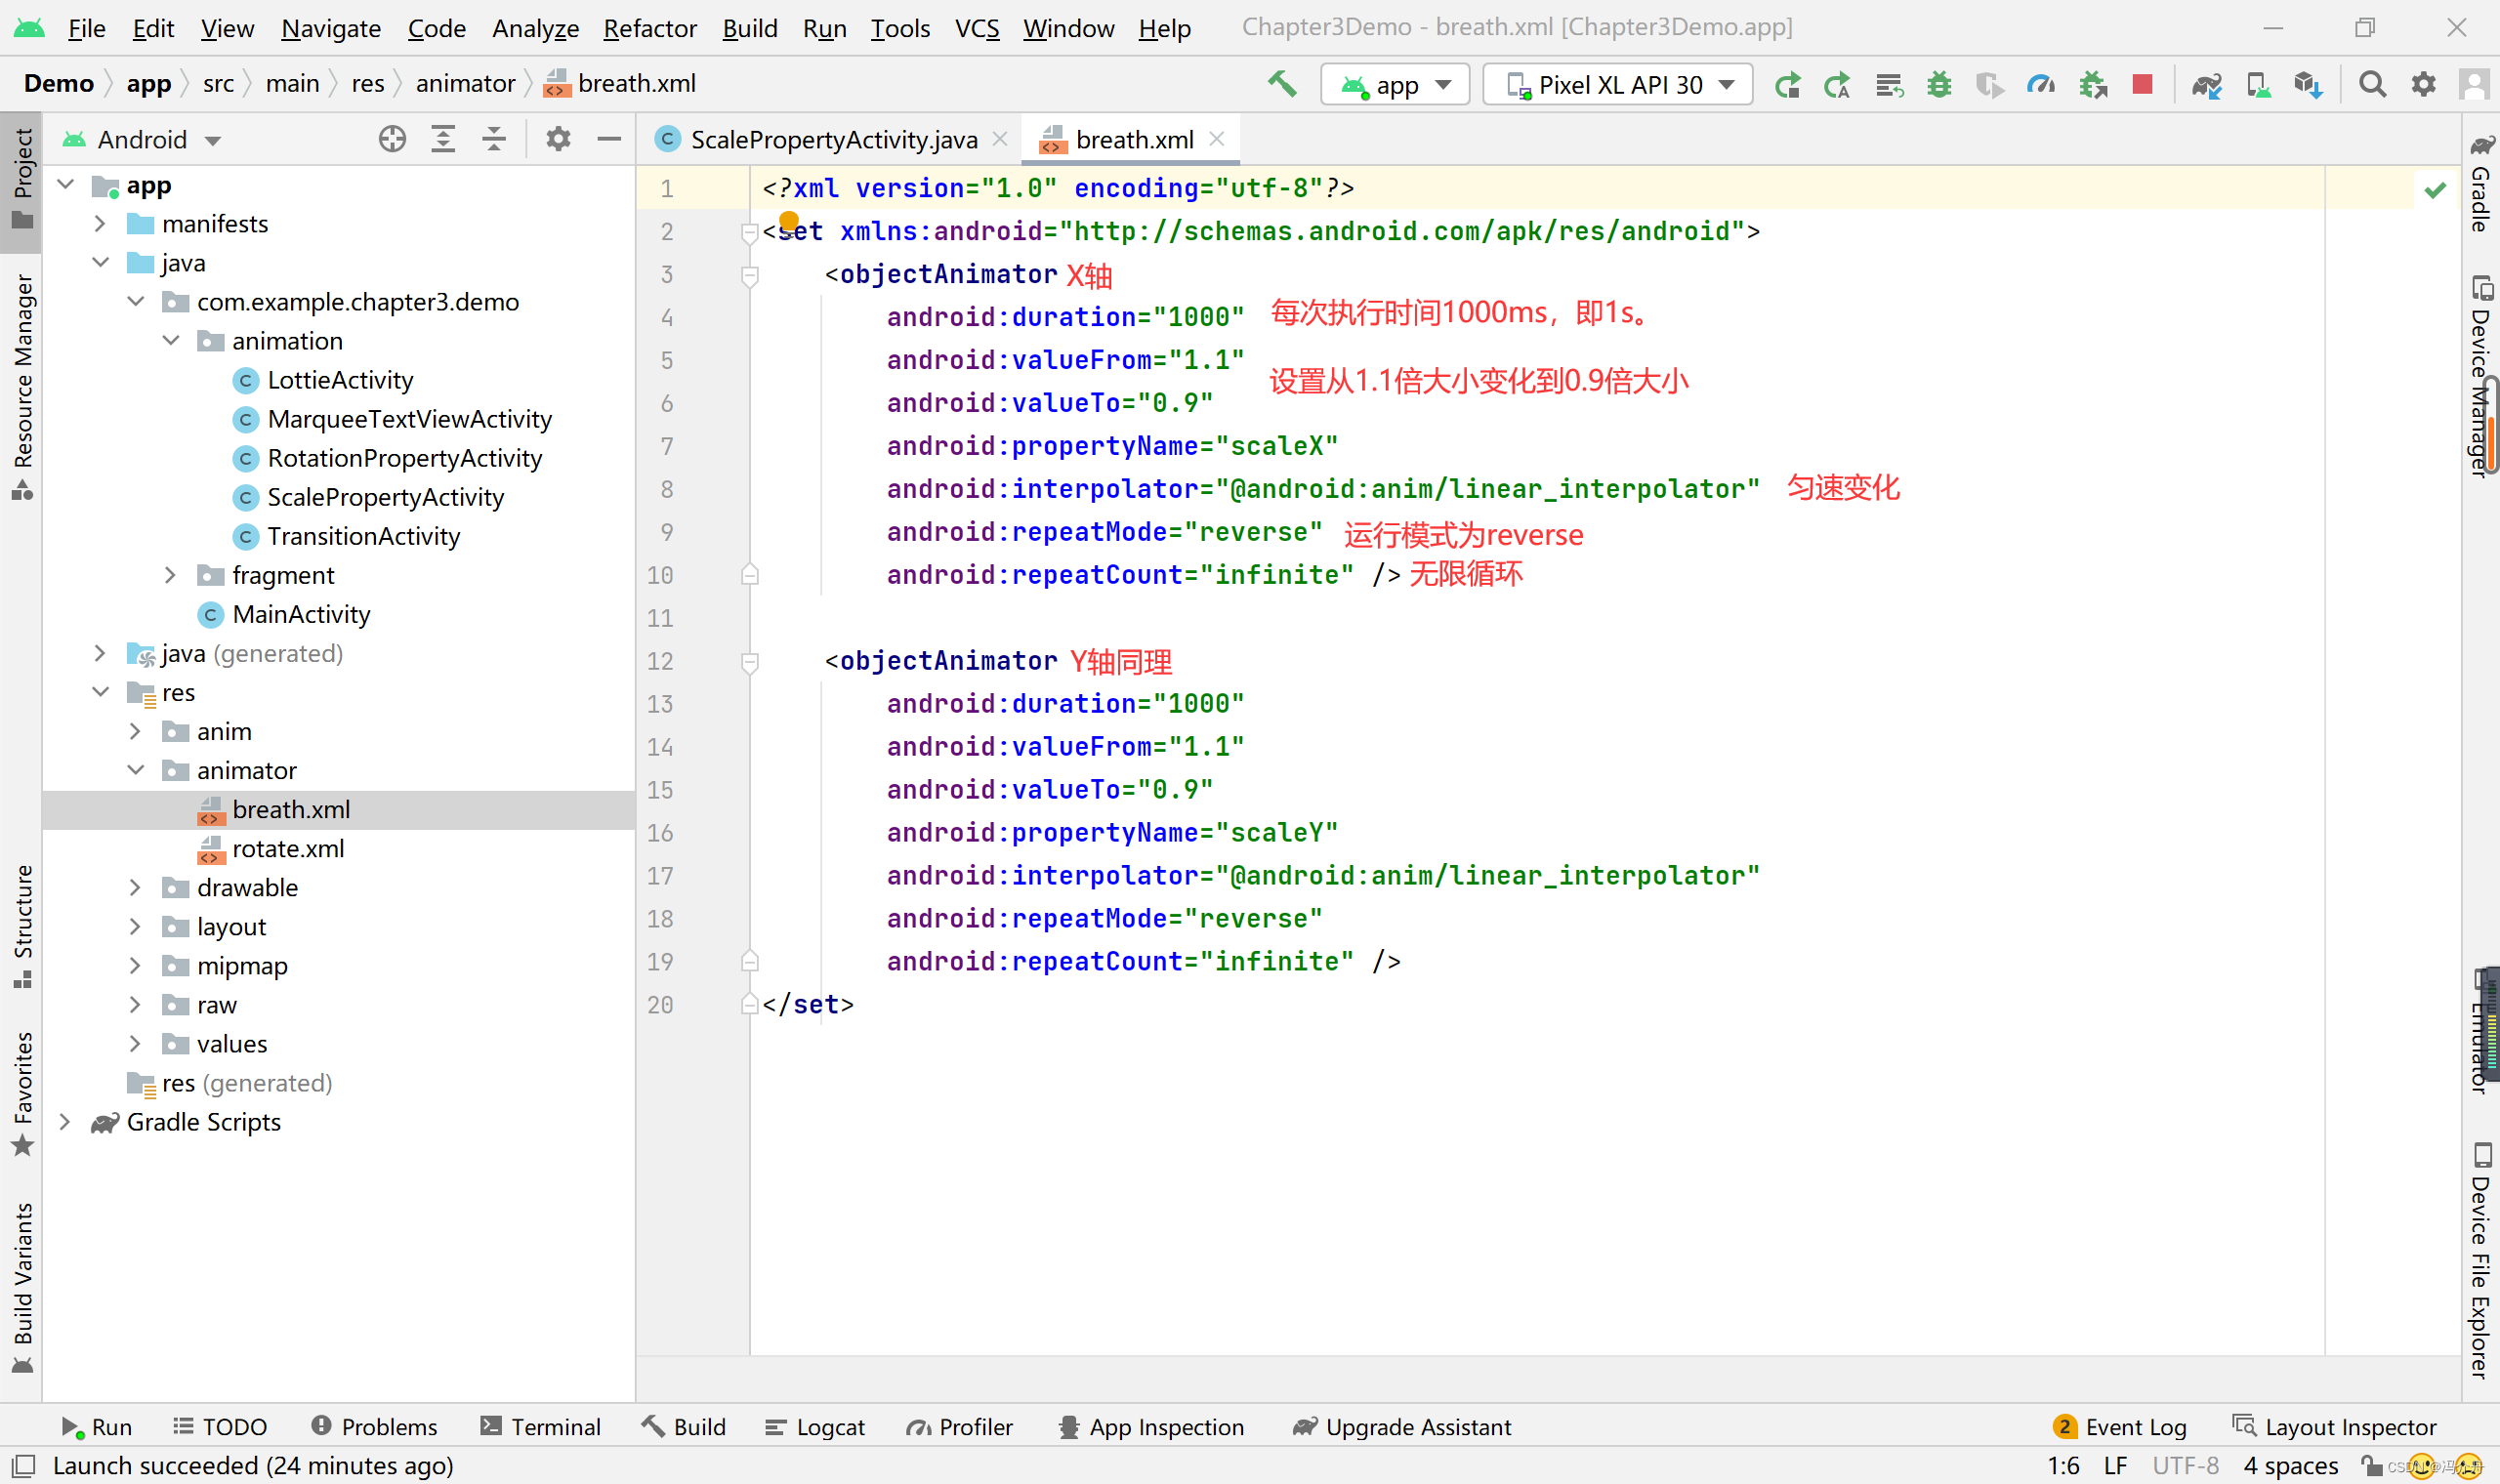
由上图可知,set中包含了两个objectAnimator。
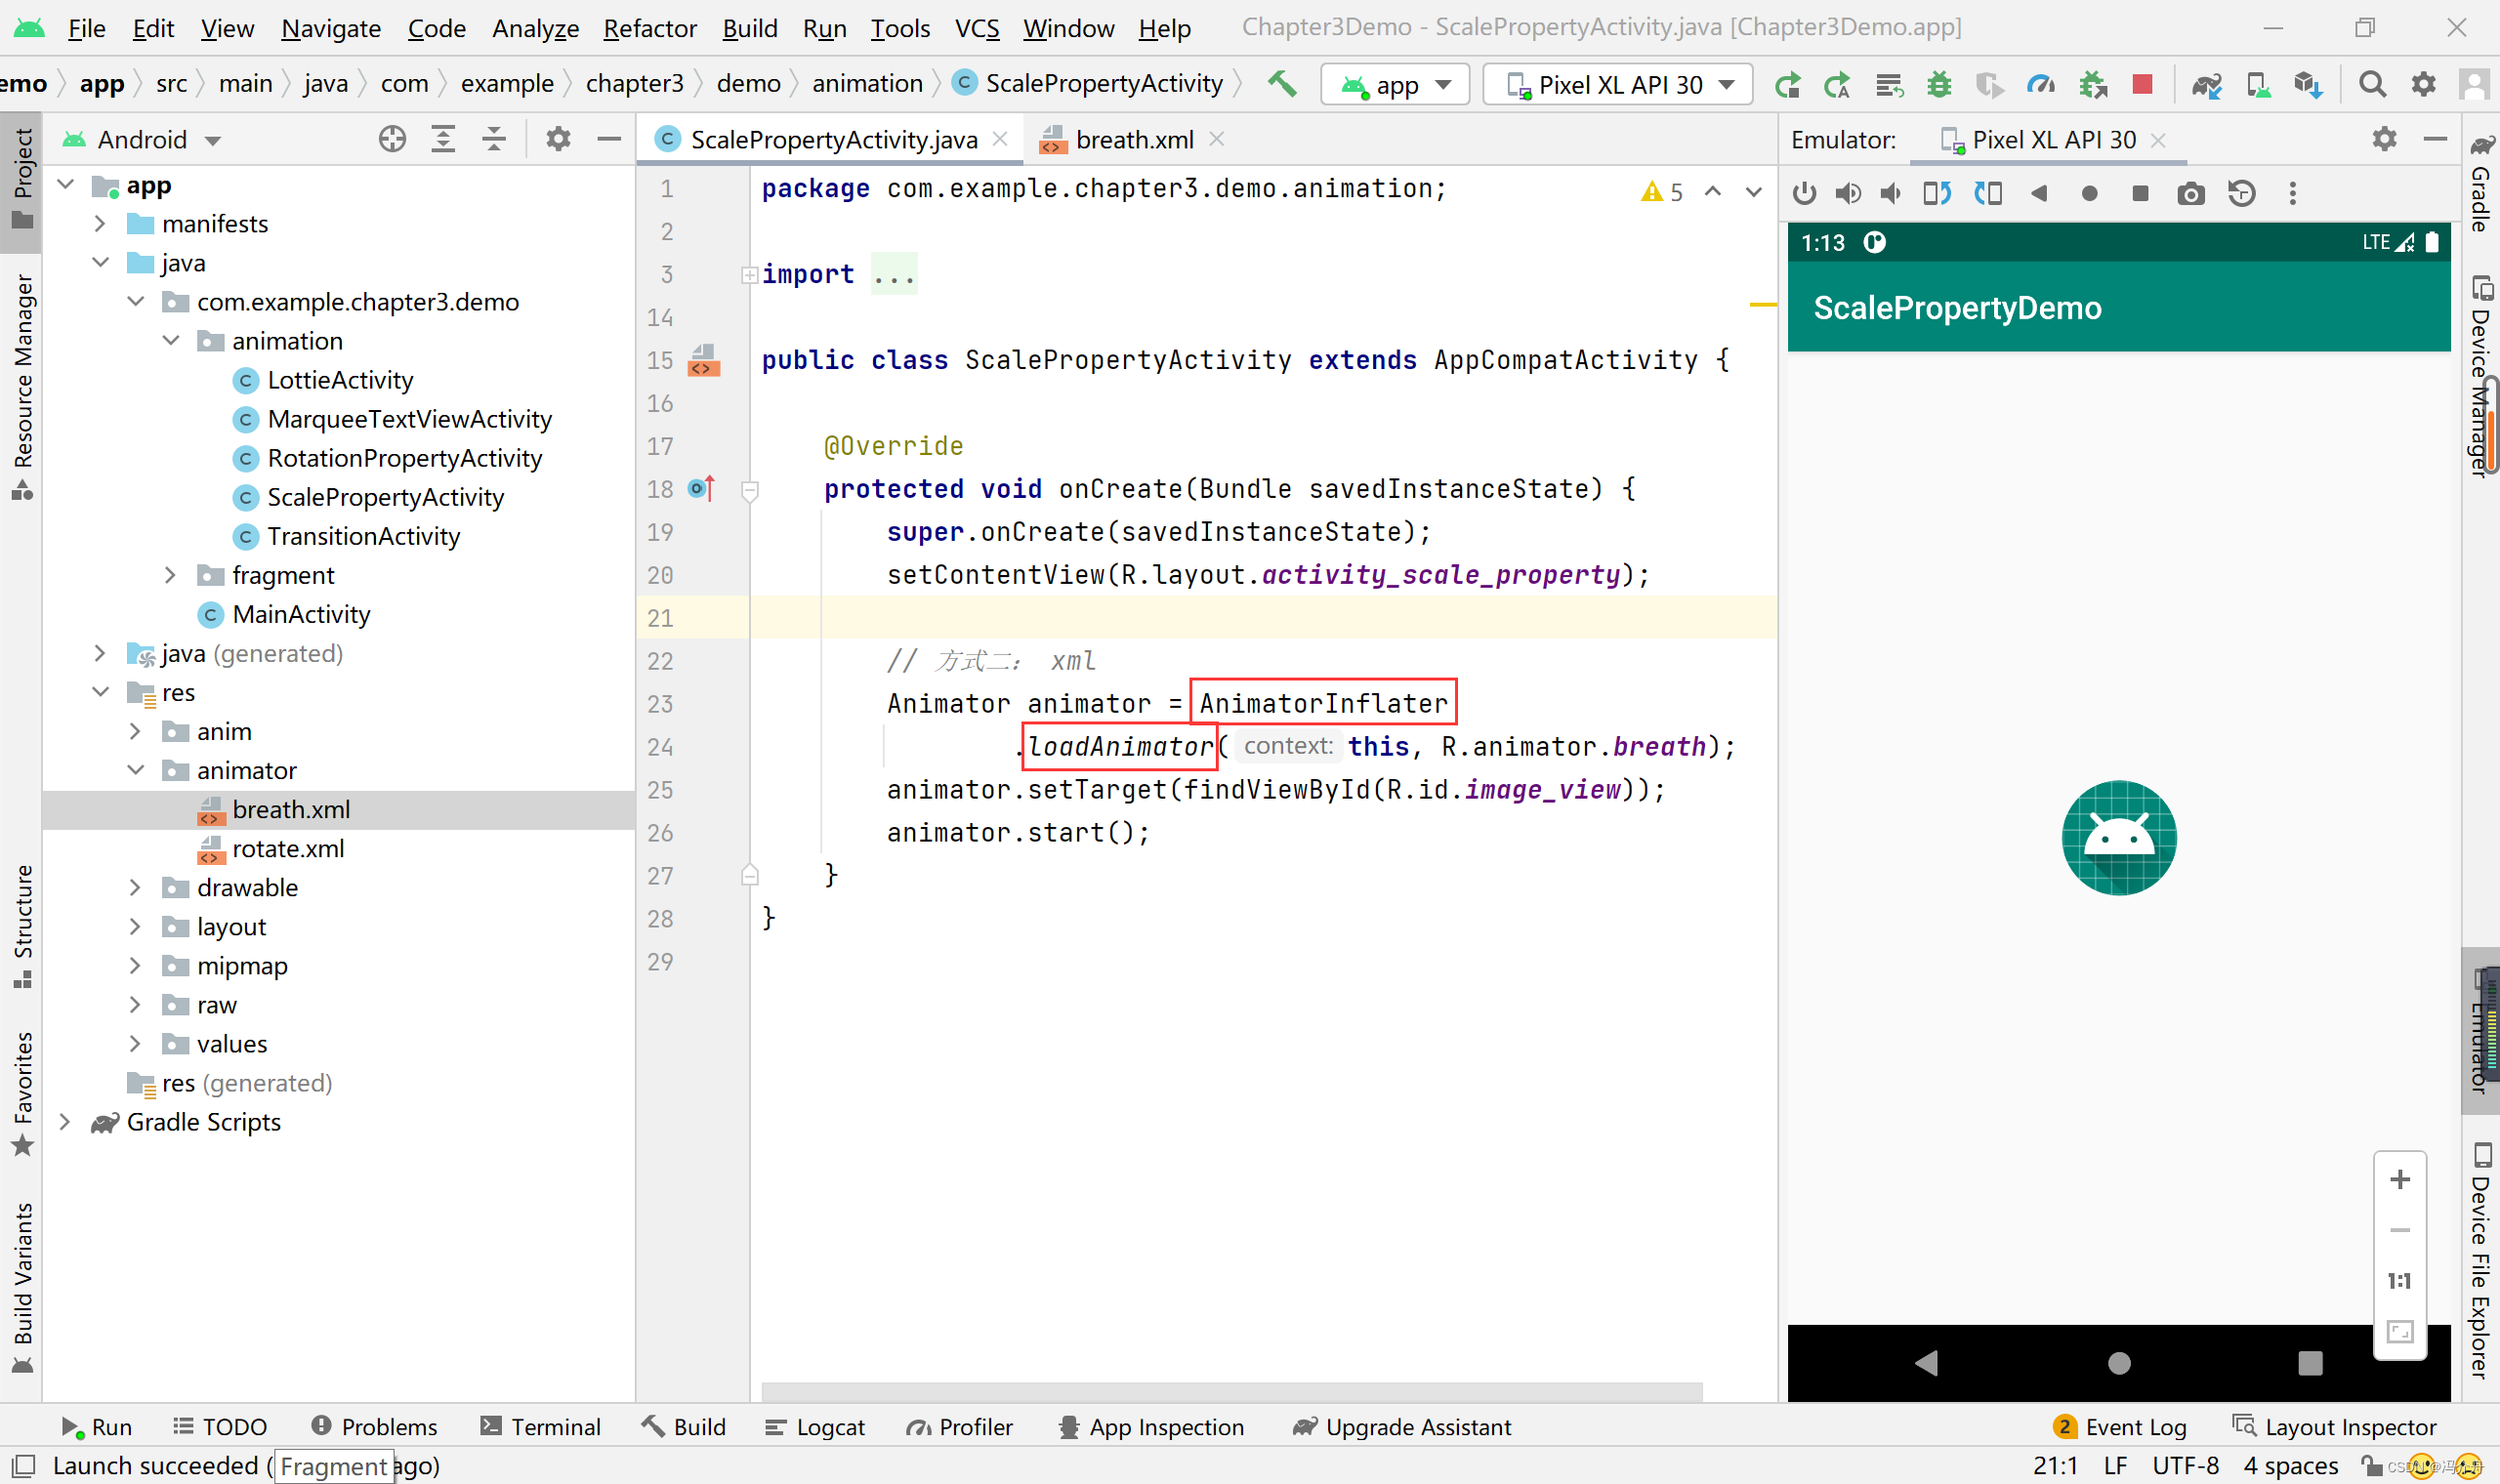
编写好xml,调用AnimatorInflater的load方法加载动画。
1.3. 属性动画实现原理
通过设置listener,每间隔一段很小的时间改变Animator的属性值。
final View v = findViewById(R.id.image_view);
ValueAnimator valueAnimator = ValueAnimator.ofFloat(0, 360);
valueAnimator.setRepeatCount(ValueAnimator.INFINITE);
valueAnimator.setInterpolator(new LinearInterpolator());
valueAnimator.setRepeatMode(ValueAnimator.RESTART);
valueAnimator.setDuration(8000);
valueAnimator.addUpdateListener(new ValueAnimator.AnimatorUpdateListener() {
   @Override
   public void onAnimationUpdate(ValueAnimator animation) {
    v.setRotation((float) animation.getAnimatedValue());
   }
});
valueAnimator.start();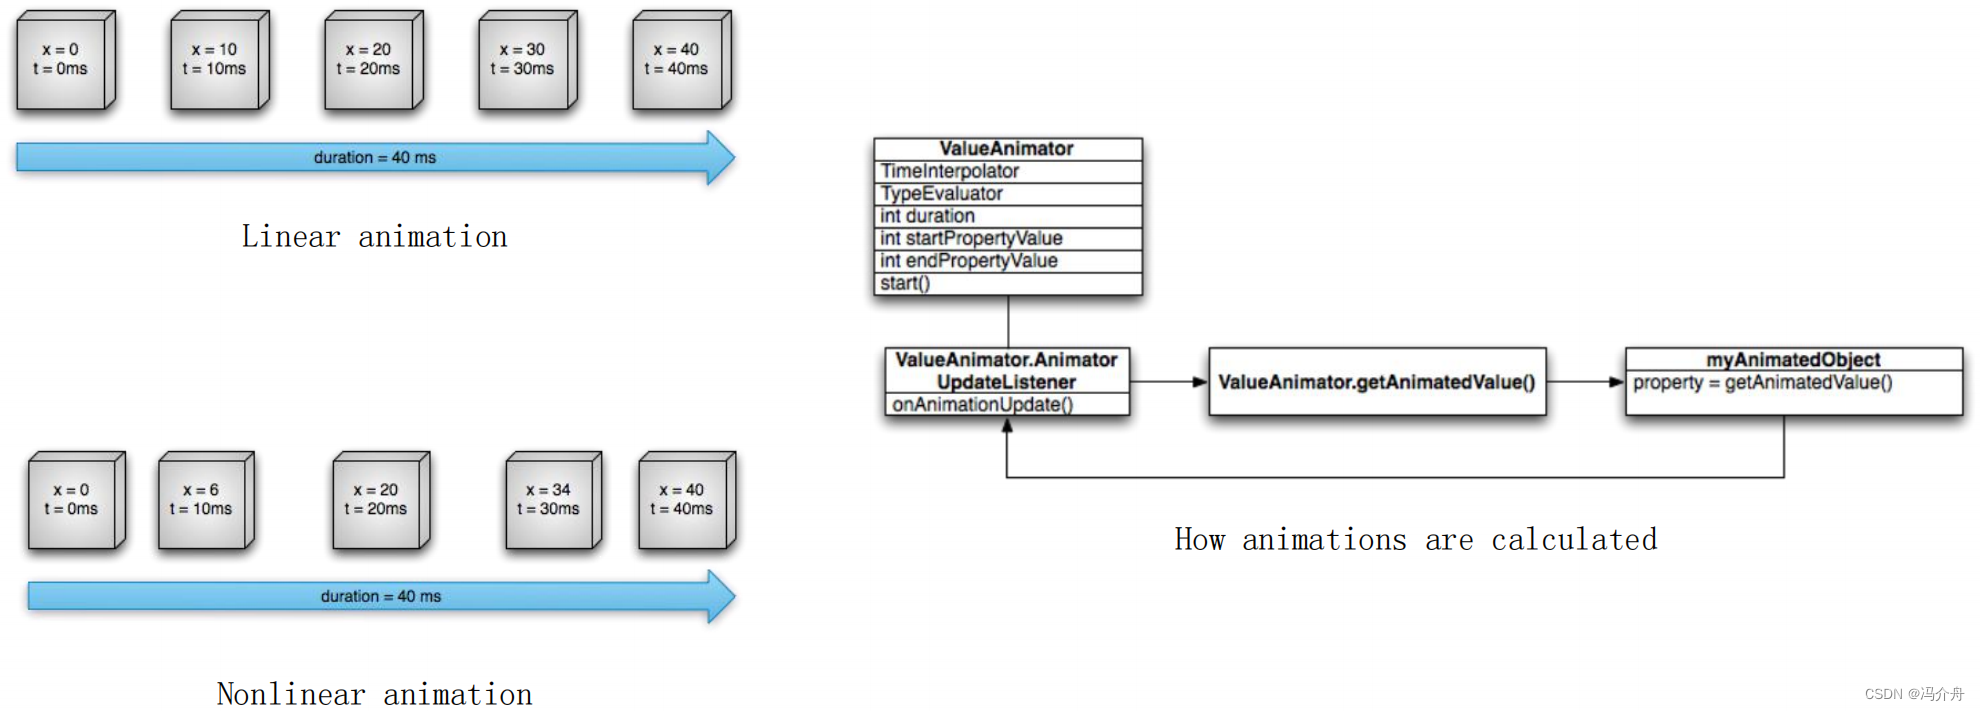
2.动画视图
不常用,只能对view的某些属性做动画。只是视觉效果,比如上例的呼吸动画,属性动画改变了动画的属性值,但是动画视图只是视觉效果,实际并没有改变动画的属性值。
3.动画切换示例
①编写页面布局
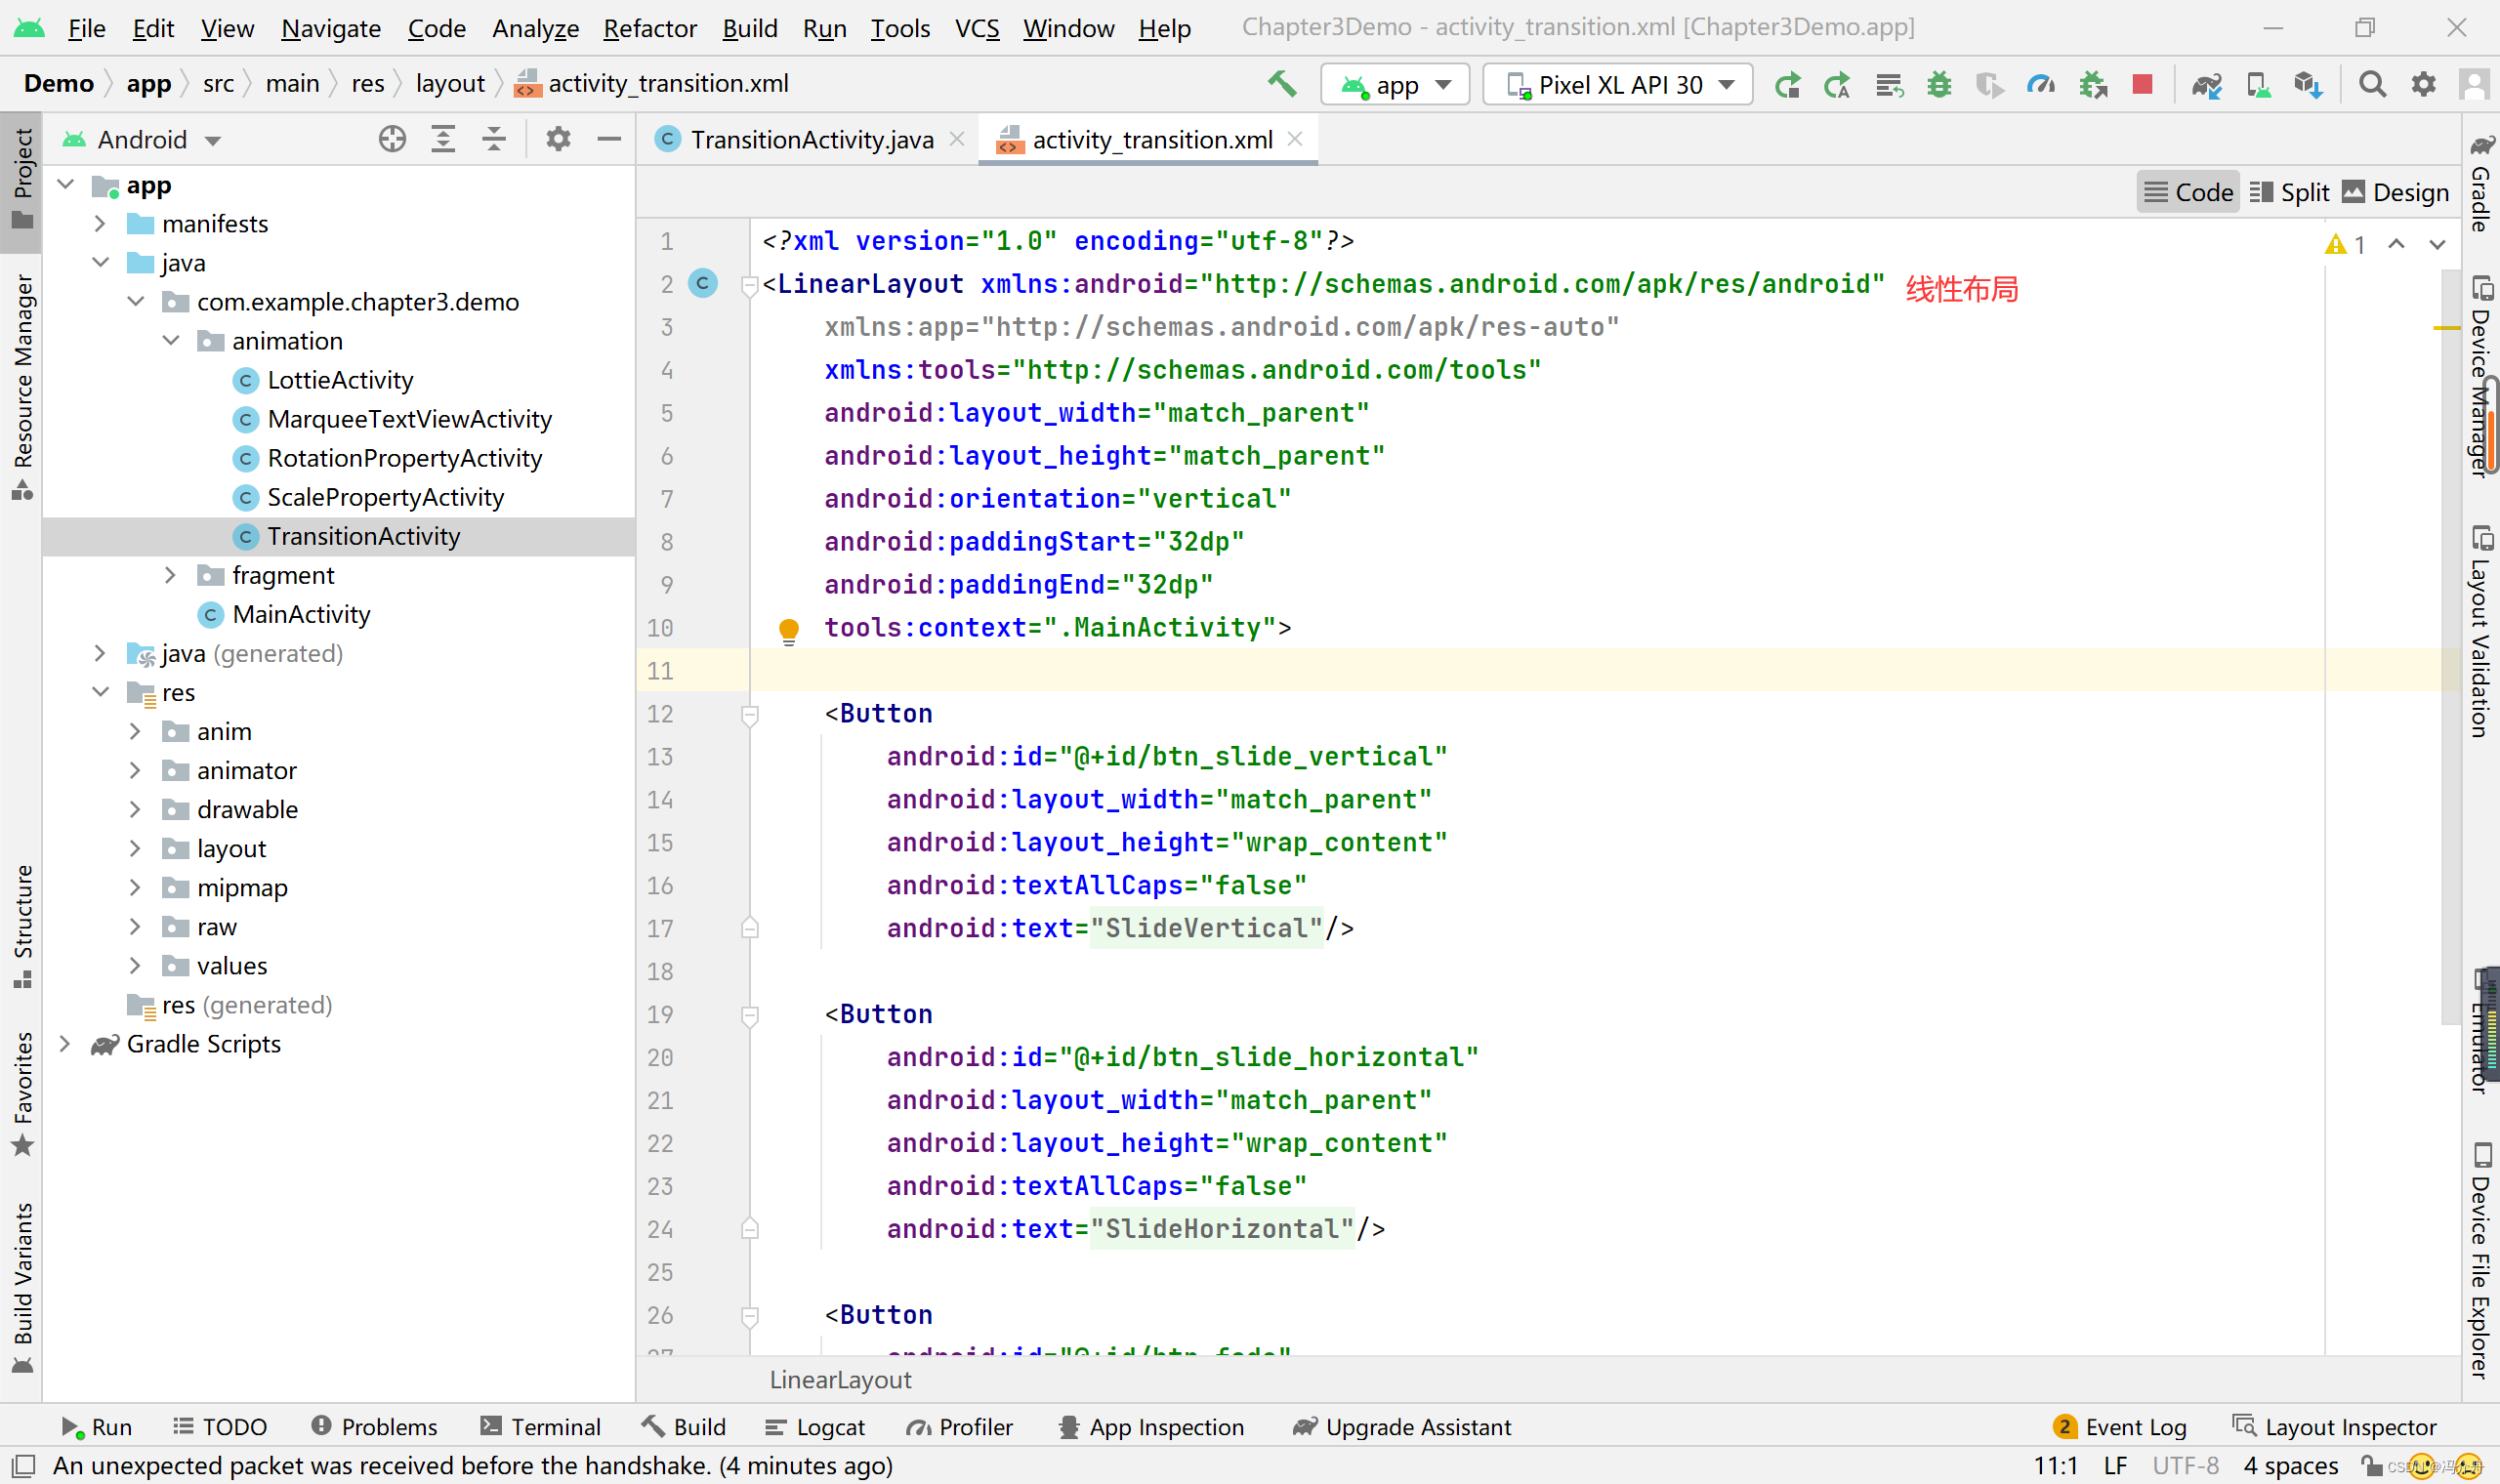
 页面预览效果:点击第一个按钮SlideVertical时,为从下至上切换,而点击第二个按钮SlideHorizontal时为左右切换方式,点击第三个按钮fade实现淡入淡出的切换效果。
②编写TransitionActivity继承自Activity
package com.example.chapter3.demo.animation;

import android.content.Intent;
import android.graphics.Color;
import android.os.Bundle;
import android.support.v7.app.AppCompatActivity;
import android.view.View;

import com.example.chapter3.demo.R;

import java.util.Random;

public class TransitionActivity extends AppCompatActivity {

    private static final String EXTRA_EXIT_ANIM = "extra_exit_anim";

    private int exitAnim;

    @Override
    protected void onCreate(Bundle savedInstanceState) {
        super.onCreate(savedInstanceState);
        setContentView(R.layout.activity_transition);// 设置页面布局

        exitAnim = getIntent().getIntExtra(EXTRA_EXIT_ANIM, 0);
        // 上下方式切换
        bindTransition(R.id.btn_slide_vertical, R.anim.slide_up, R.anim.slide_down);

        // 左右方式切换
        bindTransition(R.id.btn_slide_horizontal, R.anim.slide_right, R.anim.slide_left);

        // 淡入淡出方式切换
        bindTransition(R.id.btn_fade, R.anim.fade_in, R.anim.fade_out);

        // 背景颜色,以便观察每次切换。
        Random random = new Random();
        getWindow().getDecorView().setBackgroundColor(Color.argb(255,
                random.nextInt(256),
                random.nextInt(256),
                random.nextInt(256)));
    }

    @Override
    public void finish() {
        super.finish();
        if (exitAnim != 0) {
            // 退出时,调用overridePendingTransition实现切换。
            overridePendingTransition(0, exitAnim);
        }
    }

    // 三个参数分别表示:切换的按钮编号,进入方式,退出方式。
    private void bindTransition(final int btnId, final int enterAnim, final int exitAnim) {
        findViewById(btnId).setOnClickListener(new View.OnClickListener() { // 绑定监听事件
            @Override
            public void onClick(View v) {
                Intent intent = new Intent(TransitionActivity.this, TransitionActivity.class);
                intent.putExtra(EXTRA_EXIT_ANIM, exitAnim);
                startActivity(intent);
                // 进入时,也调用overridePendingTransition方法实现效果。
                overridePendingTransition(enterAnim, 0);
            }
        });
    }
}
其中,每一个切换效果均是使用xml实现:
slide_up.xml:
<?xml version="1.0" encoding="utf-8"?>
<translate
    xmlns:android="http://schemas.android.com/apk/res/android"
    android:fromYDelta="100%p" android:toYDelta="0%p"
    android:duration="300"/>
slide_down.xml:
<?xml version="1.0" encoding="utf-8"?>
<translate xmlns:android="http://schemas.android.com/apk/res/android"
    android:duration="300"
    android:fromYDelta="0%p"
    android:toYDelta="100%p" />
slide_left.xml:
<?xml version="1.0" encoding="utf-8"?>
<translate
    xmlns:android="http://schemas.android.com/apk/res/android"
    android:fromXDelta="0%p" android:toXDelta="100%p"
    android:duration="300"/>
slide_right.xml:
<?xml version="1.0" encoding="utf-8"?>
<translate
    xmlns:android="http://schemas.android.com/apk/res/android"
    android:fromXDelta="100%p" android:toXDelta="0%p"
    android:duration="300"/>
fade_in.xml:
<?xml version="1.0" encoding="utf-8"?>
<alpha xmlns:android="http://schemas.android.com/apk/res/android"
    android:duration="@android:integer/config_shortAnimTime"
    android:fromAlpha="0.0"
    android:interpolator="@android:anim/accelerate_interpolator"
    android:toAlpha="1.0" />
fade_out.xml:
<?xml version="1.0" encoding="utf-8"?>
<alpha xmlns:android="http://schemas.android.com/apk/res/android"
    android:duration="@android:integer/config_shortAnimTime"
    android:fromAlpha="1.0"
    android:interpolator="@android:anim/accelerate_interpolator"
    android:toAlpha="0.0" />
4.Drawable动画——Lottie示例
使用Lottie可以方便快速地做出较为复杂的动态动画。美工设计师会使用相关的工具将设计好的动画生成一个json文件,Lottie只需根据此文件,就可以做出复杂的动画,而不需要程序员反复根据设计人员所给动画效果调参数。下面介绍一个实例。
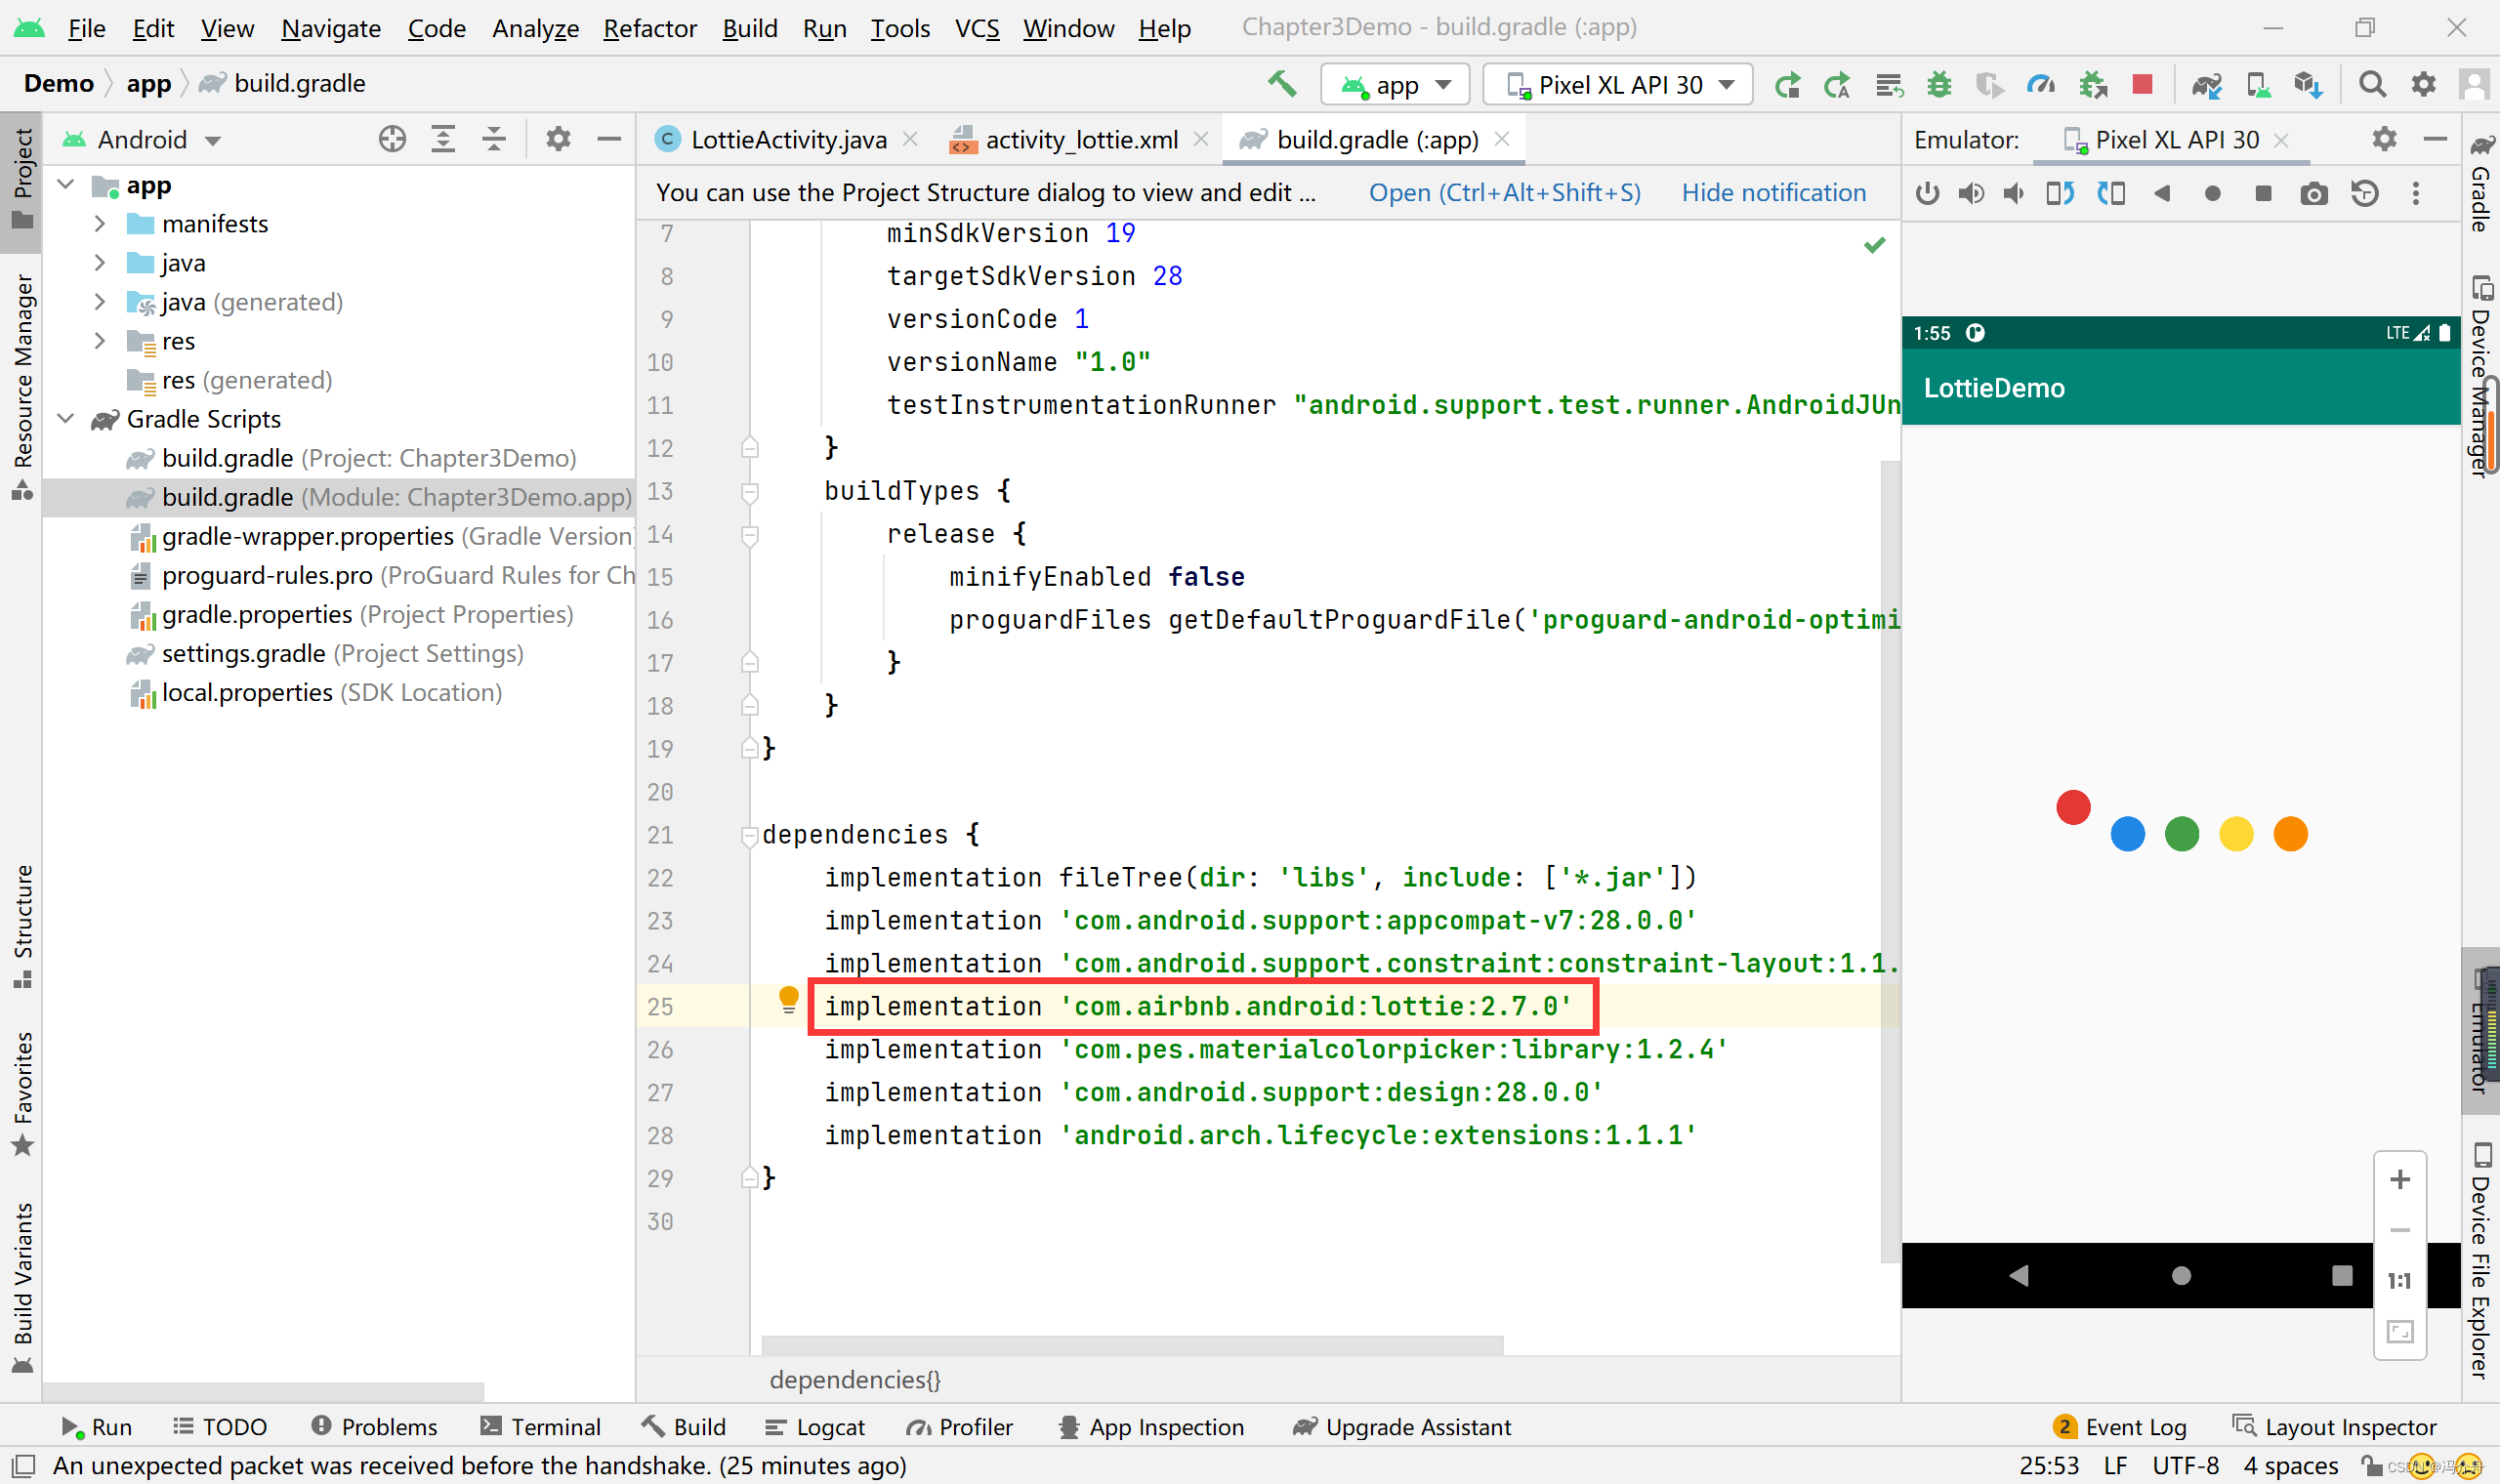
①添加Lottie依赖
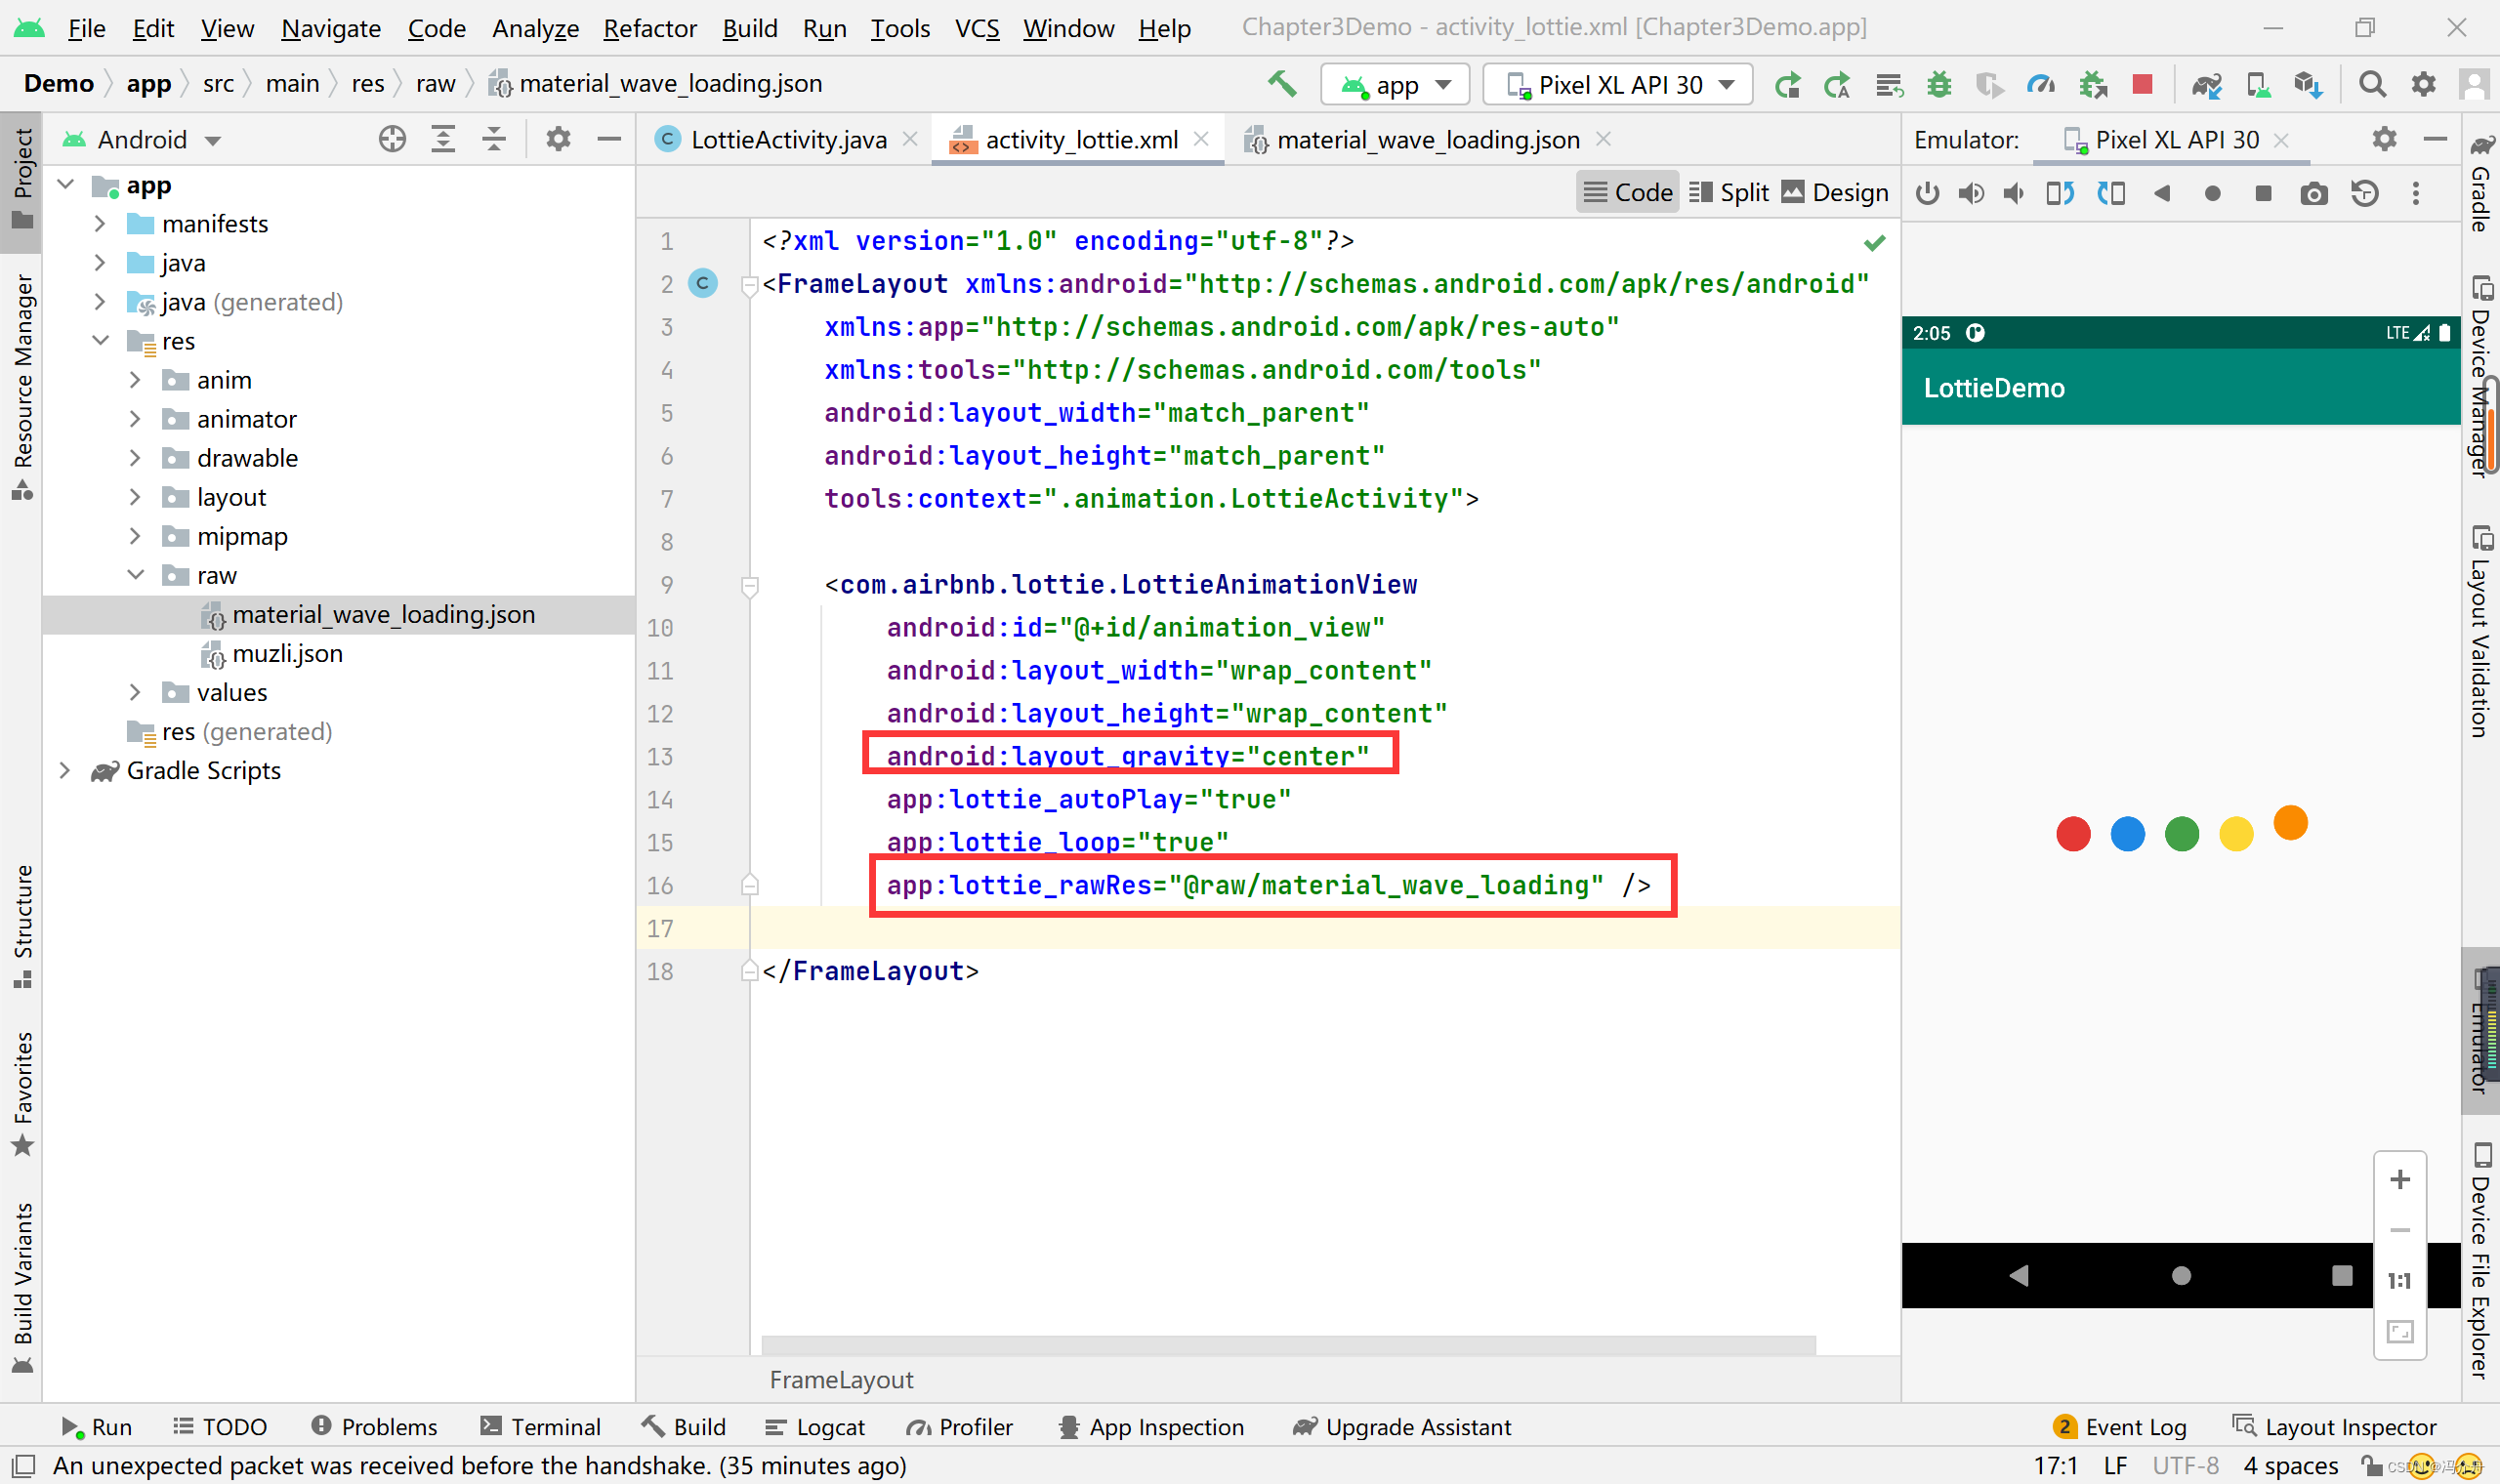
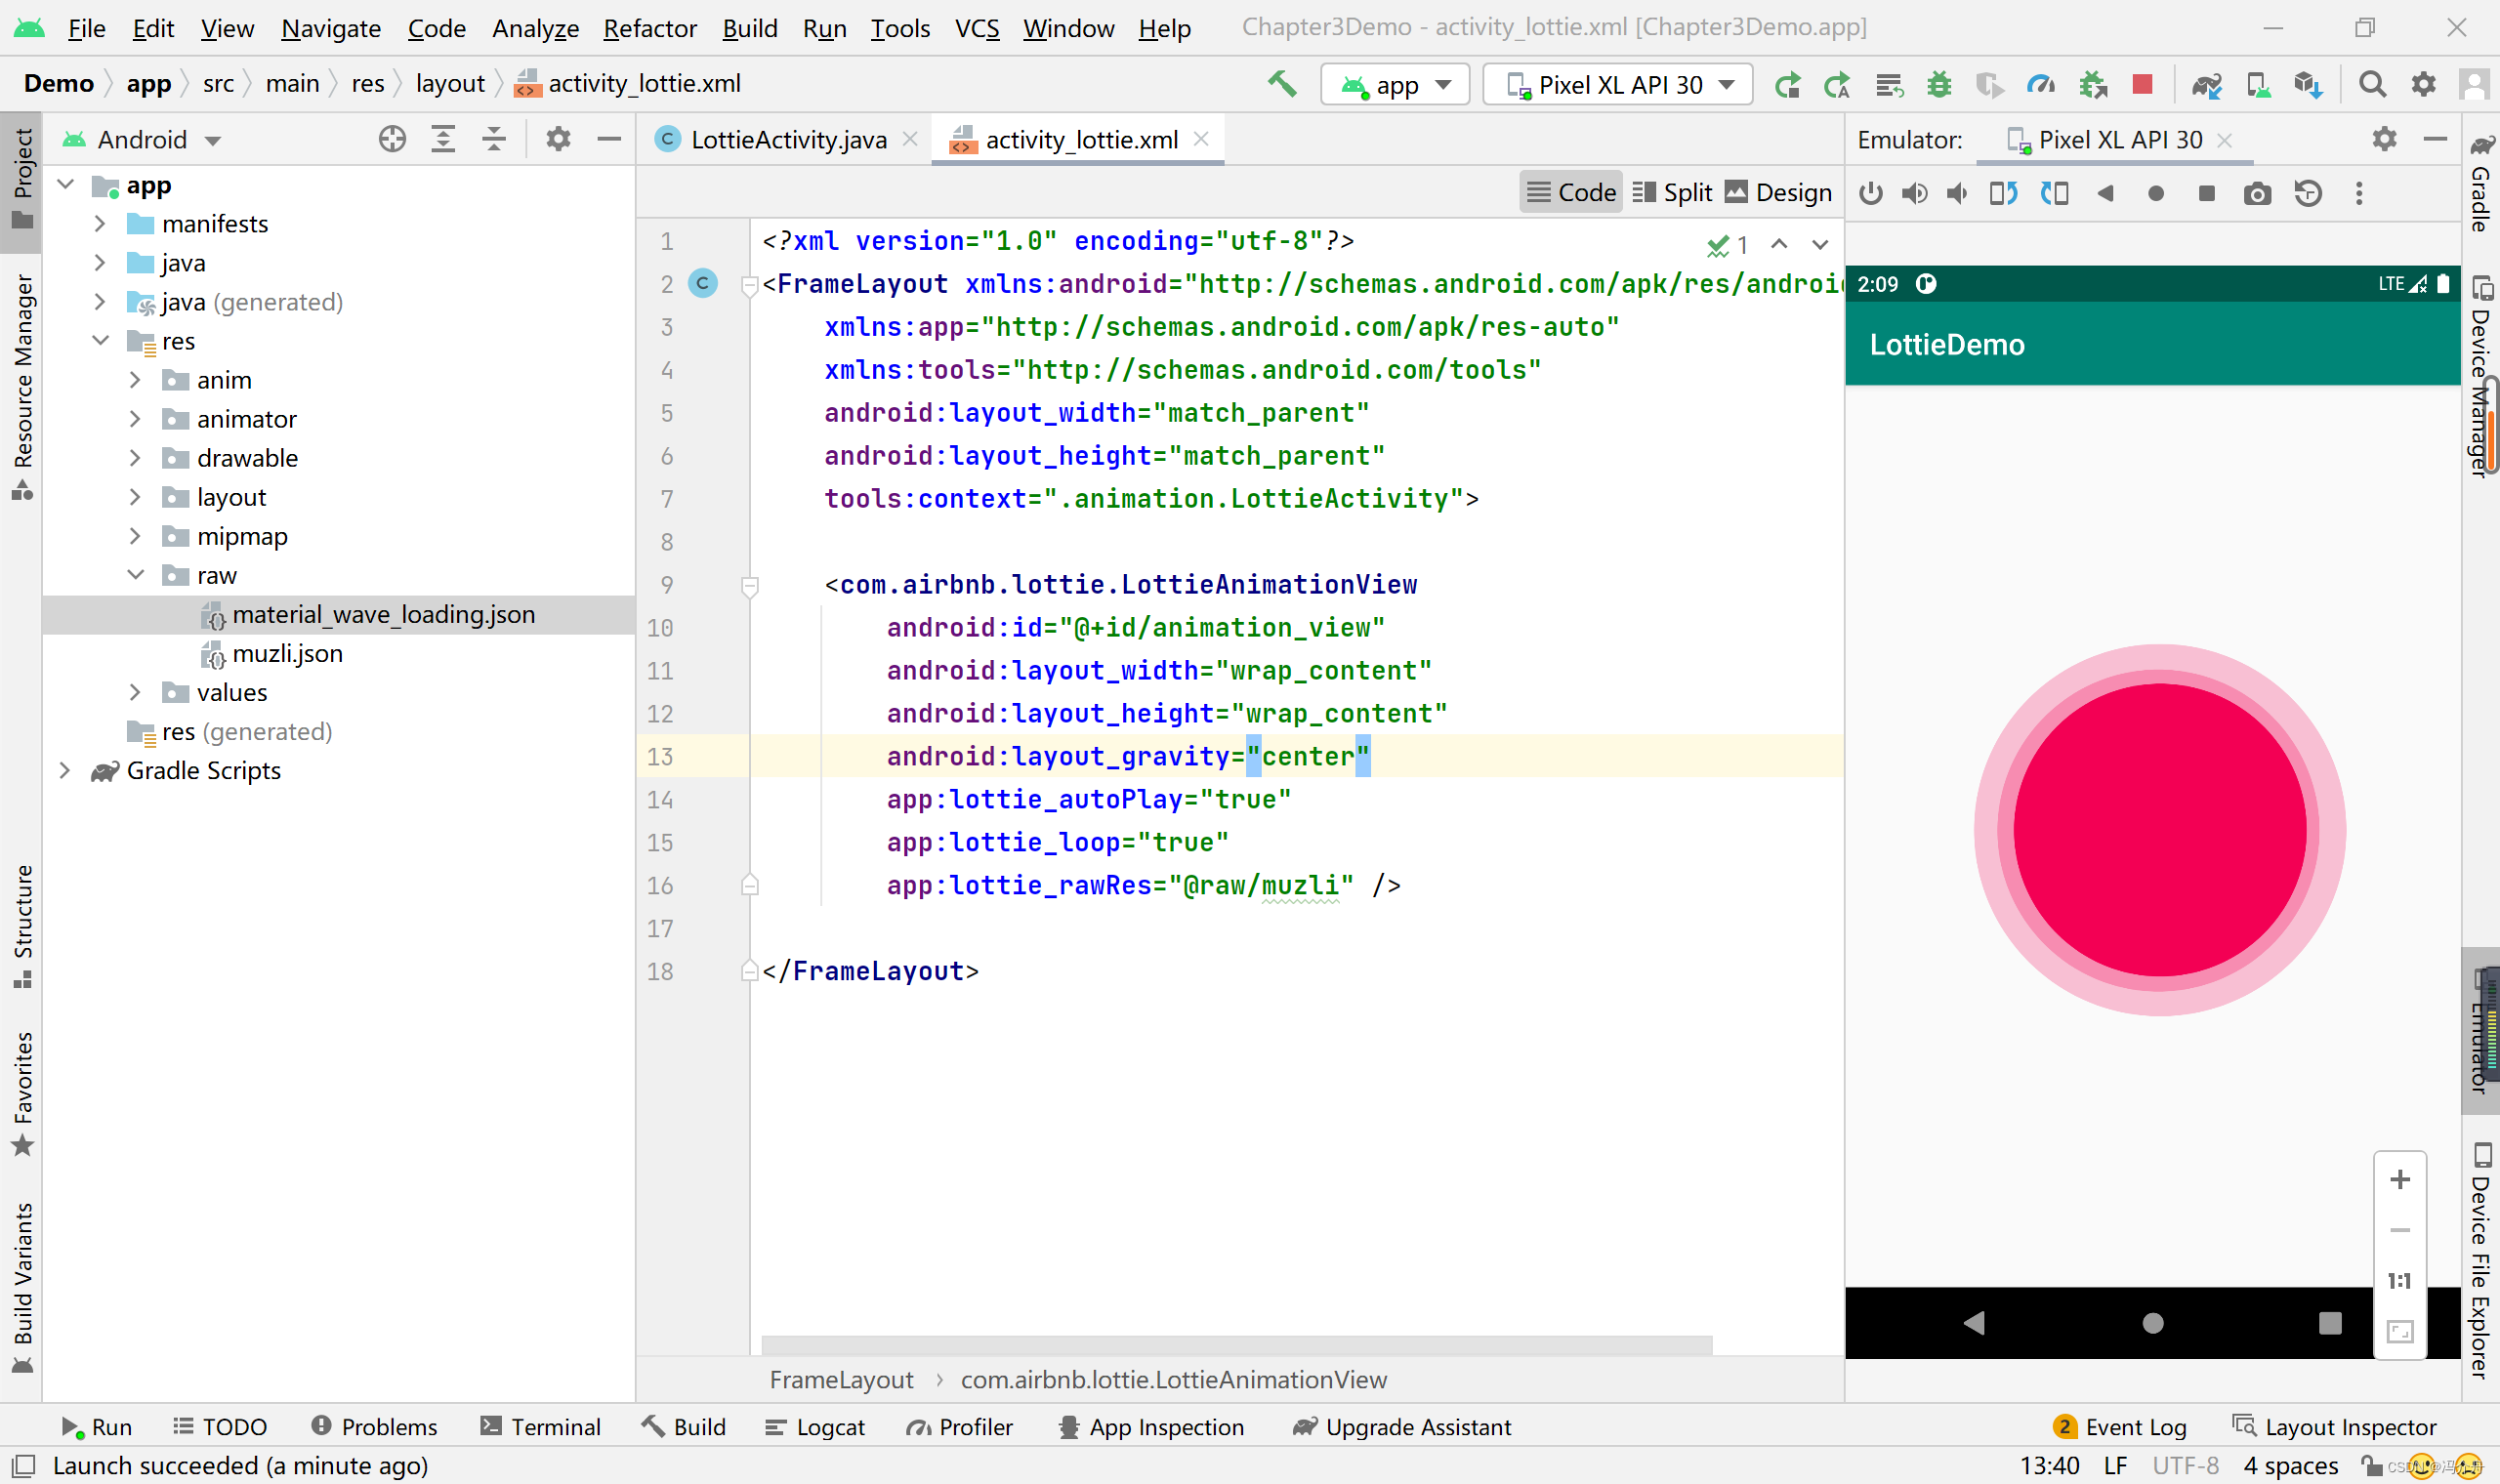
②编写布局
布局预览:
 仅仅是设置了该动画的位置在中心,并配置相关json文件。
json文件内容如下:
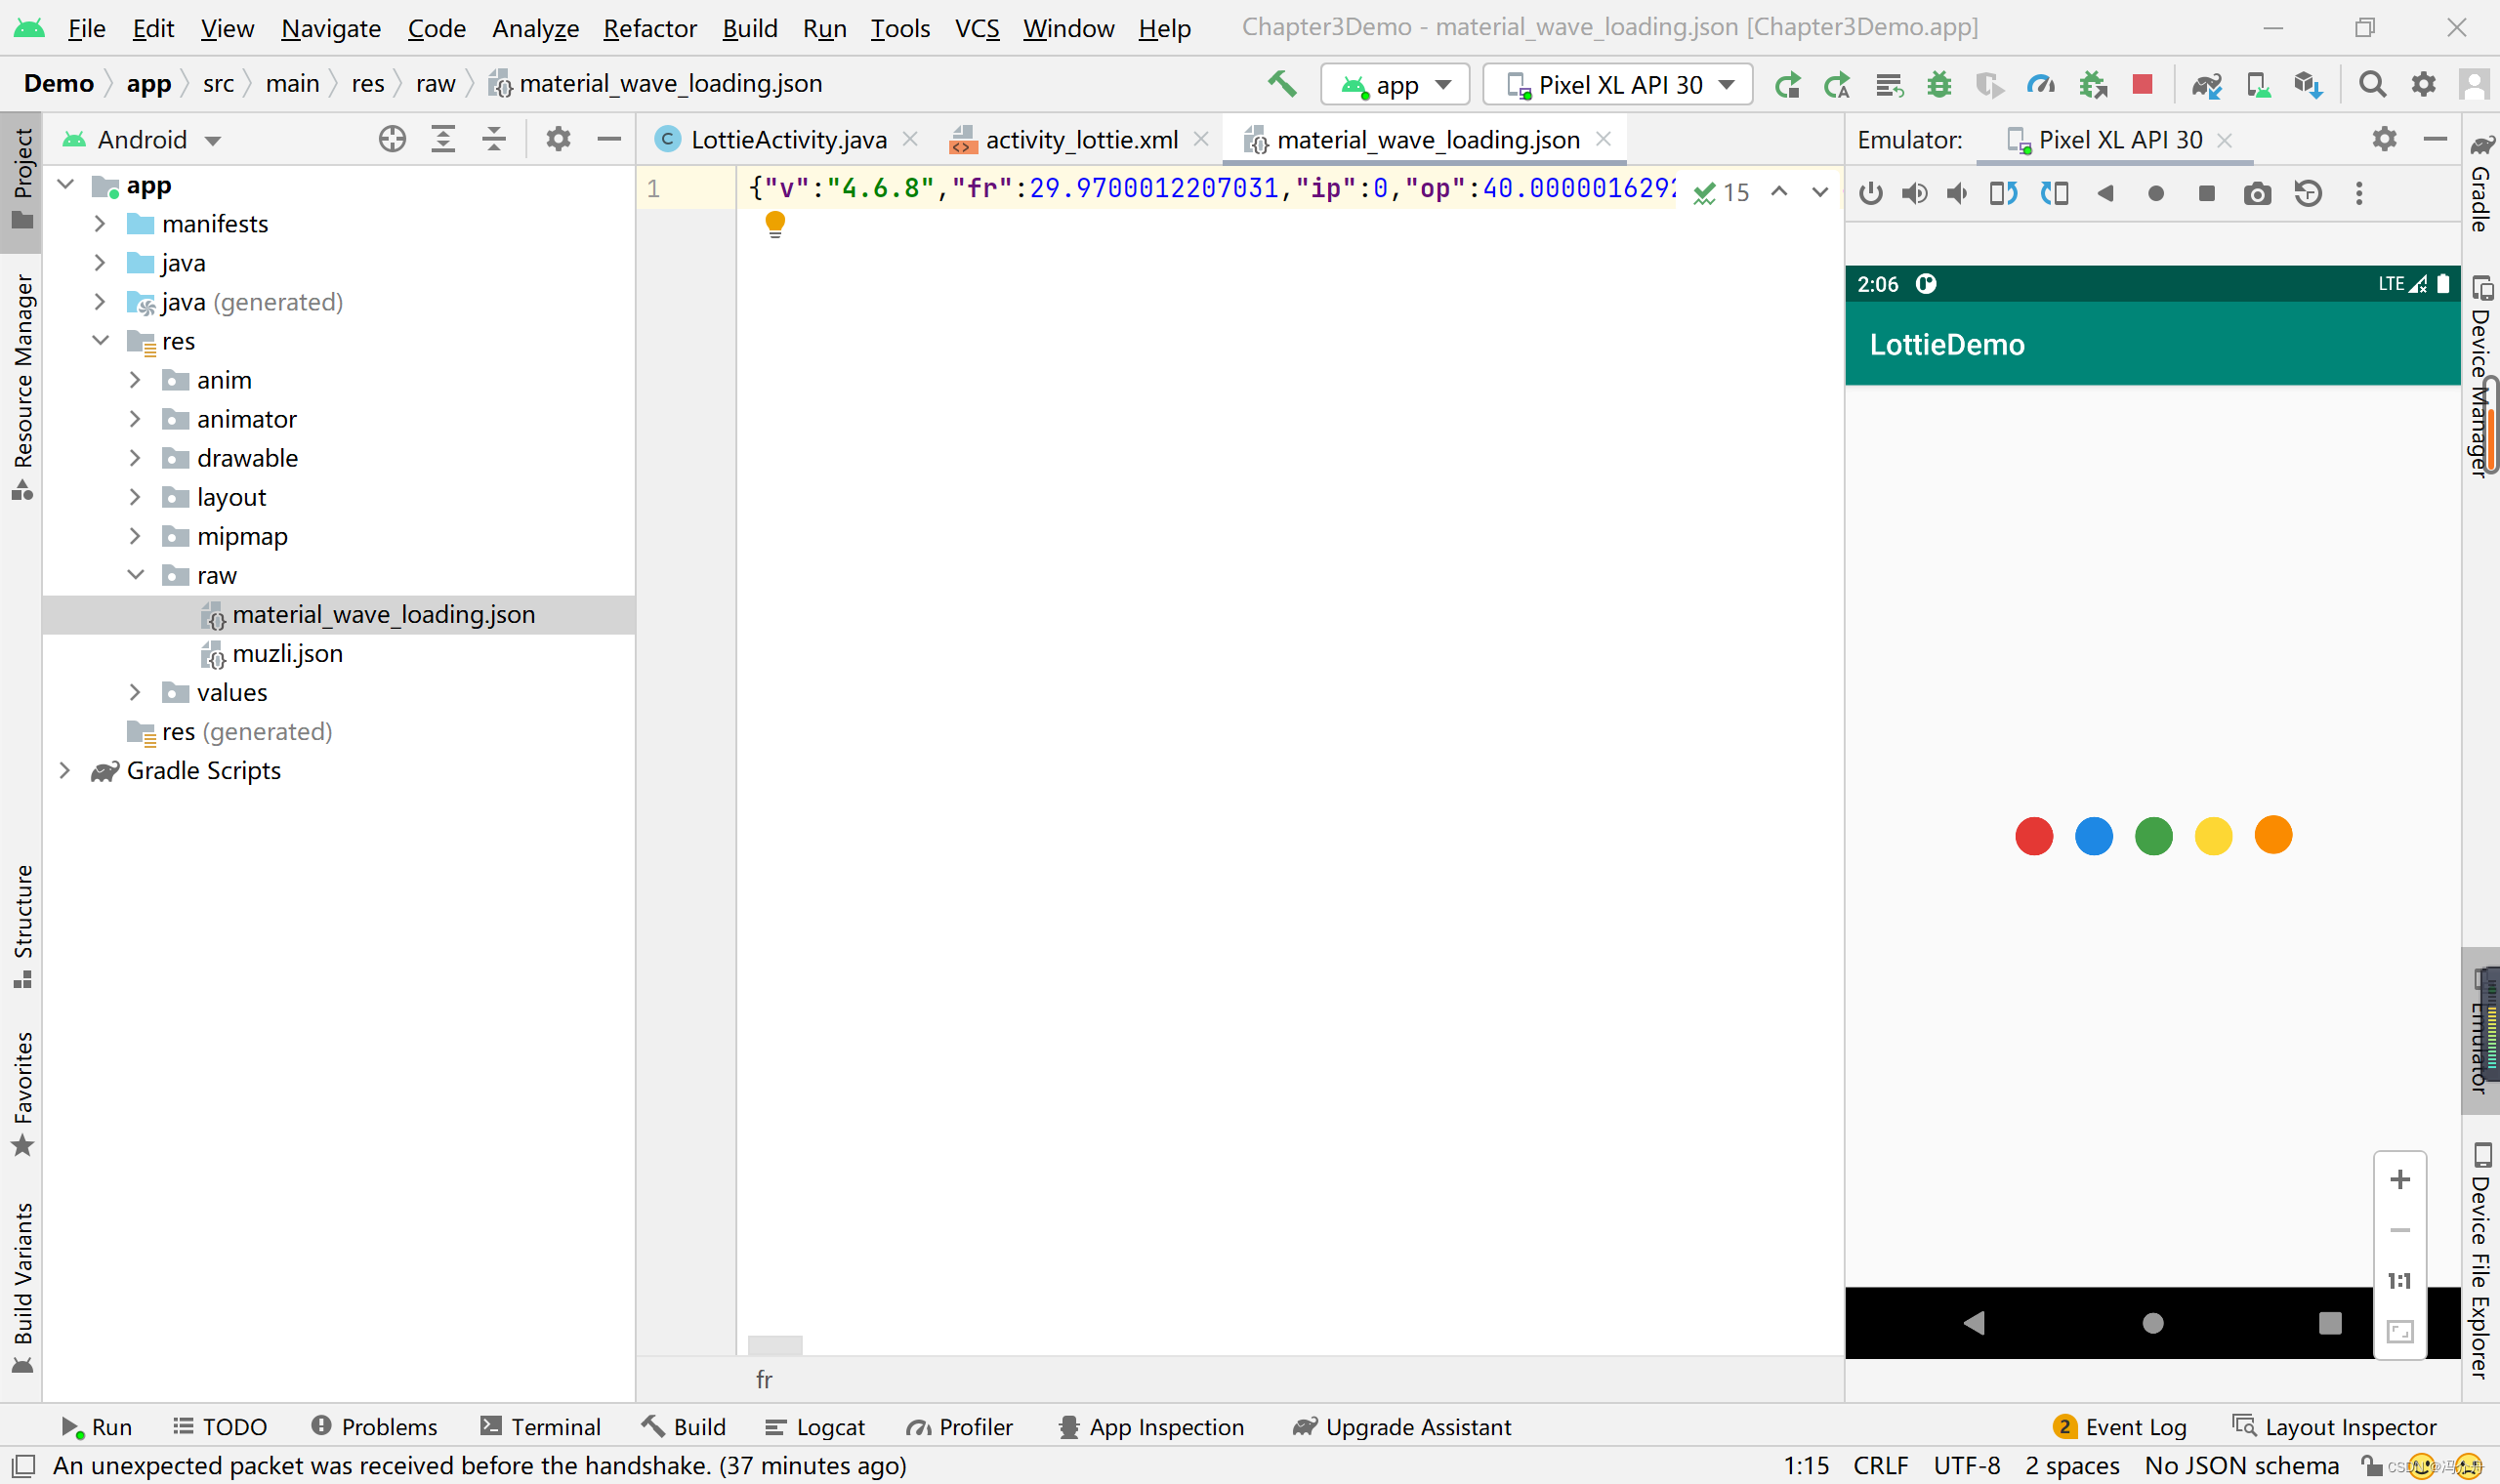
比如,当我将json换成raw文件夹下的muzli.json,可以得到一个波纹的动画,效果如下:
从上面两个例子可以看到,使用Lottie做动画非常方便简洁,可以在Lottie官网查找更多示例。
二、Fragment
1.概念
Fragment是UI的碎片,使用该组件可以容易地达到复用效果,即同一个Frragment可以为多个activity所用,相比 View,带有生命周期管理,可以这么理解,Activity相当于一个大容器,Fragment是可复用的一部分。也可以达到响应式设计,比如
2.生命周期管理
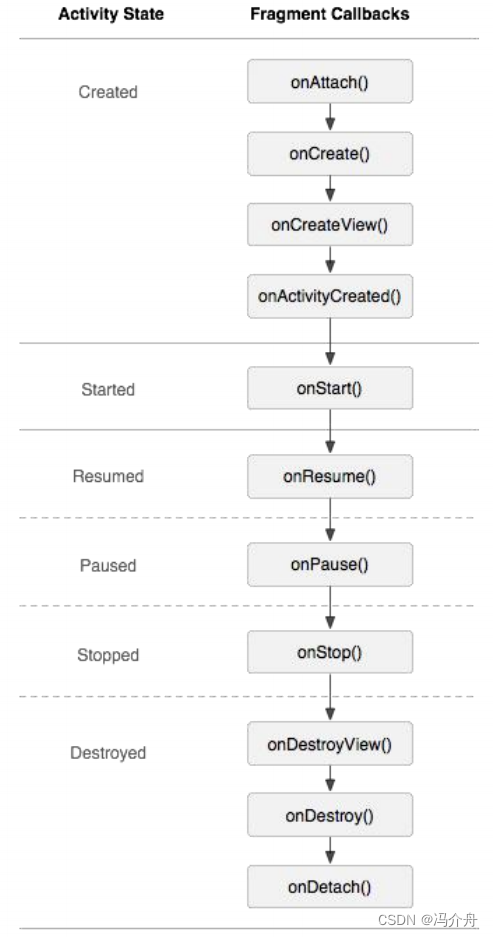
因为Fragment依附于Activity,因此是在Activity生命周期中加入一些特有的生命周期。
onAttach/onDetach:Fragment必须建立在Activity之中,因此需要使用onAttach方法将Fragment与Activity绑定,而在Activity销毁前需要用onDetach解绑。
onCreateView/onDestroyView:当创建好Activity之后,需要创建Fragment相应的View,销毁Activity前也需要将Fragment相应的View销毁。
3.Fragment相关示例
使用方法
3.1 LifeCycle示例(静态添加Fragment)
①创建该Fragment依附的Activity
package com.example.chapter3.demo.fragment;

import android.support.v7.app.AppCompatActivity;
import android.os.Bundle;

import com.example.chapter3.demo.R;

public class LifecycleFragmentActivity extends AppCompatActivity {

    @Override
    protected void onCreate(Bundle savedInstanceState) {
        super.onCreate(savedInstanceState);
        setContentView(R.layout.activity_lifecycle_fragment);
    }
}
该Activity的布局为:
<?xml version="1.0" encoding="utf-8"?>
<FrameLayout xmlns:android="http://schemas.android.com/apk/res/android"
    android:layout_width="match_parent"
    android:layout_height="match_parent"
    android:orientation="vertical">

    <fragment
        android:id="@+id/hello_fragment"
        android:name="com.example.chapter3.demo.fragment.HelloFragment"
        android:layout_width="match_parent"
        android:layout_height="match_parent" />
</FrameLayout>
由上图可知:在Activity的布局文件中通过指定全名称 com.example.chapter3.demo.fragment.HelloFragment指定了相关的Fragment类,是静态定义,后面会介绍如何动态定义一个Fragment。
预览:

HelloFragement类:
package com.example.chapter3.demo.fragment;

import android.content.Context;
import android.os.Bundle;
import android.support.annotation.NonNull;
import android.support.annotation.Nullable;
import android.support.v4.app.Fragment;
import android.util.Log;
import android.view.LayoutInflater;
import android.view.View;
import android.view.ViewGroup;

import com.example.chapter3.demo.R;

public class HelloFragment extends Fragment {

    private static final String TAG = "HelloFragment";

    @Nullable
    @Override
    public View onCreateView(@NonNull LayoutInflater inflater, @Nullable ViewGroup container, @Nullable Bundle savedInstanceState) {
        Log.d(TAG, "onCreateView() called with: inflater = [" + inflater + "], container = [" + container + "], savedInstanceState = [" + savedInstanceState + "]");
        // 如果attachToRoot为false,container为当前布局,如果为true,则container为Activity的布局。
        return inflater.inflate(R.layout.fragment_hello, container, false);
    }

    @Override
    public void onAttach(Context context) {
        super.onAttach(context);
        Log.d(TAG, "onAttach() called with: context = [" + context + "]");
    }

    @Override
    public void onCreate(@Nullable Bundle savedInstanceState) {
        super.onCreate(savedInstanceState);
        Log.d(TAG, "onCreate() called with: savedInstanceState = [" + savedInstanceState + "]");
    }

    @Override
    public void onActivityCreated(@Nullable Bundle savedInstanceState) {
        super.onActivityCreated(savedInstanceState);
        Log.d(TAG, "onActivityCreated() called with: savedInstanceState = [" + savedInstanceState + "]");
    }

    @Override
    public void onStart() {
        super.onStart();
        Log.d(TAG, "onStart() called");
    }

    @Override
    public void onResume() {
        super.onResume();
        Log.d(TAG, "onResume() called");
    }

    @Override
    public void onPause() {
        super.onPause();
        Log.d(TAG, "onPause() called");
    }

    @Override
    public void onStop() {
        super.onStop();
        Log.d(TAG, "onStop() called");
    }

    @Override
    public void onDestroyView() {
        super.onDestroyView();
        Log.d(TAG, "onDestroyView() called");
    }

    @Override
    public void onDestroy() {
        super.onDestroy();
        Log.d(TAG, "onDestroy() called");
    }

    @Override
    public void onDetach() {
        super.onDetach();
        Log.d(TAG, "onDetach() called");
    }
}
该HelloFragment类中只重写了onAttach、onCreate等生命周期方法,使用log.d输出运行日志。
该Fragment的布局为:
<?xml version="1.0" encoding="utf-8"?>
<FrameLayout xmlns:android="http://schemas.android.com/apk/res/android"
android:layout_width="match_parent"
android:layout_height="match_parent"
android:orientation="vertical">
<TextView
android:layout_width="wrap_content"
android:layout_height="wrap_content"
android:layout_gravity="center"
android:text="@string/hello_fragment" />
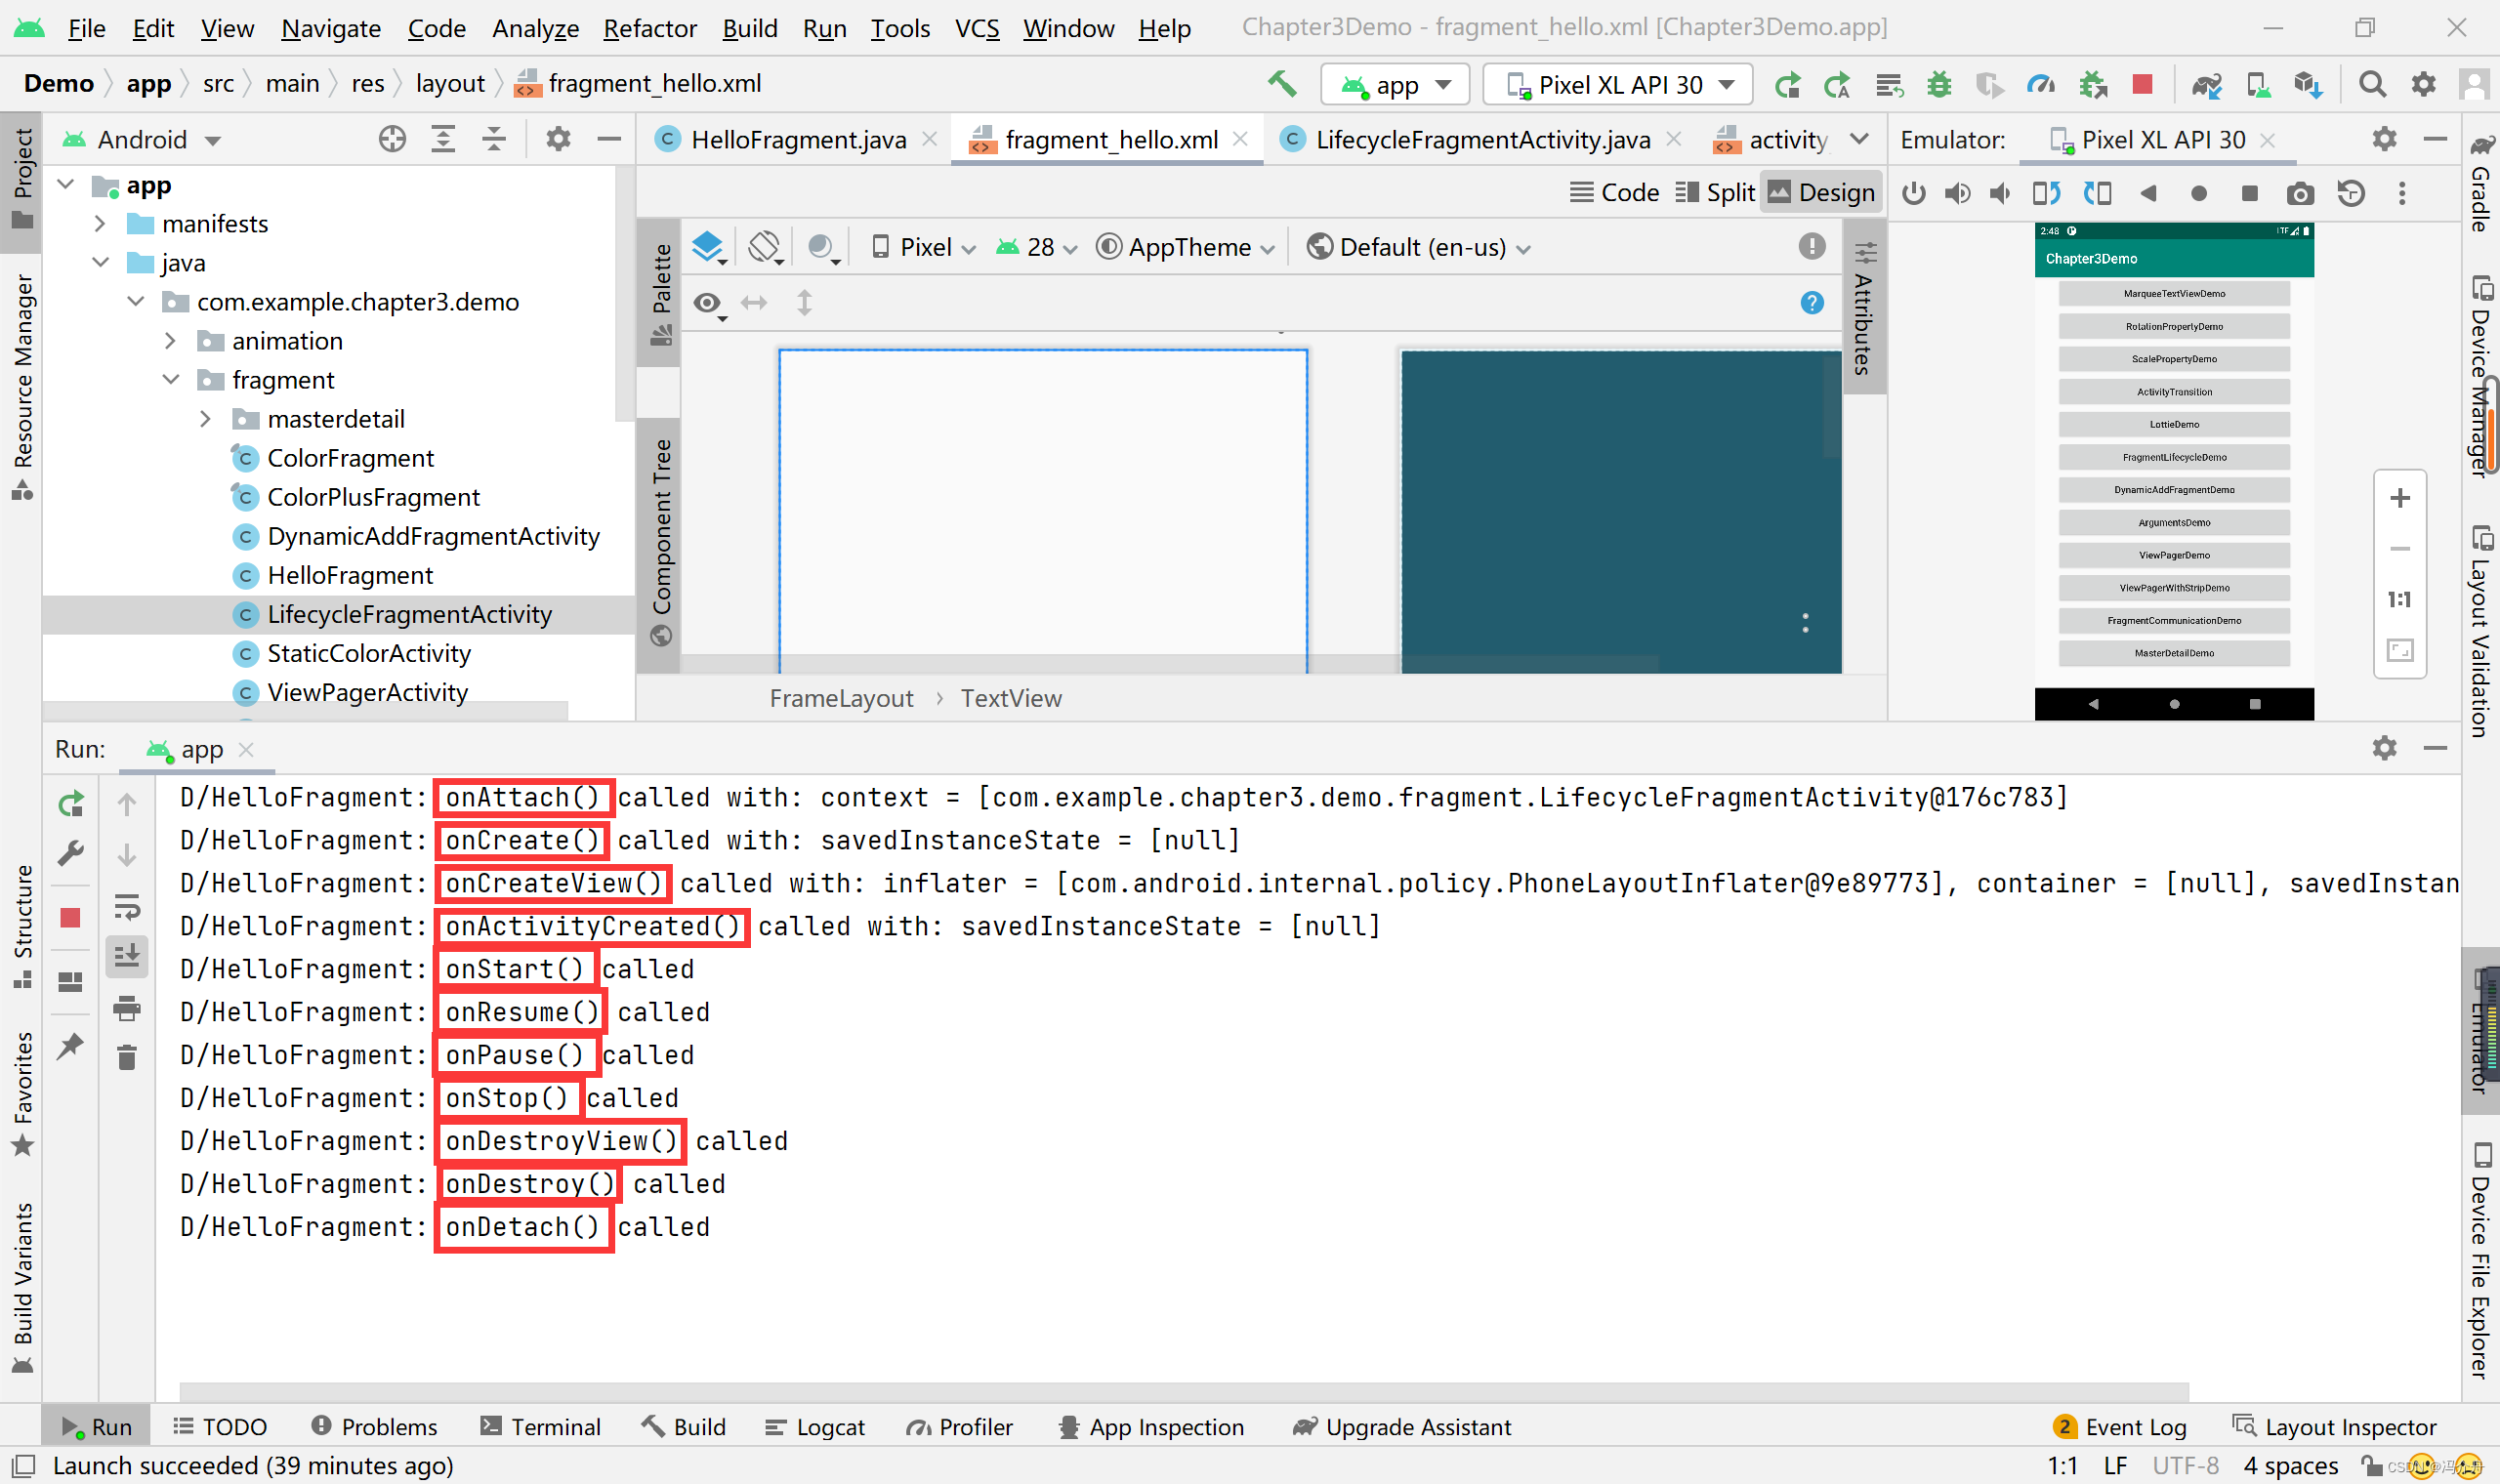
</FrameLayout>预览:

运行Activity后,可以由下图看到Fragment执行的生命周期:
3.2 动态添加Fragment示例
①编写Activity
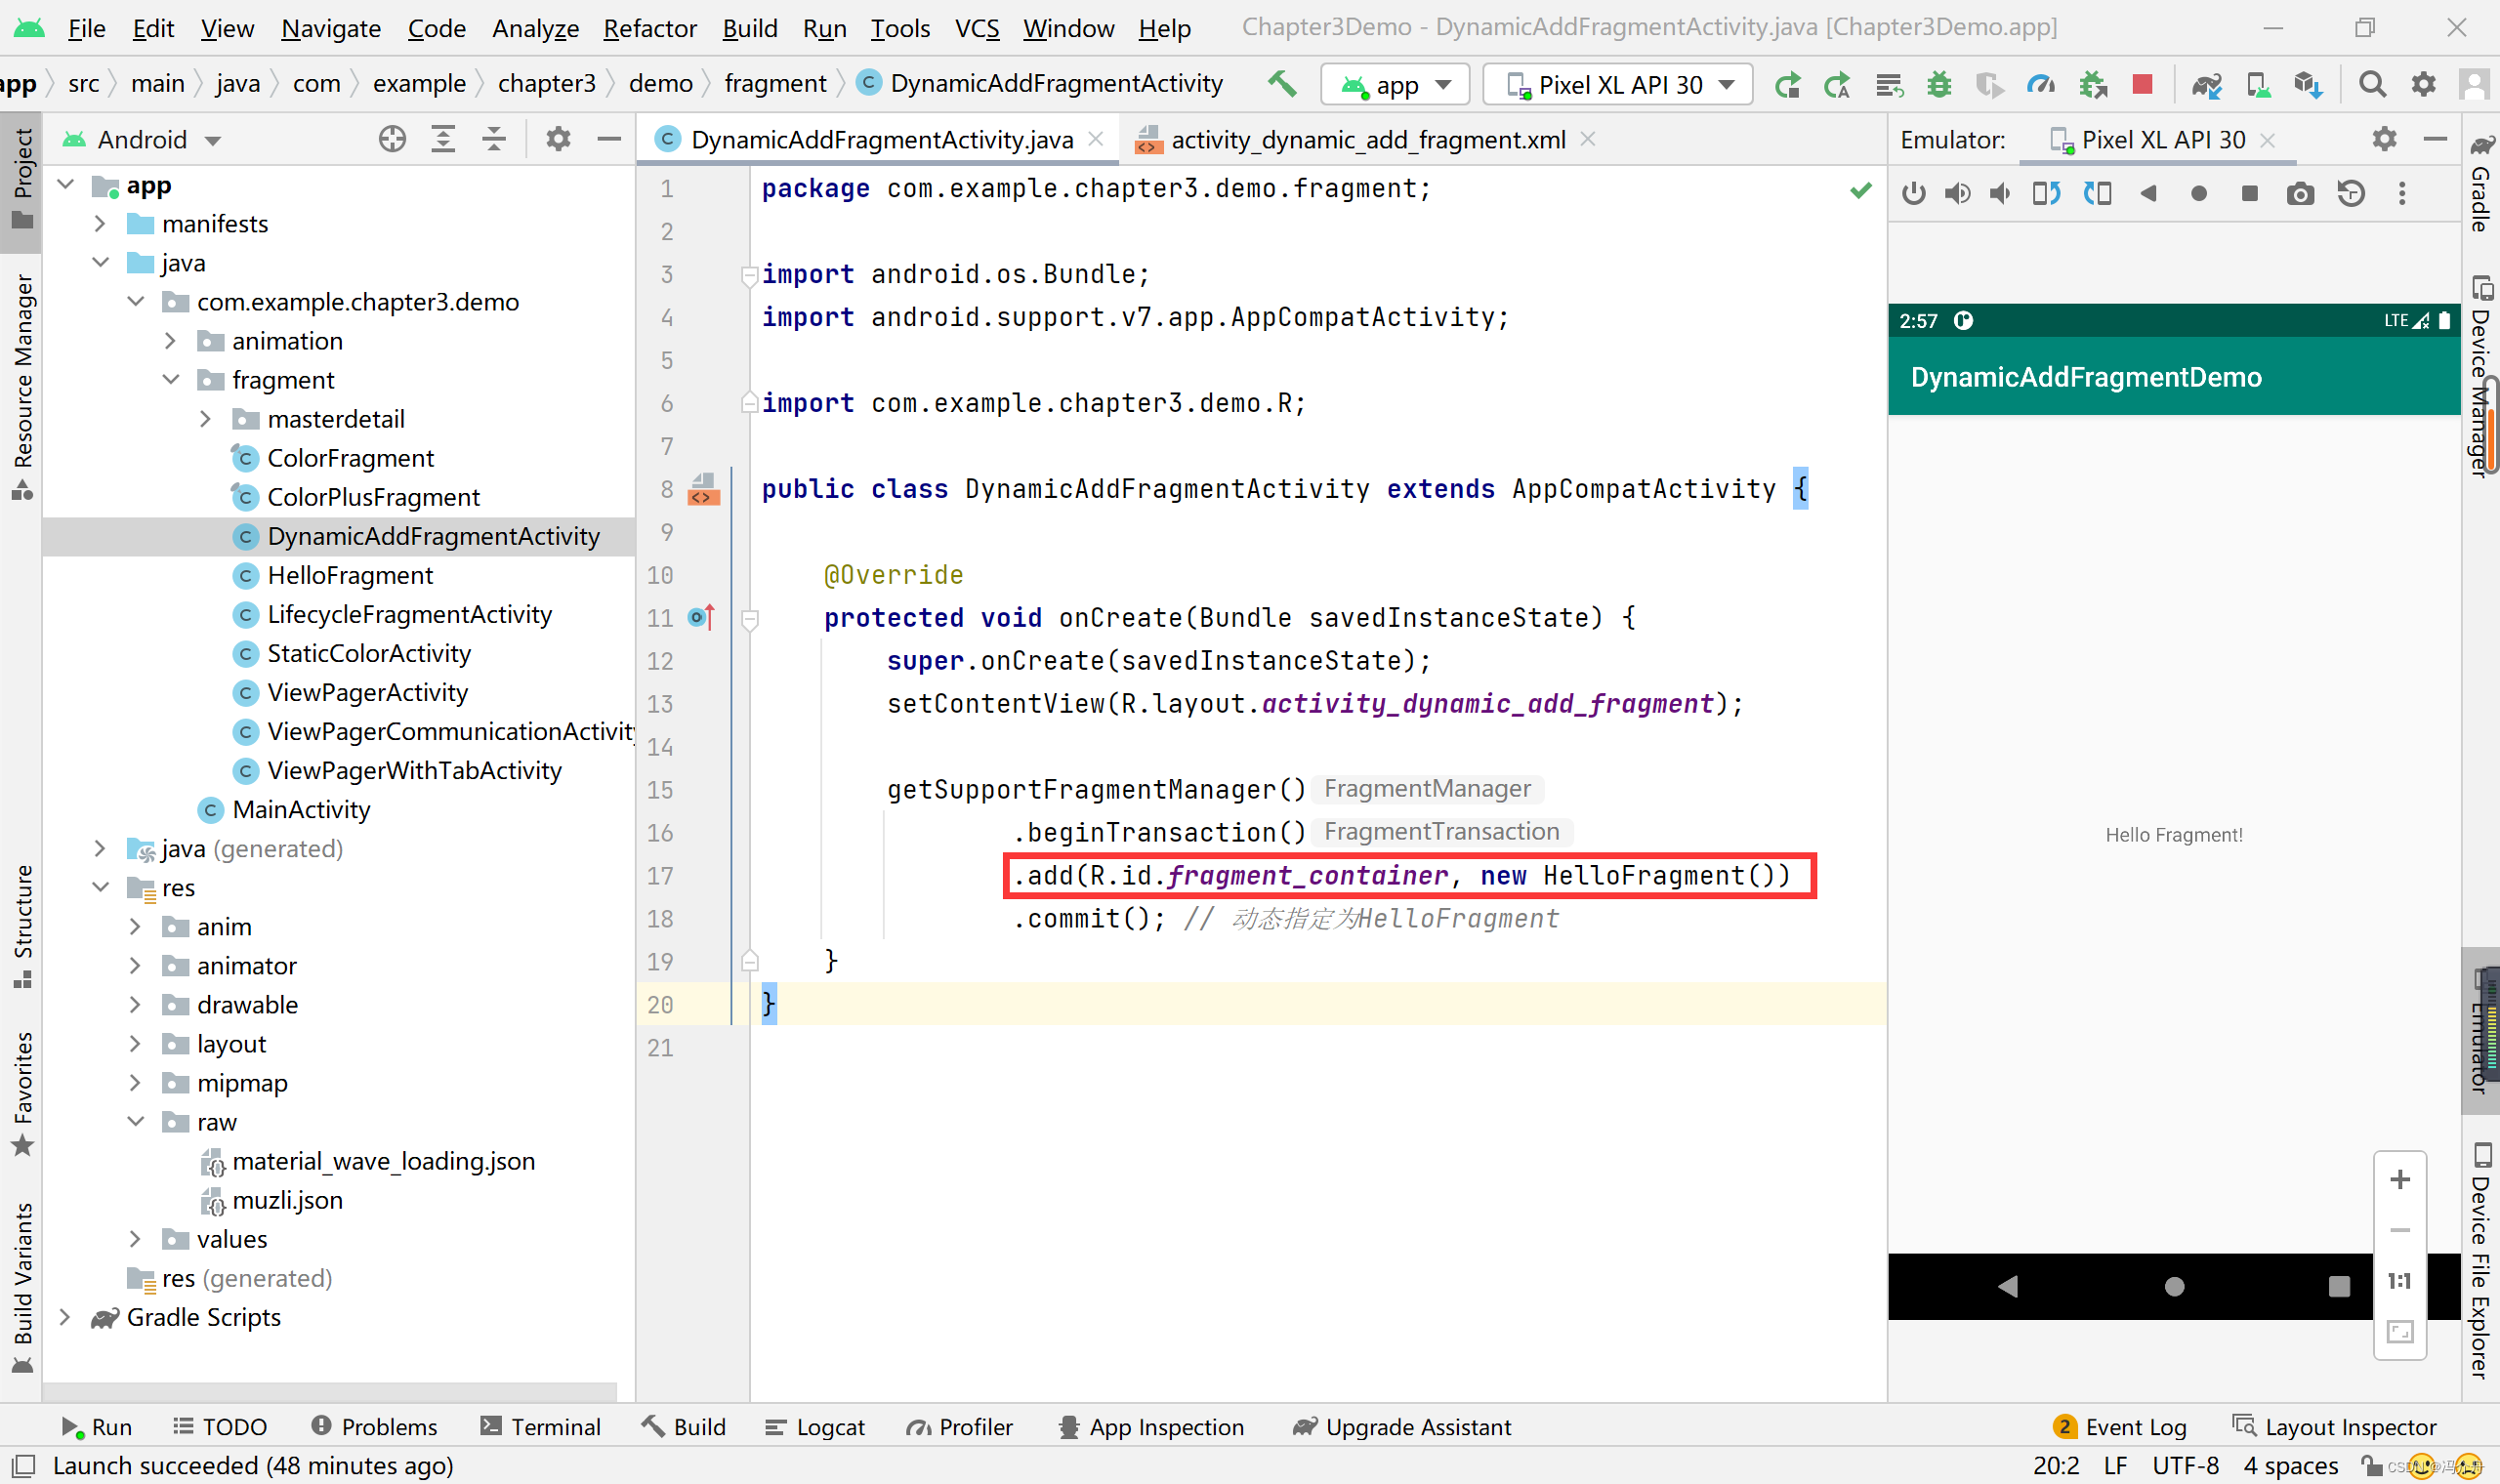
在Activity中使用 FragmentManager 添加HelloFragment。
该Activity的布局:
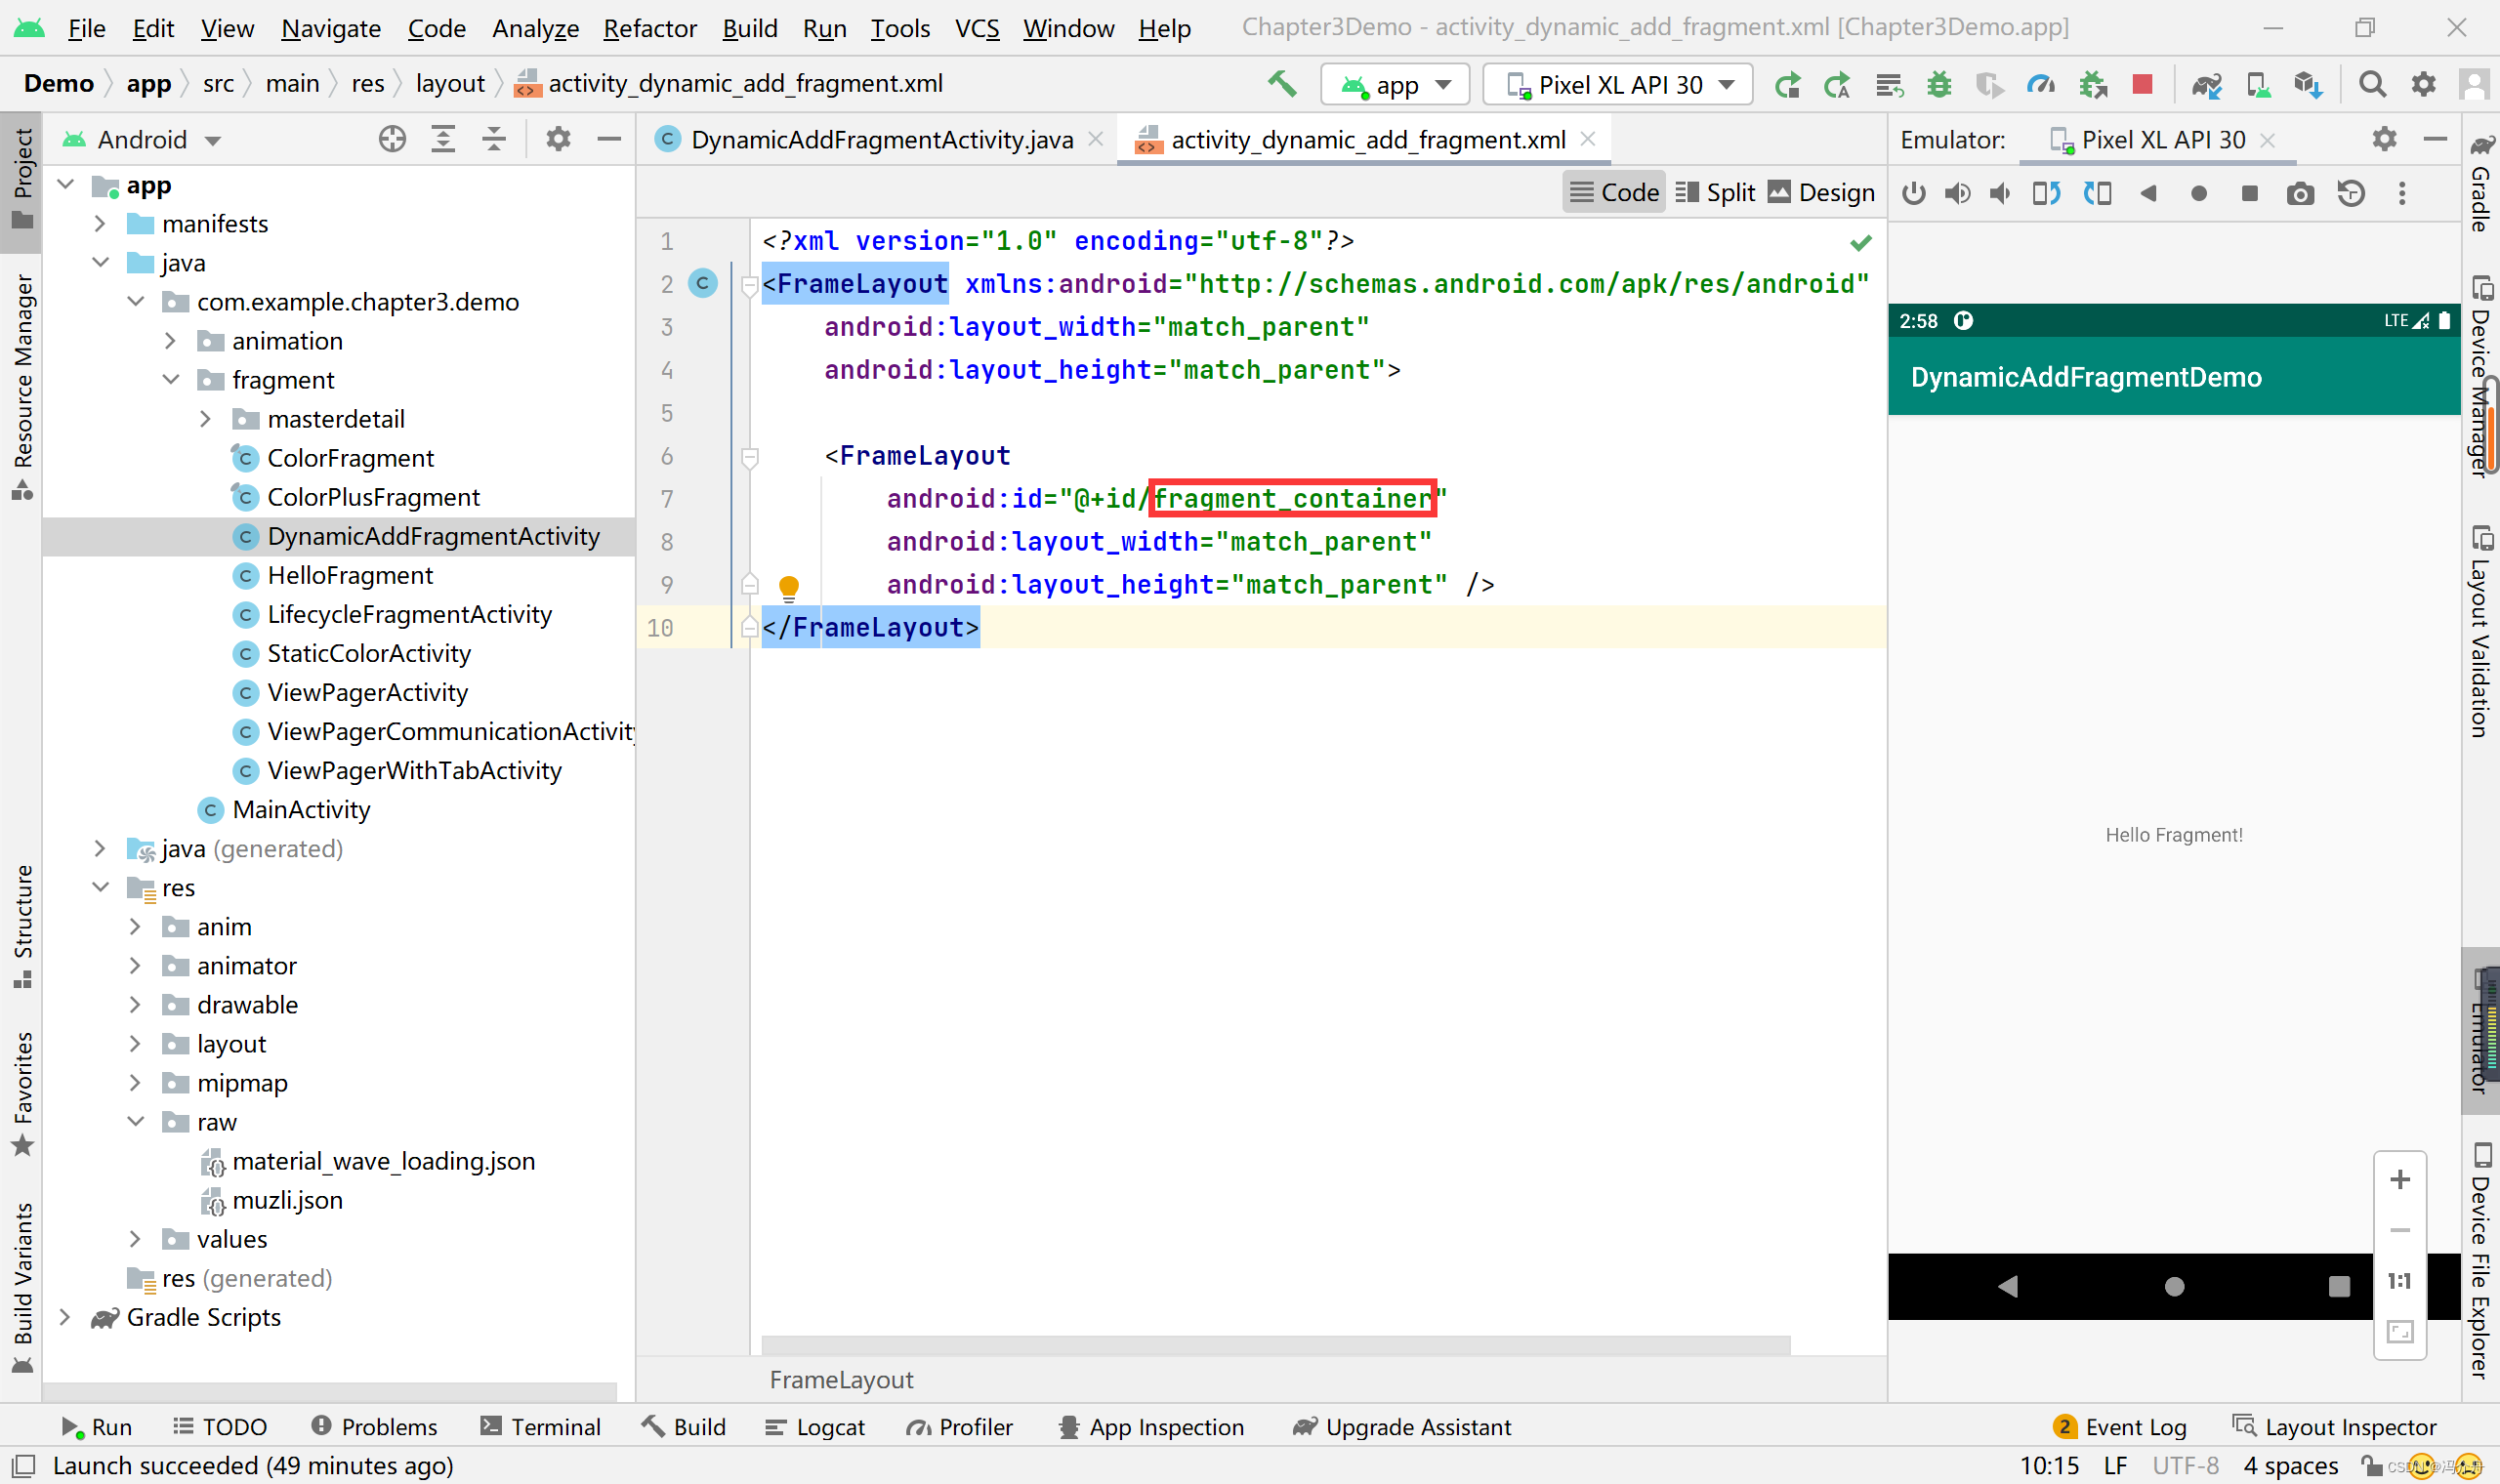
可以看到,一般设置为container名称的都是动态为Fragment预留位置。
接着编写Fragment类及其布局,该Activity仍然使用的是HelloFragment类,不再赘述。
3.3 ViewPager + Fragment示例
ViewPager概念:
<?xml version="1.0" encoding="utf-8"?>

<FrameLayout xmlns:android="http://schemas.android.com/apk/res/android"
    android:layout_width="match_parent"
    android:layout_height="match_parent">

    <android.support.v4.view.ViewPager
        android:id="@+id/view_pager"
        android:layout_width="match_parent"
        android:layout_height="match_parent" />

</FrameLayout>②通过 Adapter 配置页面的 Fragment
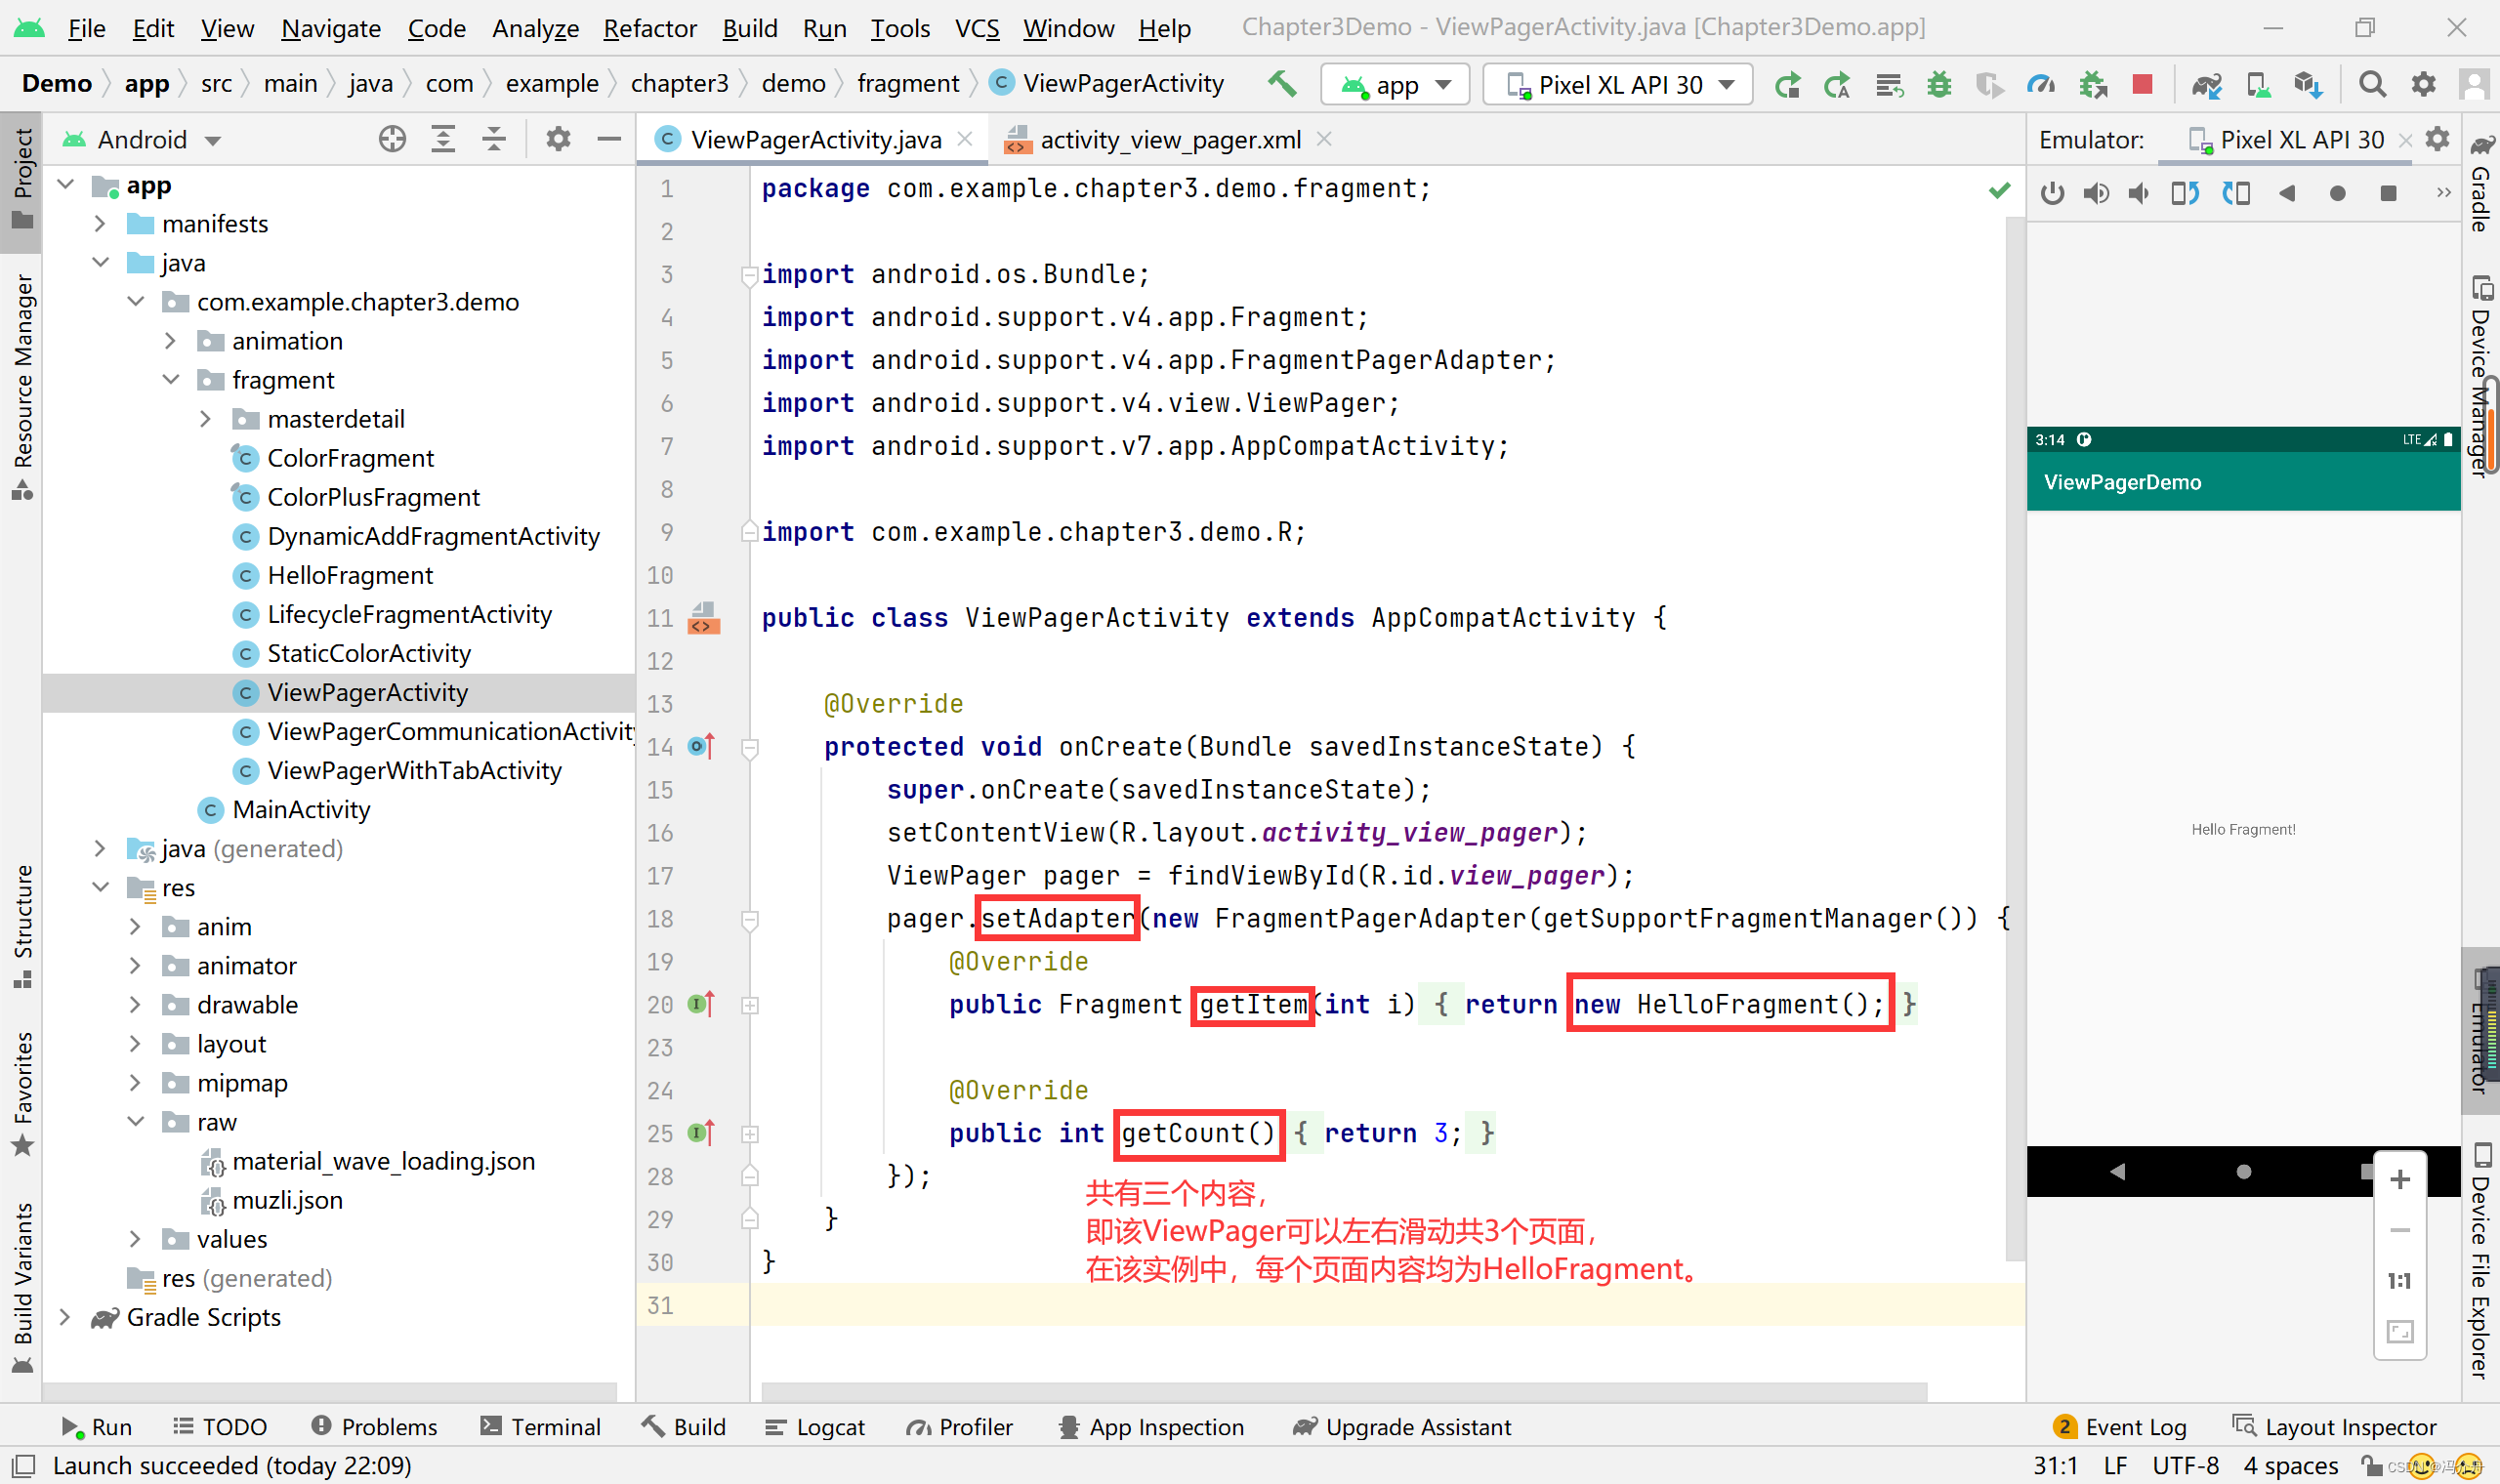
编写HelloFragment类,仍然使用HelloFragment类,不再赘述。
3.4ViewPager + TabLayout示例
①在布局 xml 中继续添加 TabLayout
<?xml version="1.0" encoding="utf-8"?>

<LinearLayout xmlns:android="http://schemas.android.com/apk/res/android"
    android:layout_width="match_parent"
    android:layout_height="match_parent"
    android:orientation="vertical">

    <android.support.design.widget.TabLayout
        android:id="@+id/tab_layout"
        android:layout_width="match_parent"
        android:layout_height="40dp" />

    <android.support.v4.view.ViewPager
        android:id="@+id/view_pager"
        android:layout_width="match_parent"
        android:layout_height="match_parent" />

</LinearLayout>②在代码中对 ViewPager 和 TabLayout 建立关联
package com.example.chapter3.demo.fragment;

import android.os.Bundle;
import android.support.design.widget.TabLayout;
import android.support.v4.app.Fragment;
import android.support.v4.app.FragmentPagerAdapter;
import android.support.v4.view.ViewPager;
import android.support.v7.app.AppCompatActivity;

import com.example.chapter3.demo.R;

public class ViewPagerWithTabActivity extends AppCompatActivity {

    private static final int PAGE_COUNT = 3;

    @Override
    protected void onCreate(Bundle savedInstanceState) {
        super.onCreate(savedInstanceState);
        setContentView(R.layout.activity_view_pager_with_tab);
        // 找到内容的容器
        ViewPager pager = findViewById(R.id.view_pager);
        // 找到标题的容器
        TabLayout tabLayout = findViewById(R.id.tab_layout);
        // 通过适配器设置内容
        pager.setAdapter(new FragmentPagerAdapter(getSupportFragmentManager()) {
            @Override
            public Fragment getItem(int i) {
                return new HelloFragment();
            }

            @Override
            public int getCount() {
                return PAGE_COUNT;
            }

            @Override
            // 通过Adapter设置标题信息
            public CharSequence getPageTitle(int position) {
                return "Hello " + position;
            }
        });
        // 显示相对应的标题和内容
        tabLayout.setupWithViewPager(pager);
    }
}
实现效果如下:

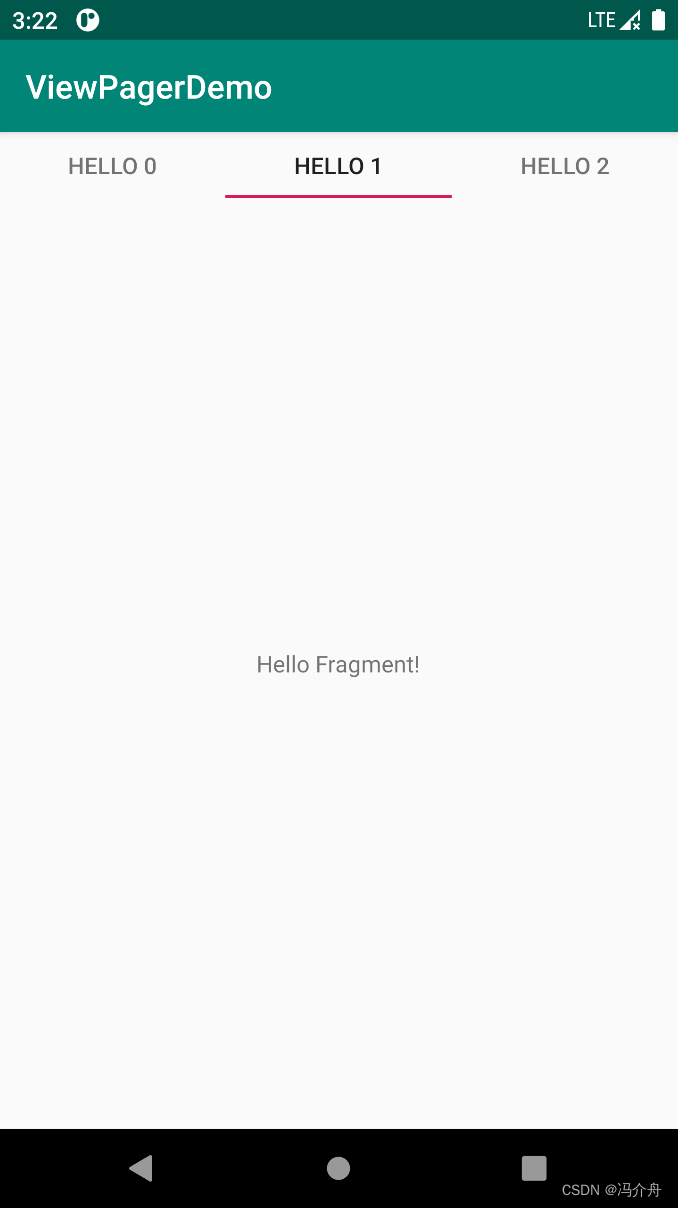
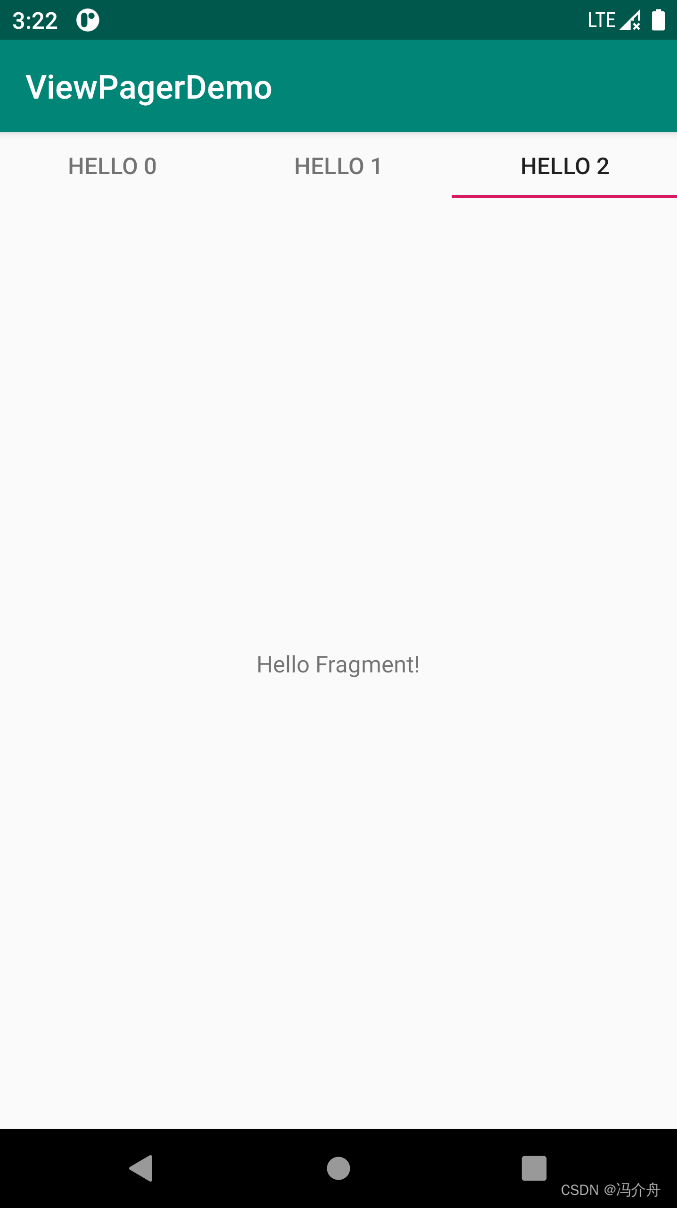
左右滑动,都可以显示对应的标题和内容,类似地,新闻,知乎等都用的该功能。
3.5 Activity向Fragment传信—— 构造 Fragment 时传递参数 (setArguments/getArguments)
使用效果:
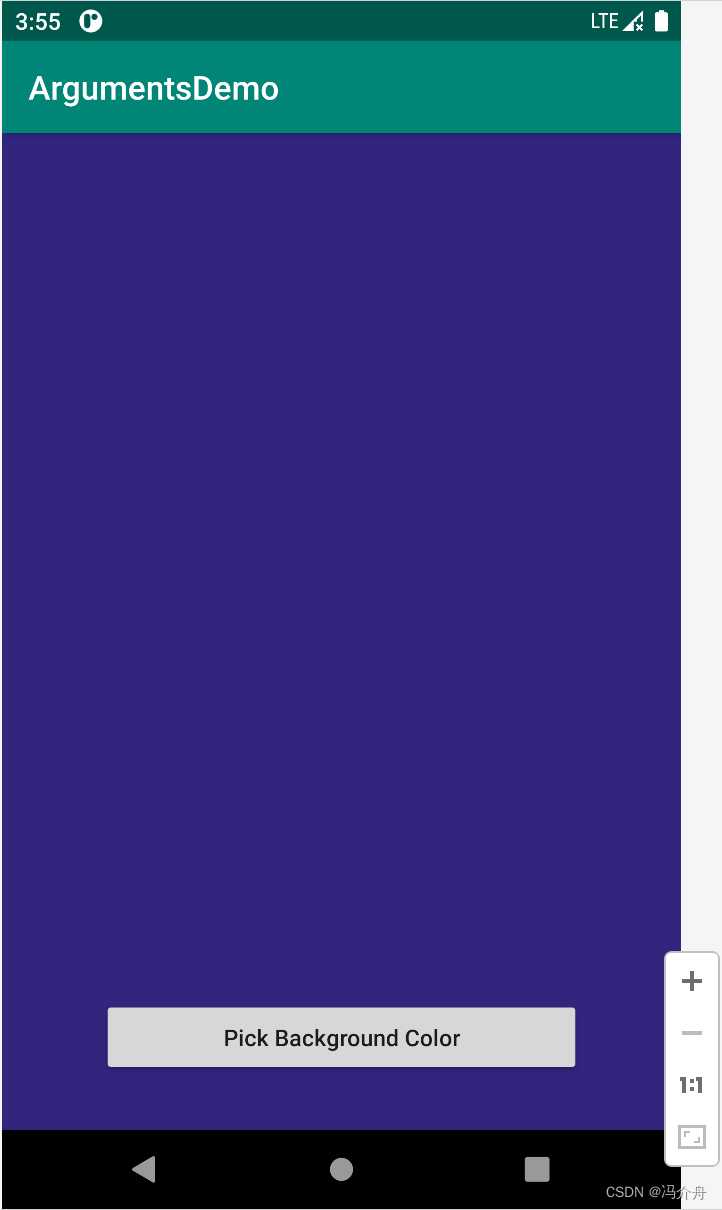
点击Pick Background Color后弹出颜色选择框,选择好颜色后,内容Fragment的背景会变成相应的颜色。即在Activity中选择的颜色参数传递给了Fragment。
内容部分id为fragment_container,看名知意,是一个Fragment的容器,下方有一个Button用于选择Fragment的背景颜色,每次选择了颜色后,会动态生成一个Fragment。
②编写Activity
package com.example.chapter3.demo.fragment;

import android.graphics.Color;
import android.support.v7.app.AppCompatActivity;
import android.os.Bundle;
import android.view.View;

import com.example.chapter3.demo.R;
import com.pes.androidmaterialcolorpickerdialog.ColorPicker;
import com.pes.androidmaterialcolorpickerdialog.ColorPickerCallback;

public class StaticColorActivity extends AppCompatActivity {

    private int lastColor = Color.BLUE;

    @Override
    protected void onCreate(Bundle savedInstanceState) {
        super.onCreate(savedInstanceState);
        setContentView(R.layout.activity_static_color);

        findViewById(R.id.btn_pick_color).setOnClickListener(new View.OnClickListener() {
            @Override
            public void onClick(View v) {
                // 颜色选择器
                ColorPicker picker = new ColorPicker(StaticColorActivity.this);
                picker.setColor(lastColor);
                picker.enableAutoClose();
                picker.setCallback(new ColorPickerCallback() {
                    @Override
                    public void onColorChosen(int color) {
                        lastColor = color;
                        // 动态的方式replace新的Fragment
                        // 动态方式:1.要有Container(id为fragment_container);
                        // 2.替换的Fragment的内容(使用ColorFragment.newInstance(color)创建新的带有颜色值参数的Fragment)
                        getSupportFragmentManager()
                                .beginTransaction()
                                .replace(R.id.fragment_container, ColorFragment.newInstance(color))
                                .commit();
                    }
                });
                picker.show();
            }
        });
    }
}
实现ColorFragment类:
package com.example.chapter3.demo.fragment;

import android.graphics.Color;
import android.os.Bundle;
import android.support.annotation.NonNull;
import android.support.annotation.Nullable;
import android.support.v4.app.Fragment;
import android.view.LayoutInflater;
import android.view.View;
import android.view.ViewGroup;

import com.example.chapter3.demo.R;

public final class ColorFragment extends Fragment {
    private static final String KEY_EXTRA_COLOR = "extra_color";
    // 使用标准的静态工厂方法,在New的时候使用setArguments携带参数。
    public static ColorFragment newInstance(int color) {
        ColorFragment cf = new ColorFragment();
        // 定义一个Bundle参数,Bundle是Intent的参数数据类型。
        Bundle args = new Bundle();
        args.putInt(KEY_EXTRA_COLOR, color);
        // 获取Activity传过来的颜色值参数
        cf.setArguments(args);
        return cf;
    }

    @Override
    public View onCreateView(@NonNull LayoutInflater inflater,
                             @Nullable ViewGroup container,
                             // savedInstanceState用于销毁后保留使用的,不是Activity传来的参数。
                             @Nullable Bundle savedInstanceState) {
        int color = Color.BLUE;
        // 使用getArguments得到Activity的参数值
        Bundle args = getArguments();
        if (args != null) {
            color = args.getInt(KEY_EXTRA_COLOR, Color.BLUE);
        }
        View view = inflater.inflate(R.layout.fragment_color, container, false);
        view.setBackgroundColor(color);//设置颜色背景
        return view;
    }
}
使用setArguments和getArguments方法传递参数,而不是使用构造方法传参原因:
Fragment的生命周期,在被销毁后重建时,只会调用无参的构造函数,如果我们强制写了有参构造函数,而没有写无参构造函数,会报错误,因此如果需要Activity向Fragment传参,不能使用有参构造方法传递。
3.6 Fragment向Activity传递信息——通过接口和回调
使用效果:
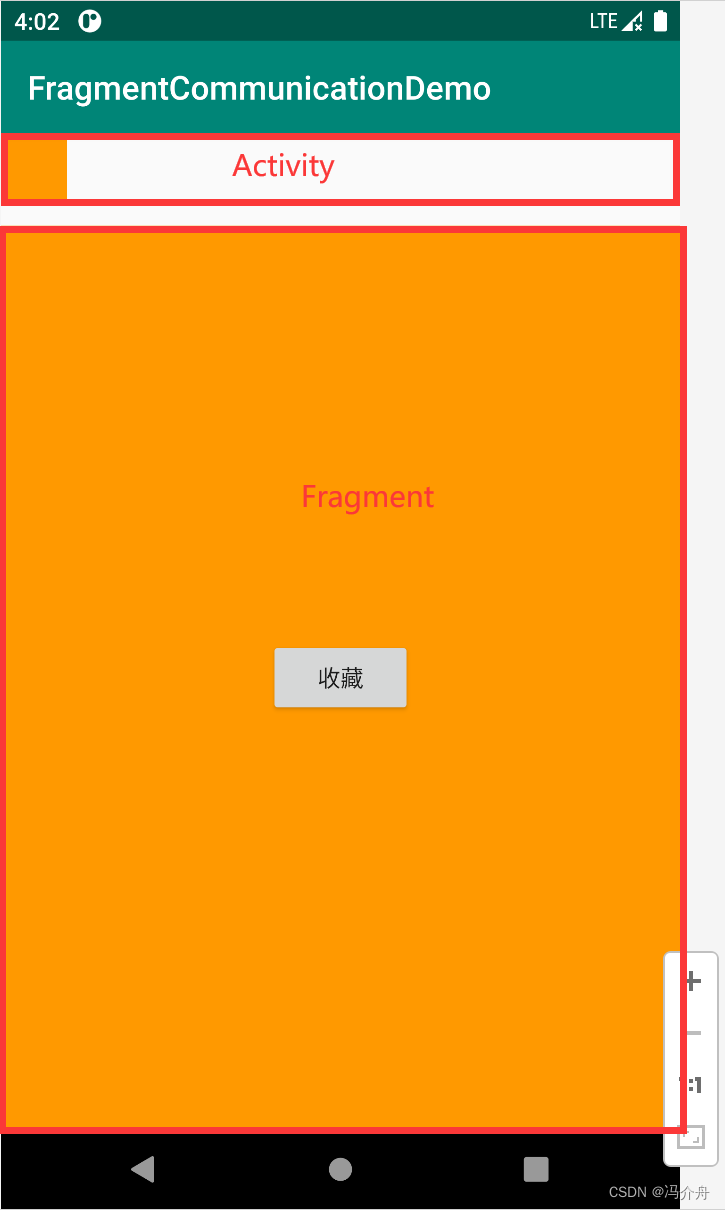
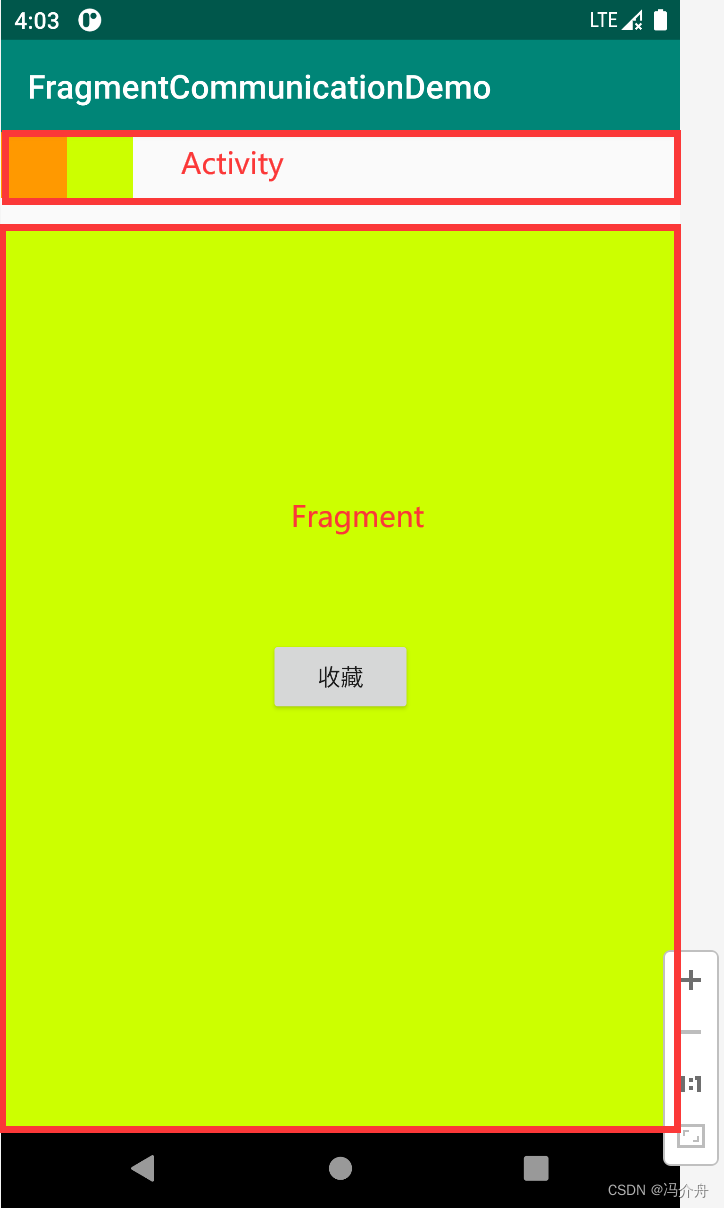
左右滑动有不同的Fragment,当点击相应Fragment的收藏按钮后,可以在Activity收藏该颜色。
①Activity布局

②编写Activity
Activity包含了两个部分:
- Fragment通过Adapter适配器设置其内容:Activity继承自Fragment的Listener接口,需要实现该接口的onCollectColor方法,即得到了Fragment传来的参数。
- RecycleView通过Adapter设置其内容
package com.example.chapter3.demo.fragment;

import android.graphics.Color;
import android.os.Bundle;
import android.support.annotation.NonNull;
import android.support.v4.app.Fragment;
import android.support.v4.app.FragmentPagerAdapter;
import android.support.v4.view.ViewPager;
import android.support.v7.app.AppCompatActivity;
import android.support.v7.widget.LinearLayoutManager;
import android.support.v7.widget.RecyclerView;
import android.view.LayoutInflater;
import android.view.View;
import android.view.ViewGroup;

import com.example.chapter3.demo.R;

import java.util.ArrayList;
import java.util.List;

public class ViewPagerCommunicationActivity extends AppCompatActivity
        implements ColorPlusFragment.Listener {
    private ViewPager mViewPager;
    private RecyclerView mCollectView;
    private CollectColorAdapter mCollectAdapter;

    @Override
    protected void onCreate(Bundle savedInstanceState) {
        super.onCreate(savedInstanceState);
        setContentView(R.layout.activity_view_pager_communication);
        // 找到下方的Fragment容器
        mViewPager = findViewById(R.id.view_pager);
        // 找到上方所收藏的颜色
        mCollectView = findViewById(R.id.collect_view);

        // Fragment容器通过Adapter设置内容
        mViewPager.setAdapter(new FragmentPagerAdapter(getSupportFragmentManager()) {

            private final static int TOTAL = 10;

            // 调用ColorPlusFragment的new方法,创建Fragment,有十种不同的颜色。
            @Override
            public Fragment getItem(int i) {
                return ColorPlusFragment.newInstance(Color.HSVToColor(new float[]{i * 360.f / TOTAL, 1.0f, 1.0f}));
            }

            // 定义了10个不同的Fragment
            @Override
            public int getCount() {
                return TOTAL;
            }
        });

        // 收藏按钮
        mCollectAdapter = new CollectColorAdapter();
        mCollectView.setLayoutManager(new LinearLayoutManager(this, LinearLayoutManager.HORIZONTAL, false));
        mCollectView.setAdapter(mCollectAdapter);
    }

    // 继承了Listener接口,需要实现该接口。
    @Override
    public void onCollectColor(int color) {

        mCollectAdapter.addColor(color);
    }

    private static class ColorViewHolder extends RecyclerView.ViewHolder {
        public ColorViewHolder(@NonNull View itemView) {
            super(itemView);
        }
    }

    // 在Activity的收藏夹部分使用RecycleView实现
    private static class CollectColorAdapter extends RecyclerView.Adapter<ColorViewHolder> {

        private List<Integer> mColorList = new ArrayList<>();

        @NonNull
        @Override
        public ColorViewHolder onCreateViewHolder(@NonNull ViewGroup viewGroup, int i) {
            return new ColorViewHolder(LayoutInflater.from(viewGroup.getContext()).inflate(R.layout.item_color, viewGroup, false));
        }

        @Override
        public void onBindViewHolder(@NonNull ColorViewHolder colorViewHolder, int i) {
            int color = mColorList.get(i);
            colorViewHolder.itemView.setBackgroundColor(color);
        }

        @Override
        public int getItemCount() {

            return mColorList.size();
        }

        // addColor自己声明
        public void addColor(int color) {
            mColorList.add(color); // 将新收藏的颜色添加到集合
            notifyDataSetChanged(); // 调用该方法可以重新刷新RecycleView
        }
    }
}
③Fragment类
package com.example.chapter3.demo.fragment;

import android.content.Context;
import android.graphics.Color;
import android.os.Bundle;
import android.support.annotation.NonNull;
import android.support.annotation.Nullable;
import android.support.v4.app.Fragment;
import android.view.LayoutInflater;
import android.view.View;
import android.view.ViewGroup;

import com.example.chapter3.demo.R;

public final class ColorPlusFragment extends Fragment {
    private static final String KEY_EXTRA_COLOR = "extra_color";

    // 定义Listener接口,Activity会实现该接口。
    public interface Listener {
        void onCollectColor(int color);
    }

    // 定义Listener,相当于Activity观察者。
    private Listener mListener;

    public static ColorPlusFragment newInstance(int color) {
        ColorPlusFragment cf = new ColorPlusFragment();
        Bundle args = new Bundle();
        args.putInt(KEY_EXTRA_COLOR, color);
        cf.setArguments(args);
        return cf;
    }

    @Override
    public void onAttach(Context context) {
        super.onAttach(context);
        if (context instanceof Listener) {
            mListener = (Listener) context;
        }
    }

    @Nullable
    @Override
    public View onCreateView(@NonNull LayoutInflater inflater, @Nullable ViewGroup container, @Nullable Bundle savedInstanceState) {
        Bundle args = getArguments();
        final int color = args != null ? args.getInt(KEY_EXTRA_COLOR, Color.BLUE) : Color.BLUE;
        View view = inflater.inflate(R.layout.fragment_color_plus, container, false);
        view.setBackgroundColor(color);
        view.findViewById(R.id.btn_collect).setOnClickListener(new View.OnClickListener() {
            @Override
            public void onClick(View v) {
                if (mListener != null) {
                    mListener.onCollectColor(color);// 点击了收藏按钮,Listener发生变化,回调onCollectColor。
                }
            }
        });
        return view;
    }
}
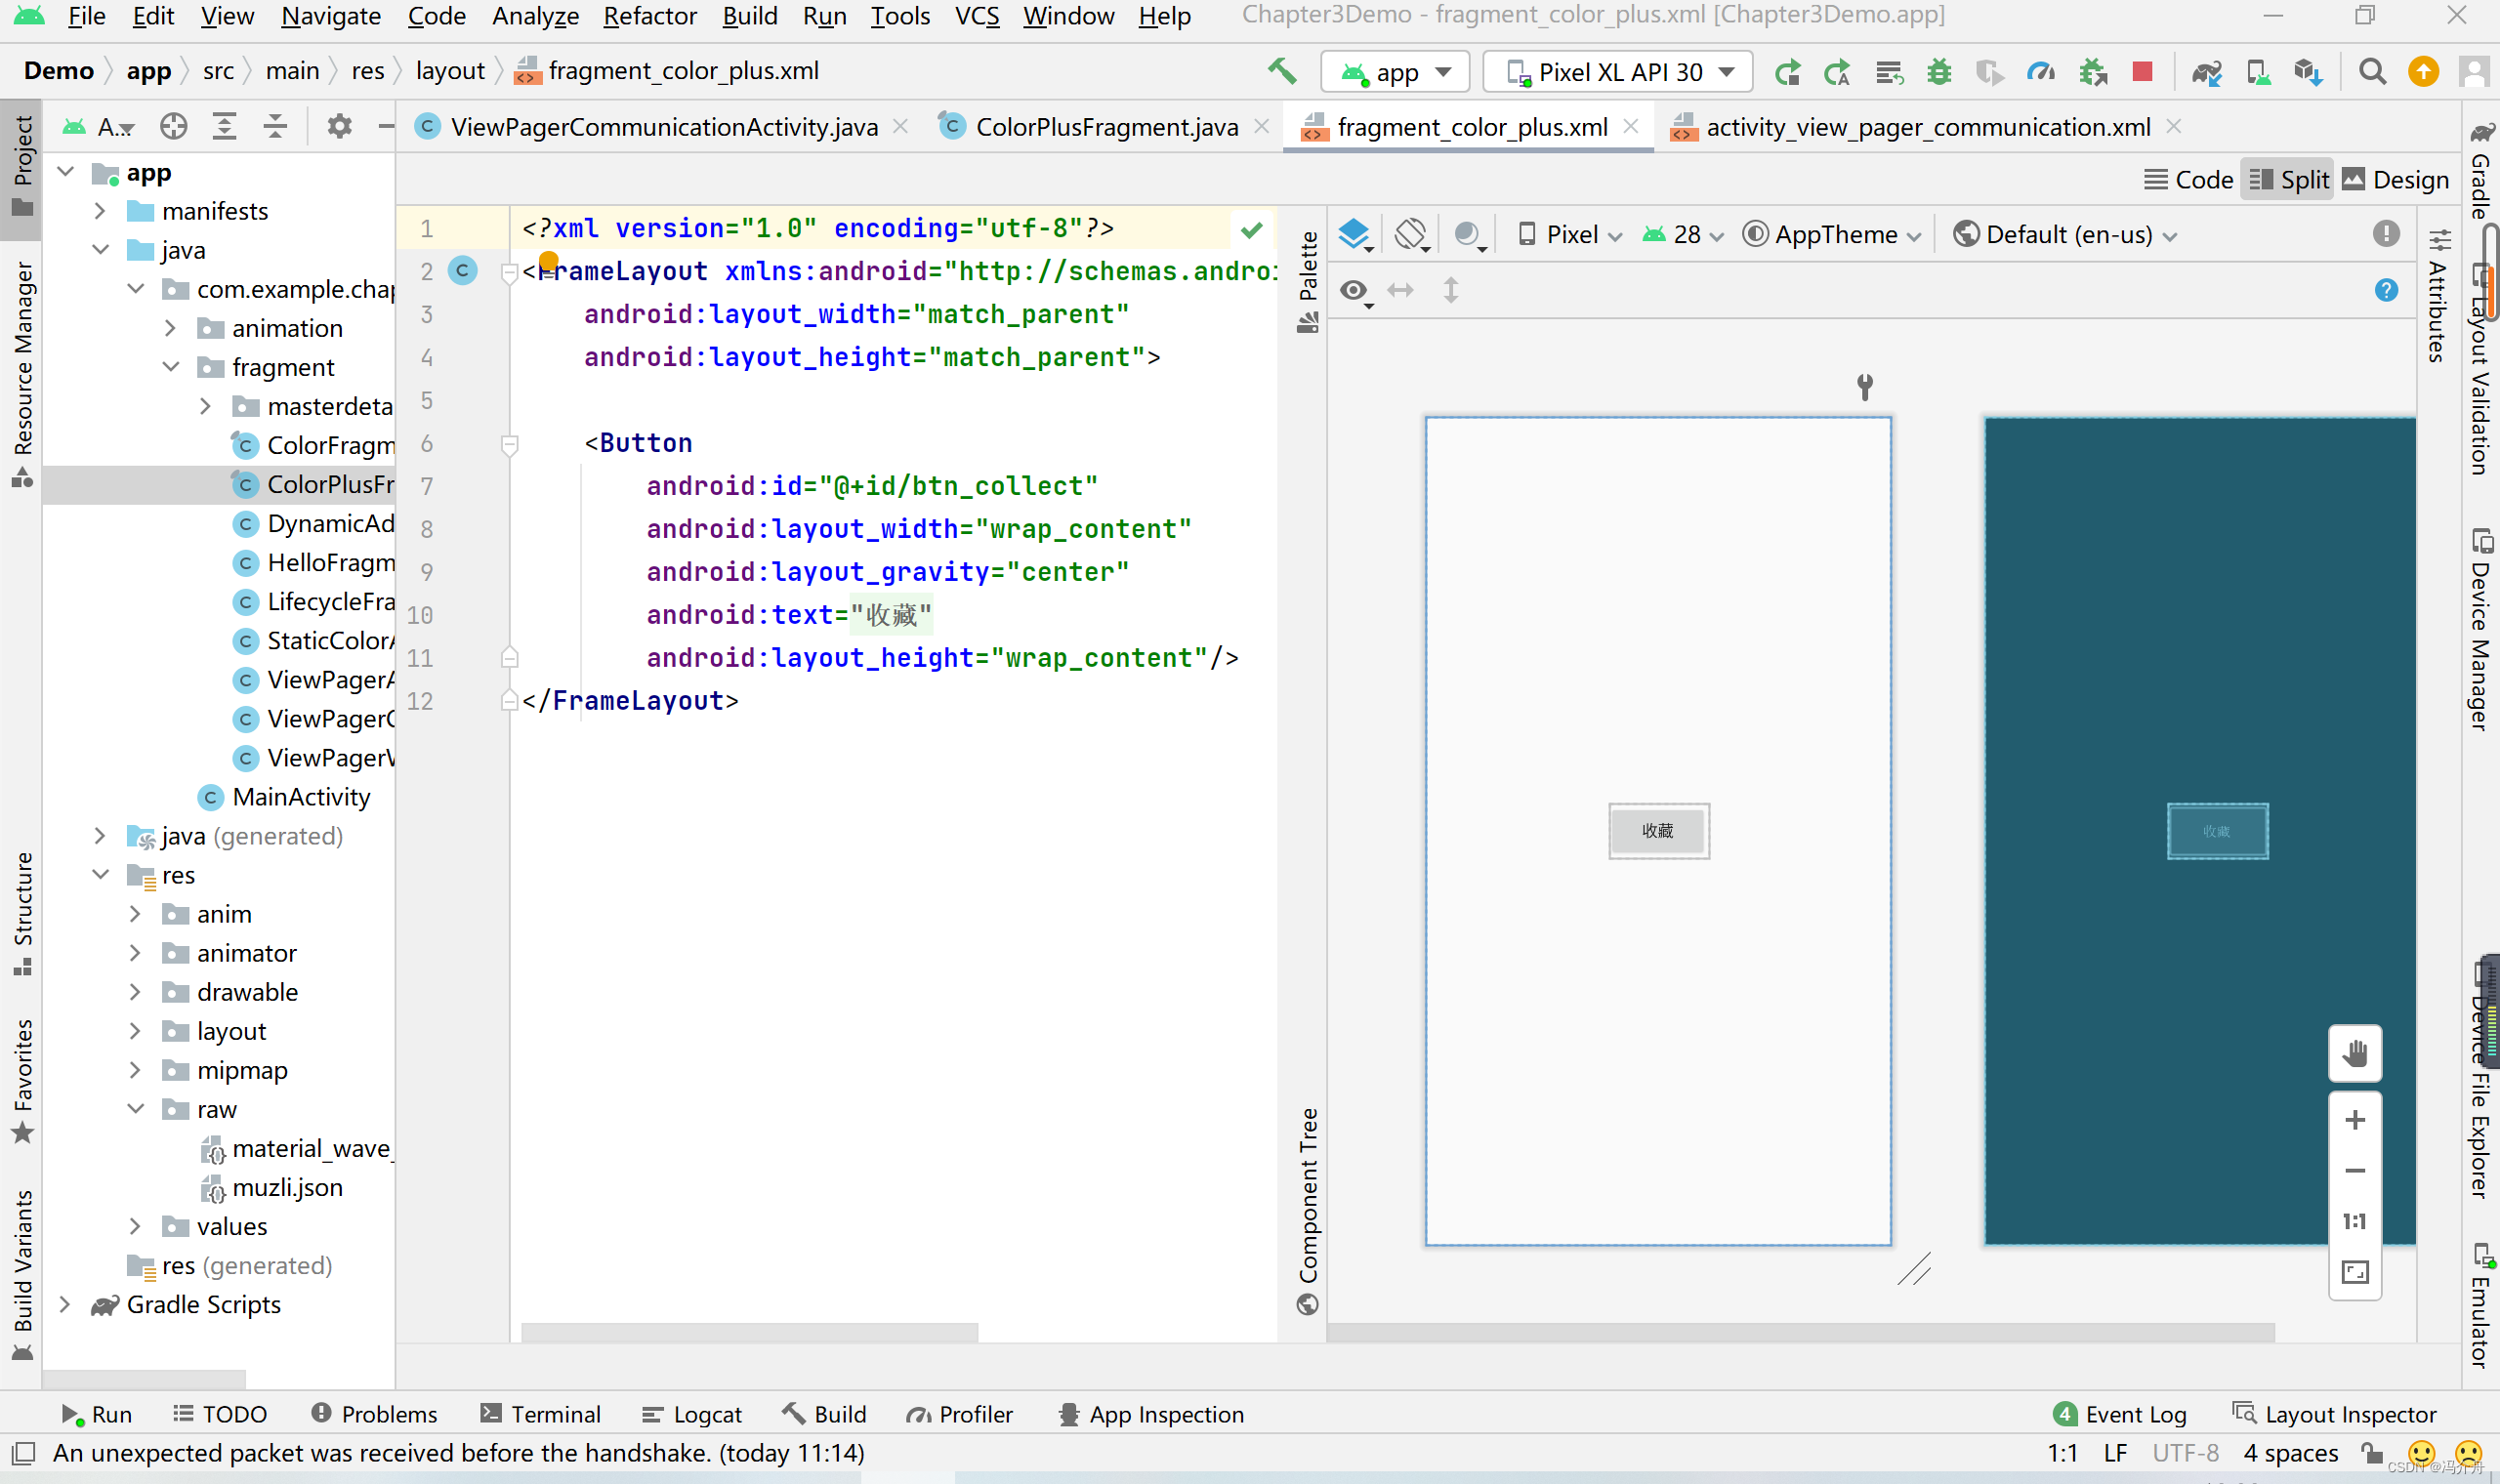
④Fragment布局:


 1万+
1万+


 被折叠的 条评论
为什么被折叠?
被折叠的 条评论
为什么被折叠?
 到【灌水乐园】发言


