


1.名词介绍
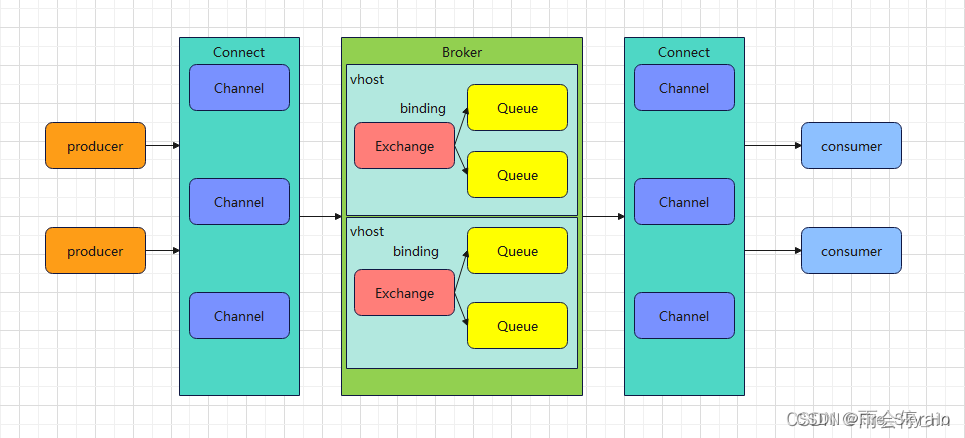
Broker: 接收和分发消息的应用,RabbitMQ Server就是Message Broker
Connection: publisher / consumer和 broker之间的TCP连接
Channel:如果每一次访问RabbitMQ都建立一个Connection,在消息量大的时候建立TCP
Connection的开销将是巨大的,效率也较低。Channel是在connection 内部建立的逻辑连接,如果应用程序支持多线程,通常每个thread创建单独的channel进行通讯,AMQP method包含了channel id 帮助客户端和message broker识别 channel,所以channel 之间是完全隔离的。Channel作为轻量级的Connection极大减少了操作系统建TCP connection的开销
Exchange: message 到达 broker 的第一站,根据分发规则,匹配查询表中的 routing key,分发消息到queue 中去。常用的类型有: direct (point-to-point), topic(publish-subscribe) and fanout(multicast)
Routing Key:生产者将消息发送到交换机时会携带一个key,来指定路由规则
binding Key:在绑定Exchange和Queue时,会指定一个BindingKey,生产者发送消息携带的RoutingKey会和bindingKey对比,若一致就将消息分发至这个队列
vHost 虚拟主机:每一个RabbitMQ服务器可以开设多个虚拟主机每一个vhost本质上是一个mini版的RabbitMQ服务器,拥有自己的 “交换机exchange、绑定Binding、队列Queue”,更重要的是每一个vhost拥有独立的权限机制,这样就能安全地使用一个RabbitMQ服务器来服务多个应用程序,其中每个vhost服务一个应用程序。
2.安装
2.1下载安装包
https://download.csdn.net/download/Fire_Sky_Ho/87765198
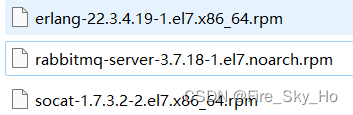
2.2 上传并安装
使用rpm -ivh 文件名.rpm安装上面那三个包
安装web管理插件rabbitmq-plugins enable rabbitmq-management
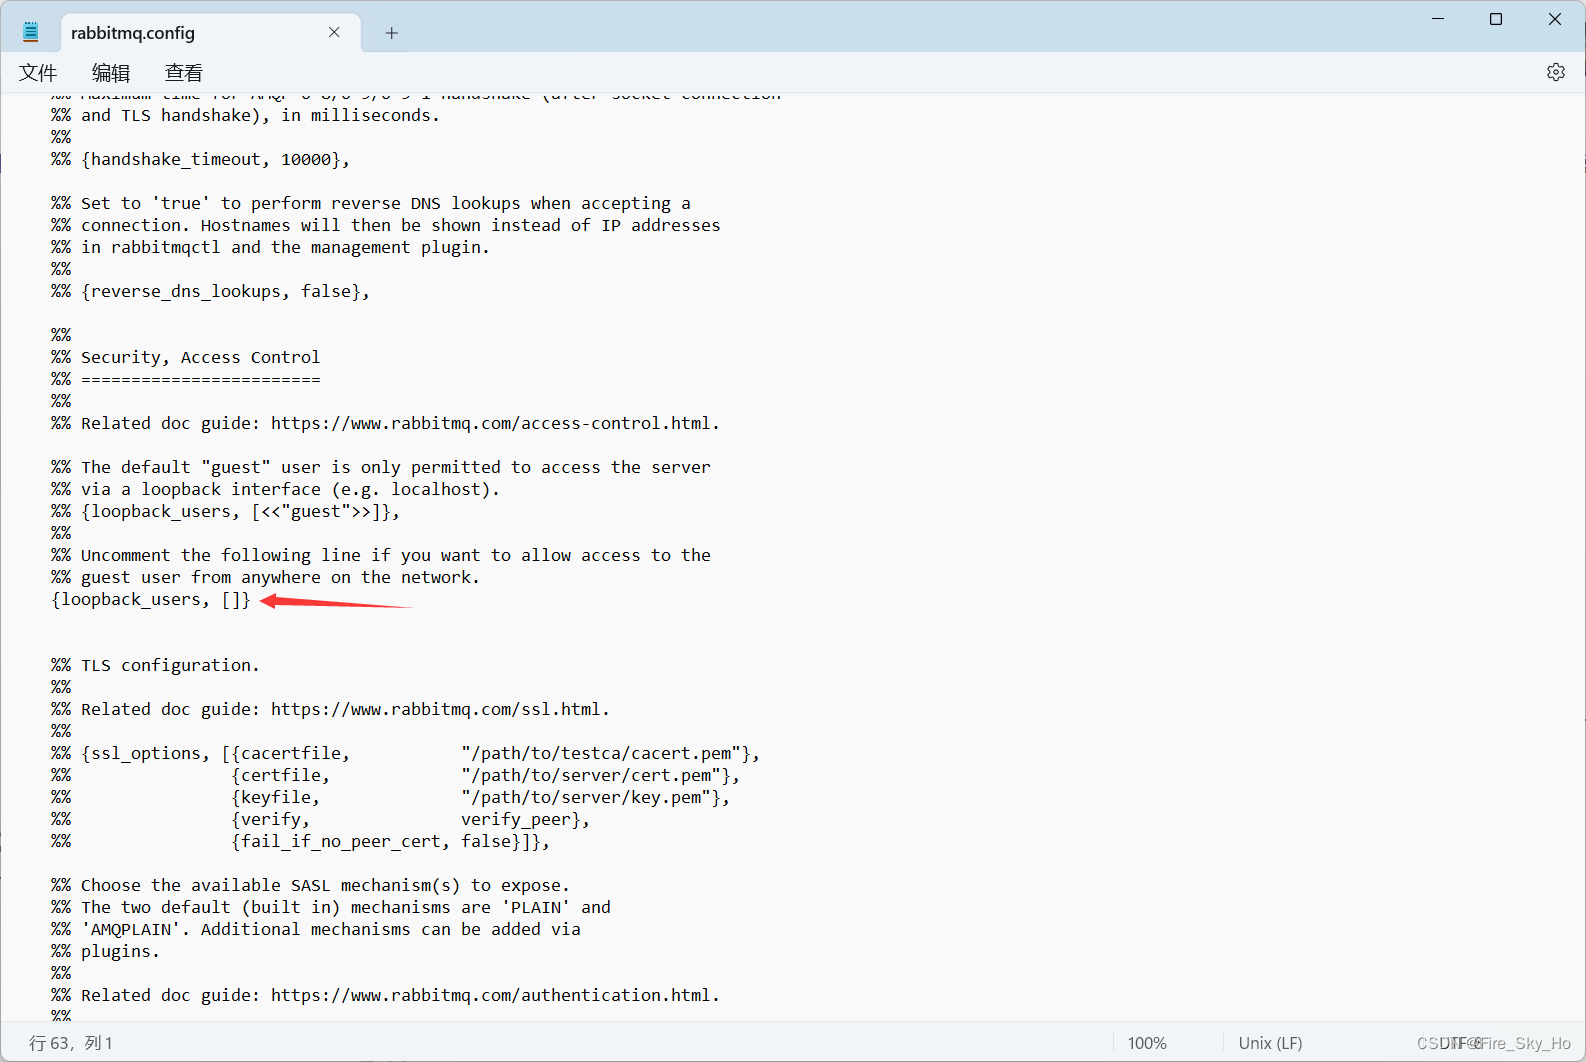
安装完,复制/usr/share/doc/rabbitmq-server-3.7.18/rabbitmq.config.example文件到/etc/rabbitmq/目录下
rabbitmq默认从这个目录读取配置文件
然后修改下配置文件,%% {loopback_users, []},改成{loopback_users, []},注意原先的逗号去掉
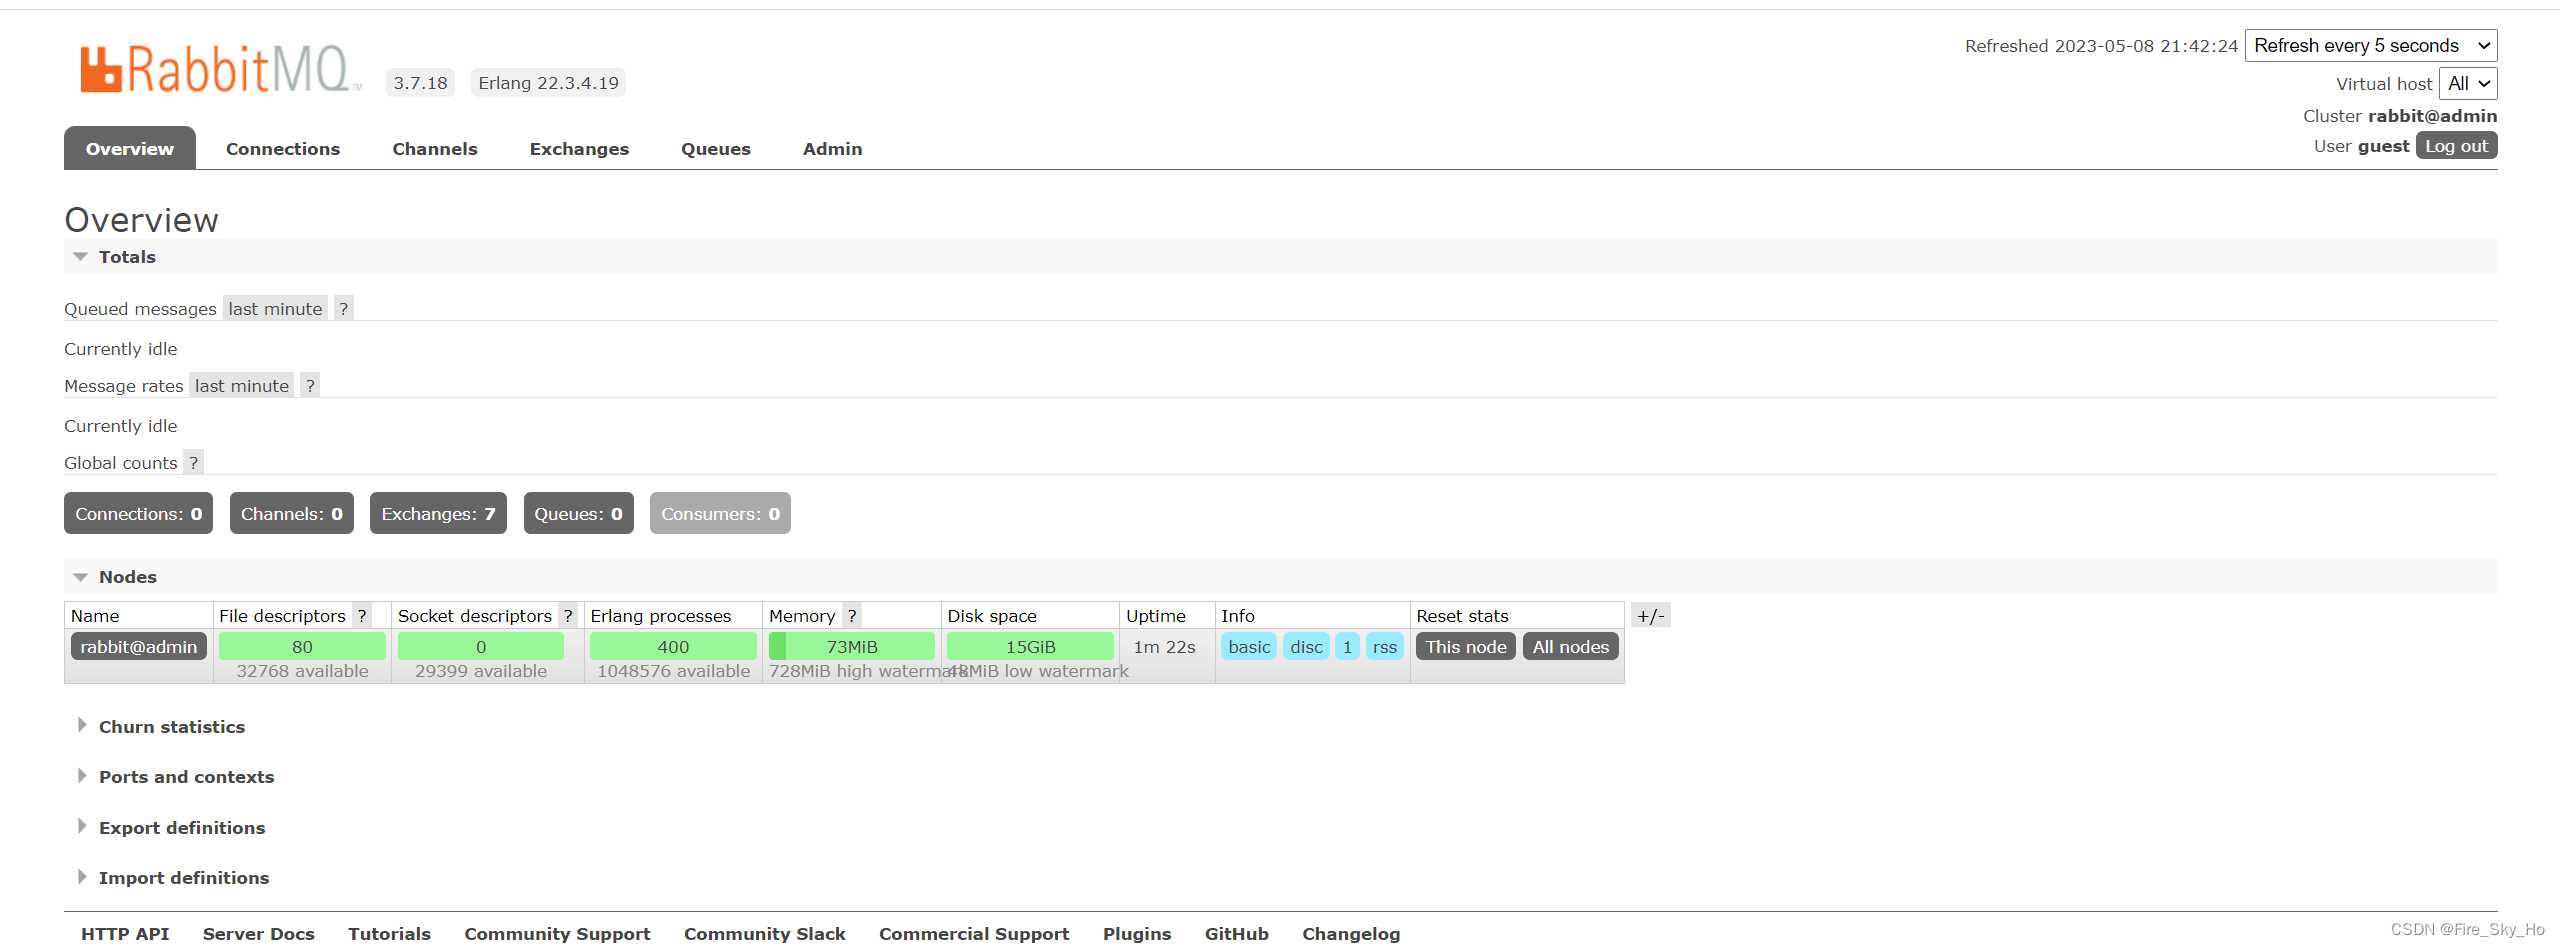
开启web管理工具systemctl start rabbitmq-server
访问管理页面http://127.0.0.1:15672,默认账户和密码都是guest
要是重启系统,以后台方式重新启动可以用下面命令
重启服务器后在公司用rabbitmqctl start_app启动失败,下面这个是成功启动
rabbitmq-server -detached
rabbitmqctl start_app 用于启动 RabbitMQ 应用程序,而 rabbitmq-server -detached 用于启动整个 RabbitMQ 服务器。如果只需要启动应用程序而不是整个服务器,可以使用第一个命令;如果需要启动整个服务器并以后台模式运行,可以使用第二个命令。
忘了账户可以用以下命令查看当前拥有的用户
rabbitmqctl list_users
3.消息模型

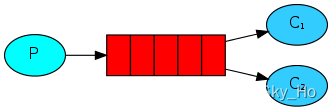
3.1第一种-Hello World!/基础队列(生产者-队列-消费者)
P:生产者,要发送消息的程序
C:消费者,等待接收消息的程序
Queue:消息队列,图中红色部分。实质上是一个大的消息缓冲区。类似一个邮箱,可以缓存消息;生产者向其中投递消息,消费者从其中取出消息。遵循先进先出原则

<dependency>
            <groupId>com.rabbitmq</groupId>
            <artifactId>amqp-client</artifactId>
            <version>5.10.0</version>
        </dependency>
生产者
import com.rabbitmq.client.Channel;
import com.rabbitmq.client.Connection;
import com.rabbitmq.client.ConnectionFactory;

import java.io.IOException;
import java.util.concurrent.TimeoutException;

/**
 * 消息生产者
 */
public class Producer {
    public static void main(String[] args) throws IOException, TimeoutException {
        //创建连接mq的连接工厂对象,重量级对象,类加载时创建一次即可
        ConnectionFactory connectionFactory = new ConnectionFactory();
        //设置连接rabbitmq的主机
        connectionFactory.setHost("192.168.80.131");
        //设置端口号
        connectionFactory.setPort(5672);
        //设置连接的虚拟主机
        connectionFactory.setVirtualHost("/");
        //设置访问虚拟主机的用户名和密码
        connectionFactory.setUsername("guest");
        connectionFactory.setPassword("guest");

        //获取连接对象
        Connection connection = connectionFactory.newConnection();
        //创建一个通道
        Channel channel = connection.createChannel();
        //通道绑定对应消息队列
        /*
         * 参数1 queue:队列名称(不存在自动创建)
         * 参数2 durable:用来定义队列特性是否需要持久化(为true该队列将在服务器重启后保留下来,持久化到硬盘中)
         * 参数3 exclusive:是否独占队列(为true仅限此连接)
         * 参数4 autoDelete:是否在消费完成后自动删除队列
         * 参数5 arguments:队列的其他属性(构造参数)
         * */
        channel.queueDeclare("hello",true,false,false,null);
        //发布消息
        /*
         * 参数1 exchange:要将消息发布到的交换机
         * 餐数2 routingKey:路由键,指定队列
         * 参数3 props:消息的其他属性
         * 参数4 body:消息具体内容
         * */
        channel.basicPublish("","hello",null,"hello world".getBytes());
        channel.close();
        connection.close();
    }
}
发现队列已经发布了3个消息

消费者
import com.rabbitmq.client.*;

import java.io.IOException;

public class Consumer {
    public static void main(String[] args) throws Exception {
        //创建连接mq的连接工厂对象,重量级对象,类加载时创建一次即可
        ConnectionFactory connectionFactory = new ConnectionFactory();
        //设置连接rabbitmq的主机
        connectionFactory.setHost("192.168.80.131");
        //设置端口号
        connectionFactory.setPort(5672);
        //设置连接的虚拟主机
        connectionFactory.setVirtualHost("/");
        //设置访问虚拟主机的用户名和密码
        connectionFactory.setUsername("guest");
        connectionFactory.setPassword("guest");

        //获取连接对象
        Connection connection = connectionFactory.newConnection();
        //创建一个通道
        Channel channel = connection.createChannel();
        //通道绑定对应消息队列
        /*
         * 参数1 queue:队列名称(不存在自动创建)
         * 参数2 durable:用来定义队列特性是否需要持久化(为true该队列将在服务器重启后保留下来,持久化到硬盘中)
         * 参数3 exclusive:是否独占队列(为true仅限此连接)
         * 参数4 autoDelete:是否在消费完成后自动删除队列
         * 参数5 arguments:队列的其他属性(构造参数)
         * */
        channel.queueDeclare("hello", true, false, false, null);

        channel.basicConsume("hello", true, new DefaultConsumer(channel) {
            @Override
            public void handleDelivery(String consumerTag, Envelope envelope, AMQP.BasicProperties properties, byte[] body) throws IOException {
                System.out.println("consumerTag:" + consumerTag);
                System.out.println("exchange:" + envelope.getExchange());
                System.out.println("routingKey:" + envelope.getRoutingKey());
                System.out.println("properties:" + properties);
                System.out.println("body" + new String(body));
            }
        });
        //channel.close();
        //connection.close();
        //阻塞防止还没消费完,就退出线程了
        while (true) {

        }

    }
}
输出了3次
consumerTag:amq.ctag-iKrA8vdEXX1oEzbEyeYqYA
exchange:
routingKey:hello
properties:#contentHeader<basic>(content-type=null, content-encoding=null, headers=null, delivery-mode=null, priority=null, correlation-id=null, reply-to=null, expiration=null, message-id=null, timestamp=null, type=null, user-id=null, app-id=null, cluster-id=null)
bodyhello world

提取公用代码,封装工具类
import com.rabbitmq.client.Channel;
import com.rabbitmq.client.Connection;
import com.rabbitmq.client.ConnectionFactory;

public class RabbitMQUtils {

    private static ConnectionFactory connectionFactory;

    static {
        //重量级资源  类加载执行之执行一次
        connectionFactory = new ConnectionFactory();
        connectionFactory.setHost("192.168.42.134");
        connectionFactory.setPort(5672);
        connectionFactory.setVirtualHost("/");
        connectionFactory.setUsername("admin");
        connectionFactory.setPassword("admin");

    }

    //定义提供连接对象的方法
    public static Connection getConnection() {
        try {
            return connectionFactory.newConnection();
        } catch (Exception e) {
            e.printStackTrace();
        }
        return null;
    }

    //关闭通道和关闭连接工具方法
    public static void closeConnectionAndChanel(Channel channel, Connection conn) {
        try {
            if (channel != null) {
                channel.close();
            }
            if (conn != null) {
                conn.close();
            }
        } catch (Exception e) {
            e.printStackTrace();
        }
    }
}
持久化消息
生产者代码修改如下
//第二个参数填true
channel.queueDeclare("hello",true,false,false,null);
//第三个参数填MessageProperties.PERSISTENT_TEXT_PLAIN
channel.basicPublish("","hello", MessageProperties.PERSISTENT_TEXT_PLAIN,"hello world".getBytes());
此时重新运行生产者,重启mq,发现消息依旧存在
3.2第二种-Work Queues/工作队列/任务队列
Work queues,也被称为(Task queues),任务模型。
当消息处理比较耗时的时候,可能生产消息的速度会
远远大于消息的消费速度。长此以往,消息就会堆积
越来越多,无法及时处理。此时就可以使用work 模型:
让多个消费者绑定到一个队列,共同消费队列中的消息。
队列中的消息一旦消费,就会消失,因此任务是不会被重复执行的。
角色:
P:生产者:任务的发布者
C1:消费者-1,领取任务并且完成任务,假设完成速度较慢
C2:消费者-2:领取任务并完成任务,假设完成速度快
生产者
package Work_Queues;

import com.rabbitmq.client.Channel;
import com.rabbitmq.client.Connection;
import com.rabbitmq.client.MessageProperties;
import utils.RabbitMQUtils;

/**
 * 消息生产者
 */
public class Producer {
    public static void main(String[] args) throws Exception {
        Connection connection = RabbitMQUtils.getConnection();
        Channel channel = connection.createChannel();
        channel.queueDeclare("hello",true,false,false,null);
        for (int i = 0; i <10 ; i++) {
            channel.basicPublish("","hello", MessageProperties.PERSISTENT_TEXT_PLAIN,("hello world-"+i).getBytes());
        }
        RabbitMQUtils.closeConnectionAndChanel(channel,connection);
    }
}
消费者1
package Work_Queues;

import com.rabbitmq.client.*;
import utils.RabbitMQUtils;

import java.io.IOException;

/**
 * 消息消费者
 */
public class Consumer_1 {
    public static void main(String[] args) throws Exception {
        Connection connection = RabbitMQUtils.getConnection();
        Channel channel = connection.createChannel();
        channel.queueDeclare("hello",true,false,false,null);
        channel.basicConsume("hello", false,new DefaultConsumer(channel) {
            @Override
            public void handleDelivery(String consumerTag, Envelope envelope, AMQP.BasicProperties properties, byte[] body) throws IOException {
                System.out.println(new String(body));
            }
        });
    }
}
消费者2
package Work_Queues;

import com.rabbitmq.client.*;
import utils.RabbitMQUtils;

import java.io.IOException;

/**
 * 消息消费者
 */
public class Consumer_1 {
    public static void main(String[] args) throws Exception {
        Connection connection = RabbitMQUtils.getConnection();
        Channel channel = connection.createChannel();
        channel.queueDeclare("hello",true,false,false,null);
        channel.basicConsume("hello", false,new DefaultConsumer(channel) {
            @Override
            public void handleDelivery(String consumerTag, Envelope envelope, AMQP.BasicProperties properties, byte[] body) throws IOException {
                System.out.println(new String(body));
            }
        });
    }
}
生产者启动发布10个消息
消费者1收到消息
hello world-0
hello world-2
hello world-4
hello world-6
hello world-8
消费者2收到消息
hello world-1
hello world-3
hello world-5
hello world-7
hello world-9
总结
默认情况下,RabbitMQ将按顺序将每个消息发送给
下一个使用者。平均而言,每个消费者都会收到相同数量
的消息。这种分发消息的方式称为循环。
3.3消息确认机制
上面代码运行完,再去查看会发现Unacked为10,表示待应答的消息总数,即生产者并没有给生产者说我确认此条消息消费了,因为basicConsume方法第二个参数没设置为true自动确认。
如果此时没有其他消费者,只剩一个消费者,重启这个消费者,会重新接收到这些未确认的消息。
channel.basicAck(envelope.getDeliveryTag(),false);加入这串,basicConsume第二个参数autoAck改为false,即可手动确认消息
消费者1
public class Consumer_1 {
    public static void main(String[] args) throws Exception {
        Connection connection = RabbitMQUtils.getConnection();
        Channel channel = connection.createChannel();
        channel.basicQos(1);//每一次只能消费一个消息
        channel.queueDeclare("hello",true,false,false,null);
        channel.basicConsume("hello", false,new DefaultConsumer(channel) {
            @SneakyThrows
            @Override
            public void handleDelivery(String consumerTag, Envelope envelope, AMQP.BasicProperties properties, byte[] body) throws IOException {
                TimeUnit.SECONDS.sleep(1);
                System.out.println(new String(body));
                //参数1:手动确认消息标识 参数2:false 每次确认一个
                channel.basicAck(envelope.getDeliveryTag(),false);
            }
        });
    }
}
消费者2
public class Consumer_2 {
    public static void main(String[] args) throws Exception {
        Connection connection = RabbitMQUtils.getConnection();
        Channel channel = connection.createChannel();
        channel.queueDeclare("hello", true, false, false, null);
        channel.basicQos(1);
        channel.basicConsume("hello", false, new DefaultConsumer(channel) {
            @Override
            public void handleDelivery(String consumerTag, Envelope envelope, AMQP.BasicProperties properties, byte[] body) throws IOException {
                System.out.println(new String(body));
                //参数1:手动确认消息标识 参数2:false 每次确认一个
                channel.basicAck(envelope.getDeliveryTag(), false);
            }
        });
    }
}
消费者1输出
hello world-0
消费者2输出
hello world-1
hello world-2
hello world-3
hello world-4
hello world-5
hello world-6
hello world-7
hello world-8
hello world-9
上面的结果因为消费者1,加了延时1秒,且channel.basicQos(1); 每次接收接收一条消息,直到确认返回,所以其他就被消费者2没加延迟消费完了,能者多劳
3.4第三种模式-Publish/Subscribe/发布订阅(交换机-fanout类型)
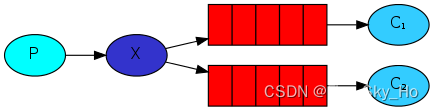
在广播模式下,消息发送流程是这样的:
可以有多个消费者
每个消费者有自己的queue(队列)
每个队列都要绑定到Exchange(交换机)
生产者发送的消息,只能发送到交换机,
交换机来决定要发给哪个队列,生产者无法决定。
交换机把消息发送给绑定过的所有队列
队列的消费者都能拿到消息。实现一条消息被多个消费者消费
生产者
public class Producer {
public static void main(String[] args) throws Exception {
Connection connection = RabbitMQUtils.getConnection();
Channel channel = connection.createChannel();
//将通道声明指定交换机
//参数1: 交换机名称 参数2: 交换机类型 fanout 广播类型
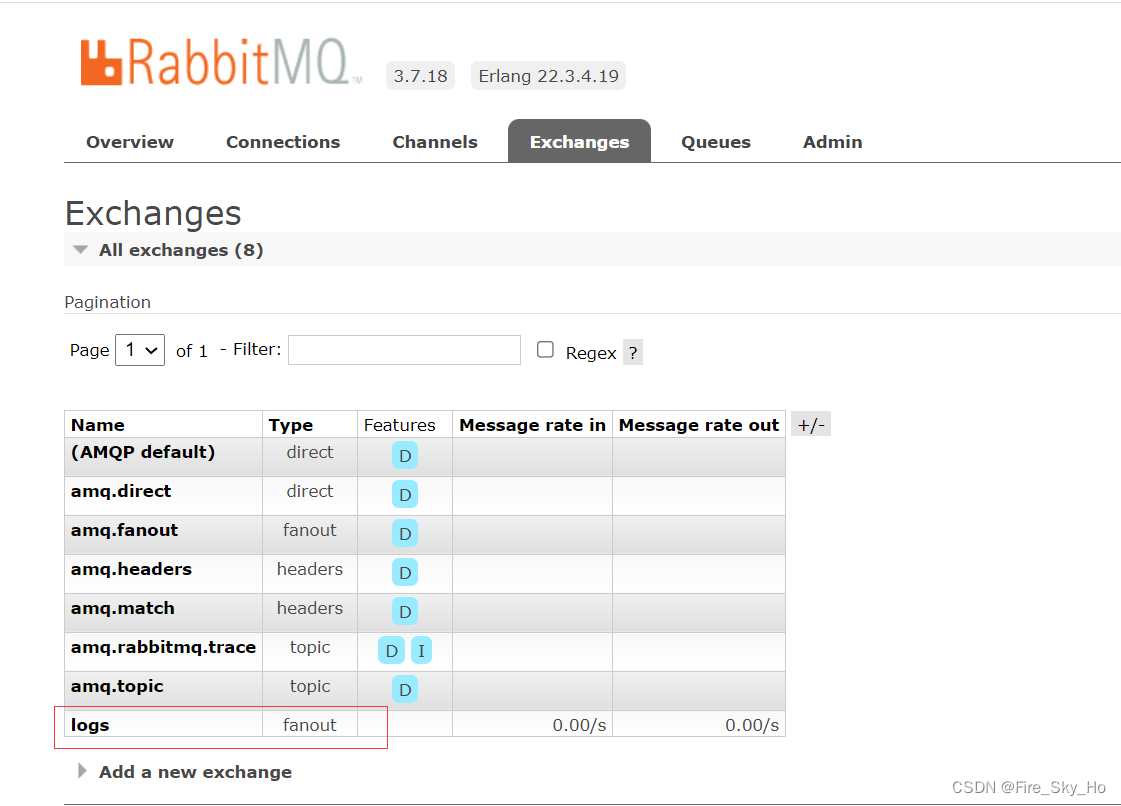
channel.exchangeDeclare("logs", BuiltinExchangeType.FANOUT);
//发消息
channel.basicPublish("logs","",null,"fanout type message".getBytes());
RabbitMQUtils.closeConnectionAndChanel(channel,connection);
}
}
消费者1
public class Consumer_1 {
    public static void main(String[] args) throws Exception {
        Connection connection = RabbitMQUtils.getConnection();
        Channel channel = connection.createChannel();
        //通道绑定交换机
        channel.exchangeDeclare("logs", "fanout");
        //获取临时队列名
        String queueName = channel.queueDeclare().getQueue();
        System.out.println("queueName:" + queueName);
        //绑定交换机和队列
        channel.queueBind(queueName, "logs", "");
        //自动确认关掉
        channel.basicConsume(queueName, true, new DefaultConsumer(channel) {
            @SneakyThrows
            @Override
            public void handleDelivery(String consumerTag, Envelope envelope, AMQP.BasicProperties properties, byte[] body) throws IOException {
                System.out.println("消费者1" + new String(body));
            }
        });
    }
}
消费者2
public class Consumer_2 {
    public static void main(String[] args) throws Exception {
        Connection connection = RabbitMQUtils.getConnection();
        Channel channel = connection.createChannel();
        //通道绑定交换机
        channel.exchangeDeclare("logs", "fanout");
        //获取临时队列名
        String queueName = channel.queueDeclare().getQueue();
        System.out.println("queueName:" + queueName);
        //绑定交换机和队列
        channel.queueBind(queueName, "logs", "");
        //自动确认关掉
        channel.basicConsume(queueName, true, new DefaultConsumer(channel) {
            @SneakyThrows
            @Override
            public void handleDelivery(String consumerTag, Envelope envelope, AMQP.BasicProperties properties, byte[] body) throws IOException {
                System.out.println("消费者2" + new String(body));
            }
        });
    }
}
生产者启动,发布消息
两个消费者收到消息
消费者1fanout type message
消费者2fanout type message
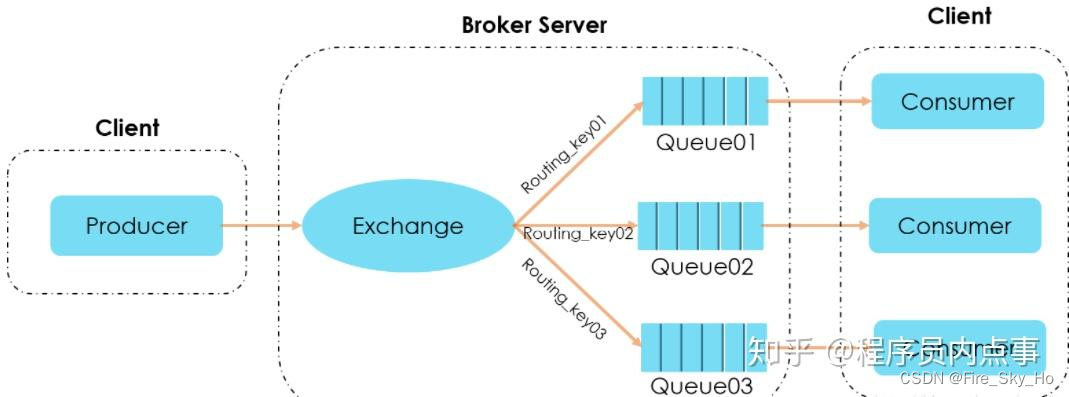
3.5第四种模式-Routing/路由(交换机-Direct类型)
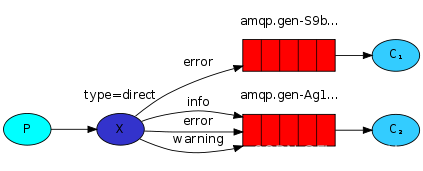
P:生产者,向Exchange发送消息,发送消息时,
会指定一个routing key。
X:Exchange(交换机),接收生产者的消息,
然后把消息递交给 与routing key完全匹配的队列
C1:消费者,其所在队列指定了需要routing key 为 error 的消息
C2:消费者,其所在队列指定了需要routing key 为 info、
error、warning 的消息
在Fanout模式中,一条消息,会被所有订阅的队列都消费。
但是,在某些场景下,我们希望不同的消息被不同的队列消费。
这时就要用到Direct类型的Exchange。
在Direct模型下:队列与交换机的绑定,不能是任意绑定了,
而是要指定一个RoutingKey(路由key)
消息的发送方在 向 Exchange发送消息时,
也必须指定消息的 RoutingKey。
Exchange不再把消息交给每一个绑定的队列,
而是根据消息的Routing Key进行判断,
只有队列的Routingkey与消息的 Routing key完全一致,
才会接收到消息
生产者
public class Producer {
    public static void main(String[] args) throws Exception {
        Connection connection = RabbitMQUtils.getConnection();
        Channel channel = connection.createChannel();

        String exchangeName = "logs_direct";
        //将通道声明指定交换机
        //参数1: 交换机名称    参数2: 交换机类型  fanout 广播类型
        channel.exchangeDeclare(exchangeName, BuiltinExchangeType.DIRECT);

        String routingKey = "info";
//        String routingKey = "error";
        //发消息
        channel.basicPublish(exchangeName, routingKey, null, ("这是direct模型发布的基于route key: [" + routingKey + "] 发送的消息").getBytes());

        RabbitMQUtils.closeConnectionAndChanel(channel, connection);
    }
}
消费者1
public class Consumer_1 {
    public static void main(String[] args) throws Exception {
        Connection connection = RabbitMQUtils.getConnection();
        Channel channel = connection.createChannel();
        String exchangeName = "logs_direct";
        //通道绑定交换机
        channel.exchangeDeclare(exchangeName, BuiltinExchangeType.DIRECT);
        //获取临时队列名
        String queueName = channel.queueDeclare().getQueue();

        String routingKey = "error";

        //绑定交换机和队列
        channel.queueBind(queueName, exchangeName, routingKey);
        //自动确认关掉
        channel.basicConsume(queueName, true, new DefaultConsumer(channel) {
            @SneakyThrows
            @Override
            public void handleDelivery(String consumerTag, Envelope envelope, AMQP.BasicProperties properties, byte[] body) throws IOException {
                System.out.println("消费者1" + new String(body));
            }
        });
    }
}
消费者2
public class Consumer_2 {
    public static void main(String[] args) throws Exception {
        Connection connection = RabbitMQUtils.getConnection();
        Channel channel = connection.createChannel();
        String exchangeName = "logs_direct";
        //通道绑定交换机
        channel.exchangeDeclare(exchangeName, BuiltinExchangeType.DIRECT);
        //获取临时队列名
        String queueName = channel.queueDeclare().getQueue();


        //绑定交换机和队列
        //临时队列和交换机绑定
        channel.queueBind(queueName, exchangeName, "info");
        channel.queueBind(queueName, exchangeName, "error");
        channel.queueBind(queueName, exchangeName, "warning");
        //自动确认关掉
        channel.basicConsume(queueName, true, new DefaultConsumer(channel) {
            @SneakyThrows
            @Override
            public void handleDelivery(String consumerTag, Envelope envelope, AMQP.BasicProperties properties, byte[] body) throws IOException {
                System.out.println("消费者2" + new String(body));
            }
        });
    }
}
消费者1接收routingKey为error的消息,消费者2接收info,error,warning三种routingKey
首先启动生产者,routingKey为info,此时消费者2能收到消息
消费者2这是direct模型发布的基于route key: [info] 发送的消息
生产者,routingKey为error,消费者1和2都能收到消息
消费者1这是direct模型发布的基于route key: [error] 发送的消息
消费者2这是direct模型发布的基于route key: [error] 发送的消息
3.6第五种模式-Topic/主题(交换机-topic类型)
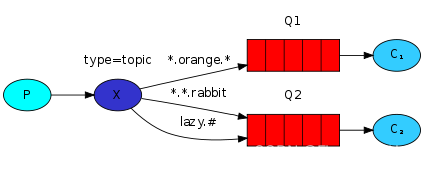
Topic类型的Exchange与Direct相比,都是可以根据RoutingKey
把消息路由到不同的队列。只不过Topic类型Exchange可以让
队列在绑定Routing key的时候使用通配符!这种模型Routingkey
一般都是由一个或多个单词组成,多个单词之间以”.”分割,
例如: item.insert
在Direct模型下:队列与交换机的绑定,不能是任意绑定了,
而是要指定一个RoutingKey(路由key)
消息的发送方在 向 Exchange发送消息时,
也必须指定消息的 RoutingKey。
Exchange不再把消息交给每一个绑定的队列,
而是根据消息的Routing Key进行判断,
只有队列的Routingkey与消息的 Routing key完全一致,
才会接收到消息
P:生产者,向Exchange发送消息,发送消息时,
会指定一个routing key。
X:Exchange(交换机),接收生产者的消息,
然后把消息递交给 与routing key完全匹配的队列
C1:消费者,其所在队列指定了需要routing key 为 error 的消息
C2:消费者,其所在队列指定了需要routing key 为 info、
error、warning 的消息
生产者
public class Producer {
    public static void main(String[] args) throws Exception {
        Connection connection = RabbitMQUtils.getConnection();
        Channel channel = connection.createChannel();

        String exchangeName = "topics";
        //将通道声明指定交换机
        //参数1: 交换机名称    参数2: 交换机类型  TOPIC 主题类型
        channel.exchangeDeclare(exchangeName, BuiltinExchangeType.TOPIC);

        String routingKey = "user.save";
        //发消息
        channel.basicPublish(exchangeName, routingKey, null, ("这是topic模型发布的基于route key: [" + routingKey + "] 发送的消息").getBytes());
        channel.basicPublish(exchangeName, "a.pp", null, ("这是topic模型发布的基于route key: [" + "a.pp" + "] 发送的消息").getBytes());

        RabbitMQUtils.closeConnectionAndChanel(channel, connection);
    }
}
消费者1
public class Consumer_1 {
    public static void main(String[] args) throws Exception {
        Connection connection = RabbitMQUtils.getConnection();
        Channel channel = connection.createChannel();
        String exchangeName = "topics";
        //通道绑定交换机
        channel.exchangeDeclare(exchangeName, BuiltinExchangeType.TOPIC);
        //获取临时队列名
        String queueName = channel.queueDeclare().getQueue();

        String routingKey = "user.*";

        //绑定交换机和队列
        channel.queueBind(queueName, exchangeName, routingKey);
        //自动确认关掉
        channel.basicConsume(queueName, true, new DefaultConsumer(channel) {
            @SneakyThrows
            @Override
            public void handleDelivery(String consumerTag, Envelope envelope, AMQP.BasicProperties properties, byte[] body) throws IOException {
                System.out.println("消费者1" + new String(body));
            }
        });
    }
}
消费者2
public class Consumer_2 {
    public static void main(String[] args) throws Exception {
        Connection connection = RabbitMQUtils.getConnection();
        Channel channel = connection.createChannel();
        String exchangeName = "topics";
        //通道绑定交换机
        channel.exchangeDeclare(exchangeName, BuiltinExchangeType.TOPIC);
        //获取临时队列名
        String queueName = channel.queueDeclare().getQueue();

        String routingKey = "a.*";

        //绑定交换机和队列
        channel.queueBind(queueName, exchangeName, routingKey);
        //自动确认关掉
        channel.basicConsume(queueName, true, new DefaultConsumer(channel) {
            @SneakyThrows
            @Override
            public void handleDelivery(String consumerTag, Envelope envelope, AMQP.BasicProperties properties, byte[] body) throws IOException {
                System.out.println("消费者2" + new String(body));
            }
        });
    }
}
生产者发布了routingKey为user.save和a.pp的消息
消费者1使用routingKey 通配符 user.*接收,所以收到了以下消息
消费者1这是topic模型发布的基于route key: [user.save] 发送的消息
消费者2使用routingKey 通配符 a.*接收,所以收到了以下消息
消费者2这是topic模型发布的基于route key: [a.pp] 发送的消息
4.SpringBoot中使用RabbitMQ
4.1 环境搭建
pom
<?xml version="1.0" encoding="UTF-8"?>
<project xmlns="http://maven.apache.org/POM/4.0.0" xmlns:xsi="http://www.w3.org/2001/XMLSchema-instance"
    xsi:schemaLocation="http://maven.apache.org/POM/4.0.0 https://maven.apache.org/xsd/maven-4.0.0.xsd">
    <modelVersion>4.0.0</modelVersion>
    <groupId>com.example</groupId>
    <artifactId>springboot-rabbitmq</artifactId>
    <version>0.0.1-SNAPSHOT</version>
    <name>springboot-rabbitmq</name>
    <description>springboot-rabbitmq</description>
    <properties>
        <java.version>1.8</java.version>
        <project.build.sourceEncoding>UTF-8</project.build.sourceEncoding>
        <project.reporting.outputEncoding>UTF-8</project.reporting.outputEncoding>
        <spring-boot.version>2.4.2</spring-boot.version>
    </properties>
    <dependencies>
        <dependency>
            <groupId>org.springframework.boot</groupId>
            <artifactId>spring-boot-starter-web</artifactId>
        </dependency>
        <dependency>
            <groupId>org.springframework.boot</groupId>
            <artifactId>spring-boot-starter-test</artifactId>
            <scope>test</scope>
        </dependency>
        <dependency>
            <groupId>org.springframework.boot</groupId>
            <artifactId>spring-boot-starter-amqp</artifactId>
        </dependency>
    </dependencies>
    <dependencyManagement>
        <dependencies>
            <dependency>
                <groupId>org.springframework.boot</groupId>
                <artifactId>spring-boot-dependencies</artifactId>
                <version>${spring-boot.version}</version>
                <type>pom</type>
                <scope>import</scope>
            </dependency>
        </dependencies>
    </dependencyManagement>

</project>
yml
spring:
  application:
    name: springboot_rabbitmq
  rabbitmq:
    host: 127.0.0.1
    port: 5673
    username: root
    password: 123
    virtual-host: /
4.1第一种-Hello World!/基础队列(生产者-队列-消费者)
生产者
@SpringBootTest
public class Producer {

    @Autowired
    private RabbitTemplate rabbitTemplate;

    /**
     * 生产端没有指定交换机只有routingKey和Object。
     * 消费方产生hello队列,放在默认的交换机(AMQP default)上。
     * 而默认的交换机有一个特点,只要你的routerKey的名字与这个
     * 交换机的队列有相同的名字,他就会自动路由上。
     * 生产端routingKey 叫hello ,消费端生产hello队列。
     * 他们就路由上了
     */
    @Test
    void producer() {
        rabbitTemplate.convertAndSend("hello", "hello world");
    }

}
消费者
Spring Boot中@RabbitHandler注解的介绍、原理和使用
/**
 * 生产端没有指定交换机只有routingKey和Object。
 * 消费方产生hello队列,放在默认的交换机(AMQP default)上。
 * 而默认的交换机有一个特点,只要你的routerKey的名字与这个
 * 交换机的队列有相同的名字,他就会自动路由上。
 * 生产端routingKey 叫hello ,消费端生产hello队列。
 * 他们就路由上了
 */
@Component
@RabbitListener(queuesToDeclare = @Queue(value = "hello"))
public class ConsumerHelloWord {

    @RabbitHandler
    public void receive(String message) {
        System.out.println("message = " + message);
    }

}
先运行消费者,在运行生产者
4.2第二种-Work Queues/工作队列/任务队列
生产者
/**
 * 生产端没有指定交换机只有routingKey和Object。
 * 消费方产生work队列,放在默认的交换机(AMQP default)上。
 * 而默认的交换机有一个特点,只要你的routerKey的名字与这个
 * 交换机的队列有相同的名字,他就会自动路由上。
 * 生产端routingKey 叫work ,消费端生产work队列。
 * 他们就路由上了
 */
@Component
public class ConsumerWorkQueues {

    @RabbitListener(queuesToDeclare = @Queue("work"))
    public void receive1(String message) {
        System.out.println("work message1 = " + message);
    }


    @RabbitListener(queuesToDeclare = @Queue("work"))
    public void receive2(String message) {
        System.out.println("work message2 = " + message);
    }
}
消费者
/**
 * 生产端没有指定交换机只有routingKey和Object。
 * 消费方产生work队列,放在默认的交换机(AMQP default)上。
 * 而默认的交换机有一个特点,只要你的routerKey的名字与这个
 * 交换机的队列有相同的名字,他就会自动路由上。
 * 生产端routingKey 叫work ,消费端生产work队列。
 * 他们就路由上了
 */
@Component
public class ConsumerWorkQueues {

    @RabbitListener(queuesToDeclare = @Queue("work"))
    public void receive1(String message) {
        System.out.println("work message1 = " + message);
    }


    @RabbitListener(queuesToDeclare = @Queue("work"))
    public void receive2(String message) {
        System.out.println("work message2 = " + message);
    }
}
4.3第三种模式-Publish/Subscribe/发布订阅(交换机-fanout类型)
生产者
@SpringBootTest
public class Producer {

    @Autowired
    private RabbitTemplate rabbitTemplate;

    @Test
    void producer() {
        for (int i = 0; i < 10; i++) {
            //参数1为交换机
            //参数2为路由key,“”表示为任意路由
            //参数3为消息内容
            rabbitTemplate.convertAndSend("logs","","这是日志广播");
        }
    }

}
消费者
@Component
public class ConsumerWorkQueuesFanout {

    //使用@RabbitListener注解中的bindings声明并绑定交换机和队列
    @RabbitListener(bindings = @QueueBinding(value = @Queue, // 创建临时队列
            exchange = @Exchange(name = "logs", type = ExchangeTypes.FANOUT)
    ))
    public void receive1(String message) {
        System.out.println("message1 = " + message);
    }

    @RabbitListener(bindings = @QueueBinding(value = @Queue, // 创建临时队列
            exchange = @Exchange(name = "logs", type = ExchangeTypes.FANOUT)
    ))
    public void receive2(String message) {
        System.out.println("message2 = " + message);
    }
}
4.4第四种模式-Routing/路由(交换机-Direct类型)
生产者
@SpringBootTest
public class Producer {

    @Autowired
    private RabbitTemplate rabbitTemplate;

    @Test
    void producer() {
        for (int i = 0; i < 10; i++) {
            //参数1为交换机
            //参数2为路由key,“”表示为任意路由
            //参数3为消息内容
            rabbitTemplate.convertAndSend("directs","error","error 的日志信息");
        }
    }

}
消费者
@Component
public class ConsumerRouting {

    //使用@RabbitListener注解中的bindings声明并绑定交换机和队列
    @RabbitListener(bindings = @QueueBinding(value = @Queue("directsQueue"),//指定队列名
            key = {"info", "error"},
            exchange = @Exchange(name = "directs", type = ExchangeTypes.DIRECT)
    ))
    public void receive1(String message) {
        System.out.println("message1 = " + message);
    }

    @RabbitListener(bindings = @QueueBinding(value = @Queue("directsQueue"),
            key = {"error"},
            exchange = @Exchange(name = "directs", type = ExchangeTypes.DIRECT)
    ))
    public void receive2(String message) {
        System.out.println("message2 = " + message);
    }
}
4.5第五种模式-Topic/主题(交换机-topic类型)
生产者
@SpringBootTest
public class Producer {

    @Autowired
    private RabbitTemplate rabbitTemplate;

    @Test
    void producer() {
        for (int i = 0; i < 10; i++) {
            //参数1为交换机
            //参数2为路由key,“”表示为任意路由
            //参数3为消息内容
            rabbitTemplate.convertAndSend("topics","user.save.findAll","user.save.findAll 的消息");
        }
    }

}
消费者
@Component
public class ConsumerTopics {

    @RabbitListener(bindings = {
            @QueueBinding(
                    value = @Queue,
                    key = {"user.*"},
                    exchange = @Exchange(type = ExchangeTypes.TOPIC, name = "topics")
            )
    })
    public void receive1(String message) {
        System.out.println("message1 = " + message);
    }

    @RabbitListener(bindings = {
            @QueueBinding(
                    value = @Queue,
                    key = {"user.#"},
                    exchange = @Exchange(type = ExchangeTypes.TOPIC, name = "topics")
            )
    })
    public void receive2(String message) {
        System.out.println("message2 = " + message);
    }
}
5.死信队列,延迟队列
5.1 死信概念
先从概念解释上搞清楚这个定义,死信,顾名思义就是无法被消费的消息,字面意思可以这样理解,一般来说,producer 将消息投递到
broker 或者直接到queue 里了,consumer 从 queue 取出消息进行消费,但某些时候由于特定的原因导致 queue
中的某些消息无法被消费,这样的消息如果没有 后续的处理,就变成了死信,有死信自然就有了死信队列。
应用场景:为了保证订单业务的消息数据不丢失,需要使用到
RabbitMQ的死信队列机制,当消息消费发生异常时,将消息投入死信队列中.还有比如说:用户在商城下单成功并点击去支付后在指定时间未支付时自动失效
5.2死信的来源
- 消息 TTL 过期
- 队列达到最大长度(队列满了,无法再添加数据到 mq 中)
- 消息被拒绝(basic.reject 或 basic.nack)并且 requeue=false.
5.3入门实战
5.3.1 架构图

5.3.2 代码
生产者
public class Producer {
    private static final String NORMAL_EXCHANGE = "normal_exchange";

    public static void main(String[] argv) throws Exception {
        try (Channel channel = RabbitMQUtils.getConnection().createChannel()) {
            channel.exchangeDeclare(NORMAL_EXCHANGE,
                    BuiltinExchangeType.DIRECT);
            //设置消息的 TTL 时间
            AMQP.BasicProperties properties = new AMQP.BasicProperties().builder().expiration("10000").build();
            //该信息是用作演示队列个数限制
            for (int i = 1; i < 11; i++) {
                String message = "info" + i;
                channel.basicPublish(NORMAL_EXCHANGE, "zhangsan", properties, message.getBytes());
                System.out.println("生产者发送消息:" + message);
            }
        }
    }
}
消费者1
public class Consumer01 {
    //普通交换机名称
    private static final String NORMAL_EXCHANGE = "normal_exchange";
    //死信交换机名称
    private static final String DEAD_EXCHANGE = "dead_exchange";

    public static void main(String[] argv) throws Exception {
        Channel channel = RabbitMQUtils.getConnection().createChannel();
        //声明死信和普通交换机 类型为 direct
        channel.exchangeDeclare(NORMAL_EXCHANGE, BuiltinExchangeType.DIRECT);
        channel.exchangeDeclare(DEAD_EXCHANGE, BuiltinExchangeType.DIRECT);

        //声明死信队列
        String deadQueue = "dead-queue";
        channel.queueDeclare(deadQueue, false, false, false, null);
        //死信队列绑定死信交换机与 routingKey
        channel.queueBind(deadQueue, DEAD_EXCHANGE, "lisi");

        Map<String, Object> params = new HashMap<>();
        //正常队列设置死信交换机 参数 key 是固定值
        params.put("x-dead-letter-exchange", DEAD_EXCHANGE);
        //正常队列设置死信 routing-key 参数 key 是固定值
        params.put("x-dead-letter-routing-key", "lisi");
        String normalQueue = "normal-queue";
        //正常队列绑定死信队列信息
        channel.queueDeclare(normalQueue, false, false, false, params);
        channel.queueBind(normalQueue, NORMAL_EXCHANGE, "zhangsan");

        System.out.println("等待接收消息........... ");

        DeliverCallback deliverCallback = (consumerTag, delivery) ->
        {
            String message = new String(delivery.getBody(), StandardCharsets.UTF_8);
            System.out.println("Consumer01 接收到消息" + message);
        };
        channel.basicConsume(normalQueue, true, deliverCallback, consumerTag -> {
        });
    }
}
消费者2
public class Consumer02 {
    //死信交换机名称
    private static final String DEAD_EXCHANGE = "dead_exchange";

    public static void main(String[] argv) throws Exception {
        Channel channel = RabbitMQUtils.getConnection().createChannel();
        channel.exchangeDeclare(DEAD_EXCHANGE, BuiltinExchangeType.DIRECT);

        //声明死信队列
        String deadQueue = "dead-queue";
        channel.queueDeclare(deadQueue, false, false, false, null);
        //死信队列绑定死信交换机与 routingKey
        channel.queueBind(deadQueue, DEAD_EXCHANGE, "lisi");

        System.out.println("等待接收消息........... ");

        DeliverCallback deliverCallback = (consumerTag, delivery) ->
        {
            String message = new String(delivery.getBody(), StandardCharsets.UTF_8);
            System.out.println("Consumer01 接收到消息" + message);
        };
        channel.basicConsume(deadQueue, true, deliverCallback, consumerTag -> {
        });
    }
}
流程
启动消费者1,生产交换机和队列


启动消费者,发现10条消息没被消费

等待10S后,发现没被消费就转移到死信队列

启动消费者2,消费者2去消费死信队列的消息

5.4 SpringBoot实现延迟队列
5.4.1 延迟队列概念
延时队列,队列内部是有序的,最重要的特性就体现在它的延时属性上,延时队列中的元素是希望在指定时间到了以后或之前取出和处理,简单来说,延时队列就是用来存放需要在指定时间被处理的元素的队列。
5.4.2 延迟队列使用场景
1.订单在十分钟之内未支付则自动取消
2.新创建的店铺,如果在十天内都没有上传过商品,则自动发送消息提醒。
3.用户注册成功后,如果三天内没有登陆则进行短信提醒。
4.用户发起退款,如果三天内没有得到处理则通知相关运营人员。
5.预定会议后,需要在预定的时间点前十分钟通知各个与会人员参加会议
这些场景都有一个特点,需要在某个事件发生之后或者之前的指定时间点完成某一项任务
5.4.3 RabbitMQ 中的 TTL
TTL 是什么呢?TTL 是 RabbitMQ 中一个消息或者队列的属性,表明一条消息或者该队列中的所有消息的最大存活时间,单位是毫秒。
换句话说,如果一条消息设置了 TTL 属性或者进入了设置TTL 属性的队列,那么这条消息如果在TTL 设置的时间内没有被消费,则会成为"死信"。如果同时配置了队列的TTL 和消息的TTL,那么较小的那个值将会被使用,有两种方式设置 TTL。
如果设置了队列的 TTL 属性,那么一旦消息过期,就会被队列丢弃(如果配置了死信队列被丢到死信队 列中),而第二种方式,消息即使过期,也不一定会被马上丢弃,因为消息是否过期是在即将投递到消费者 之前判定的,如果当前队列有严重的消息积压情况,则已过期的消息也许还能存活较长时间;另外,还需 要注意的一点是,如果不设置 TTL,表示消息永远不会过期,如果将 TTL 设置为 0,则表示除非此时可以 直接投递该消息到消费者,否则该消息将会被丢弃。
前一小节我们介绍了死信队列,刚刚又介绍了 TTL,至此利用 RabbitMQ 实现延时队列的两大要素已 经集齐,接下来只需要将它们进行融合,再加入一点点调味料,延时队列就可以新鲜出炉了。想想看,延 时队列,不就是想要消息延迟多久被处理吗,TTL 则刚好能让消息在延迟多久之后成为死信,另一方面, 成为死信的消息都会被投递到死信队列里,这样只需要消费者一直消费死信队列里的消息就完事了,因为 里面的消息都是希望被立即处理的消息。
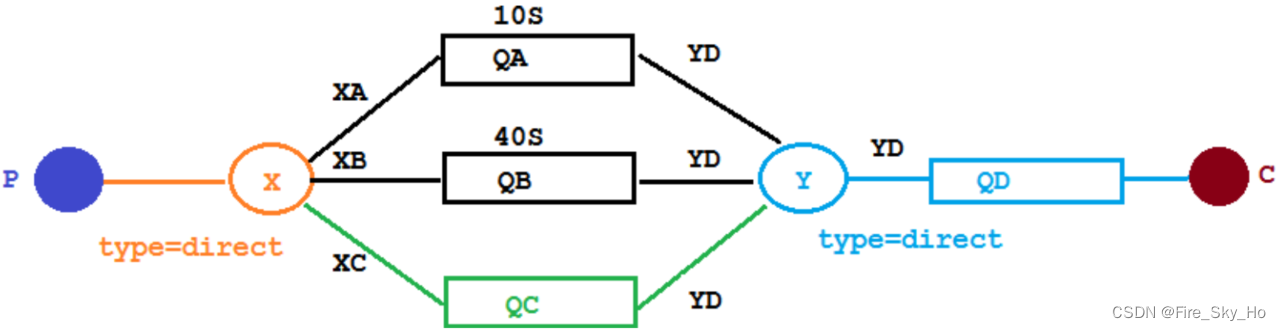
5.4.3 架构图
创建两个队列 QA 和 QB,两者队列 TTL 分别设置为 10S 和 20S,然后在创建一个交换机 X 和死信交换机 Y,它们的类型都是direct,创建一个死信队列 QD,它们的绑定关系如下:

5.4.4 实现代码
用上面的springboot项目继续搞这个延迟队列
配置类 用于生命交换机、队列以及之间的绑定关系
@Configuration
public class DeadQueueConfig {
    public static final String EXCHANGE_X = "X";
    public static final String ROUTING_KEY_XA = "XA";
    public static final String ROUTING_KEY_XB = "XB";
    public static final String QUEUE_A = "QA";
    public static final String QUEUE_B = "QB";
    public static final String EXCHANGE_Y = "Y";
    public static final String QUEUE_D = "QD";
    public static final String ROUTING_KEY_YD = "YD";
    public static final int X_MESSAGE_TTL_QA = 10;
    public static final int X_MESSAGE_TTL_QB = 20;

    // 声明 交换机X
    @Bean
    public DirectExchange exchangeX() {
        return new DirectExchange(EXCHANGE_X);
    }

    //声明队列 A ttl 为 10s 并绑定到对应的死信交换机
    @Bean
    public Queue queueA() {
        return QueueBuilder.durable(QUEUE_A)
                //声明当前队列绑定的死信交换机
                .deadLetterExchange(EXCHANGE_Y)
                //声明当前队列的死信路由 key
                .deadLetterRoutingKey(ROUTING_KEY_YD)
                //声明队列的 TTL
                .ttl(X_MESSAGE_TTL_QA * 1000)
                .build();
    }

    // 声明队列 A 绑定 X 交换机
    @Bean
    public Binding queueABindExchangeX(Queue queueA, DirectExchange exchangeX) {
        return BindingBuilder.bind(queueA).to(exchangeX).with(ROUTING_KEY_XA);
    }

    //声明队列 B ttl 为 20s 并绑定到对应的死信交换机
    @Bean
    public Queue queueB() {
        return QueueBuilder.durable(QUEUE_B)
                .deadLetterExchange(EXCHANGE_Y)
                .deadLetterRoutingKey(ROUTING_KEY_YD)
                .ttl(X_MESSAGE_TTL_QB * 1000)
                .build();
    }

    //声明队列 B 绑定 X 交换机
    @Bean
    public Binding queueBBindExchangeX(Queue queueB, DirectExchange exchangeX) {
        return BindingBuilder.bind(queueB).to(exchangeX).with(ROUTING_KEY_XB);
    }

    // 声明 交换机Y
    @Bean
    public DirectExchange exchangeY() {
        return new DirectExchange(EXCHANGE_Y);
    }

    //声明死信队列 QD
    @Bean
    public Queue queueD() {
        return new Queue(QUEUE_D);
    }

    //声明死信队列 QD 绑定关系
    @Bean
    public Binding queueDBindExchangeX(Queue queueD, DirectExchange exchangeY) {
        return BindingBuilder.bind(queueD).to(exchangeY).with(ROUTING_KEY_YD);
    }

}
消费者
@Slf4j
@Component
public class DeadLetterQueueConsumer {

    @RabbitListener(queues = DeadQueueConfig.QUEUE_D)
    public void receiveD(Message message, Channel channel){
        String msg = StrUtil.str(message.getBody(), StandardCharsets.UTF_8);
        log.info("当前时间:{},收到死信队列信息{}", DateUtil.now(), msg);
    }
}
生产者
@Slf4j
@RequestMapping("ttl")
@RestController
public class SendMsgController {
    @Autowired
    private RabbitTemplate rabbitTemplate;

    @GetMapping("sendMsg/{message}")
    public void sendMsg(@PathVariable String message) {
        log.info("当前时间:{},发送一条信息给两个 TTL 队列:{}", DateUtil.now(), message);
        //第三个参数:要发送的消息
        rabbitTemplate.convertAndSend(DeadQueueConfig.EXCHANGE_X, DeadQueueConfig.ROUTING_KEY_XA, "消息来自 ttl 为 " + DeadQueueConfig.X_MESSAGE_TTL_QA + "S 的队列: " + message);
        rabbitTemplate.convertAndSend(DeadQueueConfig.EXCHANGE_X, DeadQueueConfig.ROUTING_KEY_XB, "消息来自 ttl 为 " + DeadQueueConfig.X_MESSAGE_TTL_QB + "S 的队列: " + message);
    }
}
发送请求 http://127.0.0.1:8080/ttl/sendMsg/姬霓太美

第一条消息在 10S 后变成了死信消息,然后被消费者消费掉,第二条消息在 40S 之后变成了死信消息, 然后被消费掉,这样一个延时队列就打造完成了。
不过,如果这样使用的话,岂不是每增加一个新的时间需求,就要新增一个队列,这里只有 10S 和 40S 两个时间选项,如果需要一个小时后处理,那么就需要增加TTL 为一个小时的队列,如果是预定会议室然 后提前通知这样的场景,岂不是要增加无数个队列才能满足需求?
0
5.4.5 优化,由生产者定义消息存活时间
5.4.5.1 代码架构图
在这里新增了一个队列 QC,绑定关系如下,该队列不设置TTL 时间,有生产者设定消息ttl
5.4.5.2 代码
配置类新增
    //声明队列C,ttl为生产者设置,并绑定到对应的死信交换机
    @Bean
    public Queue queueC() {
        return QueueBuilder.durable(QUEUE_C)
                //声明当前队列绑定的死信交换机
                .deadLetterExchange(EXCHANGE_Y)
                //声明当前队列的死信路由 key
                .deadLetterRoutingKey(ROUTING_KEY_YD)
                .build();
    }

    //声明队列 QC 绑定关系
    @Bean
    public Binding queueCBindExchangeX(Queue queueC, DirectExchange exchangeX) {
        return BindingBuilder.bind(queueC).to(exchangeX).with(ROUTING_KEY_XC);
    }
消费者新增
    @GetMapping("sendExpirationMsg/{message}/{ttlTimeMillisecond}")
    public void sendMsg(@PathVariable String message, @PathVariable String ttlTimeMillisecond) {
        rabbitTemplate.convertAndSend(DeadQueueConfig.EXCHANGE_X, DeadQueueConfig.ROUTING_KEY_XC, message, correlationData -> {
            correlationData.getMessageProperties().setExpiration(ttlTimeMillisecond);
            return correlationData;
        });
        log.info("当前时间:{},发送一条时长{}秒 TTL 信息给队列 C:{}", DateUtil.now(), TimeUnit.MILLISECONDS.toSeconds(Long.parseLong(ttlTimeMillisecond)), message);
    }
启动应用,按顺序请求以下接口
http://127.0.0.1:8080/ttl/sendExpirationMsg/姬霓太美/2000
http://127.0.0.1:8080/ttl/sendExpirationMsg/姬霓太美/20000
可以发现,正常消费,2秒后的消费了,20秒后的也消费了

此时看着正常,但是我们反顺序过来请求,先请求20秒的,在请求2秒的
http://127.0.0.1:8080/ttl/sendExpirationMsg/姬霓太美/20000
http://127.0.0.1:8080/ttl/sendExpirationMsg/姬霓太美/2000
结果如下,发现2秒的并没有先消费,而是消费完20秒的,再消费2秒的,因为mq底层就是FIFO,所以只能这样

结论
使用这种由生产者定义消息ttl的方式,如果第一个消息的延时时长很长,而第二个消息的延时时长很短,第二个消息并不会优先得到执行。
5.4.6 Rabbitmq 插件实现延迟队列
上文中提到的问题,确实是一个问题,如果不能实现在消息粒度上的 TTL,并使其在设置的TTL 时间及时死亡,就无法设计成一个通用的延时队列。那如何解决呢,接下来我们就去解决该问题。
5.4.6.1 安装延时队列插件
在官网上下载 https://www.rabbitmq.com/community-plugins.html,下载
rabbitmq_delayed_message_exchange 插件,注意对应当前mq版本,然后到 RabbitMQ 的插件目录。
可以使用搜索命令,查找插件目录
find / -name plugins

/usr/lib/rabbitmq/lib/rabbitmq_server-3.7.18/plugins
执行下面命令让该插件生效
rabbitmq-plugins enable rabbitmq_delayed_message_exchange

5.4.6.2 代码架构图
在这里新增了一个队列delayed.queue,一个自定义交换机delayed.exchange,绑定关系如下:

5.4.6.3 代码
在我们自定义的交换机中,这是一种新的交换类型,该类型消息支持延迟投递机制 消息传递后并不会立即投递到目标队列中,而是存储在 mnesia(一个分布式数据系统)表中,当达到投递时间时,才投递到目标队列中。
配置类
@Configuration
public class DelayedQueueConfig {
    public static final String DELAYED_QUEUE_NAME = "delayed.queue";
    public static final String DELAYED_EXCHANGE_NAME = "delayed.exchange";
    public static final String DELAYED_ROUTING_KEY = "delayed.routingkey";

    @Bean
    public Queue delayedQueue() {
        return new Queue(DELAYED_QUEUE_NAME);
    }

    //自定义交换机 我们在这里定义的是一个延迟交换机
    @Bean
    public CustomExchange delayedExchange() {
        Map<String, Object> args = new HashMap<>();
        //自定义交换机的类型
        args.put("x-delayed-type", ExchangeTypes.DIRECT);
        return new CustomExchange(DELAYED_EXCHANGE_NAME, "x-delayed-message", true, false,
                args);
    }

    @Bean
    public Binding bindingDelayedQueue(Queue delayedQueue, CustomExchange delayedExchange) {
        return BindingBuilder.bind(delayedQueue).to(delayedExchange).with(DELAYED_ROUTING_KEY).noargs();
    }
}
生产者
@Slf4j
@RequestMapping("ttl")
@RestController
public class DelayedQueueProducerController {


    @Autowired
    private RabbitTemplate rabbitTemplate;
    public static final String DELAYED_EXCHANGE_NAME = "delayed.exchange";
    public static final String DELAYED_ROUTING_KEY = "delayed.routingkey";

    @GetMapping("sendDelayMsg/{message}/{delayTime}")
    public void sendMsg(@PathVariable String message, @PathVariable Integer delayTime) {
        rabbitTemplate.convertAndSend(DELAYED_EXCHANGE_NAME, DELAYED_ROUTING_KEY, message,
                correlationData -> {
                    correlationData.getMessageProperties().setDelay(delayTime);
                    return correlationData;
                });
        log.info(" 当 前 时 间 : {}, 发 送 一 条 延 迟 {} 秒的信息给队列 delayed.queue:{}", DateUtil.now(), TimeUnit.MILLISECONDS.toSeconds(delayTime), message);
    }
}
消费者
@Slf4j
@Component
public class DelayedQueueConsumer {
    public static final String DELAYED_QUEUE_NAME = "delayed.queue";

    @RabbitListener(queues = DELAYED_QUEUE_NAME)
    public void receiveDelayedQueue(Message message) {
        String msg = StrUtil.str(message.getBody(), StandardCharsets.UTF_8);
        log.info("当前时间:{},收到延时队列的消息:{}", DateUtil.now(), msg);
    }

}
启动应用,分别访问
http://localhost:8080/ttl/sendDelayMsg/come on baby1/20000
http://localhost:8080/ttl/sendDelayMsg/come on baby1/2000
结果如下,20秒的先访问,2秒后访问,但是还是2秒快的先消费了

5.4.7 总结
延时队列在需要延时处理的场景下非常有用,使用 RabbitMQ 来实现延时队列可以很好的利用 RabbitMQ 的特性,如:消息可靠发送、消息可靠投递、死信队列来保障消息至少被消费一次以及未被正 确处理的消息不会被丢弃。另外,通过 RabbitMQ 集群的特性,可以很好的解决单点故障问题,不会因为 单个节点挂掉导致延时队列不可用或者消息丢失。
当然,延时队列还有很多其它选择,比如利用 Java 的 DelayQueue,利用 Redis 的 zset,利用 Quartz 或者利用 kafka 的时间轮,这些方式各有特点,看需要适用的场景
6 发布确认高级
springboot + rabbitmq 消息确认机制(避坑指南)
发送消息确认:用来确认生产者 producer 将消息发送到 broker ,broker 上的交换机 exchange 再投递给队列
queue的过程中,消息是否成功投递。消息从 producer 到 rabbitmq broker有一个 confirmCallback 确认模式。
消息从 exchange 到 queue 投递失败有一个 returnCallback 退回模式。
我们可以利用这两个Callback来确保消的100%送达。
在生产环境中由于一些不明原因,导致 rabbitmq 重启,在 RabbitMQ 重启期间生产者消息投递失败,
导致消息丢失,需要手动处理和恢复。于是,我们开始思考,如何才能进行 RabbitMQ 的消息可靠投递呢? 特
别是在这样比较极端的情况,RabbitMQ 集群不可用的时候,无法投递的消息该如何处理呢:
6.1 确认机制方案
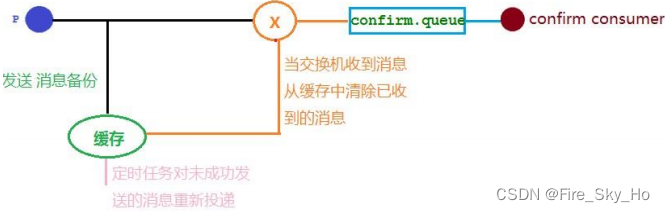
6.2 代码架构图
简单来说就是,生产者发送消息到交换机这一步,不论成功失败,都会有个回调方法被调用,从回调方法可以知道是否发送成功,从而进行下一步处理,比如重新发送

6.3 开启发布确认配置
spring:
  rabbitmq:
    publisher-confirm-type: correlated
枚举类ConfirmType定义了三种RabbitMQ发布确认类型:
- NONE:表示不使用发布确认。当配置为该类型时,生产者发送消息后将不会等待或接收任何确认通知。
- SIMPLE:表示使用简单的发布确认。当配置为该类型时,生产者发送消息后将等待Broker的确认通知,并根据确认通知进行下一步的操作。simple模式下如果消息成功到达Broker后一样会触发
- CORRELATED:表示消息成功到达Broker后触发ConfirmCalllBack回调;表示使用关联ID的发布确认。当配置为该类型时,生产者发送消息后将等待Broker的确认通知,并通过关联ID来确定是哪条消息被确认。
6.4 代码编写
队列交换机配置
@Configuration
public class QueueConfig {
    public static final String CONFIRM_EXCHANGE_NAME = "confirm.exchange";
    public static final String CONFIRM_QUEUE_NAME = "confirm.queue";
    public static final String ROUTING_KEY = "key1";

    //声明业务 Exchange
    @Bean("confirmExchange")
    public DirectExchange confirmExchange() {
        return new DirectExchange(CONFIRM_EXCHANGE_NAME);
    }

    // 声明确认队列
    @Bean("confirmQueue")
    public Queue confirmQueue() {
        return QueueBuilder.durable(CONFIRM_QUEUE_NAME).build();
    }

    // 声明确认队列绑定关系
    @Bean
    public Binding queueBinding(@Qualifier("confirmQueue") Queue queue,
                                @Qualifier("confirmExchange") DirectExchange exchange) {

        return BindingBuilder.bind(queue).to(exchange).with(ROUTING_KEY);
    }
}
消息生产者
发送了三条消息
- 第一条可达
- 第二条路由不到
- 第三条没有指定的交换机
@RestController
@RequestMapping("/confirm")
@Slf4j
public class Producer {
    public static final String CONFIRM_EXCHANGE_NAME = "confirm.exchange";
    @Autowired
    private RabbitTemplate rabbitTemplate;
    @Autowired
    private MyCallBack myCallBack;

    //依赖注入 rabbitTemplate 之后再设置它的回调对象
    @PostConstruct
    public void init() {
        rabbitTemplate.setConfirmCallback(myCallBack);
    }

    @GetMapping("confirmCallback/{message}")
    public void confirmCallback(@PathVariable String message) throws InterruptedException {
        /*
         *此消息正常发送到队列
         */
        //指定消息 id 为 1
        CorrelationData correlationData1 = new CorrelationData("1");
        String routingKey = "key1";
        rabbitTemplate.convertAndSend(CONFIRM_EXCHANGE_NAME, routingKey, message + routingKey, correlationData1);
        log.info("发送消息内容:{}", message);
        TimeUnit.SECONDS.sleep(3);
        log.info("\n");

        /*
         *此消息发到交换机了,但是路由失败,没发送到队列
         */
        CorrelationData correlationData2 = new CorrelationData("2");
        routingKey = "key2";
        rabbitTemplate.convertAndSend(CONFIRM_EXCHANGE_NAME, routingKey, message + routingKey, correlationData2);
        log.info("发送消息内容:{}", message + routingKey);
        TimeUnit.SECONDS.sleep(3);
        log.info("\n");

        /*
         *没有这个交换机,发送失败
         */
        CorrelationData correlationData3 = new CorrelationData("3");
        routingKey = "key3";
        rabbitTemplate.convertAndSend(CONFIRM_EXCHANGE_NAME + 3, routingKey, message + routingKey, correlationData3);
        log.info("发送消息内容:{}", message + routingKey);
    }
}
不管发没发到都有的回调确认类
@Component
@Slf4j
public class MyCallBack implements RabbitTemplate.ConfirmCallback {
    /**
     * 交换机不管是否收到消息的一个回调方法
     * CorrelationData
     * 消息相关数据
     * ack
     * 交换机是否收到消息
     */
    @Override
    public void confirm(CorrelationData correlationData, boolean ack, String cause) {
        String id = correlationData != null ? correlationData.getId() : "";
        if (ack) {
            log.info("交换机已经收到 id 为:{}的消息", id);
        } else {
            log.info("交换机还未收到 id 为:{}消息,由于原因:{}", id, cause);
        }
    }
}
消息消费者
@Component
@Slf4j
public class ConfirmConsumer {
    public static final String CONFIRM_QUEUE_NAME = "confirm.queue";

    @RabbitListener(queues = CONFIRM_QUEUE_NAME)
    public void receiveMsg(Message message) {
        String msg = new String(message.getBody());
        log.info("接受到队列 {} 消息:{}", CONFIRM_QUEUE_NAME, msg);
    }
}
启动运行,发送消息http://localhost:8080/confirm/confirmCallback/123
- 第一条消息,发送到了队列,回调接口的信息也打印了
- 第二条消息由于路由key不存在,无法发送到队列,没发送成功,但是发送到了交换机,所以回调函数依旧被执行,打印回调消息
- 第三条是连交换机都不存在,发不出去,但还是执行了回调方法
2023-07-18 21:53:15.296  INFO 16232 --- [nio-8080-exec-3] com.publisher_confirm.Producer           : 发送消息内容:123
2023-07-18 21:53:15.299  INFO 16232 --- [nectionFactory1] com.publisher_confirm.MyCallBack         : 交换机已经收到 id 为:1的消息
2023-07-18 21:53:15.300  INFO 16232 --- [tContainer#11-1] com.publisher_confirm.ConfirmConsumer    : 接受到队列 confirm.queue 消息:123key1
2023-07-18 21:53:18.301  INFO 16232 --- [nio-8080-exec-3] com.publisher_confirm.Producer           :

2023-07-18 21:53:18.301  INFO 16232 --- [nio-8080-exec-3] com.publisher_confirm.Producer           : 发送消息内容:123key2
2023-07-18 21:53:18.304  WARN 16232 --- [nectionFactory1] o.s.amqp.rabbit.core.RabbitTemplate      : Returned message but no callback available
2023-07-18 21:53:18.304  INFO 16232 --- [nectionFactory2] com.publisher_confirm.MyCallBack         : 交换机已经收到 id 为:2的消息
2023-07-18 21:53:21.305  INFO 16232 --- [nio-8080-exec-3] com.publisher_confirm.Producer           :

2023-07-18 21:53:21.305  INFO 16232 --- [nio-8080-exec-3] com.publisher_confirm.Producer           : 发送消息内容:123key3
2023-07-18 21:53:21.308 ERROR 16232 --- [168.80.131:5672] o.s.a.r.c.CachingConnectionFactory       : Shutdown Signal: channel error; protocol method: #method<channel.close>(reply-code=404, reply-text=NOT_FOUND - no exchange 'confirm.exchange3' in vhost '/', class-id=60, method-id=40)
2023-07-18 21:53:21.308  INFO 16232 --- [nectionFactory1] com.publisher_confirm.MyCallBack         : 交换机还未收到 id 为:3消息,由于原因:channel error; protocol method: #method<channel.close>(reply-code=404, reply-text=NOT_FOUND - no exchange 'confirm.exchange3' in vhost '/', class-id=60, method-id=40)
6.5 回退消息
从上面例子可以看出,第二条消息找不到指定路由key的队列,导致消息不见了,但是生产者也不知道,这时候如果想通知生产者处理这种消息咋办呢,这时候通过设置开启回退配置,可以将无法路由的消息返回给生产者。
首先开启回退回调配置
spring:
  rabbitmq:
    publisher-returns: true
回退消息回调接口
@Component
@Slf4j
public class MyCallBack implements RabbitTemplate.ReturnsCallback {

    /**
     * 回退消息:当消息发送给Exchange后,Exchange路由到Queue失败后才执行returnedMessage
     */
    @Override
    public void returnedMessage(ReturnedMessage returned) {
        log.info("没发送到队列的消息{}",returned);
    }
}
消息生产者
跟之前的一样,就多了个这是回退回调方法的设置,我不设置setMandatory为true也生效,因为配置文件里设置了publisher-returns: true,二选一方法设置即可,推荐用yml配置
@RestController
@RequestMapping("/confirm")
@Slf4j
public class Producer {
    public static final String CONFIRM_EXCHANGE_NAME = "confirm.exchange";
    @Autowired
    private RabbitTemplate rabbitTemplate;
    @Autowired
    private MyCallBack myCallBack;

    //依赖注入 rabbitTemplate 之后再设置它的回调对象
    @PostConstruct
    public void init() {
        /*
          true:
          交换机无法将消息进行路由时,会将该消息返回给生产者
          false:
          如果发现消息无法进行路由,则直接丢弃
         */
        //我这个不设置也会执行回退方法,因为配置文件里设置了publisher-returns: true
//        rabbitTemplate.setMandatory(true);
        //设置回退消息交给谁处理

        rabbitTemplate.setReturnsCallback(myCallBack);
    }

    @GetMapping("sendMsg/{message}")
    public void sendMsg(@PathVariable String message) throws InterruptedException {
        /*
         *此消息正常发送到队列
         */
        //指定消息 id 为 1
        CorrelationData correlationData1 = new CorrelationData("1");
        String routingKey = "key1";
        rabbitTemplate.convertAndSend(CONFIRM_EXCHANGE_NAME, routingKey, message + routingKey, correlationData1);
        log.info("发送消息内容:{}", message);
        TimeUnit.SECONDS.sleep(3);
        log.info("\n");

        /*
         *此消息发到交换机了,但是路由失败,没发送到队列
         */
        CorrelationData correlationData2 = new CorrelationData("2");
        routingKey = "key2";
        rabbitTemplate.convertAndSend(CONFIRM_EXCHANGE_NAME, routingKey, message + routingKey, correlationData2);
        log.info("发送消息内容:{}", message + routingKey);
        TimeUnit.SECONDS.sleep(3);
        log.info("\n");

        /*
         *没有这个交换机,发送失败
         */
        CorrelationData correlationData3 = new CorrelationData("3");
        routingKey = "key3";
        rabbitTemplate.convertAndSend(CONFIRM_EXCHANGE_NAME + 3, routingKey, message + routingKey, correlationData3);
        log.info("发送消息内容:{}", message + routingKey);
    }
}
运行,发送消息http://localhost:8080/confirm/sendMsg/123
- 第一条消息正常,不会回调
- 第二条消息无法路由,这时候就会触发returnedMessage回调方法
- 第三条消息连交换机都到不了,无法触发
2023-07-18 22:32:36.036  INFO 20564 --- [nio-8080-exec-2] com.publisher_confirm.Producer           : 发送消息内容:123
2023-07-18 22:32:36.039  INFO 20564 --- [tContainer#11-1] com.publisher_confirm.ConfirmConsumer    : 接受到队列 confirm.queue 消息:123key1
2023-07-18 22:32:39.051  INFO 20564 --- [nio-8080-exec-2] com.publisher_confirm.Producer           :

2023-07-18 22:32:39.051  INFO 20564 --- [nio-8080-exec-2] com.publisher_confirm.Producer           : 发送消息内容:123key2
2023-07-18 22:32:39.053  INFO 20564 --- [nectionFactory1] com.publisher_confirm.MyCallBack         : 没发送到队列的消息ReturnedMessage [message=(Body:'123key2' MessageProperties [headers={spring_returned_message_correlation=2}, contentType=text/plain, contentEncoding=UTF-8, contentLength=0, receivedDeliveryMode=PERSISTENT, priority=0, deliveryTag=0]), replyCode=312, replyText=NO_ROUTE, exchange=confirm.exchange, routingKey=key2]
2023-07-18 22:32:42.062  INFO 20564 --- [nio-8080-exec-2] com.publisher_confirm.Producer           :

2023-07-18 22:32:42.062  INFO 20564 --- [nio-8080-exec-2] com.publisher_confirm.Producer           : 发送消息内容:123key3
2023-07-18 22:32:42.067 ERROR 20564 --- [168.80.131:5672] o.s.a.r.c.CachingConnectionFactory       : Shutdown Signal: channel error; protocol method: #method<channel.close>(reply-code=404, reply-text=NOT_FOUND - no exchange 'confirm.exchange3' in vhost '/', class-id=60, method-id=40)
6.6 org.springframework.amqp.rabbit.core.RabbitTemplate.ConfirmCallback和com.rabbitmq.client.ConfirmCallback 区别
org.springframework.amqp.rabbit.core.RabbitTemplate.ConfirmCallback 和 com.rabbitmq.client.ConfirmCallback 是用于处理 RabbitMQ 消息确认的回调接口,它们有以下区别:
包位置:这两个接口来自于不同的包。org.springframework.amqp.rabbit.core.RabbitTemplate.ConfirmCallback属于 Spring AMQP 包,用于与 RabbitMQ 进行交互。org.springframework.amqp.rabbit.core.RabbitTemplate 是 Spring AMQP 提供的 RabbitMQ 操作模板类。而 com.rabbitmq.client.ConfirmCallback 属于 RabbitMQ Java 客户端库,用于原生的 RabbitMQ 客户端。
使用方式:org.springframework.amqp.rabbit.core.RabbitTemplate.ConfirmCallback 是通过 Spring AMQP 提供的 RabbitTemplate 类来实现的回调,可以用于处理发送给 RabbitMQ 的消息是否成功确认的回调。而 com.rabbitmq.client.ConfirmCallback 是在原生的 RabbitMQ Java 客户端中使用的回调,用于处理 RabbitMQ 确认的回调。
总的来说,org.springframework.amqp.rabbit.core.RabbitTemplate.ConfirmCallback 是在 Spring AMQP 中用于处理 RabbitMQ 消息确认的回调,而 com.rabbitmq.client.ConfirmCallback 则是在原生的 RabbitMQ Java 客户端中用于处理消息确认的回调,都是为了再生产者到交换机或者队列之间保证消息不被丢失
6.7 RabbitMQ发布确认机制是一种用于解决消息可靠性传递的机制
它确保了消息在发送到消息队列之后是否成功被消息代理(Broker)接收和持久化。以下是通过RabbitMQ发布确认机制解决的几个问题:
-
可靠性传递:通过发布确认机制,生产者可以确保消息成功发送到消息代理,并且代理已经进行了持久化保存。如果消息发送失败或代理无法接收消息,生产者可以得到通知并采取相应的措施,如重新发送消息。
-
异步处理:发布确认机制使生产者能够以异步的方式发送消息,并在消息成功确认后得到通知。这样,生产者可以继续发送下一条消息,而无需等待确认结果,提高了消息发送的效率。
-
数据一致性:使用发布确认机制可以确保消息在发送和接收过程中的一致性。生产者可以在接收到消息确认之前保留消息的副本,以避免数据丢失或不一致的情况发生。
-
过载保护:发布确认机制还可以用于解决消息代理和消费者之间的不平衡问题。当消息代理无法处理更多的消息时,它可以通过发送确认来通知生产者减慢消息发送的速度,以防止消息代理过载。
综上所述,RabbitMQ发布确认机制有效地解决了消息可靠性传递、异步处理、数据一致性和过载保护等问题,确保了消息传递的可靠性和一致性。
实战代码
交换机-Direct类型,一个交换机,每个队列单独一个路由键
mq配置
@Configuration
public class RabbitMqConfig {
    //这段配置表示使用 Jackson 库将对象转换为 JSON 格式,以便在消息队列中进行传递
    @Bean
    public MessageConverter messageConverter() {
        return new Jackson2JsonMessageConverter();
    }

    //声明交换机
    @Bean
    public DirectExchange mqttEquipmentMsgExchange() {
        return new DirectExchange(CommonConstant.MQTT_EQUIPMENT_MSG_EXCHANGE);
    }

    /**
     * 开始 推送水质原始数据主题配置
     */
    // 声明队列
    @Bean
    public Queue mqttWaterDataRawQueue() {
        return QueueBuilder.durable(CommonConstant.MQTT_WATER_DATA_RAW_QUEUE).build();
    }

    // 队列绑定到交换机并设置路由键
    @Bean
    public Binding mqttWaterDataRawBinding(Queue mqttWaterDataRawQueue, DirectExchange mqttEquipmentMsgExchange) {
        return BindingBuilder.bind(mqttWaterDataRawQueue).to(mqttEquipmentMsgExchange).with(CommonConstant.MQTT_WATER_DATA_RAW_ROUTING_KEY);
    }
    /** 结束 推送水质原始数据主题配置 */

    /**
     * 开始 推送水质数据主题配置
     */

    // 声明队列
    @Bean
    public Queue mqttWaterDataQueue() {
        return QueueBuilder.durable(CommonConstant.MQTT_WATER_DATA_QUEUE).build();
    }

    // 队列绑定到交换机
    @Bean
    public Binding mqttWaterDataBinding(Queue mqttWaterDataQueue, DirectExchange mqttEquipmentMsgExchange) {
        return BindingBuilder.bind(mqttWaterDataQueue).to(mqttEquipmentMsgExchange).with(CommonConstant.MQTT_WATER_DATA_ROUTING_KEY);
    }
    /** 结束 推送水质数据主题配置 */

    /**
     * 开始 设备其他主题配置
     */

    // 声明队列
    @Bean
    public Queue mqttEquipmentOtherTopicMsgQueue() {
        return QueueBuilder.durable(CommonConstant.MQTT_EQUIPMENT_OTHER_TOPIC_MSG_QUEUE).build();
    }

    // 队列绑定到交换机
    @Bean
    public Binding mqttEquipmentOtherTopicMsgBinding(Queue mqttEquipmentOtherTopicMsgQueue, DirectExchange mqttEquipmentMsgExchange) {
        return BindingBuilder.bind(mqttEquipmentOtherTopicMsgQueue).to(mqttEquipmentMsgExchange).with(CommonConstant.MQTT_EQUIPMENT_OTHER_TOPIC_MSG_ROUTING_KEY);
    }
    /** 结束 设备其他主题配置 */
}
该配置声明了1个交换机,声明了3个队列分别绑定到同意交换机,并指定不同路由键,应用启动的时候就会去创建交换机和队列
还有消息转换器配置,配置了这个发送消息的时候不用手动转成json发出去,而且不配置,消费者那边接收参数就不能用实体对象直接接收,会报错,MessageConverter作用如下
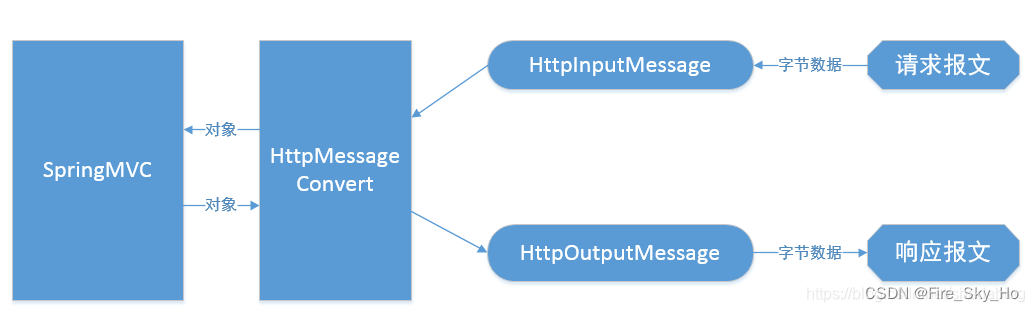
生产者传送消息对象时,生产端消息转换器将对象转换成某一格式(如json格式)字节数据,消费者接收到对应字节数据,根据类型、消费端的消息转换器将字节数据转换成具体对象类型。
生产者发送消息
直接发,如果没配置消息转换器就会报错,消费者接收报错
//将设备发布消息转存mq
String routingKey = CommonConstant.ROUTING_KEY;
MqttMsgDto mqttMsgDto = new MqttMsgDto(topic, content);
rabbitTemplate.convertAndSend(CommonConstant.MQTT_EQUIPMENT_MSG_EXCHANGE, routingKey, mqttMsgDto);
消费者消费消息
import cn.hutool.core.util.StrUtil;
import com.alibaba.fastjson.JSON;
import com.rabbitmq.client.Channel;
import lombok.extern.slf4j.Slf4j;
import org.springframework.amqp.rabbit.annotation.Exchange;
import org.springframework.amqp.rabbit.annotation.Queue;
import org.springframework.amqp.rabbit.annotation.QueueBinding;
import org.springframework.amqp.rabbit.annotation.RabbitListener;
import org.springframework.amqp.support.AmqpHeaders;
import org.springframework.beans.factory.annotation.Autowired;
import org.springframework.messaging.handler.annotation.Header;
import org.springframework.stereotype.Component;

import java.io.IOException;

@Slf4j
@Component
public class MqttEquipmentMsgConsumer {

    @RabbitListener(bindings = {@QueueBinding(
            value = @Queue(CommonConstant.MQTT_WATER_DATA_RAW_QUEUE),
            key = {CommonConstant.MQTT_WATER_DATA_RAW_ROUTING_KEY},
            exchange = @Exchange(name = CommonConstant.MQTT_EQUIPMENT_MSG_EXCHANGE))})
    public void receiveMqttWaterDataRaw(MqttMsgDto mqttMsgDto, Channel channel, @Header(AmqpHeaders.DELIVERY_TAG) long deliveryTag) {
        String topicDesc = EquipmentMqttTopicType.getDesc(mqttMsgDto.getTopic());
        receiveMsg(mqttMsgDto, channel, deliveryTag, topicDesc);
    }

    @RabbitListener(bindings = {@QueueBinding(
            value = @Queue(CommonConstant.MQTT_WATER_DATA_QUEUE),
            key = {CommonConstant.MQTT_WATER_DATA_ROUTING_KEY},
            exchange = @Exchange(name = CommonConstant.MQTT_EQUIPMENT_MSG_EXCHANGE))})
    public void receiveMqttWaterData(MqttMsgDto mqttMsgDto, Channel channel, @Header(AmqpHeaders.DELIVERY_TAG) long deliveryTag) {
        String topicDesc = EquipmentMqttTopicType.getDesc(mqttMsgDto.getTopic());
        receiveMsg(mqttMsgDto, channel, deliveryTag, topicDesc);
    }


    @RabbitListener(bindings = {@QueueBinding(
            value = @Queue(CommonConstant.MQTT_EQUIPMENT_OTHER_TOPIC_MSG_QUEUE),
            key = {CommonConstant.MQTT_EQUIPMENT_OTHER_TOPIC_MSG_ROUTING_KEY},
            exchange = @Exchange(name = CommonConstant.MQTT_EQUIPMENT_MSG_EXCHANGE))})
    public void receiveMqttEquipmentOtherMsg(MqttMsgDto mqttMsgDto, Channel channel, @Header(AmqpHeaders.DELIVERY_TAG) long deliveryTag) {
        String topicDesc = EquipmentMqttTopicType.getDesc(mqttMsgDto.getTopic());
        receiveMsg(mqttMsgDto, channel, deliveryTag, topicDesc);
    }


    private void receiveMsg(MqttMsgDto mqttMsgDto, Channel channel, long deliveryTag, String topicDesc) {
        String mqttMsgDtoJson = JSON.toJSONString(mqttMsgDto);
        log.info("receiveMsg,收到{}消息,{}", topicDesc, mqttMsgDtoJson);

        String equipmentMqttMsgRecordId = equipmentMqttMsgRecordService.insertIgnore(mqttMsgDto);
        if (StrUtil.isBlank(equipmentMqttMsgRecordId)) {
            log.info("receiveMsg,{}消息已存在,{}", topicDesc, mqttMsgDtoJson);
            return;
        }

        //业务处理
		......
        try {
            //在处理完业务逻辑后,通过调用 channel.basicAck 方法来手动确认消息。这是为了告诉 RabbitMQ 这个消息已经成功被消费,可以从队列中删除。
            channel.basicAck(deliveryTag, false);
        } catch (IOException e) {
            log.error("receiveMsg,确认{}消息异常", topicDesc, e);
        }
    }
}
消费者接收参数
mqttMsgDto: 表示接收到的消息内容,是一个自定义的对象。channel: 是 RabbitMQ 的通道,可以用于消息的确认。deliveryTag: 是消息的交付标签,用于确认消息。
RabbitMQ两种消息确认机制
简单来说就是一个是处理生产者到broker的消息机制,一个是队列到消费者的机制
生产者确认机制(Publisher Confirm):
概要:
生产者确认机制是一种异步机制,用于确认消息是否成功投递到 Broker。
主要应用于生产者(发布者)确认消息是否被正确投递到 Broker 的 Exchange。
工作原理:
当启用了确认模式后,生产者可以注册一个 ConfirmListener 监听器,用于接收确认或拒绝消息的通知。
发送消息后,生产者可以等待来自 Broker 的确认或拒绝通知。
使用
上面一节发布高级确认就是这个内容
优点:
异步确认机制,性能较好。
无法回滚已发送的消息,但可以通过重新发送来实现类似的效果。
消费者确认机制(Consumer Acknowledgments):
概要:
消费者确认机制是一种同步机制,用于确认消费者是否成功处理了消息。
主要应用于消费者确认消息是否被正确处理。
工作原理:
当消费者成功处理消息后,通过发送确认消息给 RabbitMQ Broker,告知消息已被处理。
如果消费者无法成功处理消息,可以选择拒绝消息,以便 RabbitMQ 根据配置进行消息的重新入队或者丢弃。
优点:
同步确认机制,确保消息被正确处理。
可以选择性地拒绝消息,触发重试或者将消息放入死信队列。
使用
spring:
  rabbitmq:
    listener:
      simple:
        acknowledge-mode: manual #自动签收auto  手动 manual
当消费者成功处理消息后,您需要调用 channel.basicAck(deliveryTag, false) 来手动确认消息。
deliveryTag 是消息的标签,它唯一标识消息。
这两种确认机制通常配合使用,生产者确认用于确认消息是否被成功发送到 Broker,而消费者确认则用于确认消息是否被成功处理。
7 面试常问
7.1 RabbitMQ消息堆积处理
一、增加处理能力
优化系统架构、增加服务器资源、采用负载均衡等手段,以提高系统的处理能力和并发处理能力。通过增加服务器数量或者优化代码,确保系统能够及时处理所有的消息。
二、异步处理
将消息的处理过程设计为异步执行,即接收到消息立即返回响应,然后将消息放入队列中进行后续处理。这样可以避免同步请求的阻塞,提高系统的吞吐量和响应速度。
三、消息分片
如果消息体较大或者复杂,可以考虑将消息分片处理。将消息拆分为多个小的部分进行处理,减少单个消息的处理时间,从而提高整体处理能力。
四、集群扩展
根据实际情况,可以考虑通过添加更多的节点来扩展消息处理的集群规模,实现分布式部署和负载均衡,以应对大量消息的处理需求。
五、优化数据库操作
如果消息的处理涉及到数据库操作,可以考虑对数据库查询和写入进行性能优化,如建立索引、合理使用缓存等,以减少数据库的压力。
六、监控和报警
建立监控系统,实时监测消息队列的积压情况、处理延迟等指标,并设置相应的报警机制,及时发现和解决潜在问题,确保消息的正常处理。需要根据具体的场景和需求来选择适合的解决方案,综合考虑各种因素,以提高系统的消息处理能力和性能。
七、增加消费者数量
增加消费者可以提高消息处理速度,从而减少消息积压。可以根据消息的类型和优先级分配消费者,使消息得到及时处理。
八、增加队列
可以增加队列数量来缓解消息积压。根据消息的类型和优先级,可以将不同类型的消息存储在不同的队列中,更好的管理消息流量
九、设置消息的过期时间
可以设置消息的过期时间,当消息在队列中等待时间超过指定时间时,会被自动删除,直到消息被正确处理或超过最大重试次数为止。
十、使用限流机制
可以使用限流机制来控制消费者的消费速度,避免消息过多导致消费者无法及时处理。可以使用Qos机制,设置每个消费者同时处理消息的最大数量,从而保证系统的性能和稳定性。
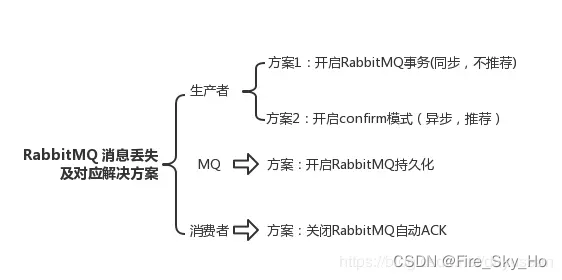
7.2 RabbitMQ消息丢失的场景,如何保证消息不丢失
直接看这篇
RabbitMQ消息丢失的场景,如何保证消息不丢失?(详细讲解,一文看懂)
丢失场景
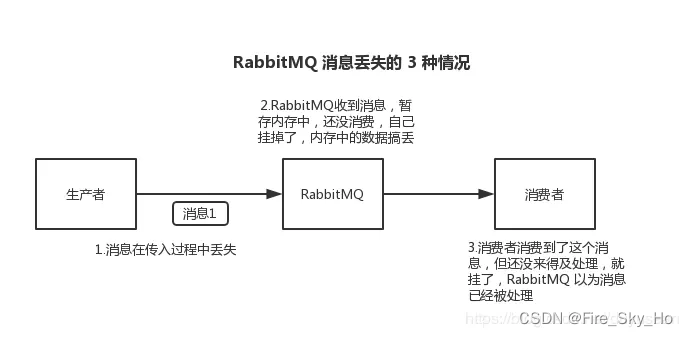
RabbitMQ消息丢失解决方案


 2614
2614


 被折叠的 条评论
为什么被折叠?
被折叠的 条评论
为什么被折叠?
 到【灌水乐园】发言


