


Handler机制大致结构:
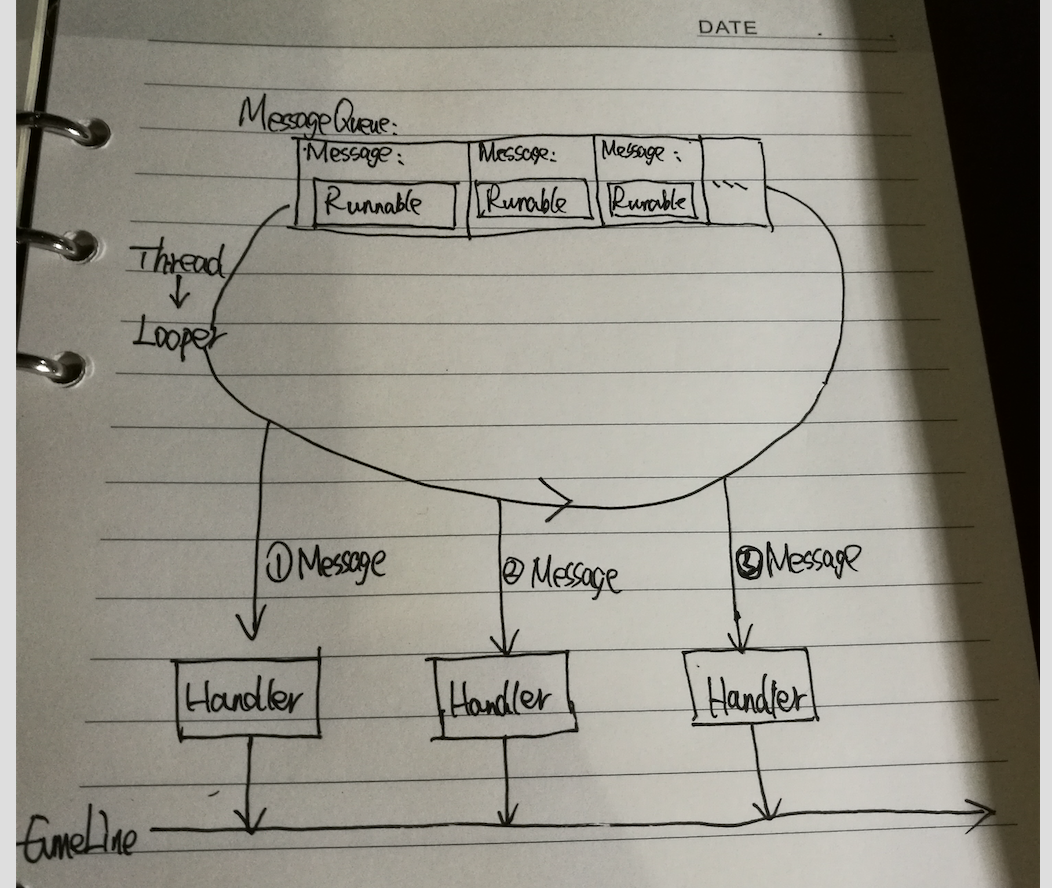
对应关系:
1. 每个Thread对应一个Looper
2. 每个Looper对应一个MessageQueue
3. 每个MessageQueue对应N个Message
4. 每个Message对应一个Handler
测试类
目标:先在主线程执行一些操作,然后发起一个异步任务,再在主线程继续做其它操作,当异步任务完成后,再回调通知主线程做一些操作
要求:不使用任何Android系统的API
其实用Future也可以实现这点,但是,future的get操作是阻塞的,这意味着当你在主线程去获取异步任务的结果时,会阻塞主线程,这显然不是我们希望的!
好了,如果你有更好的实现方式,欢迎指点!这里我先上自己的测试类,让大家看看效果,然后再来分析具体的实现思路
package base.handler;

import base.thread.LogUtil;

/**
 * 模拟子线程请求网络
 * <p>
 * Created by yutianran on 16/7/4.
 */
public class TestClient {

    private MyHandler mainHandler;

    public static void main(String[] args) {
        new TestClient().test();
    }

    private void test() {
        //初始化主线程Looper
        MyLooper.prepare();
        mainHandler = new MyHandler(new MyHandler.CallBack() {
            @Override
            public void handleMessage(MyMessage msg) {
                // 刷新界面
                String obj = (String) msg.obj;
                LogUtil.print("刷新界面:" + obj);
            }
        });
        //发起网络请求
        LogUtil.print("在主线程发起一个网络请求");
        NetThread netThread = new NetThread("http://baidu.com");
        netThread.start();
        LogUtil.print("在主线程继续其它操作");

        //开始消息循环
        MyLooper.loop();
    }


    //网络线程类
    private class NetThread extends Thread {
        private String url;

        public NetThread(String url) {
            this.url = url;
        }

        @Override
        public void run() {
            String body = getWebData(url);
            MyMessage msg = new MyMessage();
            msg.obj = body;
            mainHandler.sendMessage(msg);
        }
    }

    //执行网络请求
    private String getWebData(String url) {
        LogUtil.print("执行请求网络:" + url);
        try {
            Thread.sleep(3000);
        } catch (InterruptedException e) {
            e.printStackTrace();
        }
        String body = "这是" + url + "的响应值";
        LogUtil.print("请求网络成功:" + body);
        return body;
    }
}
输出:

自定义消息处理器
思路分析:
1. 首先我们仿照Android的Handler,给我们的自定义Handler定义了:阻塞队列、处理消息的回调、分发和发送消息的方法
2.然后在创建Handler时,我们获取了当前线程的Looper和MessageQueue
3. 最后,当我们发送消息的时候,将消息添加进之前得到的MessageQueue
package base.handler;

/**
 * 消息处理器
 * <p>
 * Created by yutianran on 16/7/4.
 */
public class MyHandler {

    private MyMessageQueue queue;// 用于进行线程间通信的阻塞队列
    private CallBack callBack; // 处理消息的回调

    public MyHandler(CallBack callBack) {
        MyLooper looper = MyLooper.myLooper();
        if (looper == null) {
            throw new RuntimeException("在新开的线程中。创建MyHandler对象需要先调用MyLooper.prepare()方法。");
        }
        queue = looper.queue;
        this.callBack = callBack;
    }

    //消息接收的回调
    public interface CallBack {
        void handleMessage(MyMessage msg);
    }

    //发送消息
    public void sendMessage(MyMessage msg) {
        msg.target = this;
        queue.enqueueMessage(msg);
    }

    //派发消息
    public void dispatchMessage(MyMessage msg) {
        callBack.handleMessage(msg);
    }

}
自定义消息循环器-Looper
思路分析:
1. 在Looper中,我们用一个ThreadLocal存储当前Looper的相关数据
2. 定义了一个消息队列,用来管理消息
3. 在prepare()时,用ThreadLocal存储Looper的数据;在myLooper时,读取ThreadLocal存储的Looper数据
4. 在loop()时,用一个死循环来不断的接受和分发消息
package base.handler;

/**
 * 消息循环器
 * <p>
 * Created by yutianran on 16/7/4.
 */
public class MyLooper {

    private static ThreadLocal<MyLooper> threadLocal = new ThreadLocal<>();
    private static MyLooper myLooper;
    public MyMessageQueue queue;//一个线程对应一个阻塞队列

    private MyLooper() {
        queue = new MyMessageQueue();
    }

    //为本线程准备对应的MyLooper对象
    public static void prepare() {
        if (threadLocal.get() != null) {
            throw new RuntimeException(
                    "Only one MyLooper may be created per thread");
        }
        threadLocal.set(new MyLooper());
    }

    //获取当前线程相对应的Looper对象
    public static MyLooper myLooper() {
        return threadLocal.get();//当未调用prepare()方法时。ThreadLocal.get()方法返回的为null;
    }

    //这里启动消息循环
    public static void loop() {
        while (true) {
            myLooper = myLooper();
            MyMessageQueue mQueue = myLooper.queue;
            MyMessage msg = mQueue.next();// take()方法是个阻塞方法。线程运行到此会阻塞住。以准备接收发过来的消息
            msg.target.dispatchMessage(msg);
        }
    }
}
自定义消息实体和消息队列
下面的消息实体就没什么好说的了,主要就是一个入队和出队的方法
/**
 * 消息实体
 * <p>
 * Created by yutianran on 16/7/4.
 */
public class MyMessage {
    public int msg1;
    public int msg2;
    public int what;
    public Object obj;
    public MyHandler target;
    public Runnable runnable;
}
package base.handler;
import java.util.concurrent.BlockingQueue;
import java.util.concurrent.LinkedBlockingQueue;
/**
* 消息队列
* <p>
* Created by yutianran on 16/7/4.
*/
public class MyMessageQueue {
private BlockingQueue<MyMessage> queue;
private boolean quit = false;
public MyMessageQueue() {
queue = new LinkedBlockingQueue<>();
queue.clear();
}
public boolean enqueueMessage(MyMessage msg) {
if (msg.target == null) {
throw new RuntimeException("消息必须有一个消息处理者");
}
try {
queue.put(msg);
} catch (InterruptedException e) {
e.printStackTrace();
}
return true;
}
public MyMessage next() {
MyMessage msg = null;
if (quit) {
return null;
}
try {
msg = queue.take();
} catch (InterruptedException e) {
e.printStackTrace();
}
return msg;
}
public synchronized void quit() {
quit = true;
}
}
这里的LogUtil其实也与Android无关:
public class LogUtil {

    public static void print(String msg) {
        System.out.println("Thread:" + Thread.currentThread().getName() + "\t" + System.currentTimeMillis() + "\t" + msg);
    }
}
好了,我的自定义消息传递机制搞定!
菜鸟一枚,水平有限,欢迎大家指出博文中的不足之处,小鱼将不胜感激!@qq:630709658


 1161
1161

 被折叠的 条评论
为什么被折叠?
被折叠的 条评论
为什么被折叠?
 到【灌水乐园】发言


