


Nginx简介
Nginx是一个高性能的Web服务器和反向代理的软件。
Web服务器:就是运行我们web服务的容器,提供web功能,还有tomcat也提供类似的功能。
代理是软件架构和网络设计中,非常重要的一个概念。有两种代理:正向代理和反向代理。
正向代理
用户端设置代理服务器。
所有的请求都由代理服务器发出,无法判断代理了多少用户端,叫正向代理。
反向代理
和正向代理相反:在服务端设置代理,所有请求,由服务端接受,然后再由代理服务器发到 后方的服务器。这么一来,所有请求,都由一个服务器接收,无法判断代理了多少服务端。这就是反向代理。
利用反向代理,就可以将请求分发到系统内部的多个节点上,从而减少每个节点的并发数。而这些节点在外界看来,就是一个系统,表现出唯一的ip,也就是代理服务器的IP。
最初是由一个俄罗斯人(Igor Sysoev:伊戈尔 塞索耶夫)开发的。Nginx的第一个版本发布于2004年,因其系统资源消耗低、运行稳定,且具有高性能的并发处理能力等特性,Nginx在互联网企业中得到广泛应用。Nginx是互联网上最受欢迎的开源Web服务器之一,Netcraft公司2019年7月的统计数据表明,Nginx为全球最繁忙网站中的25.42%提供了服务或代理。得益于近几年云计算和微服务的快速发展,Nginx因在其中发挥了自身优势而得到广泛应用,且有望在未来占有更多的市场份额。
2019年3月,著名硬件负载均衡厂商F5宣布收购Nginx,Nginx成为F5的一部分。
Nginx安装
1. 安装:yum
[root@localhost /]# yum install yum-utils
2. 切换目录:
[root@localhost /]# cd /etc/yum.repos.d/
3. 创建文件:
[root@localhost yum.repos.d]# touch nginx.repo
4. 修改文件内容:
[nginx-stable]
name=nginx stable repo
baseurl=http://nginx.org/packages/centos/$releasever/$basearch/
gpgcheck=1
enabled=1
gpgkey=https://nginx.org/keys/nginx_signing.key
module_hotfixes=true
[nginx-mainline]
name=nginx mainline repo
baseurl=http://nginx.org/packages/mainline/centos/$releasever/$basearch/
gpgcheck=1
enabled=0
gpgkey=https://nginx.org/keys/nginx_signing.key
module_hotfixes=true
5. Nginx的安装:
[root@localhost yum.repos.d]# yum install nginx
Nginx启动
启动命令:./nginx
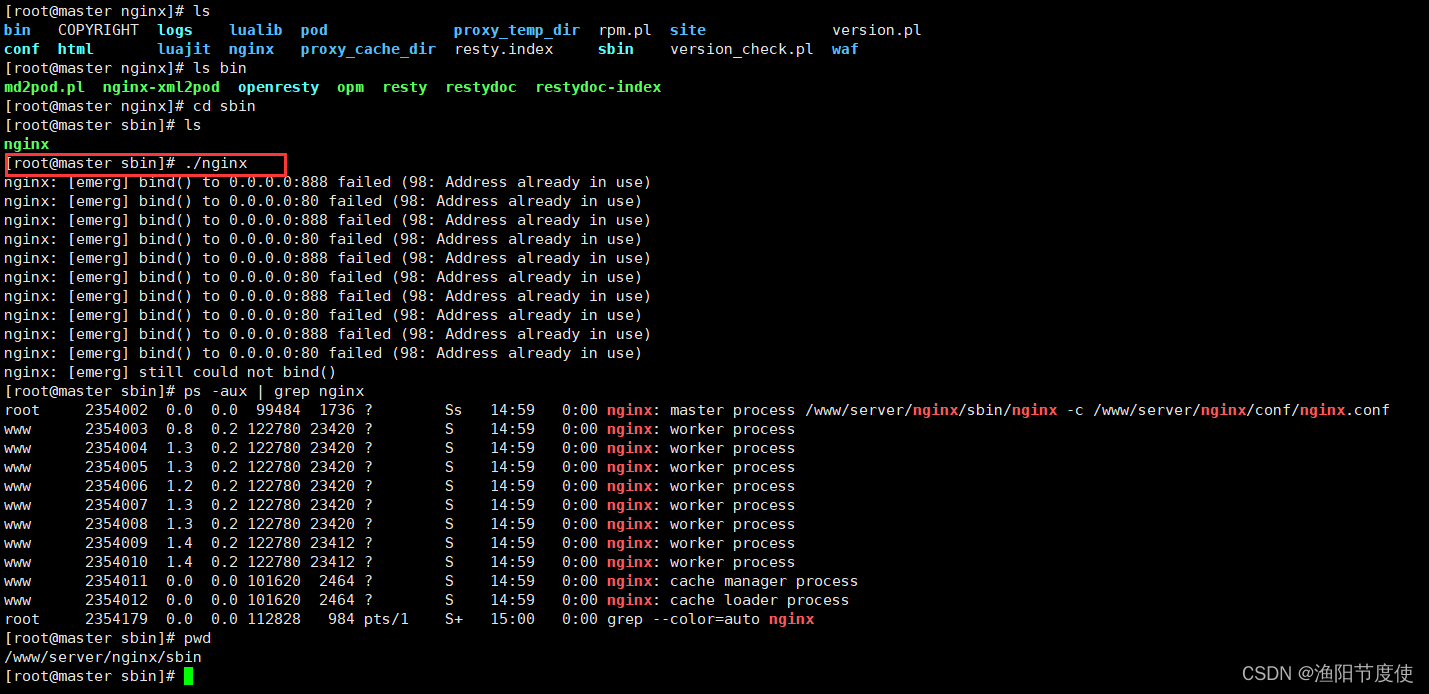
验证nginx本机访问是否成功:
[root@localhost sbin]# curl localhost:80
如果出现:Welcome to nginx!,证明nginx启动成功。
关闭防火墙:
先查询防火墙的状态:[root@localhost sbin]# systemctl status firewalld
关闭防火墙:[root@localhost sbin]# systemctl stop firewalld
开机禁用防火墙:
[root@localhost sbin]# systemctl disable firewalld
Nginx常用命令
配置文件重新加载(修改后)
./nginx -s reload
启动Nginx命令:
./nginx
关闭Nginx命令:
./nginx -s stop
优雅停止nginx
./nginx -s quit
查看nginx版本号:
./nginx -v
重载nginx配置文件:
./nginx -s reload
nginx反向代理相关指令
①、listen
该指令用于配置网络监听。主要有如下三种配置语法结构:
②、server_name
该指令用于虚拟主机的配置。通常分为以下两种:
③、location
该指令用于匹配 URL。
④、proxy_pass
该指令用于设置被代理服务器的地址。可以是主机名称、IP地址加端口号的形式。
⑤、index
该指令用于设置网站的默认首页。
Nginx 配置文件
nginx.conf 配置文件的几大块
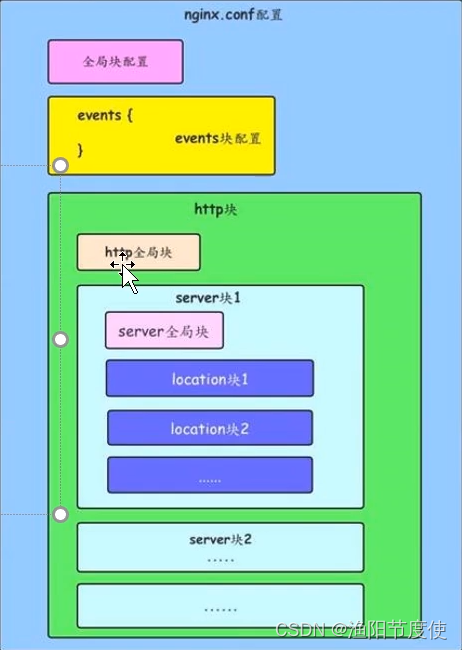
#   nginx配置文件主要分为六个区域: 核心区域
#    main(全局设置)  作用域是全局
#    events(nginx工作模式)
#   upstream(负载均衡服务器设置)
#    http(http设置)
#   	 sever(主机设置)
#   		 location(URL匹配)
#
具体(调优后的)
#设置用户的权限  root nobody 指定 用户名虚拟机内用户   或者 Ip访问
#user  nobody;
#设置工作进程数 一般为 Cpu 核心*2  4*2
worker_processes  8;
# 日志记录
#error_log  logs/error.log;
#error_log  logs/error.log  notice;
#error_log  logs/error.log  info;
# 进程ID
#pid        logs/nginx.pid;

events {
	#指定工作模型
    use epoll;
	# 工作连接数  默认512 根据自己的情况调整
    worker_connections  1024;
}

#http模块 (核心)
http {
	#  能够支持的类型 在 这个文件下写着  mime.types
	#include:来用设定文件的mime类型,类型在配置文件目录下的mime.type文件定义,来告诉nginx来识别文件类型。
    include       mime.types;
	# 默认的类型  在 application/octet-stream;
    default_type  application/octet-stream;
	# 日志的格式
    #log_format  main  '$remote_addr - $remote_user [$time_local] "$request" '
    #                  '$status $body_bytes_sent "$http_referer" '
    #                  '"$http_user_agent" "$http_x_forwarded_for"';
	#访问日志记录
    #access_log  logs/access.log  main;
	#启动 发送文件
    sendfile        on;
	# 开启TCP 推送
    #tcp_nopush     on;
	# 连接超时时间
    #keepalive_timeout  0;
    keepalive_timeout  65;
	# 开启压缩文件
    #gzip  on;

 # 服务
 # 服务组群   反向代理的核心关键
 upstream yuyang{
 # ip 方式 最大失败3个连接  间隔 30S  权重为 5
        server 127.0.0.1:8080       max_fails=3 fail_timeout=30s weight=5;
 #根据ip 利用Hash算法决定访问哪台机器
   ip_hash;
    }
    server {
        listen       80;
        server_name  localhost;   #ip地址,可以是域名
        #charset koi8-r;
        #访问日志记录 以及位置
        #access_log  logs/host.access.log  main;
        # 匹配位置 支持正则表达式
        location / {
            # 寻找位置 默认在Nginx 目录下的  类型
            root   html;
            #代理路径     所有的请求都代理到这上面
			proxy_pass   http://yuyang;

            index  index.html index.html;
        }
        #错误信息 页面
        #error_page  404              /404.html;
        #将服务器错误页重定向到静态页/50x.html
        # redirect server error pages to the static page /50x.html
        #
        error_page   500 502 503 504  /50x.html;
        location = /50x.html {
            root   html;
        }
        #实例 入 将访问尾缀为 \.php 跳转到 127.0.0.1
        # proxy the PHP scripts to Apache listening on 127.0.0.1:80
        #
        #location ~ \.php$ {
        #    proxy_pass   http://127.0.0.1;
        #}
        #将PHP脚本传递给正在侦听127.0.0.1:9000的FastCGI服务器
        # pass the PHP scripts to FastCGI server listening on 127.0.0.1:9000
        #
        #location ~ \.php$ {
        #    root           html;
        #    fastcgi_pass   127.0.0.1:9000;
        #    fastcgi_index  index.php;
        #    fastcgi_param  SCRIPT_FILENAME  /scripts$fastcgi_script_name;
        #    include        fastcgi_params;
        #}
        #拒绝访问.htaccess文件,如果Apache的文档根
        # deny access to .htaccess files, if Apache's document root
        # concurs with nginx's one
        #
        #location ~ /\.ht {
        #    deny  all;
        #}
    }


    # another virtual host using mix of IP-, name-, and port-based configuration
    #
    #server {
    #    listen       8000;
    #    listen       somename:8080;
    #    server_name  somename  alias  another.alias;

    #    location / {
    #        root   html;
    #        index  index.html index.htm;
    #    }
    #}


    # HTTPS server
    #
    #server {
    #    listen       443 ssl;
    #    server_name  localhost;

    #    ssl_certificate      cert.pem;
    #    ssl_certificate_key  cert.key;

    #    ssl_session_cache    shared:SSL:1m;
    #    ssl_session_timeout  5m;

    #    ssl_ciphers  HIGH:!aNULL:!MD5;
    #    ssl_prefer_server_ciphers  on;

    #    location / {
    #        root   html;
    #        index  index.html index.htm;
    #    }
    #}
}
文字版描述
################### main区域 #################################
#user :来指定Nginx Worker进程运行用户以及用户组,默认由nobody账号运行。也可以创建nginx用户指定用户。
#    创建www用户,在nginx配置文件中把user noboby noboby;-->user www www;即可
#    /usr/sbin/groupadd www
#    /usr/sbin/useradd -g www www
#worker_processes:来指定了Nginx要开启的子进程数。每个Nginx进程平均耗费10M~12M内存。根据经验,一般指定1个进程就足够了,如果是多核CPU,
#    建议指定和CPU的数量一样的进程数即可。我这里写2,那么就会开启2个子进程,总共3个进程。
#error_log:用来定义全局错误日志文件。日志输出级别有debug、info、notice、warn、error、crit可供选择,其中,debug输出日志最为最详细,而crit输出日志最少。
#pid:用来指定进程id的存储文件位置。
#worker_rlimit_nofile:用于指定一个nginx进程可以打开的最多文件描述符数目,这里是65535,需要使用命令“ulimit -n 65535”来设置。

user  nobody;
worker_processes  1;
error_log  logs/error.log;
error_log  logs/error.log  notice;
error_log  logs/error.log  info;
pid        logs/nginx.pid;


#####################event 区域###############################
#use:用来指定Nginx的工作模式。Nginx支持的工作模式有select、poll、kqueue、epoll、rtsig和/dev/poll。
#    其中select和poll都是标准的工作模式,kqueue和epoll是高效的工作模式,不同的是epoll用在Linux平台上,
#    而kqueue用在BSD系统中,对于Linux系统,epoll工作模式是首选。
#worker_connections:用于定义Nginx每个进程的最大连接数,即接收前端的最大请求数,默认是1024。
#    最大客户端连接数由worker_processes和worker_connections决定,即Max_clients=worker_processes*worker_connections,
#   在作为反向代理时,Max_clients变为:Max_clients = worker_processes * worker_connections/4。
#    进程的最大连接数受Linux系统进程的最大打开文件数限制,在执行操作系统命令“ulimit -n 65536”后worker_connections的设置才能生效。

events {
    use epoll;
    worker_connections  1024;
}
######################### http设置#####################################
#    http模块负责HTTP服务器相关属性的配置,有server和upstream两个子模块
http {
#include :来用设定文件的mime类型,类型在配置文件目录下的mime.type文件定义,来告诉nginx来识别文件类型。
#default_type:设定了默认的类型为二进制流,也就是当文件类型未定义时使用这种方式,例如在没有配置asp的locate环境时,Nginx是不予解析的,此时,用浏览器访问asp文件就会出现下载了。
#log_format:用于设置日志的格式,和记录哪些参数,这里设置为main,刚好用于access_log来纪录这种类型。
    include       mime.types;
    default_type  application/octet-stream;
    log_format  main  '$remote_addr - $remote_user [$time_local] "$request" '
                      '$status $body_bytes_sent "$http_referer" '
                      '"$http_user_agent" "$http_x_forwarded_for"';
    access_log  logs/access.log  main;
    sendfile        on;
    tcp_nopush     on;
    keepalive_timeout  0;
    keepalive_timeout  65;
    gzip  on;

######################### server设置#####################################
#server用来定一个虚拟主机,标志定义虚拟主机开始。
#listen:用于指定虚拟主机的服务端口。
#server_name:用来指定IP地址或者域名,多个域名之间用空格分开。
#root :表示在这整个server虚拟主机内,全部的root web根目录。注意要和locate {}下面定义的区分开来。
#index :全局定义访问的默认首页地址。注意要和locate {}下面定义的区分开来。
#charset:用于设置网页的默认编码格式。
#access_log:用来指定此虚拟主机的访问日志存放路径,最后的main用于指定访问日志的输出格式。
    server {
        listen       80;
        server_name  localhost;
        root   /Users/hk/www;
        index  index.php index.html index.htm;
        charset utf-8;
        access_log  logs/host.access.log  main;
        aerror_log  logs/host.error.log   main;

######################### location设置#####################################
# location模块 负载均衡,反向代理,虚拟域名等配置。是来定位的,定位URL,解析URL,它也提供了强大的正则匹配功能,也支持条件判断匹配,
#    可以通过location指令实现Nginx对动,静态网页进行过滤处理。
#/表示匹配访问根目录。
#root指令用于指定访问根目录时,虚拟主机的web目录,这个目录可以是相对路径(相对路径是相对于nginx的安装目录)。也可以是绝对路径。
#proxy_pass:代理转发,如果在proxy_pass后面的url加/,表示绝对根路径;如果没有/,表示相对路径,把匹配的路径部分也给代理走。
#proxy_set_header:允许重新定义或者添加发往后端服务器的请求头。
#include:加载配置文件,后面介绍nginx多个配置文件时候会提到。
#root:定位localtion匹配的url资源路径。
#index:定义页面显示html,一般和alias配合使用。
        location / {
            root   html;
            index  index.html index.htm;
        }

    error_page  404              /404.html;
    error_page   500 502 503 504  /50x.html;
    location = /50x.html {
        root   html;
    }


    #反向代理配置
    location /jyb {
        proxy_pass http://qurt/;
        proxy_read_timeout 1800s;
        proxy_set_header   Host $host:$server_port;
        proxy_set_header   X-real-ip  $remote_addr;
        proxy_set_header   X-Forwarded-For $proxy_add_x_forwarded_for;
        proxy_set_header   X-Forwarded-Proto  $scheme;
     }


     #采用uwsgi方式
     location /python/ {
         include uwsgi_params;
         uwsgi_pass 127.0.0.1:33333;
     }

    # FastCGI方式
    location ~ \.php$ {
        root           html;
        fastcgi_pass   127.0.0.1:9000;
        fastcgi_index  index.php;
        fastcgi_param  SCRIPT_FILENAME  /scripts$fastcgi_script_name;
        include        fastcgi_params;
    }

    #访问nginx本机目录的文件
    location / {
        root   /home/hk/;
        index  index.html index.htm;
    }

    location  /static/ {
         alias /var/static/;
    }

    # deny access to .htaccess files, if Apache's document root
    # concurs with nginx's one
    #
    location ~ /\.ht {
        deny  all;
    }
}


# another virtual host using mix of IP-, name-, and port-based configuration
server {
    listen       8000;
    listen       somename:8080;
    server_name  somename  alias  another.alias;

    location / {
        root   html;
        index  index.html index.htm;
    }
}


# HTTPS server
server {
    listen       443 ssl;
    server_name  localhost;

    ssl_certificate      cert.pem;
    ssl_certificate_key  cert.key;

    ssl_session_cache    shared:SSL:1m;
    ssl_session_timeout  5m;

    ssl_ciphers  HIGH:!aNULL:!MD5;
    ssl_prefer_server_ciphers  on;

    location / {
        root   html;
        index  index.html index.htm;
    }
}

##############upstram 模块################
# upstream 模块  负载均衡模块,通过一个简单的调度算法来实现客户端IP到后端服务器的负载均衡。
#Nginx的负载均衡模块目前支持4种调度算法:
#    weight 轮询(默认)。每个请求按时间顺序逐一分配到不同的后端服务器,如果后端某台服务器宕机,故障系统被自动剔除,使用户访问不受影响。
#        weight指定轮询权值,weight值越大,分配到的访问机率越高,主要用于后端每个服务器性能不均的情况下。
#    ip_hash。每个请求按访问IP的hash结果分配,这样来自同一个IP的访客固定访问一个后端服务器,有效解决了动态网页存在的session共享问题。
#    fair。比上面两个更加智能的负载均衡算法。此种算法可以依据页面大小和加载时间长短智能地进行负载均衡,
#        也就是根据后端服务器的响应时间来分配请求,响应时间短的优先分配。Nginx本身是不支持fair的,如果需要使用这种调度算法,必须下载Nginx的upstream_fair模块。
#    url_hash。按访问url的hash结果来分配请求,使每个url定向到同一个后端服务器,可以进一步提高后端缓存服务器的效率。Nginx本身是不支持url_hash的,
#        如果需要使用这种调度算法,必须安装Nginx 的hash软件包。

#在HTTP Upstream模块中,可以通过server指令指定后端服务器的IP地址和端口,同时还可以设定每个后端服务器在负载均衡调度中的状态。常用的状态有:
#    down,表示当前的server暂时不参与负载均衡。
#    backup,预留的备份机器。当其他所有的非backup机器出现故障或者忙的时候,才会请求backup机器,因此这台机器的压力最轻。
#    max_fails,允许请求失败的次数,默认为1。当超过最大次数时,返回proxy_next_upstream 模块定义的错误。
#    fail_timeout,在经历了max_fails次失败后,暂停服务的时间。max_fails可以和fail_timeout一起使用。

#注意 当负载调度算法为ip_hash时,后端服务器在负载均衡调度中的状态不能是weight和backup。
#备注: nginx的worker_rlimit_nofile达到上限时,再有客户端链接报502错误. 用了log_format指令设置了日志格式之后,需要用access_log指令指定日志文件的存放路径。

upstream server_group {
    ip_hash;
    server 192.168.123.1:80;
    server 192.168.123.2:80 down;
    server 192.168.123.3:8080  max_fails=3  fail_timeout=20s;
    server 192.168.123.4:8080;
}

server {
    listen       80;
    server_name  localhost;

    location / {
        proxy_pass http://server_group/;
    }
}

}


######################nginx 中location中root和alias的区别 ####################
    nginx指定文件路径有两种方式root和alias,这两者的用法区别,使用方法总结了。
    root与alias主要区别在于nginx如何解释location后面的uri,这会使两者分别以不同的方式将请求映射到服务器文件上。
    [root]
        语法:root path
        默认值:root html
        配置段:http、server、location、if

[alias]
    语法:alias path
    配置段:location

root实例:

    location ^~ /t/ {
        root /www/root/html/;
    }
    如果一个请求的URI是/t/a.html时,web服务器将会返回服务器上的/www/root/html/t/a.html的文件。

alias实例:
    location ^~ /t/ {
        alias /www/root/html/new_t/;
    }
    如果一个请求的URI是/t/a.html时,web服务器将会返回服务器上的/www/root/html/new_t/a.html的文件。注意这里是new_t,
    因为alias会把location后面配置的路径丢弃掉,把当前匹配到的目录指向到指定的目录。
注意:
    1. 使用alias时,目录名后面一定要加"/"。
    2. alias在使用正则匹配时,必须捕捉要匹配的内容并在指定的内容处使用。
    3. alias只能位于location块中。(root可以不放在location中)
实战(核心在server这)
worker_processes  1;

events {
    worker_connections  1024;
}


http {
   upstream  dalaoyang-server {
       server    localhost:10001;
       server    localhost:10002;
   }

server {
        listen       80;
        server_name  www.cpf.com;

        location / {
			proxy_pass http://dalaoyang-server;   #所有的请求都代理到上面的upstream app 里
			proxy_redirect default;
        }
	}
}
Nginx负载均衡
轮询
upstream  dalaoyang-server {
       server    localhost:8081;
       server    localhost:8082;
}
权重
upstream  dalaoyang-server {
       server    localhost:8081 weight=1;
       server    localhost:8082 weight=2;
}
iphash
upstream  dalaoyang-server {
       ip_hash;
       server    localhost:8081 ;
       server    localhost:8082  ;
}
最少连接
upstream  dalaoyang-server {
       least_conn;
       server    localhost:8081 ;
       server    localhost:8082 ;
}
fair
upstream  dalaoyang-server {
       server    localhost:10001 weight=1;
       server    localhost:10002 weight=2;
       fair;
}
限流
漏斗算法(信号量)
无论访问量多大,通过的请求就是限定的,其余请求依次排队等待

令牌桶算法(信号量)
获取到令牌的请求通过,反之处于等待状态,与漏斗区别在于漏斗是固定速率,令牌桶是平均速率,允许通过的请求可大可小
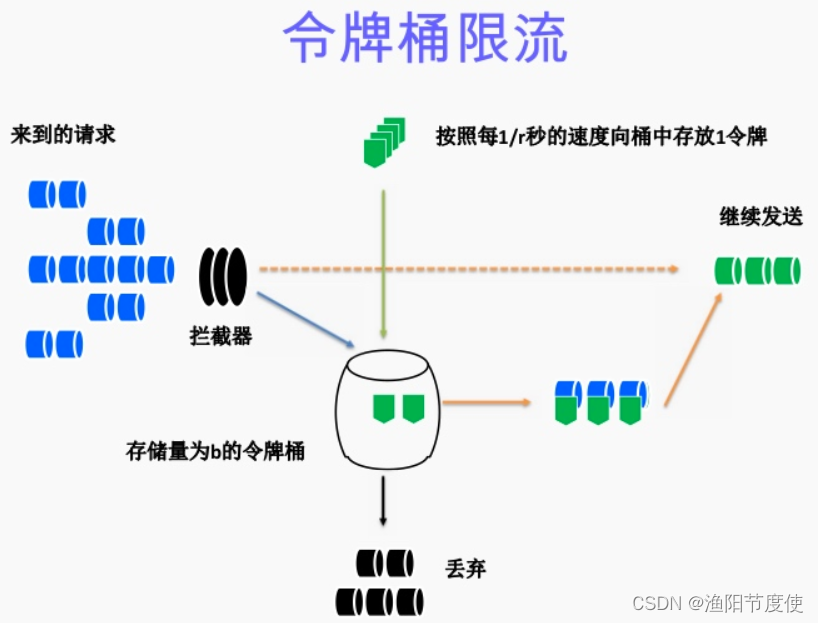
#限制访问速率
limit_req_zone $binary_remote_addr zone=app:10m rate=2r/s;
10m缓存大小
rate每秒能处理的请求
limit_req zone=app burst=5;
实现动静分离
实现整个网站的动静分离,实现如下要求:
1.前端Nginx收到静态请求,直接从NFS中返回给客户端。
2.前端Nginx收到动态请求转交给通过FastCGI交给服务器处理。
----如果得到静态结果直接从NFS取出结果交给Nginx然后返回给客户端。
----如果需要数据处理服务器连接数据库后将结果返回给Nginx
3.前端Nginx收到图片请求以.jpg、.png、.gif等请求交给后端Images服务器处理
location ~* \.(jpg|gif)$ { # location匹配将图片交给Image处理
# proxy_pass http://localhost:90; # Image服务器要开启web服务
proxy_pass http://app1;
}
error_page 500 502 503 504 /50x.html;
location = /50x.html {
root html;
}
镜像服务器
Nginx的proxy_store作用是直接把静态文件在本地硬盘创建并读取,类似于七牛或者又拍这样的镜像CDN功能(类似于oss),首次访问会自动获取源站的静态图片等文件,之后的访问就是直接从CDN服务器读取,加快了速度。
需要配置一下参数:
#启用缓存到本地的功能
  proxy_store on;
  #表示用户读写权限,如果在error中报路径不允许访问的话就用"chomod -R a+rw"将下面配置的路径改为相应的权限.
  proxy_store_access user:rw group:rw all:rw;
  #此处为文件的缓存路径,这个路径是和url中的文件路径一致的
  proxy_temp_path 缓存目录;
  #在上面的配置之后,虽然文件被缓存到了本地磁盘上,但每次请求仍会向远端拉取文件,为了避免去远端拉取文件,还必须增加:
  if ( !-e $request_filename) {
  proxy_pass http://192.168.10.10;
  }
  注:"!-e $request_filename"正则表达式,匹配缓存目录中的文件与源文件是否存在。
 "http://192.168.10.10" 源服务器的地址,默认端口80,如监听其他端口,此处要指出,例如4000端口,http://192.168.10.10:4000
整体配置如下(修改nginx的配置文件nginx.conf)
location / {                 //这里的location是要换成自己经过精确匹配的location,比如要缓存图片要写成 "location ~*\.(gif|jpg|jepg|png|bmp)${"
    expires 3d;               //所有链接,浏览器缓存过期时间为3天
    proxy_set_header Accept-Encoding '';
    root /home/mpeg/nginx;          //此目录为服务器的根目录,下面的if语句就是判断此目录下是否有响应的文件
    proxy_store on;             //表示开启缓存
    proxy_store_access user:rw group:rw all:rw;//表示用户读写权限
    proxy_temp_path /home/mpeg/nginx;    //此处为文件的缓存路径,这个路径是和url根目录中的文件路径一致的
    if ( !-e $request_filename) {
        proxy_pass http://192.168.0.1;  //此处为要被代理的服务器的地址
    }
  }
高可用 热备部署 Nginx负载均衡HA(keepalived,LVS)

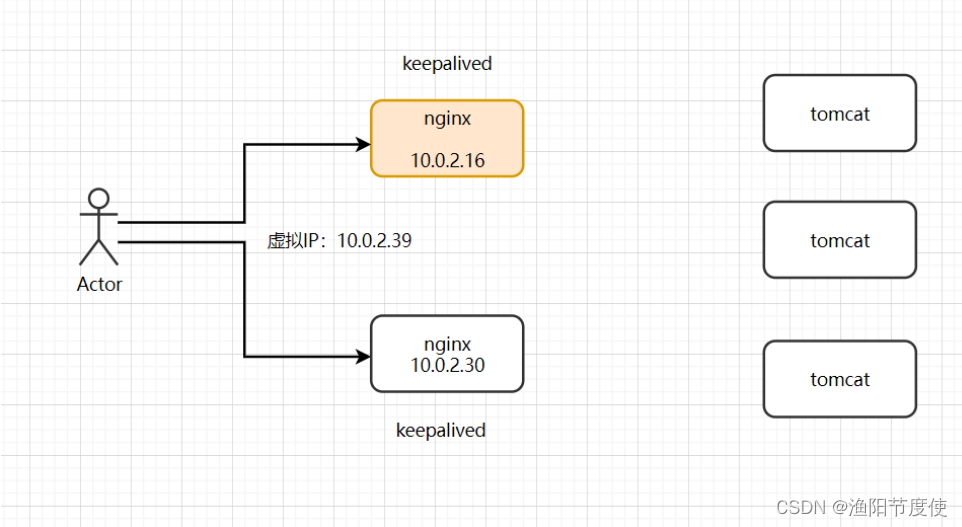

用nginx做负载均衡,作为架构的最前端或中间层,随着日益增长的访问量,需要给负载均衡做高可用架构,利用keepalived解决单点风险,一旦 nginx宕机能快速切换到备份服务器
安装 keepalived
yum install nginx keepalived pcre-devel -y
配置keepalived高可用,修改主配置文件
两台均备份
cp /etc/keepalived/keepalived.conf keepalived.conf.bak
global_defs {
    vrrp_garp_interval 0
    vrrp_gna_interval 0
 }
 vrrp_instance VI_1 {
     state MASTER    #备用机 修改为 BACKUP
     interface enp0s8
     virtual_router_id 50
     priority 100   # 参数 备用比主机低就可以了
     advert_int 1
     authentication {
         auth_type PASS
         auth_pass 1111
     }

	#核心
     virtual_ipaddress {
         192.168.56.120
     }
 }
~
启动nginx集群
在启动keepalived
service keepalived start
停止指令
service keepalived stop
systemctl status keepalived -l     查看keepalived 状态
系统服务之间的备份
upstream app{
        server localhost:8081;
        server localhost:8082   BACKUP;
     }


 2万+
2万+


 被折叠的 条评论
为什么被折叠?
被折叠的 条评论
为什么被折叠?
 到【灌水乐园】发言


