


文章目录
Module
初识Module
-
什么是模块
模块:一个一个的局部作用域的代码块
- 什么是模块系统
- 模块系统需要解决的主要问题
① 模块化的问题
② 消除全局变量
③ 管理加载顺序
// base.js (function(){ class BaseSlider{...} window.BaseSlider = BaseSlider; //只暴露一个接口 })() //slider.js (function(){class Slider extends BaseSlider{...}})(); //index.js new Slider(document.querySelector('.slider')); //index.html <script src="./base.js"></script> <script src="./slider.js"></script> <script src="./index.js"></script> - 什么是模块系统
Module的基本用法
1.使用 Module 模块化之前的例子
2.使用 script 标签加载模块
console.log(Slider);
一个文件就是一个模块
只要你会用到 import 或 export,在使用 script 标签加载的时候,就要加上 type=“module”
3.分析 Module 解决的问题
① 模块化的问题
② 消除全局变量
③ 管理加载顺序
// base.js
class BaseSlider{...}
export default BaseSlider;

//slider.js
import BaseSlider from './base.js';
class Slider extends BaseSlider{...};
export default Slider;

//index.js
import Slider from './slider.js';
new Slider(document.querySelector('.slider'));

//index.html
<script src="./index.js" type="module"></script>
Module的导入和导出
export default
<script type="module">
    // 1.认识导出和导入
    // 导出的东西可以被导入(import),并访问到

    // 一个模块没有导出,也可以将其导入
    // 被导入的代码都会执行一遍,也仅会执行一遍
    // import './module.js';
    // import './module.js';
    // import './module.js';

    // 2.基本用法
    // 可以随便起名
    import age from './module.js';
    console.log(age); // //随便起什么都行,因为export default只能导出一个,建议和原模块相同

    // 一个模块只能有一个 export default
</script>
module.js
const age = 18;
const sex = 'male';
console.log(age);

// export default age;
// export default 20;
// export default {};

// const fn = () => {};
// export default fn;
// export default function () {}
export default class {}

// 一个模块只能有一个 export default
export default sex;
export
module.js
const age = 18;
export age;  // ×
export 18;   // ×
// export 声明或语句
export const age = 18; //√

//导出多个
export const age = 18;

//function fn(){}
//export fn;  // ×

export function fn(){} //√
// export function(){} // × 不能匿名

//class className{}
//export className; // ×

export class className{} //√
//export class{} // × 不能匿名

// 方法Ⅱ
function fn(){}
class className{}
const age = 18;
export {age,fn,className};
//导出时起别名
export {fn as func,className as cN,age as Age};
export default age;
index.html
<script type="module">
    // 1.基本用法
    // export 声明或语句
    // export const age = 18;
    // const age = 18;
    // export { age };
    // 不能随意命名
    import { age } from './module.js';
    console.log(age);

    // 多个导入
    import {fn} from './module.js'
    import {className} from './module.js'
    import {age} from './module.js'

    // 同时导入
    import {age,func,className} from './module.js'

    // 导入时起别名
    import {fn as func,className as cName,age as Age} from './module.js'

    // 整体导入
    // 回导入所有输出,包括通过export default导出的
    import * as obj from './module.js'

    //同时导入
    //方法Ⅰ
    import {Age,func,cN} from './module.js';
    import age2 from './module.js'; //这个age2是随便起的用于接收export default导出的
    //方法Ⅱ
    //注意export default的要放在前面
    import age2,{Age,func,cN} from './module.js';
</script>
Module的注意事项
index.html
<!DOCTYPE html>
<html lang="en">
  <head>
    <meta charset="UTF-8" />
    <title>Module 的注意事项</title>
  </head>
  <body>
    <!-- <script src="./module.js"></script> -->
    <!-- <script src="./module.js" type="module"></script> -->

    <script type="module">
      // 1.模块顶层的 this 指向
      // 模块中,顶层的 this 指向 undefined
      // import './module.js';

      // 2.import 和 import()
      // import 命令具有提升效果,会提升到整个模块的头部,率先执行
      console.log('沙发');
      console.log('第二');
      import './module.js';

      // import 执行的时候,代码还没执行
      // import 和 export 命令只能在模块的顶层,不能在代码块中执行
      if (PC) {
        import 'pc.js';
      } else if (Mobile) {
        import 'mobile.js';
      }

      // import() 可以按条件导入
      if (PC) {
        import('pc.js').then().catch();
      } else if (Mobile) {
        import('mobile.js').then().catch();
      }

      // 3.导入导出的复合写法
      // 复合写法导出的,无法在当前模块中使用
      export { age } from './module.js';
      console.log(age);

      // 等价于下面的写法,可以在当前模块中使用
      import { age } from './module.js';
      export { age  } from './module.js';
      console.log(age);
    </script>
  </body>
</html>
module.js
console.log(this);

if (typeof this !== 'undefined') {
  throw new Error('请使用模块的方式加载');
}

export const age = 18;
Module的应用
index.html
<!DOCTYPE html>
<html lang="en">
  <head>
    <meta charset="UTF-8" />
    <title>Module 的应用</title>
    <link rel="stylesheet" href="./slider.css" />
  </head>
  <body>
      ...
    <script src="./index.js" type="module"></script>
  </body>
</html>
//default.js
// 默认参数
// const DEFAULTS = {
//   // 初始索引
//   initialIndex: 0,
//   // 切换时是否有动画
//   animation: true,
//   // 切换速度,单位 ms
//   speed: 300
// };

// export default DEFAULTS;

export default {
  // 初始索引
  initialIndex: 0,
  // 切换时是否有动画
  animation: true,
  // 切换速度,单位 ms
  speed: 300
};


//constants.js
// for base
export const ELEMENT_NODE = 1;
export const SLIDER_ANIMATION_CLASSNAME = 'slider-animation';
// for keyboard
export const LEFT_KEYCODE = 37;
export const RIGHT_KEYCODE = 39;

//base.js
// 默认参数
import DEFAULTS from './defaults.js';
// 常量
import { ELEMENT_NODE, SLIDER_ANIMATION_CLASSNAME } from './constants.js';

class BaseSlider {
  // ...
}
export default BaseSlider;


//keyborad.js
import { LEFT_KEYCODE, RIGHT_KEYCODE } from './constants.js';

const keyboard = {
  bindEvent(slider) {
    document.addEventListener(
      'keyup',
      ev => {
        if (ev.keyCode === LEFT_KEYCODE) {
          slider.prev();
        } else if (ev.keyCode === RIGHT_KEYCODE) {
          slider.next();
        }
      },
      false
    );
  }
};
export default keyboard;


//slider.js
import BaseSlider from './base.js';
import Keyboard from './keyboard.js';
// import Mouse from './mouse.js';

class Slider extends BaseSlider {
  constructor(el, options) {
    super(el, options);
    this._bindEvent();
  }

  _bindEvent() {
    Keyboard.bindEvent(this);
    // Mouse.bindEvent(this);
  }
}
export default Slider;


//index.js
import Slider from './slider.js';
new Slider(document.querySelector('.slider'));
总结
-
Module的加载
-
使用script标签加载模块时需要添加 type=“module”
-
<script type="module">
	import age from './module.js';
</script>

<script type="module" src="./module.js"></script>
-
-
导出和导入
- 一个模块的导出可以被其它模块导入,并访问
- 没有导出,也可以将其导入,此时会将被导入的模块执行一次
- 被导入的代码都会执行一遍,也仅会执行一遍
-
export default和对应的import
- export default 用于导出一个默认值,一个模块只能有一个
- 基本用法:
export default 19; import age from './module.js';
-
export和对应的import
-
export 用于导出声明或语句
-
export const age=19; import {age} from './module.js'; -
export可以导出多个
-
export const age= 18;
export function fn(){};
export class className{};
import {age,fn,className} from './module.js';
const age= 18;
function fn(){};
class className {};
export {age,fn,className};
import {age,fn,className} from './module.js';
-
-
export 导出的时候可以起别名
-
export {age as userAge,fn as getUserAge,className as User}; import {userAge,getUserAge,User} from './module.js'; -
import 导入的时候也可以起别名
-
const age = 19;
function fn(){}
class className{}
export {age,fn,className};

import {
    age as userAge,
    fn as getUserAge,
    className as User
} from './module.js';
-
-
可以整体导入所有导出,包括export和export default 的导出
import * as obj from './module.js';
-
可以同时导入export default和export导出的内容
import userAge,{age,fn,className} from './module.js';
-
-
Module注意事项
- 模块中,顶层的this指向undefined
- import具有提升效果,会提升到整个模块的头部,率先执行
- import执行的时候,代码还没执行
- import和export只能在模块的顶层,不能在代码块中执行
- import() 可以按条件导入
- 复合写法导出的,无法在当前模块中使用
Babel和Webpack
Babel
-
Babel编译器
- Babel本身可以编译ES6的大部分语法
- ES6Module语法一般需要使用Webpack来处理
- Babel本身不能编译ES6新增的API,需要借助其它的模块
-
Babel流程
-
安装Node.js(https://nodejs.org/en/)
-
初始化项目,生成package.json文件
npm init
-
安装Babel需要的包(@babel/core、@babel/cli和@babel/preset-env )
-
$root npm install --save-dev @babel/core @babel/cli
$root npm install --save-dev @babel/preset-env
-
-
在package.json文件添加执行编译的命令
-
{
  "name": "babel",
  "version": "1.0.0",
  "description": "",
  "main": "index.js",
  "scripts": {
    "build": "babel src -d dist"
  },
  "author": "",
  "license": "ISC",
  }
}
-
-
创建配置文件 .babelrc,并配置
-
{
    "presets":["@babel/preset-env"]
}
-
-
编译并测试:
npm run build
-
Babel是什么
// 1.认识 Babel
// 官网:https://babeljs.io/
// 在线编译:https://babeljs.io/repl

// Babel 是 JavaScript 的编译器,用来将 ES6 的代码,转换成 ES6 之前的代码

// 2.使用 Babel
// ES6
let name = 'Alex';
const age = 18;

const add = (x, y) => x + y;

// Set Map

new Promise((resolve, reject) => {
    resolve('成功');
}).then(value => {
    console.log(value);
});

Array.from([1, 2]);

class Person {
    constructor(name, age) {
        Object.assign(this, { name, age });
    }
}
new Person('Alex', 18);

import './index.js';

// 使用 Babel 编译后
('use strict');

require('./index.js');

function _instanceof(left, right) {
    if (
        right != null &&
        typeof Symbol !== 'undefined' &&
        right[Symbol.hasInstance]
    ) {
        return !!right[Symbol.hasInstance](left);
    } else {
        return left instanceof right;
    }
}

function _classCallCheck(instance, Constructor) {
    if (!_instanceof(instance, Constructor)) {
        throw new TypeError('Cannot call a class as a function');
    }
}

var name = 'Alex';
var age = 18;

var add = function add(x, y) {
    return x + y;
};

new Promise(function (resolve, reject) {
    resolve('成功');
}).then(function (value) {
    console.log(value);
});
Array.from([1, 2]);

var Person = function Person(name, age) {
    _classCallCheck(this, Person);

    Object.assign(this, {
        name: name,
        age: age
    });
};

new Person('Alex', 18);

// 3.解释编译结果
// Babel 本身可以编译 ES6 的大部分语法,比如 let、const、箭头函数、类
// 但是对于 ES6 新增的 API,比如 Set、Map、Promise 等全局对象,以及一些定义在全局对象上的方法(比如 Object.assign/Array.from)都不能直接编译,需要借助其它的模块
// Babel 一般需要配合 Webpack 来编译模块语法
使用babel前的准备
// 1.什么是 Node.js 和 npm
// Node.js 是个平台或者工具,对应浏览器
// 后端的 JavaScript = ECMAScript + IO + File + ...等服务器端的操作

// npm:node 包管理工具

// npm install

// 2.安装 Node.js
// node -v
// npm -v

// 3.初始化项目
// npm init 项目名-> package.json

// 4.安装 Babel 需要的包

// npm install --save-dev @babel/core @babel/cli
// npm install --save-dev @babel/core@7.11.0 @babel/cli@7.10.5

// npm install
- package.json
{
  "name": "babel",
  "version": "1.0.0",
  "description": "",
  "main": "index.js",
  "scripts": {
    "test": "echo \"Error: no test specified\" && exit 1"
  },
  "author": "",
  "license": "ISC",
  "devDependencies": {
    "@babel/cli": "^7.10.5",
    "@babel/core": "^7.11.0"
  }
}
使用babel编译ES6代码
https://babeljs.io/setup
1.执行编译的命令
在 package.json 文件中添加执行 babel 的命令
"scripts": {
    "build": "babel src -d dist" // 等价于 babel src out-dir dist
}
命令行窗口执行 npm run build 来编译代码
2.Babel 的配置文件 .babelrc
npm install @babel/preset-env@7.11.0 --save-dev
创建配置文件 .babelrc,并配置
{
    "presets": ["@babel/preset-env"]
}
- package.json
{
  "name": "babel",
  "version": "1.0.0",
  "description": "",
  "main": "index.js",
  "scripts": {
    "build": "babel src -d dist"
  },
  "author": "",
  "license": "ISC",
  "devDependencies": {
    "@babel/cli": "^7.10.5",
    "@babel/core": "^7.11.0",
    "@babel/preset-env": "^7.11.0"
  }
}
- src/babel.js
let name = 'Alex';
const age = 18;
const add = (x, y) => x + y;
new Promise((resolve, reject) => {
  resolve('成功');
});
Array.from([1, 2]);
class Person {}
import './index.js';
- dist/babel.js
"use strict";

require("./index.js");

function _classCallCheck(instance, Constructor) { if (!(instance instanceof Constructor)) { throw new TypeError("Cannot call a class as a function"); } }

var name = 'Alex';
var age = 18;

var add = function add(x, y) {
  return x + y;
};

new Promise(function (resolve, reject) {
  resolve('成功');
});
Array.from([1, 2]);

var Person = function Person() {
  _classCallCheck(this, Person);
};
Webpack
-
初始化项目,生成package.json文件
-
安装webpack需要的包(webpack-cli和webpack)
-
$root npm install --save-dev webpack-cli webpack
-
-
在package.json文件添加执行编译的命令
-
{ "name": "webpack", "scripts": { "webpack":"webpack" // "webpack": "webpack --config webpack.config.js" // "webpack": "webpack --config webpack.js" //自己指定配置目录 }, } -
创建配置文件 (默认为webpack.config.js),并配置
-
打包测试
npm run webpack
-
Webpack初识
Webpack是什么
-
认识 Webpack
- webpack 是静态模块打包器,当 webpack 处理应用程序时,会将所有这些模块打包成一个或多个文件
-
什么是 Webpack(模块)
- webpack 可以处理 js/css/图片、图标字体等单位
- 开发过程中存在于本地的 js/css/图片/图标字体等文件,就是静态的
- 动态的内容,webpack没办法处理,只能处理静态的
Webpack初体验
1.初始化项目
npm init
2.安装 webpack 需要的包
npm install --save-dev webpack-cli@3.3.12 webpack@4.44.1
3.配置 webpack
- package.json
{
  "name": "webpack2",
  "version": "1.0.0",
  "description": "",
  "main": "index.js",
  "scripts": {
    "webpack": "webpack --config webpack.config.js"
  },
  "author": "",
  "license": "ISC",
  "devDependencies": {
    "webpack": "^4.44.1",
    "webpack-cli": "^3.3.12"
  }
}
- webpack.config.js
const path = require('path');

module.exports = {
  mode: 'development',
  entry: './src/index.js',
  output: {
    path: path.resolve(__dirname, 'dist'),
    filename: 'bundle.js'
  }
};
4.编译并测试
$root npm run webpack
- src/module.js
export default 18;
console.log('module.js');
- src/index.js
import age from './module.js';
console.log('index.js', age);
- dist/bundle.js (编译后的文件)
// ...省略不写
Webpack核心概念
- entry指定入口文件
- output指定输出相关信息
- loader可以帮助webpack处理那些非JavaScript文件
- plugins用于执行范围更广的任务
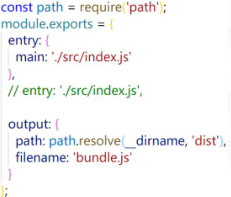
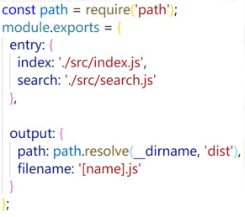
entry和output
- 单入口
- 多入口
- package.json
{
  "name": "webpack2",
  "version": "1.0.0",
  "description": "",
  "main": "index.js",
  "scripts": {
    "webpack": "webpack --config webpack.config.js"
  },
  "author": "",
  "license": "ISC",
  "devDependencies": {
    "webpack": "^4.44.1",
    "webpack-cli": "^3.3.12"
  }
}
- webpack.config.js
const path = require('path');

module.exports = {
  // 单入口
  mode: 'development',
  // entry: './src/index.js',

  // output: {
  //   path: path.resolve(__dirname, 'dist'),
  //   filename: 'bundle.js'
  // }
  // 多入口
  entry: {
    main: './src/index.js',
    search: './src/search.js'
  },
  output: {
    path: path.resolve(__dirname, 'dist'),
    filename: '[name].js'
  }
};
//search.js
console.log('search.js');

//module.js
export default 18;
console.log('module.js');

//index.js
import age from './module.js';
console.log('index.js', age);
loader
学会到官网或者其他地方查找相应的loader文档
module.exports = {
  module: {
    rules: [  //配置loader的规则
      {
        test: /\.js$/,  //正则表达式
        exclude: /node_modules/, //排除该目录下的JS文件
        loader: 'babel-loader'
      }
    ]
  }
};
1.什么是 loader
-
webpack js/css/图片
-
loader 让 webpack 能够去处理那些非 JS 文件的模块
2.babel-loader 让webpack中能够使用babel
-
先使用babel-loader编译ES6至ES5,然后交给webpack打包
-
注意这里的babel-loader只负责连通babel和webpack,真正编译工作还是交给babel-core,babel-loader会自动调用babel-core
-
npm install --save-dev babel-loader@8.1.0
3.安装 Babel
-
命令:npm install --save-dev @babel/core@7.11.0 @babel/preset-env@7.11.0
4.配置 babel-loader
-
文档:https://www.webpackjs.com/loaders/
5.引入 core-js 编译ES5中未定义的ES6的新增API
-
文档:https://www.babeljs.io/docs/en/babel-polyfill
-
安装:npm install --save-dev core-js@3.6.5
-
使用:在需要编译新API的JS文件中:import “core-js/stable”;
6.打包并测试
npm run webpack
index.js
import 'core-js/stable';

let name = 'Alex';
const age = 18;
console.log(name, age);

const add = (x, y) => x + y;
console.log(add(1, 1));

new Promise((resolve, reject) => {
  resolve('成功');
}).then(value => {
  console.log(value);
});

console.log(Array.from([1, 2]));

class Person {
  constructor(name, age) {
    Object.assign(this, { name, age });
  }
}
new Person('Alex', 18);
.babelr #这个是babel的配置文件
{
  "presets": ["@babel/preset-env"] //用来设置如何编译ES6版本的JS
}
package.json
{
  "name": "webpack2",
  "version": "1.0.0",
  "description": "",
  "main": "index.js",
  "scripts": {
    "webpack": "webpack --config webpack.config.js"
  },
  "author": "",
  "license": "ISC",
  "devDependencies": {
    "@babel/core": "^7.11.0",
    "@babel/preset-env": "^7.11.0",
    "babel-loader": "^8.1.0",
    "core-js": "^3.6.5",
    "webpack": "^4.44.1",
    "webpack-cli": "^3.3.12"
  }
}
webpack.config.js
const path = require('path');

module.exports = {
  mode: 'development',  //设置为开发模式,不会压缩代码
  entry: {
    index: './src/index.js'
  },
  output: {
    path: path.resolve(__dirname, 'dist'),
    filename: '[name].js'
  },
  module: {
    rules: [  //配置loader的规则
      {
        test: /\.js$/,  //正则表达式
        exclude: /node_modules/, //排除该目录下的JS文件
        loader: 'babel-loader'
      }
    ]
  }
};
plugins
学会到官网或其他地方查找相应plugins的文档
const HtmlWebpackPlugin = require('html-webpack-plugin');
module.exports = {
  plugins: [
     new HtmlWebpackPlugin({
       template: './index.html'
     })
  ]
};
1.什么是 plugins
loader 被用于帮助 webpack 处理各种模块,而插件则可以用于执行范围更广的任务
https://www.webpackjs.com/plugins/
2.html-webpack-plugin
npm install --save-dev html-webpack-plugin@4.3.0
3.配置 html-webpack-plugin 插件
4.多页面时 html-webpack-plugin 插件的配置
5.html-webpack-plugin 插件的其他功能
index.html -> index.js
search.html -> search.js
package.json
{
  "name": "webpack2",
  "version": "1.0.0",
  "description": "",
  "main": "index.js",
  "scripts": {
    "webpack": "webpack --config webpack.config.js"
  },
  "author": "",
  "license": "ISC",
  "devDependencies": {
    "html-webpack-plugin": "^4.3.0",
    "webpack": "^4.44.1",
    "webpack-cli": "^3.3.12"
  }
}
webpack.config.js
const path = require('path');
const HtmlWebpackPlugin = require('html-webpack-plugin');

module.exports = {
  mode: 'development',
  // entry: {
  //   index: './src/index.js'
  // },
  entry: {
    index: './src/index.js',
    search: './src/search.js'
  },
  output: {
    path: path.resolve(__dirname, 'dist'),
    filename: '[name].js'
  },
  plugins: [
    // 单入口
    // new HtmlWebpackPlugin({
    //   template: './index.html'
    // })

    // 多入口
    new HtmlWebpackPlugin({
      template: './index.html',  //告诉插件要渲染的模板文件
      filename: 'index.html',
      chunks: ['index'], //告诉插件要引入的JS文件,对应entry中的键
      minify: {
        // 删除 index.html 中的注释
        removeComments: true,
        // 删除 index.html 中的空格
        collapseWhitespace: t rue,
        // 删除各种 html 标签属性值的双引号
        removeAttributeQuotes: true
      }
    }),
    new HtmlWebpackPlugin({
      template: './search.html',
      filename: 'search.html',
      chunks: ['search']
    })
  ]
};
Webpack应用
处理CSS文件
package.json
{
  "name": "webpack-css",
  "version": "1.0.0",
  "description": "",
  "main": "index.js",
  "scripts": {
    "webpack": "webpack"
  },
  "author": "",
  "license": "ISC",
  "devDependencies": {
    "css-loader": "^4.1.1",
    "html-webpack-plugin": "^4.3.0",
    "mini-css-extract-plugin": "^0.9.0",
    "style-loader": "^1.2.1",
    "webpack": "^4.44.1",
    "webpack-cli": "^3.3.12"
  }
}
webpack.config.js
const path = require('path');
const HtmlWebpackPlugin = require('html-webpack-plugin');
const MiniCssExtractPlugin = require('mini-css-extract-plugin');

module.exports = {
  mode: 'development',
  entry: './src/index.js',
  output: {
    path: path.resolve(__dirname, 'dist'),
    filename: '[name].js'
  },
  module: {
    rules: [
      {
        test: /\.css$/,
        // loader: 'css-loader'
        // use: ['style-loader', 'css-loader'] //行内样式
        use: [MiniCssExtractPlugin.loader, 'css-loader'] //从右往左执行 链接式
      }
    ]
  },
  plugins: [
    new HtmlWebpackPlugin({
      template: './index.html',
      filename: 'index.html'
    }),
    new MiniCssExtractPlugin({
      filename: 'css/[name].css'
    })
  ]
};
使用 file-loader 处理CSS图片
- 如果是外部的资源,是不需要考虑 webpack 的,只有本地的图片才需要被 webpack 处
- file-loader首先将源文件复制到目标文件中,并将目标文件中的文件路径改成相应的目录
- npm install --save-dev file-loader@6.0.0
- webconfig.json
{
  "name": "webpack-css-img",
  "version": "1.0.0",
  "description": "",
  "main": "index.js",
  "scripts": {
    "webpack": "webpack"
  },
  "author": "",
  "license": "ISC",
  "devDependencies": {
    "css-loader": "^4.1.1",
    "file-loader": "^6.0.0",
    "html-webpack-plugin": "^4.3.0",
    "mini-css-extract-plugin": "^0.9.0",
    "style-loader": "^1.2.1",
    "webpack": "^4.44.1",
    "webpack-cli": "^3.3.12"
  }
}
- src/index.css
body {
  /* background-image: url(https://www.imooc.com/static/img/index/logo.png); */
  background-image: url(img/logo.png);
  background-repeat: no-repeat;
}
- src/index.js
import './index.css';
console.log('index');
- webpack.config.js
const path = require('path');
const HtmlWebpackPlugin = require('html-webpack-plugin');
const MiniCssExtractPlugin = require('mini-css-extract-plugin');

module.exports = {
  mode: 'development',
  entry: './src/index.js',
  output: {
    path: path.resolve(__dirname, 'dist'),
    filename: '[name].js'
  },
  module: {
    rules: [
      {
        test: /\.css$/,
        use: [
          {
            loader: MiniCssExtractPlugin.loader,
            options: {
              publicPath: '../'
            }
          },
          'css-loader'
        ]
      },
      {
        test: /\.(jpg|png|gif)$/,
        use: {
          loader: 'file-loader',
          options: {
            name: 'img/[name].[ext]' // 保持原文件名和扩展名
          }
        }
      }
    ]
  },
  plugins: [
    new HtmlWebpackPlugin({
      template: './index.html',
      filename: 'index.html'
    }),
    new MiniCssExtractPlugin({
      filename: 'css/[name].css'
    })
  ]
};
使用 html-withimg-loader 处理 HTML 中的图片
- html-withimg-loader只是用来解析HTML中的图片文件,而具体的图片处理还是要交给File-Loader
$root npm install --save-dev html-withimg-loader@0.1.16
- package.json
{
  "name": "webpack-html-img",
  "version": "1.0.0",
  "description": "",
  "main": "index.js",
  "scripts": {
    "webpack": "webpack"
  },
  "author": "",
  "license": "ISC",
  "devDependencies": {
    "css-loader": "^4.1.1",
    "file-loader": "^6.0.0",
    "html-webpack-plugin": "^4.3.0",
    "html-withimg-loader": "^0.1.16",
    "mini-css-extract-plugin": "^0.9.0",
    "style-loader": "^1.2.1",
    "webpack": "^4.44.1",
    "webpack-cli": "^3.3.12"
  }
}
- webpack.config.js
const path = require('path');
const HtmlWebpackPlugin = require('html-webpack-plugin');
const MiniCssExtractPlugin = require('mini-css-extract-plugin');

module.exports = {
  mode: 'development',
  entry: './src/index.js',
  output: {
    path: path.resolve(__dirname, 'dist'),
    filename: '[name].js'
  },
  module: {
    rules: [
      {
        test: /\.css$/,
        use: [
          {
            loader: MiniCssExtractPlugin.loader,
            options: {
              publicPath: '../'
            }
          },
          'css-loader'
        ]
      },
      {
        test: /\.(jpg|png|gif)$/,
        use: {
          loader: 'file-loader',
          options: {
            name: 'img/[name].[ext]',
            // file-loader默认按ES6模块导出,不关闭此选项,图片资源会被当成模块导出,使HTML无法访问图片文件
            esModule: false   // <img src={"default":"img/logo.png"} alt=""/>
          }
        }
      },
      {
        test: /\.(htm|html)$/,
        loader: 'html-withimg-loader'
      }
    ]
  },
  plugins: [
    new HtmlWebpackPlugin({
      template: './index.html',
      filename: 'index.html'
    }),
    new MiniCssExtractPlugin({
      filename: 'css/[name].css'
    })
  ]
};
- ./src/index.css
body {
  background-color: yellow;
  /* background-image: url(); */
}
- ./src/index.js
import './index.css';
console.log('index');
- ./index.html
<!DOCTYPE html>
<html lang="en">
  <head>
    <meta charset="UTF-8" />
    <title>使用 html-withimg-loader 处理 HTML 中的图片</title>
  </head>
  <body>
    <img src="./src/img/logo.png" alt="" />

    <script>
      // npm install --save-dev html-withimg-loader@0.1.16
    </script>
  </body>
</html>
使用 file-loader 处理JS图片
- package.json
{
  "name": "webpack-js-img",
  "version": "1.0.0",
  "description": "",
  "main": "index.js",
  "scripts": {
    "webpack": "webpack"
  },
  "author": "",
  "license": "ISC",
  "devDependencies": {
    "css-loader": "^4.1.1",
    "file-loader": "^6.0.0",
    "html-webpack-plugin": "^4.3.0",
    "mini-css-extract-plugin": "^0.9.0",
    "style-loader": "^1.2.1",
    "webpack": "^4.44.1",
    "webpack-cli": "^3.3.12"
  }
}
- webpack.config.js
const path = require('path');
const HtmlWebpackPlugin = require('html-webpack-plugin');
const MiniCssExtractPlugin = require('mini-css-extract-plugin');

module.exports = {
  mode: 'development',
  entry: './src/index.js',
  output: {
    path: path.resolve(__dirname, 'dist'),
    filename: '[name].js'
  },
  module: {
    rules: [
      {
        test: /\.css$/,
        use: [
          {
            loader: MiniCssExtractPlugin.loader,
            options: {
              publicPath: '../'
            }
          },
          'css-loader'
        ]
      },
      {
        test: /\.(jpg|png|gif)$/,
        use: {
          loader: 'file-loader',
          options: {
            name: 'img/[name].[ext]',
            esModule: false
          }
        }
      }
    ]
  },
  plugins: [
    new HtmlWebpackPlugin({
      template: './index.html',
      filename: 'index.html'
    }),
    new MiniCssExtractPlugin({
      filename: 'css/[name].css'
    })
  ]
};
- src/index.js
import './index.css';
import img from './img/logo.png';
console.log(img); //打印图片路径
const imgEl = document.createElement('img');
imgEl.src = img;
document.body.appendChild(imgEl);
- src/index.css
body {
  background-color: yellow;
}
- index.html
使用url-loader处理图片
$root npm install --save-dev url-loader@4.1.0
- package.json
{
  "name": "webpack-url-loader",
  "version": "1.0.0",
  "description": "",
  "main": "index.js",
  "scripts": {
    "webpack": "webpack"
  },
  "author": "",
  "license": "ISC",
  "devDependencies": {
    "css-loader": "^4.1.1",
    "file-loader": "^6.0.0",
    "html-webpack-plugin": "^4.3.0",
    "mini-css-extract-plugin": "^0.9.0",
    "style-loader": "^1.2.1",
    "url-loader": "^4.1.0",
    "webpack": "^4.44.1",
    "webpack-cli": "^3.3.12"
  }
}
-
webpack.config.js
const path = require('path');
const HtmlWebpackPlugin = require('html-webpack-plugin');
const MiniCssExtractPlugin = require('mini-css-extract-plugin');

module.exports = {
  mode: 'development',
  entry: './src/index.js',
  output: {
    path: path.resolve(__dirname, 'dist'),
    filename: '[name].js'
  },
  module: {
    rules: [
      {
        test: /\.css$/,
        use: [
          {
            loader: MiniCssExtractPlugin.loader,
            options: {
              publicPath: '../'
            }
          },
          'css-loader'
        ]
      },
      {
        test: /\.(jpg|png|gif)$/,
        use: {
          loader: 'url-loader',
          options: {
            name: 'img/[name].[ext]',
            esModule: false,
            limit: 3000 //小于3000字节转换为Base64格式存储在JS中,大于3000字节还是用file-loader处理
          }
        }
      }
    ]
  },
  plugins: [
    new HtmlWebpackPlugin({
      template: './index.html',
      filename: 'index.html'
    }),
    new MiniCssExtractPlugin({
      filename: 'css/[name].css'
    })
  ]
};
使用 webpack-dev-server 搭建开发环境
文件修改后自动打包文件,且不会生成dist目录。项目保存后会实时渲染生成。
$root npm install --save-dev webpack-dev-server@3.11.0
- package.json
{
  "name": "webpack-url-loader",
  "version": "1.0.0",
  "description": "",
  "main": "index.js",
  "scripts": {
    "webpack": "webpack",
    "dev": "webpack-dev-server --open chrome"
  },
  "author": "",
  "license": "ISC",
  "devDependencies": {
    "css-loader": "^4.1.1",
    "html-webpack-plugin": "^4.3.0",
    "mini-css-extract-plugin": "^0.9.0",
    "webpack": "^4.44.1",
    "webpack-cli": "^3.3.12",
    "webpack-dev-server": "^3.11.0"
  }
}
- webpack.config.js
const path = require('path');
const HtmlWebpackPlugin = require('html-webpack-plugin');
const MiniCssExtractPlugin = require('mini-css-extract-plugin');

module.exports = {
  mode: 'development',
  entry: './src/index.js',
  output: {
    path: path.resolve(__dirname, 'dist'),
    filename: '[name].js'
  },
  // devServer:{},
  module: {
    rules: [
      {
        test: /\.css$/,
        use: [
          {
            loader: MiniCssExtractPlugin.loader,
            options: {
              publicPath: '../'
            }
          },
          'css-loader'
        ]
      }
    ]
  },
  plugins: [
    new HtmlWebpackPlugin({
      template: './index.html',
      filename: 'index.html'
    }),
    new MiniCssExtractPlugin({
      filename: 'css/[name].css'
    })
  ]
};


 3542
3542


 被折叠的 条评论
为什么被折叠?
被折叠的 条评论
为什么被折叠?
 到【灌水乐园】发言


