


In this section i will provide you some basic examples for image processing using C#
Example 1:
Get the RGB and Luminosity histograms using the default C# classes
public static int[][] Histogram_CSharp(Bitmap SourceImage)
{
int[][] RGBColor = { new int[256], new int[256], new int[256], new int[256] };
int width = SourceImage.Width, height = SourceImage.Height;
byte Red, Green, Blue;
Color pixelColor;
for (int i = 0, j; i < width; ++i)
for (j = 0; j < height; ++j)
{
pixelColor = SourceImage.GetPixel(i, j);
Red = pixelColor.R;
Green = pixelColor.G;
Blue = pixelColor.B;
++RGBColor[0][(int)(0.114 * Blue + 0.587 * Green + 0.299 * Red)];
++RGBColor[1][Red]; // Red
++RGBColor[2][Green]; // Green
++RGBColor[3][Blue]; // Blue
}
return RGBColor;
}
Get the RGB and Luminosity histograms using unsafe code
int[][] RGBColor = { new int[256], new int[256], new int[256], new int[256] };
// [Luminosity, Red, Green, Blue]
int width = SourceImage.Width, height = SourceImage.Height;
bool imagGrayscale = (SourceImage.PixelFormat == PixelFormat.Format8bppIndexed);
BitmapData srcData = SourceImage.LockBits(new Rectangle(0, 0, width, height), ImageLockMode.ReadOnly,
(imagGrayscale ? PixelFormat.Format8bppIndexed : PixelFormat.Format24bppRgb)); // lock bitmap data
unsafe
{
byte* ptr = (byte*)srcData.Scan0.ToPointer();
int pointrInc = imagGrayscale ? 1 : 3;
int remain = srcData.Stride - width * pointrInc;
for (int i = 0, j; i < height; ++i, ptr += remain)
for (j = 0; j < width; j++, ptr += pointrInc)
{
if (imagGrayscale == false)
{
++RGBColor[0][(int)(0.114 * ptr[0] + 0.587 * ptr[1] + 0.299 * ptr[2])];
++RGBColor[1][ptr[2]]; // R
++RGBColor[2][ptr[1]]; // G
++RGBColor[3][ptr[0]]; // B
}
else ++RGBColor[0][ptr[0]]; // L
}
}
SourceImage.UnlockBits(srcData);
return RGBColor;
}
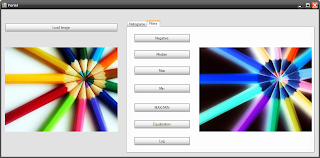
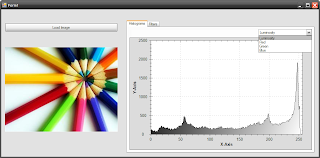
Load Image using Unsafe Code, read the image and get the pixels information in several tables. Then plot the histograms in a
ZedGraphControl
Control.
Available Histograms: Luminosity, Red, Green, Blue
Available Filters: Negative, Median, Max, Min, Max/Min, Equalization, Log
Example 3:
Download an example application, in which we describe the retrieval procedure using CEDD, FCTH and the MPEG-7 Descriptors.

Download Example 3
Example 4: Image Processing in Windows Presentation Foundation (.NET Framework 3.0)
Many image processing researchers which they develop on .NET/C# they still stuck in GDI+. That means, they still using the unsafe bracket and by pointers they get the image information. This has changed since the introduction of the Windows Presentation Foundation (WPF) for .NET Framework 3.0 and beyond. In this blog post, we will discuss how to open and process an image using the WPF tools. Let's consider that the image.png is a 32bits/pixel color image. To access the image pixels:
PngBitmapDecoder myImage = new PngBitmapDecoder(new Uri("image.png"), BitmapCreateOptions.DelayCreation,BitmapCacheOption.OnLoad);byte[] myImageBytes = new byte [myImage.Frames[0].PixelWidth * 4 * myImage.Frames[0].PixelHeight];
myImage.Frames[0].CopyPixels(myImageBytes, myImage.Frames[0].PixelWidth * 4, 0);
At first line, a image object is created by using the pngbitmapdecoder class. The myImage.Frames collection holds the image information. In this example, an image is opened so the collection is equal to 1 and the picture is accessed by the myImage.Frames[0].
Then a byte array is created which it will hold the image pixels information. The CopyPixels function of the Frames[0] is used to get the pixels of the opened image. In this particular example because the image format is Bgra32, the array byte size is equal to 4*Width*Height. In general, the ordering of bytes in the bitmap corresponds to the ordering of the letters B, G, R, and A in the property name. So in Bgra32 the order is Blue, Green, Red and Alpha. Generally, the image format for the image is accessed by myImage.Frames[0].Format and the palette (if the image is using one) by myImage.Frames[0].Palette.
To manipulate the image pixels in order to create a greyscale image:
int Width = myImage.Frames[0].PixelWidth;
int Height = myImage.Frames[0].PixelHeight;
for (int x = 0; x < Width; x++)
{
for (int y = 0; y < Height; y++)
{
int r = myImageBytes[4 * x + y * (4 * Width) + 2];
int g = myImageBytes[4 * x + y * (4 * Width) + 1];
int b = myImageBytes[4 * x + y * (4 * Width) + 0];
int greyvalue = (int)(0.3 * r + 0.59 * g + 0.11 * b);
myImageBytes[4 * x + y * (4 * Width) + 2] = (byte)greyvalue;
myImageBytes[4 * x + y * (4 * Width) + 1] = (byte)greyvalue;
myImageBytes[4 * x + y * (4 * Width) + 0] = (byte)greyvalue;
}
}
Finally, to create a new image object from the byte array and save it:
BitmapSource myNewImage = BitmapSource.Create(Width, Height, 96, 96, PixelFormats.Bgra32, null, myImageBytes, 4 * Width);BmpBitmapEncoder enc = new
BmpBitmapEncoder();
enc.Frames.Add(BitmapFrame.Create(myNewImage));FileStream fs = newFileStream("newimage.png", FileMode.Create);
enc.Save(fs);fs.Close();
A BitmapSource object is created with the corresponding Width, Height and PixelFormat. Then a bmp encoder object is created to save the image as bmp format. A frame is added and the encoder save the image to the corresponding stream.
These programming tools for image manipulation are only a subset of those that they are available in WPF. For example is the WriteableBitmap Class which it is not an immutable object, suitable for dynamic images.
from: http://savvash.blogspot.com/p/c-tutorials.html


 80
80


 被折叠的 条评论
为什么被折叠?
被折叠的 条评论
为什么被折叠?
 到【灌水乐园】发言


