


在一些特定 UI 实现需求中,比如滑动切换视图、或者横屏左 item 右 message 的信息展示界面,使用 Fragment 作为视图的载体就比用 Activity 去实现要更为合理。
之前对于 Fragment 的知识点掌握得不够全面,不系统。用到的时候就临时抱佛脚去查一下。今天我要从头到尾全面的剖析一下它。
1. Fragment 简介
Fragment 直译“碎片”,是一种可以嵌入在 Activity 中的 UI 片段,因此 Fragment 的存在必须依附于 Activity。同时,相同的界面如果用 Fragment 实现会比 Activity 实现大幅度提升性能,并降低系统占用内存。Fragment 还十分善于充分利用大屏幕的 Android 设备,可以在大尺寸设备上实现更为合理的布局,去展示信息。
2. Fragment 的使用
2.1 Fragment 生命周期
先上一张 Fragment 生命周期图:
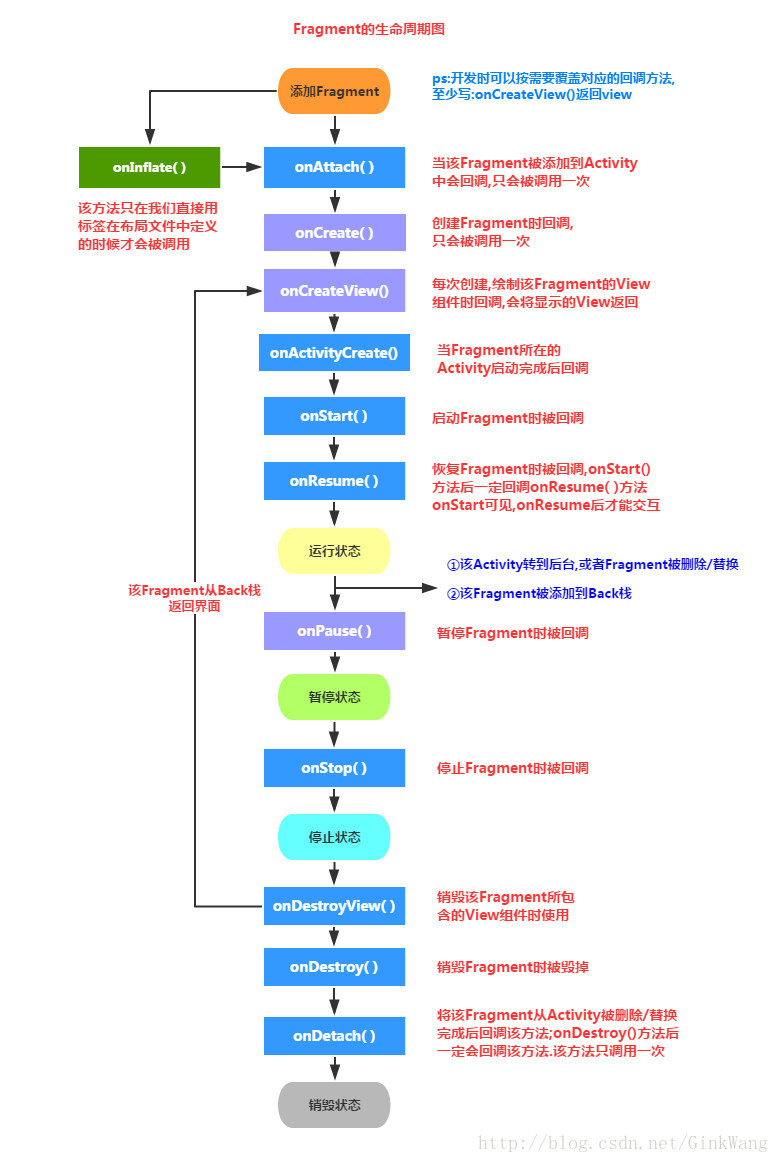
各个周期已经很详细地在图中注明了。
之前说 Fragment 必须依附于 Activity 存在,我们都知道 Activity 有它自己的生命周期,那么 Activity 的生命周期与 Fragment 的生命周期是什么样的对应关系呢?下面的这幅图给出了答案:

2.2 Fragment 的静态使用
了解了生命周期,接着我们来试着使用它。先来一个 Fragment 的最简单的使用方式——静态使用。
先建立左右两个 Fragment 布局:
fragment_left:
    <RelativeLayout xmlns:android="http://schemas.android.com/apk/res/android"
                  android:orientation="vertical"
                  android:layout_width="match_parent"
                  android:layout_height="match_parent"
        android:background="@android:color/darker_gray">

        <TextView
            android:layout_width="wrap_content"
            android:layout_height="wrap_content"
            android:textSize="20sp"
            android:text="left_fragmetn"
            android:layout_centerInParent="true"/>

        <Button
            android:id="@+id/btn_left"
            android:layout_width="wrap_content"
            android:layout_height="wrap_content"
            android:text="left_button"/>
    </RelativeLayout>
fragment_right:
    <RelativeLayout xmlns:android="http://schemas.android.com/apk/res/android"
                    android:layout_width="match_parent"
                    android:layout_height="match_parent"
                    android:background="@android:color/holo_green_dark"
                    android:orientation="vertical">

        <TextView
            android:layout_width="wrap_content"
            android:layout_height="wrap_content"
            android:layout_centerInParent="true"
            android:text="right_fragmetn"
            android:textSize="20sp"/>

        <Button
            android:id="@+id/btn_right"
            android:layout_width="wrap_content"
            android:layout_height="wrap_content"
            android:text="right_button"/>
    </RelativeLayout>
然后创建 Fragment:
LeftFragment:
    public class LeftFragment extends Fragment {

        private View mView;

        @Override
        public View onCreateView(LayoutInflater inflater, ViewGroup container, Bundle savedInstanceState) {
            mView = inflater.inflate(R.layout.fragment_left, container, false);
            return mView;
        }
    }
RightFragment:
    public class RightFragment extends Fragment {

        private View mView;

        @Override
        public View onCreateView(LayoutInflater inflater, ViewGroup container, Bundle savedInstanceState) {
            mView = inflater.inflate(R.layout.fragment_right, container, false);
            return mView;
        }
    }
这里会有两个 Fragment 供引用,一个是系统内置的 android.app.Fragment,一个是 support-v4 库中的 android.support.v4.app.Fragment。这里引用的是 support-v4 库中的 Fragment,因为它可以让 Fragment 在所有 Android 版本中保持一致。
之后将两个 Fragment 写死在 Activity 布局 activity_main.xml 中:
    <LinearLayout
        xmlns:android="http://schemas.android.com/apk/res/android"
        xmlns:tools="http://schemas.android.com/tools"
        android:id="@+id/activity_main"
        android:layout_width="match_parent"
        android:layout_height="match_parent"
        android:orientation="horizontal"
        tools:context="com.ginkwang.fragmenttest.MainActivity">

        <fragment
            android:id="@+id/fragment_left"
            android:layout_width="0dp"
            android:layout_height="match_parent"
            android:layout_weight="1"
            android:name="com.ginkwang.fragmenttest.LeftFragment"/>

        <fragment
            android:id="@+id/fragment_right"
            android:layout_width="0dp"
            android:layout_height="match_parent"
            android:layout_weight="1"
            android:name="com.ginkwang.fragmenttest.RightFragment"/>
    </LinearLayout>
这里要调用 android:name 属性指明要添加的 Fragment 类名,包名也要写好。
运行程序:
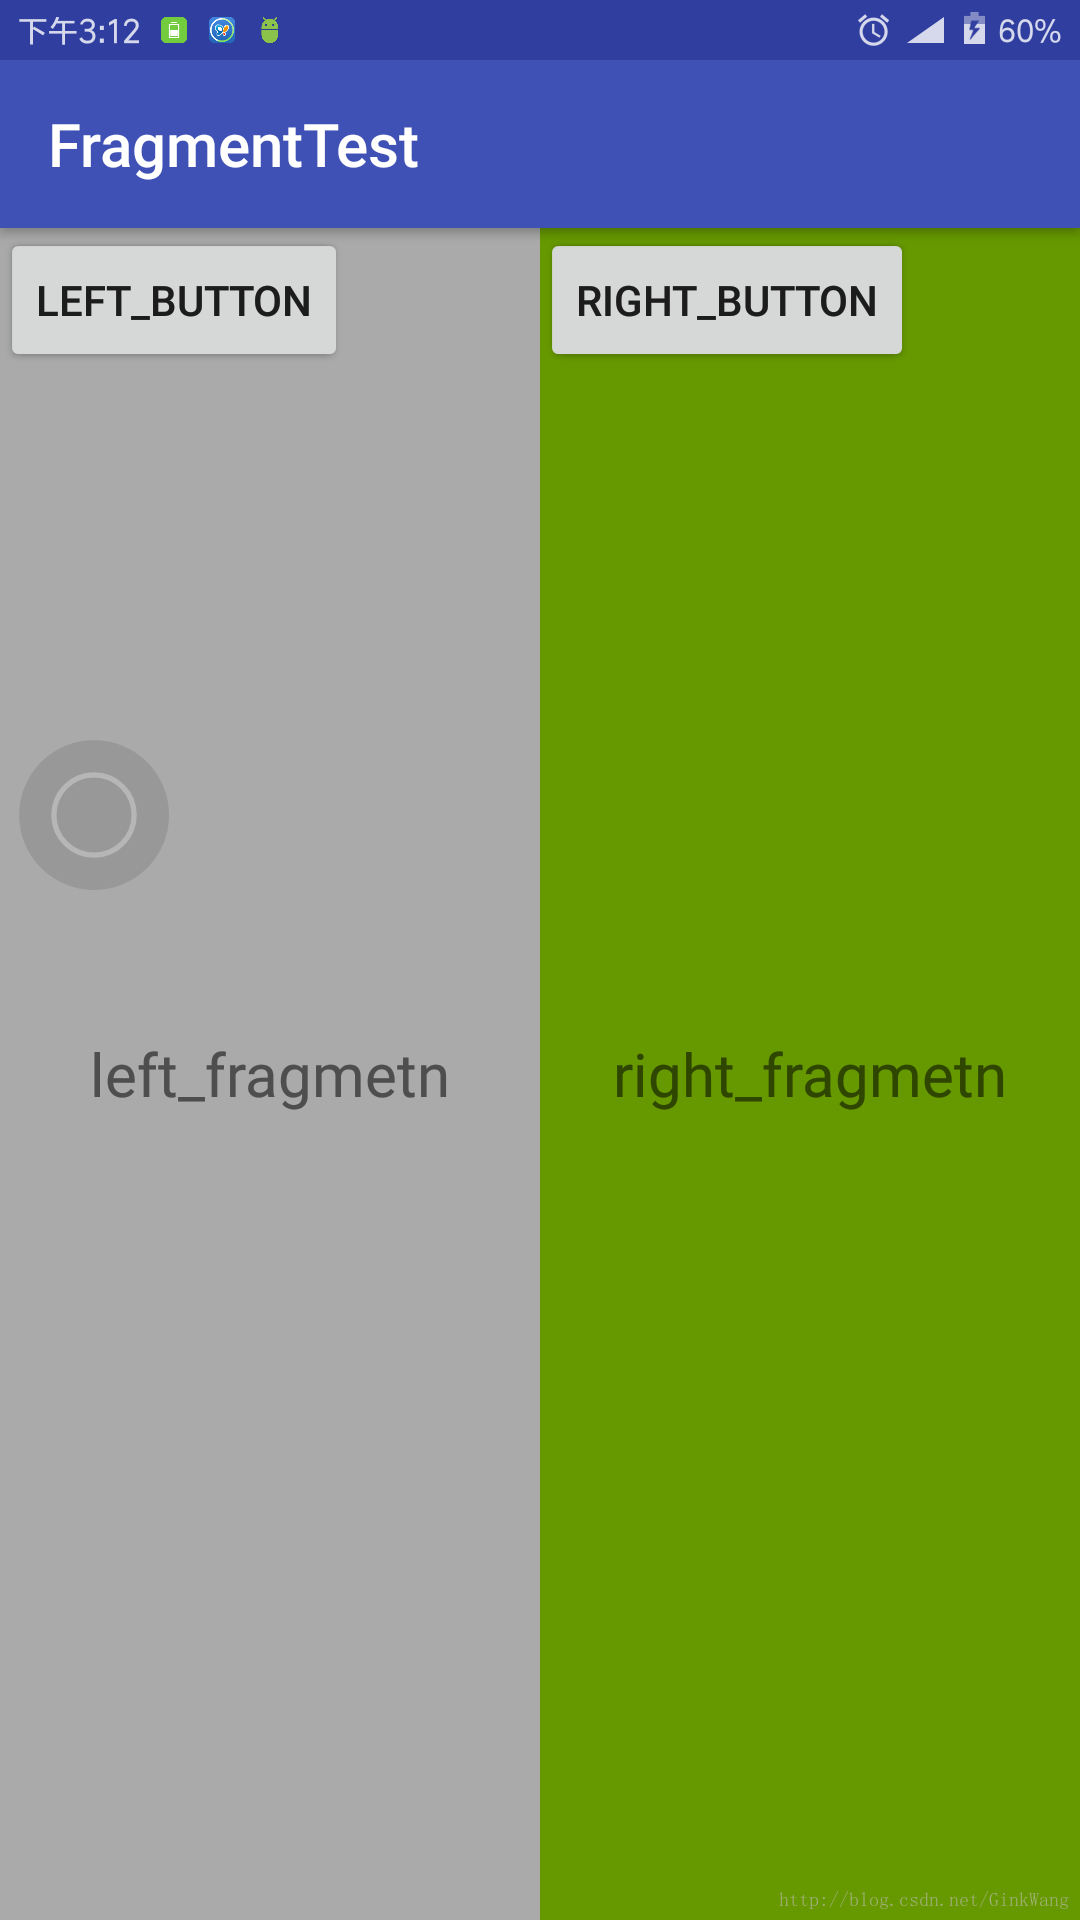
可以看到,静态使用 Fragment 有它的优点,就是业务逻辑全部可以写在 Fragment 中,Activity 会很轻。同时它也有很大的局限性,把 Fragment 的灵活性都给抹杀了。接下来介绍 Fragment 的高级调用方式。
2.3 动态添加 Fragment
还是在之前的代码上进行修改。
再建立一个 Fragment,直接上代码:
布局,fragment_right_new:
    <RelativeLayout xmlns:android="http://schemas.android.com/apk/res/android"
                    android:layout_width="match_parent"
                    android:layout_height="match_parent"
                    android:background="@android:color/holo_red_dark"
                    android:orientation="vertical">

        <TextView
            android:layout_width="wrap_content"
            android:layout_height="wrap_content"
            android:layout_centerInParent="true"
            android:text="new_right_fragmetn"
            android:textSize="20sp"/>
    </RelativeLayout>
NewRightFragment:
    public class NewRightFragment extends Fragment {

        private View mView;

        @Override
        public View onCreateView(LayoutInflater inflater, ViewGroup container, Bundle savedInstanceState) {
            mView = inflater.inflate(R.layout.fragment_right_new, container, false);
            return mView;
        }
    }
activity_main.xml:
    <LinearLayout
        xmlns:android="http://schemas.android.com/apk/res/android"
        xmlns:tools="http://schemas.android.com/tools"
        android:id="@+id/activity_main"
        android:layout_width="match_parent"
        android:layout_height="match_parent"
        android:orientation="horizontal"
        tools:context="com.ginkwang.fragmenttest.MainActivity">

        <fragment
            android:id="@+id/fragment_left"
            android:layout_width="0dp"
            android:layout_height="match_parent"
            android:layout_weight="1"
            android:name="com.ginkwang.fragmenttest.LeftFragment"/>

        <FrameLayout
            android:id="@+id/frame_layout"
            android:layout_width="0dp"
            android:layout_height="match_parent"
            android:layout_weight="1"
            />
    </LinearLayout>
MainActivity:
    public class MainActivity extends AppCompatActivity {

        private Button mBtnLeft;

        private RightFragment mRightFragment;
        private NewRightFragment mNewRightFragment;

        @Override
        protected void onCreate(Bundle savedInstanceState) {
            super.onCreate(savedInstanceState);
            setContentView(R.layout.activity_main);
            mBtnLeft = (Button) findViewById(R.id.btn_left);
            mBtnLeft.setOnClickListener(new View.OnClickListener() {
                @Override
                public void onClick(View pView) {
                    replaceFragment(mNewRightFragment);
                }
            });
            mRightFragment = new RightFragment();
            mNewRightFragment = new NewRightFragment();
            replaceFragment(mRightFragment);
        }

        /*切换 Fragment*/
        private void replaceFragment(Fragment pFragment) {
            FragmentManager lFragmentManager = getSupportFragmentManager();
            FragmentTransaction lFragmentTransaction = lFragmentManager.beginTransaction();
            lFragmentTransaction.replace(R.id.frame_layout, pFragment);
            lFragmentTransaction.commit();
        }

    }
这里是将 MainActivity 的布局中的 right_fragment 换成了一个 FrameLayout,用来装载动态添加的 Fragment。
然后在 MainActivity 中,最重要的就是切换 Fragment 的那部分代码了。通过代码,我们大概知道动态添加 Fragment 的步骤:
- (1)创建 Fragment 实例
- (2)获取 FragmentManager,在 Activity 中可以调用 getSupportFragmentManager() 获得
- (3)通过调用 beginTransaction() 开启一个事务
- (4)向容器内添加或替换 Fragment,一般使用 replace 方法,需传入容器 id 和 Fragment 实例
- (5)使用 commit 方法提交事务
运行程序:
另外,FragmentTransaction 还提供了一个 addToBackStack 方法,用于将一个事务添加到返回栈中
lFragmentTransaction.addToBackStack(null);一般参数传入 null 即可。
之前程序添加 NewRightFragment 后,点击返回键,程序直接退出,并不返回到 RightFragment。调用 addToBackStack 方法后,点击返回键,程序返回到 Rightfragment,再次点击返回键程序才退出。这样就和 Activity 返回栈类似了。
3. Fragment 进阶
3.1 Fragment 与 Activity 通信
(1)获取组件:
- Fragment 获取 Activity 中的组件:getActivity().findViewById(R.id.xxx);
- Activity获得Fragment中的组件(根据id和tag都可以):getFragmentManager.findFragmentByid(R.id.fragment_xxx);
(2)数据传递:
- Activity 传递数据给 Fragment:
调用 Fragment 的 setArgument(bundle) 方法,将装载数据的 bundle 对象传给 Fragment,然后在 Fragment 中调用 getArguments 获取到传递过来的对象。 - Fragment 传递数据给 Activity
在 Fragment 内部定义一个接口,然后在其依附的 Activity 中实现该回调接口。 - Fragment 传递数据给 Fragment
如果是 Fragment 携带数据跳转到另一个 Fragment 中,就直接调用 setArgument(bundle) 方法就好,然后在对应 Fragment 中接收就好。如果是两个 Fragment 实时互传数据,就需要经过其依附的 Activity 进行数据传导。
- Activity 传递数据给 Fragment:
3.2 Fragment 动态加载布局
在大屏幕的平板设备上,打开系统设置,会发现其界面采用的是双页模式(即屏幕左边显示各设置项 item,右边显示该 item 详细设置信息),很多专为平板开发的应用也都是这样设计的。 图为 QQ HD

这样的好处显而易见,更合理的利用的大屏幕空间,也给使用者带来便利。
但是作为开发的角度来说,如果一款应用要求同时适配手机和平板两种界面,那就一定要创建两个工程,根据屏幕大小不同然后并行开发吗?这样也不是不行,只是很多工作都做了两遍,日后一旦有新需求或者发现 bug 也要更改两次,还有打版、测试等等这些工作。
那么有没有办法在一款应用上,让它运行时根据屏幕大小不同去加载相对应的布局呢?答案当然是肯定的。接下来就来看一下 Fragment 动态加载布局的相关知识。
还是先上代码吧。
先建立两个 Fragment:
FragmentOne:
    public class FragmentOne extends Fragment {

        private View mView;

        @Nullable
        @Override
        public View onCreateView(LayoutInflater inflater, @Nullable ViewGroup container, @Nullable Bundle savedInstanceState) {
            mView = inflater.inflate(R.layout.fragment_one, container, false);
            return mView;
        }
} <LinearLayout xmlns:android="http://schemas.android.com/apk/res/android"
android:layout_width="match_parent"
android:layout_height="match_parent"
android:gravity="center"
android:orientation="vertical"
android:background="@android:color/holo_orange_dark">
<TextView
android:layout_width="wrap_content"
android:layout_height="wrap_content"
android:text="Fragment-One"
android:textSize="22sp"/>
</LinearLayout>FragmentTwo:
    public class FragmentTwo extends Fragment {

        private View mView;

        @Nullable
        @Override
        public View onCreateView(LayoutInflater inflater, @Nullable ViewGroup container, @Nullable Bundle savedInstanceState) {
            mView = inflater.inflate(R.layout.fragment_two, container, false);
            return mView;
        }
} <LinearLayout xmlns:android="http://schemas.android.com/apk/res/android"
android:layout_width="match_parent"
android:layout_height="match_parent"
android:background="@android:color/holo_blue_dark"
android:gravity="center"
android:orientation="vertical">
<TextView
android:layout_width="wrap_content"
android:layout_height="wrap_content"
android:text="Fragment-Two"
android:textSize="22sp"/>
</LinearLayout>然后在 MainActivity 的布局 activity_main 中引入 FragmentOne:
    <RelativeLayout
        xmlns:android="http://schemas.android.com/apk/res/android"
        xmlns:tools="http://schemas.android.com/tools"
        android:id="@+id/activity_main"
        android:layout_width="match_parent"
        android:layout_height="match_parent"
        tools:context="com.ginkwang.limitfragment.MainActivity">

        <fragment
            android:id="@+id/one_fragment"
            android:layout_width="match_parent"
            android:layout_height="match_parent"
            android:name="com.ginkwang.limitfragment.FragmentOne"/>
    </RelativeLayout>
接下来,重要!
在 res 目录下新建一个 layout-large 文件夹,然后在里面新建一个同样名为 activity_main.xml 的布局文件,在此布局中将两个 Fragment 全部引入:
    <LinearLayout
        xmlns:android="http://schemas.android.com/apk/res/android"
        xmlns:tools="http://schemas.android.com/tools"
        android:id="@+id/activity_main"
        android:layout_width="match_parent"
        android:layout_height="match_parent"
        android:orientation="horizontal"
        tools:context="com.ginkwang.limitfragment.MainActivity">

        <fragment
            android:id="@+id/one_fragment"
            android:layout_width="0dp"
            android:layout_height="match_parent"
            android:layout_weight="1"
            android:name="com.ginkwang.limitfragment.FragmentOne"/>

        <fragment
            android:id="@+id/two_fragment"
            android:layout_width="0dp"
            android:layout_height="match_parent"
            android:layout_weight="3"
            android:name="com.ginkwang.limitfragment.FragmentTwo"/>
    </LinearLayout>
写到这,逻辑已经很明白了。正常屏幕尺寸加载 layout 下的 activity_main 布局,然后如果是大尺寸设备,就去加载 layout-large 下的布局。究竟是不是这样呢,我们运行程序看一下:
先看正常尺寸设备的:
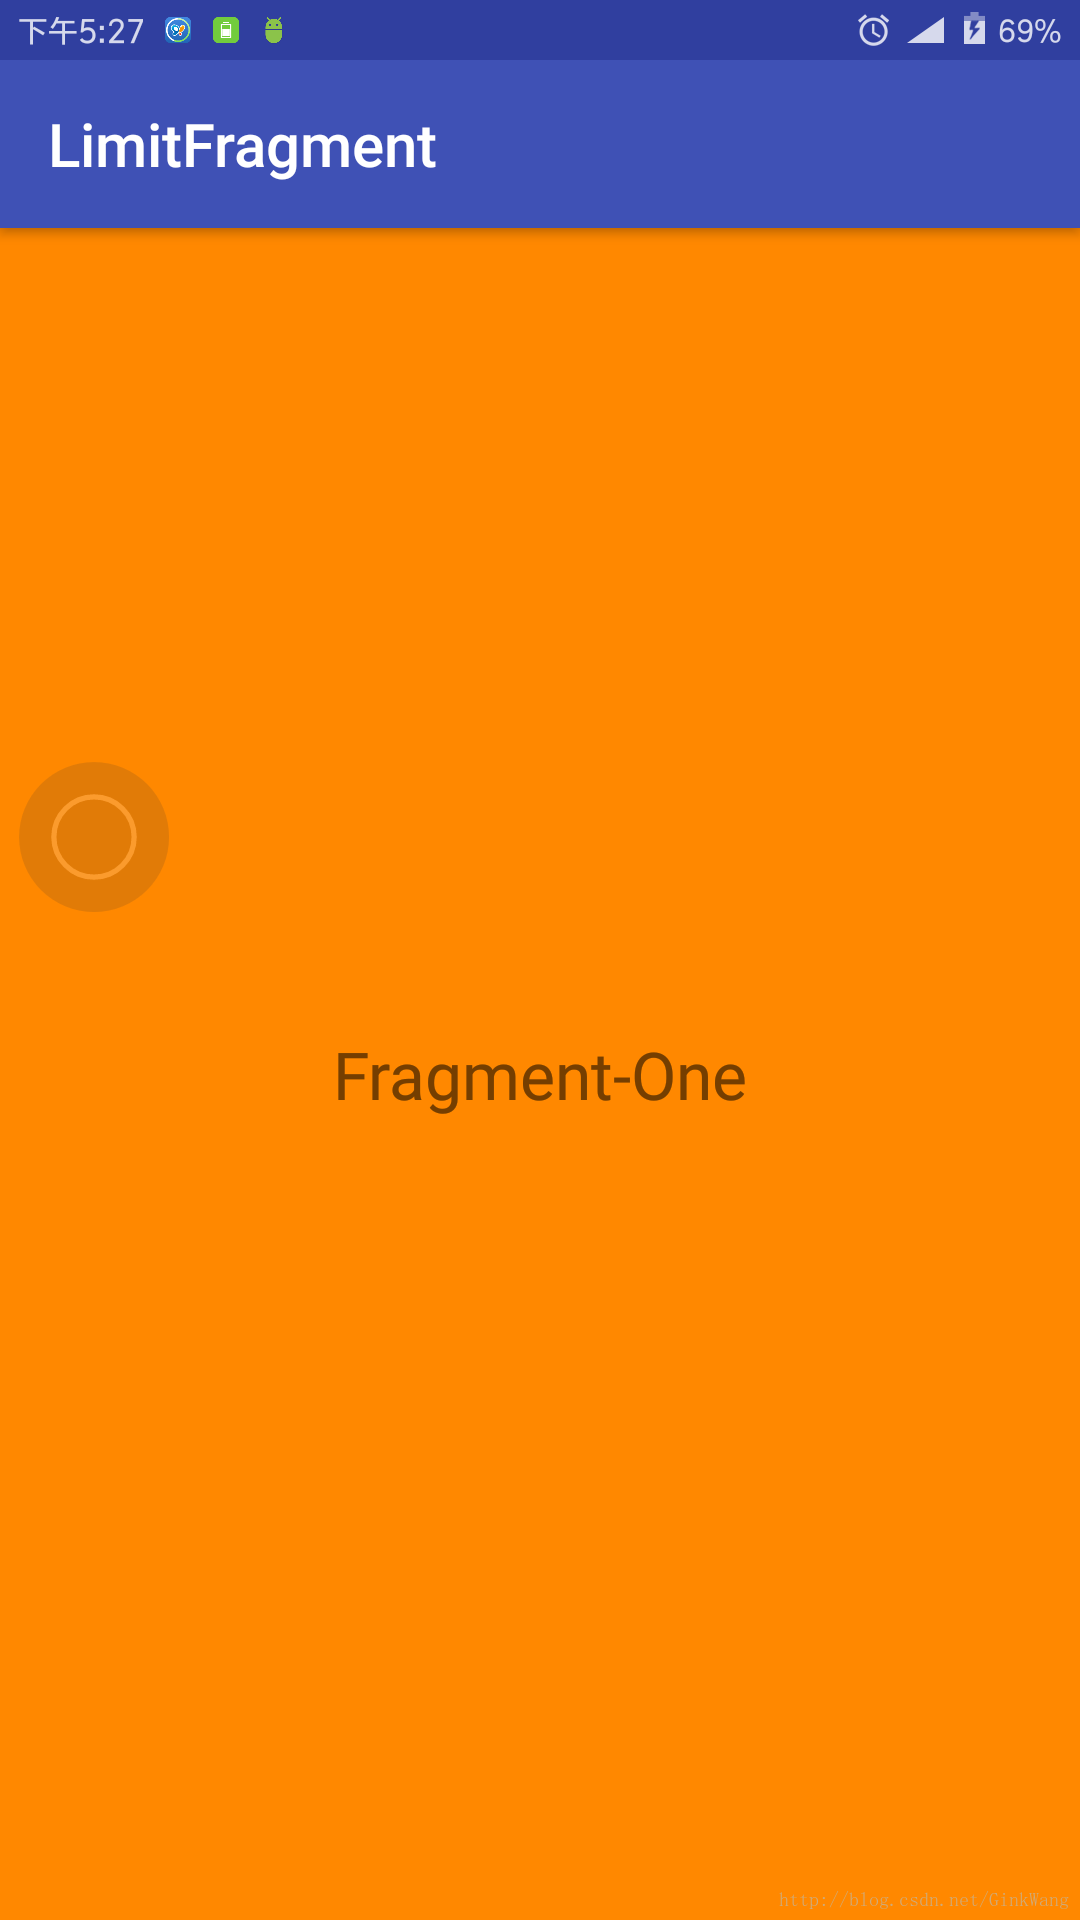
和我们想的一致,程序去加载正常尺寸的布局,只显示了 FragmentOne。
然后看一下大尺寸屏幕运行结果:
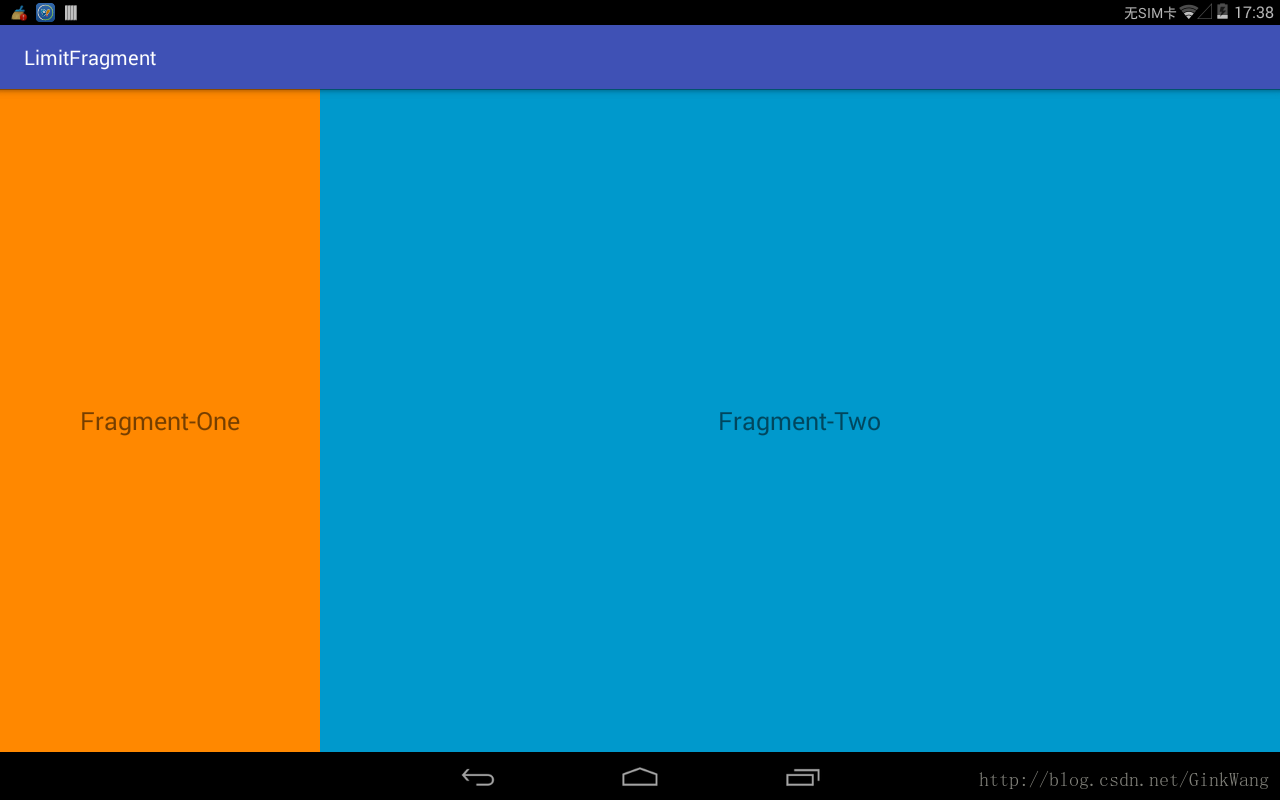
可以看到,完全符合我们的设想!
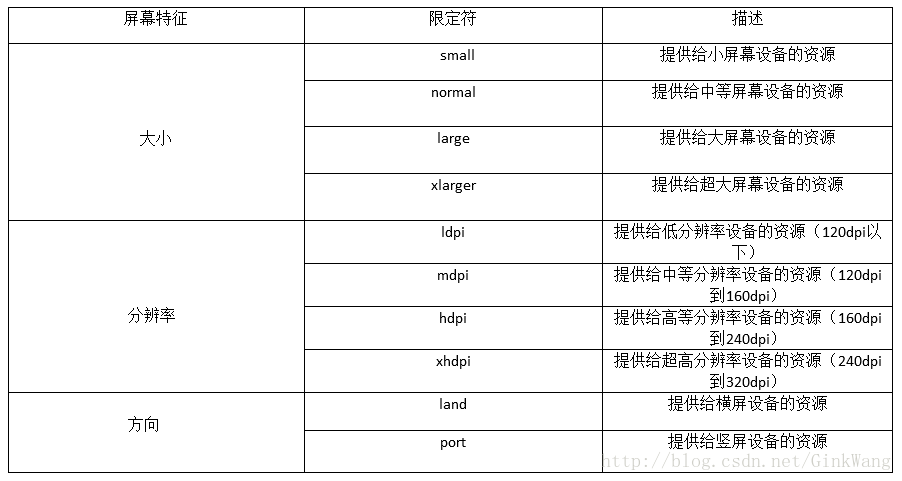
我们在这个程序里,运用到了限定符的知识点。刚才我们在 res 下建立的 layout-large 文件夹,就是限定符。
此外,Android 其他限定符可参考下表,也都很简单,根据名字就可以猜出其作用的:
看到这,你肯定会有疑虑,限定符中的 large 是指多大呢?有具体数值吗?也可能有的时候,设备尺寸就刚好稍小于系统认定的 large 临界值,然后系统还是去加载的正常布局,这样就不太灵活了。
还好,有最小宽度限定符可以解决这个问题。
最小宽度限定符可以允许我们对屏幕的宽度指定一个最小值(单位为 dp),然后以这个最小值为临界点。宽度大于这个临界点时就去加载另一个布局,宽度小于这个值就加载另一个布局。
例如:我们可以在 res 下建立一个名为 layout-sw600dp 的文件夹,然后在里面写布局。这个就代表如果屏幕宽度大于600dp,系统就加载 layout-sw600dp 下面的布局,反之则加载默认布局。
4. 总结
Fragment 的相关知识点就学习整理到这里。反正我是从一开始的懵懂到现在知道怎么用和怎么把它用好了。里面的学习步骤大部分参考郭霖大神的《第一行代码》和鸿洋大神的 Android Fragment 真正的完全解析。但好在知识是学到自己的肚子里了,而且里面的实例代码我也都是亲自跟着敲了一遍。学习的过程中也了解到,Fragment 的坑很多,例如懒加载、多层嵌套之类的。这些还要在以后的使用时慢慢填,然后会及时更新到 blog 的。
5. 参考
郭霖——《第一行代码》


 4427
4427

 被折叠的 条评论
为什么被折叠?
被折叠的 条评论
为什么被折叠?
 到【灌水乐园】发言


