


转载请注明出处:http://blog.csdn.net/yangyu20121224/article/details/8995025
由于TabActivity在Android4.0以后已经被完全弃用,那么我就不再浪费口水继续讲解它了,取而代之的是Fragment。Fragment是Android3.0新增的概念,Fragment翻译成中文是碎片的意思,不过却和Activity十分的相似,这一篇我花大量的篇幅来详细的讲解Fragment的介绍和使用方法。
一、Fragment的基础知识介绍
1.1概述
1.1.1 特性
Fragment是activity的界面中的一部分或一种行为。可以把多个Fragment组合到一个activity中来创建一个多界面
并且可以在多个activity中重用一个Fragment。可以把Fragment任务模块化的一段activity,它具有自己的生命周期,
接收它自己的事件,并可以在activity运行时被添加或删除。
Fragment不能独立存在,它必须嵌入到activity中,而且Fragment的生命周期直接受所在的activity的影响。例
如:当activity暂停时,他拥有的所有的Fragment都暂停了,当activity销毁时,他拥有的所有Fragment都被销毁。然
而,当activity运行时(在onResume()之后,onPause()之前),可以单独地操作每个Fragment,比如添加或删除它
们。当中执行上述针对Fragment的事务时,可以将事务添加到一个栈中,这个栈被activity管理,栈中的每一条都是一
个Fragment的一次事务。有了这个栈,就可以反向执行Fragment的事务,这样就可以在Fragment级支持“返回”键
(向后导航)。
当向activity中添加一个Fragment时,它须置于ViewGroup控件中,并且需定义Fragment自己的界面。可以在
layout.xml布局文件中声明Fragment,元素为:<fragment>;也可以在代码中创建Fragment,然后把它加入到
ViewGroup控件中。然而,Fragment不一定非要放在activity的界面中,它可以隐藏在后台为activity工作。
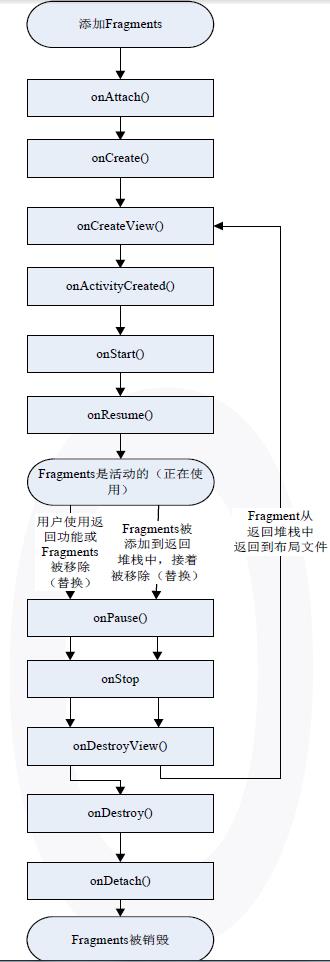
1.1.2 生命周期
onCreate():
当创建fragment时系统调用此方法。在其中必须初始化fragment的基础组件们。可参考activity的说明;
onCreateView():
系统在fragment要画自己的界面时调用(在真正显示之前)此方法,这个方法必须返回fragment的layout的根控
件,如果这个fragment不提供界面,那它应返回null;
onPause():
大多数程序应最少对fragment实现这三个方法,当然还有其它几个回调方法可应该按情况实现之,所有的声明周期
回调函数在“操控fragment的生命周期”一节中有详细讨论。
下图为fragment的生命周期(它所在的activity处于运行状态)
Activity和Fragment生命周期对比图如下:
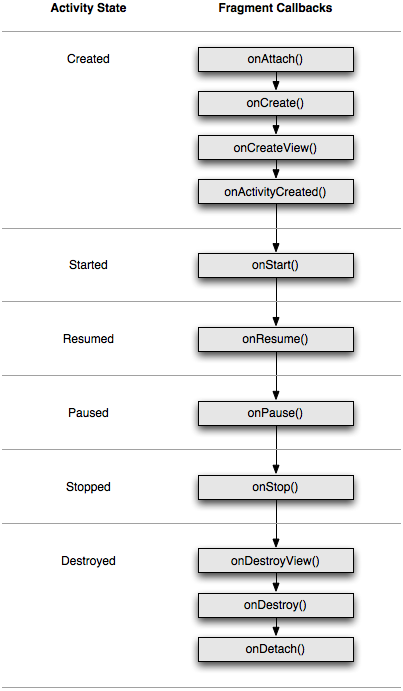
两个的生命周期很类似,也息息相关。
1.1.3 派生类
DialogFragment
显示一个浮动的对话框。使用这个类创建对话框是替代activity创建对话框的最佳选择。因为可以把fragmentdialog
放入到activity的返回栈中,使用户能再返回到这个对话框。
ListFragment
显示一个列表控件,就像ListActivity类,它提供了很多管理列表的方法,比如onListItemClick()方法响应click事件。
PreferenceFragment
显示一个由Preference对象组成的列表,与PreferenceActivity相同。它用于为程序创建“设置”activity。
1.2 范例
写一个读新闻的程序,可以用一个fragment显示标题列表,另一个fragment显示选中标题的内容,这两个fragment
都在一个activity上,并排显示。那么这两个fragment都有自己的生命周期并响应自己感兴趣的事件。于是,不需要再
像手机上那样用一个activity显示标题列表,用另一个activity显示新闻内容;现在可以把两者放在一个activity上同时显
示出来。如下图:
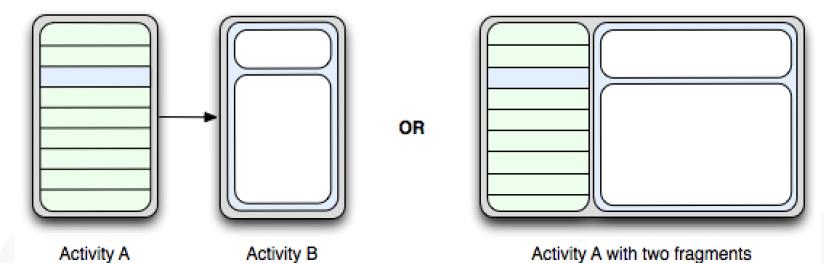
Fragment必须被写成可重用的模块。因为fragment有自己的layout,自己进行事件响应,拥有自己的生命周期和
行为,所以可以在多个activity中包含同一个Fragment的不同实例。这对于让世界在不同的屏幕尺寸下都能给用户完美
的体验尤其重要。比如可以在程序运行于大屏幕中时启动包含很多fragment的activity,而在运行小屏幕时启动一个包
含少量fragment的activity。
刚才读新闻的程序,当检测到程序运行于大屏幕时,启动activityA,将标题列表和新闻内容这两个fragment都放
在activityA中;当检测到程序运行于小屏幕时,还是启动activityA,但此时A中只有标题列表fragment,当选中一个标
题时,activityA启动activityB,B中含有新闻内容fragment。
1.3 创建Fragment
要创建fragment,必须从Fragment或Fragment的派生类派生出一个类。Fragment的代码写起来有些像activity。
它具有跟activity一样的回调方法,比如onCreate(),onStart(),onPause()和onStop()。实际上,如果想把老的程序改为
使用fragment,基本上只需要把activity的回调方法的代码移到fragment中对应的方法即可。
1.3.1添加有界面的Fragment
Fragment一般作为activity的用户界面的一部分,把它自己layout嵌入到activity的layout中。一个要为fragment提
供layout,必须实现onCreateView()回调方法,然后在这个方法中返回一个View对象,这个对象时fragment的layout的
根。
注意:如果fragment是从ListFragment中派生的,就不需要实现onCreateView()方法了,因为默认的实现已经返
回了ListView控件对象。
要从onCreateView()方法中返回layout对象,可以从layout.xml布局文件中生成layout对象。为了帮助这样做,
onCreateView()提供了一个layoutInflater对象。举例:以下代码展示了一个Fragment的子类如何从layout.xml布局文件
example_fragment.xml中生成对象。
public static ExampleFragment extends Fragment {
@Override
publicView onCreateView(LayoutInflater inflater, ViewGroup container,
Bundle savedInstanceState) {
returninflater.inflate(R.layout.example_fragment, container, false);
}
}
onCreateView()参数中的container是存放fragment的layout的ViewGroup对象。saveInstanceState参数是一个
Bundle,跟activity的onCreate()中Bundle差不多,用于状态恢复。但是fragment的onCreate()中也有Bundle参数,所
以此处的Bundle中存放的数据与onCreate()中存放的数据还是不同的。
Inflate()方法中有三个参数:
<1> layout的资源ID;
<2> 存放fragment的layout的ViewGroup;
<3> 布尔数据表示是否在创建fragment的layout期间,把layout附加到container上(在这个例子中,因为系统已经把layout插入到container中了,所以值为false,如果为true会导致在最终的layout中创建多余的ViewGroup)。
下面讲述如何把它添加到activity中。把fragment添加到activity一般情况下,fragment把它的layout作为activity的
layout的一部分合并到activity中,有两种方法将一个fragment添加到activity中:
方法一:在activity的layout.xml文件中声明fragment
<?xmlversion="1.0" encoding="utf-8" ?>
<LinearLayoutxmlns:android=" http://schemas.android.com/apk/res/android"
android:orientation="horizontal"
android:layout_width="match_parent"
android:layout_height="match_parent" >
<fragmentandroid:name="com.android.cwj.ArticleListFragment"
android:id="@+id/list"
android:layout_weight="1"
android:layout_width="0dp"
android:layout_height="match_parent" />
<fragmentandroid:name="com.android.cwj.ArticleReaderFragment"
android:id="@+id/viewer"
android:layout_weight="2"
android:layout_width="0dp"
android:layout_height="match_parent" />
</LinearLayout>
以上代码中,<fragment>中声明一个fragment。当系统创建上例中的layout时,它实例化每一个fragment,然后调
用它们的onCreateView()方法,以获取每个fragment的layout。系统把fragment返回的view对象插入到<fragment>元
素的位置,直接代替<fragment>元素。
注:每个fragment都需要提供一个ID,系统在activity重新创建时用它来恢复fragment,也可以用它来操作fragment进
行其它的事物,比如删除它。有三种方法给fragment提供ID:
<1> 为Android:id属性赋一个数字;
<2> 为Android:tag属性赋一个字符串。
如果没有使用上述任何一种方法,系统将使用fragment的容器的ID。
方法二:在代码中添加fragment到一个ViewGroup
这种方法可以在运行时,把fragment添加到activity的layout中。只需指定一个要包含fragment的ViewGroup。为
了完成fragment的事务(比如添加,删除,替换等),必须使用FragmentTransaction的方法。可以从activity获取
FragmentTransaction,如下:
FragmentManager fragmentManager = getFragmentManager();
FragmentTransaction fragmentTransaction = fragmentManager.beginTransaction();
然后可以用add()方法添加一个fragment,它有参数用于指定容纳fragment的ViewGroup。如,Add()的第一个参数
是容器ViewGroup,第二个是要添加的fragment。一旦通过FragmentTransaction对fragment做出了改变,必须调用方
法commit()提交这些改变。不仅在无界面的fragment中,在有界面的fragment中也可以使用tag来作为唯一的标志,这
样在需要获取fragment对象时,要调用findFragmentTag()。
1.3.2 添加没有界面的Fragment
上面演示了如何添加fragment来提供界面,然而,也可以使用fragment为activity提供后台的行为而不用显示
fragment的界面。要添加一个没有界面的fragment,需要在activity中调用方法add(Fragment,String)(它支持用一个唯
一的字符串做为fragment的“tag”,而不是viewID)。这样添加的fragment由于没有界面,所以在实现它时不需要调用
实现onCreateView()方法。
使用tag字符串来标示一个fragment并不是只能用于没有界面的fragment上,也可以把它用于有界面的fragment
上,但是,如果一个fragment没有界面,tag字符串将成为它唯一的选择。获取以tag表示的fragment,需使用方法
findFragmentByTab()。
1.4 Fragment管理
要管理fragment,需使用FragmentManager,要获取它,需在activity中调用方法getFragmentManager()。
可以用FragmentManager来做以下事情:
<1> 使用方法findFragmentById()或findFragmentByTag(),获取activity中已存在的fragment;
<2> 使用方法popBackStack()从activity的后退栈中弹出fragment(这可以模拟后退键引发的动作),用方法addOnBackStackChangedListenner()注册一个侦听器以监视后退栈的变化;
<3> 还可以使用FragmentManager打开一个FragmentTransaction来执行fragment的事务,比如添加或删除fragment。
在activity中使用fragment的一个伟大的好处是能根据用户的输入对fragment进行添加、删除、替换以及执行其他
动作的能力。提交的一组fragment的变化叫做一个事务。事务通过FragmentTransaction来执行。还可以把每个事务保
存在activity的后退栈中,这样就可以让用户在fragment变化之间导航(跟在activity之间导航一样)。
可以通过FragmentManager来取得FragmentTransaction的实例,如下:
FragmentManager fragmentManager = getFragmentManager();
FragmentTransaction fragmentTransaction = fragmentManager.beginTransaction();
一个事务是在同一时刻执行的一组动作(很像数据库中的事务)。可以用add(),remove(),replace()等方法构成事务
,最后使用commit()方法提交事务。在调用commit()之前,可以用addToBackStack()把事务添加到一个后退栈中,这
个后退栈属于所在的activity。有了它,就可以在用户按下返回键时,返回到fragment执行事务之前的状态。如下例:
演示了如何用一个fragment代替另一个fragment,同时在后退栈中保存被代替的fragment的状态。
//创建一个fragment
Fragment newFragment = new ExampleFragment();
//实例化fragment事务管理器
FragmentTransaction transaction = getFragmentManager().beginTransaction();

//用新创建的fragment来代替fragment_container
transaction.replace(R.id.fragment_container,newFragment);
//添加进栈中
transaction.addToBackStack(null);

//提交事务
transaction.commit();解释:newFragment代替了控件ID R.id.fragment_container所指向的ViewGroup中所含的任何fragment。然后调
用addToBackStack(),此时被代替的fragment就被放入后退栈中,于是当用户按下返回键时,事务发生回溯,原先的
fragment又回来了。如果向事务添加了多个动作,比如多次调用了add(),remove()等之后又调用了addToBackStack(
)方法,那么所有的在commit()之前调用的方法都被作为一个事务。
当用户按返回键时,所有的动作都被反向执行(事务回溯)。
事务中动作的执行顺序可随意,但要注意以下几点:
<1> 必须最后调用commit();
<2> 如果添加了多个fragment,那么它们的现实顺序跟添加顺序一致(后显示的覆盖前面的)
<3> 如果在执行的事务中有删除fragment的动作,而且没有调用addToBackStack(),那么当事务提交时,那些被删除
的fragment就被销毁了。反之,那些fragment就不会被销毁,而是处于停止状态。当用户返回时,它们会被恢复。
<4> 但是,调用commit()后,事务并不会马上执行。它会在activity的UI线程(其实就是主线程)中等待直到现成能执
行的时候才执行。如果必要,可以在UI线程中调用executePendingTransactions()方法来立即执行事务。但一般不需
要这样做,除非有其它线程在等待事务的执行。
注意:只能在activity处于可保存状态的状态时,比如running中,onPause()方法和onStop()方法中提交事务,否则
会引发异常。这是因为fragment的状态会丢失。如果要在可能丢失状态的情况下提交事务,请使用
commitAllowingStateLoss()。
1.5 Fragment与Activity通讯
尽管fragment的实现是独立于activity的,可以被用于多个activity,但是每个activity所包含的是同一个fragment的
不同的实例。Fragment可以调用getActivity()方法很容易的得到它所在的activity的对象,然后查找activity中的控件
们(findViewById())。
有时,可能需要fragment与activity共享事件。一个好办法是在fragment中定义一个回调接口,然后在activity中实
现之。例如,还是那个新闻程序的例子,它有一个activity,activity中含有两个fragment。fragmentA显示新闻标题,
fragmentB现实标题对应的内容。fragmentA必须在用户选择了某个标题时告诉activity,然后activity再告诉
fragmentB,fragmentB就显示出对应的内容。
二、Fragment实例讲解一
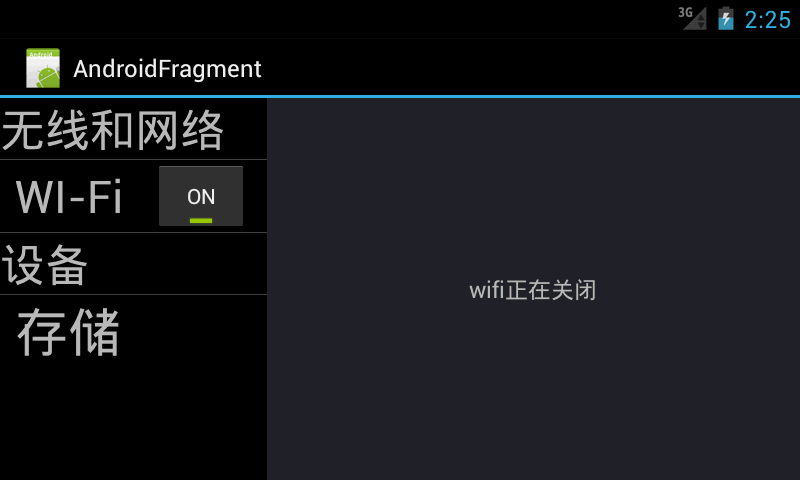
2.1 实例效果图
点击“存储”按钮显示的界面:
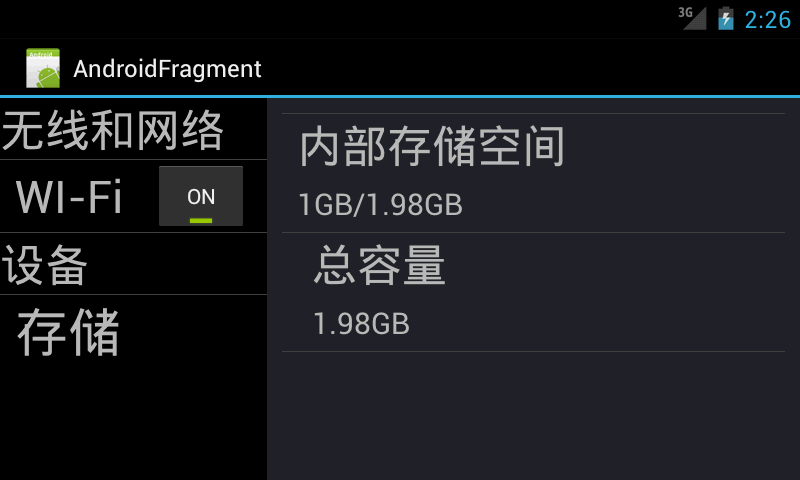
点击wifi“按钮”显示的界面:
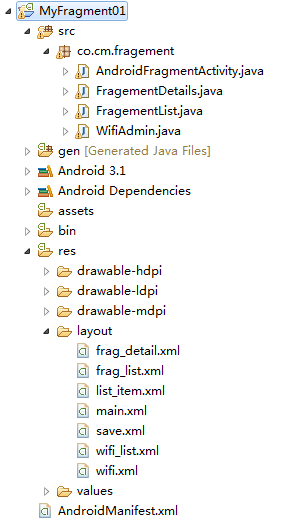
2.2 项目结构
2.3 具体代码编写
1、左边页面布局界面,frag_list.xml:
<?xml version="1.0" encoding="utf-8"?>
<LinearLayout xmlns:android="http://schemas.android.com/apk/res/android"
    android:layout_width="match_parent"
    android:layout_height="match_parent"
    android:orientation="vertical" >

    <TextView
        android:layout_width="wrap_content"
        android:layout_height="wrap_content"
        android:text="无线和网络"
        android:textSize="30sp" />

    <TextView
        android:layout_width="match_parent"
        android:layout_height="1px"
        android:background="@color/lineColor" />

    <LinearLayout
        android:layout_width="match_parent"
        android:layout_height="wrap_content"
        android:layout_gravity="center_vertical"
        android:layout_marginLeft="10dp"
        android:orientation="horizontal" >

        <TextView
            android:id="@+id/wifi"
            android:layout_width="wrap_content"
            android:layout_height="wrap_content"
            android:layout_gravity="center_vertical"
            android:text="WI-Fi"
            android:textSize="30sp" />

        <ToggleButton
            android:id="@+id/toggleButton"
            android:layout_width="wrap_content"
            android:layout_height="wrap_content"
            android:layout_gravity="center_vertical"
            android:layout_marginLeft="20dp"
            android:text="开" />
    </LinearLayout>

    <TextView
        android:layout_width="match_parent"
        android:layout_height="1px"
        android:background="@color/lineColor" />

    <TextView
        android:layout_width="wrap_content"
        android:layout_height="wrap_content"
        android:text="设备"
        android:textSize="30sp" />

    <TextView
        android:layout_width="match_parent"
        android:layout_height="1px"
        android:background="@color/lineColor" />

    <TextView
        android:id="@+id/saveBut"
        android:layout_width="fill_parent"
        android:layout_height="wrap_content"
        android:layout_marginLeft="10dp"
        android:text="存储"
        android:textSize="35sp" />

</LinearLayout>
2、右边页面布局界面,frag_detail.xml:
<?xml version="1.0" encoding="utf-8"?>
<LinearLayout xmlns:android="http://schemas.android.com/apk/res/android"
    android:layout_width="match_parent"
    android:layout_height="match_parent"
    android:background="@color/right"
    android:orientation="vertical" >

    <RelativeLayout
        android:id="@+id/save"
        android:layout_width="fill_parent"
        android:layout_height="fill_parent"
        android:layout_margin="10dp"
        android:visibility="gone" >

        <include layout="@layout/save" />
    </RelativeLayout>

    <RelativeLayout
        android:id="@+id/wifi"
        android:layout_width="fill_parent"
        android:layout_height="fill_parent"
        android:layout_margin="10dp"
        android:visibility="gone" >

        <include layout="@layout/wifi" />
    </RelativeLayout>

</LinearLayout>
3、主布局界面,main.xml:
<LinearLayout xmlns:android="http://schemas.android.com/apk/res/android"
    xmlns:tools="http://schemas.android.com/tools"
    android:layout_width="match_parent"
    android:layout_height="match_parent"
    android:orientation="horizontal"
    tools:context=".AndroidFragmentActivity" >

    <!-- 主頁面 -->
    <!-- 左边页面 -->

    <fragment
        android:id="@+id/frag_list"
        android:name="co.cm.fragement.FragementList"
        android:layout_width="fill_parent"
        android:layout_height="wrap_content"
        android:layout_weight="2" />

    <!-- 右面页面 -->

    <fragment
        android:id="@+id/frag_detail"
        android:name="co.cm.fragement.FragementDetails"
        android:layout_width="fill_parent"
        android:layout_height="wrap_content"
        android:layout_weight="1" />

</LinearLayout>
4、list_item.xml:
<?xml version="1.0" encoding="utf-8"?>
<LinearLayout xmlns:android="http://schemas.android.com/apk/res/android"
    android:layout_width="match_parent"
    android:layout_height="match_parent"
    android:background="@color/left"
    android:orientation="horizontal" >

    <ImageView
        android:id="@+id/img"
        android:layout_width="wrap_content"
        android:layout_height="wrap_content" />

    <TextView
        android:id="@+id/txt_title"
        android:layout_width="wrap_content"
        android:layout_height="wrap_content"
        android:text="Large Text"
        android:textAppearance="?android:attr/textAppearanceLarge" />

</LinearLayout>
5、save.xml:
<?xml version="1.0" encoding="utf-8"?>
<LinearLayout xmlns:android="http://schemas.android.com/apk/res/android"
    android:layout_width="match_parent"
    android:layout_height="match_parent"
    android:orientation="vertical" >

    <TextView
        android:layout_width="match_parent"
        android:layout_height="1px"
        android:background="@color/lineColor" />

    <TextView
        android:layout_width="wrap_content"
        android:layout_height="wrap_content"
        android:layout_marginLeft="10dp"
        android:text="内部存储空间"
        android:textSize="30sp" />

    <TextView
        android:layout_width="wrap_content"
        android:layout_height="wrap_content"
        android:layout_marginBottom="5dp"
        android:layout_marginLeft="10dp"
        android:layout_marginTop="5dp"
        android:text="1GB/1.98GB"
        android:textSize="20sp" />

    <TextView
        android:layout_width="match_parent"
        android:layout_height="1px"
        android:background="@color/lineColor" />

    <TextView
        android:layout_width="wrap_content"
        android:layout_height="wrap_content"
        android:layout_marginLeft="20dp"
        android:text="总容量"
        android:textSize="30sp" />

    <TextView
        android:layout_width="wrap_content"
        android:layout_height="wrap_content"
        android:layout_marginBottom="5dp"
        android:layout_marginLeft="20dp"
        android:layout_marginTop="5dp"
        android:text="1.98GB"
        android:textSize="20sp" />

    <TextView
        android:layout_width="match_parent"
        android:layout_height="1px"
        android:background="@color/lineColor" />

</LinearLayout>
6、wifi_list:
<?xml version="1.0" encoding="utf-8"?>
<LinearLayout xmlns:android="http://schemas.android.com/apk/res/android"
    android:layout_width="match_parent"
    android:layout_height="match_parent"
    android:orientation="vertical" >

    <TextView
        android:id="@+id/wifi_name"
        android:layout_width="match_parent"
        android:layout_height="wrap_content"
        android:text="qinjin_tp_2" />

    <LinearLayout
        android:layout_width="match_parent"
        android:layout_height="wrap_content"
        android:orientation="horizontal" >

        <TextView
            android:layout_width="wrap_content"
            android:layout_height="wrap_content"
            android:text="信号强度  :" />

        <TextView
            android:id="@+id/wifi_name_state"
            android:layout_width="match_parent"
            android:layout_height="wrap_content"
            android:text="还没有连接" />
    </LinearLayout>

</LinearLayout>
7、wifi.xml:
<?xml version="1.0" encoding="utf-8"?>
<RelativeLayout xmlns:android="http://schemas.android.com/apk/res/android"
    android:layout_width="match_parent"
    android:layout_height="match_parent"
    android:orientation="vertical" >

    <LinearLayout
        android:id="@+id/wifiLinear"
        android:layout_width="match_parent"
        android:layout_height="wrap_content"
        android:orientation="vertical" >

        <LinearLayout
            android:layout_width="match_parent"
            android:layout_height="wrap_content"
            android:orientation="vertical" >

            <TextView
                android:layout_width="wrap_content"
                android:layout_height="wrap_content"
                android:text="MAC地址  :"
                android:textSize="@dimen/textsize" />

            <TextView
                android:id="@+id/mac_address"
                android:layout_width="wrap_content"
                android:layout_height="wrap_content"
                android:text="MAC地址 "
                android:textSize="@dimen/textsize" />
        </LinearLayout>

        <LinearLayout
            android:layout_width="match_parent"
            android:layout_height="wrap_content"
            android:orientation="vertical" >

            <TextView
                android:layout_width="wrap_content"
                android:layout_height="wrap_content"
                android:text="接入点的BSSID :"
                android:textSize="@dimen/textsize" />

            <TextView
                android:id="@+id/bssid"
                android:layout_width="wrap_content"
                android:layout_height="wrap_content"
                android:text="接入点的BSSID "
                android:textSize="@dimen/textsize" />
        </LinearLayout>

        <LinearLayout
            android:layout_width="match_parent"
            android:layout_height="wrap_content"
            android:orientation="vertical" >

            <TextView
                android:layout_width="wrap_content"
                android:layout_height="wrap_content"
                android:text="IP地址: "
                android:textSize="@dimen/textsize" />

            <TextView
                android:id="@+id/ip_address"
                android:layout_width="wrap_content"
                android:layout_height="wrap_content"
                android:text="IP地址 "
                android:textSize="@dimen/textsize" />
        </LinearLayout>

        <LinearLayout
            android:layout_width="match_parent"
            android:layout_height="wrap_content"
            android:orientation="vertical" >

            <TextView
                android:layout_width="wrap_content"
                android:layout_height="wrap_content"
                android:text="id  "
                android:textSize="@dimen/textsize" />

            <TextView
                android:id="@+id/id"
                android:layout_width="wrap_content"
                android:layout_height="wrap_content"
                android:text="id "
                android:textSize="@dimen/textsize" />
        </LinearLayout>

        <LinearLayout
            android:layout_width="match_parent"
            android:layout_height="wrap_content"
            android:orientation="vertical" >

            <TextView
                android:layout_width="wrap_content"
                android:layout_height="wrap_content"
                android:text=" WifiInfo的所有信息包   "
                android:textSize="@dimen/textsize" />

            <TextView
                android:id="@+id/info"
                android:layout_width="wrap_content"
                android:layout_height="wrap_content"
                android:text="WifiInfo的所有信息包  "
                android:textSize="@dimen/textsize" />
        </LinearLayout>

        <ListView
            android:id="@+id/listview"
            android:layout_width="fill_parent"
            android:layout_height="fill_parent"
            android:layout_marginBottom="2dp" >
        </ListView>
    </LinearLayout>

    <TextView
        android:id="@+id/wifiText"
        android:layout_width="wrap_content"
        android:layout_height="wrap_content"
        android:layout_centerInParent="true"
        android:text="要查看可用的网络,请打开wifi"
        android:textSize="@dimen/textsize" />

</RelativeLayout>
8、主界面类,AndroidFragmentActivity.java:
package co.cm.fragement;

import co.cm.fragement.R;
import android.app.Activity;
import android.content.Context;
import android.os.Bundle;

public class AndroidFragmentActivity extends Activity {
	// 主activity
	@Override
	public void onCreate(Bundle savedInstanceState) {
		super.onCreate(savedInstanceState);
		setContentView(R.layout.main);
		WifiAdmin.getWifiAdmin().setmContext(AndroidFragmentActivity.this);
		WifiAdmin.getWifiAdmin().getWifiMeathod();
	}
}
9、左面fragment界面类,FragmentList.java:
package co.cm.fragement;

import co.cm.fragement.R;

import android.app.Fragment;
import android.os.Bundle;
import android.os.Handler;
import android.os.Message;
import android.util.Log;
import android.view.LayoutInflater;
import android.view.View;
import android.view.View.OnClickListener;
import android.view.ViewGroup;
import android.widget.CompoundButton;
import android.widget.CompoundButton.OnCheckedChangeListener;
import android.widget.LinearLayout;
import android.widget.TextView;
import android.widget.ToggleButton;

/**
 * @author yuyang
 *	功能描述:左面fragment界面类,该类提供了选项操作
 */
public class FragementList extends Fragment {
	//点击切换到wifi存储界面
	private TextView wifi;

	//点击切换到save存储界面
	private TextView saveBut;

	//定义右面fragment实例
	private FragementDetails frag_detail;

	//打开关闭wifi按钮
	private ToggleButton toggleButton;

	//toggleButton按钮是否被点击
	private boolean isChecked = false;

	//监听button状态线程标志位
	private boolean butIsRunning = false;

	@Override
	public View onCreateView(LayoutInflater inflater, ViewGroup container,Bundle savedInstanceState) {
		// 在这里初始化fragment的页面
		return inflater.inflate(R.layout.frag_list, container, false);
	}

	@Override
	public void onActivityCreated(Bundle savedInstanceState) {
		super.onActivityCreated(savedInstanceState);
		// 由于fragment不是activity,不是oncreated,而是onActivityCreated
		setView();
		setListener();

		startThread();// 启动控制button的线程,当wifi状态不是在1或者3的时候,不可点击,
		// if (frag != null && frag.isInLayout()) {
		// switch (arg2) {
		// case 0:
		// frag.setText("0000");
	}

	/**
	 * 给按钮设置监听
	 */
	public void setListener() {
		saveBut.setOnClickListener(new OnClickListener() {
			@Override
			public void onClick(View v) {
				frag_detail.setSaveShow();
			}
		});

		wifi.setOnClickListener(new OnClickListener() {
			@Override
			public void onClick(View v) {
				frag_detail.setWifiShow();
				Log.i("111", WifiAdmin.getWifiAdmin().checkState() + "===-=-");
				checktoggleButton();// 当点回到wifi界面时,刷新button的状态
			}
		});

		toggleButton.setOnClickListener(new OnClickListener() {
			@Override
			public void onClick(View v) {
				Log.i("111", isChecked + "/" + WifiAdmin.getWifiAdmin().checkState());
				if (isChecked) {
					WifiAdmin.getWifiAdmin().OpenWifi();
					frag_detail.setWifiShow();
					// toggleButton.setText("关闭");
					toggleButton.setChecked(false);
					isChecked = false;
				} else {
					WifiAdmin.getWifiAdmin().CloseWife();
					frag_detail.setWifiShow();
					// toggleButton.setText("打开");
					toggleButton.setChecked(true);
					isChecked = true;
				}
				toggleButton.setClickable(false);
			}
		});
	}

	//
	public void checktoggleButton() {
		if (WifiAdmin.getWifiAdmin().checkState() == 1) {
			toggleButton.setChecked(true);
			isChecked = true;
		}
		if (WifiAdmin.getWifiAdmin().checkState() == 3) {
			toggleButton.setChecked(false);
			isChecked = false;
		}
	}

	public void setView() {
		wifi = (TextView) getView().findViewById(R.id.wifi);
		toggleButton = (ToggleButton) getView().findViewById(R.id.toggleButton);
		saveBut = (TextView) getView().findViewById(R.id.saveBut);

		// 实例化右面界面,以便操纵里面的方法F
		frag_detail = (FragementDetails) getFragmentManager().findFragmentById(R.id.frag_detail);

		// 初始化button的装态
		if (WifiAdmin.getWifiAdmin().checkState() == 3) {
			toggleButton.setChecked(false);
			isChecked = false;
		}
		if (WifiAdmin.getWifiAdmin().checkState() == 1) {
			toggleButton.setChecked(true);
			isChecked = true;
		}
		toggleButton.setClickable(true);
	}

	@Override
	public void onDestroy() {
		frag_detail.stopWifiThread();
		butIsRunning = false;
		super.onDestroy();
	}

	private void startThread() {
		butIsRunning = true;
		new Thread(new Runnable() {

			@Override
			public void run() {
				while (butIsRunning) {
					//只有wifi状态改变变化完毕之后才能允许点击按钮
					if (WifiAdmin.getWifiAdmin().checkState() == 3) {
						if (!isChecked) {
							toggleButton.setClickable(true);
						}

					} else if (WifiAdmin.getWifiAdmin().checkState() == 1) {
						if (isChecked) {
							toggleButton.setClickable(true);
						}
					}
				}
			}
		}).start();
	}

}
10、右面fragment界面类
package co.cm.fragement;

import java.util.ArrayList;
import java.util.List;
import co.cm.fragement.R;
import android.app.Fragment;
import android.net.wifi.ScanResult;
import android.net.wifi.WifiConfiguration;
import android.os.Bundle;
import android.os.Handler;
import android.os.Message;
import android.util.Log;
import android.view.LayoutInflater;
import android.view.View;
import android.view.ViewGroup;
import android.widget.BaseAdapter;
import android.widget.LinearLayout;
import android.widget.ListView;
import android.widget.RelativeLayout;
import android.widget.TextView;

/**
 * @author yangyu
 *	功能描述:右面fragment界面类,该类实现了右面显示的操作
 */
public class FragementDetails extends Fragment {
	private TextView mac_address, bssid, ip_address, id, info, wifiText;

	private ListView listView;

	private LinearLayout wifiLinear;

	private RelativeLayout save, wifi;

	private boolean ThreadFlag = false;

	//wifi数据适配器
	private WifiAdapter wifiAdapter;

	// 扫描出的网络连接列表
	private List<ScanResult> mWifiList = new ArrayList<ScanResult>();

	// 网络连接列表
	private List<WifiConfiguration> mWifiConfiguration = null;

	private int nowWifiState = 0;

	@Override
	public View onCreateView(LayoutInflater inflater, ViewGroup container,Bundle savedInstanceState) {
		return inflater.inflate(R.layout.frag_detail, container, false);
	}

	@Override
	public void onActivityCreated(Bundle savedInstanceState) {
		super.onActivityCreated(savedInstanceState);
		setView();
		// setListener();
		setWifiShow();

	}

	/**
	 * 显示wifi界面
	 */
	public void setWifiShow() {
		//通过隐藏显示来达到不同页面内容的切换
		save.setVisibility(View.GONE);
		wifi.setVisibility(View.VISIBLE);
		stopWifiThread();
		refreshWifi();

	}

	/**
	 * 显示保存界面
	 */
	public void setSaveShow() {
		stopWifiThread();
		save.setVisibility(View.VISIBLE);
		wifi.setVisibility(View.GONE);
	}

	/**
	 * 初始化组件
	 */
	public void setView() {
		// -----------------wifi-----------------
		wifiText = (TextView) getView().findViewById(R.id.wifiText);
		mac_address = (TextView) getView().findViewById(R.id.mac_address);
		bssid = (TextView) getView().findViewById(R.id.bssid);
		ip_address = (TextView) getView().findViewById(R.id.ip_address);
		id = (TextView) getView().findViewById(R.id.id);
		info = (TextView) getView().findViewById(R.id.info);
		listView = (ListView) getView().findViewById(R.id.listview);
		wifiLinear = (LinearLayout) getView().findViewById(R.id.wifiLinear);
		save = (RelativeLayout) getView().findViewById(R.id.save);
		wifi = (RelativeLayout) getView().findViewById(R.id.wifi);
		wifiAdapter = new WifiAdapter();
		listView.setAdapter(wifiAdapter);
	}

	private Handler handler = new Handler() {
		@Override
		public void handleMessage(Message msg) {
			nowWifiState = WifiAdmin.getWifiAdmin().checkState();
			// 当wifi打开时,刷新wifi列表的内容
			if (nowWifiState == 3) {
				mWifiList = WifiAdmin.getWifiAdmin().GetWifiList();
				// 如果刚开始检测的wifi列表为空,则创建一个实例化的wifi而不是null,负责会在adpter里面报错
				if (mWifiList != null) {
					// 如果wifi列表发生改变,则更新,else不更新
					if (!mWifiList.toString().equals(
							WifiAdmin.getWifiAdmin().getLastWifiList().toString())) {
						WifiAdmin.getWifiAdmin().setLastWifiList(mWifiList);
						wifiAdapter.notifyDate();
					}
				} else {
					mWifiList = new ArrayList<ScanResult>();
				}
			}
			refreshMeathod();

			super.handleMessage(msg);
		}
	};

	/**
	 * 刷新wifi的状态
	 */
	public void refreshWifi() {
		new Thread(new Runnable() {
			@Override
			public void run() {
				ThreadFlag = true;
				while (ThreadFlag) {
					// Log.i("111", WifiAdmin.getWifiAdmin().checkState() +
					// "!!!");
					Message msg = handler.obtainMessage();
					handler.sendMessage(msg);
					try {
						Thread.sleep(1000);
					} catch (InterruptedException e) {
						e.printStackTrace();
					}
				}
			}
		}).start();
	}

	public void refreshMeathod() {
		// 此处可用switch
		if (nowWifiState == 3) {
			wifiLinear.setVisibility(View.VISIBLE);
			wifiText.setVisibility(View.INVISIBLE);
			mac_address.setText(WifiAdmin.getWifiAdmin().GetMacAddress() + "");
			bssid.setText(WifiAdmin.getWifiAdmin().GetBSSID() + "");
			ip_address.setText(WifiAdmin.getWifiAdmin().GetIPAddress() + "");
			id.setText(WifiAdmin.getWifiAdmin().GetNetworkId() + "");
			info.setText(WifiAdmin.getWifiAdmin().GetWifiInfo() + "");
		} else if (nowWifiState == 1) {
			wifiText.setVisibility(View.VISIBLE);
			wifiLinear.setVisibility(View.INVISIBLE);
			wifiText.setText("要查看可用的网络,请打开wifi");
		} else if (nowWifiState == 2) {
			wifiText.setVisibility(View.VISIBLE);
			wifiLinear.setVisibility(View.INVISIBLE);
			wifiText.setText("wifi正在打开");
		} else if (nowWifiState == 4) {
			wifiText.setVisibility(View.VISIBLE);
			wifiLinear.setVisibility(View.INVISIBLE);
			wifiText.setText("wifi正在关闭");
		} else {
			wifiText.setVisibility(View.VISIBLE);
			wifiLinear.setVisibility(View.INVISIBLE);
			wifiText.setText("我不知道wifi正在做什么");
		}
	}

	public void stopWifiThread() {
		ThreadFlag = false;
	}

	public class WifiAdapter extends BaseAdapter {
		@Override
		public int getCount() {
			return mWifiList.size();
		}

		@Override
		public Object getItem(int position) {
			return mWifiList.get(position);
		}

		@Override
		public long getItemId(int position) {
			return position;
		}

		@Override
		public View getView(int position, View convertView, ViewGroup parent) {
			View view = convertView;

			final ChatViewHolder vh;

			if (convertView == null) {
				vh = new ChatViewHolder();
				view = View.inflate(WifiAdmin.getWifiAdmin().getmContext(),
						R.layout.wifi_list, null);
				vh.wifi_name = (TextView) view.findViewById(R.id.wifi_name);

				vh.wifi_name_state = (TextView) view
						.findViewById(R.id.wifi_name_state);

				view.setTag(vh);
			} else {
				vh = (ChatViewHolder) view.getTag();
			}
			vh.wifi_name.setText(mWifiList.get(position).SSID.toString());// 网络的名字,唯一区别WIFI网络的名字
			vh.wifi_name_state.setText(mWifiList.get(position).level + "");
			return view;
		}

		public void notifyDate() {
			notifyDataSetChanged();
		}

	}

	public class ChatViewHolder {
		TextView wifi_name;// 网络的名字,唯一区别WIFI网络的名字
		TextView wifi_name_state;// 所发现的WIFI网络信号强度
	}

}
11、wifiAdmin类,提供了wifi操作的方法,WifiAdmin.java:
package co.cm.fragement;

import java.util.ArrayList;
import java.util.List;

import android.content.Context;
import android.net.wifi.ScanResult;
import android.net.wifi.WifiConfiguration;
import android.net.wifi.WifiInfo;
import android.net.wifi.WifiManager;
import android.net.wifi.WifiManager.WifiLock;
import android.util.Log;

/**
 * @author yangyu
 *	wifiAdmin提供了wifi操作的方法
 */
public class WifiAdmin {
	private static WifiAdmin wifiAdmin;

	private WifiManager mWifiManager = null;

	private WifiInfo mWifiInfo = null;

	// 扫描出的网络连接列表
	private List<ScanResult> mWifiList = new ArrayList<ScanResult>();

	// 扫描出的网络连接列表
	private List<ScanResult> lastWifiList = new ArrayList<ScanResult>();

	// 网络连接列表
	private List<WifiConfiguration> mWifiConfiguration = null;

	private WifiLock mWifiLock = null;

	// 上次网络状态
	private int lastWifiState = 0;

	//定义上下文Context
	Context mContext;

	public List<ScanResult> getLastWifiList() {
		return lastWifiList;
	}

	public void setLastWifiList(List<ScanResult> lastWifiList) {
		this.lastWifiList = lastWifiList;
	}

	public int getLastWifiState() {
		return lastWifiState;
	}

	public void setLastWifiState(int lastWifiState) {
		this.lastWifiState = lastWifiState;
	}

	public static WifiAdmin getWifi() {
		return wifiAdmin;
	}

	public Context getmContext() {
		return mContext;
	}

	public void setmContext(Context mContext) {
		this.mContext = mContext;
	}

	public static WifiAdmin getWifiAdmin() {
		if (wifiAdmin == null) {
			wifiAdmin = new WifiAdmin();

		}
		return wifiAdmin;
	}

	public void getWifiMeathod() {
		mWifiManager = (WifiManager) mContext
				.getSystemService(mContext.WIFI_SERVICE);
		mWifiInfo = mWifiManager.getConnectionInfo();
	}

	/**
	 * 打开wifi
	 */
	public void OpenWifi() {
		if (!mWifiManager.isWifiEnabled()) {
			mWifiManager.setWifiEnabled(true);
		} else {
			Log.i("111", "open 失败");
		}
	}

	/**
	 * 关闭wifi
	 */
	public void CloseWife() {
		if (mWifiManager.isWifiEnabled()) {
			mWifiManager.setWifiEnabled(false);
		} else {
			Log.i("111", "close 失败");
		}
	}

	/**
	 * 锁定wifi
	 */
	public void lockWifi() {
		mWifiLock.acquire();
	}

	public void rlockWifi() {
		if (mWifiLock.isHeld()) {
			mWifiLock.acquire();
		}
	}

	// 检查当前wifi状态WIFI网卡的状态是由一系列的整形常量来表示的。
	//1.WIFI_STATE_DISABLED : WIFI网卡不可用(1)
	//2.WIFI_STATE_DISABLING : WIFI网卡正在关闭(0)
	//3.WIFI_STATE_ENABLED : WIFI网卡可用(3)
	//4.WIFI_STATE_ENABLING : WIFI网正在打开(2) (WIFI启动需要一段时间)
	//5.WIFI_STATE_UNKNOWN : 未知网卡状态
	public int checkState() {
		return mWifiManager.getWifiState();
	}

	/**
	 * 创建一个wifilock
	 */
	public void Createwifilock() {
		mWifiLock = mWifiManager.createWifiLock("Testss");
	}

	/**
	 * 得到配置好的网络
	 * @return
	 */
	public List<WifiConfiguration> GetConfinguration() {
		return mWifiConfiguration;
	}

	/**
	 * 连接配置好的指定ID的网络
	 * @param index
	 */
	public void ConnectConfiguration(int index) {
		if (index > mWifiConfiguration.size()) {
			return;
		}
		mWifiManager.enableNetwork(mWifiConfiguration.get(index).networkId,true);
	}

	/**
	 * 开始扫描网络
	 */
	public void StartScan() {
		mWifiManager.startScan();
		// 得到扫描结果
		mWifiList = mWifiManager.getScanResults();
		// 得到配置好的网络连接
		mWifiConfiguration = mWifiManager.getConfiguredNetworks();
	}

	/**
	 * 得到网络列表
	 * @return
	 */
	public List<ScanResult> GetWifiList() {
		mWifiManager.startScan();
		// 得到扫描结果
		mWifiList = mWifiManager.getScanResults();
		return mWifiList;
	}

	public List<WifiConfiguration> getmWifiConfiguration() {
		return mWifiConfiguration;
	}

	/**
	 * 查看扫描结果
	 */
	public StringBuilder LookUpScan() {
		StringBuilder stringBuilder = new StringBuilder();
		for (int i = 0; i < mWifiList.size(); i++) {
			stringBuilder.append("Index_" + new Integer(i + 1).toString() + ":");
			// 将ScanResult信息转换成一个字符串包
			// 其中把包括:BSSID、SSID、capabilities、frequency、level
			stringBuilder.append((mWifiList.get(i)).toString());
			stringBuilder.append("\n");
		}
		return stringBuilder;
	}

	/**
	 * 得到MAC地址
	 */
	public String GetMacAddress() {
		return (mWifiInfo == null) ? "NULL" : mWifiInfo.getMacAddress();
	}

	/**
	 * 得到接入点的BSSID
	 */
	public String GetBSSID() {
		return (mWifiInfo == null) ? "NULL" : mWifiInfo.getBSSID();
	}

	/**
	 * 得到IP地址
	 */
	public int GetIPAddress() {
		return (mWifiInfo == null) ? 0 : mWifiInfo.getIpAddress();
	}

	/**
	 * 得到连接的ID
	 */
	public int GetNetworkId() {
		return (mWifiInfo == null) ? 0 : mWifiInfo.getNetworkId();
	}

	/**
	 * 得到WifiInfo的所有信息包
	 */
	public String GetWifiInfo() {
		return (mWifiInfo == null) ? "NULL" : mWifiInfo.toString();
	}

	/**
	 * 添加一个网络并连接
	 */
	public void AddNetwork(WifiConfiguration wcg) {
		int wcgID = mWifiManager.addNetwork(wcg);
		mWifiManager.enableNetwork(wcgID, true);
	}

	/**
	 * 断开指定ID的网络
	 */
	public void DisconnectWifi(int netId) {
		mWifiManager.disableNetwork(netId);
		mWifiManager.disconnect();
	}
}
小结: 当我们需要在一个界面中处理很多事情的时候,可以推荐使用fragment,因为他会把我们的activity分割成很多小块,每个小块都有他的生命周期,非常方便,而有时我们会用单例模式来存储每个页面都有的东西。
三、Fragment实例讲解二
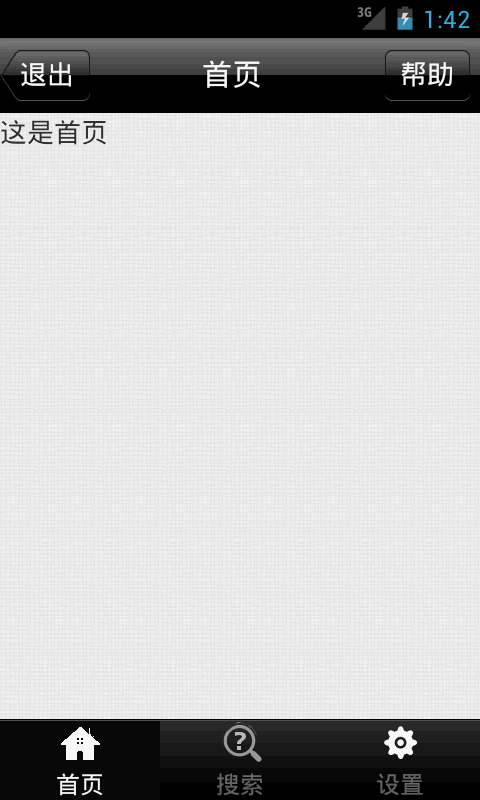
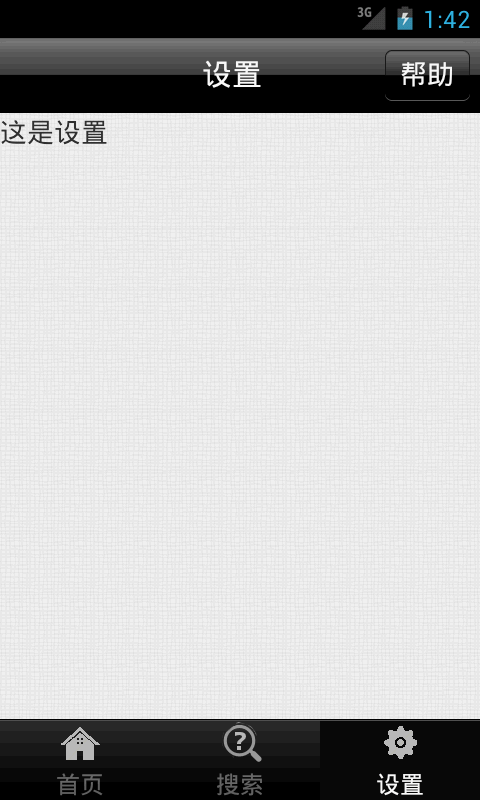
3.1 项目的效果图
3.2 项目结构目录
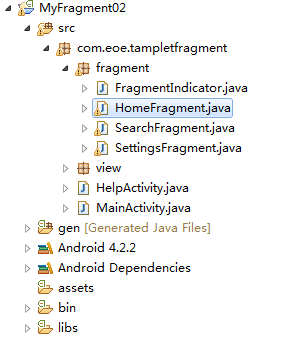
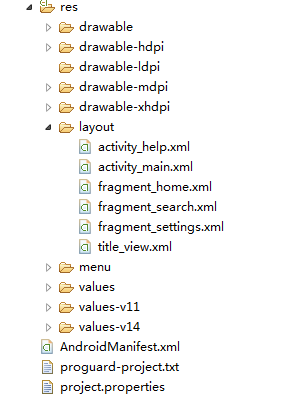
3.3 代码具体编写
1、标题栏的布局界面,title_view.xml:
<?xml version="1.0" encoding="utf-8"?>
<LinearLayout xmlns:android="http://schemas.android.com/apk/res/android"
    android:layout_width="fill_parent"
    android:layout_height="50dip"
    android:background="@drawable/title_bg"
    android:orientation="horizontal" >

    <Button
        android:id="@+id/left_btn"
        style="@style/Text.Title_Button"
        android:layout_width="wrap_content"
        android:layout_height="35dip"
        android:layout_gravity="center_vertical"
        android:background="@drawable/title_btn_back"
        android:minWidth="60dip" />

    <TextView
        android:id="@+id/title_text"
        style="@style/Text.Title"
        android:layout_width="fill_parent"
        android:layout_height="wrap_content"
        android:layout_gravity="center_vertical"
        android:layout_weight="1" />

    <Button
        android:id="@+id/right_btn"
        style="@style/Text.Title_Button"
        android:layout_width="wrap_content"
        android:layout_height="35dip"
        android:layout_gravity="center_vertical"
        android:background="@drawable/title_btn"
        android:minWidth="70dip" />

</LinearLayout>
2、首页的fragment页面,这里就列出一个,fragment_home.xml:
<?xml version="1.0" encoding="utf-8"?>
<LinearLayout xmlns:android="http://schemas.android.com/apk/res/android"
    android:layout_width="fill_parent"
    android:layout_height="fill_parent"
    android:orientation="vertical" >

    <com.eoe.tampletfragment.view.TitleView
        android:id="@+id/title"
        android:layout_width="fill_parent"
        android:layout_height="wrap_content" />

    <TextView
        android:id="@+id/fragment_home_text"
        android:layout_width="fill_parent"
        android:layout_height="wrap_content"
        android:text="@string/fragment_home_text"
        android:textSize="18sp" />

</LinearLayout>
3、帮助Activity界面,activity_help.xml:
<?xml version="1.0" encoding="utf-8"?>
<LinearLayout xmlns:android="http://schemas.android.com/apk/res/android"
    android:layout_width="fill_parent"
    android:layout_height="fill_parent"
    android:background="@drawable/activity_bg"
    android:orientation="vertical" >

    <com.eoe.tampletfragment.view.TitleView
        android:id="@+id/title"
        android:layout_width="fill_parent"
        android:layout_height="wrap_content" />

</LinearLayout>
4、主页面布局,activity_main.xml:
<?xml version="1.0" encoding="utf-8"?>
<LinearLayout xmlns:android="http://schemas.android.com/apk/res/android"
    android:layout_width="fill_parent"
    android:layout_height="fill_parent"
    android:background="@drawable/activity_bg"
    android:orientation="vertical" >

    <fragment
        android:id="@+id/fragment_home"
        android:layout_width="fill_parent"
        android:layout_height="fill_parent"
        android:layout_weight="1"
        class="com.eoe.tampletfragment.fragment.HomeFragment" />

    <fragment
        android:id="@+id/fragment_search"
        android:layout_width="fill_parent"
        android:layout_height="fill_parent"
        android:layout_weight="1"
        class="com.eoe.tampletfragment.fragment.SearchFragment" />

    <fragment
        android:id="@+id/fragment_settings"
        android:layout_width="fill_parent"
        android:layout_height="fill_parent"
        android:layout_weight="1"
        class="com.eoe.tampletfragment.fragment.SettingsFragment" />

    <com.eoe.tampletfragment.fragment.FragmentIndicator
        android:id="@+id/indicator"
        android:layout_width="fill_parent"
        android:layout_height="wrap_content"
        android:background="@drawable/tab_footer_bg" />

</LinearLayout>
详细说明:
<1> 主页面MainActivity继承自FragmentActivity类,负责实现导航按钮所对应页面的显示和隐藏。
(详细实现见源码)
<2> 主页面由底部导航栏和面板组成。
<3> fragment标签所对应Fragment的实现类。
<4> com.eoe.tampletfragment.fragment.FragmentIndicator标签所对应的是底部导航栏。
5、自定义顶部工具栏,TitleView.java:
package com.eoe.tampletfragment.view;

import android.content.Context;
import android.util.AttributeSet;
import android.view.LayoutInflater;
import android.view.View;
import android.widget.Button;
import android.widget.FrameLayout;
import android.widget.TextView;

import com.eoe.tampletfragment.R;

/**
 * @author yangyu
 *	功能描述:自定义顶部工具栏
 */
public class TitleView extends FrameLayout implements View.OnClickListener {

	private Button mLeftBtn;
	private Button mRightBtn;
	private TextView mTitle;

	private OnLeftButtonClickListener mOnLeftButtonClickListener;
	private OnRightButtonClickListener mOnRightButtonClickListener;

	public interface OnLeftButtonClickListener {
		public void onClick(View button);
	}

	public interface OnRightButtonClickListener {
		public void onClick(View button);
	}

	public void setLeftButton(String text, OnLeftButtonClickListener listener) {
		mLeftBtn.setText(text);
		mLeftBtn.setVisibility(View.VISIBLE);
		mOnLeftButtonClickListener = listener;
	}

	public void setLeftButton(int stringID, OnLeftButtonClickListener listener) {
		mLeftBtn.setText(stringID);
		mLeftBtn.setVisibility(View.VISIBLE);
		mOnLeftButtonClickListener = listener;
	}

	public void removeLeftButton() {
		mLeftBtn.setText("");
		mLeftBtn.setVisibility(View.INVISIBLE);
		mOnLeftButtonClickListener = null;
	}

	public void hiddenLeftButton() {
		mLeftBtn.setVisibility(View.INVISIBLE);
	}

	public void showLeftButton() {
		mLeftBtn.setVisibility(View.VISIBLE);
	}

	public void setRightButton(String text, OnRightButtonClickListener listener) {
		mRightBtn.setText(text);
		mRightBtn.setVisibility(View.VISIBLE);
		mOnRightButtonClickListener = listener;
	}

	public void setRightButton(int stringID, OnRightButtonClickListener listener) {
		mRightBtn.setText(stringID);
		mRightBtn.setVisibility(View.VISIBLE);
		mOnRightButtonClickListener = listener;
	}

	public void removeRightButton() {
		mRightBtn.setText("");
		mRightBtn.setVisibility(View.INVISIBLE);
		mOnRightButtonClickListener = null;
	}

	public void hiddenRightButton() {
		mRightBtn.setVisibility(View.INVISIBLE);
	}

	public void showRightButton() {
		mRightBtn.setVisibility(View.VISIBLE);
	}

	public TitleView(Context context) {
		this(context, null);
	}

	public TitleView(Context context, AttributeSet attrs) {
		this(context, attrs, 0);
	}

	public TitleView(Context context, AttributeSet attrs, int defStyle) {
		super(context, attrs, defStyle);

		LayoutInflater inflater = (LayoutInflater) context
				.getSystemService(Context.LAYOUT_INFLATER_SERVICE);
		inflater.inflate(R.layout.title_view, this, true);

		mLeftBtn = (Button) findViewById(R.id.left_btn);
		mLeftBtn.setVisibility(View.INVISIBLE);
		mLeftBtn.setOnClickListener(this);
		mRightBtn = (Button) findViewById(R.id.right_btn);
		mRightBtn.setVisibility(View.INVISIBLE);
		mRightBtn.setOnClickListener(this);

		mTitle = (TextView) findViewById(R.id.title_text);
		mTitle.setVisibility(View.INVISIBLE);
	}

	public void setTitle(String text) {
		mTitle.setVisibility(View.VISIBLE);
		mTitle.setText(text);
	}

	public void setTitle(int stringID) {
		mTitle.setVisibility(View.VISIBLE);
		mTitle.setText(stringID);
	}

	@Override
	public void onClick(View v) {
		switch (v.getId()) {
		case R.id.left_btn:
			if(mOnLeftButtonClickListener != null)
				mOnLeftButtonClickListener.onClick(v);
			break;
		case R.id.right_btn:
			if(mOnRightButtonClickListener != null)
				mOnRightButtonClickListener.onClick(v);
			break;
		}
	}

}
6、自定义底部工具栏,FragmentIndicator.java:
package com.eoe.tampletfragment.fragment;

import android.content.Context;
import android.graphics.Color;
import android.util.AttributeSet;
import android.util.TypedValue;
import android.view.Gravity;
import android.view.View;
import android.view.View.OnClickListener;
import android.widget.ImageView;
import android.widget.LinearLayout;
import android.widget.TextView;

import com.eoe.tampletfragment.R;

/**
 * @author yangyu
 *	功能描述:自定义底部工具栏
 */
public class FragmentIndicator extends LinearLayout implements OnClickListener {

	private int mDefaultIndicator = 0;

	private static int mCurIndicator;

	private static View[] mIndicators;

	private OnIndicateListener mOnIndicateListener;

	private static final String TAG_ICON_0 = "icon_tag_0";
	private static final String TAG_ICON_1 = "icon_tag_1";
	private static final String TAG_ICON_2 = "icon_tag_2";

	private static final String TAG_TEXT_0 = "text_tag_0";
	private static final String TAG_TEXT_1 = "text_tag_1";
	private static final String TAG_TEXT_2 = "text_tag_2";

	private static final int COLOR_UNSELECT = Color.argb(100, 0xff, 0xff, 0xff);
	private static final int COLOR_SELECT = Color.WHITE;

	private FragmentIndicator(Context context) {
		super(context);
	}

	public FragmentIndicator(Context context, AttributeSet attrs) {
		super(context, attrs);

		mCurIndicator = mDefaultIndicator;
		setOrientation(LinearLayout.HORIZONTAL);
		init();
	}

	private View createIndicator(int iconResID, int stringResID, int stringColor,
			String iconTag, String textTag) {
		LinearLayout view = new LinearLayout(getContext());
		view.setOrientation(LinearLayout.VERTICAL);
		view.setLayoutParams(new LinearLayout.LayoutParams(
				LayoutParams.WRAP_CONTENT, LayoutParams.WRAP_CONTENT, 1));
		view.setGravity(Gravity.CENTER_HORIZONTAL);

		ImageView iconView = new ImageView(getContext());
		iconView.setTag(iconTag);
		iconView.setLayoutParams(new LinearLayout.LayoutParams(
				LayoutParams.WRAP_CONTENT, LayoutParams.WRAP_CONTENT, 1));
		iconView.setImageResource(iconResID);

		TextView textView = new TextView(getContext());
		textView.setTag(textTag);
		textView.setLayoutParams(new LinearLayout.LayoutParams(
				LayoutParams.WRAP_CONTENT, LayoutParams.WRAP_CONTENT, 1));
		textView.setTextColor(stringColor);
		textView.setTextSize(TypedValue.COMPLEX_UNIT_SP, 16);
		textView.setText(stringResID);

		view.addView(iconView);
		view.addView(textView);

		return view;

	}

	private void init() {
		mIndicators = new View[3];
		mIndicators[0] = createIndicator(R.drawable.ic_home_focused,
				R.string.tab_home, COLOR_SELECT, TAG_ICON_0, TAG_TEXT_0);
		mIndicators[0].setBackgroundResource(R.drawable.indic_select);
		mIndicators[0].setTag(Integer.valueOf(0));
		mIndicators[0].setOnClickListener(this);
		addView(mIndicators[0]);
		mIndicators[1] = createIndicator(R.drawable.ic_search_normal,
				R.string.tab_search, COLOR_UNSELECT, TAG_ICON_1, TAG_TEXT_1);
		mIndicators[1].setBackgroundColor(Color.alpha(0));
		mIndicators[1].setTag(Integer.valueOf(1));
		mIndicators[1].setOnClickListener(this);
		addView(mIndicators[1]);
		mIndicators[2] = createIndicator(R.drawable.ic_settings_normal,
				R.string.tab_settings, COLOR_UNSELECT, TAG_ICON_2, TAG_TEXT_2);
		mIndicators[2].setBackgroundColor(Color.alpha(0));
		mIndicators[2].setTag(Integer.valueOf(2));
		mIndicators[2].setOnClickListener(this);
		addView(mIndicators[2]);
	}

	public static void setIndicator(int which) {
		// clear previous status.
		mIndicators[mCurIndicator].setBackgroundColor(Color.alpha(0));
		ImageView prevIcon;
		TextView prevText;
		switch(mCurIndicator) {
		case 0:
			prevIcon =(ImageView) mIndicators[mCurIndicator].findViewWithTag(TAG_ICON_0);
			prevIcon.setImageResource(R.drawable.ic_home_normal);
			prevText = (TextView) mIndicators[mCurIndicator].findViewWithTag(TAG_TEXT_0);
			prevText.setTextColor(COLOR_UNSELECT);
			break;
		case 1:
			prevIcon =(ImageView) mIndicators[mCurIndicator].findViewWithTag(TAG_ICON_1);
			prevIcon.setImageResource(R.drawable.ic_search_normal);
			prevText = (TextView) mIndicators[mCurIndicator].findViewWithTag(TAG_TEXT_1);
			prevText.setTextColor(COLOR_UNSELECT);
			break;
		case 2:
			prevIcon =(ImageView) mIndicators[mCurIndicator].findViewWithTag(TAG_ICON_2);
			prevIcon.setImageResource(R.drawable.ic_settings_normal);
			prevText = (TextView) mIndicators[mCurIndicator].findViewWithTag(TAG_TEXT_2);
			prevText.setTextColor(COLOR_UNSELECT);
			break;
		}

		// update current status.
		mIndicators[which].setBackgroundResource(R.drawable.indic_select);
		ImageView currIcon;
		TextView currText;
		switch(which) {
		case 0:
			currIcon =(ImageView) mIndicators[which].findViewWithTag(TAG_ICON_0);
			currIcon.setImageResource(R.drawable.ic_home_focused);
			currText = (TextView) mIndicators[which].findViewWithTag(TAG_TEXT_0);
			currText.setTextColor(COLOR_SELECT);
			break;
		case 1:
			currIcon =(ImageView) mIndicators[which].findViewWithTag(TAG_ICON_1);
			currIcon.setImageResource(R.drawable.ic_search_focused);
			currText = (TextView) mIndicators[which].findViewWithTag(TAG_TEXT_1);
			currText.setTextColor(COLOR_SELECT);
			break;
		case 2:
			currIcon =(ImageView) mIndicators[which].findViewWithTag(TAG_ICON_2);
			currIcon.setImageResource(R.drawable.ic_settings_focused);
			currText = (TextView) mIndicators[which].findViewWithTag(TAG_TEXT_2);
			currText.setTextColor(COLOR_SELECT);
			break;
		}

		mCurIndicator = which;
	}

	public interface OnIndicateListener {
		public void onIndicate(View v, int which);
	}

	public void setOnIndicateListener(OnIndicateListener listener) {
		mOnIndicateListener = listener;
	}

	@Override
	public void onClick(View v) {
		if (mOnIndicateListener != null) {
			int tag = (Integer) v.getTag();
			switch (tag) {
			case 0:
				if (mCurIndicator != 0) {
					mOnIndicateListener.onIndicate(v, 0);
					setIndicator(0);
				}
				break;
			case 1:
				if (mCurIndicator != 1) {
					mOnIndicateListener.onIndicate(v, 1);
					setIndicator(1);
				}
				break;
			case 2:
				if (mCurIndicator != 2) {
					mOnIndicateListener.onIndicate(v, 2);
					setIndicator(2);
				}
				break;
			default:
				break;
			}
		}
	}
}
7、首页fragment页面,HomeFragment.java:
package com.eoe.tampletfragment.fragment;

import android.content.Intent;
import android.os.Bundle;
import android.support.v4.app.Fragment;
import android.support.v4.app.FragmentActivity;
import android.view.LayoutInflater;
import android.view.View;
import android.view.ViewGroup;
import android.widget.TextView;

import com.eoe.tampletfragment.HelpActivity;
import com.eoe.tampletfragment.R;
import com.eoe.tampletfragment.view.TitleView;
import com.eoe.tampletfragment.view.TitleView.OnLeftButtonClickListener;
import com.eoe.tampletfragment.view.TitleView.OnRightButtonClickListener;

/**
 * @author yangyu
 *	功能描述:首页fragment页面
 */
public class HomeFragment extends Fragment {

	private View mParent;

	private FragmentActivity mActivity;

	private TitleView mTitle;

	private TextView mText;

	/**
	 * Create a new instance of DetailsFragment, initialized to show the text at
	 * 'index'.
	 */
	public static HomeFragment newInstance(int index) {
		HomeFragment f = new HomeFragment();

		// Supply index input as an argument.
		Bundle args = new Bundle();
		args.putInt("index", index);
		f.setArguments(args);

		return f;
	}

	public int getShownIndex() {
		return getArguments().getInt("index", 0);
	}

	@Override
	public View onCreateView(LayoutInflater inflater, ViewGroup container,
			Bundle savedInstanceState) {
		View view = inflater.inflate(R.layout.fragment_home, container, false);
		return view;
	}

	@Override
	public void onActivityCreated(Bundle savedInstanceState) {
		super.onActivityCreated(savedInstanceState);
		mActivity = getActivity();
		mParent = getView();

		mTitle = (TitleView) mParent.findViewById(R.id.title);
		mTitle.setTitle(R.string.title_home);
		mTitle.setLeftButton(R.string.exit, new OnLeftButtonClickListener(){

			@Override
			public void onClick(View button) {
				mActivity.finish();
			}

		});
		mTitle.setRightButton(R.string.help, new OnRightButtonClickListener() {

			@Override
			public void onClick(View button) {
				goHelpActivity();
			}
		});

		mText = (TextView) mParent.findViewById(R.id.fragment_home_text);

	}

	private void goHelpActivity() {
		Intent intent = new Intent(mActivity, HelpActivity.class);
		startActivity(intent);
	}

	@Override
	public void onHiddenChanged(boolean hidden) {
		super.onHiddenChanged(hidden);
	}

	@Override
	public void onDestroy() {
		super.onDestroy();
	}

}
8、Activity帮助界面,HelpActivity.java:
package com.eoe.tampletfragment;

import android.os.Bundle;
import android.support.v4.app.FragmentActivity;
import android.view.Window;

/**
 * @author yangyu
 *	功能描述:帮助Activity界面
 */
public class HelpActivity extends FragmentActivity {

	@Override
	protected void onCreate(Bundle savedInstanceState) {
		super.onCreate(savedInstanceState);
		requestWindowFeature(Window.FEATURE_NO_TITLE);
		setContentView(R.layout.activity_help);
	}

}
9、Activity主界面,MainActivity.java:
package com.eoe.tampletfragment;

import android.os.Bundle;
import android.support.v4.app.Fragment;
import android.support.v4.app.FragmentActivity;
import android.view.View;
import android.view.Window;

import com.eoe.tampletfragment.fragment.FragmentIndicator;
import com.eoe.tampletfragment.fragment.FragmentIndicator.OnIndicateListener;

/**
 * @author yangyu
 *	功能描述:主Activity类,继承自FragmentActivity
 */
public class MainActivity extends FragmentActivity {

	public static Fragment[] mFragments;

	@Override
	protected void onCreate(Bundle savedInstanceState) {
		super.onCreate(savedInstanceState);
		requestWindowFeature(Window.FEATURE_NO_TITLE);
		setContentView(R.layout.activity_main);

		setFragmentIndicator(0);

	}

	/**
	 * 初始化fragment
	 */
	private void setFragmentIndicator(int whichIsDefault) {
		mFragments = new Fragment[3];
		mFragments[0] = getSupportFragmentManager().findFragmentById(R.id.fragment_home);
		mFragments[1] = getSupportFragmentManager().findFragmentById(R.id.fragment_search);
		mFragments[2] = getSupportFragmentManager().findFragmentById(R.id.fragment_settings);
		getSupportFragmentManager().beginTransaction().hide(mFragments[0])
				.hide(mFragments[1]).hide(mFragments[2]).show(mFragments[whichIsDefault]).commit();

		FragmentIndicator mIndicator = (FragmentIndicator) findViewById(R.id.indicator);
		FragmentIndicator.setIndicator(whichIsDefault);
		mIndicator.setOnIndicateListener(new OnIndicateListener() {
			@Override
			public void onIndicate(View v, int which) {
				getSupportFragmentManager().beginTransaction()
						.hide(mFragments[0]).hide(mFragments[1])
						.hide(mFragments[2]).show(mFragments[which]).commit();
			}
		});
	}

	@Override
	protected void onResume() {
		super.onResume();
	}

	@Override
	protected void onPause() {
		super.onPause();
	}

}


 1049
1049


 被折叠的 条评论
为什么被折叠?
被折叠的 条评论
为什么被折叠?
 到【灌水乐园】发言


