


SpringBoot8
SpringBoot默认使用Tomcat作为嵌入式的Servlet容器

那么问题来了,我们以前做项目,使用的是外部的tomcat,如果想要修改tomcat,知道本地文件夹中的sever.xml就能修改配置,那么,在使用嵌入式Servlet容器的情况下:
- 如何定制和修改Servlet容器的相关配置;
- SpringBoot能不能支持其他的servlet容器。
1. 定制和修改Servlet容器的相关配置
1.1 在application.properties配置文件中修改
在application.properties配置文件中可以修改与server和tomcat有关的配置
//通用的Servlet容器设置
server.xxx=yyy
server.port=8080
server.context‐path=/crud

//Tomcat的设置
server.tomcat.xxx=yyy
server.tomcat.uri‐encoding=UTF‐8
1.2 在配置类中添加嵌入式的Servlet容器的定制器
在 Spring Boot 1.x 中 ,我们通过 EmbeddedServletContainerCustomizer 接口调优 Tomcat 自定义配置。 在Spring Boot 2.x 中,通过 WebServerFactoryCustomizer 接口定制。
我使用的是SpringBoot2.0以上版本,所以可以编写一个WebServerFactoryCustomizer:嵌入式的Servlet容器的定制器;来修改Servlet容器的配置 ,在MyMvcConfig中添加如下代码
@Bean
public WebServerFactoryCustomizer<TomcatServletWebServerFactory> webServerFactoryCustomizer(){
    return new WebServerFactoryCustomizer<TomcatServletWebServerFactory>() {
        @Override
        public void customize(TomcatServletWebServerFactory factory) {
            factory.setPort(8080);
            factory.setUriEncoding(Charset.forName("UTF-8"));
        }
    };
}
2. 注册servlet三大组件
首先新建一个MyServerConfig配置类,用来放置有关server的配置,将前面1.2节中的WebServerFactoryCustomizer添加进来
-
注册servlet
创建MyServlet
public class MyServlet extends HttpServlet {
    @Override
    protected void doGet(HttpServletRequest req, HttpServletResponse resp) throws ServletException, IOException {
        doPost(req, resp);
    }

    @Override
    protected void doPost(HttpServletRequest req, HttpServletResponse resp) throws ServletException, IOException {
        resp.getWriter().write("Hello MyServlet");
    }
}
添加进MyServerConfig,当访问
/myServlet请求时,页面显示"Hello MyServlet"@Bean public ServletRegistrationBean myServlet(){ ServletRegistrationBean registrationBean = new ServletRegistrationBean(new MyServlet(),"/myServlet"); return registrationBean; } -
注册filter
创建MyFilter
public class MyFilter implements Filter {
    @Override
    public void init(FilterConfig filterConfig) throws ServletException {

    }

    @Override
    public void doFilter(ServletRequest servletRequest, ServletResponse servletResponse, FilterChain filterChain) throws IOException, ServletException {
        System.out.println("MyFilter process...");
    }

    @Override
    public void destroy() {

    }
}
添加进MyServerConfig,拦截到
/hello和/myServlet请求时,控制台打印"MyFilter process…"@Bean public FilterRegistrationBean myFilter(){ FilterRegistrationBean registrationBean = new FilterRegistrationBean(); registrationBean.setFilter(new MyFilter()); registrationBean.setUrlPatterns(Arrays.asList("/hello","/myServlet")); return registrationBean; } -
注册listener
创建MyListener
public class MyListener implements ServletContextListener {
    @Override
    public void contextInitialized(ServletContextEvent sce) {
        System.out.println("contextInitialized...web应用启动");
    }

    @Override
    public void contextDestroyed(ServletContextEvent sce) {
        System.out.println("contextDestroyed...当前web项目销毁");
    }
}
添加进MyServerConfig,当项目启动和销毁时,控制台显示不同的输出。
@Bean public ServletListenerRegistrationBean myListener(){ ServletListenerRegistrationBean<MyListener> registrationBean = new ServletListenerRegistrationBean<>(new MyListener()); return registrationBean; } -
SpringBoot帮我们配置SpringMVC的时候,自动注册SpringMVC的前端控制器:dispatcherServlet。
在DispatcherServletAutoConfiguration中
@Configuration(
    proxyBeanMethods = false
)
@Conditional({DispatcherServletAutoConfiguration.DispatcherServletRegistrationCondition.class})
@ConditionalOnClass({ServletRegistration.class})
@EnableConfigurationProperties({WebMvcProperties.class})
@Import({DispatcherServletAutoConfiguration.DispatcherServletConfiguration.class})
protected static class DispatcherServletRegistrationConfiguration {
    protected DispatcherServletRegistrationConfiguration() {
    }

    @Bean(
        name = {"dispatcherServletRegistration"}
    )
    @ConditionalOnBean(
        value = {DispatcherServlet.class},
        name = {"dispatcherServlet"}
    )
    public DispatcherServletRegistrationBean dispatcherServletRegistration(DispatcherServlet dispatcherServlet, WebMvcProperties webMvcProperties, ObjectProvider<MultipartConfigElement> multipartConfig) {
        DispatcherServletRegistrationBean registration = new DispatcherServletRegistrationBean(dispatcherServlet, webMvcProperties.getServlet().getPath());
        registration.setName("dispatcherServlet");
        registration.setLoadOnStartup(webMvcProperties.getServlet().getLoadOnStartup());
        multipartConfig.ifAvailable(registration::setMultipartConfig);
        return registration;
    }
}
其中
DispatcherServletRegistrationBean registration = new DispatcherServletRegistrationBean(dispatcherServlet, webMvcProperties.getServlet().getPath());为注册的dispatcherServlet。查看webMvcProperties中的方法,可以得到默认拦截的路径为
/,表明会拦截所有请求;包静态资源,但是不拦截jsp请求 。如果拦截路径为/*的话,会拦截jsp请求。public class WebMvcProperties { private final WebMvcProperties.Servlet servlet; public WebMvcProperties.Servlet getServlet() { return this.servlet; } ... public static class Servlet { private String path = "/"; private int loadOnStartup = -1; public String getPath() { return this.path; } ... }
3. 切换其他嵌入式Servlet容器
在SpringBoot中,有三种嵌入式Servlet容器,分别为:tomcat、jetty、undertow。
tomcat为默认方式;jetty适用于长连接,比如说聊天场景;undertow不支持jsp
要切换其他容器,只需要在pom文件中,把tomcat排除,添加要使用的容器的依赖即可
<!‐‐排除tomcat容器‐‐>
<dependency>
	<groupId>org.springframework.boot</groupId>
	<artifactId>spring‐boot‐starter‐web</artifactId>
	<exclusions>
		<exclusion>
			<artifactId>spring‐boot‐starter‐tomcat</artifactId>
			<groupId>org.springframework.boot</groupId>
		</exclusion>
	</exclusions>
</dependency>
<!‐‐引入其他的Servlet容器,以jetty为例‐‐>
<dependency>
	<artifactId>spring‐boot‐starter‐jetty</artifactId>
	<groupId>org.springframework.boot</groupId>
</dependency>
4. 嵌入式Servlet容器自动配置原理
org.springframework.boot.autoconfigure.web.embedded.EmbeddedWebServerFactoryCustomizerAutoConfiguration自动配置嵌入式servlet容器,其详细代码如下所示:
@Configuration(
    proxyBeanMethods = false
)
//运行在web应用中,条件成立
@ConditionalOnWebApplication
@EnableConfigurationProperties({ServerProperties.class})
public class EmbeddedWebServerFactoryCustomizerAutoConfiguration {
    public EmbeddedWebServerFactoryCustomizerAutoConfiguration() {
    }

    //配置Netty
    @Configuration(
        proxyBeanMethods = false
    )
    //当类HttpServer.class存在时,条件成立。引入依赖,这个类就会存在
    @ConditionalOnClass({HttpServer.class})
    public static class NettyWebServerFactoryCustomizerConfiguration {
        public NettyWebServerFactoryCustomizerConfiguration() {
        }

        @Bean
        public NettyWebServerFactoryCustomizer nettyWebServerFactoryCustomizer(Environment environment, ServerProperties serverProperties) {
            return new NettyWebServerFactoryCustomizer(environment, serverProperties);
        }
    }

    //配置Undertow
    @Configuration(
        proxyBeanMethods = false
    )
    @ConditionalOnClass({Undertow.class, SslClientAuthMode.class})
    public static class UndertowWebServerFactoryCustomizerConfiguration {
        public UndertowWebServerFactoryCustomizerConfiguration() {
        }

        @Bean
        public UndertowWebServerFactoryCustomizer undertowWebServerFactoryCustomizer(Environment environment, ServerProperties serverProperties) {
            return new UndertowWebServerFactoryCustomizer(environment, serverProperties);
        }
    }

    //配置Jetty
    @Configuration(
        proxyBeanMethods = false
    )
    @ConditionalOnClass({Server.class, Loader.class, WebAppContext.class})
    public static class JettyWebServerFactoryCustomizerConfiguration {
        public JettyWebServerFactoryCustomizerConfiguration() {
        }

        @Bean
        public JettyWebServerFactoryCustomizer jettyWebServerFactoryCustomizer(Environment environment, ServerProperties serverProperties) {
            return new JettyWebServerFactoryCustomizer(environment, serverProperties);
        }
    }

    //配置tomcat
    @Configuration(
        proxyBeanMethods = false
    )
    @ConditionalOnClass({Tomcat.class, UpgradeProtocol.class})
    public static class TomcatWebServerFactoryCustomizerConfiguration {
        public TomcatWebServerFactoryCustomizerConfiguration() {
        }

        @Bean
        public TomcatWebServerFactoryCustomizer tomcatWebServerFactoryCustomizer(Environment environment, ServerProperties serverProperties) {
            return new TomcatWebServerFactoryCustomizer(environment, serverProperties);
        }
    }
}
-
ServletWebServerFactory:容器工厂,其代码如下所示
public interface ServletWebServerFactory {
    //获取嵌入式的servlet容器
    WebServer getWebServer(ServletContextInitializer... initializers);
}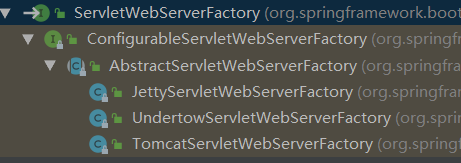
-
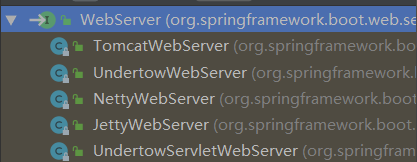
嵌入式servlet容器
-
以TomcatServletWebServerFactory为例
public class TomcatServletWebServerFactory extends AbstractServletWebServerFactory implements ConfigurableTomcatWebServerFactory, ResourceLoaderAware {
    ...

    public WebServer getWebServer(ServletContextInitializer... initializers) {
        if (this.disableMBeanRegistry) {
            Registry.disableRegistry();
        }
        //创建一个tomcat
        Tomcat tomcat = new Tomcat();
        //配置tomcat的基本环境
        File baseDir = this.baseDirectory != null ? this.baseDirectory : this.createTempDir("tomcat");
        tomcat.setBaseDir(baseDir.getAbsolutePath());
        Connector connector = new Connector(this.protocol);
        connector.setThrowOnFailure(true);
        tomcat.getService().addConnector(connector);
        this.customizeConnector(connector);
        tomcat.setConnector(connector);
        tomcat.getHost().setAutoDeploy(false);
        this.configureEngine(tomcat.getEngine());
        Iterator var5 = this.additionalTomcatConnectors.iterator();

        while(var5.hasNext()) {
            Connector additionalConnector = (Connector)var5.next();
            tomcat.getService().addConnector(additionalConnector);
        }

        this.prepareContext(tomcat.getHost(), initializers);
        //将配置好的tomcat传进去
        return this.getTomcatWebServer(tomcat);
    }
    //返回一个TomcatWebServer
    protected TomcatWebServer getTomcatWebServer(Tomcat tomcat) {
        return new TomcatWebServer(tomcat, this.getPort() >= 0);
    }

}
//并启动tomcat服务器
public TomcatWebServer(Tomcat tomcat, boolean autoStart) { this.monitor = new Object(); this.serviceConnectors = new HashMap(); Assert.notNull(tomcat, "Tomcat Server must not be null"); this.tomcat = tomcat; this.autoStart = autoStart; this.initialize(); } -
我们对嵌入式容器的配置修改是怎么生效
有两种方式:
- 在application.properties中修改
- 添加WebServerFactoryCustomizer到配置类
这两种方式归根结底,其实都是修改的
ServerProperties中的值@ConfigurationProperties( prefix = "server", ignoreUnknownFields = true ) public class ServerProperties { private Integer port; private InetAddress address; ... }从上述代码可以看出,在application.properties中,以
server开头的配置,是对ServerProperties的属性进行了修改而TomcatServletWebServerFactoryCustomizer中的所有方法也都是围绕它的唯一属性ServerProperties来展开的。
public class TomcatServletWebServerFactoryCustomizer implements WebServerFactoryCustomizer<TomcatServletWebServerFactory>, Ordered { private final ServerProperties serverProperties; public TomcatServletWebServerFactoryCustomizer(ServerProperties serverProperties) { this.serverProperties = serverProperties; } ... } -
容器配置修改的原理:
容器中导入了 WebServerFactoryCustomizerBeanPostProcessor
public class WebServerFactoryCustomizerBeanPostProcessor implements BeanPostProcessor, BeanFactoryAware {
    private ListableBeanFactory beanFactory;
    private List<WebServerFactoryCustomizer<?>> customizers;

    public WebServerFactoryCustomizerBeanPostProcessor() {
    }

    public void setBeanFactory(BeanFactory beanFactory) {
        Assert.isInstanceOf(ListableBeanFactory.class, beanFactory, "WebServerCustomizerBeanPostProcessor can only be used with a ListableBeanFactory");
        this.beanFactory = (ListableBeanFactory)beanFactory;
    }

    public Object postProcessBeforeInitialization(Object bean, String beanName) throws BeansException {
        //如果当前初始化的是一个WebServerFactory类型的组件
        if (bean instanceof WebServerFactory) {
            this.postProcessBeforeInitialization((WebServerFactory)bean);
        }

        return bean;
    }

    public Object postProcessAfterInitialization(Object bean, String beanName) throws BeansException {
        return bean;
    }

    private void postProcessBeforeInitialization(WebServerFactory webServerFactory) {
        //获取所有的定制器,调用每一个定制器的customize方法来给Servlet容器进行属性赋值
        ((Callbacks)LambdaSafe.callbacks(WebServerFactoryCustomizer.class, this.getCustomizers(), webServerFactory, new Object[0]).withLogger(WebServerFactoryCustomizerBeanPostProcessor.class)).invoke((customizer) -> {
            customizer.customize(webServerFactory);
        });
    }

    private Collection<WebServerFactoryCustomizer<?>> getCustomizers() {
        if (this.customizers == null) {
            this.customizers = new ArrayList(this.getWebServerFactoryCustomizerBeans());
            this.customizers.sort(AnnotationAwareOrderComparator.INSTANCE);
            this.customizers = Collections.unmodifiableList(this.customizers);
        }

        return this.customizers;
    }

    private Collection<WebServerFactoryCustomizer<?>> getWebServerFactoryCustomizerBeans() {
        return this.beanFactory.getBeansOfType(WebServerFactoryCustomizer.class, false, false).values();
    }
}
定制器会修改ServerProperties
-
嵌入式Servlet容器自动配置的顺序
- SpringBoot根据导入的依赖情况,给容器中添加相应的ServletWebServerFactory,如TomcatServletWebServerFactory
- 容器中某个组件要创建对象就会惊动后置处理器WebServerFactoryCustomizerBeanPostProcessor,只要是嵌入式的Servlet容器工厂,后置处理器就工作
- 后置处理器,从容器中获取所有的WebServerFactoryCustomizer,调用定制器的定制方法
5. 使用外部servlet容器
嵌入式Servlet容器:将应用打成可执行的jar包
- 优点:简单、便捷
- 缺点:默认不支持JSP、优化定制比较复杂(使用定制器、自己编写嵌入式Servlet容器的创建工厂 )
外置的Servlet容器:可以将应用以war包的方式打包
步骤:
-
必须创建一个war项目(利用IDEA创建好目录结构),详细步骤在后面
-
在pom文件中将嵌入式的Tomcat指定为provided
<dependency> <groupId>org.springframework.boot</groupId> <artifactId>spring-boot-starter-tomcat</artifactId> <scope>provided</scope> </dependency> -
必须编写一个SpringBootServletInitializer的子类,并调用configure方法

-
启动服务器就可以使用
创建war项目且实现jsp功能的详细步骤


创建项目以后,打开project settings使用idea自动生成webapp目录

将web.xml文件放入src\main\webapp\WEB-INF文件夹中

目录结构如下

添加本地tomcat服务器

把要部署的项目添加进来

上述步骤完成之后,在webapp下创建hello.jsp,启动tomat服务器,地址栏输入localhost:8080/hello.jsp就能正常访问了。jsp功能实现了。
下面实现sprngmvc功能
在webapp\WEB-INF目录下创建success.jsp
<%@ page contentType="text/html;charset=UTF-8" language="java" %>
<html>
<head>
    <title>$Title$</title>
</head>
<body>
    <h1>success</h1>
    <h3>${msg}</h3>
</body>
</html>
创建controller.HelloController
@Controller
public class HelloController {
    @GetMapping("/abc")
    public String hello(Model model){
        model.addAttribute("msg","你好");
        return "success";
    }
}
在application.properties文件中配置前缀和后缀
spring.mvc.view.prefix=/WEB-INF/
spring.mvc.view.suffix=.jsp
重新启动服务器,在地址栏输入localhost:8080/abc即可访问success页面,并且也能获取到msg的值


 696
696

 被折叠的 条评论
为什么被折叠?
被折叠的 条评论
为什么被折叠?
 到【灌水乐园】发言


