


文章目录
js基础
js 预解析
js 代码的编译和执行
通俗的说,预解析是在代码执行之前,先对代码进行通读和解释 ,之后执行代码
js变量提升
    // 声明式函数
    var fn = 100;
    function fn() {
      console.log('方法执行')
    }
    console.log(fn);//100
    fn()//fn is not a function
- 变量提升执行步骤
fn
fn()
fn = 100
//undifined 预解析了title的变量名称,没有赋值
console.log(title)
var title = '苹果';
console.log(title)//苹果
赋值式函数 和 声明式函数

上述例子中,预解析只是声明了 func这个变量,没有赋值 所以说func()不是 function 只是声明了一个func变量
第一个 函数 只能在 声明后 执行
第二个 声明式函数 可以在之前执行
DOM相关知识
节点选择器
<div id="hbox">
    强大的内心
    <div id="box"></div>
</div>
- childNodes属性 children
  box.childNodes //获取所有节点
  box.children 所有元素
- firstChild and firstElementChild
  box.firstChild //获取所有节点中的第一个 包含 text /n
  box.firstElementChild 所有元素 标签
- lastChild lastElementChild
- previousSibling previousElementSibling //上一个节点的兄弟节点
- nextSibling nextElementSibling //下一个节点的兄弟节点
- parentNode parentElement //父节点 parentElement拿不到则为null
获取属性节点
box.getAttribute('index');
console.log(box.attributes[1]);
创建节点
创建之后,直接可以利用 '.'方式更改/添加的属性
const newDiv = document.creatElement('div');
newDiv.className = 'newd';
newDiv.id = 'dd';
newDiv.innerHTML = "玫瑰和王子不属于一个世界";
插入节点
<div id="box">
    <div id="box1"></div>
</div>

<script>
box.appendChild(newDiv) //在box下增加一个节点

// insertBefore(要插入的节点,谁的前面)
hbox.insertBefore(newDiv,box);

// 删除节点(节点对象)
box.removeChild(newDiv);

// 删除自己以及后代
box.remove();
</script>
替换节点
replaceChild(新的节点,老的节点)
<script>
// 替换节点
const newDiv = document.createElement('div')
newDiv.innerHTML = '替换'
box.replaceChild(newDiv,box1)
</script>
克隆节点
cloneNode() 默认不传参 仅克隆当前j节点
<script>
// 克隆节点
// cloneNode(true) 克隆包含后代
const clnode = box.cloneNode(true);
clnode.id = 'cloneId';
document.body.appendChild(clnode);
</script>
获取节点属性
| 节点类型 | 属性名 | 属性值 |
|---|---|---|
| 元素节点 | nodeType | 1 |
| 属性节点 | nodeName | 2 |
| 文本节点 | text | 3 |
<script>
const box = document.getElementbyId('box')
console.log(box.nodeType)
</script>
获取元素尺寸
offsetWith 和 offsetHeight
获取尺寸:内容+padding+border 宽/高 度
clientWidth 和 clientHeight
获取尺寸:内容+padding 宽/高 度
获取元素偏移量
offsetLeft 和 offsetTop
参考点是定位父级 position:relative;
如果元素没有定位,偏移量相对于body
标准的dom事件流
捕获:window -> document -> body -> outer
目标:inner
冒泡:outer -> body -> document -> window
默认情况 只在冒泡触发 按照 dom2事件绑定,并进行配置,才能看到捕获的回调函数被触发
阻止事件传播
// propagation 传播
 e.stopPropagation();
阻止默认行为
e.preventDefault();
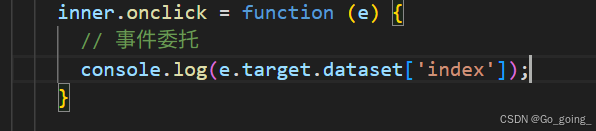
事件委托
e.target
减少多个函数绑定 的 性能损耗
动态添加li也 有事件处理
可以根据dom流,将事件委托给父组件,在父组件中获取到点击元素
详见示例
<ul id="list">
  <li><button type="button"></button></li>
</ul>
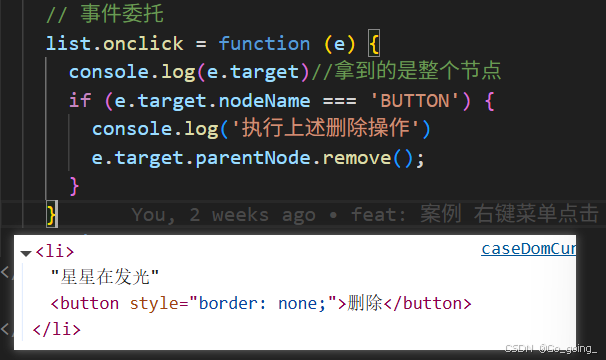
事件委托,将事件绑定在父组件<u id='list'>上
此时打印e.target可以获取到整个父节点和子节点。
通过获取 e.target.nodeName 选择要绑定的 子组件 节点类型
也可以根据节点操作方式,对节点操作
正则表达式
js复杂类型
- 字面量
//
字符中包含 连续字符 abc
const reg = /abc/
//验证data.value是否符合表达式规则
reg.test(data.value)
- 内置构造函数
const reg = new RegExp("abc")
元字符 - 基本元字符
\d包含一位数字(0-9)
  const reg = /\d/
  console.log(reg.test("abc"))//false
  console.log(reg.test("123"))//true
\D包含一位 非 数字
  const reg = /\D/
  console.log(reg.test("abc"))//true
  console.log(reg.test("123"))//false
\s包含一位空白 (空格 缩进 换行)
  const reg = /\s/
  console.log(reg.test("ab c"))//true
  console.log(reg.test("123"))//false
\S包含一位 非 空白 (空格 缩进 换行)
  const reg = /\S/
  console.log(reg.test("ab c"))//false
  console.log(reg.test("123"))//true
\w包含一位 字母 数字 下划线
  const reg = /\w/
  const reg2 = /\w\w/ //包含两个
  console.log(reg.test("123ab c"))//true
  console.log(reg.test("&*"))//false
\W包含一位 非 字母 数字 下划线
  const reg = /\W/
  const reg2 = /\W\W/ //包含两个
  console.log(reg.test("123ab c"))//false
  console.log(reg.test("&*"))//true
.任意内容( 换行不算 )
一个符合条件就可以 如果 exec() 截取 只会截取第一个
  const reg = /./
  console.log(reg.test("\n\n\n"))//false
  console.log(reg.test("&\naac*"))//true
. \转义字符
  const reg = /\d\.\d/
  console.log(reg.test("1.2"))//true
  console.log(reg.test("1a2"))//false
元字符 - 边界符
^以什么为开头
const reg = /^\d/ //以数字开头
console.log(reg.test('abc'))//false
console.log(reg.test('1abc'))//true
$以什么为结尾
const reg = /\d$/ //以数字结尾
console.log(reg.test('abc'))//false
console.log(reg.test('abc33'))//true
^开头结尾$
const reg = /^ae$/
console.log(reg.test('abc'))//false
console.log(reg.test('ae'))//true
  const reg = /^a\de$/
  console.log(reg.test('abc'))//false
  console.log(reg.test('a2e'))//true
  console.log(reg.test('a232323e'))//false
元字符 - 限定符
*0到多次
 const reg = /^a\d*c$/;
 console.log(reg.test('a222222c'))//true
 console.log(reg.test('a222222'))//f
+1到多次
 const reg = /\d+/;
 console.log(reg.test('a222222c'))//true
 console.log(reg.test('a222222'))//f
 console.log(reg.exec('ads222222'))//可以取出符合条件的字符
?0-1次
 const reg = /\d?/;
 console.log(reg.test('a222222c'))//true
 console.log(reg.test('ac'))//true
{n}指定次数 n
  const reg = /\d{3}/
  console.log(reg.test('ac'))//false
  console.log(reg.test('a2c'))//false
  console.log(reg.test('a232e'))//true
{n,m}指定次数 n < x < m
  const reg = /\d{1,3}/
  console.log(reg.test('ac'))//false
  console.log(reg.test('a2c'))//true
  console.log(reg.test('a232e'))//true
  console.log(reg.test('a123456e'))//true
  console.log(reg.exec('a123456e'))//123
元字符 - 特殊符号
()整体
  const reg = /(a){2}/
  console.log(reg.test('aca'))//false
  console.log(reg.test('aac'))//true
| 或 ,左右是一个整体
  const reg = /a|2/ // a或者是2
  console.log(reg.test('aca'))//false
  console.log(reg.test('aac'))//true
  const reg = /(abc|234)/ //abc或者是 234
  console.log(reg.test('ab234'))//true
  console.log(reg.test('abc34'))//true
  console.log(reg.test('abc'))//true
  const reg = /abc|234/ //ab c或2 34
  console.log(reg.test('ab234'))//true
  console.log(reg.test('abc'))//true
  console.log(reg.test('ab34'))//false
  console.log(reg.test('c23'))//false
  console.log(reg.test('234'))//true
[]包含其中1个
[a-zA-Z0-9_] 等价于 \w 字母数字下划线
[0-9] <=> \d
  const reg = /[123sad]/
  console.log(reg.test('abc'))//true
  console.log(reg.test('234'))//true
  const reg = /[123sad]{3,5}/
  console.log(reg.test('ba2s'))//true
  console.log(reg.test('ab2s'))//false 要包含在【】中 连续在一起的为true
[^abc]取反 ^
^ 写在外面 以什么为开头 写在[]中 取反
  const reg = /[^abc]/
  console.log(reg.test('wabc'))//true
  console.log(reg.test('abc'))//false 要包含在【】中 连续在一起的为^ 取反
正则表达式 - 捕获
- exec(‘表达式’)
截取字符串中,符合正则表达式的内容
但是是懒惰模式,只会匹配遇到的第一个内容,不会返回多个片段
  const str = 'who say 2025-05-20'
  const reg = /\d{4}-\d{1,2}-\d{1,2}/
  console.log(reg.test(str))//true
  console.log(reg.exec(str)[0])//2025-05-20
- 标识符
gi
g 全局匹配 global
  const str = 'who say 2025-05-20 is my birthday,my birthday in 2025-6-1';
  const reg = /\d{4}-\d{1,2}-\d{1,2}/g
  console.log(reg.test(str))//true
  console.log(reg.exec(str)[0])//2025-05-20
const reg = /(\d{4})-(\d{1,2})-(\d{1,2})/g该表达式 加了()会 将符合的整体单独提取
  const str = 'who say 2025-05-20 is my birthday,my birthday in 2025-6-1';
  const reg = /\d{4}-\d{1,2}-\d{1,2}/g
  // const reg = /(\d{4})-(\d{1,2})-(\d{1,2})/g 加了()会 将符合的整体单独提取

  console.log(reg.test(str))//true 全局模式 会记录此次内容
  const res1 = reg.exec(str);//2025-6-1',
  const res2 = reg.exec(str);// null  最上面的console.log 输出一次 调用了reg 匹配 全局g记录了输出的操作,所以 只剩下 第二次的结果
i 忽略大小写 - ignore
  const str = 'who say 2025-05-20 is my birthday,my birthday in 2025-6-1';
  const reg = /a-z/i
  console.log(reg.test(str))//true
- 贪婪 非贪婪
?
示例
贪婪匹配 匹配 符合条件的最大次数
  const reg = /\d{1,4}/
  console.log(reg.exec('aca124856'))//1248  贪婪匹配 匹配 符合条件的最大次数
?非贪婪匹配 匹配 符合条件的最小次数
  const reg = /\d{1,4}?/
  console.log(reg.exec('aca124856'))//1  ?非贪婪匹配 匹配 符合条件的最小次数
常见搭配
*?
+?
??
{n,}? {n,m}?
场景应用
  const str = `<p class='list'> xxxxx <p/>`
  const reg = /^<p.*>$/
  const reg = /./ //一个符合条件就可以
  console.log(reg.exec(str))//<p class='list'> xxxxx <p/>  贪婪匹配
  const str = `<p class='list'> xxxxx <p/>`
  const reg = /^<p.*?>$/
  console.log(reg.exec(str))//<p class='list'> xxxxx <p/> >$存在 正则引擎 必须要找到正确的,所以会匹配到 第二个p 。为了满足 $,.*? 会继续扩展直到能匹配到字符串末尾的 >
  const str = `<p class='list'> xxxxx <p/>`
  const reg = /^<p.*?>/
  console.log(reg.exec(str))//<p class='list'> 非贪婪匹配
正则与字符串写法
正则.test(字符串)
正则.exec(字符串)
字符串.replace search match
  const str = 'I will marry with my boy friend,I do not want get marry';
  const reg = /marry/g
  console.log(str.replace(reg, '*'))//I will * with my boy friend,I do not want get marry
  const str = '';
  const reg = /marry/g
  console.log(str.search(reg))//有返回 开始下标 没有则 -1
  const str = 'I will marry with my boy friend,I do not want get marry';
  const reg = /marry/g
  console.log(str.match(reg))// ['marry', 'marry']
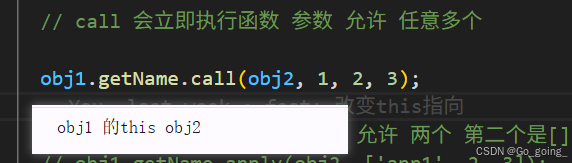
call、apply、bind的作用与区别
call apply 和 bind 都是可以修改 this 指向
使用区别是
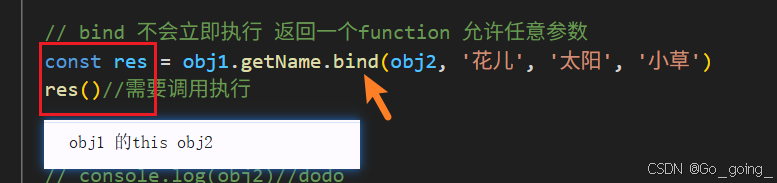
- call apply 会立即执行函数 . bind 返回一个function 需要被调用执行
- 参数的区别
call(this的指向,arg1,arg2…) 传递多个参数
apply(this的指向,[arg1,arg2… ]) 第二个参数 是 数组
bind(this的指向,arg1,arg2…) 传递多个参数
速记: call 相当于打电话,拨打号码,要输入多个数字
示例:
-
未被改变的this指向
谁调用,this指向谁

- 通过 call apply bind 修改 this 指向后
call 和 apply 修改 this 指向是 立即执行 所以不需要调用函数,直接会执行被修改的function
apply 第二个参数 是 数组 【】

- bind 修改this 不会立即执行,需要调用
js 类写法 (es6)
本质是 构造函数 class 写法是es6的语法糖 可以用prototype修改
class Hander {
  constructor(name, adge) {
    this.name = name;
    this.adge = adge;
  }

  introduce() {
    console.log('hello', this.name, this.adge)
  }
}
const obj = new Hander('张三',12)//传递的参数,会被构造函数 construct 接收
obj.introduce();//调用类中的 方法
js 构造函数 (es5)
function Hander(name,age){
  this.name = name;
  this.age = age;
}

// 节省空间公用内存,将function写在原型prototype上
Hander.prototype.introduce(){
  console.log('挂在原型上的方法',name,age)
}

const obj = new Hander('百里',400);
obj.introduce();
js原型链
每一个对象上都有一个
__proto__
通过 obj.__proto__可以获取到上一级方法的构造方法,逐级向上,形成原型链
obj.__proto__=== 构造函数.prototype这俩的区别是
__proto__是一个内置函数。类似君子协议,以__开头的方法不允许被调用。所以,使用prototype代替
原型链的源头:
可以理解为null 因为 Object.prototype.__proto__= null
也可以说是 Object.prototype
js面向对象继承 es5
分为构造函数继承 和 原型继承
通过 改变this指向(call || apply),实现远程继承
通过 prototype 改变父类构造函数 实现增强 或 复用
- 继承属性
通过call/apply改变父方法的this指向
call 会立即执行函数 参数 允许 任意多个
apply 会立即执行函数 参数 允许 两个 第二个是[]
function Person(name,age){
  this.name = name;
  this.age = age;
}
function getGrades(){
  console.log(this.name,this.age,'3年级');
}

// 构造函数继承 继承属性
function Student(name,age){
  // call('this要指向的对象',参数1,...,参数n)
  Person.call(this,name,age);
}

const obj = new Student('1班','35号')
console.log(obj)//成功继承 能看到有name 和 age
上述中 Person.call(this,name,age); 修改 父方法 Person的this指向 子方法Student 此时,相当于 子方法,存在 父方法的 this.name = name; this.age = age;
- 继承方法
直接在子方法的原型prototype上创建一个 父对象,就相当于继承了父亲的方法
// 对象原型继承 继承方法
Student.prototype = new Person();
// 原型增加
Student.prototype.getName = function () {
  console.log(this.name)
}
- 属性增强
子方法,可以通过原型prototype创建新的方法,继承父方法。
也可以创建同名方法,进行覆盖或者继承
通过this继承父方法中的 getGrades()方法
// 原型增强1
Student.prototype.getGrades2 = function () {
  this.getGrades();
  console.log('增强了原来的方法')
}
创建同名方法,修改this指向,进行覆盖 + 增强
// 注意:在原型继承的时候 要在 new 实例化之前
// 原型增强2
Student.prototype.getGrades = function () {
  Person.prototype.getGrades.call(this)
  // console.log('增强了你的方法',this.name)
}

// 原型覆盖
Student.prototype.getGrades = function () {
  console.log('覆盖了你的方法',this.name)
}

const obj = new Student('1班','35号')

obj.getGrades();//可以看到 getGrades方法被调用 成功继承
es6 类继承
通常使用super继承父类的变量 和 方法
在子类中,如果是同名方法,父类同名方法会被覆盖。
也可以通过super继承方法,并提升方法
父类代码示例
//父类 father.js
class father{
 construct(gender){
   this.gender = gender
 }
 getToal(){
 	console.log('父类方法')
 }
}
子类继承示例
子类继承中 super关键字 必须在第一行
//子类 child.js
class child extends father{
 construct(gender,name,age){
   super(gender)//继承父类的属性
   this.name = name;
   this.age = age;
 }
//如果只写 父类同名方法,父类会被覆盖;
//可以使用 super继承父类方法
getToal(){
	super.getToal(){
		console.log('我是子类')
	}
}
}


 被折叠的 条评论
为什么被折叠?
被折叠的 条评论
为什么被折叠?
 到【灌水乐园】发言


