


二、JQuery与Ajax
- JQuery3使用方法——jQuery是前段必不可少的技能
- Ajax原理——介绍Ajax核心对象XmlHttpRequest对象
- JQuery’处理Ajax——讲解JQuery如何发起并处理Ajax请求
1.什么是JS库
js库实际上就是各大公司开发出来的JS函数。主流的JS库包括jQuery,Vue,REACT等。
2.jQuery是什么?
- jQuery是一个轻量级JS库,使用起来非常方便
- jQuery的核心是选择器,用于获取页面元素
- jQuery提供了大量高效方法 ,大幅提高开发速率.
3.jQuery下载与安装
- jQuery官网:jquery.com,最新版本 :3.6.0
- jQuery采用独立的JS文件进行发布:jquery-3.6.0.js;
- IDE:eclipse,IDEA…
4.web页面开发的两个要素
- 选择页面上的哪些元素
- 对于这些元素做那些操作
针对第一点要素,我们就会使用jquery选择器来进行处理
5.jQuery选择器
- jQuery选择器用于选中需要操作的页面元素
- 语法1:jQuery(选择器表达式)
- 语法2:$(选择器表达式)
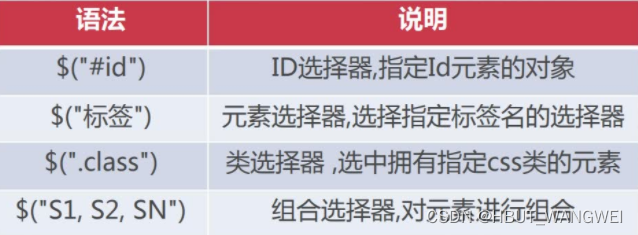
6.基本选择器
基本选择器是jQuery最基本也是最常用的选择器表达式,他包含以下几个种类:
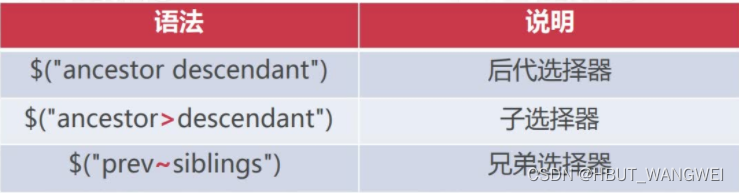
7.层叠选择器
- 层叠选择器是根据元素的位置关系来获取元素的选择其表达式
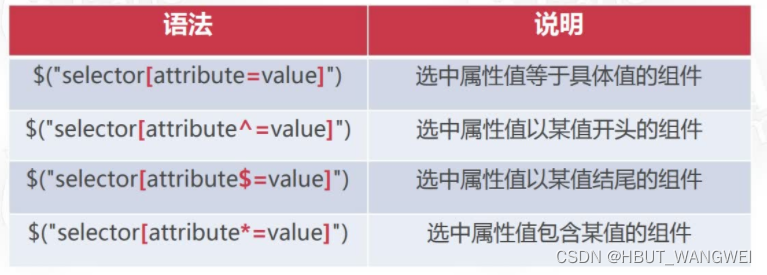
8.属性选择器
属性选择器是根据元素的属性值来选择元素的选择器表达式
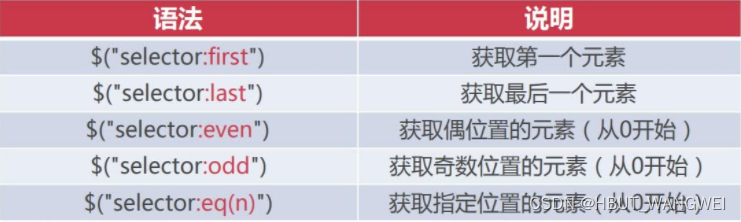
9.位置选择器
位置选择器是通过位置获取指定的元素,例如:获取第三个元素
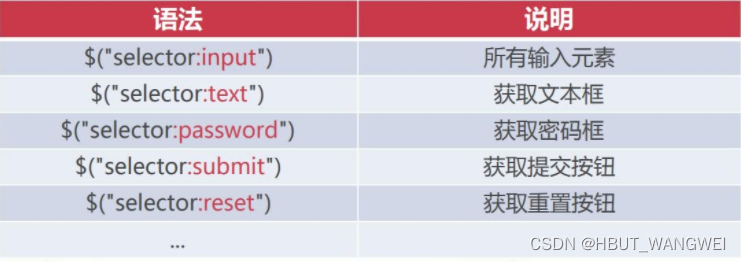
10.表单选择器

- 表单选择器是获取表单元素的简化形式,例如:获取所有的文本框
11.操作元素属性
- attr(name|properities|key):设置或者获取元素的属性
- removeAttr(name):移除元素属性
下面给出这两个函数的使用示例:
<script type="text/javascript">
	// 获取值
			var href =$("a[href*='163']").attr("href");
			alert(href);
			//设置值
			$("a[href*='163']").attr("href","http://www.sougou.com");
			// 移除值
			$("a[href*='sougou']").removeAttr("href");
	</script>
12 操作元素的CSS样式
- css() -获取或者设置匹配元素的样式属性
- addClass()-为每个匹配的元素添加指定的类名
- removeClass() -从所有匹配元素移除类名
下面给出使用这几个函数的示例代码
	<script type="text/javascript">
	// 获取值
	document.getElementById("btnSelect").onclick=function(){
		//设置CSS
		$("a").css("color","pink");
		// 设置多样式可用json
		$("a").css({"color":"yellow","font-size":"20px"});
		//增加类
		$("li").addClass("highlight");
		//移除类
		$("p").removeClass("myclass");
	}

	</script>
Ajax
1.什么是Ajax?
- Ajax(Asynchronous JavaScript And XML)异步的JavaScript和XML
- Ajax可以在不刷新页面的前提下,进行页面局部更新
- Ajax不是新的技术,Ajax并不是W3C的标准
2.Ajax使用流程
- 创建XmlHttpRequest对象
- 发送Ajax请求
- 处理服务器响应
下面我们使用代码来逐步介绍Ajax的使用
a.前端创建XmlHttpRequest对象
<!DOCTYPE html>
<html>
<head>
<meta charset="UTF-8">
<title>Insert title here</title>
</head>
<body>
<input id="btnLoad" type="button" value="加载">
<div id="divContent"></div>
</body>
<script>
document.getElementById("btnLoad").onclick =function(){
	var xmlhttp;
	if(window.XMLHttpRequest){
		xmlhttp = new XMLHttpRequest();
	}else{
		xmlhttp =ActiveXObject("Microsoft.XMLHttp");
	}
	console.log(xmlhttp);
}
</script>
</html>
补充:xmlHttpRequest对象有几个重要属性:{
responseText返回的响应文本,responseUrl:响应路径
responseXML:响应的XML文本,status:状态,statusText:状态描述文本}

b.发送Ajax请求
- xmlhttp.open()用于创建请求
- xmlhttp.send()用于发送请求
例如:
//创建请求
xmlhttp.open("GET","http://localhost/test?name=admin",true);
//发送到服务器
xmlhttp.send();
给出示例:
<!DOCTYPE html>
<html>
<head>
<meta charset="UTF-8">
<title>Insert title here</title>
</head>
<body>
<input id="btnLoad" type="button" value="加载">
<div id="divContent"></div>
</body>
<script>
document.getElementById("btnLoad").onclick =function(){
	var xmlhttp;
	if(window.XMLHttpRequest){
		xmlhttp = new XMLHttpRequest();
	}else{
		xmlhttp =ActiveXObject("Microsoft.XMLHttp");
	}
	console.log(xmlhttp);
	xmlhttp.open("GET","/ajax/ContentServlet",true);
	xmlhttp.send();
}
</script>
</html>
c.处理服务器响应
- xmlhttp.onreadystatechange()时间用于监听AJAX的执行过程
- xmlhttp.readyState属性说明XMLHttpRequest当前状态
- 处理服务器响应:
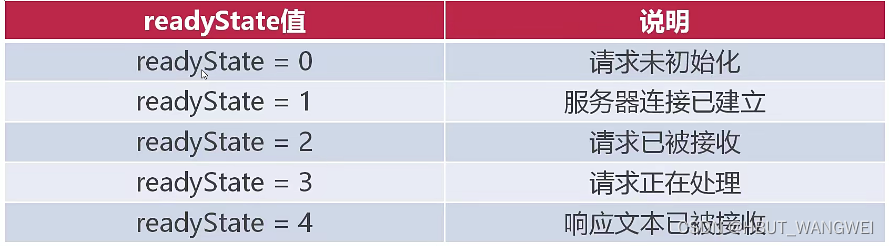
- xmlhttp.status属性服务器响应状态码
<!DOCTYPE html>
<html>
<head>
<meta charset="UTF-8">
<title>Insert title here</title>
</head>
<body>
<input id="btnLoad" type="button" value="加载">
<div id="divContent"></div>
</body>
<script>
document.getElementById("btnLoad").onclick =function(){
	var xmlhttp;
	if(window.XMLHttpRequest){
		xmlhttp = new XMLHttpRequest();
	}else{
		xmlhttp =ActiveXObject("Microsoft.XMLHttp");
	}
	console.log(xmlhttp);
	xmlhttp.open("GET","/ajax/ContentServlet",true);
	xmlhttp.send();
	//3.处理服务器响应
	xmlhttp.onreadystatechange=function(){
		if(xmlhttp.readyState == 4 && xmlhttp.status ==200){
			var t =	xmlhttp.responseText;
			console.log(t);
			alert(t);
			document.getElementById("divContent").innerHTML=t;
		}
}
}
</script>
</html>
3.使用示例:
前端:
<!DOCTYPE html>
<html>
<head>
<meta charset="UTF-8">
<title>Insert title here</title>
</head>
<body>
<input id="btnLoad" type="button" value="加载">
<div id="divContent"></div>
</body>
<script>
var xmlhttp =new XMLHttpRequest();
xmlhttp.open("GET","/ajax/newsListServlet",true);
xmlhttp.onreadystatechange=function(){
	if(xmlhttp.readyState == 4 && xmlhttp.status ==200){
		var t =	xmlhttp.responseText;
		console.log(t);
		alert(t);
		var json =JSON.parse(t);
		var html =""
		for ( var i=0;i<json.length;i++) {
			html=html+"<h1>"+json[i]+"</h1>";
		}
		document.getElementById("divContent").innerHTML = html;
	}
}
		xmlhttp.send();
</script>
</html>
后端:
package com.immo.ajacx;

import java.io.IOException;
import java.util.ArrayList;
import java.util.List;

import javax.servlet.ServletException;
import javax.servlet.annotation.WebServlet;
import javax.servlet.http.HttpServlet;
import javax.servlet.http.HttpServletRequest;
import javax.servlet.http.HttpServletResponse;

import com.alibaba.fastjson.JSON;

/**
 * Servlet implementation class newsListServlet
 */
@WebServlet("/newsListServlet")
public class newsListServlet extends HttpServlet {
	private static final long serialVersionUID = 1L;

    /**
     * @see HttpServlet#HttpServlet()
     */
    public newsListServlet() {
        super();
        // TODO Auto-generated constructor stub
    }

	/**
	 * @see HttpServlet#doGet(HttpServletRequest request, HttpServletResponse response)
	 */
	protected void doGet(HttpServletRequest request, HttpServletResponse response) throws ServletException, IOException {
		List<String> list =new ArrayList();
		list.add("第一条新闻");
		list.add("第一条新闻");
		list.add("第一条新闻");
		list.add("第一条新闻");
		list.add("第一条新闻");
		String str =JSON.toJSONString(list);
		response.setContentType("text/html;charset=UTF-8");
		response.getWriter().print(str);

	}

	/**
	 * @see HttpServlet#doPost(HttpServletRequest request, HttpServletResponse response)
	 */
	protected void doPost(HttpServletRequest request, HttpServletResponse response) throws ServletException, IOException {

	}
}
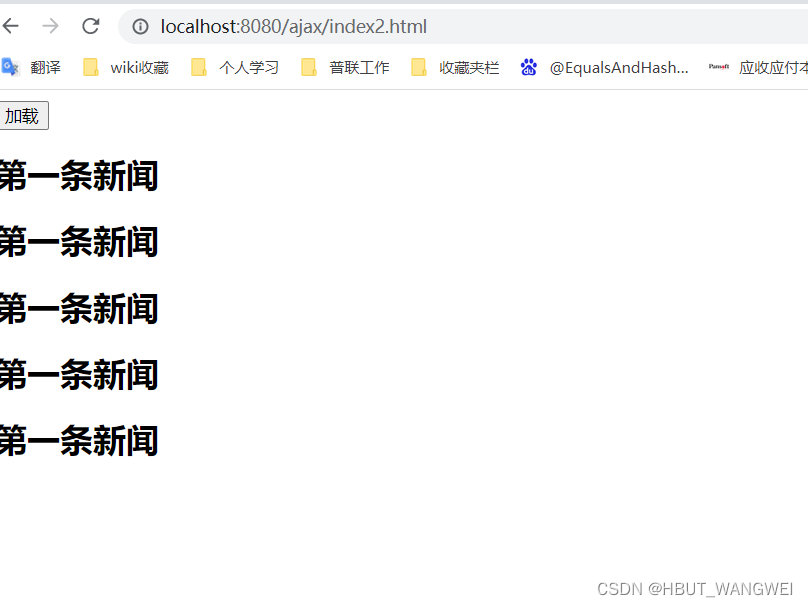
效果:
4.同步和异步的区别
在上面的代码中,我们可以看到xmlhttp.open("GET","/ajax/newsListServlet",true);第三个参数为true,这是什么意思呢,这其实就代表着AJAX请求异步进行,即当ajax发送请求后,不需要等待执行结果返回直接可以执行之后的语句。而同步则意味着等待到返回后才能继续执行。
例如我们修改前后端代码如下:
前端:
<!DOCTYPE html>
<html>
<head>
<meta charset="UTF-8">
<title>Insert title here</title>
</head>
<body>
<input id="btnLoad" type="button" value="加载">
<div id="divContent"></div>
</body>
<script>
var xmlhttp =new XMLHttpRequest();
xmlhttp.open("GET","/ajax/newsListServlet",true);
xmlhttp.onreadystatechange=function(){
	if(xmlhttp.readyState == 4 && xmlhttp.status ==200){
		var t =	xmlhttp.responseText;
		console.log(t);
		alert(t);
		var json =JSON.parse(t);
		var html =""
		for ( var i=0;i<json.length;i++) {
			html=html+"<h1>"+json[i]+"</h1>";
		}
		document.getElementById("divContent").innerHTML = html;
	}
}
console.log("请求已经发送了");
		xmlhttp.send();
</script>
</html>
后端:
package com.immo.ajacx;

import java.io.IOException;
import java.util.ArrayList;
import java.util.List;

import javax.servlet.ServletException;
import javax.servlet.annotation.WebServlet;
import javax.servlet.http.HttpServlet;
import javax.servlet.http.HttpServletRequest;
import javax.servlet.http.HttpServletResponse;

import com.alibaba.fastjson.JSON;

/**
 * Servlet implementation class newsListServlet
 */
@WebServlet("/newsListServlet")
public class newsListServlet extends HttpServlet {
	private static final long serialVersionUID = 1L;

    /**
     * @see HttpServlet#HttpServlet()
     */
    public newsListServlet() {
        super();
        // TODO Auto-generated constructor stub
    }

	/**
	 * @see HttpServlet#doGet(HttpServletRequest request, HttpServletResponse response)
	 */
	protected void doGet(HttpServletRequest request, HttpServletResponse response) throws ServletException, IOException {
		try {
			Thread.sleep(5000);
		} catch (InterruptedException e) {
			// TODO Auto-generated catch block
			e.printStackTrace();
		}
		List<String> list =new ArrayList();
		list.add("第一条新闻");
		list.add("第一条新闻");
		list.add("第一条新闻");
		list.add("第一条新闻");
		list.add("第一条新闻");
		String str =JSON.toJSONString(list);
		response.setContentType("text/html;charset=UTF-8");
		response.getWriter().print(str);

	}

	/**
	 * @see HttpServlet#doPost(HttpServletRequest request, HttpServletResponse response)
	 */
	protected void doPost(HttpServletRequest request, HttpServletResponse response) throws ServletException, IOException {

	}
}
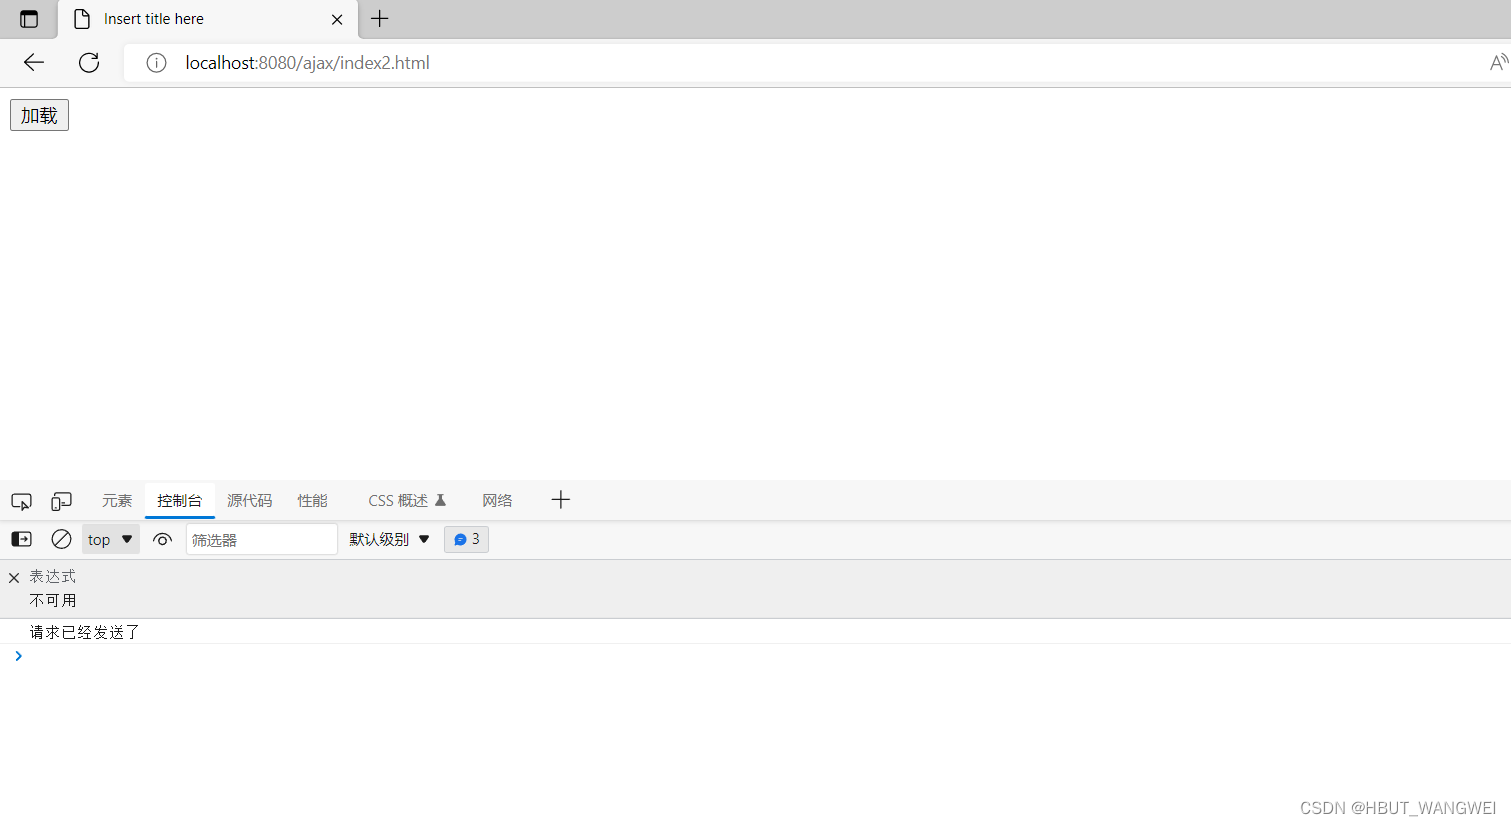
结果:
控制台先输出
5S后页面显示:
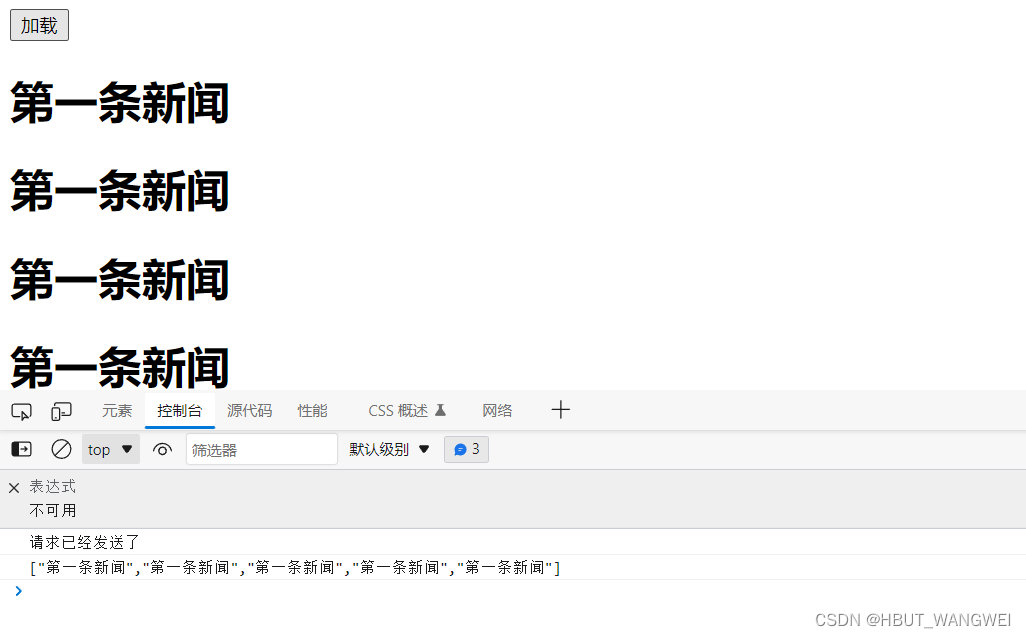
而如果改成同步,则会出现下面的效果
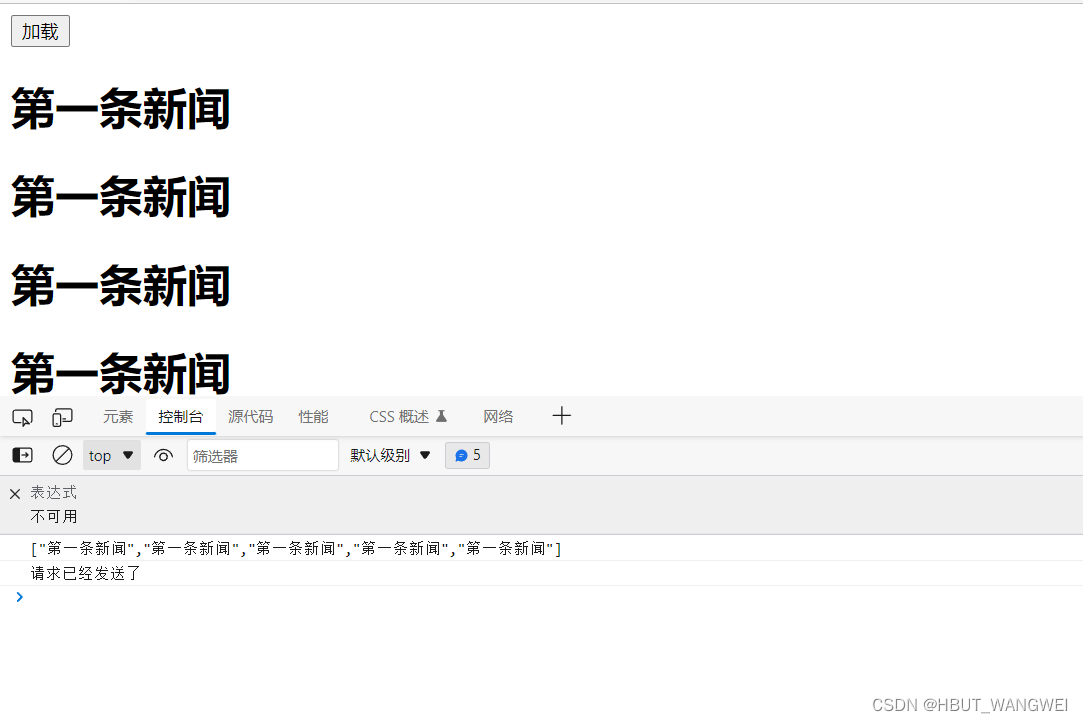
等待5S,页面打印,然后控制台输出。
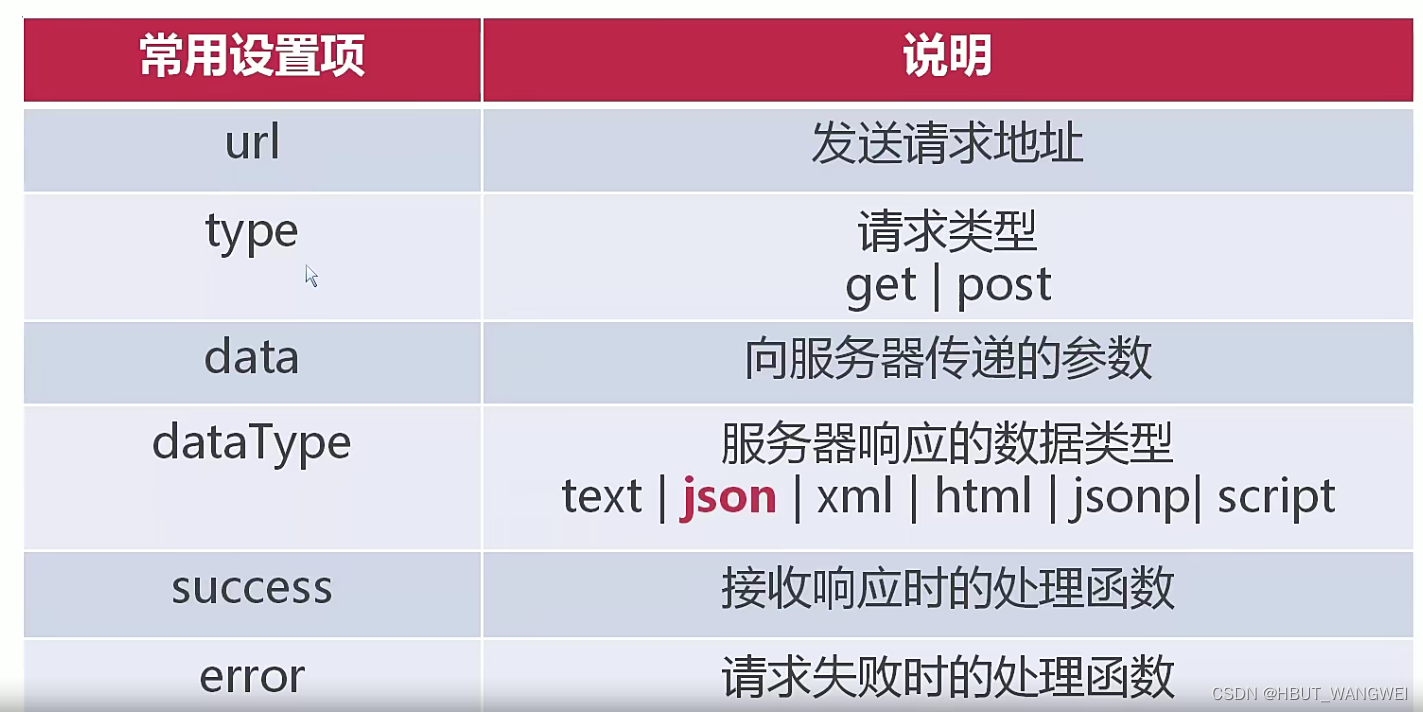
5.JQuery对AJAX的支持
-
jquery使用AJAX只需要使用$.ajax()方法;
-
语法使用$.ajax(options);
例如,使用jQuery操作ajax
<!DOCTYPE html>
<html>
<head>
<meta charset="UTF-8">
<title>Insert title here</title>
<script type="text/javascript" src="js/jquery-3.3.1.js"></script>
<script type="text/javascript" >
$(function(){
	$.ajax({
	"url":"/ajax/newsListServlet",
	"type":"get",
	"datatype":"json",
	"data":"id=123",
	"success":function(json){
		var arr =JSON.parse(json);
		for (var i = 0; i < arr.length; i++) {
			$("#divContent").append("<h1>"+arr[i]+"</h1>");
		}
	}
	})
})
</script>
</head>
<body>
<input id="btnLoad" type="button" value="加载">
<div id="divContent"></div>
</body>
</html>
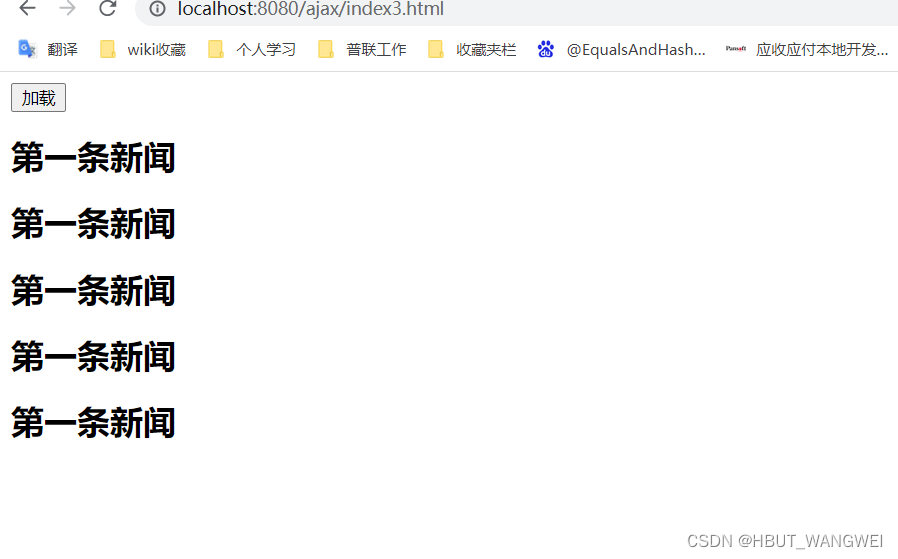
效果;
### 6.jquery使用ajax的其他用法
- 使用error处理异常错误信息
- data使用:可以用json的方式进行拼写,jquery会自动拼接成参数
6.实现二级联动菜单
后端代码:
package com.immo.ajacx;

public class channel {

	private String code;

	private String name;

	public channel(String code, String name) {
		super();
		this.code = code;
		this.name = name;
	}

	public channel() {

	}

	public String getCode() {
		return code;
	}

	public void setCode(String code) {
		this.code = code;
	}

	public String getName() {
		return name;
	}

	public void setName(String name) {
		this.name = name;
	}


}
package com.immo.ajacx;

import java.io.IOException;
import java.util.ArrayList;
import java.util.List;

import javax.servlet.ServletException;
import javax.servlet.annotation.WebServlet;
import javax.servlet.http.HttpServlet;
import javax.servlet.http.HttpServletRequest;
import javax.servlet.http.HttpServletResponse;

import com.alibaba.fastjson.JSON;

/**
 * Servlet implementation class ChannelServlet
 */
@WebServlet("/ChannelServlet")
public class ChannelServlet extends HttpServlet {
	private static final long serialVersionUID = 1L;

    /**
     * @see HttpServlet#HttpServlet()
     */
    public ChannelServlet() {
        super();
        // TODO Auto-generated constructor stub
    }

	/**
	 * @see HttpServlet#doGet(HttpServletRequest request, HttpServletResponse response)
	 */
	protected void doGet(HttpServletRequest request, HttpServletResponse response) throws ServletException, IOException {
		// TODO Auto-generated method stub
		String level =request.getParameter("level");
		String parent =request.getParameter("parent");
		List childList =new ArrayList();
		if("1".equals(level)) {
			childList.add(new channel("AI","前沿/区块链/人工智能"));
			childList.add(new channel("WEB","前端/小程序/JS"));
		}else if("2".equals(level)){
			if(parent.equals("AI")) {
				childList.add(new channel("micro","微服务"));
			}else {
				childList.add(new channel("html","HTML"));
			}

		}
		String json =JSON.toJSONString(childList);
		response.setContentType("text/html;charset=utf-8");
		response.getWriter().println(json);

	}

}
前端代码:
<!DOCTYPE html>
<html>
<head>
<meta charset="UTF-8">
<title>Insert title here</title>
<script type="text/javascript" src="js/jquery-3.3.1.js"></script>
<script type="text/javascript">
	$(function(){
		$.ajax({
			"url":"/ajax/ChannelServlet",
			"data":{"level":"1"},
			"type":"get",
			"dataType":"json",
			"success":function(json){
				console.log(json);
				for(var i=0;i<json.length;i++){
					var ch =json[i];
					$("#lv1").append("<option value='" + ch.code + "'>" + ch.name + "</option>")
				}
			}
		})
	})

	$(function(){
		$("#lv1").on("change",function(){
			var parent = $(this).val();
			console.log(parent);
			$.ajax({
				"url":"/ajax/ChannelServlet",
				"data":{"level":"2","parent":parent},
				"type":"get",
				"dataType":"json",
				"success":function(json){
					console.log(json);
					$("#lv2>option").remove();
					for(var i=0;i<json.length;i++){
						var ch =json[i];
						$("#lv2").append("<option value='" + ch.code + "'>" + ch.name + "</option>")
					}
					}
			})
		})
	})
</script>
</head>
<body>
<select id="lv1" style = "width:200px;height:30px">
<option selected="selected">请选择</option>
</select>

<select id="lv2" style = "width:200px;height:30px">
<option selected="selected">请选择</option>
</select>
</body>
</html>


 764
764


 被折叠的 条评论
为什么被折叠?
被折叠的 条评论
为什么被折叠?
 到【灌水乐园】发言


