


第一层比较浅直接声明定义自己的RoutedCommand实例。这样很难算真正意义的“自定义命令”。
第二层指从实现ICommand接口开始,定义自己的命令并且把某些业务逻辑也包含在命令之中。
下面看一个自定义清楚命令:
为了简化使用CommandBinding来处理业务逻辑的程序结构,可能会希望把业务逻辑移入命令的Execute方法内,这样命令直接在命令目标上起作用,而不像RoutedCommand那样先在命令目标上激发出路由事件等外围空间捕捉到事件后在“翻过头来”对命令目标加以处理。如果命令目标不包含相应的方法怎么办?这就要靠接口来约束。
该接口如下:
public interface IView
{
    //方法
    void Clear();
}
并且要求每个接受命令的组件都必须实现这个接口,确保命令可以成功地对他执行操作。
接下来我们实现ICommand接口,创建一个专门作用于IView派生类的命令。
class ClearCommand : ICommand
{
//当命令可执行状态发生改变时,应当被激发
public event EventHandler CanExecuteChanged;

//用于判断命令是否可移执行(暂不实现)
public bool CanExecute(object parameter)
{
    throw new NotImplementedException();
}

//命令执行,带有与业务相关的Clear逻辑
public void Execute(object parameter)
{
    IView view = parameter as IView;
    if (view != null)
    {
        view.Clear();
    }
}
}
命令实现了ICommand接口并继承了CanExecuteChanged事件、CanExecute方法和Execute方法。目前这个命令比较简单,只用到了Execute方法。在实现这个方法时,我们将这个方法唯一的参数作为命令的目标,如果目标是IView接口的派生类则调用其Clear方法–显然,我们已经将业务逻辑引入了命令的Execute方法中。
WPF命令系统的命令源是专门为RoutedCommand准备的并且不能重写,所以我们通过实现ICommandSource接口来创建自己的命令源。代码如下:
public class MyCommandSource : UserControl, ICommandSource
{
    //继承自ICommandSource的三个属性
    public ICommand Command { get; set; }

    public object CommandParameter { get; set; }

    public IInputElement CommandTarget { get; set; }

    //在组件被单击时连带执行命令
    protected override void OnMouseLeftButtonDown(MouseButtonEventArgs e)
    {
        base.OnMouseLeftButtonDown(e);

        //在命令目标上执行命令,或称让命令作用于命令目标
        if (this.CommandTarget != null)
        {
            this.Command.Execute(this.CommandTarget);
        }
    }
}
IcommandSource接口只包含Command、CommandParameter和CommandTarget三个属性,至于这三个属性之间有什么样的关系就要看我们怎么实现了。在本例中,CommandParameter完全没有被用到,而CommandTarget被当做参数传递给了Command的Execute方法。命令不会自己被发出,所以一定要为命令的执行选择一个合适的时机,本例中在我们在控件被左单击时执行命令。
现在需要一个命令目标。这个组件的XAML部分如下:
<UserControl x:Class="WpfWindows8.MiniView"
             xmlns="http://schemas.microsoft.com/winfx/2006/xaml/presentation"
             xmlns:x="http://schemas.microsoft.com/winfx/2006/xaml"
             xmlns:mc="http://schemas.openxmlformats.org/markup-compatibility/2006"
             xmlns:d="http://schemas.microsoft.com/expression/blend/2008"
             xmlns:local="clr-namespace:WpfWindows8"
             mc:Ignorable="d"
             d:DesignHeight="114" d:DesignWidth="200">
    <Border CornerRadius="5" BorderBrush="LawnGreen" BorderThickness="2">
        <StackPanel>
            <TextBox x:Name="txtBox1" Margin="5" />
            <TextBox x:Name="txtBox2" Margin="5,0" />
            <TextBox x:Name="txtBox3" Margin="5" />
            <TextBox x:Name="txtBox4" Margin="5,0" />
        </StackPanel>
    </Border>
</UserControl>
它的后台代码如下:
//自定义命令目标
public partial class MiniView : UserControl, IView
{
    public MiniView()
    {
        InitializeComponent();
    }

    //用于清除内容的业务逻辑
    public void Clear()
    {
        this.txtBox1.Clear();
        this.txtBox2.Clear();
        this.txtBox3.Clear();
        this.txtBox4.Clear();
    }
}
最后是把自定义的命令、命令源和命令目标集成起来。窗体的XAML代码如下:
<Window x:Class="WpfWindows8.WinMain9_2_2"
        xmlns="http://schemas.microsoft.com/winfx/2006/xaml/presentation"
        xmlns:x="http://schemas.microsoft.com/winfx/2006/xaml"
        xmlns:d="http://schemas.microsoft.com/expression/blend/2008"
        xmlns:mc="http://schemas.openxmlformats.org/markup-compatibility/2006"
        xmlns:local="clr-namespace:WpfWindows8"
        mc:Ignorable="d"
        Title="WinMain9_2_2" Height="300" Width="300">
    <StackPanel>
        <local:MyCommandSource x:Name="ctrlClear" Margin="10">
            <TextBlock Text="清除" FontSize="16" TextAlignment="Center"
                       Background="LightGreen" Width="80"/>
        </local:MyCommandSource>
        <local:MiniView x:Name="miniView" />
    </StackPanel>
</Window>
后台代码:
public partial class WinMain9_2_2 : Window
{
public WinMain9_2_2()
{
InitializeComponent();
//声明命令并使命令源和目标与之关联
ClearCommand clearCmd = new ClearCommand();
this.ctrlClear.Command = clearCmd;
this.ctrlClear.CommandTarget = this.miniView;
}
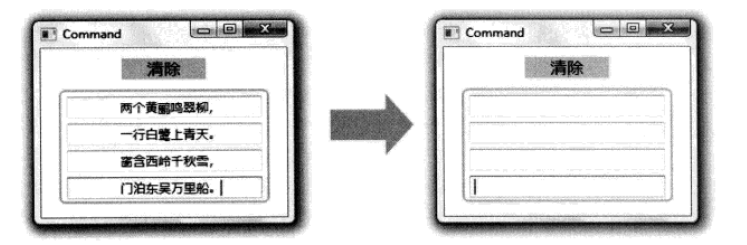
}运行程序在TextBox里输入文字单击“清楚”控件,效果如图:


 1536
1536

 被折叠的 条评论
为什么被折叠?
被折叠的 条评论
为什么被折叠?
 到【灌水乐园】发言


