


提示:文章写完后,目录可以自动生成,如何生成可参考右边的帮助文档
文章目录
一、JWT是什么?
1、先看利用token登录的实现流程:
1、客户端使用账号密码登录
2、服务端接受到请求验证账号和密码
3、服务端验证请求后,会生成一个token,并把token返回给客户端
4、客户端收到token,并存储起来,在每次请求的时候带上这个token,可以在head中携带
5、服务端接受到请求后,验证token,如果验证成功,则返回请求数据
2、JWT介绍:
JWT代表JSON Web Token,是一种用于在网络上安全地传输信息的开放标准(RFC 7519)。它以紧凑和自包含的方式表示信息,通常用于在用户和服务之间传递身份验证和授权信息。JWT由三部分组成:头部(Header)、载荷(Payload)和签名(Signature)。
3、JWT的验证流程:
1、解析Token: 首先,将收到的JWT分割成头部、载荷和签名三个部分。这个过程通常会使用编程语言中相应的库或函数来完成。
2、验证头部和签名: 获取JWT中的头部和载荷信息后,根据头部中指定的加密算法和使用的密钥(通常是一个密钥或公钥)对头部和载荷进行签名验证。验证过程会使用相同的算法和密钥来生成签名,并将生成的签名与JWT中的签名进行比较,以确认JWT的完整性和真实性。
3、检查有效期和其他声明: JWT中的载荷部分可能包含了诸如令牌的过期时间(Expiration Time)等声明。在验证过程中,需要检查这些声明以确保令牌在有效期内,并可能进行其他额外的声明验证,如角色、权限等。
4、可选的其他验证步骤: 根据需求,还可以进行其他的验证步骤,比如验证令牌是否在黑名单中,是否与存储的用户信息匹配等。
JWT的验证流程主要依赖于对JWT规范和实现的理解,以及使用的编程语言或框架提供的相应功能。在验证JWT时,确保密钥的安全性是非常重要的,因为泄露密钥可能会导致令牌被篡改或伪造。
二、使用步骤
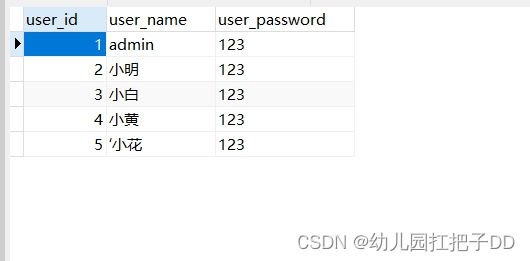
1.数据库
2.项目结构

3.相关依赖
  <dependencies>
        <dependency>
            <groupId>org.springframework.boot</groupId>
            <artifactId>spring-boot-starter-web</artifactId>
        </dependency>

        <dependency>
            <groupId>org.springframework.boot</groupId>
            <artifactId>spring-boot</artifactId>
            <version>2.5.2</version>
        </dependency>

        <dependency>
            <groupId>com.auth0</groupId>
            <artifactId>java-jwt</artifactId>
            <version>3.11.0</version>
        </dependency>

        <dependency>
            <groupId>org.projectlombok</groupId>
            <artifactId>lombok</artifactId>
        </dependency>

        <dependency>
            <groupId>org.springframework.boot</groupId>
            <artifactId>spring-boot-starter-test</artifactId>
            <scope>test</scope>
        </dependency>

        <dependency>
            <groupId>mysql</groupId>
            <artifactId>mysql-connector-java</artifactId>
            <version>5.1.48</version>
        </dependency>
        <dependency>
            <groupId>org.mybatis.spring.boot</groupId>
            <artifactId>mybatis-spring-boot-starter</artifactId>
            <version>2.2.0</version>
        </dependency>

        <dependency>
            <groupId>com.baomidou</groupId>
            <artifactId>mybatis-plus-boot-starter</artifactId>
            <version>3.5.1</version>
        </dependency>

        <dependency>
            <groupId>com.alibaba</groupId>
            <artifactId>fastjson</artifactId>
            <version>1.2.83</version>
        </dependency>
    </dependencies>
4.代码
User:
package com.explord.bean;

import com.baomidou.mybatisplus.annotation.TableField;
import com.baomidou.mybatisplus.annotation.TableName;
import lombok.Data;

/**
 * Created with IntelliJ IDEA.
 *
 * @Author: hang
 * @Date: 2023/11/17/15:55
 * @Description:
 */
@Data
@TableName("user")
public class User {

    private int userId;

    @TableField(value = "user_name")
    private String userName;

    @TableField(value = "user_password")
    private String userPassword;


}
UserDao:
package com.explord.dao;

import com.baomidou.mybatisplus.core.mapper.BaseMapper;
import com.explord.bean.User;
import org.apache.ibatis.annotations.Mapper;

/**
 * Created with IntelliJ IDEA.
 *
 * @Author: hang
 * @Date: 2023/11/17/16:07
 * @Description:
 */
@Mapper
public interface UserDao extends BaseMapper<User> {
}
UserService:
package com.explord.service;

import com.explord.bean.User;

import java.util.List;

/**
 * Created with IntelliJ IDEA.
 *
 * @Author: hang
 * @Date: 2023/11/17/16:03
 * @Description:
 */
public interface UserService {

    User loing(String userName, String userPassword);

    List<User> getUserList();
}
UserServiceImpl:
package com.explord.service.impl;

import com.explord.bean.User;
import com.explord.dao.UserDao;
import com.explord.service.UserService;
import org.omg.CORBA.OBJ_ADAPTER;
import org.springframework.stereotype.Service;

import javax.annotation.Resource;
import java.util.HashMap;
import java.util.List;
import java.util.Map;

/**
 * Created with IntelliJ IDEA.
 *
 * @Author: hang
 * @Date: 2023/11/17/16:04
 * @Description:
 */
@Service
public class UserServiceImpl implements UserService {

    @Resource
    private UserDao userDao;

    @Override
    public User loing(String userName, String userPassword) {
        Map<String, Object> map = new HashMap<>();
        map.put("user_name", userName);
        map.put("user_password", userPassword);
        List<User> users = userDao.selectByMap(map);
        return users.get(0);
    }

    @Override
    public List<User> getUserList() {
        return userDao.selectList(null);
    }
}
TokenUtil:
package com.explord.util;

import com.auth0.jwt.JWT;
import com.auth0.jwt.JWTVerifier;
import com.auth0.jwt.algorithms.Algorithm;
import com.auth0.jwt.interfaces.DecodedJWT;
import org.springframework.context.annotation.Configuration;
import org.springframework.stereotype.Component;

import javax.print.DocFlavor;
import java.util.Date;
import java.util.HashMap;
import java.util.Map;

/**
 * Created with IntelliJ IDEA.
 *
 * @Author: hang
 * @Date: 2023/11/17/10:33
 * @Description:
 */
public class TokenUtil {

    /**
     * 设置延期的时间
     */
    private static final long EXPIR_DATE = 360000;

    /**
     * 设置token的秘钥
     */
    private static final String TOKEN_SECRET = "my_secret_key";


    /**
     * 获取token
     * @param userName
     * @param passWord
     * @return
     */
    public static String getTokenSecret(String userName, String passWord){
        String token = "";
        try {
            // 过期时间
            Date date = new Date(System.currentTimeMillis() + EXPIR_DATE);
            // 设置头部信息
            Map<String, Object> head = new HashMap<>();
            head.put("typ", "JWT");
            head.put("alg", "HS256");

            // 设置秘钥
            Algorithm algorithm = Algorithm.HMAC256(TOKEN_SECRET);

            // 生成签名
            token = JWT.create()
                    .withHeader(head)
                    .withClaim("userName", userName)
                    .withClaim("passWord", passWord)
                    .withExpiresAt(date)
                    .sign(algorithm);
        }catch (Exception e){
            e.printStackTrace();
            return null;
        }
        return token;
    }

    /**
     * 验证token
     * @param token
     * @return
     */
    public static DecodedJWT verify(String token){
        try {
            Algorithm algorithm = Algorithm.HMAC256(TOKEN_SECRET);
            JWTVerifier verifier = JWT.require(algorithm).build();
            DecodedJWT jwt = verifier.verify(token);
            return jwt;
        }catch (Exception e){
            e.printStackTrace();
            return null;
        }
    }

}
CodeMessage:
package com.explord.util;

/**
 * Created with IntelliJ IDEA.
 *
 * @Author: hang
 * @Date: 2023/11/17/22:12
 * @Description:
 */
public class CodeMessage {

    private int retCode;
    private String message;
    // 按照模块定义CodeMessage
    // 通用异常
    public static CodeMessage SUCCESS = new CodeMessage(0,"success");
    // 业务异常
    public static CodeMessage USER_OR_PASS_ERROR = new CodeMessage(500102,"账号或者密码错误,请重试!");


    private CodeMessage(int retCode, String message) {
        this.retCode = retCode;
        this.message = message;
    }

    public int getRetCode() {
        return retCode;
    }
    public String getMessage() {
        return message;
    }
    public void setMessage(String message) {
        this.message = message;
    }

}
Result:
package com.explord.util;

/**
 * Created with IntelliJ IDEA.
 *
 * @Author: hang
 * @Date: 2023/11/17/22:11
 * @Description:
 */
public class Result<T> {

    private String message;
    private int retCode;
    private T data;

    private Result(T data) {
        this.retCode = 200;
        this.message = "成功";
        this.data = data;
    }

    private Result(CodeMessage cm) {
        if(cm == null){
            return;
        }
        this.retCode = cm.getRetCode();
        this.message = cm.getMessage();
    }

    /**
     * 成功时候的调用
     * @return
     */
    public static <T> Result<T> success(T data){
        return new Result<T>(data);
    }

    /**
     * 成功,不需要传入参数
     * @return
     */
    @SuppressWarnings("unchecked")
    public static <T> Result<T> success(){
        return (Result<T>) success("");
    }
    /**
     * 失败时候的调用
     * @return
     */
    public static <T> Result<T> error(CodeMessage cm){
        return new Result<T>(cm);
    }
    /**
     * 失败时候的调用,扩展消息参数
     * @param cm
     * @param msg
     * @return
     */
    public static <T> Result<T> error(CodeMessage cm,String msg){
        cm.setMessage(cm.getMessage()+"--"+msg);
        return new Result<T>(cm);
    }
    public T getData() {
        return data;
    }
    public String getMessage() {
        return message;
    }
    public int getRetCode() {
        return retCode;
    }

}
LoginController:
package com.explord.controller;
import com.alibaba.fastjson.JSONObject;
import com.explord.annotation.UserLoginToken;
import com.explord.bean.User;
import com.explord.service.UserService;
import com.explord.util.CodeMessage;
import com.explord.util.Result;
import com.explord.util.TokenUtil;
import org.springframework.stereotype.Controller;
import org.springframework.web.bind.annotation.RequestMapping;
import org.springframework.web.bind.annotation.ResponseBody;
import javax.annotation.Resource;
import javax.servlet.http.Cookie;
import javax.servlet.http.HttpServletResponse;
import java.util.List;
/**
* Created with IntelliJ IDEA.
*
* @Author: hang
* @Date: 2023/11/17/15:54
* @Description:
*/
@Controller
@RequestMapping("/login")
public class LoginController {
@Resource
private UserService userService;
@RequestMapping("/toLogin")
@ResponseBody
public Result<Object> toLogin(String userName, String userPassword, HttpServletResponse response){
User user = userService.loing(userName, userPassword);
JSONObject jsonObject = new JSONObject();
if(user == null){
Result.error(CodeMessage.USER_OR_PASS_ERROR);
}
String token = TokenUtil.getTokenSecret(userName, userPassword);
jsonObject.put("token", token);
response.setHeader("token", token);
Cookie cookie = new Cookie("token", token);
cookie.setPath("/");
response.addCookie(cookie);
return Result.success(jsonObject);
}
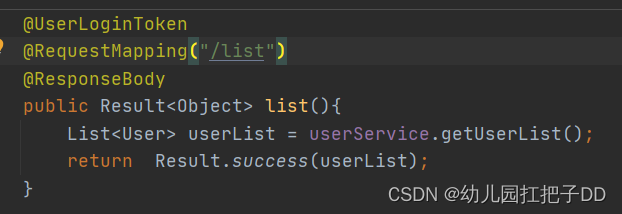
@UserLoginToken
@RequestMapping("/list")
@ResponseBody
public Result<Object> list(){
List<User> userList = userService.getUserList();
return Result.success(userList);
}
}
UserLoginToken(自定义注解)
package com.explord.annotation;

import java.lang.annotation.ElementType;
import java.lang.annotation.Retention;
import java.lang.annotation.RetentionPolicy;
import java.lang.annotation.Target;

/**
 * Created with IntelliJ IDEA.
 *
 * @Author: hang
 * @Date: 2023/11/17/16:40
 * @Description: 登录以后才能进行的token
 */
@Target({ElementType.METHOD, ElementType.TYPE})
@Retention(RetentionPolicy.RUNTIME)
public @interface UserLoginToken {

    boolean required() default true;
}
LoginrequiredInterceptor
package com.explord.controller.interceptor;
import com.auth0.jwt.interfaces.DecodedJWT;
import com.explord.annotation.UserLoginToken;
import com.explord.util.TokenUtil;
import org.springframework.stereotype.Component;
import org.springframework.web.method.HandlerMethod;
import org.springframework.web.servlet.HandlerInterceptor;
import org.springframework.web.servlet.ModelAndView;
import javax.servlet.http.HttpServletRequest;
import javax.servlet.http.HttpServletResponse;
import java.lang.reflect.Method;
/**
* Created with IntelliJ IDEA.
*
* @Author: hang
* @Date: 2023/11/17/16:43
* @Description:
*/
@Component
public class LoginrequiredInterceptor implements HandlerInterceptor {
@Override
public boolean preHandle(HttpServletRequest request, HttpServletResponse response, Object handler) throws Exception {
String token = request.getHeader("token");
if(handler instanceof HandlerMethod){
HandlerMethod handlerMethod = (HandlerMethod) handler;
Method method = handlerMethod.getMethod();
if (method.isAnnotationPresent(UserLoginToken.class)) {
UserLoginToken userLoginToken = method.getAnnotation(UserLoginToken.class);
if(userLoginToken.required()){
if(token == null){
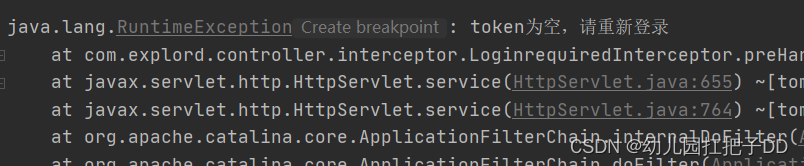
throw new RuntimeException("token为空,请重新登录");
}else{
//查询用户是否存在
// 验证token
DecodedJWT verify = TokenUtil.verify(token);
return true;
}
}
}
}
return false;
}
@Override
public void postHandle(HttpServletRequest request, HttpServletResponse response, Object handler, ModelAndView modelAndView) throws Exception {
}
}
WebMvcConfig
package com.explord.config;

import com.explord.controller.interceptor.LoginrequiredInterceptor;
import org.springframework.stereotype.Component;
import org.springframework.web.servlet.config.annotation.InterceptorRegistry;
import org.springframework.web.servlet.config.annotation.WebMvcConfigurer;

import javax.annotation.Resource;

/**
 * Created with IntelliJ IDEA.
 *
 * @Author: hang
 * @Date: 2023/11/17/17:07
 * @Description:
 */
@Component
public class WebMvcConfig implements WebMvcConfigurer {


    @Resource
    private LoginrequiredInterceptor loginrequiredInterceptor;


    @Override
    public void addInterceptors(InterceptorRegistry registry) {
        registry.addInterceptor(loginrequiredInterceptor)
                .excludePathPatterns("/login/toLogin")
                .addPathPatterns("/**");
    }
}
三、测试结果
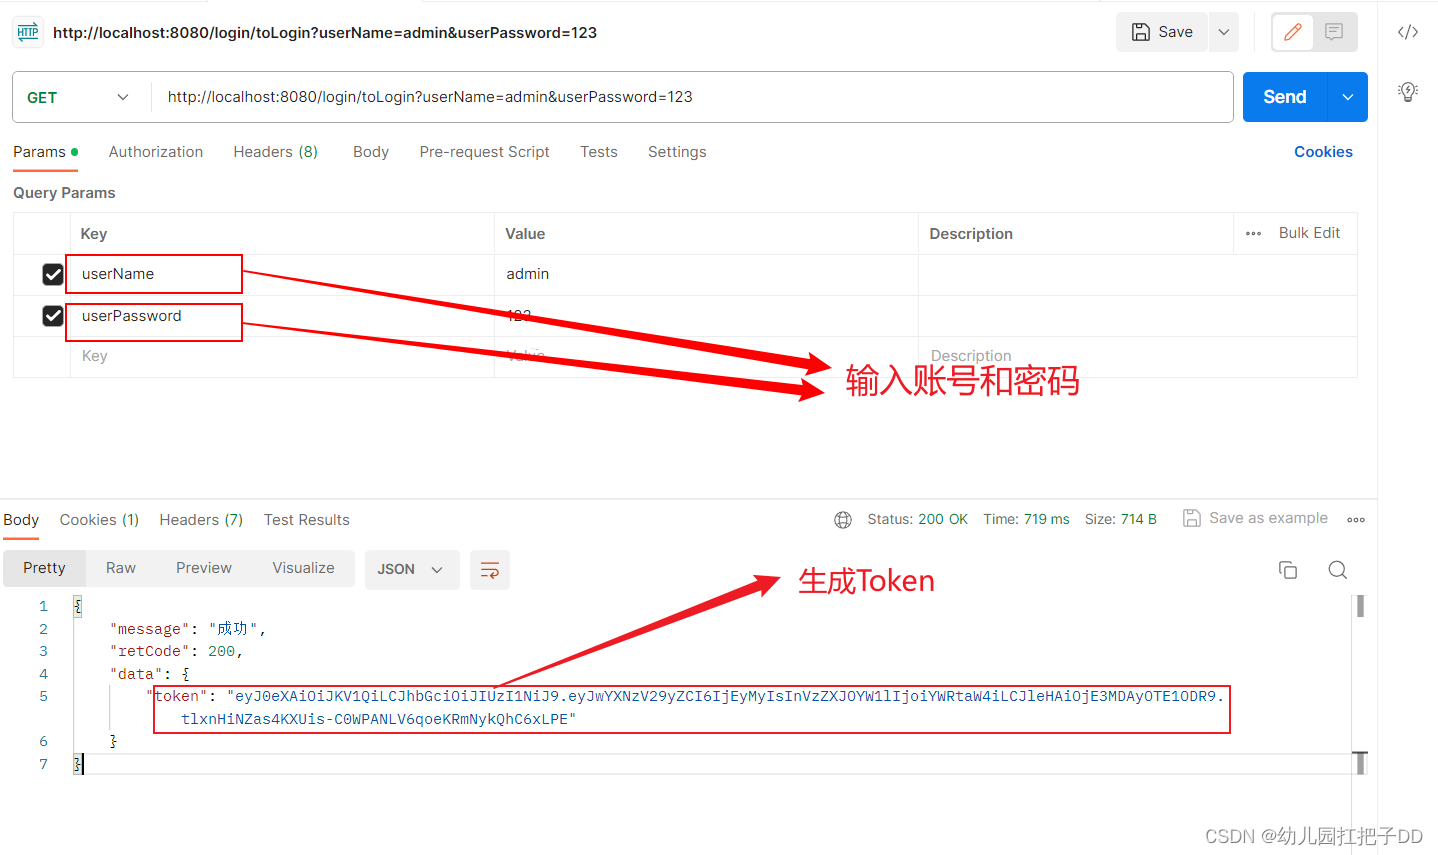
1、登录验证:
2、查询用户信息
方法上加了@UserLoginToken,因此需要token才能进行验证

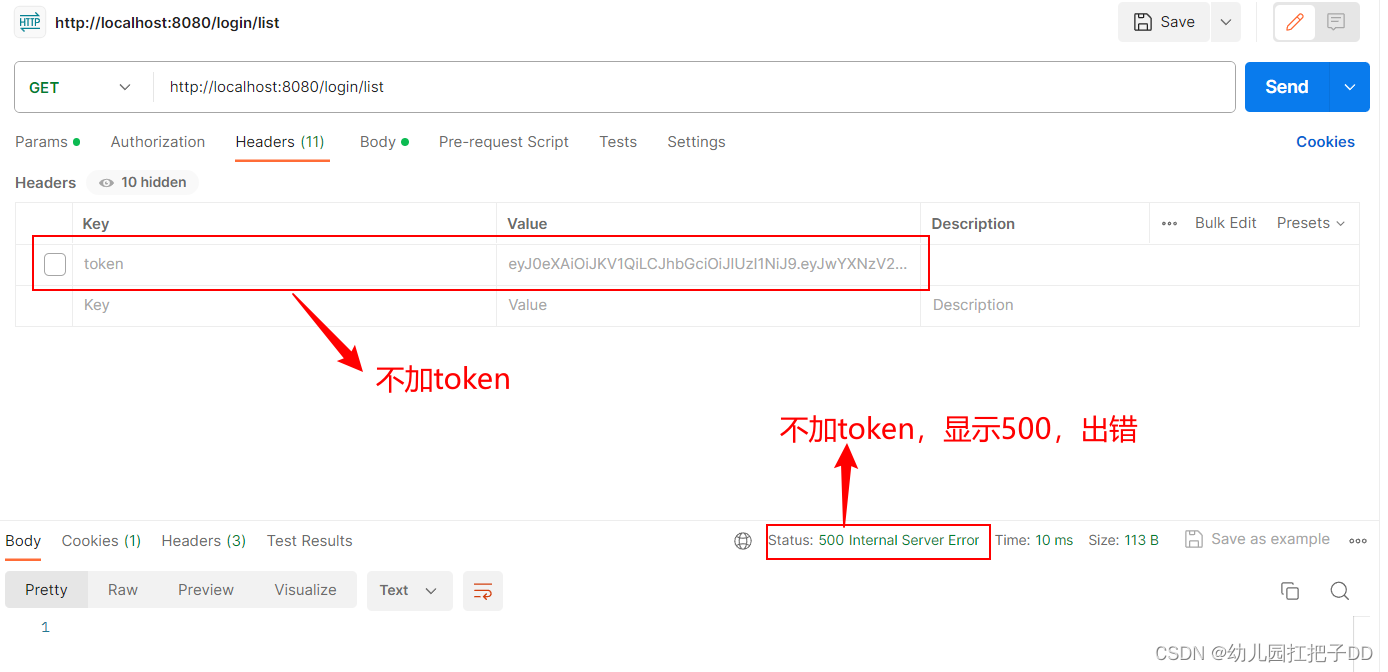
3、不加token进行查询


 879
879


 被折叠的 条评论
为什么被折叠?
被折叠的 条评论
为什么被折叠?
 到【灌水乐园】发言


