


结构型模式(Structural Patterns)
这些设计模式关注类和对象的组合。继承的概念被用来组合接口和定义组合对象获得新功能的方式。
包含以下模式:适配器模式(Adapter Pattern)、桥接模式(Bridge Pattern)、过滤器模式(Filter、Criteria Pattern)、组合模式(Composite Pattern)、装饰器模式(Decorator Pattern)、外观模式(Facade Pattern)、享元模式(Flyweight Pattern)、代理模式(Proxy Pattern)
适配器模式
适配器模式(Adapter Pattern)是作为两个不兼容的接口之间的桥梁。这种类型的设计模式属于结构型模式,它结合了两个独立接口的功能。
这种模式涉及到一个单一的类,该类负责加入独立的或不兼容的接口功能。举个真实的例子,读卡器是作为内存卡和笔记本之间的适配器。您将内存卡插入读卡器,再将读卡器插入笔记本,这样就可以通过笔记本来读取内存卡。
我们通过下面的实例来演示适配器模式的使用。其中,音频播放器设备只能播放 mp3 文件,通过使用一个更高级的音频播放器来播放 vlc 和 mp4 文件。
介绍
意图:将一个类的接口转换成客户希望的另外一个接口。适配器模式使得原本由于接口不兼容而不能一起工作的那些类可以一起工作。
主要解决:主要解决在软件系统中,常常要将一些"现存的对象"放到新的环境中,而新环境要求的接口是现对象不能满足的。
何时使用: 1、系统需要使用现有的类,而此类的接口不符合系统的需要。 2、想要建立一个可以重复使用的类,用于与一些彼此之间没有太大关联的一些类,包括一些可能在将来引进的类一起工作,这些源类不一定有一致的接口。 3、通过接口转换,将一个类插入另一个类系中。(比如老虎和飞禽,现在多了一个飞虎,在不增加实体的需求下,增加一个适配器,在里面包容一个虎对象,实现飞的接口。)
如何解决:继承或依赖(推荐)。
关键代码:适配器继承或依赖已有的对象,实现想要的目标接口。
应用实例: 1、美国电器 110V,中国 220V,就要有一个适配器将 110V 转化为 220V。 2、JAVA JDK 1.1 提供了 Enumeration 接口,而在 1.2 中提供了 Iterator 接口,想要使用 1.2 的 JDK,则要将以前系统的 Enumeration 接口转化为 Iterator 接口,这时就需要适配器模式。 3、在 LINUX 上运行 WINDOWS 程序。 4、JAVA 中的 jdbc。
优点: 1、可以让任何两个没有关联的类一起运行。 2、提高了类的复用。 3、增加了类的透明度。 4、灵活性好。
缺点: 1、过多地使用适配器,会让系统非常零乱,不易整体进行把握。比如,明明看到调用的是 A 接口,其实内部被适配成了 B 接口的实现,一个系统如果太多出现这种情况,无异于一场灾难。因此如果不是很有必要,可以不使用适配器,而是直接对系统进行重构。 2.由于 JAVA 至多继承一个类,所以至多只能适配一个适配者类,而且目标类必须是抽象类。
使用场景:有动机地修改一个正常运行的系统的接口,这时应该考虑使用适配器模式。
注意事项:适配器不是在详细设计时添加的,而是解决正在服役的项目的问题。
实现
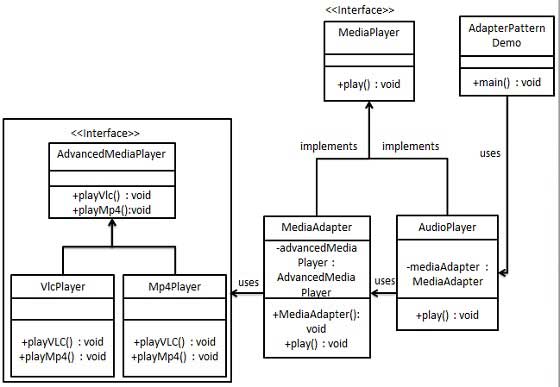
我们有一个 MediaPlayer 接口和一个实现了 MediaPlayer 接口的实体类 AudioPlayer。默认情况下,AudioPlayer 可以播放 mp3 格式的音频文件。
我们还有另一个接口 AdvancedMediaPlayer 和实现了 AdvancedMediaPlayer 接口的实体类。该类可以播放 vlc 和 mp4 格式的文件。
我们想要让 AudioPlayer 播放其他格式的音频文件。为了实现这个功能,我们需要创建一个实现了 MediaPlayer 接口的适配器类 MediaAdapter,并使用 AdvancedMediaPlayer 对象来播放所需的格式。
AudioPlayer 使用适配器类 MediaAdapter 传递所需的音频类型,不需要知道能播放所需格式音频的实际类。AdapterPatternDemo,我们的演示类使用 AudioPlayer 类来播放各种格式。
步骤 1
为媒体播放器和更高级的媒体播放器创建接口。
public interface MediaPlayer {
   public void play(String audioType, String fileName);
}
public interface AdvancedMediaPlayer {
public void playVlc(String fileName);
public void playMp4(String fileName);
}步骤 2
创建实现了 AdvancedMediaPlayer 接口的实体类。
public class VlcPlayer implements AdvancedMediaPlayer{
   @Override
   public void playVlc(String fileName) {
      System.out.println("Playing vlc file. Name: "+ fileName);
   }

   @Override
   public void playMp4(String fileName) {
      //什么也不做
   }
}
public class Mp4Player implements AdvancedMediaPlayer{
@Override
public void playVlc(String fileName) {
//什么也不做
}
@Override
public void playMp4(String fileName) {
System.out.println("Playing mp4 file. Name: "+ fileName);
}
}步骤 3
创建实现了 MediaPlayer 接口的适配器类。
public class MediaAdapter implements MediaPlayer {

   AdvancedMediaPlayer advancedMusicPlayer;

   public MediaAdapter(String audioType){
      if(audioType.equalsIgnoreCase("vlc") ){
         advancedMusicPlayer = new VlcPlayer();
      } else if (audioType.equalsIgnoreCase("mp4")){
         advancedMusicPlayer = new Mp4Player();
      }
   }

   @Override
   public void play(String audioType, String fileName) {
      if(audioType.equalsIgnoreCase("vlc")){
         advancedMusicPlayer.playVlc(fileName);
      }else if(audioType.equalsIgnoreCase("mp4")){
         advancedMusicPlayer.playMp4(fileName);
      }
   }
}
步骤 4
创建实现了 MediaPlayer 接口的实体类。
public class AudioPlayer implements MediaPlayer {
   MediaAdapter mediaAdapter;

   @Override
   public void play(String audioType, String fileName) {

      //播放 mp3 音乐文件的内置支持
      if(audioType.equalsIgnoreCase("mp3")){
         System.out.println("Playing mp3 file. Name: "+ fileName);
      }
      //mediaAdapter 提供了播放其他文件格式的支持
      else if(audioType.equalsIgnoreCase("vlc")
         || audioType.equalsIgnoreCase("mp4")){
         mediaAdapter = new MediaAdapter(audioType);
         mediaAdapter.play(audioType, fileName);
      }
      else{
         System.out.println("Invalid media. "+
            audioType + " format not supported");
      }
   }
}
步骤 5
使用 AudioPlayer 来播放不同类型的音频格式。
public class AdapterPatternDemo {
   public static void main(String[] args) {
      AudioPlayer audioPlayer = new AudioPlayer();

      audioPlayer.play("mp3", "beyond the horizon.mp3");
      audioPlayer.play("mp4", "alone.mp4");
      audioPlayer.play("vlc", "far far away.vlc");
      audioPlayer.play("avi", "mind me.avi");
   }
}
步骤 6
执行程序,输出结果:
Playing mp3 file. Name: beyond the horizon.mp3
Playing mp4 file. Name: alone.mp4
Playing vlc file. Name: far far away.vlc
Invalid media. avi format not supported
桥接模式
桥接(Bridge)是用于把抽象化与实现化解耦,使得二者可以独立变化。这种类型的设计模式属于结构型模式,它通过提供抽象化和实现化之间的桥接结构,来实现二者的解耦。
这种模式涉及到一个作为桥接的接口,使得实体类的功能独立于接口实现类。这两种类型的类可被结构化改变而互不影响。
我们通过下面的实例来演示桥接模式(Bridge Pattern)的用法。其中,可以使用相同的抽象类方法但是不同的桥接实现类,来画出不同颜色的圆。
介绍
意图:将抽象部分与实现部分分离,使它们都可以独立的变化。
主要解决:在有多种可能会变化的情况下,用继承会造成类爆炸问题,扩展起来不灵活。
何时使用:实现系统可能有多个角度分类,每一种角度都可能变化。
如何解决:把这种多角度分类分离出来,让它们独立变化,减少它们之间耦合。
关键代码:抽象类依赖实现类。
应用实例: 1、猪八戒从天蓬元帅转世投胎到猪,转世投胎的机制将尘世划分为两个等级,即:灵魂和肉体,前者相当于抽象化,后者相当于实现化。生灵通过功能的委派,调用肉体对象的功能,使得生灵可以动态地选择。 2、墙上的开关,可以看到的开关是抽象的,不用管里面具体怎么实现的。
优点: 1、抽象和实现的分离。 2、优秀的扩展能力。 3、实现细节对客户透明。
缺点:桥接模式的引入会增加系统的理解与设计难度,由于聚合关联关系建立在抽象层,要求开发者针对抽象进行设计与编程。
使用场景: 1、如果一个系统需要在构件的抽象化角色和具体化角色之间增加更多的灵活性,避免在两个层次之间建立静态的继承联系,通过桥接模式可以使它们在抽象层建立一个关联关系。 2、对于那些不希望使用继承或因为多层次继承导致系统类的个数急剧增加的系统,桥接模式尤为适用。 3、一个类存在两个独立变化的维度,且这两个维度都需要进行扩展。
注意事项:对于两个独立变化的维度,使用桥接模式再适合不过了。
实现
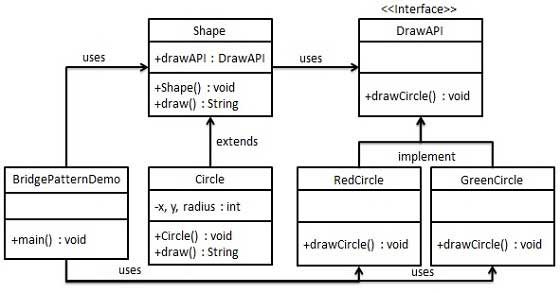
我们有一个作为桥接实现的 DrawAPI 接口和实现了 DrawAPI 接口的实体类 RedCircle、GreenCircle。Shape 是一个抽象类,将使用 DrawAPI 的对象。BridgePatternDemo,我们的演示类使用 Shape 类来画出不同颜色的圆。
步骤 1
创建桥接实现接口。
public interface DrawAPI {
   public void drawCircle(int radius, int x, int y);
}
步骤 2
创建实现了 DrawAPI 接口的实体桥接实现类。
public class RedCircle implements DrawAPI {
   @Override
   public void drawCircle(int radius, int x, int y) {
      System.out.println("Drawing Circle[ color: red, radius: "
         + radius +", x: " +x+", "+ y +"]");
   }
}
public class GreenCircle implements DrawAPI {
@Override
public void drawCircle(int radius, int x, int y) {
System.out.println("Drawing Circle[ color: green, radius: "
+ radius +", x: " +x+", "+ y +"]");
}
}步骤 3
使用 DrawAPI 接口创建抽象类 Shape。
public abstract class Shape {
   protected DrawAPI drawAPI;
   protected Shape(DrawAPI drawAPI){
      this.drawAPI = drawAPI;
   }
   public abstract void draw();
}
步骤 4
创建实现了 Shape 接口的实体类。
public class Circle extends Shape {
   private int x, y, radius;

   public Circle(int x, int y, int radius, DrawAPI drawAPI) {
      super(drawAPI);
      this.x = x;
      this.y = y;
      this.radius = radius;
   }

   public void draw() {
      drawAPI.drawCircle(radius,x,y);
   }
}
步骤 5
使用 Shape 和 DrawAPI 类画出不同颜色的圆。
public class BridgePatternDemo {
   public static void main(String[] args) {
      Shape redCircle = new Circle(100,100, 10, new RedCircle());
      Shape greenCircle = new Circle(100,100, 10, new GreenCircle());

      redCircle.draw();
      greenCircle.draw();
   }
}
步骤 6
执行程序,输出结果:
Drawing Circle[ color: red, radius: 10, x: 100, 100]
Drawing Circle[  color: green, radius: 10, x: 100, 100]
过滤器模式
过滤器模式(Filter Pattern)或标准模式(Criteria Pattern)是一种设计模式,这种模式允许开发人员使用不同的标准来过滤一组对象,通过逻辑运算以解耦的方式把它们连接起来。这种类型的设计模式属于结构型模式,它结合多个标准来获得单一标准。
实现
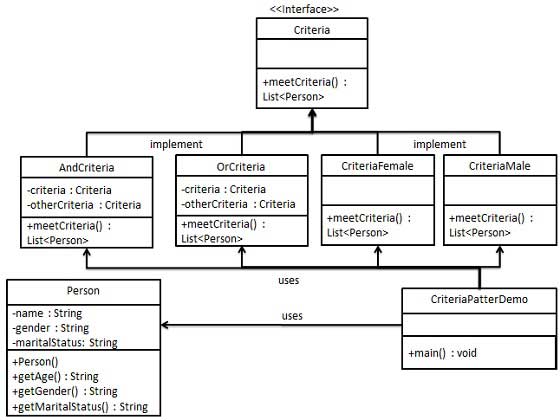
我们将创建一个 Person 对象、Criteria 接口和实现了该接口的实体类,来过滤 Person 对象的列表。CriteriaPatternDemo,我们的演示类使用 Criteria 对象,基于各种标准和它们的结合来过滤 Person 对象的列表。
步骤 1
创建一个类,在该类上应用标准。
public class Person {

   private String name;
   private String gender;
   private String maritalStatus;

   public Person(String name,String gender,String maritalStatus){
      this.name = name;
      this.gender = gender;
      this.maritalStatus = maritalStatus;
   }

   public String getName() {
      return name;
   }
   public String getGender() {
      return gender;
   }
   public String getMaritalStatus() {
      return maritalStatus;
   }
}
步骤 2
为标准(Criteria)创建一个接口。
import java.util.List;

public interface Criteria {
   public List<Person> meetCriteria(List<Person> persons);
}
步骤 3
创建实现了 Criteria 接口的实体类。
import java.util.ArrayList;
import java.util.List;

public class CriteriaMale implements Criteria {

   @Override
   public List<Person> meetCriteria(List<Person> persons) {
      List<Person> malePersons = new ArrayList<Person>();
      for (Person person : persons) {
         if(person.getGender().equalsIgnoreCase("MALE")){
            malePersons.add(person);
         }
      }
      return malePersons;
   }
}
import java.util.ArrayList;
import java.util.List;
public class CriteriaFemale implements Criteria {
@Override
public List<Person> meetCriteria(List<Person> persons) {
List<Person> femalePersons = new ArrayList<Person>();
for (Person person : persons) {
if(person.getGender().equalsIgnoreCase("FEMALE")){
femalePersons.add(person);
}
}
return femalePersons;
}
}import java.util.ArrayList;
import java.util.List;
public class CriteriaSingle implements Criteria {
@Override
public List<Person> meetCriteria(List<Person> persons) {
List<Person> singlePersons = new ArrayList<Person>();
for (Person person : persons) {
if(person.getMaritalStatus().equalsIgnoreCase("SINGLE")){
singlePersons.add(person);
}
}
return singlePersons;
}
}import java.util.List;
public class AndCriteria implements Criteria {
private Criteria criteria;
private Criteria otherCriteria;
public AndCriteria(Criteria criteria, Criteria otherCriteria) {
this.criteria = criteria;
this.otherCriteria = otherCriteria;
}
@Override
public List<Person> meetCriteria(List<Person> persons) {
List<Person> firstCriteriaPersons = criteria.meetCriteria(persons);
return otherCriteria.meetCriteria(firstCriteriaPersons);
}
}import java.util.List;
public class OrCriteria implements Criteria {
private Criteria criteria;
private Criteria otherCriteria;
public OrCriteria(Criteria criteria, Criteria otherCriteria) {
this.criteria = criteria;
this.otherCriteria = otherCriteria;
}
@Override
public List<Person> meetCriteria(List<Person> persons) {
List<Person> firstCriteriaItems = criteria.meetCriteria(persons);
List<Person> otherCriteriaItems = otherCriteria.meetCriteria(persons);
for (Person person : otherCriteriaItems) {
if(!firstCriteriaItems.contains(person)){
firstCriteriaItems.add(person);
}
}
return firstCriteriaItems;
}
}步骤4
使用不同的标准(Criteria)和它们的结合来过滤 Person 对象的列表。
import java.util.ArrayList;
import java.util.List;

public class CriteriaPatternDemo {
   public static void main(String[] args) {
      List<Person> persons = new ArrayList<Person>();

      persons.add(new Person("Robert","Male", "Single"));
      persons.add(new Person("John","Male", "Married"));
      persons.add(new Person("Laura","Female", "Married"));
      persons.add(new Person("Diana","Female", "Single"));
      persons.add(new Person("Mike","Male", "Single"));
      persons.add(new Person("Bobby","Male", "Single"));

      Criteria male = new CriteriaMale();
      Criteria female = new CriteriaFemale();
      Criteria single = new CriteriaSingle();
      Criteria singleMale = new AndCriteria(single, male);
      Criteria singleOrFemale = new OrCriteria(single, female);

      System.out.println("Males: ");
      printPersons(male.meetCriteria(persons));

      System.out.println("\nFemales: ");
      printPersons(female.meetCriteria(persons));

      System.out.println("\nSingle Males: ");
      printPersons(singleMale.meetCriteria(persons));

      System.out.println("\nSingle Or Females: ");
      printPersons(singleOrFemale.meetCriteria(persons));
   }

   public static void printPersons(List<Person> persons){
      for (Person person : persons) {
         System.out.println("Person : [ Name : " + person.getName()
            +", Gender : " + person.getGender()
            +", Marital Status : " + person.getMaritalStatus()
            +" ]");
      }
   }
}
步骤 5
执行程序,输出结果:
Males:
Person : [ Name : Robert, Gender : Male, Marital Status : Single ]
Person : [ Name : John, Gender : Male, Marital Status : Married ]
Person : [ Name : Mike, Gender : Male, Marital Status : Single ]
Person : [ Name : Bobby, Gender : Male, Marital Status : Single ]

Females:
Person : [ Name : Laura, Gender : Female, Marital Status : Married ]
Person : [ Name : Diana, Gender : Female, Marital Status : Single ]

Single Males:
Person : [ Name : Robert, Gender : Male, Marital Status : Single ]
Person : [ Name : Mike, Gender : Male, Marital Status : Single ]
Person : [ Name : Bobby, Gender : Male, Marital Status : Single ]

Single Or Females:
Person : [ Name : Robert, Gender : Male, Marital Status : Single ]
Person : [ Name : Diana, Gender : Female, Marital Status : Single ]
Person : [ Name : Mike, Gender : Male, Marital Status : Single ]
Person : [ Name : Bobby, Gender : Male, Marital Status : Single ]
Person : [ Name : Laura, Gender : Female, Marital Status : Married ]
组合模式
组合模式(Composite Pattern),又叫部分整体模式,是用于把一组相似的对象当作一个单一的对象。组合模式依据树形结构来组合对象,用来表示部分以及整体层次。这种类型的设计模式属于结构型模式,它创建了对象组的树形结构。
这种模式创建了一个包含自己对象组的类。该类提供了修改相同对象组的方式。
我们通过下面的实例来演示组合模式的用法。实例演示了一个组织中员工的层次结构。
介绍
意图:将对象组合成树形结构以表示"部分-整体"的层次结构。组合模式使得用户对单个对象和组合对象的使用具有一致性。
主要解决:它在我们树型结构的问题中,模糊了简单元素和复杂元素的概念,客户程序可以向处理简单元素一样来处理复杂元素,从而使得客户程序与复杂元素的内部结构解耦。
何时使用: 1、您想表示对象的部分-整体层次结构(树形结构)。 2、您希望用户忽略组合对象与单个对象的不同,用户将统一地使用组合结构中的所有对象。
如何解决:树枝和叶子实现统一接口,树枝内部组合该接口。
关键代码:树枝内部组合该接口,并且含有内部属性 List,里面放 Component。
应用实例: 1、算术表达式包括操作数、操作符和另一个操作数,其中,另一个操作符也可以是操作数、操作符和另一个操作数。 2、在 JAVA AWT 和 SWING 中,对于 Button 和 Checkbox 是树叶,Container 是树枝。
优点: 1、高层模块调用简单。 2、节点自由增加。
缺点:在使用组合模式时,其叶子和树枝的声明都是实现类,而不是接口,违反了依赖倒置原则。
使用场景:部分、整体场景,如树形菜单,文件、文件夹的管理。
注意事项:定义时为具体类。
实现
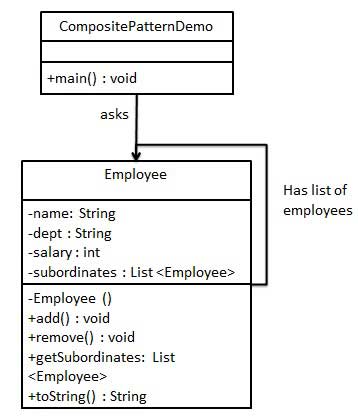
我们有一个类 Employee,该类被当作组合模型类。CompositePatternDemo,我们的演示类使用 Employee 类来添加部门层次结构,并打印所有员工。
步骤 1
创建 Employee 类,该类带有 Employee 对象的列表。
import java.util.ArrayList;
import java.util.List;

public class Employee {
   private String name;
   private String dept;
   private int salary;
   private List<Employee> subordinates;

   //构造函数
   public Employee(String name,String dept, int sal) {
      this.name = name;
      this.dept = dept;
      this.salary = sal;
      subordinates = new ArrayList<Employee>();
   }

   public void add(Employee e) {
      subordinates.add(e);
   }

   public void remove(Employee e) {
      subordinates.remove(e);
   }

   public List<Employee> getSubordinates(){
     return subordinates;
   }

   public String toString(){
      return ("Employee :[ Name : "+ name
      +", dept : "+ dept + ", salary :"
      + salary+" ]");
   }
}
步骤 2
使用 Employee 类来创建和打印员工的层次结构。
public class CompositePatternDemo {
   public static void main(String[] args) {
      Employee CEO = new Employee("John","CEO", 30000);

      Employee headSales = new Employee("Robert","Head Sales", 20000);

      Employee headMarketing = new Employee("Michel","Head Marketing", 20000);

      Employee clerk1 = new Employee("Laura","Marketing", 10000);
      Employee clerk2 = new Employee("Bob","Marketing", 10000);

      Employee salesExecutive1 = new Employee("Richard","Sales", 10000);
      Employee salesExecutive2 = new Employee("Rob","Sales", 10000);

      CEO.add(headSales);
      CEO.add(headMarketing);

      headSales.add(salesExecutive1);
      headSales.add(salesExecutive2);

      headMarketing.add(clerk1);
      headMarketing.add(clerk2);

      //打印该组织的所有员工
      System.out.println(CEO);
      for (Employee headEmployee : CEO.getSubordinates()) {
         System.out.println(headEmployee);
         for (Employee employee : headEmployee.getSubordinates()) {
            System.out.println(employee);
         }
      }
   }
}
步骤 3
执行程序,输出结果为:
Employee :[ Name : John, dept : CEO, salary :30000 ]
Employee :[ Name : Robert, dept : Head Sales, salary :20000 ]
Employee :[ Name : Richard, dept : Sales, salary :10000 ]
Employee :[ Name : Rob, dept : Sales, salary :10000 ]
Employee :[ Name : Michel, dept : Head Marketing, salary :20000 ]
Employee :[ Name : Laura, dept : Marketing, salary :10000 ]
Employee :[ Name : Bob, dept : Marketing, salary :10000 ]
装饰器模式
装饰器模式(Decorator Pattern)允许向一个现有的对象添加新的功能,同时又不改变其结构。这种类型的设计模式属于结构型模式,它是作为现有的类的一个包装。
这种模式创建了一个装饰类,用来包装原有的类,并在保持类方法签名完整性的前提下,提供了额外的功能。
我们通过下面的实例来演示装饰器模式的用法。其中,我们将把一个形状装饰上不同的颜色,同时又不改变形状类。
介绍
意图:动态地给一个对象添加一些额外的职责。就增加功能来说,装饰器模式相比生成子类更为灵活。
主要解决:一般的,我们为了扩展一个类经常使用继承方式实现,由于继承为类引入静态特征,并且随着扩展功能的增多,子类会很膨胀。
何时使用:在不想增加很多子类的情况下扩展类。
如何解决:将具体功能职责划分,同时继承装饰者模式。
关键代码: 1、Component 类充当抽象角色,不应该具体实现。 2、修饰类引用和继承 Component 类,具体扩展类重写父类方法。
应用实例: 1、孙悟空有 72 变,当他变成"庙宇"后,他的根本还是一只猴子,但是他又有了庙宇的功能。 2、不论一幅画有没有画框都可以挂在墙上,但是通常都是有画框的,并且实际上是画框被挂在墙上。在挂在墙上之前,画可以被蒙上玻璃,装到框子里;这时画、玻璃和画框形成了一个物体。
优点:装饰类和被装饰类可以独立发展,不会相互耦合,装饰模式是继承的一个替代模式,装饰模式可以动态扩展一个实现类的功能。
缺点:多层装饰比较复杂。
使用场景: 1、扩展一个类的功能。 2、动态增加功能,动态撤销。
注意事项:可代替继承。
实现
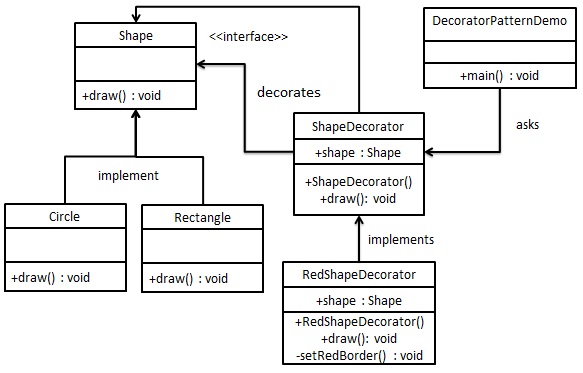
我们将创建一个 Shape 接口和实现了 Shape 接口的实体类。然后我们创建一个实现了 Shape 接口的抽象装饰类 ShapeDecorator,并把 Shape 对象作为它的实例变量。
RedShapeDecorator 是实现了 ShapeDecorator 的实体类。
DecoratorPatternDemo,我们的演示类使用 RedShapeDecorator 来装饰 Shape 对象。
步骤 1
创建一个接口:
public interface Shape {
   void draw();
}
步骤 2
创建实现接口的实体类。
public class Rectangle implements Shape {

   @Override
   public void draw() {
      System.out.println("Shape: Rectangle");
   }
}
public class Circle implements Shape {
@Override
public void draw() {
System.out.println("Shape: Circle");
}
}步骤 3
创建实现了 Shape 接口的抽象装饰类。
public abstract class ShapeDecorator implements Shape {
   protected Shape decoratedShape;

   public ShapeDecorator(Shape decoratedShape){
      this.decoratedShape = decoratedShape;
   }

   public void draw(){
      decoratedShape.draw();
   }
}
步骤 4
创建扩展了 ShapeDecorator 类的实体装饰类。
public class RedShapeDecorator extends ShapeDecorator {

   public RedShapeDecorator(Shape decoratedShape) {
      super(decoratedShape);
   }

   @Override
   public void draw() {
      decoratedShape.draw();
      setRedBorder(decoratedShape);
   }

   private void setRedBorder(Shape decoratedShape){
      System.out.println("Border Color: Red");
   }
}
步骤 5
使用 RedShapeDecorator 来装饰 Shape 对象。
public class DecoratorPatternDemo {
   public static void main(String[] args) {

      Shape circle = new Circle();

      Shape redCircle = new RedShapeDecorator(new Circle());

      Shape redRectangle = new RedShapeDecorator(new Rectangle());
      System.out.println("Circle with normal border");
      circle.draw();

      System.out.println("\nCircle of red border");
      redCircle.draw();

      System.out.println("\nRectangle of red border");
      redRectangle.draw();
   }
}
步骤 6
执行程序,输出结果:
Circle with normal border
Shape: Circle

Circle of red border
Shape: Circle
Border Color: Red

Rectangle of red border
Shape: Rectangle
Border Color: Red
后记
再举个例子:游戏里英雄皮肤的实现,就可以使用装饰器模式。
public interface Hero {
    public void init();
}

public class victor implements Hero {
    @Override
    public void init() {
        System.out.println("维克托:输出型英雄!生成完毕");
    }
}

public abstract class HeroDecorator implements Hero {
    private Hero heroDecorator;

    public HeroDecorator(Hero heroDecorator) {
        this.heroDecorator = heroDecorator;
    }

    @Override
    public void init() {
        heroDecorator.init();
    }
}

public class GalacticWarriors extends HeroDecorator {
    private Hero heroDecorator;

    public GalacticWarriors(Hero heroDecorator) {
        super(heroDecorator);
    }

    @Override
    public void init() {
        super.init();
        setSkin();
    }

    private void setSkin() {
        System.out.println("皮肤:银河战士套装");
    }
}

public class DecoratorPatternDemo {
    public static void main(String[] args) {
        Hero victor = new victor();
        GalacticWarriors galacticWarriors = new GalacticWarriors(victor);
        galacticWarriors.init();
    }
}
外观模式
外观模式(Facade Pattern)隐藏系统的复杂性,并向客户端提供了一个客户端可以访问系统的接口。这种类型的设计模式属于结构型模式,它向现有的系统添加一个接口,来隐藏系统的复杂性。
这种模式涉及到一个单一的类,该类提供了客户端请求的简化方法和对现有系统类方法的委托调用。
介绍
意图:为子系统中的一组接口提供一个一致的界面,外观模式定义了一个高层接口,这个接口使得这一子系统更加容易使用。
主要解决:降低访问复杂系统的内部子系统时的复杂度,简化客户端与之的接口。
何时使用: 1、客户端不需要知道系统内部的复杂联系,整个系统只需提供一个"接待员"即可。 2、定义系统的入口。
如何解决:客户端不与系统耦合,外观类与系统耦合。
关键代码:在客户端和复杂系统之间再加一层,这一层将调用顺序、依赖关系等处理好。
应用实例: 1、去医院看病,可能要去挂号、门诊、划价、取药,让患者或患者家属觉得很复杂,如果有提供接待人员,只让接待人员来处理,就很方便。 2、JAVA 的三层开发模式。
优点: 1、减少系统相互依赖。 2、提高灵活性。 3、提高了安全性。
缺点:不符合开闭原则,如果要改东西很麻烦,继承重写都不合适。
使用场景: 1、为复杂的模块或子系统提供外界访问的模块。 2、子系统相对独立。 3、预防低水平人员带来的风险。
注意事项:在层次化结构中,可以使用外观模式定义系统中每一层的入口。
实现
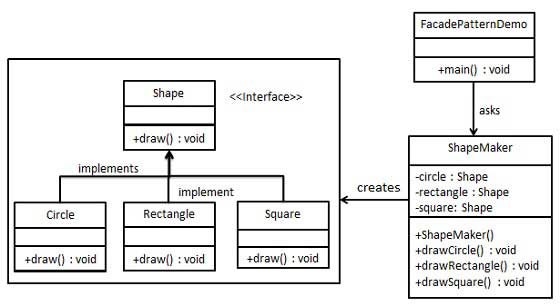
我们将创建一个 Shape 接口和实现了 Shape 接口的实体类。下一步是定义一个外观类 ShapeMaker。
ShapeMaker 类使用实体类来代表用户对这些类的调用。FacadePatternDemo,我们的演示类使用 ShapeMaker 类来显示结果。
步骤 1
创建一个接口。
public interface Shape {
   void draw();
}
步骤 2
创建实现接口的实体类。
public class Rectangle implements Shape {

   @Override
   public void draw() {
      System.out.println("Rectangle::draw()");
   }
}
public class Square implements Shape {
@Override
public void draw() {
System.out.println("Square::draw()");
}
}public class Circle implements Shape {
@Override
public void draw() {
System.out.println("Circle::draw()");
}
}步骤 3
创建一个外观类。
public class ShapeMaker {
   private Shape circle;
   private Shape rectangle;
   private Shape square;

   public ShapeMaker() {
      circle = new Circle();
      rectangle = new Rectangle();
      square = new Square();
   }

   public void drawCircle(){
      circle.draw();
   }
   public void drawRectangle(){
      rectangle.draw();
   }
   public void drawSquare(){
      square.draw();
   }
}
步骤 4
使用该外观类画出各种类型的形状。
public class FacadePatternDemo {
   public static void main(String[] args) {
      ShapeMaker shapeMaker = new ShapeMaker();

      shapeMaker.drawCircle();
      shapeMaker.drawRectangle();
      shapeMaker.drawSquare();
   }
}
步骤 5
执行程序,输出结果:
Circle::draw()
Rectangle::draw()
Square::draw()
后记
电脑整机是 CPU、内存、硬盘的外观。有了外观以后,启动电脑和关闭电脑都简化了。
直接 new 一个电脑。
在 new 电脑的同时把 cpu、内存、硬盘都初始化好并且接好线。
对外暴露方法(启动电脑,关闭电脑)。
启动电脑(按一下电源键):启动CPU、启动内存、启动硬盘
关闭电脑(按一下电源键):关闭硬盘、关闭内存、关闭CPU
享元模式
享元模式(Flyweight Pattern)主要用于减少创建对象的数量,以减少内存占用和提高性能。这种类型的设计模式属于结构型模式,它提供了减少对象数量从而改善应用所需的对象结构的方式。
享元模式尝试重用现有的同类对象,如果未找到匹配的对象,则创建新对象。我们将通过创建 5 个对象来画出 20 个分布于不同位置的圆来演示这种模式。由于只有 5 种可用的颜色,所以 color 属性被用来检查现有的 Circle 对象。
介绍
意图:运用共享技术有效地支持大量细粒度的对象。
主要解决:在有大量对象时,有可能会造成内存溢出,我们把其中共同的部分抽象出来,如果有相同的业务请求,直接返回在内存中已有的对象,避免重新创建。
何时使用: 1、系统中有大量对象。 2、这些对象消耗大量内存。 3、这些对象的状态大部分可以外部化。 4、这些对象可以按照内蕴状态分为很多组,当把外蕴对象从对象中剔除出来时,每一组对象都可以用一个对象来代替。 5、系统不依赖于这些对象身份,这些对象是不可分辨的。
如何解决:用唯一标识码判断,如果在内存中有,则返回这个唯一标识码所标识的对象。
关键代码:用 HashMap 存储这些对象。
应用实例: 1、JAVA 中的 String,如果有则返回,如果没有则创建一个字符串保存在字符串缓存池里面。 2、数据库的数据池。
优点:大大减少对象的创建,降低系统的内存,使效率提高。
缺点:提高了系统的复杂度,需要分离出外部状态和内部状态,而且外部状态具有固有化的性质,不应该随着内部状态的变化而变化,否则会造成系统的混乱。
使用场景: 1、系统有大量相似对象。 2、需要缓冲池的场景。
注意事项: 1、注意划分外部状态和内部状态,否则可能会引起线程安全问题。 2、这些类必须有一个工厂对象加以控制。
实现
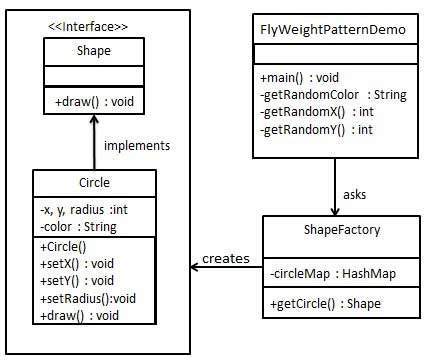
我们将创建一个 Shape 接口和实现了 Shape 接口的实体类 Circle。下一步是定义工厂类 ShapeFactory。
ShapeFactory 有一个 Circle 的 HashMap,其中键名为 Circle 对象的颜色。无论何时接收到请求,都会创建一个特定颜色的圆。ShapeFactory 检查它的 HashMap 中的 circle 对象,如果找到 Circle 对象,则返回该对象,否则将创建一个存储在 hashmap 中以备后续使用的新对象,并把该对象返回到客户端。
FlyWeightPatternDemo,我们的演示类使用 ShapeFactory 来获取 Shape 对象。它将向 ShapeFactory 传递信息(red / green / blue/ black / white),以便获取它所需对象的颜色。
步骤 1
创建一个接口。
public interface Shape {
   void draw();
}
步骤 2
创建实现接口的实体类。
public class Circle implements Shape {
   private String color;
   private int x;
   private int y;
   private int radius;

   public Circle(String color){
      this.color = color;
   }

   public void setX(int x) {
      this.x = x;
   }

   public void setY(int y) {
      this.y = y;
   }

   public void setRadius(int radius) {
      this.radius = radius;
   }

   @Override
   public void draw() {
      System.out.println("Circle: Draw() [Color : " + color
         +", x : " + x +", y :" + y +", radius :" + radius);
   }
}
步骤 3
创建一个工厂,生成基于给定信息的实体类的对象。
import java.util.HashMap;

public class ShapeFactory {
   private static final HashMap<String, Shape> circleMap = new HashMap<>();

   public static Shape getCircle(String color) {
      Circle circle = (Circle)circleMap.get(color);

      if(circle == null) {
         circle = new Circle(color);
         circleMap.put(color, circle);
         System.out.println("Creating circle of color : " + color);
      }
      return circle;
   }
}
步骤 4
使用该工厂,通过传递颜色信息来获取实体类的对象。
public class FlyweightPatternDemo {
   private static final String colors[] =
      { "Red", "Green", "Blue", "White", "Black" };
   public static void main(String[] args) {

      for(int i=0; i < 20; ++i) {
         Circle circle =
            (Circle)ShapeFactory.getCircle(getRandomColor());
         circle.setX(getRandomX());
         circle.setY(getRandomY());
         circle.setRadius(100);
         circle.draw();
      }
   }
   private static String getRandomColor() {
      return colors[(int)(Math.random()*colors.length)];
   }
   private static int getRandomX() {
      return (int)(Math.random()*100 );
   }
   private static int getRandomY() {
      return (int)(Math.random()*100);
   }
}
步骤 5
执行程序,输出结果:
Creating circle of color : Black
Circle: Draw() [Color : Black, x : 36, y :71, radius :100
Creating circle of color : Green
Circle: Draw() [Color : Green, x : 27, y :27, radius :100
Creating circle of color : White
Circle: Draw() [Color : White, x : 64, y :10, radius :100
Creating circle of color : Red
Circle: Draw() [Color : Red, x : 15, y :44, radius :100
Circle: Draw() [Color : Green, x : 19, y :10, radius :100
Circle: Draw() [Color : Green, x : 94, y :32, radius :100
Circle: Draw() [Color : White, x : 69, y :98, radius :100
Creating circle of color : Blue
Circle: Draw() [Color : Blue, x : 13, y :4, radius :100
Circle: Draw() [Color : Green, x : 21, y :21, radius :100
Circle: Draw() [Color : Blue, x : 55, y :86, radius :100
Circle: Draw() [Color : White, x : 90, y :70, radius :100
Circle: Draw() [Color : Green, x : 78, y :3, radius :100
Circle: Draw() [Color : Green, x : 64, y :89, radius :100
Circle: Draw() [Color : Blue, x : 3, y :91, radius :100
Circle: Draw() [Color : Blue, x : 62, y :82, radius :100
Circle: Draw() [Color : Green, x : 97, y :61, radius :100
Circle: Draw() [Color : Green, x : 86, y :12, radius :100
Circle: Draw() [Color : Green, x : 38, y :93, radius :100
Circle: Draw() [Color : Red, x : 76, y :82, radius :100
Circle: Draw() [Color : Blue, x : 95, y :82, radius :100
代理模式
在代理模式(Proxy Pattern)中,一个类代表另一个类的功能。这种类型的设计模式属于结构型模式。
在代理模式中,我们创建具有现有对象的对象,以便向外界提供功能接口。
介绍
意图:为其他对象提供一种代理以控制对这个对象的访问。
主要解决:在直接访问对象时带来的问题,比如说:要访问的对象在远程的机器上。在面向对象系统中,有些对象由于某些原因(比如对象创建开销很大,或者某些操作需要安全控制,或者需要进程外的访问),直接访问会给使用者或者系统结构带来很多麻烦,我们可以在访问此对象时加上一个对此对象的访问层。
何时使用:想在访问一个类时做一些控制。
如何解决:增加中间层。
关键代码:实现与被代理类组合。
应用实例: 1、Windows 里面的快捷方式。 2、猪八戒去找高翠兰结果是孙悟空变的,可以这样理解:把高翠兰的外貌抽象出来,高翠兰本人和孙悟空都实现了这个接口,猪八戒访问高翠兰的时候看不出来这个是孙悟空,所以说孙悟空是高翠兰代理类。 3、买火车票不一定在火车站买,也可以去代售点。 4、一张支票或银行存单是账户中资金的代理。支票在市场交易中用来代替现金,并提供对签发人账号上资金的控制。 5、spring aop。
优点: 1、职责清晰。 2、高扩展性。 3、智能化。
缺点: 1、由于在客户端和真实主题之间增加了代理对象,因此有些类型的代理模式可能会造成请求的处理速度变慢。 2、实现代理模式需要额外的工作,有些代理模式的实现非常复杂。
使用场景:按职责来划分,通常有以下使用场景: 1、远程代理。 2、虚拟代理。 3、Copy-on-Write 代理。 4、保护(Protect or Access)代理。 5、Cache代理。 6、防火墙(Firewall)代理。 7、同步化(Synchronization)代理。 8、智能引用(Smart Reference)代理。
注意事项: 1、和适配器模式的区别:适配器模式主要改变所考虑对象的接口,而代理模式不能改变所代理类的接口。 2、和装饰器模式的区别:装饰器模式为了增强功能,而代理模式是为了加以控制。
实现
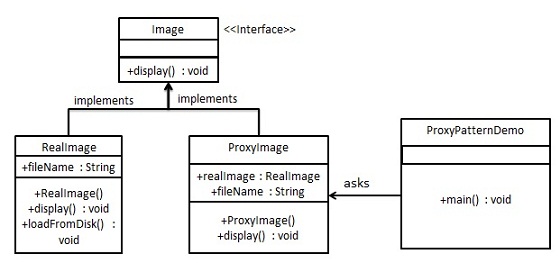
我们将创建一个 Image 接口和实现了 Image 接口的实体类。ProxyImage 是一个代理类,减少 RealImage 对象加载的内存占用。
ProxyPatternDemo,我们的演示类使用 ProxyImage 来获取要加载的 Image 对象,并按照需求进行显示。
步骤 1
创建一个接口。
public interface Image {
   void display();
}
步骤 2
创建实现接口的实体类。
public class RealImage implements Image {

   private String fileName;

   public RealImage(String fileName){
      this.fileName = fileName;
      loadFromDisk(fileName);
   }

   @Override
   public void display() {
      System.out.println("Displaying " + fileName);
   }

   private void loadFromDisk(String fileName){
      System.out.println("Loading " + fileName);
   }
}
public class ProxyImage implements Image{
private RealImage realImage;
private String fileName;
public ProxyImage(String fileName){
this.fileName = fileName;
}
@Override
public void display() {
if(realImage == null){
realImage = new RealImage(fileName);
}
realImage.display();
}
}步骤 3
当被请求时,使用 ProxyImage 来获取 RealImage 类的对象。
public class ProxyPatternDemo {

   public static void main(String[] args) {
      Image image = new ProxyImage("test_10mb.jpg");

      //图像将从磁盘加载
      image.display();
      System.out.println("");
      //图像将无法从磁盘加载
      image.display();
   }
}
步骤 4
执行程序,输出结果:
Loading test_10mb.jpg
Displaying test_10mb.jpg

Displaying test_10mb.jpg


 1815
1815


 被折叠的 条评论
为什么被折叠?
被折叠的 条评论
为什么被折叠?
 到【灌水乐园】发言


