


📄 文档说明
| 项目 | 内容 |
|---|---|
| 文档编号 | 55K-RPT-2025-Ubuntu-01 |
👥 信息介绍
- 测试人员:雾里看浮光
- 运营人员:南知意、庭吖
- 公众号:
55K-学安全 - CSDN:HackShield_Pro的技术博客
- 博客园:JaseLee的个人博客
⚠️ 免责声明
重要提示
本次文章中所有内容均在本地授权环境中进行。目的仅为安全研究与学习,提升安全防护能力。
请勿将文中所述技术用于任何非法用途,否则后果自负。
版权声明:本文由 55K-学安全 团队原创,转载请注明出处。
一、Root账户配置
1.1. 设置root密码
sudo passwd root
# 输入当前用户密码,然后设置新的root密码

1.2. 启用root登录(可选,不推荐)
# 临时切换到root
sudo -i

# 或者直接登录root(需先设置密码)
su -

1.3.配置sudo免密码(可选)
visudo
# 在文件中添加(将sysadmin替换为您的用户名)
sysadmin ALL=(ALL) NOPASSWD: ALL
# 查看配置
grep -i "sysadmin" /etc/sudoers

二、静态IP地址配置
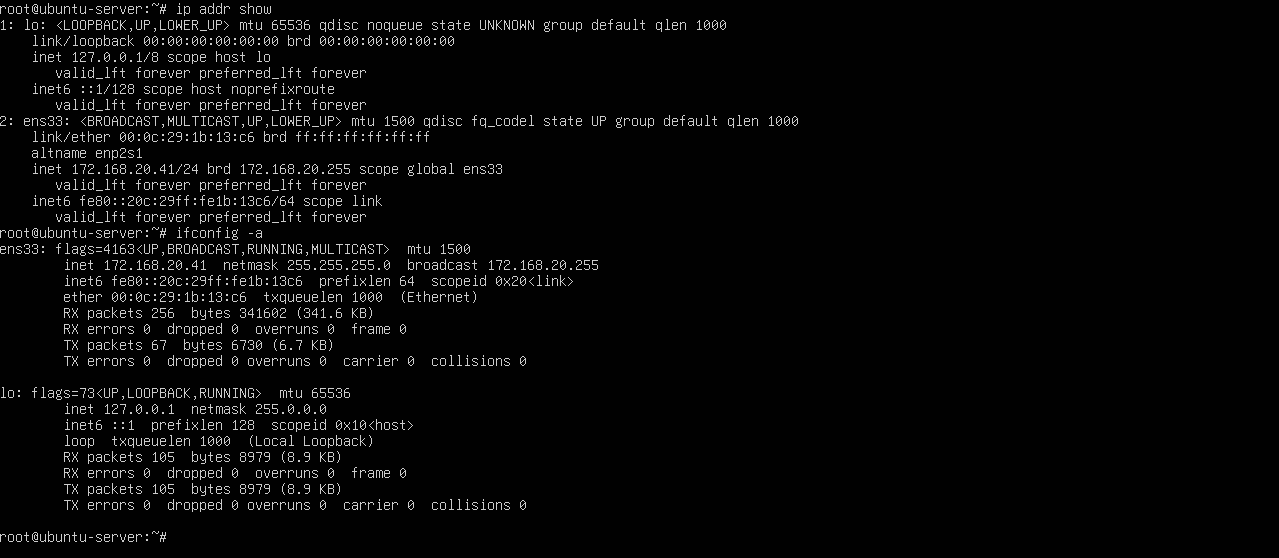
2.1.查看网络接口
# 查看所有网络接口
ip addr show
# 或使用传统命令
ifconfig -a
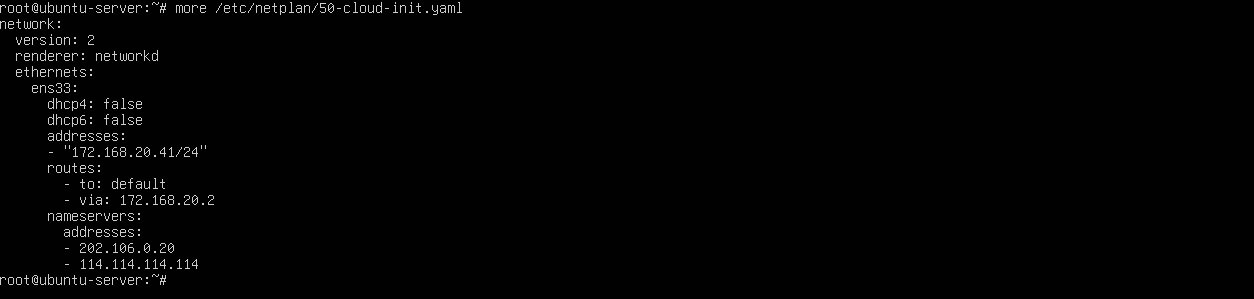
2.2.配置静态IP
# 编辑netplan配置文件
vim /etc/netplan/50-cloud-init.yaml
# 配置文件内容
network:
  version: 2
  renderer: networkd
  ethernets:
    ens33:
      dhcp4: false
      dhcp6: false
      addresses:
        - 172.168.20.41       # IPv4
      routes:
        - to: default
          via: 172.168.20.2       # IPv4 网关
      nameservers:
        addresses:
          - 202.106.0.20
          - 114.114.114.114
2.3.应用配置
netplan apply
netplan try  # 测试配置,应用配置失败会自动回滚

2.4.网络测试
# 检查IP配置
ip addr show

# 测试网络连通性
ping -c 4 baidu.com

三、国内软件源配置
3.1.备份原有源列表
cp /etc/apt/sources.list /etc/apt/sources.list.bak
3.2.选择并配置国内源
vim /etc/apt/sources.list
注:Ubuntu 版本代号对照表:
Ubuntu 24.04: noble
Ubuntu 22.04: jammy
Ubuntu 20.04: focal
Ubuntu 18.04: bionic
Ubuntu 16.04: xenial
Ubuntu 14.04: trusty
Ubuntu 12.04: precise
###########################################################################
# 1. 官方源(Ubuntu Official Repositories)
# 特点:稳定性、安全性最高,海外访问速度快;国内访问可能因网络延迟较慢
###########################################################################
# 主仓库(二进制包):包含系统核心及常用软件的安装包
deb http://archive.ubuntu.com/ubuntu/ noble main restricted universe multiverse
# 主仓库(源代码包):对应主仓库软件的源码(普通用户无需启用)
deb-src http://archive.ubuntu.com/ubuntu/ noble main restricted universe multiverse

# 安全更新仓库(二进制包):修复系统漏洞、推送紧急安全补丁(必须启用)
deb http://security.ubuntu.com/ubuntu/ noble-security main restricted universe multiverse
# 安全更新仓库(源代码包):对应安全补丁的源码(普通用户无需启用)
deb-src http://security.ubuntu.com/ubuntu/ noble-security main restricted universe multiverse

# 常规更新仓库(二进制包):软件功能优化、bug修复(非安全类更新)
deb http://archive.ubuntu.com/ubuntu/ noble-updates main restricted universe multiverse
# 常规更新仓库(源代码包):对应常规更新的源码(普通用户无需启用)
deb-src http://archive.ubuntu.com/ubuntu/ noble-updates main restricted universe multiverse

# 回溯更新仓库(二进制包):适配新版本软件到当前系统(如后续Ubuntu版本的软件)
deb http://archive.ubuntu.com/ubuntu/ noble-backports main restricted universe multiverse
# 回溯更新仓库(源代码包):对应回溯更新的源码(普通用户无需启用)
deb-src http://archive.ubuntu.com/ubuntu/ noble-backports main restricted universe multiverse

###########################################################################
# 2. 阿里云源(Aliyun Mirrors)
# 特点:国内访问速度极快(带宽足、节点多),稳定性仅次于官方,国内用户首选
###########################################################################
# 主仓库(二进制包):同步官方主仓库,国内下载无压力
deb http://mirrors.aliyun.com/ubuntu/ noble main restricted universe multiverse
# 主仓库(源代码包):同步官方源码(普通用户无需启用)
deb-src http://mirrors.aliyun.com/ubuntu/ noble main restricted universe multiverse

# 安全更新仓库(二进制包):国内快速获取安全补丁
deb http://mirrors.aliyun.com/ubuntu/ noble-security main restricted universe multiverse
# 安全更新仓库(源代码包):同步安全补丁源码(普通用户无需启用)
deb-src http://mirrors.aliyun.com/ubuntu/ noble-security main restricted universe multiverse

# 常规更新仓库(二进制包):国内快速获取软件功能修复
deb http://mirrors.aliyun.com/ubuntu/ noble-updates main restricted universe multiverse
# 常规更新仓库(源代码包):同步常规更新源码(普通用户无需启用)
deb-src http://mirrors.aliyun.com/ubuntu/ noble-updates main restricted universe multiverse

# 回溯更新仓库(二进制包):国内快速获取适配的新版本软件
deb http://mirrors.aliyun.com/ubuntu/ noble-backports main restricted universe multiverse
# 回溯更新仓库(源代码包):同步回溯更新源码(普通用户无需启用)
deb-src http://mirrors.aliyun.com/ubuntu/ noble-backports main restricted universe multiverse

###########################################################################
# 3. 清华大学源(Tsinghua University Mirrors)
# 特点:学术机构维护,支持HTTPS(传输安全),国内速度稳定,适合注重安全性用户
###########################################################################
# 主仓库(二进制包,HTTPS):同步官方内容,HTTPS避免传输篡改
deb https://mirrors.tuna.tsinghua.edu.cn/ubuntu/ noble main restricted universe multiverse
# 主仓库(源代码包,HTTPS):同步官方源码(普通用户无需启用)
deb-src https://mirrors.tuna.tsinghua.edu.cn/ubuntu/ noble main restricted universe multiverse

# 安全更新仓库(二进制包,HTTPS):HTTPS传输安全补丁
deb https://mirrors.tuna.tsinghua.edu.cn/ubuntu/ noble-security main restricted universe multiverse
# 安全更新仓库(源代码包,HTTPS):同步安全补丁源码(普通用户无需启用)
deb-src https://mirrors.tuna.tsinghua.edu.cn/ubuntu/ noble-security main restricted universe multiverse

# 常规更新仓库(二进制包,HTTPS):HTTPS传输功能修复更新
deb https://mirrors.tuna.tsinghua.edu.cn/ubuntu/ noble-updates main restricted universe multiverse
# 常规更新仓库(源代码包,HTTPS):同步常规更新源码(普通用户无需启用)
deb-src https://mirrors.tuna.tsinghua.edu.cn/ubuntu/ noble-updates main restricted universe multiverse

# 回溯更新仓库(二进制包,HTTPS):HTTPS传输适配的新版本软件
deb https://mirrors.tuna.tsinghua.edu.cn/ubuntu/ noble-backports main restricted universe multiverse
# 回溯更新仓库(源代码包,HTTPS):同步回溯更新源码(普通用户无需启用)
deb-src https://mirrors.tuna.tsinghua.edu.cn/ubuntu/ noble-backports main restricted universe multiverse

###########################################################################
# 4. 网易云源(NetEase Cloud Mirrors)
# 特点:企业维护,节点覆盖广(南方地区速度优),稳定性可靠
###########################################################################
# 主仓库(二进制包):同步官方主仓库,国内下载稳定
deb http://mirrors.163.com/ubuntu/ noble main restricted universe multiverse
# 主仓库(源代码包):同步官方源码(普通用户无需启用)
deb-src http://mirrors.163.com/ubuntu/ noble main restricted universe multiverse

# 安全更新仓库(二进制包):国内快速获取安全补丁
deb http://mirrors.163.com/ubuntu/ noble-security main restricted universe multiverse
# 安全更新仓库(源代码包):同步安全补丁源码(普通用户无需启用)
deb-src http://mirrors.163.com/ubuntu/ noble-security main restricted universe multiverse

# 常规更新仓库(二进制包):国内快速获取功能修复
deb http://mirrors.163.com/ubuntu/ noble-updates main restricted universe multiverse
# 常规更新仓库(源代码包):同步常规更新源码(普通用户无需启用)
deb-src http://mirrors.163.com/ubuntu/ noble-updates main restricted universe multiverse

# 回溯更新仓库(二进制包):国内快速获取适配软件
deb http://mirrors.163.com/ubuntu/ noble-backports main restricted universe multiverse
# 回溯更新仓库(源代码包):同步回溯更新源码(普通用户无需启用)
deb-src http://mirrors.163.com/ubuntu/ noble-backports main restricted universe multiverse

###########################################################################
# 5. 中科大源(USTC Mirrors)
# 特点:学术机构维护,更新同步快(华东地区速度优),支持HTTPS
###########################################################################
# 主仓库(二进制包,HTTPS):同步官方内容,更新及时
deb https://mirrors.ustc.edu.cn/ubuntu/ noble main restricted universe multiverse
# 主仓库(源代码包,HTTPS):同步官方源码(普通用户无需启用)
deb-src https://mirrors.ustc.edu.cn/ubuntu/ noble main restricted universe multiverse

# 安全更新仓库(二进制包,HTTPS):HTTPS传输安全补丁
deb https://mirrors.ustc.edu.cn/ubuntu/ noble-security main restricted universe multiverse
# 安全更新仓库(源代码包,HTTPS):同步安全补丁源码(普通用户无需启用)
deb-src https://mirrors.ustc.edu.cn/ubuntu/ noble-security main restricted universe multiverse

# 常规更新仓库(二进制包,HTTPS):HTTPS传输功能修复
deb https://mirrors.ustc.edu.cn/ubuntu/ noble-updates main restricted universe multiverse
# 常规更新仓库(源代码包,HTTPS):同步常规更新源码(普通用户无需启用)
deb-src https://mirrors.ustc.edu.cn/ubuntu/ noble-updates main restricted universe multiverse

# 回溯更新仓库(二进制包,HTTPS):HTTPS传输适配软件
deb https://mirrors.ustc.edu.cn/ubuntu/ noble-backports main restricted universe multiverse
# 回溯更新仓库(源代码包,HTTPS):同步回溯更新源码(普通用户无需启用)
deb-src https://mirrors.ustc.edu.cn/ubuntu/ noble-backports main restricted universe multiverse

3.3.更新软件包列表
apt update && apt upgrade -y
四、SSH服务配置
4.1.安装SSH服务器
# 老版本需要安装
apt install openssh-server -y

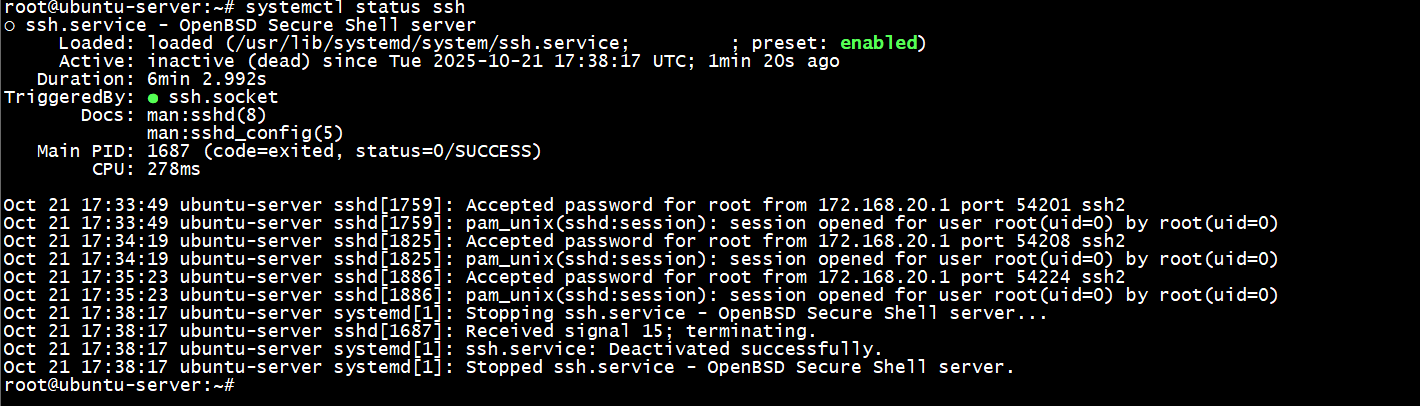
4.2.检查SSH服务状态
systemctl status ssh
# 如果未启动,执行:
systemctl start ssh
systemctl enable ssh
4.3.SSH重要配置(增强安全性)
cp /etc/ssh/sshd_config /etc/ssh/sshd_config.old
vim /etc/ssh/sshd_config

# 修改默认端口(可选)
Port 2222
# 禁止root用户直接登录
PermitRootLogin no
# 只允许特定用户登录(根据实际情况添加修改)
AllowUsers your_username
# 禁用密码认证,使用密钥登录(更安全)
# 密码认证
PasswordAuthentication no
# 密钥认证
PubkeyAuthentication yes
# 最大认证尝试次数
MaxAuthTries 3
# 客户端活动间隔
ClientAliveInterval 300
# 客户端活动最大次数
ClientAliveCountMax 3

4.4.生成SSH密钥对(在客户端操作)
ssh-keygen -t rsa -b 4096
ssh-copy-id username@server_ip  # 上传公钥到服务器
可根据公司情况进行操作,不做演示
4.5.将公钥上传到服务器
# 方法1:使用ssh-copy-id
ssh-copy-id -p 22 your_username@server_ip

# 方法2:手动复制
cat ~/.ssh/id_rsa.pub
# 然后将输出内容添加到服务器的 ~/.ssh/authorized_keys 文件中
可根据公司情况进行操作,不做演示
4.6.重启SSH服务
# 修改完配置进行重启生效
systemctl restart ssh
# 查看重启后的状态
systemctl status ssh

4.7.防火墙配置(如果启用)
可根据公司情况进行操作,不做演示
# 查看防火墙状态
ufw status
# 允许SSH端口
ufw allow 22/tcp
# 如果修改了端口,使用新端口
ufw allow 2222/tcp
# 启用防火墙
ufw enable
4.8.测试SSH连接
# 从客户端测试连接
ssh -p 22 username@server_ip

五、防火墙配置
5.1.使用UFW防火墙
apt install ufw -y

5.2.基本配置
# 启用防火墙
ufw enable

# 默认策略
ufw default deny incoming  # 默认拒绝所有入站
ufw default allow outgoing # 默认允许所有出站

# 开放SSH端口
ufw allow 22/tcp

# 开放其他常用端口
ufw allow 80/tcp    # HTTP
ufw allow 443/tcp   # HTTPS
ufw allow 53/udp    # DNS

# 按服务名称开放
ufw allow ssh
ufw allow http
ufw allow https

5.3.高级配置
# 限制IP访问
sudo ufw allow from 192.168.1.0/24 to any port 22

# 开放端口范围
sudo ufw allow 8000:8010/tcp

# 删除规则
sudo ufw delete allow 80/tcp

# 查看规则
ufw status numbered
ufw status verbose

5.4.防火墙管理
# 查看状态
ufw status

# 禁用防火墙
ufw disable

# 重置防火墙
ufw reset

# 重新加载规则
ufw reload

六、安全建议
6.1.定期更新系统
apt update && sudo apt upgrade -y
6.2.修改默认SSH端口(如2222)
ufw allow 2222/tcp
nano /etc/ssh/sshd_config  # 修改Port为2222
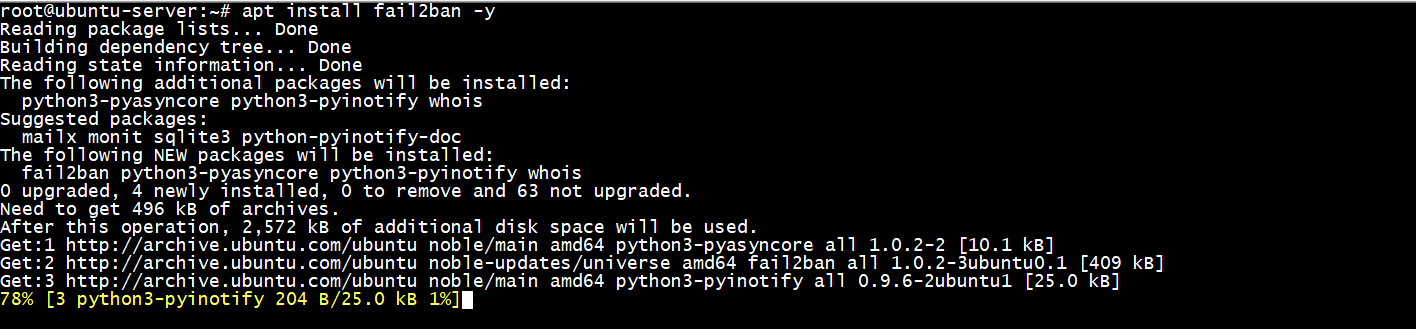
6.3.使用fail2ban防止暴力破解:
apt install fail2ban -y
6.4.定期备份重要配置
6.4.1.系统核心配置文件
1. 网络配置
/etc/netplan/          # 网络配置文件目录
/etc/hostname         # 主机名
/etc/hosts            # 本地DNS解析
/etc/resolv.conf      # DNS解析配置
2. 软件源和包管理
/etc/apt/sources.list     # APT软件源
/etc/apt/sources.list.d/  # 额外软件源目录
/var/lib/dpkg/status      # 已安装软件包状态
3. 系统服务配置
/etc/ssh/sshd_config      # SSH服务配置
/etc/ufw/                 # 防火墙配置目录
/etc/systemd/system/      # 系统服务单元文件
4. 用户和权限
/etc/passwd              # 用户账户信息
/etc/group               # 用户组信息
/etc/shadow              # 用户密码哈希
/etc/sudoers             # sudo权限配置
6.4.2.安全相关配置
1.安全配置
/etc/pam.d/              # PAM认证配置
/etc/security/           # 安全策略配置
/etc/fail2ban/           # Fail2ban配置(如安装)
2.日志配置
/etc/rsyslog.conf        # 系统日志配置
/etc/rsyslog.d/          # 日志配置片段
/etc/logrotate.conf      # 日志轮转配置
6.4.3.定时任务和服务
1.定时任务
/var/spool/cron/crontabs/ # 用户crontab文件
/etc/crontab             # 系统crontab
/etc/cron.d/             # 系统cron任务
/etc/cron.daily/         # 每日任务
/etc/cron.hourly/        # 每小时任务
/etc/cron.weekly/        # 每周任务
/etc/cron.monthly/       # 每月任务
6.4.4.应用服务配置
1.Web服务(如安装)
/etc/nginx/              # Nginx配置
/etc/apache2/            # Apache配置
/var/www/html/           # 网站文件
2. 数据库(如安装)
/etc/mysql/              # MySQL配置
/var/lib/mysql/          # 数据库数据目录(重要!)
3.其他服务
/etc/docker/daemon.json  # Docker配置
/var/lib/docker/         # Docker数据目录
6.4.5.备份脚本
1.创建备份脚本
mkdir /bash
nano /bash/backup-config.sh
2.备份脚本内容
脚本内容仅供参考,根据自身实际情况进行修改
#!/bin/bash

# 备份目录
BACKUP_DIR="/backup/config-$(date +%Y%m%d)"
CONFIG_BACKUP="$BACKUP_DIR/system-config.tar.gz"
CRON_BACKUP="$BACKUP_DIR/cron-backup.tar.gz"

# 创建备份目录
mkdir -p $BACKUP_DIR

echo "开始备份系统配置..."

# 备份核心配置文件
tar -czf $CONFIG_BACKUP \
    /etc/netplan/ \
    /etc/ssh/ \
    /etc/ufw/ \
    /etc/apt/sources.list \
    /etc/apt/sources.list.d/ \
    /etc/hostname \
    /etc/hosts \
    /etc/passwd \
    /etc/group \
    /etc/shadow \
    /etc/sudoers \
    /etc/systemd/system/ \
    2>/dev/null

# 备份cron任务
tar -czf $CRON_BACKUP \
    /var/spool/cron/crontabs/ \
    /etc/crontab \
    /etc/cron.d/ \
    /etc/cron.daily/ \
    /etc/cron.hourly/ \
    /etc/cron.weekly/ \
    /etc/cron.monthly/ \
    2>/dev/null

# 备份应用配置(如果存在)
if [ -d "/etc/nginx" ]; then
    tar -czf "$BACKUP_DIR/nginx-config.tar.gz" /etc/nginx/
fi

if [ -d "/etc/mysql" ]; then
    tar -czf "$BACKUP_DIR/mysql-config.tar.gz" /etc/mysql/
fi

# 创建恢复脚本
cat > "$BACKUP_DIR/restore-readme.txt" << EOF
配置恢复说明:

1. 系统核心配置恢复:
   sudo tar -xzf system-config.tar.gz -C /

2. Cron任务恢复:
   sudo tar -xzf cron-backup.tar.gz -C /

3. 应用配置恢复:
   sudo tar -xzf [应用名]-config.tar.gz -C /

4. 重启相关服务:
   sudo systemctl restart ssh
   sudo systemctl restart ufw
   sudo netplan apply

备份时间: $(date)
系统版本: $(lsb_release -d | cut -f2)
内核版本: $(uname -r)
EOF

echo "备份完成!备份文件保存在: $BACKUP_DIR"
echo "总大小: $(du -sh $BACKUP_DIR | cut -f1)"

# 删除7天前的备份
find /backup -name "config-*" -type d -mtime +7 -exec rm -rf {} \; 2>/dev/null
3.设置脚本权限并测试
chmod +x /usr/local/bin/backup-config.sh
/usr/local/bin/backup-config.sh
6.4.6.自动化定期备份
1.创建定时任务
crontab -e
2.添加以下行(每周日凌晨2点执行备份)
0 2 * * 0 /usr/local/bin/backup-config.sh > /var/log/config-backup.log 2>&1
6.4.7.备份验证和恢复测试
1.定期检查备份完整性
# 检查备份文件
ls -la /backup/

# 验证tar包完整性
tar -tzf /backup/config-YYYYMMDD/system-config.tar.gz > /dev/null && echo "备份完整" || echo "备份损坏"

# 测试恢复过程(在测试环境中)
6.4.8.异地备份建议
1. 复制到远程服务器
# 使用rsync同步到远程服务器
rsync -avz /backup/ user@remote-server:/remote-backup/ubuntu-config/
2. 云存储备份
# 使用rclone同步到云存储
rclone sync /backup/ mycloud:ubuntu-config-backup/


 1410
1410

 被折叠的 条评论
为什么被折叠?
被折叠的 条评论
为什么被折叠?
 到【灌水乐园】发言


