


发现大家都有疑问,特此奉上demo ,仅供学习,不承担任何责任!!!
发现大家都有疑问,特此奉上demo ,仅供学习,不承担任何责任!!!
发现大家都有疑问,特此奉上demo ,仅供学习,不承担任何责任!!!
如何运行请查看README-zh.md
如何运行请查看README-zh.md
如何运行请查看README-zh.md
————————————————
链接: https://pan.baidu.com/s/174CqVvgPgtjgTAVYXcunbw?pwd=gv5t 提取码: gv5t
————————————————
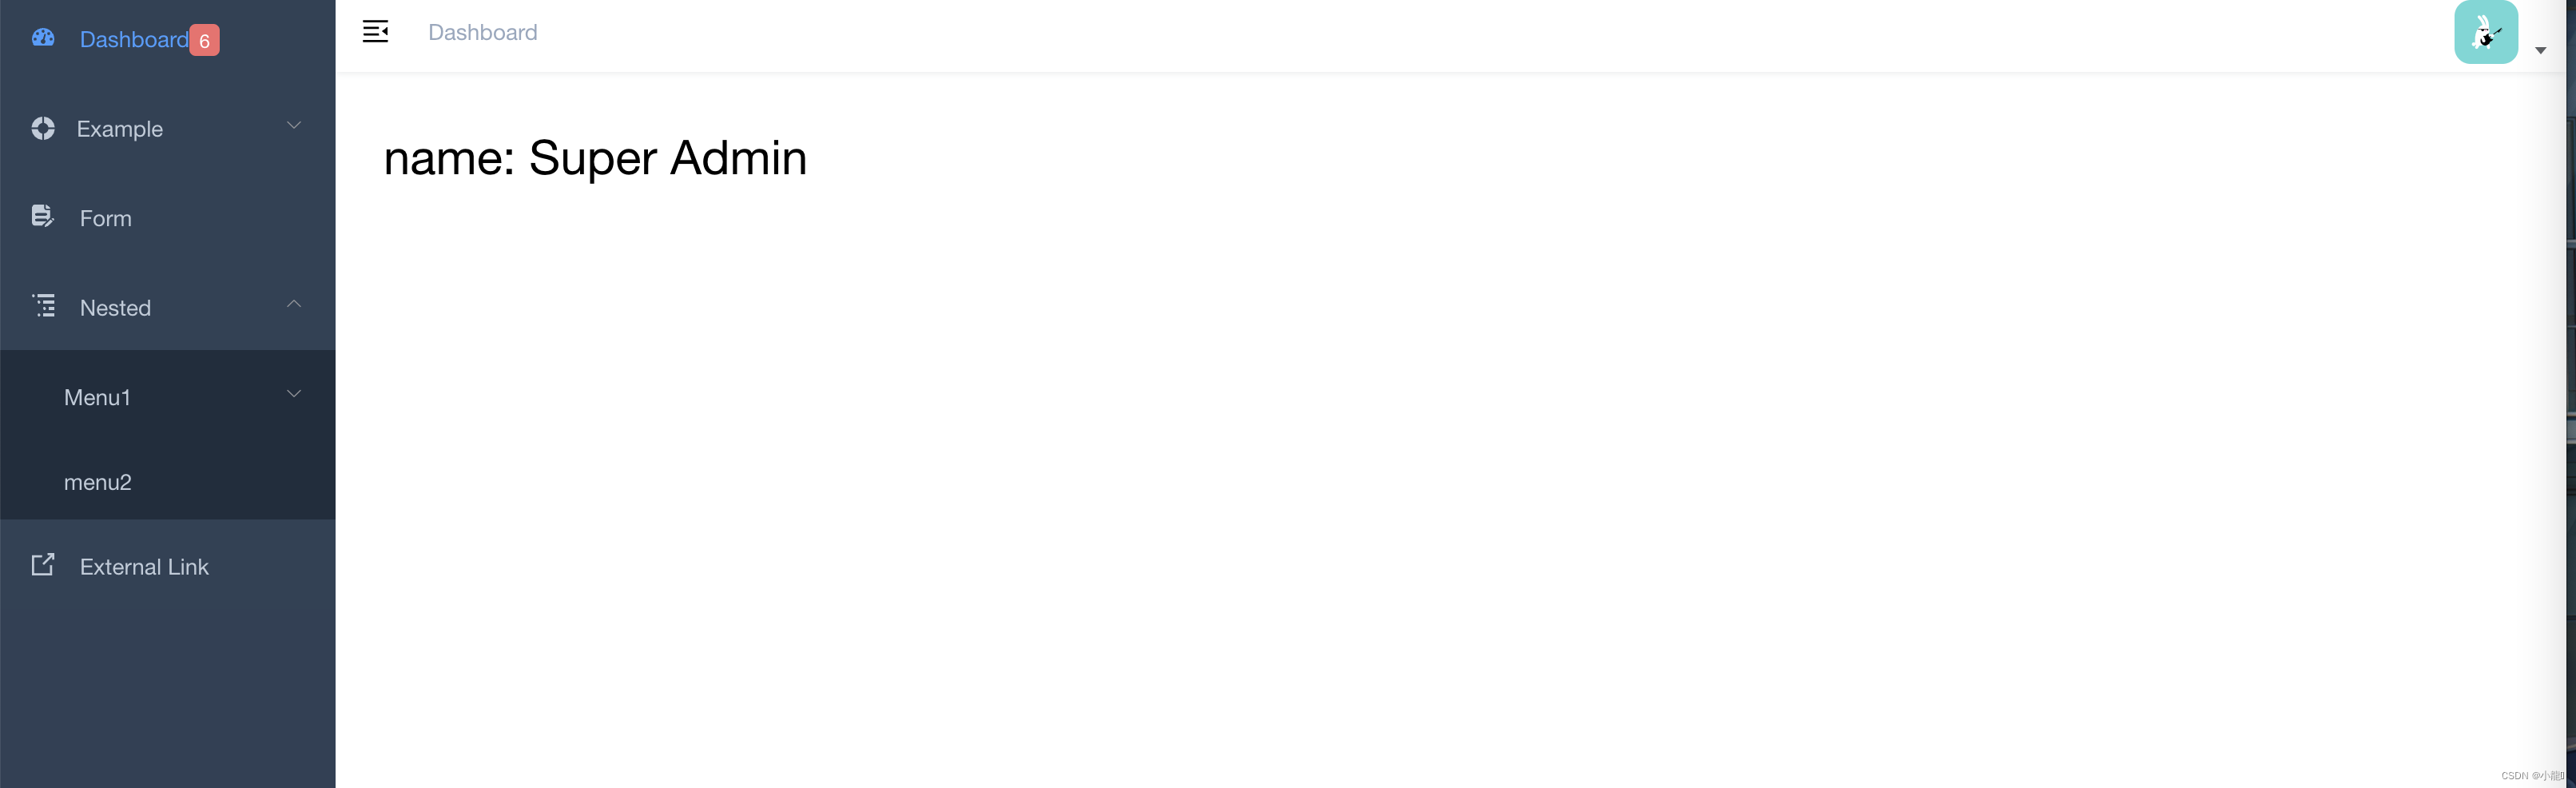
上效果
多级菜单没试过,我弄的是单页面的一级菜单。多级菜单应该可以参考类似

- 打开
src\router\index.js路径 修改路由配置
 {
    path: '/continuous_attention',
    component: Layout,
    children: [
      {
        path: 'index',
        name: 'continuous_attention',
        component: () => import('路径'),
        meta: { title: '菜单名', icon: 'eye-open' ,AttC:0}
        //Attc为统计数量的值,设置占位符,如果不需要则不填该字段
        //meta: { title: '菜单名', icon: 'eye-open' }//无状态标签填法
      }
    ]
  },
- 打开
src\layout\components\Sidebar\SidebarItem路径 第六行左右的item标签给组件传入AttC参数
<item :icon="onlyOneChild.meta.icon||(item.meta&&item.meta.icon)" :title="onlyOneChild.meta.title" :AttC='onlyOneChild.meta.AttC' />
- 进入item文件src\layout\components\Sidebar\Item.vue 添加参数
<script>

export default {
  name: 'MenuItem',
  functional: true,
  props: {
    icon: {
      type: String,
      default: ''
    },
    title: {
      type: String,
      default: ''
    },
    AttC: {//接收父类传入参数
      type: Number
    }
  },
  render(h, context) {
    const { icon, title,AttC } = context.props
    const vnodes = []
    var _this = this

    if (icon) {
      vnodes.push(<svg-icon icon-class={icon}/>)
    }
    if (title) {
        vnodes.push(<span slot='title'>{(title)} </span>)
    }
    if(AttC >=0){ //判断一下 自动添加到对应的菜单上
      vnodes.push(<span slot='title'><el-tag type="danger"    size='mini' effect="dark" style='margin-top:-2px'   >{(AttC)}</el-tag></span>)
    }

    return vnodes
  },
}
</script>
- 进入组件index页面
src\layout\components\Sidebar\index
需求一:点击侧边菜单刷新一次数据。增加点击回调函数handleSelect方法
需求二:只渲染一次。取消回调函数handleSelect方法,删除@select="handleSelect",只在created方法中调用一次即可
<template>
  <div :class="{'has-logo':showLogo}">
    <logo v-if="showLogo" :collapse="isCollapse" />
    <el-scrollbar wrap-class="scrollbar-wrapper">
      <el-menu
        :default-active="activeMenu"
        :collapse="isCollapse"
        :background-color="variables.menuBg"
        :text-color="variables.menuText"
        :unique-opened="false"
        :active-text-color="variables.menuActiveText"
        :collapse-transition="false"
        mode="vertical"
        @select="handleSelect"//增加高亮回调函数,如果只想执行一次删除这句
      >
        <sidebar-item v-for="route in permission_routes" :key="route.path" :item="route" :base-path="route.path" />
      </el-menu>
    </el-scrollbar>
  </div>
</template>

<script>
import { mapGetters } from 'vuex'
import Logo from './Logo'
import SidebarItem from './SidebarItem'
import variables from '@/styles/variables.scss'

import { getAttC } from '@/api/components'//从后台获取对应统计参数,自己去封装axios吧

export default {
  components: { SidebarItem, Logo },
  computed: {
    ...mapGetters([
      'permission_routes',
      'sidebar'
    ]),
    activeMenu() {
      const route = this.$route
      const { meta, path } = route
      // if set path, the sidebar will highlight the path you set
      if (meta.activeMenu) {
        return meta.activeMenu
      }
      return path
    },
    showLogo() {
      return this.$store.state.settings.sidebarLogo
    },
    variables() {
      return variables
    },
    isCollapse() {
      return !this.sidebar.opened
    }
  },
  created(){
    this.handleSelect()
  },
  methods:{
    handleSelect(e){
        var _this = this
        getAttC({}).then(item => {
           _this.permission_routes.forEach(element => { //获取当前所有参数 找到需要
             if(element.path == '/continuous_attention'){ //判断列表路由path,对应第一点中path字段
               element.children[0].meta.AttC = item.data //改变渲染初值
               return
             }
          });
        })
    }
  }
}
</script>


 3903
3903


 被折叠的 条评论
为什么被折叠?
被折叠的 条评论
为什么被折叠?
 到【灌水乐园】发言


