


一、需求功能
需求说明:给 element-admin 的侧边菜单栏或及子菜单栏添加计数标记 el-badge
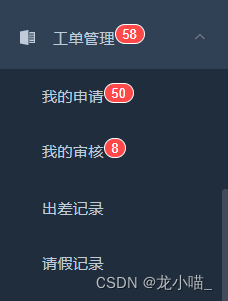
- 需求视图如下:
二、实现思路
- 结合 icon 图标渲染的思路,通过在layout 的 item.vue 中使用 vnodes.push 方法实现对
<el-badge />的渲染。- 在通过 Vuex 的状态管理将菜单栏需要的数据转递过来
- 过滤不需要的菜单栏
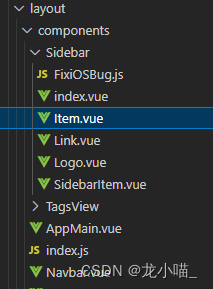
- layout目录结构
三、 具体实现步骤
1.渲染 <el-badge /> :src\layout\components\Sidebar\Item.vue
<script>
export default {
  props: {
    icon: {
      type: String,
      default: ''
    },
    title: {
      type: String,
      default: ''
    }
  },
  render(h, context) {
    const { icon, title } = context.props
    const vnodes = []

	// icon图标
    if (icon) {
    	```
    	过滤
    	```
        vnodes.push(<svg-icon icon-class={icon} />)
    }

	// 侧边菜单栏标题
	 if (title) {
      vnodes.push(<span slot='title'>{(title)}</span>)
    }

    return vnodes
  }
}
</script>
2.状态管理 Store 参数获取
- Store – commit
通过 element-admin 的 permission.js 权限文件实现参数的 commit (根据自己项目的具体菜单权限,灵活变通)
···
// 找到项目的 menu 权限、在逻辑中添加接口请求、并提交给store

// 我的申请
const { applyData} = await request({ url, data})
store.commit('SET_MYAPPLYTOTAL', applyData.length)

// 我的审核
const { approveData} = await request({ url, data})
store.commit('SET_AUDIOTOTAL', approveData.length)

···
- Store – mutations
接收commit 参数,并给定义的 state 参数赋值
const state = {
  audioTotal: 0, // 审核
  myApplyTotal: 0// 申请
}

const mutations = {
  SET_AUDIOTOTAL(state, data) {
    state.audioTotal = data
  },
  SET_MYAPPLYTOTAL(state, data) {
    state.myApplyTotal = data
  }
}
3.在渲染文件item.vue 中使用 store 参数
<script>
import store from '@/store'
export default {
  name: 'MenuItem',
  functional: true,
  props: {
    icon: {
      type: String,
      default: ''
    },
    title: {
      type: String,
      default: ''
    }
  },
  render(h, context) {
    const { icon, title } = context.props
    const vnodes = []

    if (title) {
      if (title === '我的审核') {
        vnodes.push(
          <span slot='title'>
            {title}
            <el-badge value={store.state.user.audioTotal} />
          </span>
        )
      }
      	```
    	其他菜单过滤同理
    	```
      else {
        vnodes.push(<span slot='title'>{title}</span>)
      }
    }
    return vnodes
  }
}
</script>
结语
初心:希望我的方案能给你一点思路
期盼:如果你有更好的解决方法,期盼你能分享到评论区


 1650
1650


 被折叠的 条评论
为什么被折叠?
被折叠的 条评论
为什么被折叠?
 到【灌水乐园】发言


