


经过上篇的操作,已经得到了处于同一个文件夹下的能分别独立运行的插件和前端页面子项目。
上篇链接:
使用 Vue 开发 VS Code 插件前端页面(上)![]() https://blog.csdn.net/Hi_KER/article/details/147633499样例项目地址:
https://blog.csdn.net/Hi_KER/article/details/147633499样例项目地址:
github | vscode-webview-with-vue![]() https://github.com/HiMeditator/vscode-webview-with-vue默认读者对 VS Code 插件开发有一定了解。如果对插件开发有不明白的内容,可以参考官方文档:VSCode Extension API。
https://github.com/HiMeditator/vscode-webview-with-vue默认读者对 VS Code 插件开发有一定了解。如果对插件开发有不明白的内容,可以参考官方文档:VSCode Extension API。
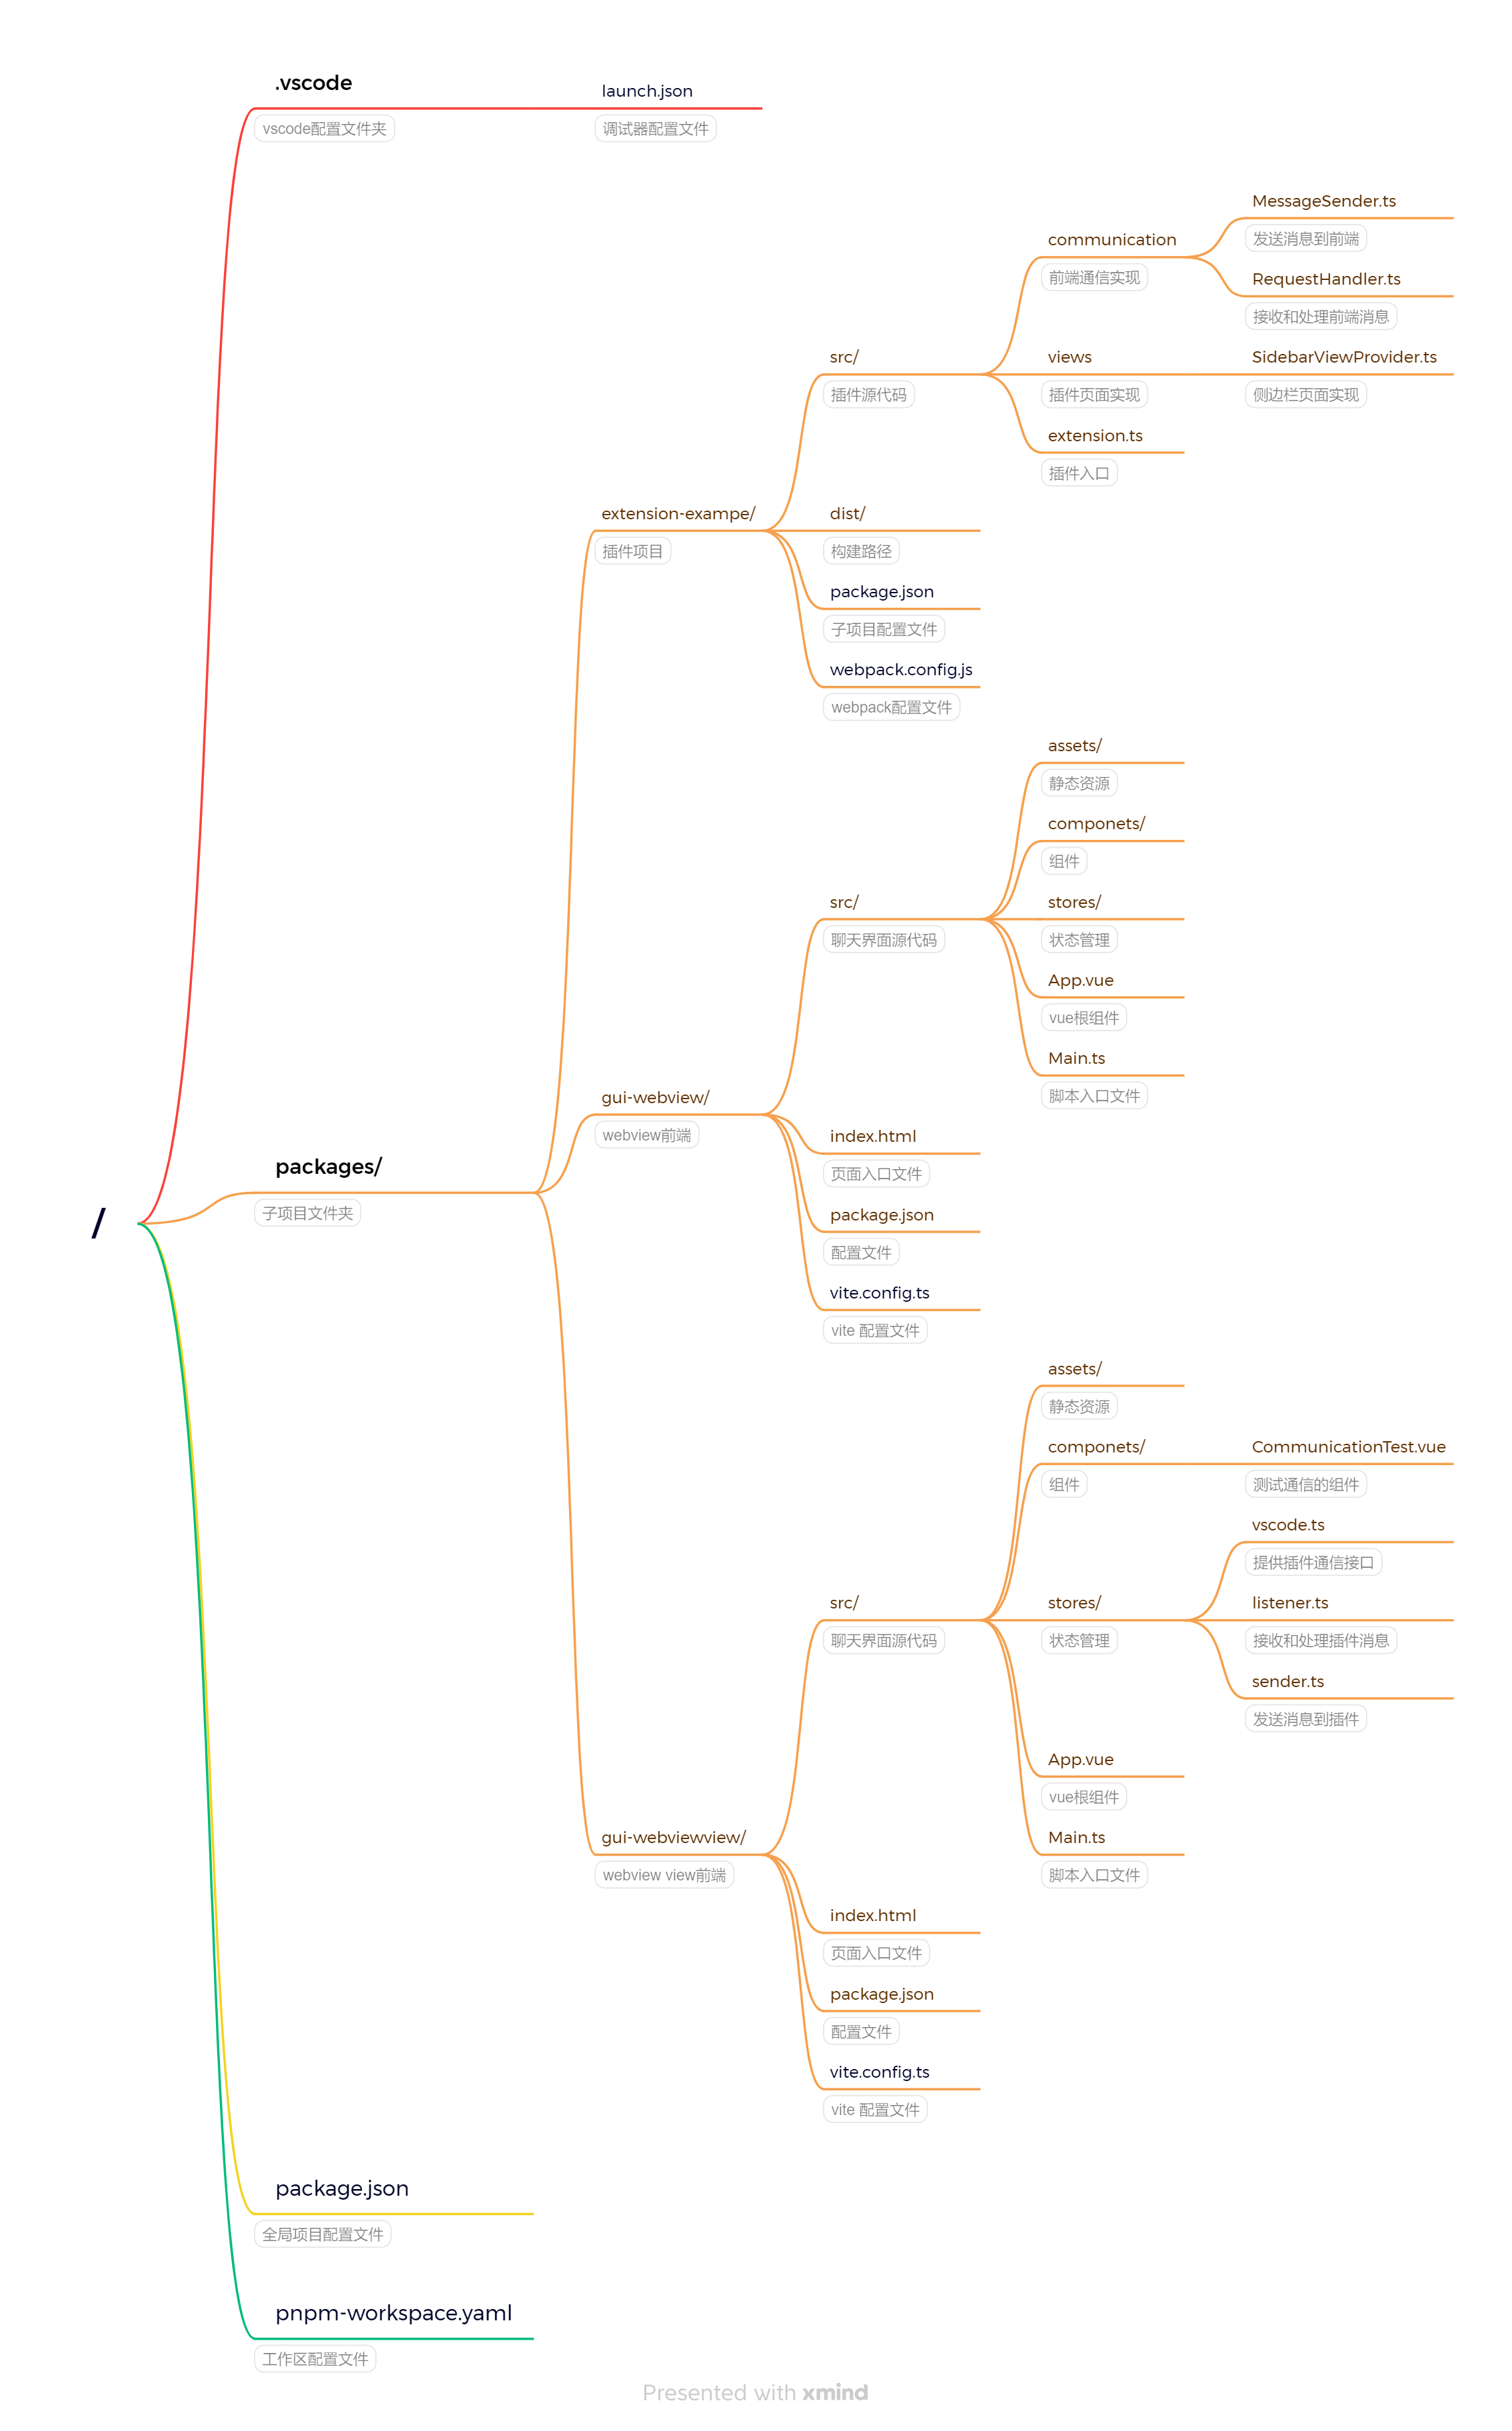
项目结构图
经过这篇博客后得到的项目结构如下。刚看到这幅图你可能会看不懂,先不要管这幅图,按博客的指导自己做一遍,在过程中可以回看这幅图,你应该就能慢慢明白每个文件的含义了。
在插件中嵌入 Webview View 页面
Webview View 页面主要用于侧边栏。接下的样例也是构建侧边栏页面。
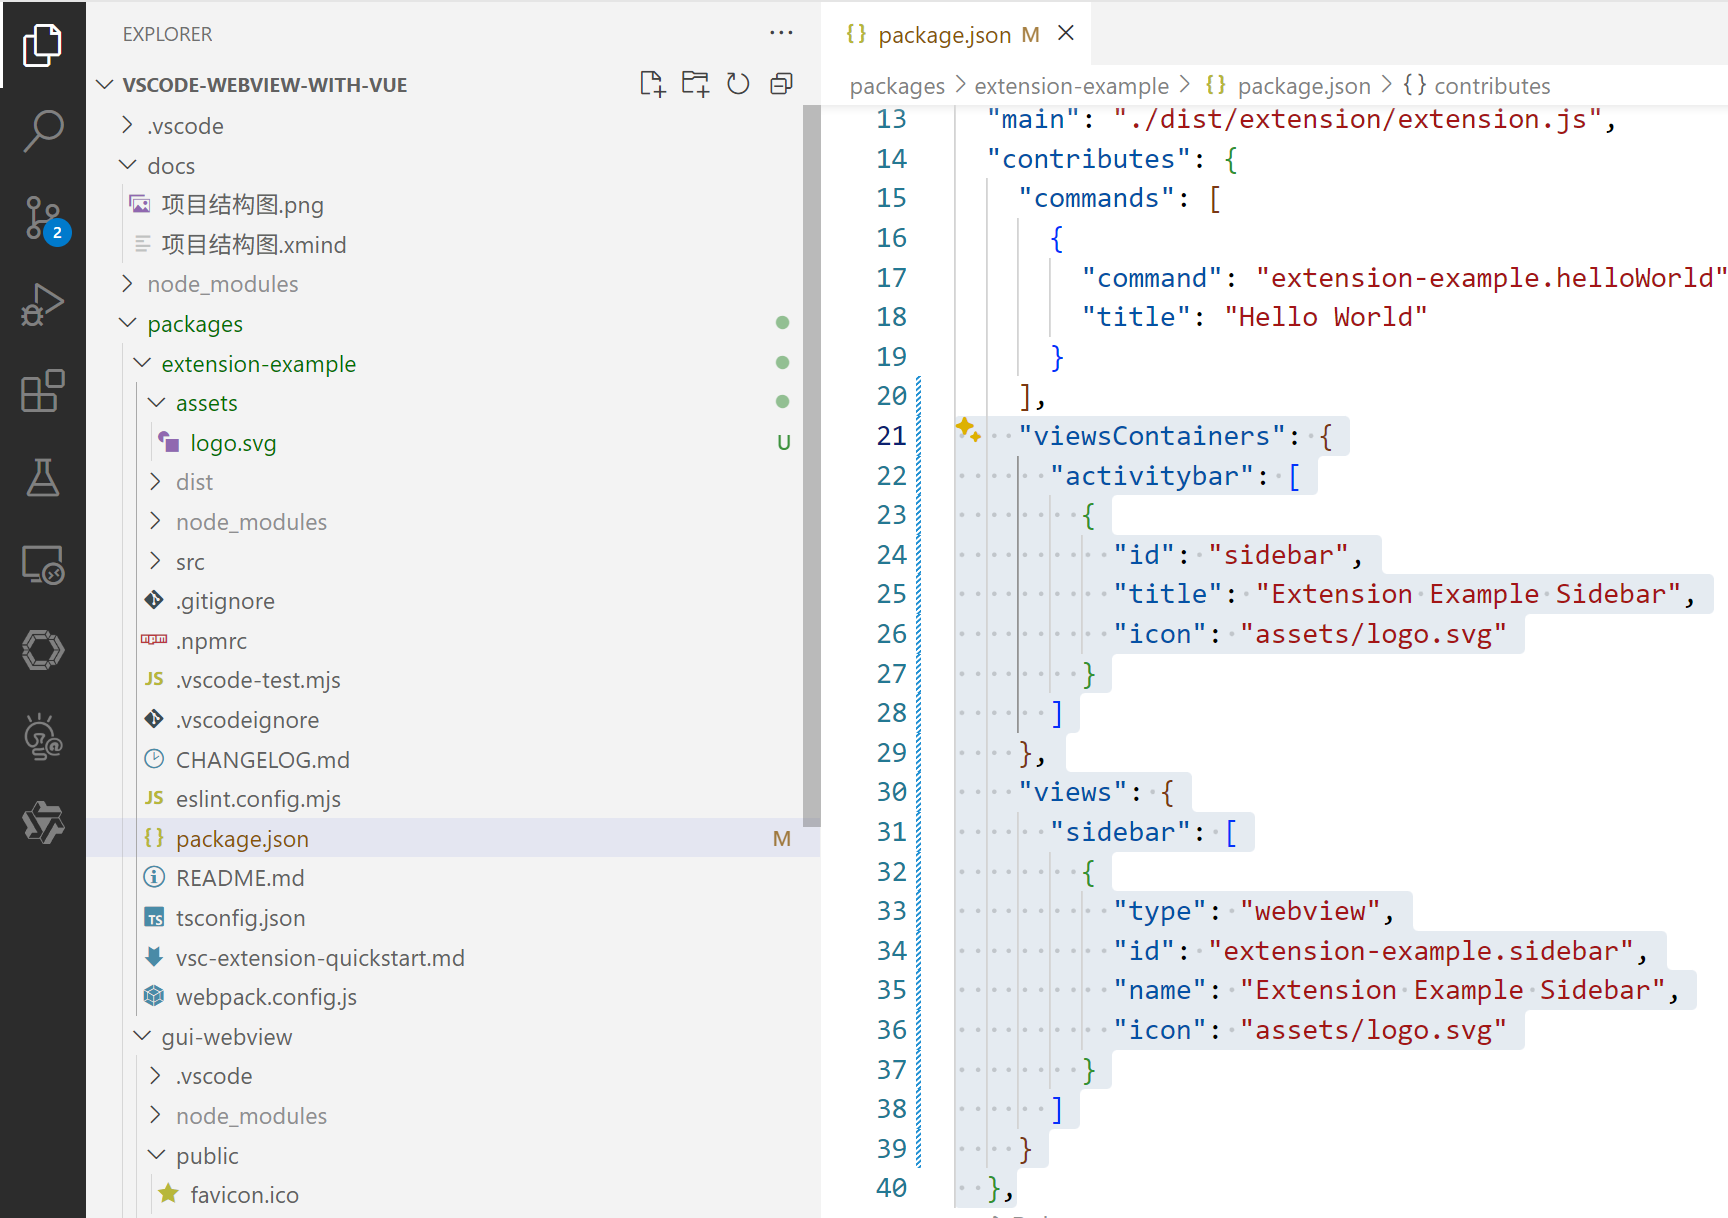
修改配置文件
首先修改插件文件夹下的 package.json 文件,新增页面配置,其中部分参数需要根据你自己的命名和路径进行调整。注意侧边栏页面需要一个图标,这里我直接在前端子项目中薅了一个 Vue 的矢量图标,保存在了插件目录下的 assets/logo.svg中。
添加页面提供类
在插件目录下的 src 文件夹中新建 views 文件夹,创建 SidebarViewProvider.ts 文件,写入如下内容:
import * as vscode from 'vscode';
import * as fs from 'fs';
import * as path from 'path';

export class SidebarViewProvider implements vscode.WebviewViewProvider {
    public static readonly viewType = 'extension-example.sidebar';
    constructor(
        private readonly _extensionUri: vscode.Uri // 插件所在路径
    ) { }

    public resolveWebviewView(
        webviewView: vscode.WebviewView,
        _context: vscode.WebviewViewResolveContext,
        _token: vscode.CancellationToken,
    ) {
        webviewView.webview.options = {
            enableScripts: true, // 允许脚本
            localResourceRoots: [this._extensionUri] // 允许加载本地资源的路径
        };
        webviewView.webview.html = this._getHtmlForWebview(webviewView.webview);
    }

    private _getHtmlForWebview(webview: vscode.Webview) {
        // 打包的前端页面资源的路径
        const guiSidebarPath = vscode.Uri.joinPath(this._extensionUri, '/dist/gui-webviewview');
        // 前端页面的入口文件
        const indexPath = vscode.Uri.joinPath(guiSidebarPath, '/index.html');
        let indexHtml = fs.readFileSync(indexPath.fsPath, 'utf-8');
        const matchLinks = /(href|src)="([^"]*)"/g;
        const toUri = (_: string, prefix: 'href' | 'src', link: string) => {
            if (link === '#') {
                return `${prefix}="${link}"`;
            }
            const _path = path.join(guiSidebarPath.fsPath, link);
            const uri = vscode.Uri.file(_path);
            return `${prefix}="${webview.asWebviewUri(uri)}"`;
        };
        // 将本地资源路径替换成 webview 可以加载的资源路径
        indexHtml = indexHtml.replace(matchLinks, toUri);
        return indexHtml;
    }
}
这个文件 SidebarViewProvider.ts 是插件的侧边栏视图提供者,它实现了 vscode.WebviewViewProvider 接口,用于在 VS Code 的侧边栏中渲染一个 Webview 界面。_getHtmlForWebview 方法读取本地的 index.html 文件内容,使用正则表达式替换 HTML 中的 href 和 src 属性值,将相对路径转换为适用于 Webview 的 URI。通过 webview.asWebviewUri 方法确保外部资源(如 CSS、JS 文件)能够被正确加载。这部分的正则匹配方案参考了该博客:VSCode插件开发:vue+vite开发webview页面。
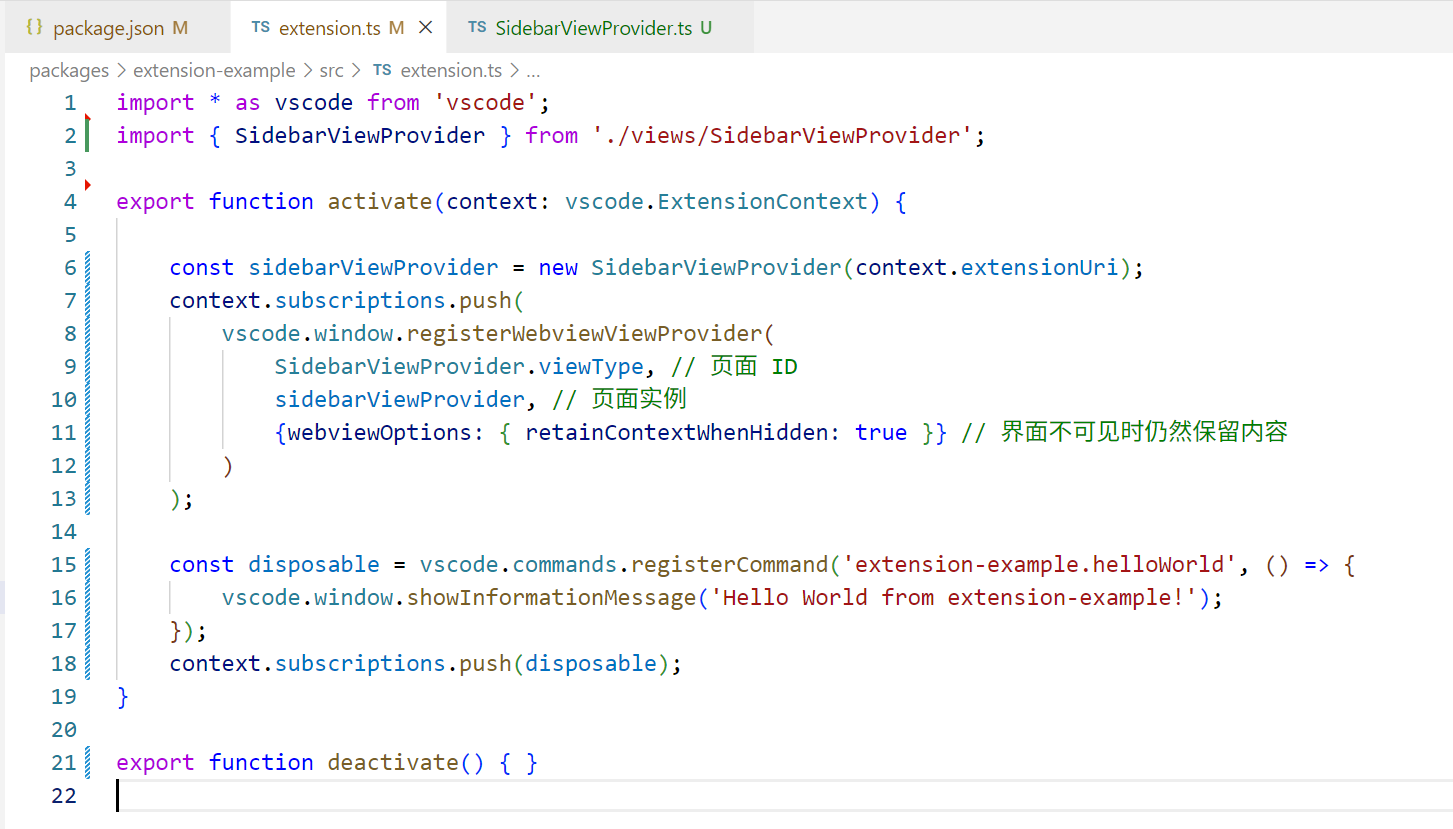
注册页面
然后修改插件目录下的 src/extension.ts 文件,注册页面:
import * as vscode from 'vscode';
import { SidebarViewProvider } from './views/SidebarViewProvider';

export function activate(context: vscode.ExtensionContext) {

    const sidebarViewProvider = new SidebarViewProvider(context.extensionUri);
    context.subscriptions.push(
        vscode.window.registerWebviewViewProvider(
            SidebarViewProvider.viewType, // 页面 ID
            sidebarViewProvider, // 页面实例
            {webviewOptions: { retainContextWhenHidden: true }} // 界面不可见时仍然保留内容
        )
    );

    const disposable = vscode.commands.registerCommand('extension-example.helloWorld', () => {
        vscode.window.showInformationMessage('Hello World from extension-example!');
    });
    context.subscriptions.push(disposable);
}

export function deactivate() { }
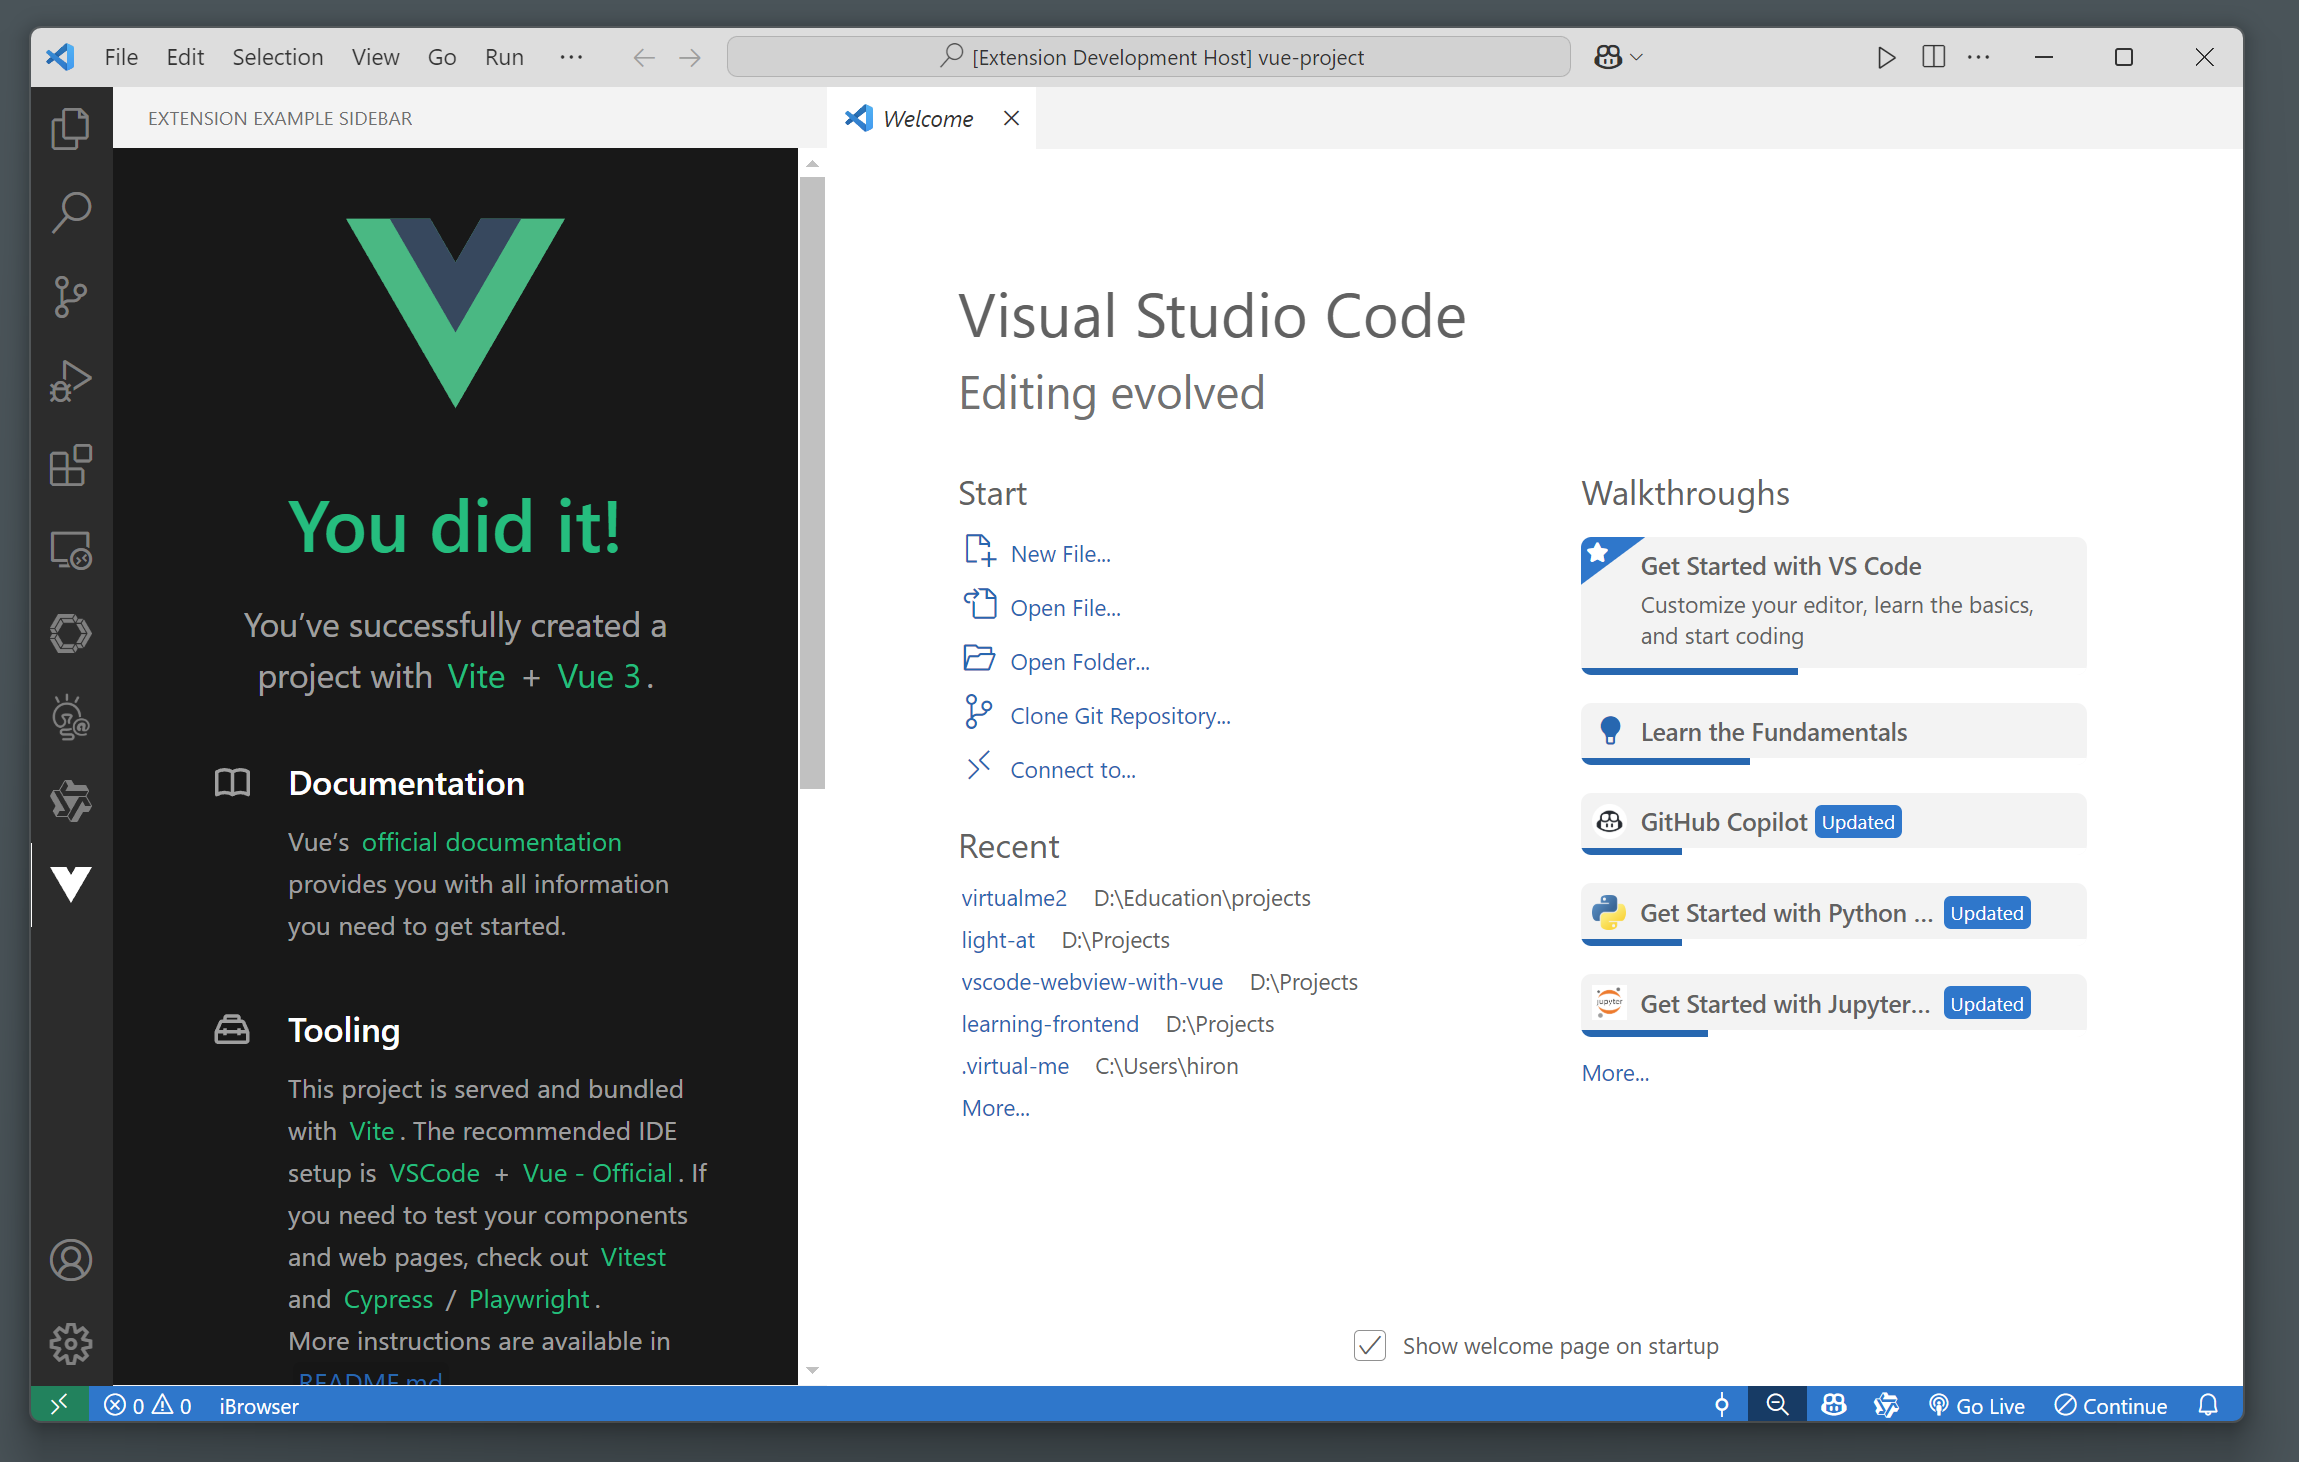
测试是否成功
完成上述操作后,运行插件(在这之前如果修改了前端页面需要先执行 pnpm build 重新构建前端页面),如果侧边栏出现 Vue 的页面说明嵌入成功:
插件与 Webview View 页面的通信
前端通信实现
在前端项目文件夹下的 src/stores 文件夹下新建 vscode.ts 文件,写入如下内容:
import { defineStore } from 'pinia';

declare const acquireVsCodeApi: () => {
    postMessage: (data: any) => any;
};

export const useVsCodeApiStore = defineStore('vsCodeApi', () => {
    const vscode = (typeof acquireVsCodeApi === 'function') ? acquireVsCodeApi() : undefined;

    return { vscode };
})
这里用于提供前端的 vscode 通信接口,如果在开发环境下(比如 pnpm dev启动的页面)获取不到 vscode 通信接口,那么对应的值为 undefined。
然后在该文件下继续创建 sender.ts 文件,用于提供向插件发送消息的功能:
import { defineStore } from 'pinia';
import { useVsCodeApiStore } from './vscode';

export const useSenderStore = defineStore('sender', () => {
    const vscode = useVsCodeApiStore().vscode;

    function initReady(){
        vscode?.postMessage({command: 'init.ready'});
    }

    function sendMessage(message: string){
        vscode?.postMessage({
            command: 'message.send',
            message: message
        });
    }

    return {
        initReady,
        sendMessage
    }
});
这里使用到了 vscode.ts 中的通信接口,该接口就一个方法 postMessage,其中可以发送任何内容,不过建议定义消息发送标准。比如我这里每条发送的消息都是一个对象,其中必定有 command 属性,表示该消息的类型。
然后在该文件下继续创建 listener.ts 文件,用于提供接收插件消息的功能:
import { defineStore } from 'pinia';
import { ref } from 'vue';
export const useListenerStore = defineStore('listener', () => {
    const receive = ref<string>('');

    window.addEventListener('message', event => {
        const message = event.data;
        switch (message.command) {
            case 'extension.message':
                receive.value = message.data;
                break;
            default:
                receive.value = `其他类型的消息:\n${JSON.stringify(message)}`;
        }
    });

    return {
        receive
    };
})
这里将接收的消息保存到全局数据中,然后 vue 组件就可以直接读取到了。
重写前端页面
为了能清楚的看到通信的效果,我们简单重写一下前端页面。编写界面的过程可以执行 pnpm dev:1 运行前端项目,这样就能实时看到界面更改。页面内容包括:信息输入框、发送信息按钮、接收信息展示框;功能主要包括:点击按钮发送数据、显示接收的数据。
主要文件的参考代码如下:
src/assets/main.css
html {
    box-sizing: border-box;
    font-size: 13px;
}

body {
    margin: 0;
    padding: 0;
    overflow: hidden;
    font-weight: normal;
    background-color: var(--vscode-sideBar-background, #f2f2f2);
}

*:focus {
	outline-color: var(--vscode-focusBorder) !important;
}

button {
	border: none;
	padding: var(--input-padding-vertical) var(--input-padding-horizontal);
	width: 100%;
	text-align: center;
	outline: 1px solid transparent;
	outline-offset: 2px !important;
	color: var(--vscode-button-foreground, #ffffff);
	background: var(--vscode-button-background, #705697);
}

button:hover {
	cursor: pointer;
	background: var(--vscode-button-hoverBackground, #5a4579);
}

button:focus {
	outline-color: var(--vscode-focusBorder);
}

button.secondary {
	color: var(--vscode-button-secondaryForeground);
	background: var(--vscode-button-secondaryBackground);
}

button.secondary:hover {
	background: var(--vscode-button-secondaryHoverBackground);
}
src/App.vue
<template>
  <CommunicationTest />
</template>

<script setup lang="ts">
import CommunicationTest from './components/CommunicationTest.vue'
import { useSenderStore } from './stores/sender'
import { onMounted } from 'vue'

onMounted(() => {
  // 组件挂载完成后向插件发送消息
  useSenderStore().initReady()
})
</script>

<style scoped>

</style>
scr/componets/CommunicationTest.vue
<template>
    <div class="container">
        <textarea v-model="send" placeholder="输入发送内容"></textarea>
        <button @click="sendMessage">发送信息</button>
        <textarea disabled v-model="receive" placeholder="接收到的信息"></textarea>
    </div>
</template>

<script setup lang="ts">
import { ref } from 'vue'
import { storeToRefs } from 'pinia'
import { useListenerStore } from '@/stores/listener'
import { useSenderStore } from '@/stores/sender'

const send = ref<string>('')
const { receive } = storeToRefs(useListenerStore())

function sendMessage() {
    useSenderStore().sendMessage(send.value)
    send.value = ''
}
</script>

<style scoped>
.container {
    margin-left: 10%;
    width: 80%;
}
textarea {
    width: 100%;
    resize: vertical;
    margin: 20px auto;
}
button {
    margin-left: 20%;
    padding: 5px;
    width: 60%;
}
</style>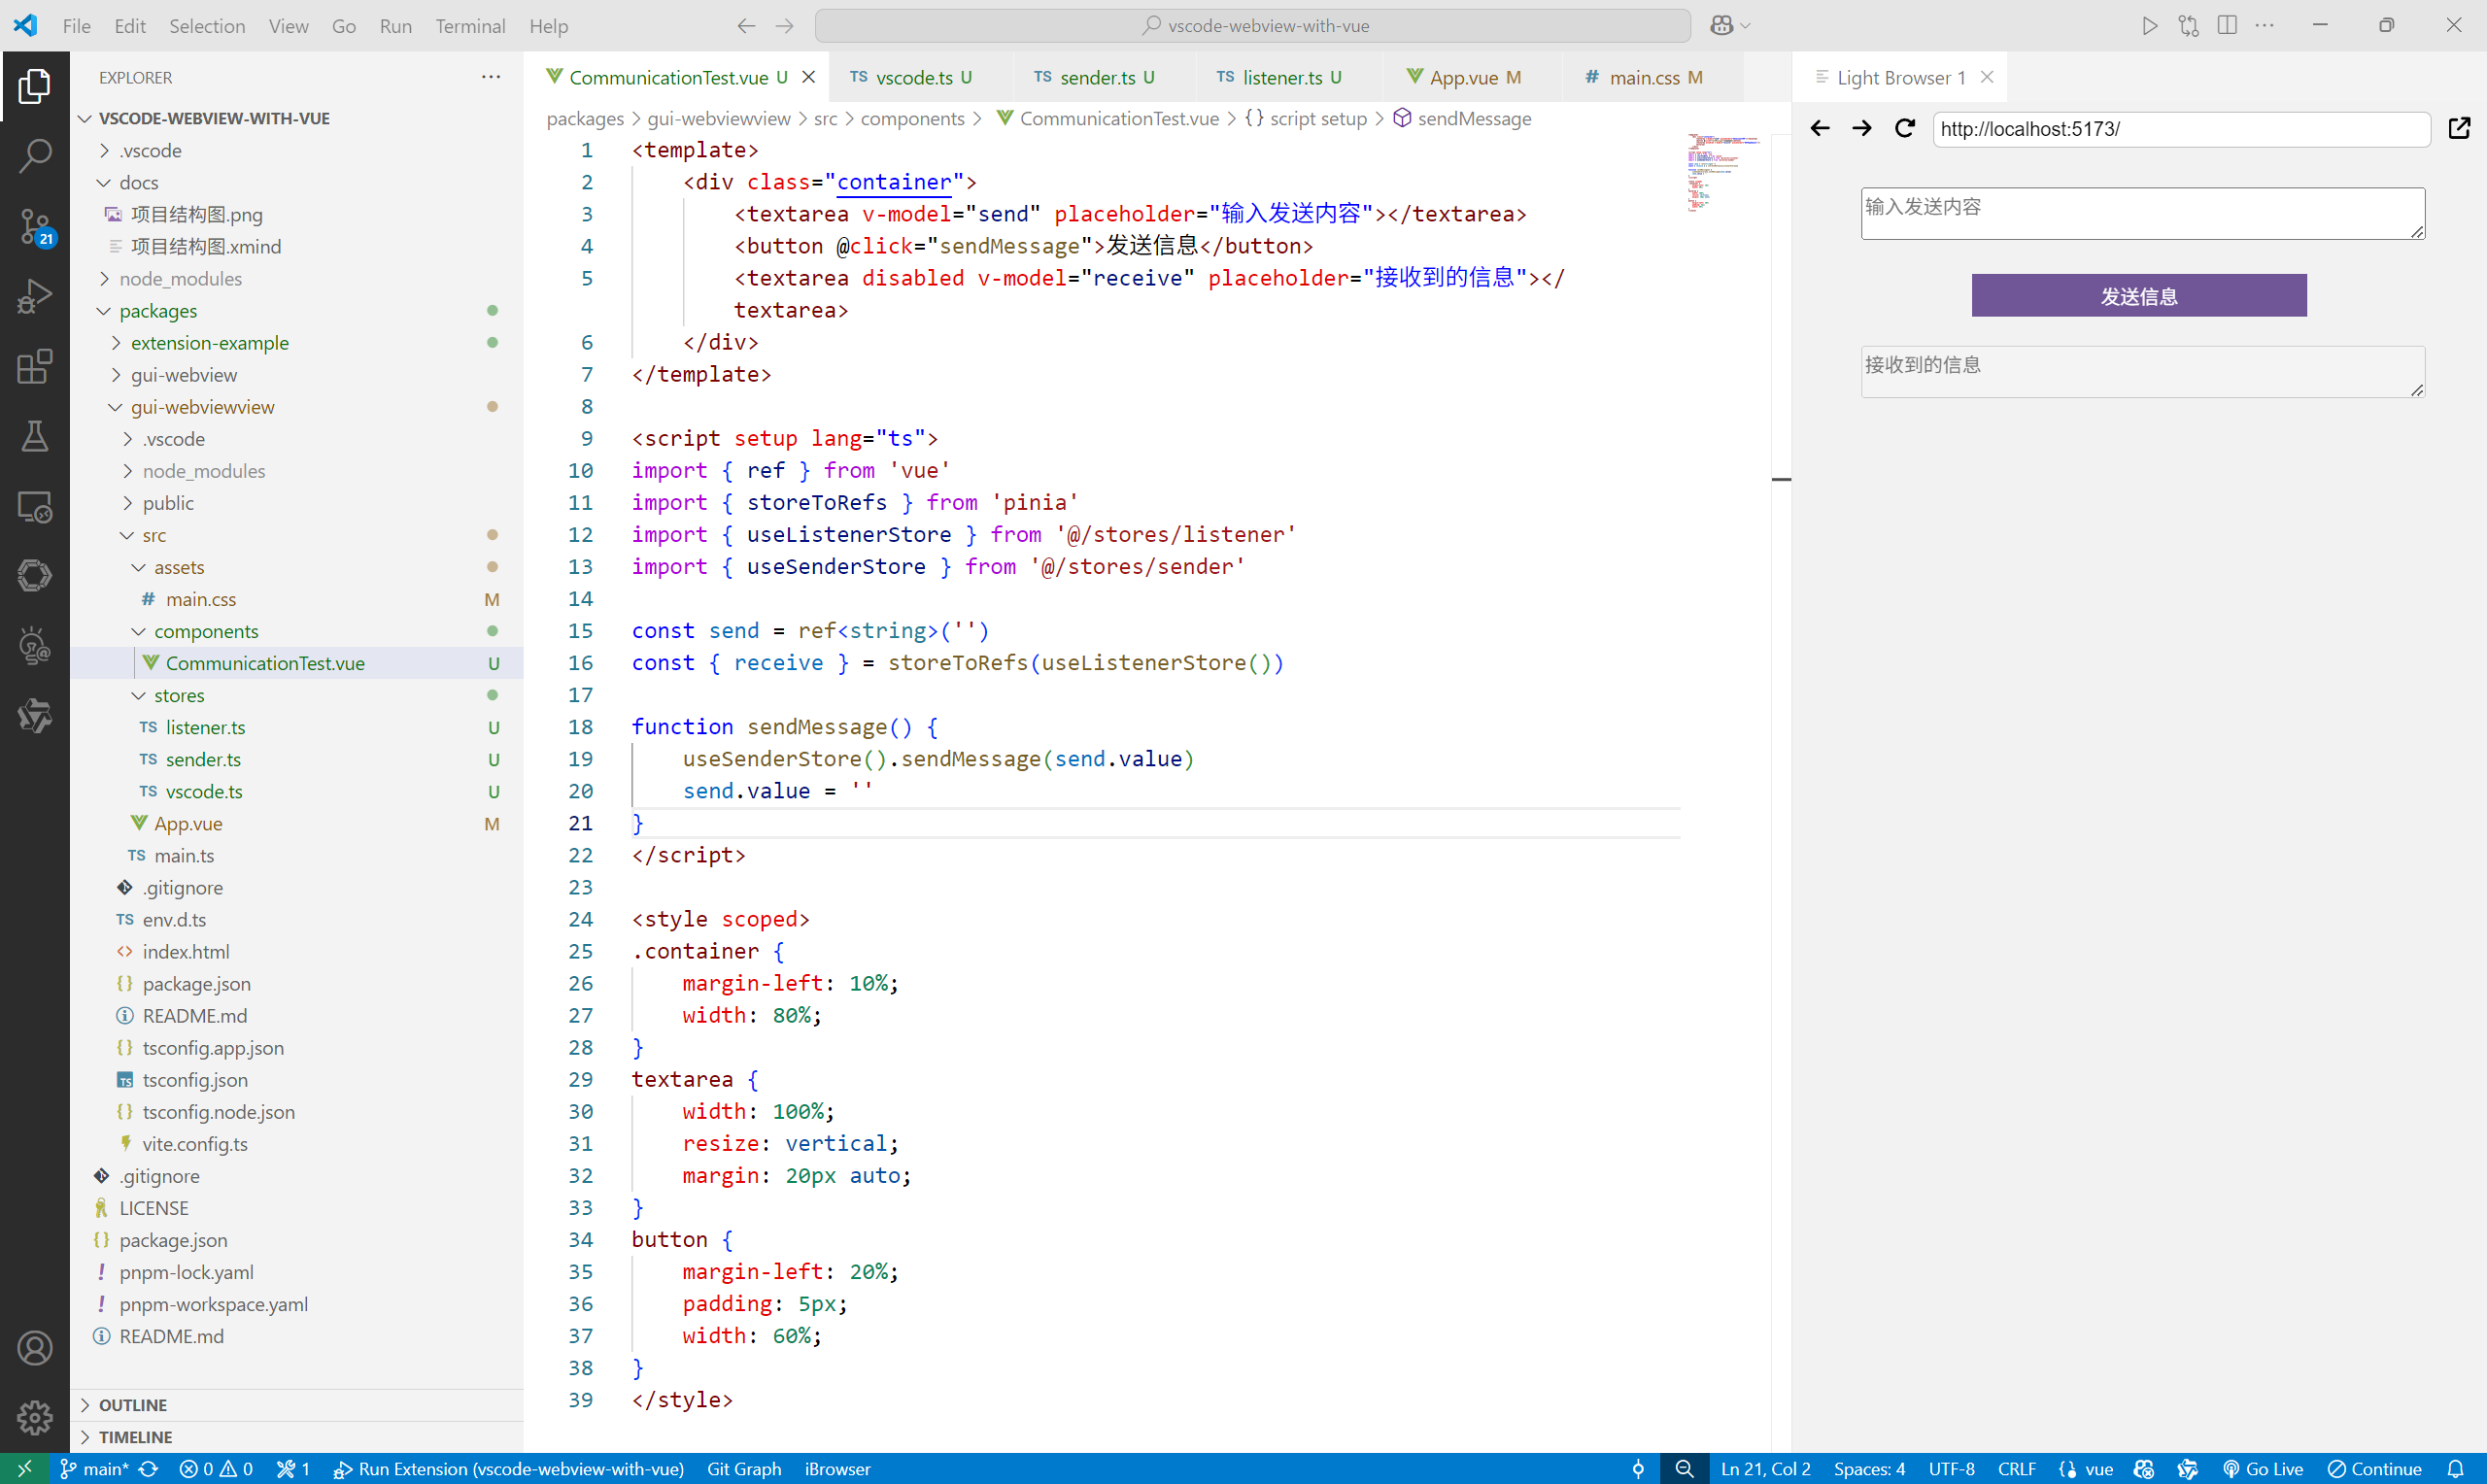
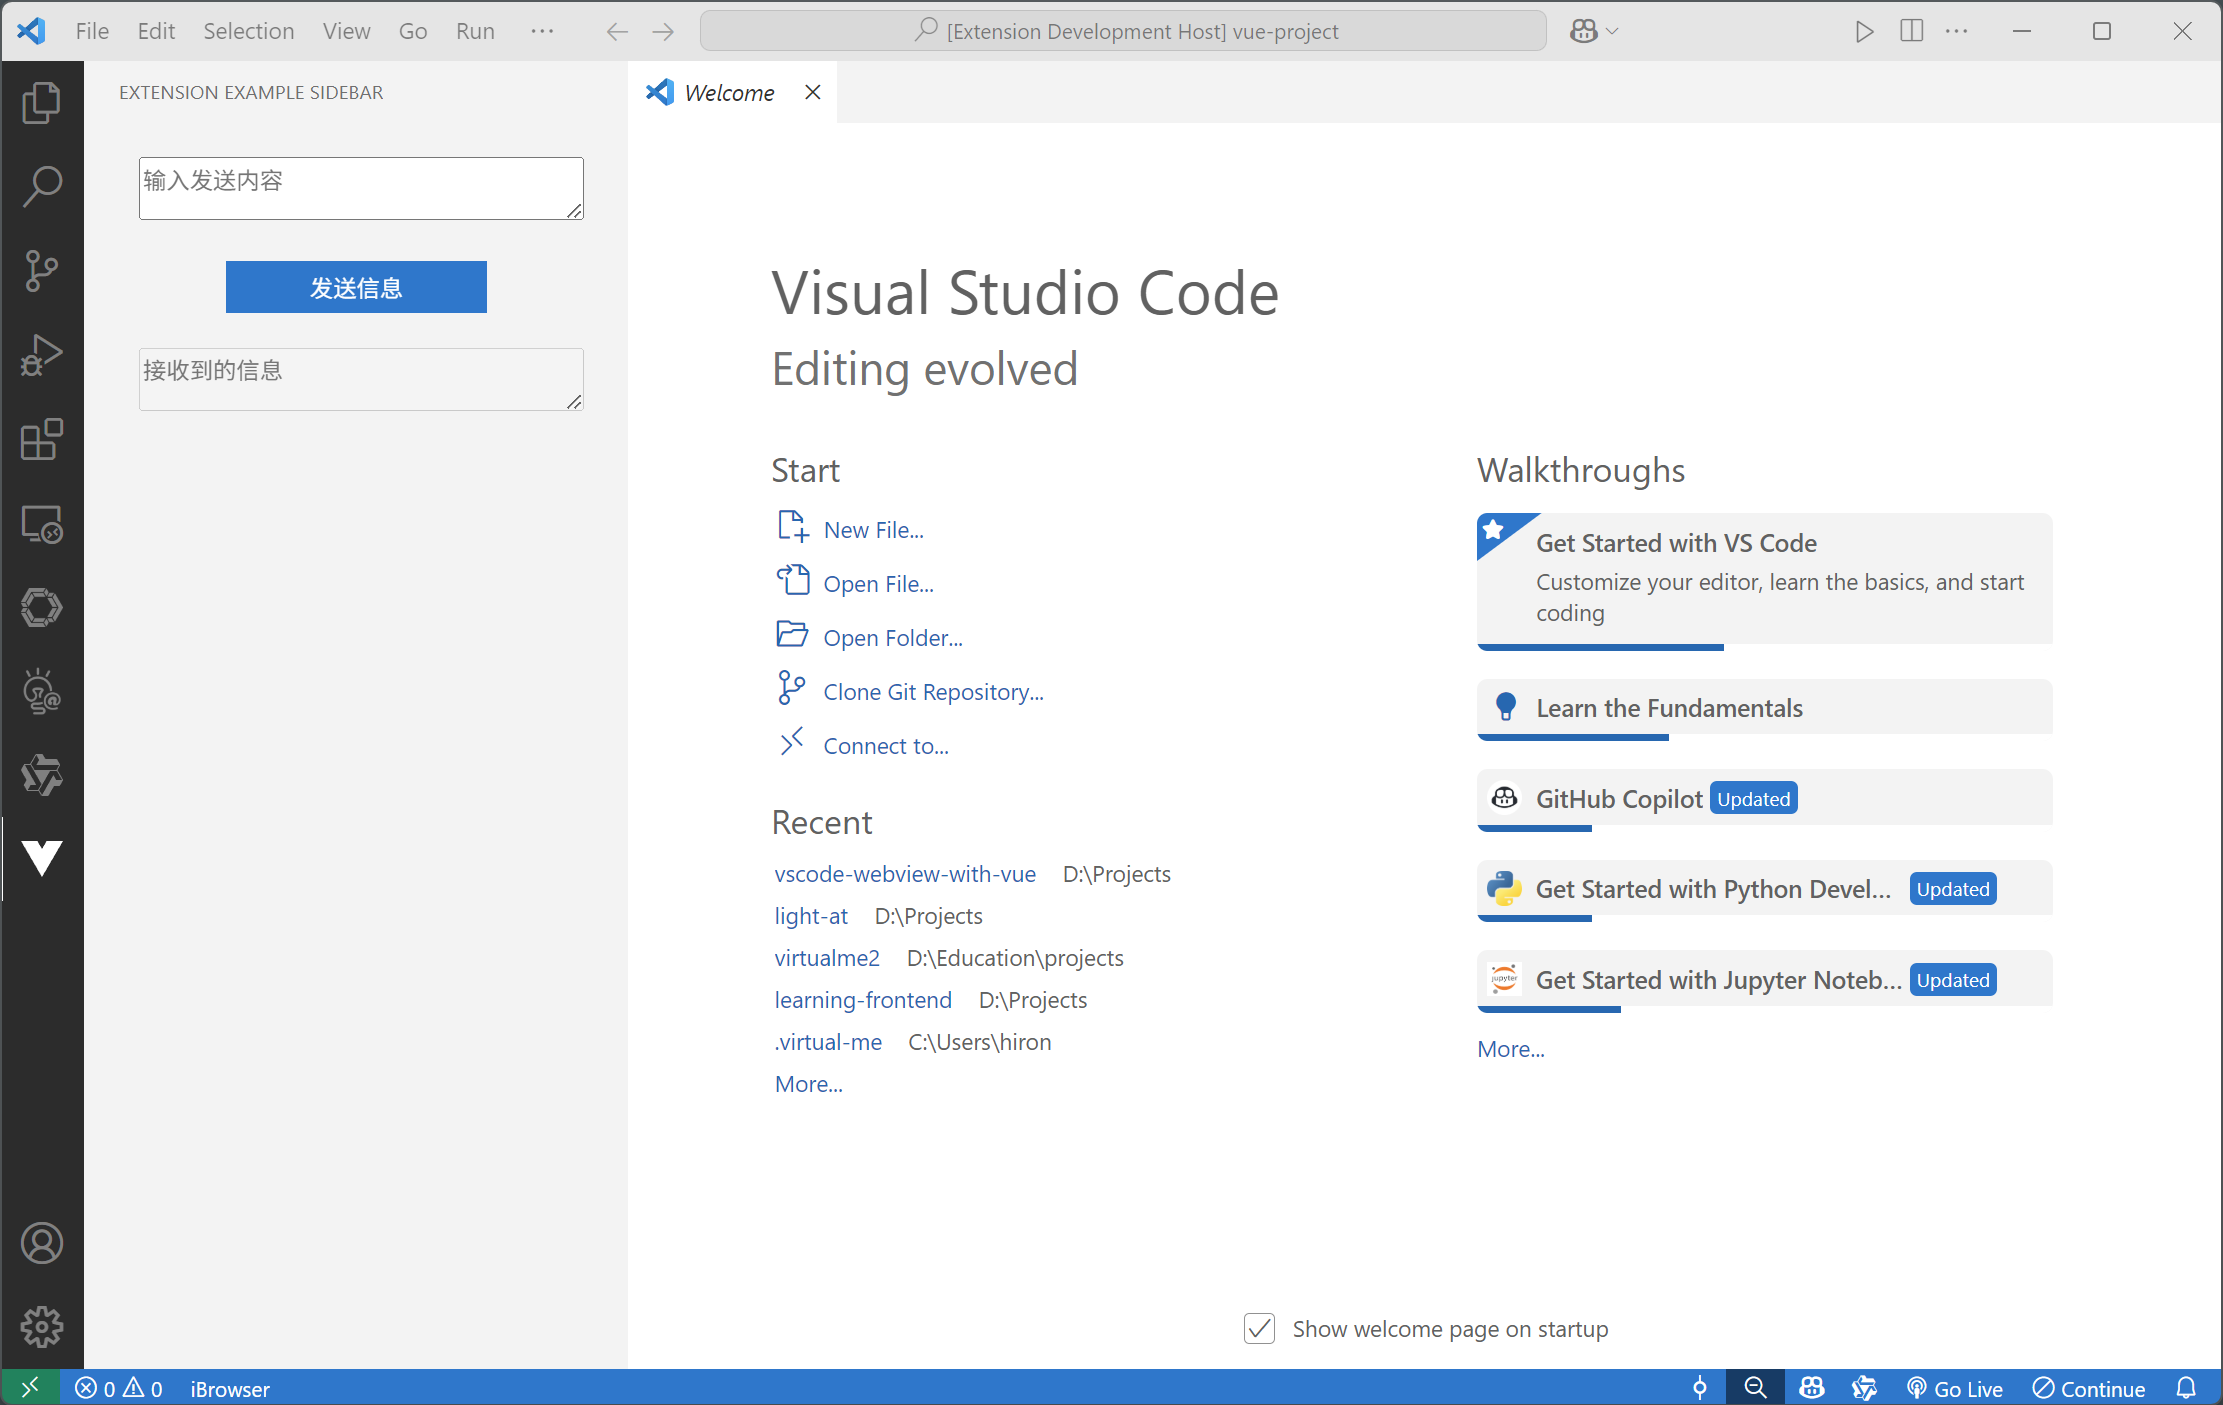
写好后执行 pnpm build:1 进行构建,然后运行插件,看看侧边栏页面是否更新:
插件通信实现
在插件文件夹的 src 文件夹下新建 communicaion 文件夹,在其中新建 MessageSender.ts 文件
import * as vscode from 'vscode';
export class MessageSender{
public static view: vscode.WebviewView | undefined;
public static respondInit(){
MessageSender.view?.webview.postMessage({
command: 'extension.init.respond',
data: '插件收到前端初始化完成的消息,特此回复'
});
}
public static respondMessage(message: string){
MessageSender.view?.webview.postMessage({
command: 'extension.message',
data: `插件已经收到前端消息:\n${message}\n特此回复`
});
}
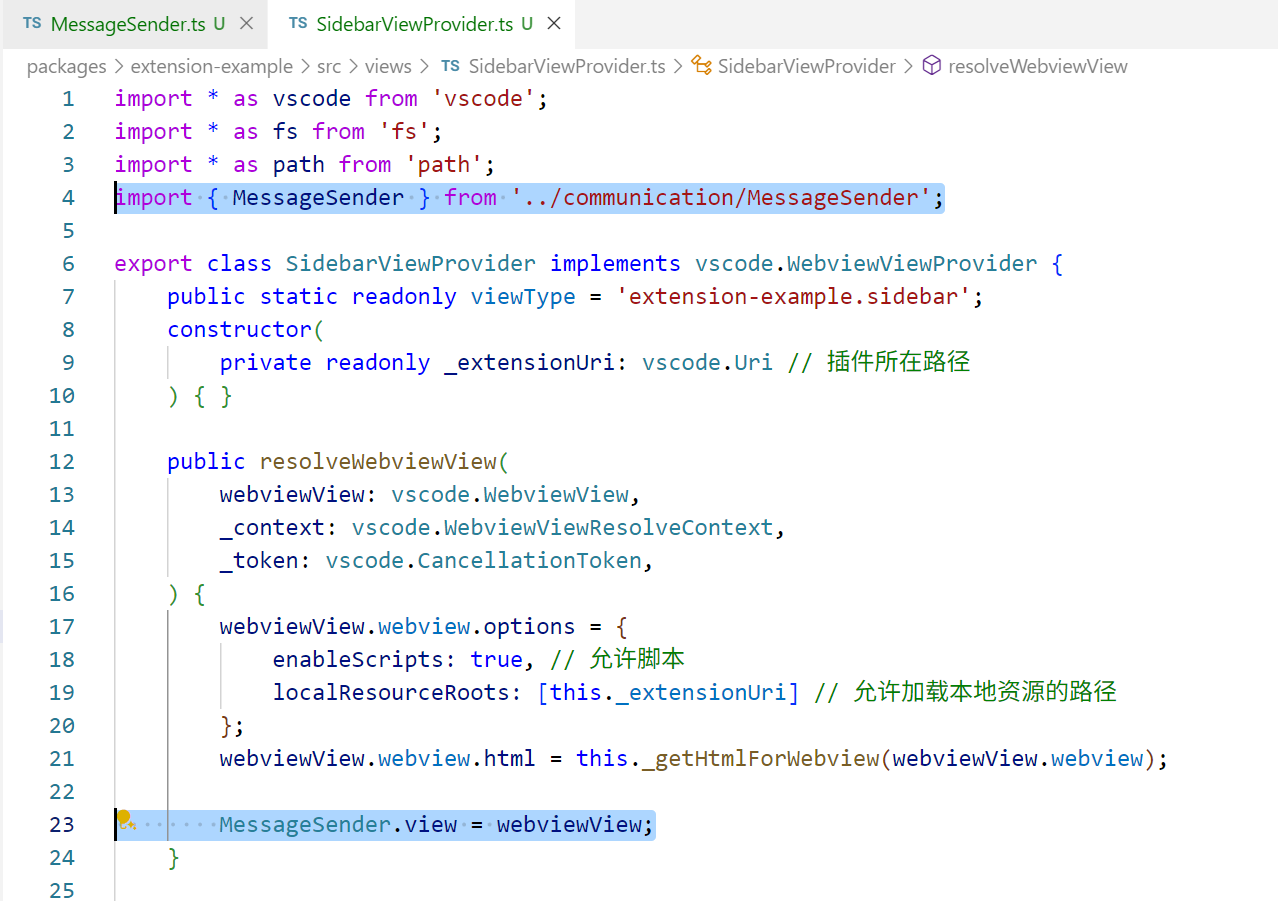
}该文件提供向前端发送消息的功能,这是一个只有静态属性和静态方法的类,其中静态属性需要在页面提供类中初始化,打开插件文件夹下 src/views/SidebarViewProvider.ts 文件,添加内容:
然后回到 communicaion 文件夹,创建 RequestHandler.ts 文件:
import * as vscode from 'vscode';
import { MessageSender } from './MessageSender';

export class RequestHandler {
    public static view: vscode.WebviewView | undefined;

    public static handleRequest(message: any) {
        // console.log('Plugin receive:', JSON.stringify(message));
        switch (message.command) {
            case 'init.ready':
                RequestHandler.respondInit();
                break;
            case 'message.send':
                RequestHandler.respondMessage(message.message);
                break;
        }
    }

    private static respondInit(){
        vscode.window.showInformationMessage('插件收到前端初始化完成的消息');
        MessageSender.respondInit();
    }

    private static respondMessage(message: string){
        vscode.window.showInformationMessage(`插件收到前端消息:\n${message}\n`);
        MessageSender.respondMessage(message);
    }
}
该文件实现的类提供接收消息处理的功能,这里实现比较简单,你可以根据需求进行修改。
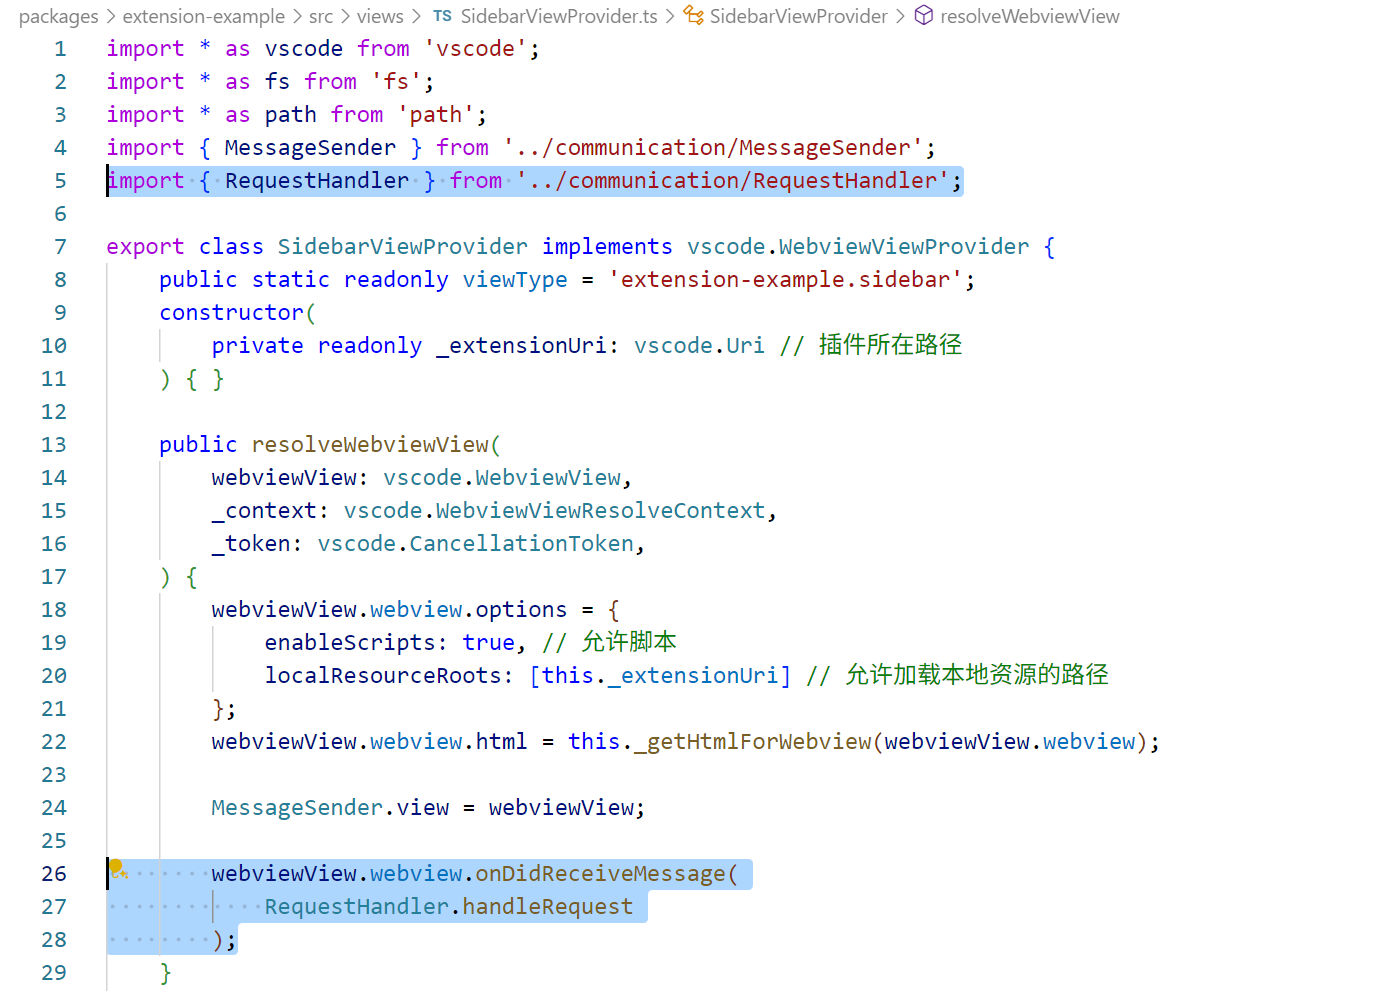
需要打开插件文件夹下 src/views/SidebarViewProvider.ts 文件,添加内容,用于监听前端发送的消息并传递给 RequestHandler 类进行处理。
最后需要注意插件端和前端消息发送和接收的一致性,也就是约定好消息的格式,每个参数的名称和类型,防止接收到错误的消息或接收失败。
测试是否成功
如果修改了前端页面一定要记得执行 pnpm build 进行构建。
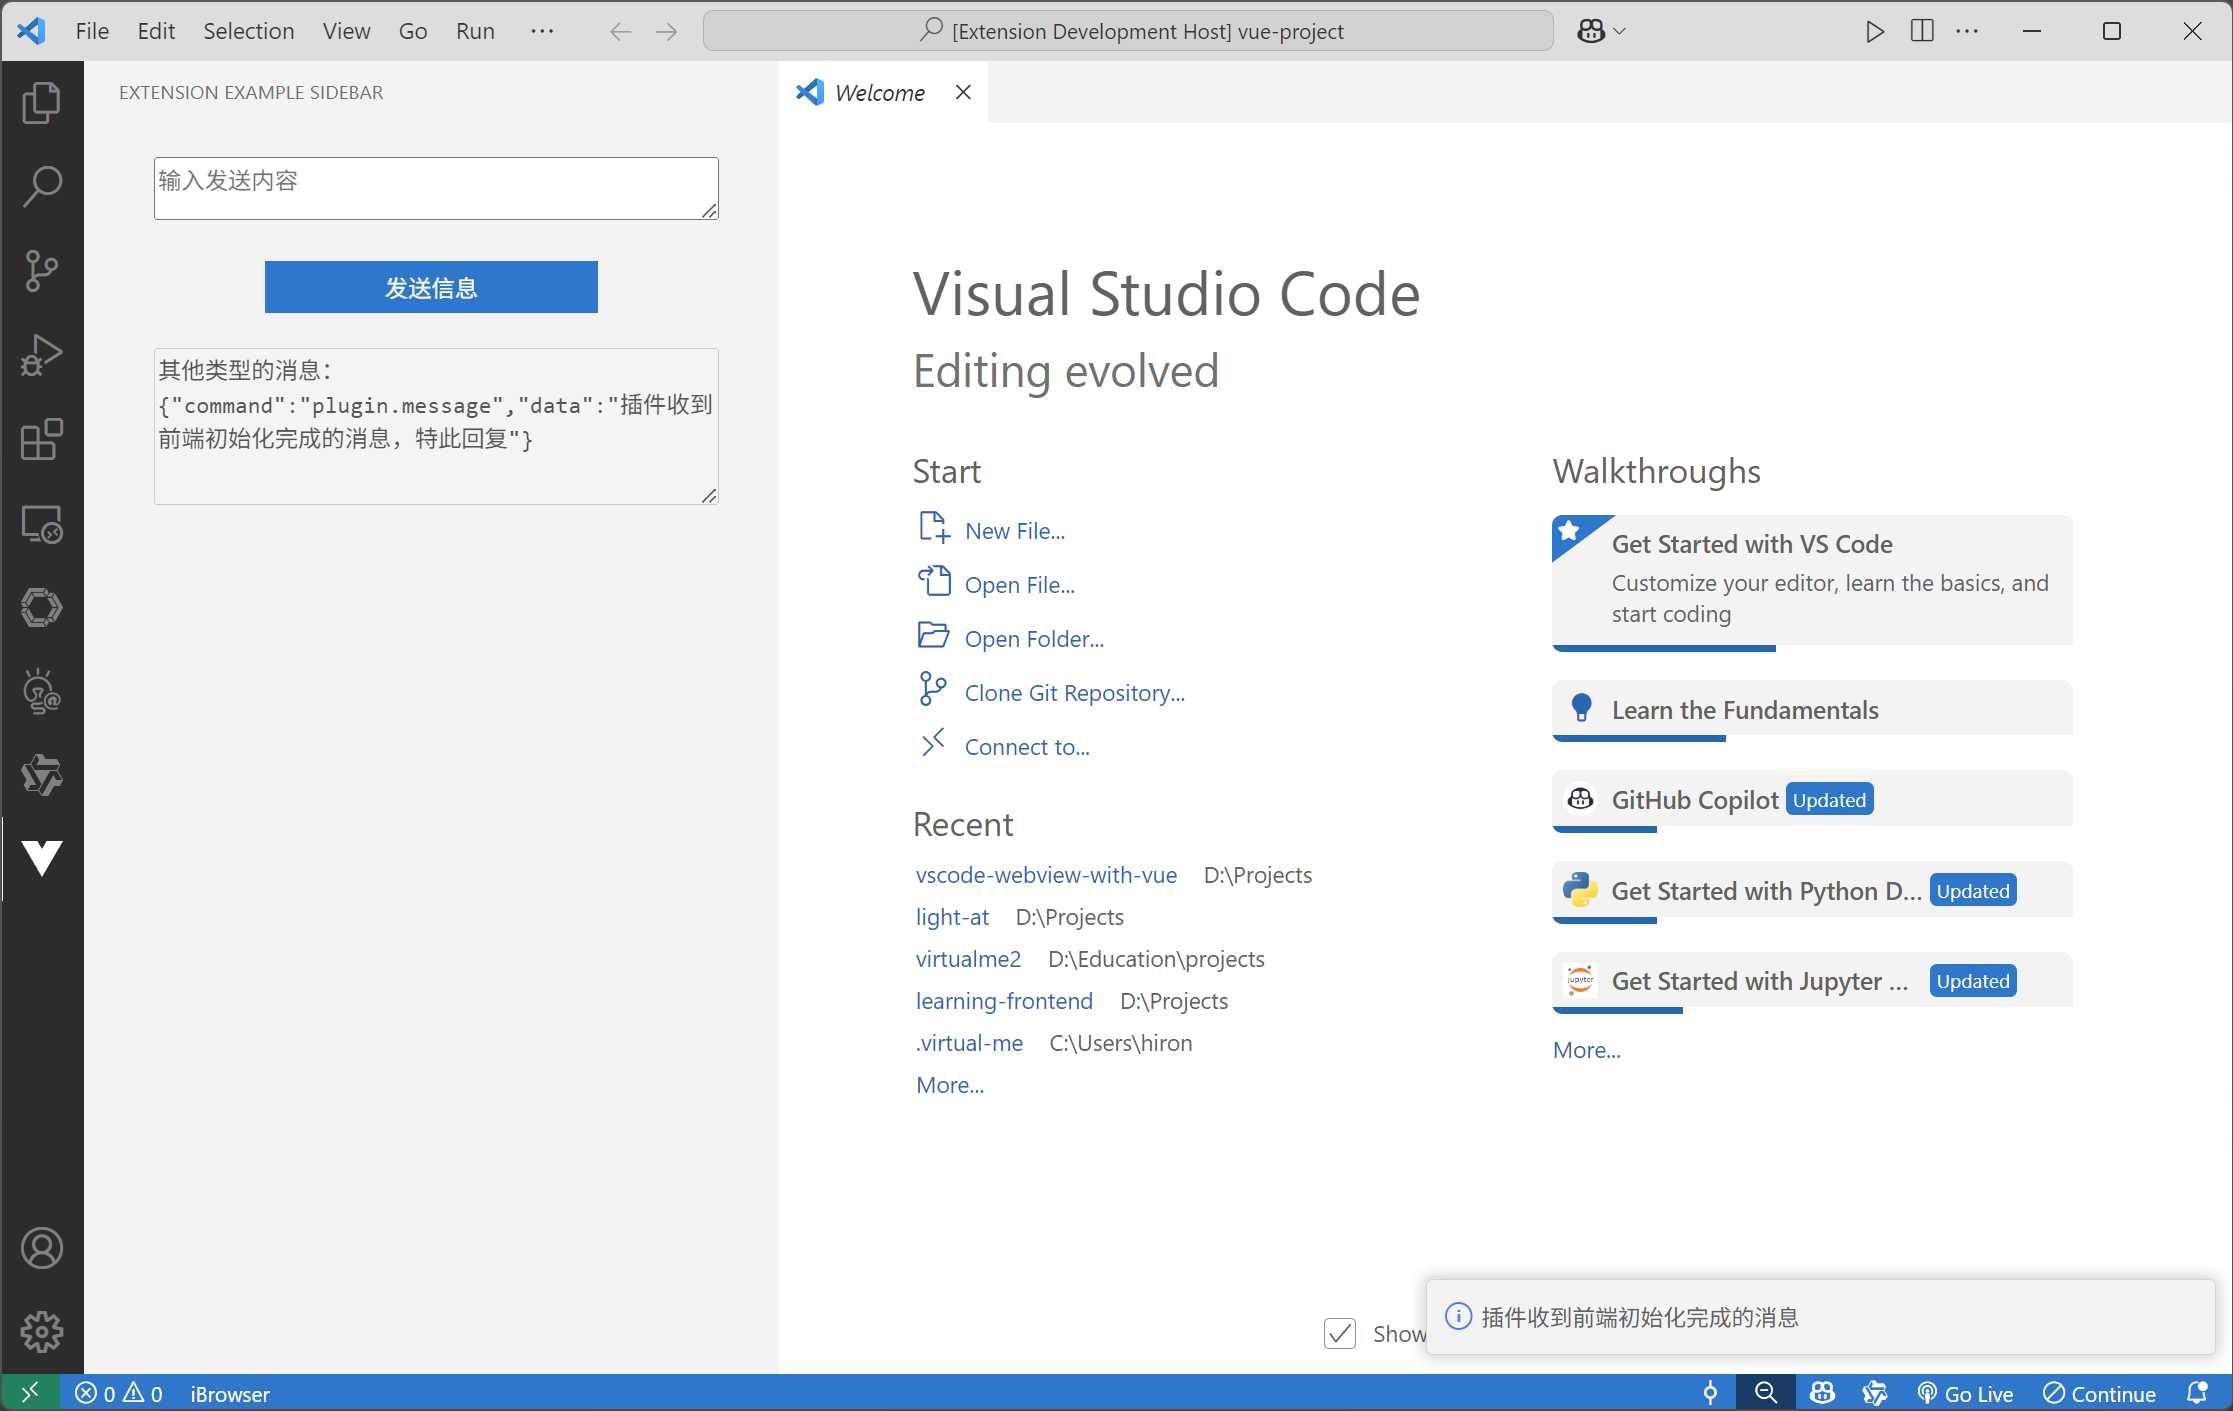
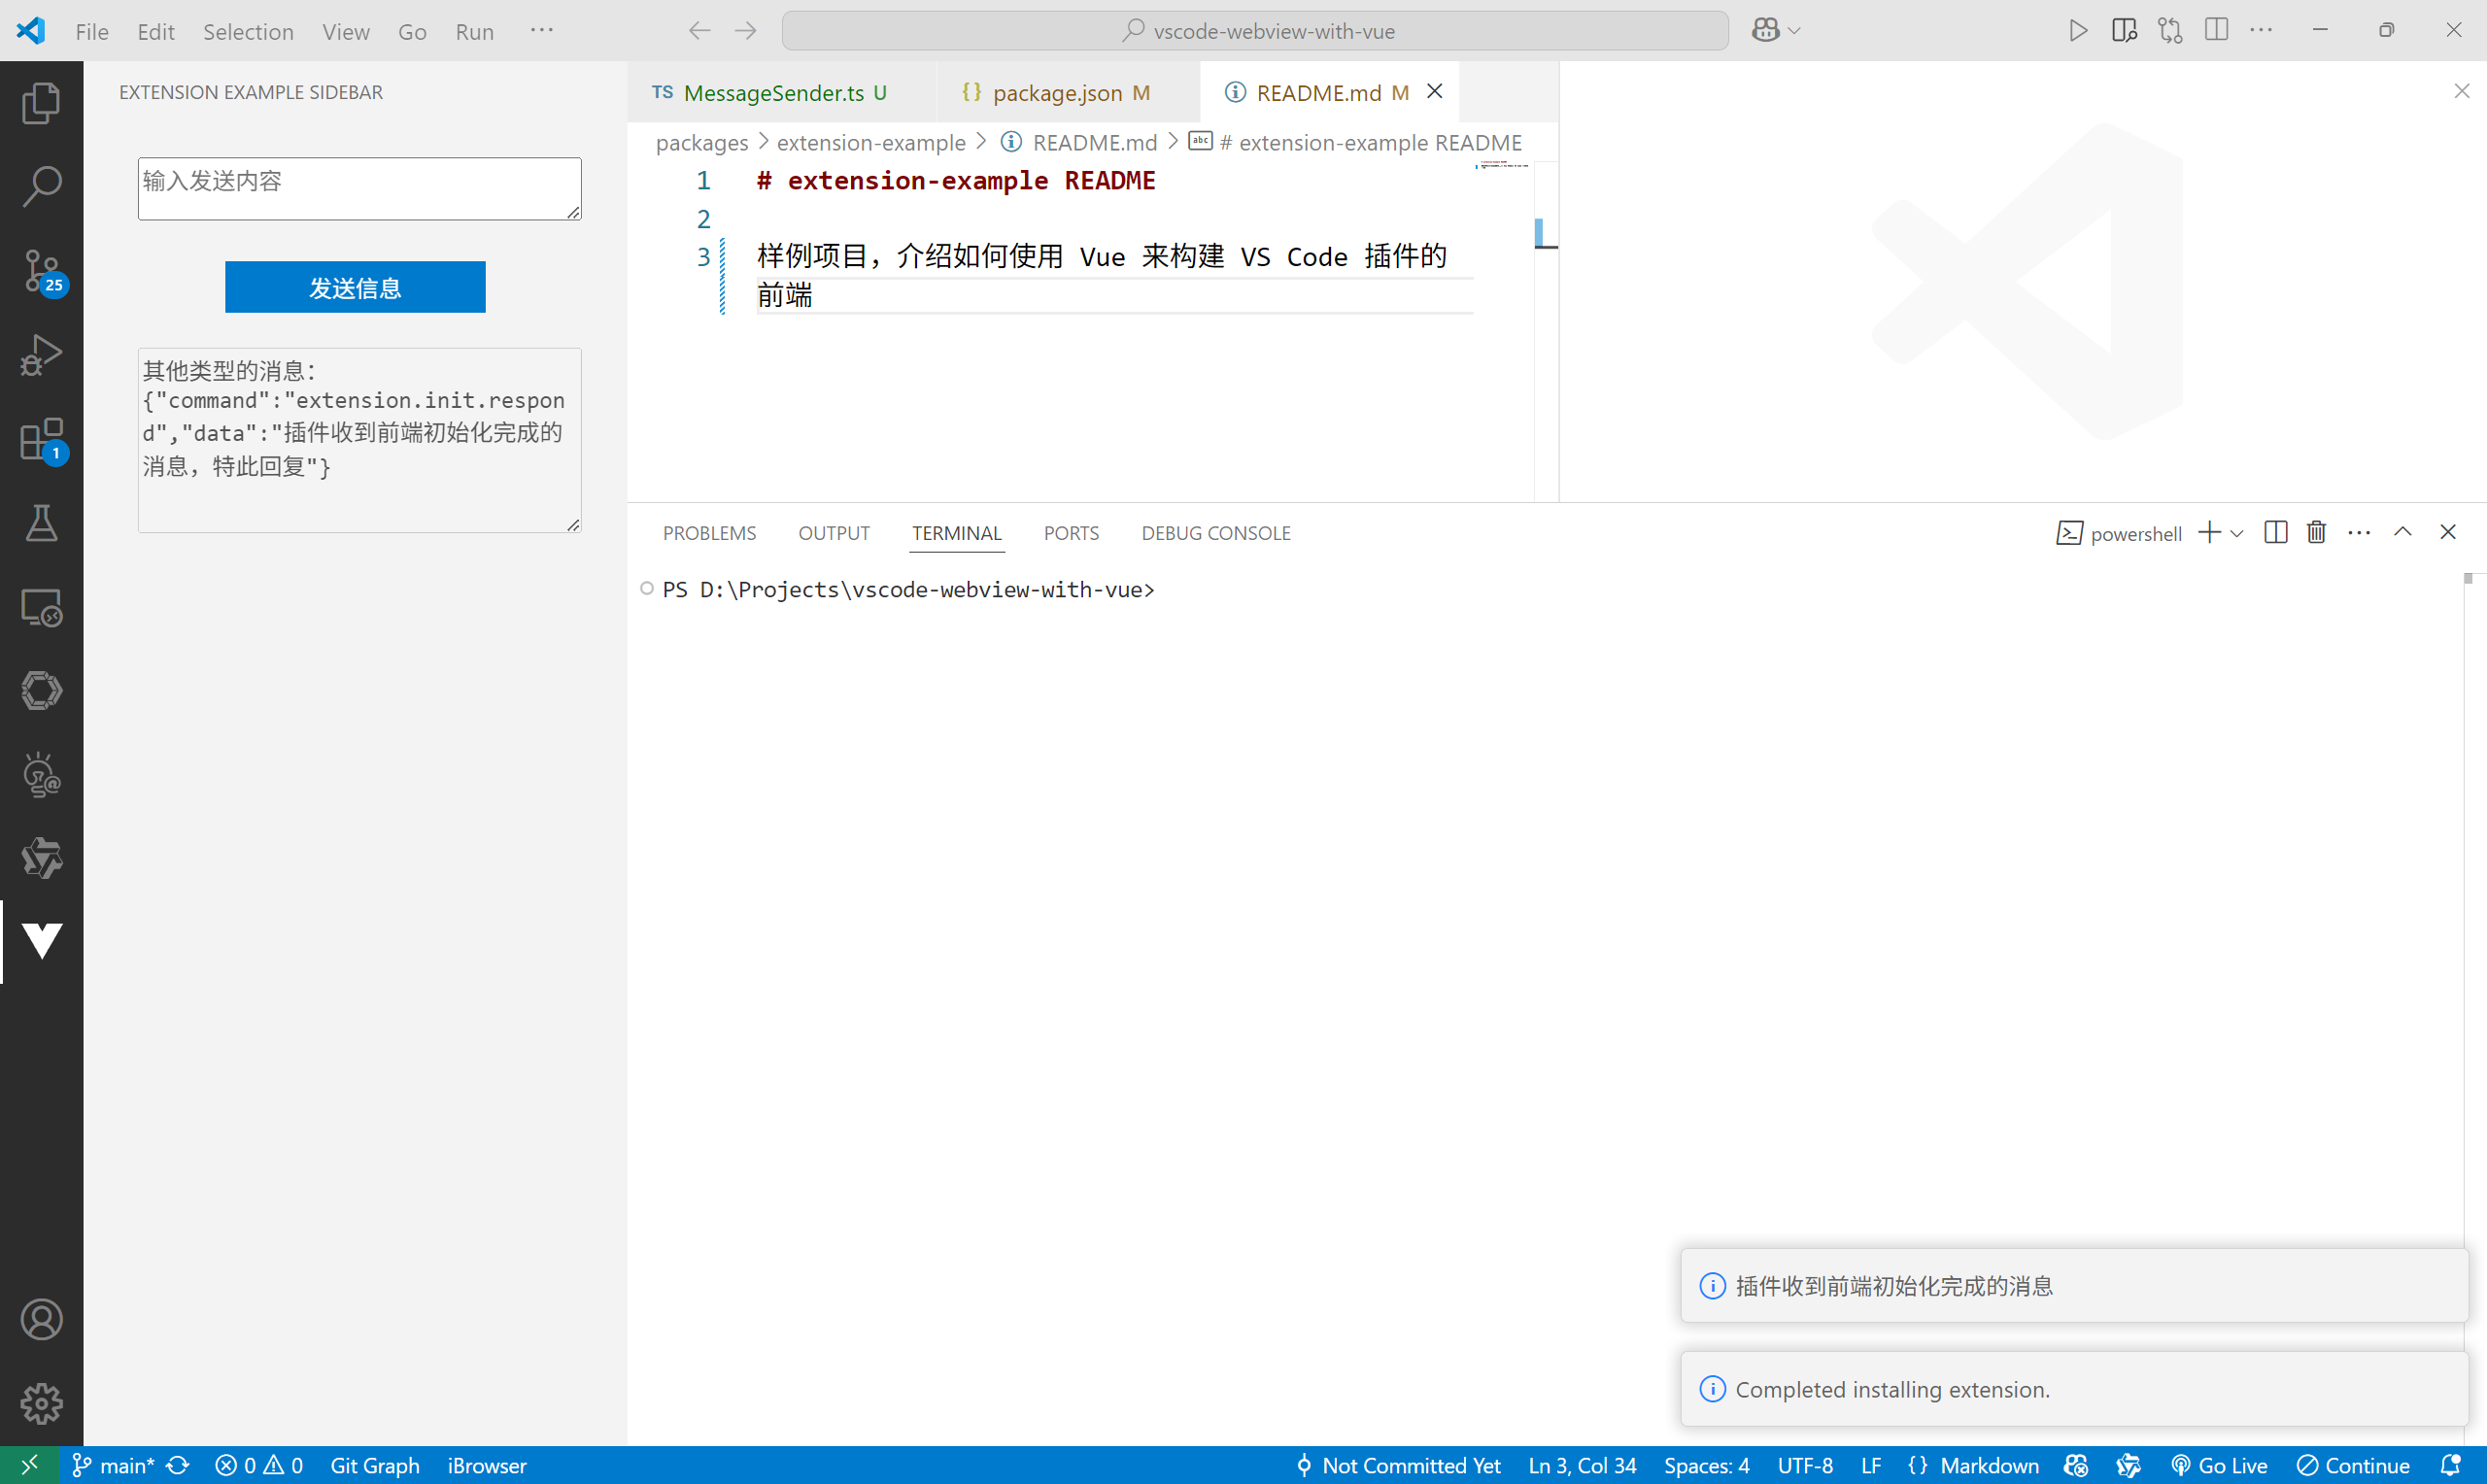
运行插件,首先可以看到插件接收到了前端初始化完成后发出的消息,然后回信给前端,前端收到了消息并显示在了第二个输入框里。
然后我们在输入框里写一下内容,点击按钮,看插件是否能接收到并回复:
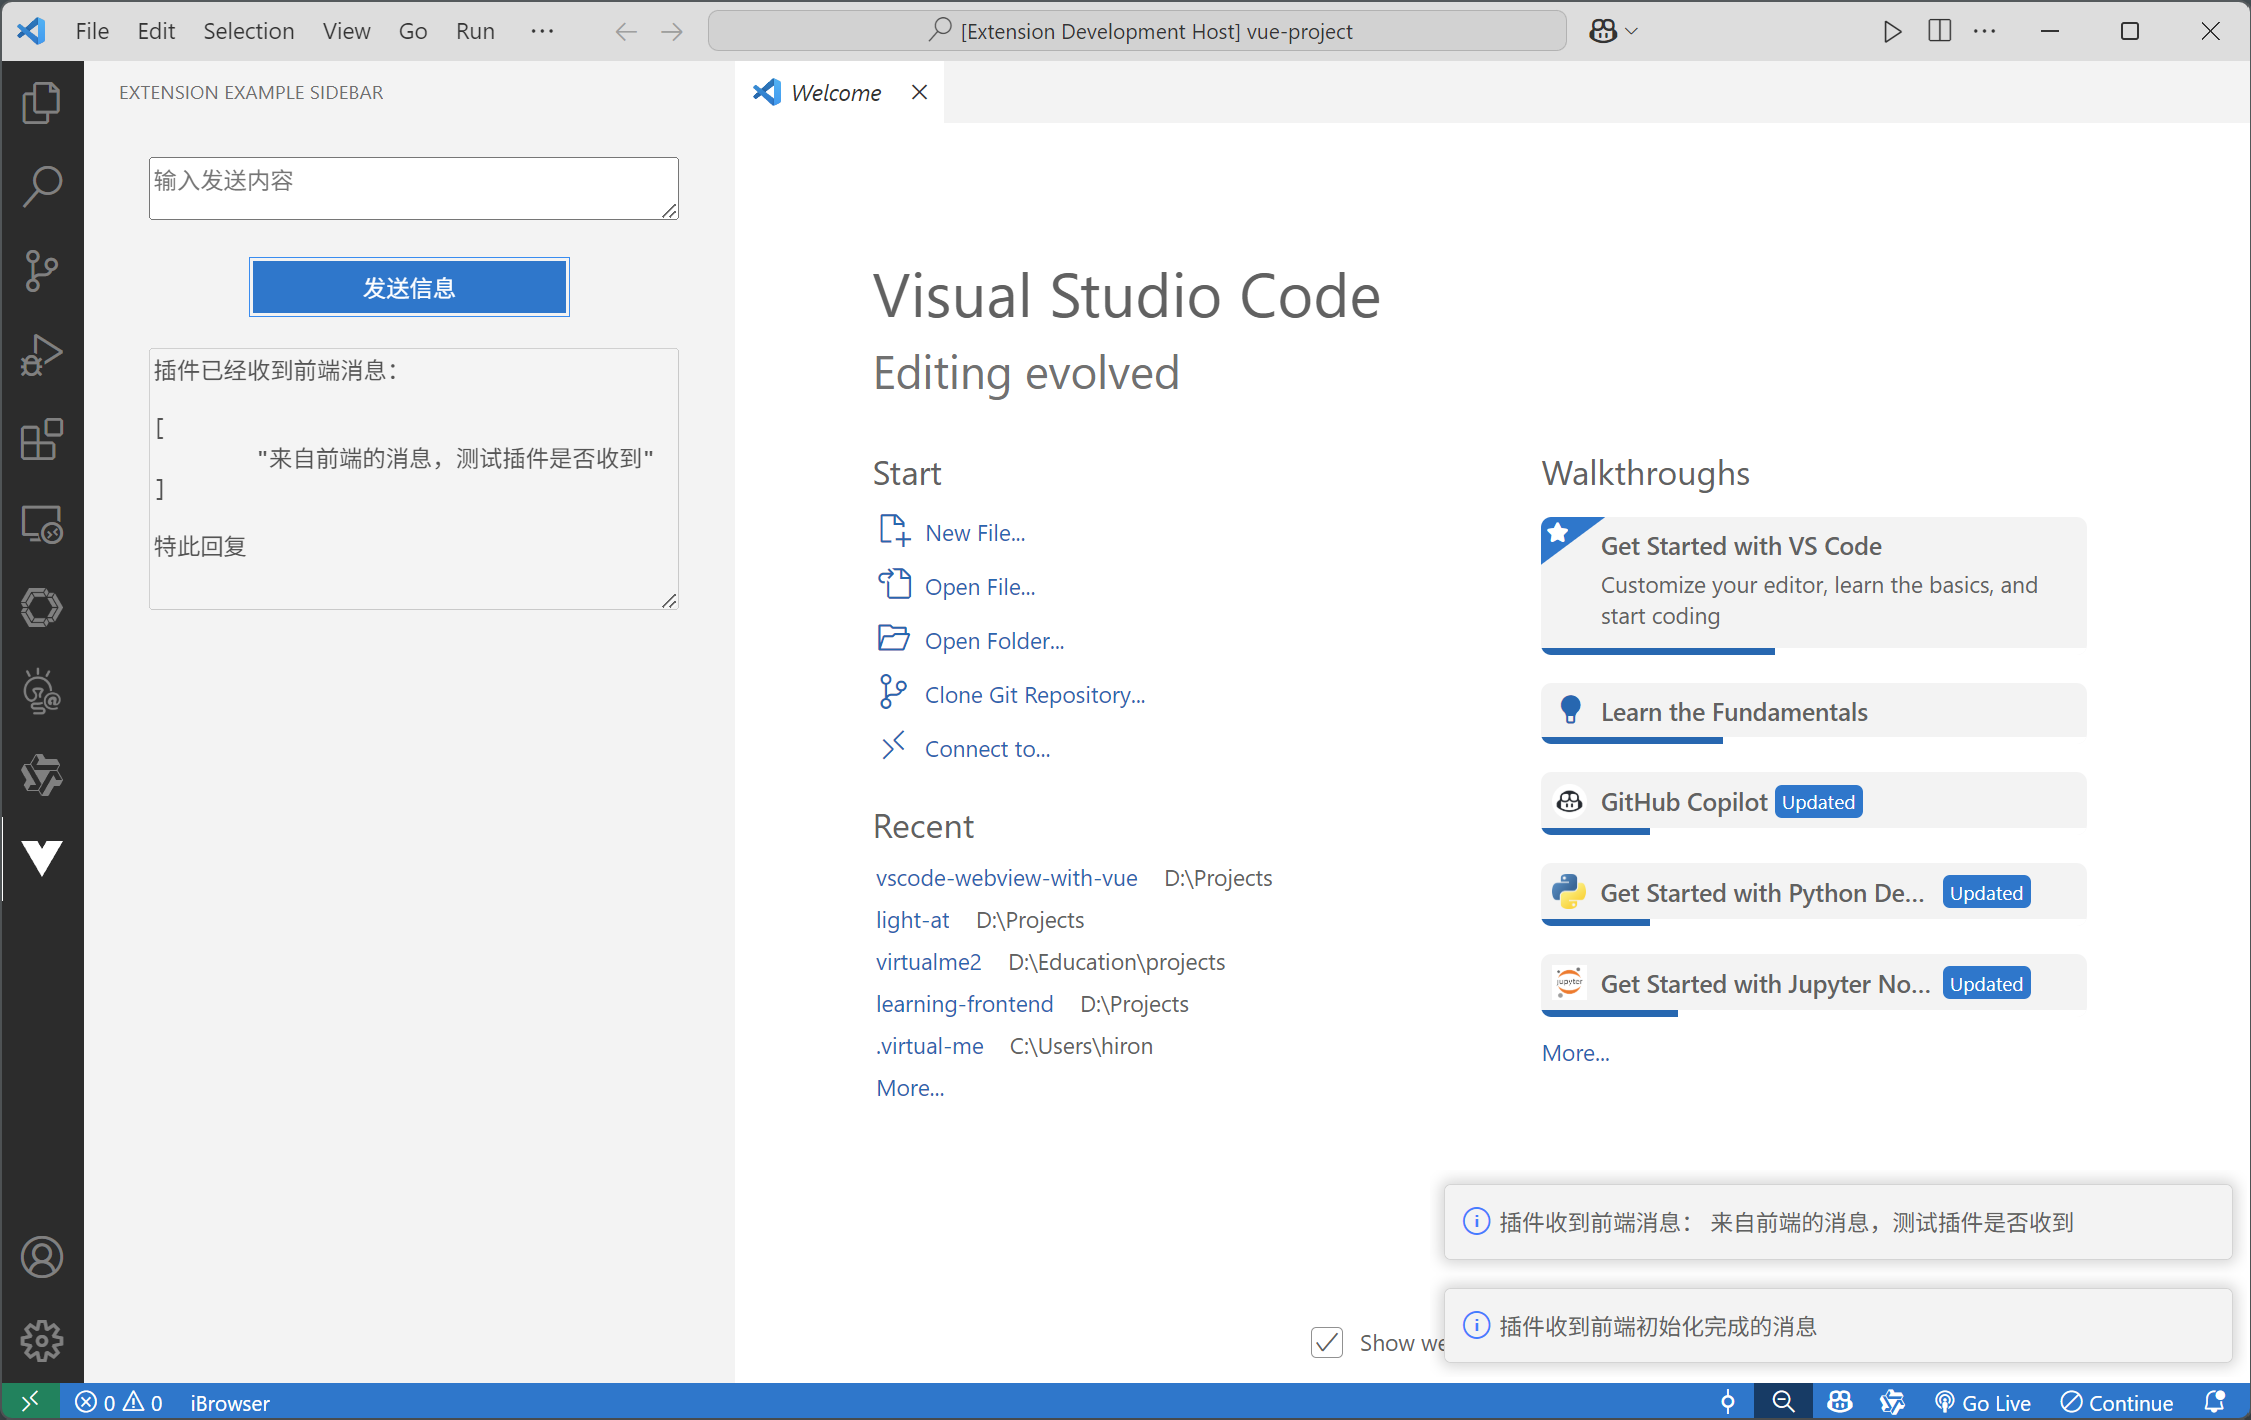
由此可以看到,插件与前端可以正常通信。
在插件中嵌入 Webview 页面
这部分先咕了,后续有时间再更新。
插件与 Webview 页面的通信
这部分也咕了,后续有时间再更新。
插件打包
添加打包指令
打开插件文件夹的 package.json 文件,新增指令:
"vsce:package": "vsce package --no-dependencies"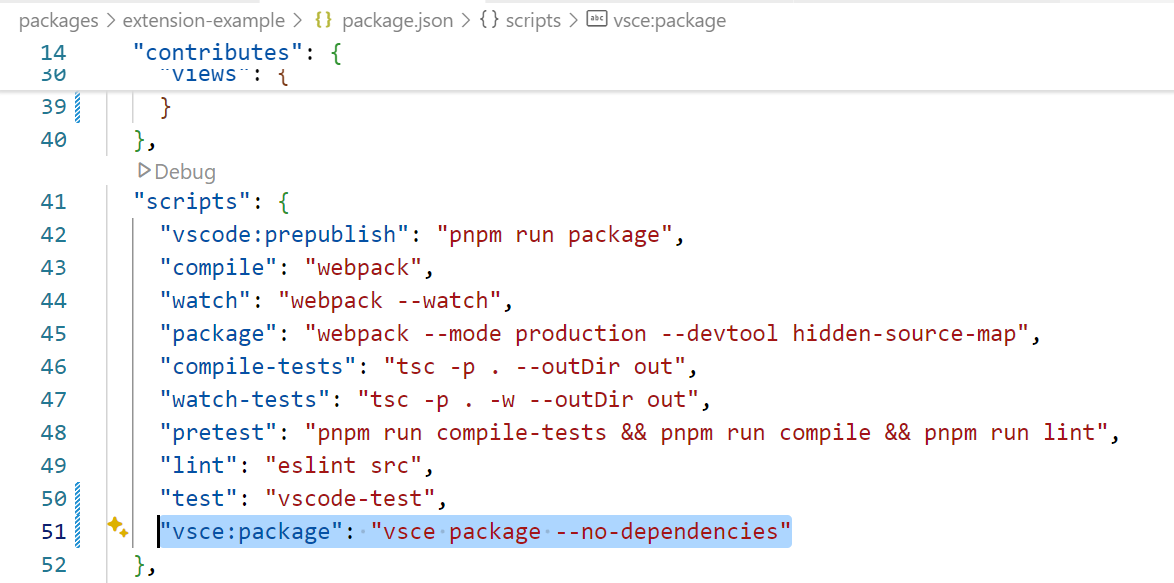
再打开根目录下的 package.json 文件,新增指令,其中 [name] 是插件项目的名称。
"package": "pnpm run -F [name] vsce:package"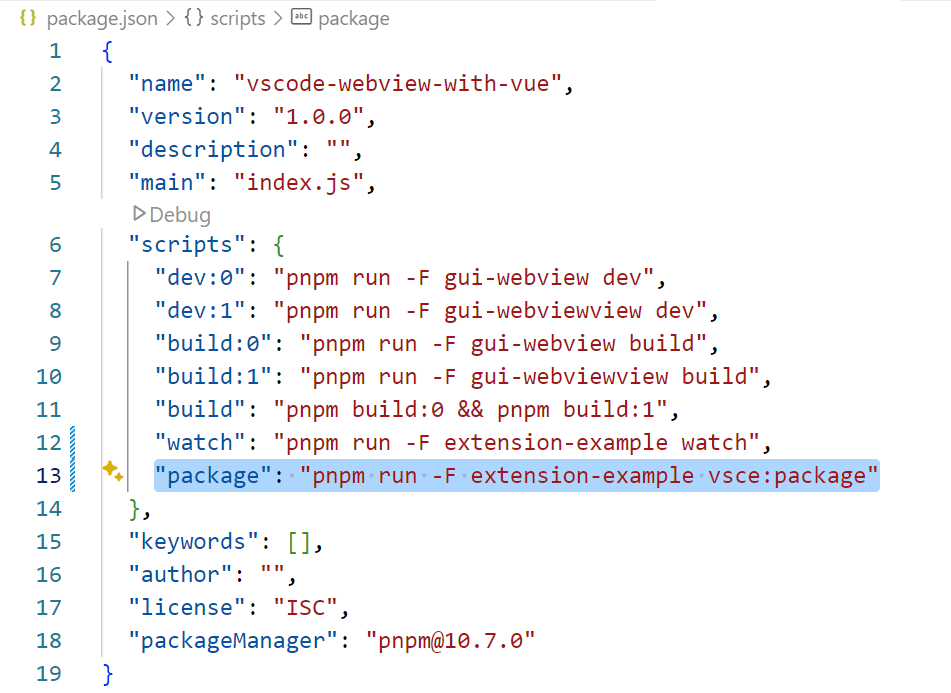
测试打包指令
再修改一下插件目录下的 README.md 文件(不改构建会报错)。
最后在根目录下执行 pnpm package 命令,一切顺利的话就开始构建了,因为配置文件缺少部分信息,构建过程中会有警告,输入 y 按回车即可继续。
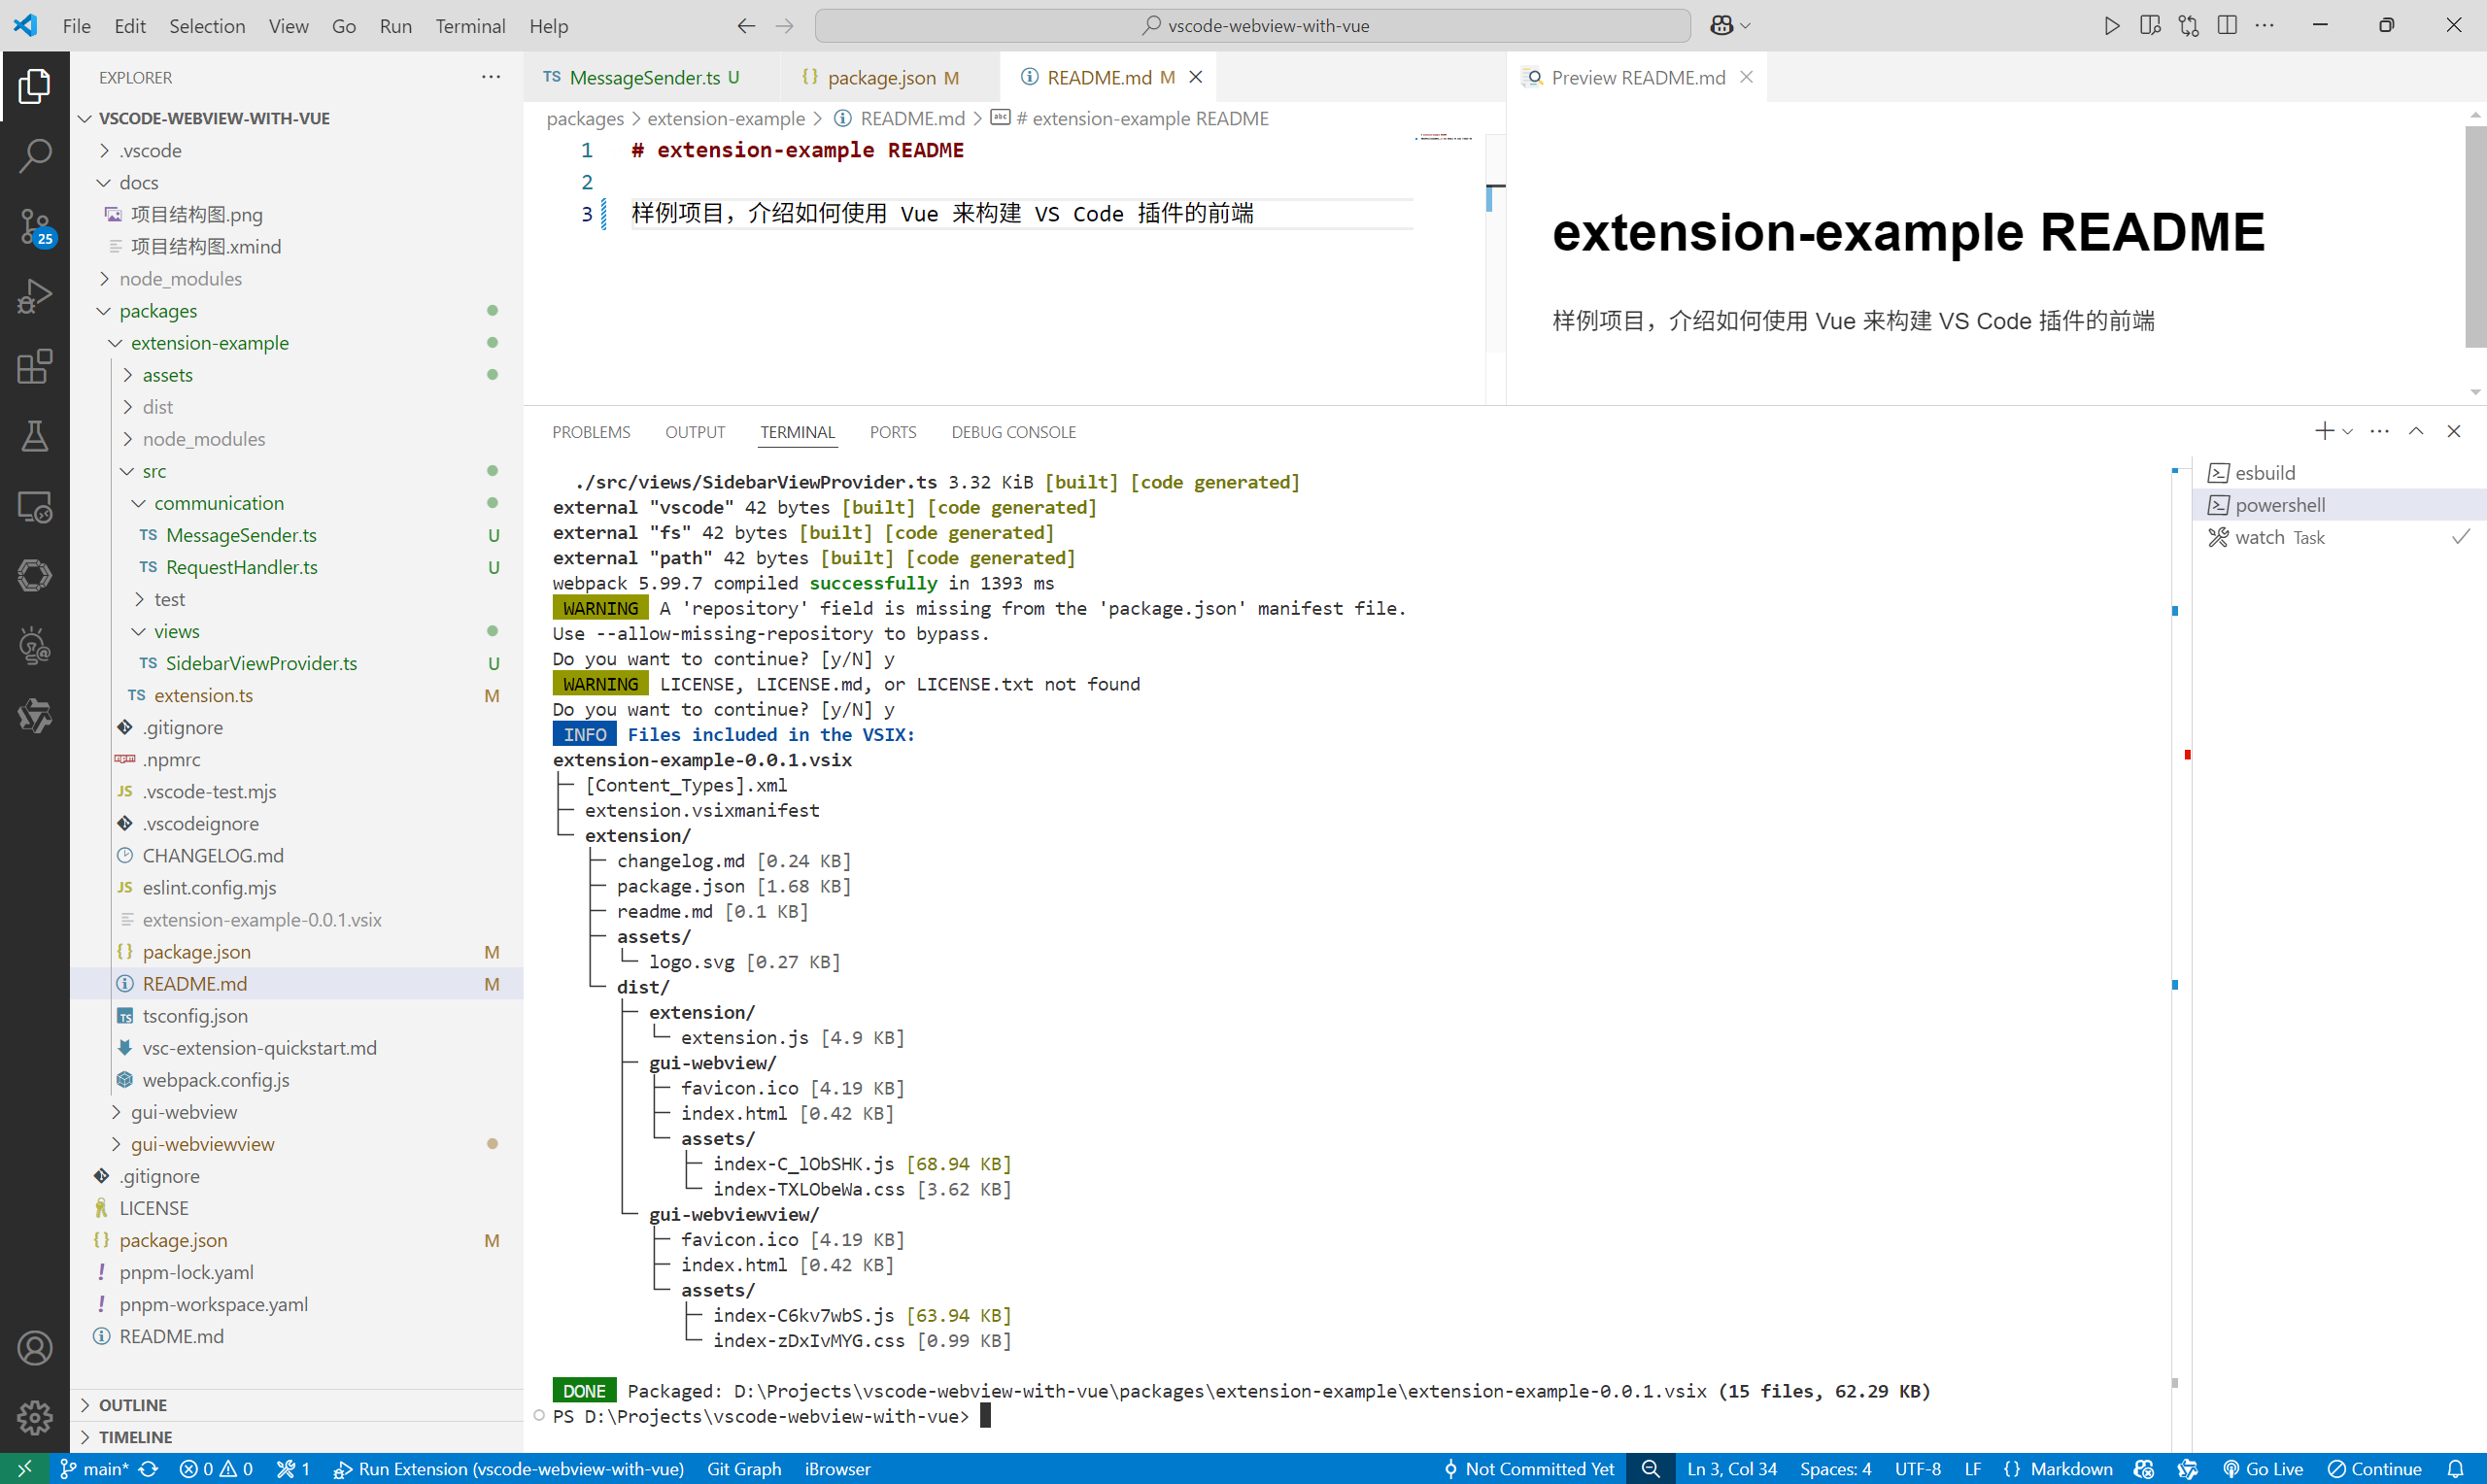
安装打包好的插件
构建完成后,在插件目录下你能发现构建好的插件(后缀为 .vsix)。在活动栏点击扩展选项,在点击扩展侧边栏右上角的三个点图标,在弹出的选项中选择 Install from VSIX...,找到打包好的插件进行安装。
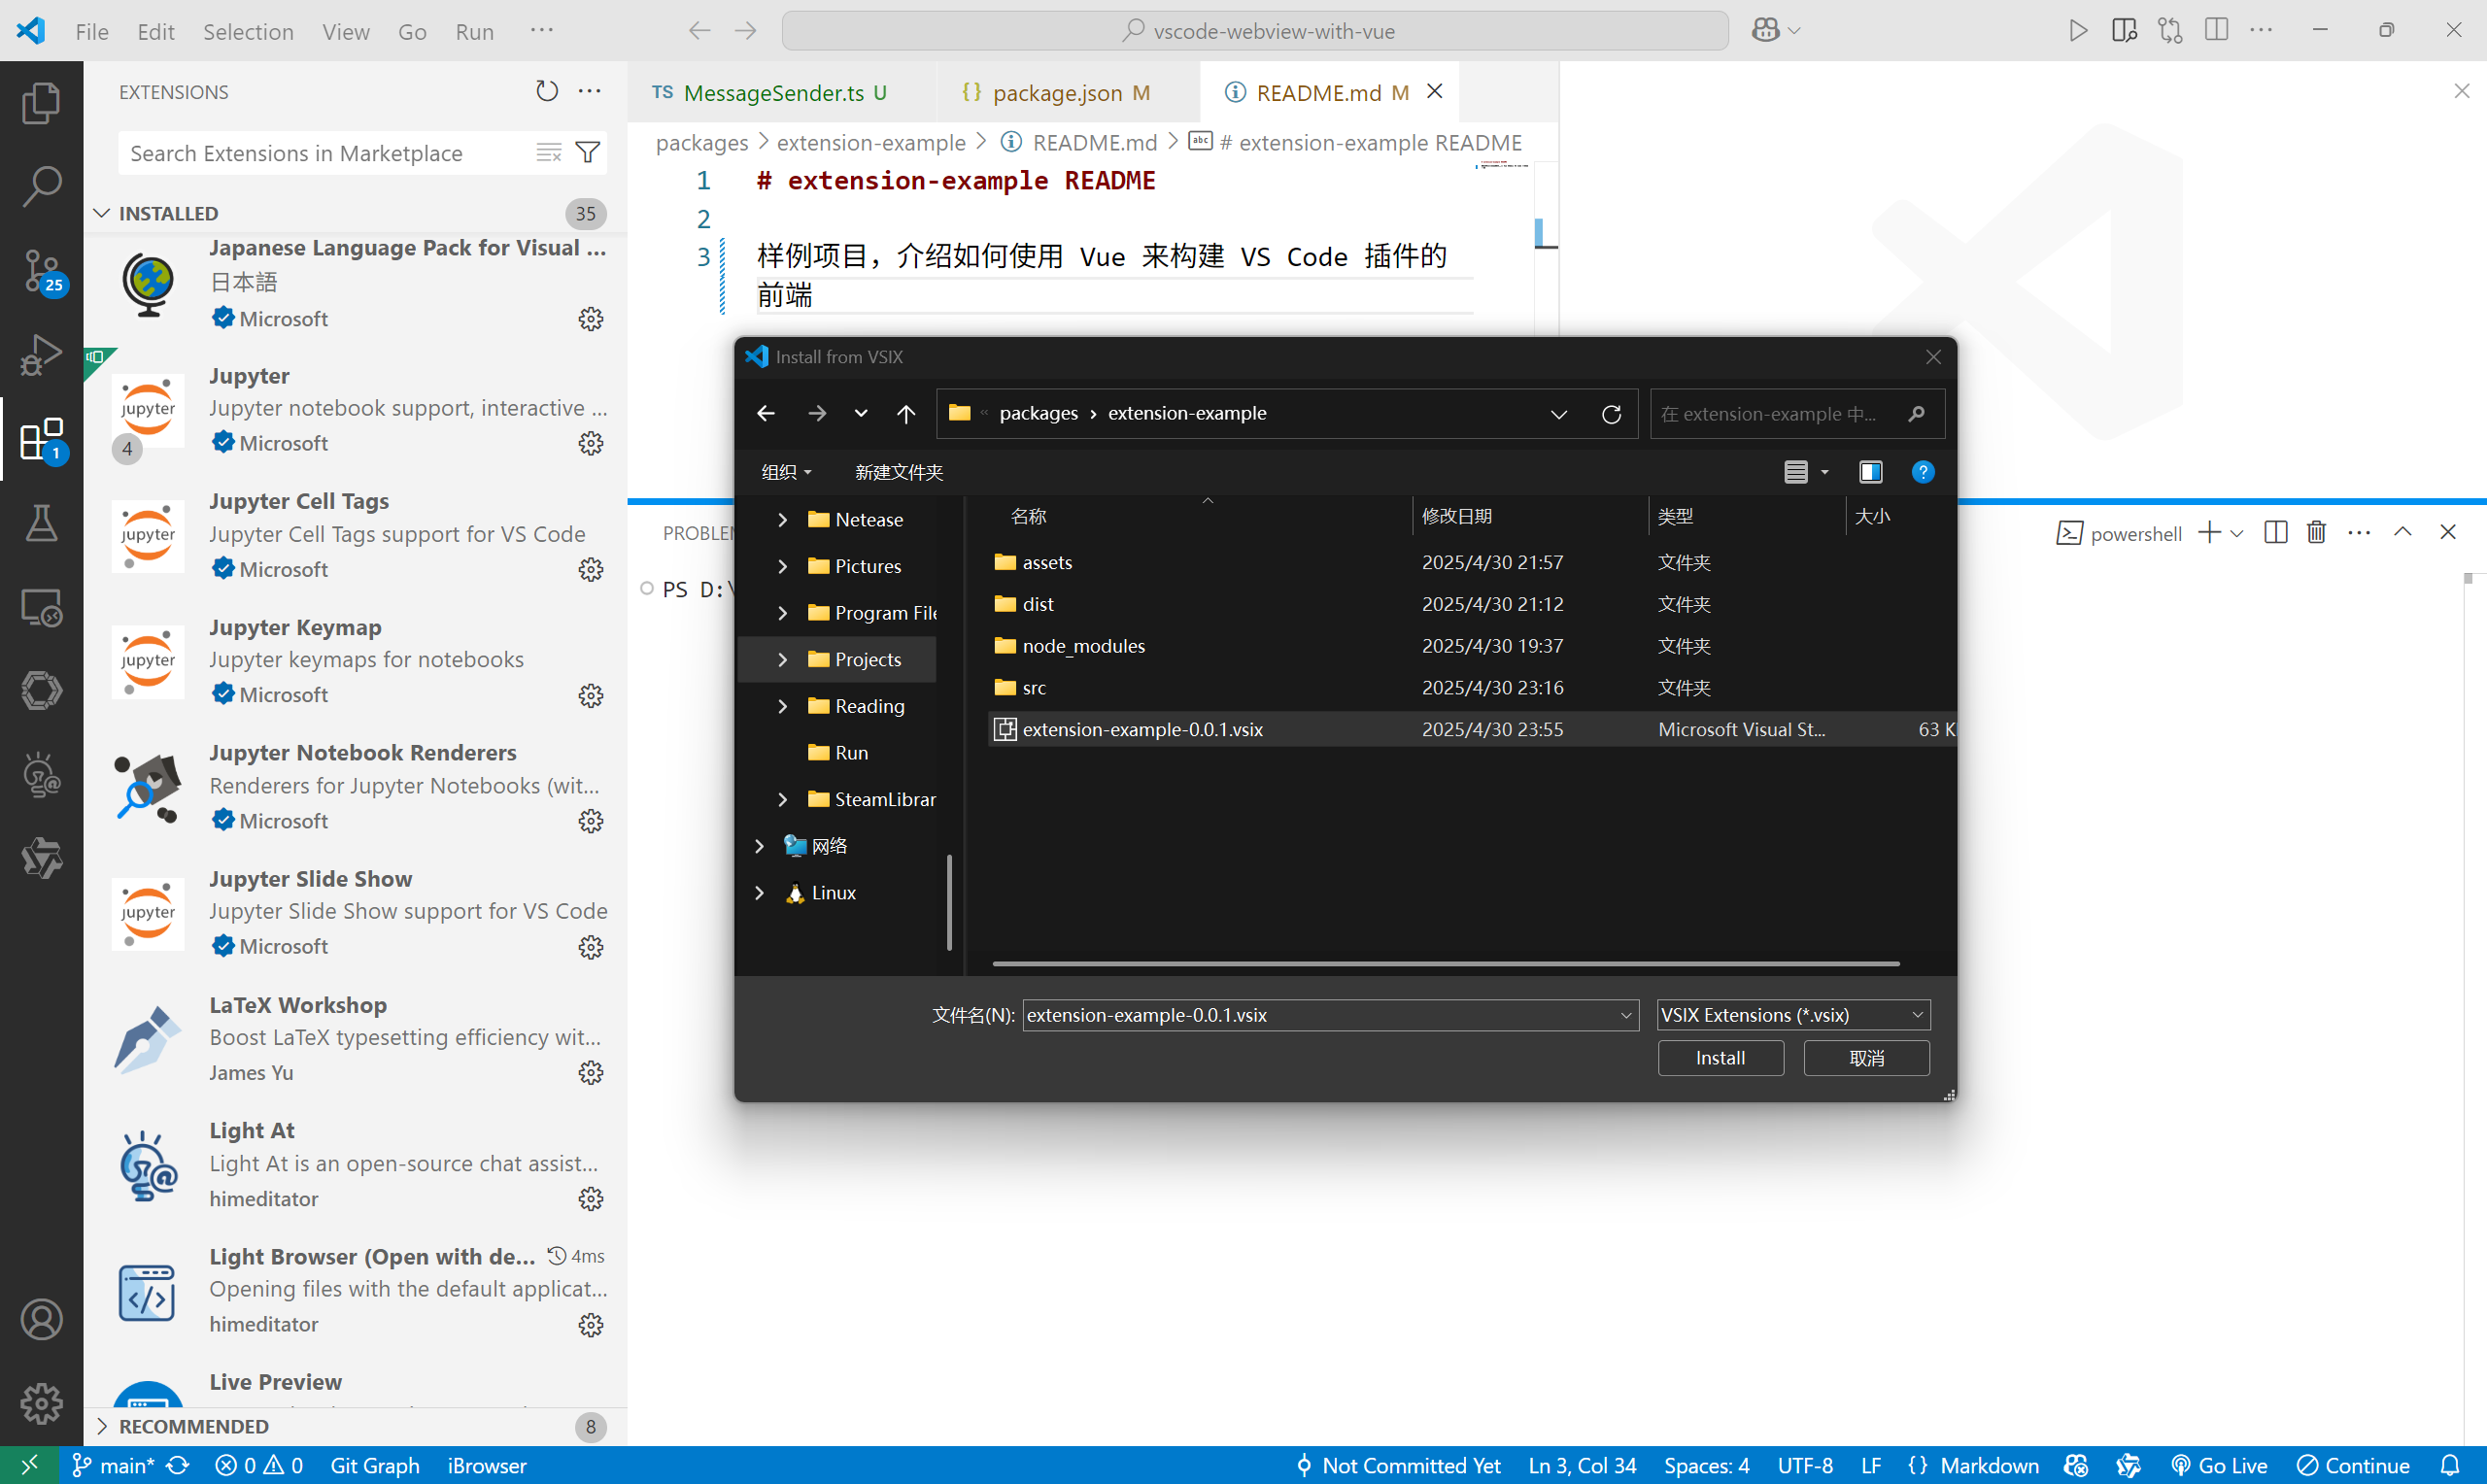
即可完成安装。


 7万+
7万+

 被折叠的 条评论
为什么被折叠?
被折叠的 条评论
为什么被折叠?
 到【灌水乐园】发言


