


虚拟机准备
三台服务器,部署k8s集群
准备三台虚拟机
| 主机名 | IP |
|---|---|
| DCS1.ctticsh.cn | 10.10.10.145 |
| DCS2.ctticsh.cn | 10.10.10.146 |
| DCS3.ctticsh.cn | 10.10.10.147 |
关闭防火墙
systemctl stop firewalld
systemctl disable firewalld
关闭selinux
sed -i ‘s/enforcing/disabled/’ /etc/selinux/config # 永久
setenforce 0 # 临时
ssh免密登录
1.三个节点执行 ssh-keygen -t rsa 一直回车
2.节点DCS2.ctticsh.cn执行:
scp /root/.ssh/id_rsa.pub DCS1.ctticsh.cn:/root/.ssh/id_rsa.pub2
3.节点DCS3.ctticsh.cn执行:
scp /root/.ssh/id_rsa.pub DCS1.ctticsh.cn:/root/.ssh/id_rsa.pub3
4.主节点DCS1.ctticsh.cn执行:
cat /root/.ssh/id_rsa.pub >> /root/.ssh/authorized_keys
cat /root/.ssh/id_rsa.pub2 >> /root/.ssh/authorized_keys
cat /root/.ssh/id_rsa.pub3 >> /root/.ssh/authorized_keys
chmod 600 /root/.ssh/authorized_keys
scp /root/.ssh/authorized_keys DCS2.ctticsh.cn:/root/.ssh/
scp /root/.ssh/authorized_keys DCS3.ctticsh.cn:/root/.ssh/
5.其他两个节点执行:
chmod 600 /root/.ssh/authorized_keys
关闭swap
swapoff -a # 临时
sed -ri ‘s/.swap./#&/’ /etc/fstab # 永久
设置主机名
hostnamectl set-hostname
三台机器修改hosts
10.10.10.145 DCS1.ctticsh.cn
10.10.10.146 DCS2.ctticsh.cn
10.10.10.147 DCS3.ctticsh.cn
将桥接的IPv4流量传递到iptables的链
三台服务器执行
cat > /etc/sysctl.d/k8s.conf << EOF
net.bridge.bridge-nf-call-ip6tables = 1
net.bridge.bridge-nf-call-iptables = 1
EOF
sysctl --system # 生效
安装时间同步服务(ntp)
安装:yum install -y ntp
启动并查看状态:
systemctl start ntpd.service
systemctl status ntpd.service
三个节点安装Docker,kubeaadm,kubectl
1.卸载之前的docker
yum remove docker \
                  docker-client \
                  docker-client-latest \
                  docker-common \
                  docker-latest \
                  docker-latest-logrotate \
                  docker-logrotate \
                  docker-engine
2.安装Docker -CE
yum install -y yum-utils \
device-mapper-persistent-data \
lvm2
yum-config-manager \
    --add-repo \
    https://download.docker.com/linux/centos/docker-ce.repo
yum -y install docker-ce docker-ce-cli containerd.io
3.配置镜像加速
sudo mkdir -p /etc/docker
sudo tee /etc/docker/daemon.json <<-‘EOF’
{
“registry-mirrors”: [“https://1y2oncqa.mirror.aliyuncs.com”]
}
EOF
sudo systemctl daemon-reload
sudo systemctl restart docker
4.yum仓库镜像
cat <<EOF > /etc/yum.repos.d/kubernetes.repo
[kubernetes]
name=Kubernetes
baseurl=http://mirrors.aliyun.com/kubernetes/yum/repos/kubernetes-el7-x86_64
enabled=1
gpgcheck=0
repo_gpgcheck=0
gpgkey=http://mirrors.aliyun.com/kubernetes/yum/doc/yum-key.gpg
       http://mirrors.aliyun.com/kubernetes/yum/doc/rpm-package-key.gpg
EOF
5.安装kubeadm 、kubelet、kubectl
yum install -y kubelet-1.17.3 kubeadm-1.17.3 kubectl-1.17.3
6.启动 kubelet
systemctl enable kubelet && systemctl start kubelet
7.在Master节点上,创建并执行master_images.sh
#!/bin/bash

images=(
	kube-apiserver:v1.17.3
    kube-proxy:v1.17.3
	kube-controller-manager:v1.17.3
	kube-scheduler:v1.17.3
	coredns:1.6.5
	etcd:3.4.3-0
    pause:3.1
)

for imageName in ${images[@]} ; do
    docker pull registry.cn-hangzhou.aliyuncs.com/google_containers/$imageName
#   docker tag registry.cn-hangzhou.aliyuncs.com/google_containers/$imageName  k8s.gcr.io/$imageName
done
7.初始化master(10.10.10.145)
kubeadm init \
--apiserver-advertise-address=10.10.10.145 \
--image-repository registry.cn-hangzhou.aliyuncs.com/google_containers \
--kubernetes-version   v1.17.3 \
--service-cidr=10.96.0.0/16  \
--pod-network-cidr=10.244.0.0/16
8.根据提示执行命令

mkdir -p $HOME/.kube
sudo cp -i /etc/kubernetes/admin.conf $HOME/.kube/config
sudo chown $(id -u):$(id -g) $HOME/.kube/config
9.配置pod网络(flannel)
kubectl apply -f \
https://raw.githubusercontent.com/coreos/flannel/master/Documentation/kube-flannel.yml
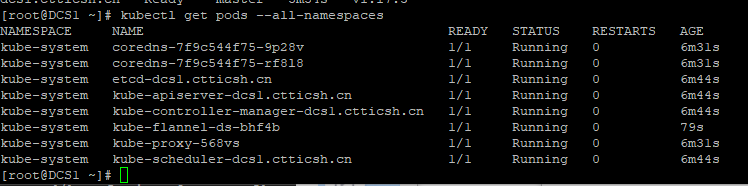
运行指令:kubectl get pods --all-namespaces
全是Running进行下一步操作
9.其他节点加入
kubeadm join 10.10.10.145:6443 --token nbnvce.szmhdyjv1mwm7afg \
    --discovery-token-ca-cert-hash sha256:eab2be9be4b24d76b9ed9be744b2905add40abbc3e56229663cd4fd2f495b6d5
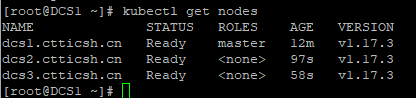
10.查看指令:kubectl get nodes
安装可视化工具
安装网址:https://v2-1.docs.kubesphere.io/docs/zh-CN/installation/prerequisites/
1、安装helm(master节点执行)
curl -L https://git.io/get_helm.sh|bash
2、创建权限(145执行)
创建helm-rbac.yaml
apiVersion: v1
kind: ServiceAccount
metadata:
  name: tiller
  namespace: kube-system
---
apiVersion: rbac.authorization.k8s.io/v1
kind: ClusterRoleBinding
metadata:
  name: tiller
roleRef:
  apiGroup: rbac.authorization.k8s.io
  kind: ClusterRole
  name: cluster-admin
subjects:
  - kind: ServiceAccount
    name: kubernetes-dashboard
    namespace: kube-system
执行
kubectl apply -f helm-rbac.yaml
3.安装Tilller(145执行)
初始化
helm init --service-account=tiller --tiller-image=sapcc/tiller:v2.16.3 --history-max 300
4.安装 OpenEBS 创建 LocalPV 存储类型
前提条件
1)查看节点名称
kubectl get node -o wide
2)确认 master 节点是否有 污点( Taint)
kubectl describe node dcs1.ctticsh.cn | grep Taint

3)去除污点( Taint)
kubectl taint nodes dcs1.ctticsh.cn node-role.kubernetes.io/master:NoSchedule-
安装 OpenEBS
1)创建 OpenEBS 的 namespace,OpenEBS 相关资源将创建在这个 namespace 下
kubectl create ns openebs
2)通过 Helm 命令来安装 OpenEBS
helm install --namespace openebs --name openebs stable/openebs --version 1.5.0
若出现Error: incompatible versions client[v2.17.0] server[v2.16.3]
重新下载helm:https://get.helm.sh/helm-v2.16.3-linux-amd64.tar.gz
发送到服务器,解压将里面的文件替换掉 /usr/local/bin/目录下的文件

若出现Error: release openebs failed: namespaces “openebs” is forbidden: User “system:serviceaccount:kube-system:tiller” cannot get resource “namespaces” in API group “” in the namespace “openebs”
kubectl create clusterrolebinding tiller-cluster-rule --clusterrole=cluster-admin --serviceaccount=kube-system:tiller
kubectl patch deploy --namespace kube-system tiller-deploy -p '{"spec":{"template":{"spec":{"serviceAccount":"tiller"}}}}'
3)安装 OpenEBS 后将自动创建 4 个 StorageClass,查看创建的 StorageClass
kubectl get sc

4)将 openebs-hostpath设置为 默认的 StorageClass
kubectl patch storageclass openebs-hostpath -p '{"metadata": {"annotations":{"storageclass.kubernetes.io/is-default-class":"true"}}}'

5)还原污点( Taint)
kubectl taint nodes dcs1.ctticsh.cn node-role.kubernetes.io=master:NoSchedule
6)安装kubesphere(最小)
kubectl apply -f https://raw.githubusercontent.com/kubesphere/ks-installer/v2.1.1/kubesphere-minimal.yaml
查看进度
kubectl logs -n kubesphere-system $(kubectl get pod -n kubesphere-system -l app=ks-install -o jsonpath='{.items[0].metadata.name}') -f
7)取人所有pods状态为running
查看
kubectl get pods --all-namespaces
8)自定义组件服务开启
https://v2-1.docs.kubesphere.io/docs/zh-CN/installation/pluggable-components/
修改配置文件
kubectl edit cm -n kubesphere-system ks-installer
修改对应服务enabled: True


 855
855


 被折叠的 条评论
为什么被折叠?
被折叠的 条评论
为什么被折叠?
 到【灌水乐园】发言


