


Spring
01: Spring简介
02: Spring–Spring组成及拓展
03: Spring–IoC理论推导&IoC本质
04: Spring–第一个Spring程序HelloSpring&修改上节案例
05: Spring–IoC创建对象方式
06: Spring–Spring配置
07: Spring–依赖注入(Dependency Injection)
08: Spring–Bean的作用域
09: Spring–自动装配Bean(使用自动装配xml配置)
10: Spring–使用注解实现自动装配(推荐使用)
11: Spring–注解开发
12: Spring–使用JavaConfig实现配置
13: Spring–静态代理再理解&AOP
14: Spring–AOP(通过 Spring API 实现&自定义类来实现Aop&使用注解实现)
15: Spring–回忆Mybatis
16: Spring–整合Mybatis
17: Spring–Spring声明式事务
1.Spring–第一个Spring程序HelloSpring
项目结构

1.1 导入依赖
pom.xml
    <dependencies>
        <!-- https://mvnrepository.com/artifact/org.springframework/spring-webmvc -->
        <dependency>
            <groupId>org.springframework</groupId>
            <artifactId>spring-webmvc</artifactId>
            <version>5.3.3</version>
        </dependency>
    </dependencies>
1.2 编写一个Hello实体类
Hello .java
package com.tian.pojo;

public class Hello {
    private String str;

    public String getStr() {
        return str;
    }

    public void setStr(String str) {
        this.str = str;
    }

    @Override
    public String toString() {
        return "Hello{" +
                "str='" + str + '\'' +
                '}';
    }
}
1.3 编写我们的spring文件 , 这里我们命名为beans.xml
<?xml version="1.0" encoding="UTF-8"?>
<beans xmlns="http://www.springframework.org/schema/beans"
       xmlns:xsi="http://www.w3.org/2001/XMLSchema-instance"
       xsi:schemaLocation="http://www.springframework.org/schema/beans
        https://www.springframework.org/schema/beans/spring-beans.xsd">

    <!--bean就是java对象 , 由Spring创建和管理-->
    <!--   使用Spring来创建对象

      id =变量名
      class = new的对象;
      property相当于给对象中的属性设置一个值
      -->
    <bean id="hello" class="com.tian.pojo.Hello">
        <property name="str" value="Spring"/>
    </bean>
</beans>
1.4 进行测试
Test .java
public class Test {
    public static void main(String[] args) {
        //解析beans.xml文件 , 生成管理相应的Bean对象
        ApplicationContext context = new ClassPathXmlApplicationContext("beans.xml");
        //getBean : 参数即为spring配置文件中bean的id .
        Hello hello = (Hello) context.getBean("hello");
        System.out.println(hello.toString());
    }
}
运行结果:
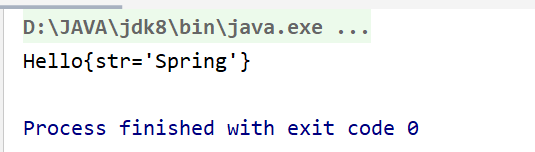
1.5 总结

2. 修改上节案例
上节案例
我们在案例一中, 新增一个Spring配置文件beans.xml
beans.xml
<?xml version="1.0" encoding="UTF-8"?>
<beans xmlns="http://www.springframework.org/schema/beans"
       xmlns:xsi="http://www.w3.org/2001/XMLSchema-instance"
       xsi:schemaLocation="http://www.springframework.org/schema/beans
       http://www.springframework.org/schema/beans/spring-beans.xsd">
    <bean id="DaoImpl" class="com.tian.dao.UserDaoImpl"/>
    <bean id="MySqlImpl" class="com.tian.dao.UserDaoMySql"/>

    <bean id="ServiceImpl" class="com.tian.service.UserServiceImpl">
        <!--注意: 这里的name并不是属性 , 而是set方法后面的那部分 , 首字母小写-->
        <!--引用另外一个bean , 不是用value 而是用 ref-->
        <property name="userDao" ref="DaoImpl"/>
    </bean>
</beans>
Test.java
@org.junit.Test
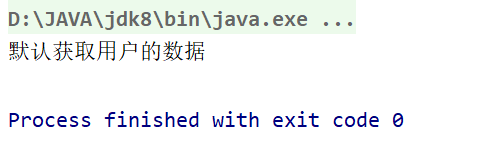
public void test2() {
//获取Applicationcontext;拿到Spring的容器
ApplicationContext context = new ClassPathXmlApplicationContext("beans.xml");
//容器在手,天下我有,需要什么,就直接get什么!
UserServiceImpl serviceImpl = (UserServiceImpl) context.getBean("ServiceImpl");
serviceImpl.getUser();
}
}


 1241
1241


 被折叠的 条评论
为什么被折叠?
被折叠的 条评论
为什么被折叠?
 到【灌水乐园】发言


