本系列文章为黑马程序员C++教程学习笔记,前面的系列文章链接如下
C++核心编程:P1->程序的内存模型
C++核心编程:P2->引用
C++核心编程:P3->函数提高
C++核心编程:P4->类和对象----封装
C++核心编程:P5->类和对象----对象的初始化和清理
C++核心编程:P6->类和对象----C++对象模型和this指针
C++核心编程:P7->类和对象----友元
C++核心编程:P8->类和对象----运算符重载
C++核心编程:P9->类和对象----继承
C++核心编程:P10->类和对象----多态
C++核心编程:P11->文件操作
C++核心编程:P12->模板----函数模板
文章目录
一、类模板
类模板
作用: 建立一个通用类,类中的成员数据类型可以不具体制定,用一个虚拟的类型来代表。
语法:
template<typename T>
类
解释:
template ---- 声明创建模板
typename ---- 表面其后面的符号是一种数据类型,可以用class代替
T ---- 通用的数据类型,名称可以替换,通常为大写字母
案例:
案例描述: 我们创建一个Person类模板,含有成员变量m_Age和m_Name。我们想让这两个成员变量的类型用一个虚拟的类型来代表,同时这两个变量的类型可能会不一样。
解决方案: ①创建一个类模板,由于存在两种数据类型,所以在声明创建模板时应指定两种数据类型,我们这里指定为NameType和AgeType,因此整体语句为template<class NameType, class AgeType>
②在使用类模板实例化对象时,需要显示地指定数据类型(尖括号<>中就是模板的参数列表)
代码
#include <iostream>
#include <string>
using namespace std;

template<class NameType, class AgeType>
class Person
{
public:
	Person(NameType name, AgeType age)
	{
		this->m_Name = name;
		this->m_Age = age;
	}
	void showPerson()
	{
		cout << "name: " << this->m_Name << " age: " << this->m_Age << endl;
	}
public:
	NameType m_Name;
	AgeType m_Age;
};

void test01()
{
	Person<string, int> p("孙悟空", 999);
	p.showPerson();
}

int main(void)
{
	test01();
	system("pause");
	return 0;
}
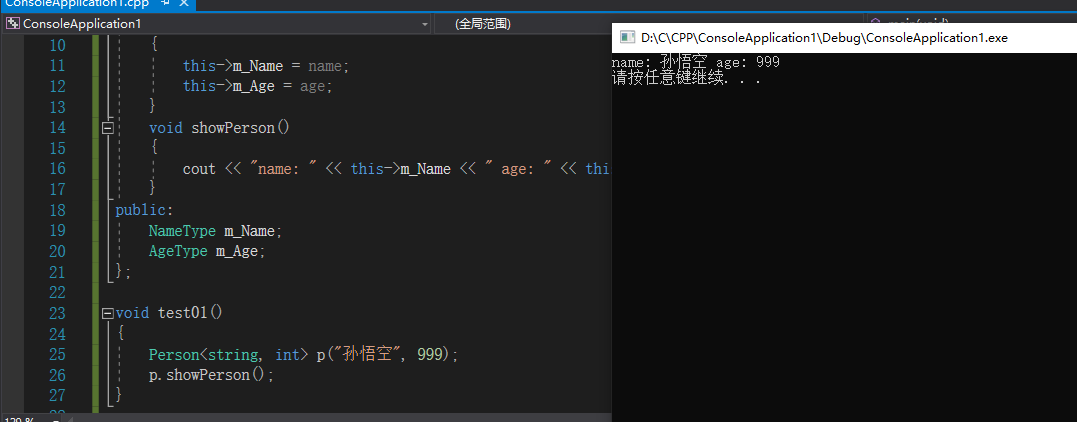
运行,可以看出函数模板正确实例化出对象并调用了相应的成员函数。
二、类模板与函数模板区别
类模板与函数模板区别主要有两点:
①类模板没有自动类型推导的使用方式
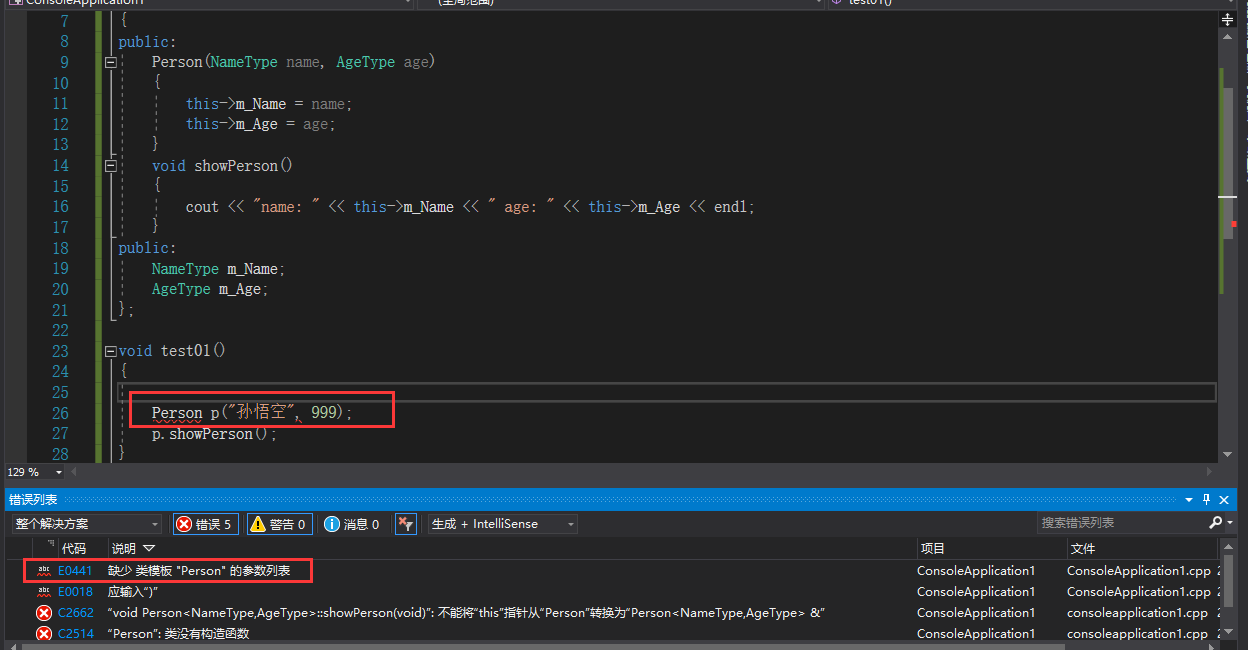
案例: 在上面那个Person类模板中,我们隐式地初始化一个对象(不指定模板参数列表)。可以看到会报错,提示缺少类模板的参数列表。
②类模板在模板参数列表中可以有默认参数
区别②案例: 在声明创建模板时,我们可以为模板参数列表中的各参数指定默认参数,比如我们为AgeType指定默认数据类型为int。在调用时我们就可以省略掉模板参数列表中的AgeType。如果我们再为NameType指定为string,则在调用时我们可以省略掉模板参数列表中的所有内容,但是<>还是需要保留。
#include <iostream>
#include <string>
using namespace std;

template<class NameType = string, class AgeType = int>
class Person
{
public:
	Person(NameType name, AgeType age)
	{
		this->m_Name = name;
		this->m_Age = age;
	}
	void showPerson()
	{
		cout << "name: " << this->m_Name << " age: " << this->m_Age << endl;
	}
public:
	NameType m_Name;
	AgeType m_Age;
};

void test01()
{
	// < >就是类模板的参数列表,我们要向里面填充数据类型
	Person<> p("孙悟空", 999);
	p.showPerson();
}

int main(void)
{
	test01();
	system("pause");
	return 0;
}
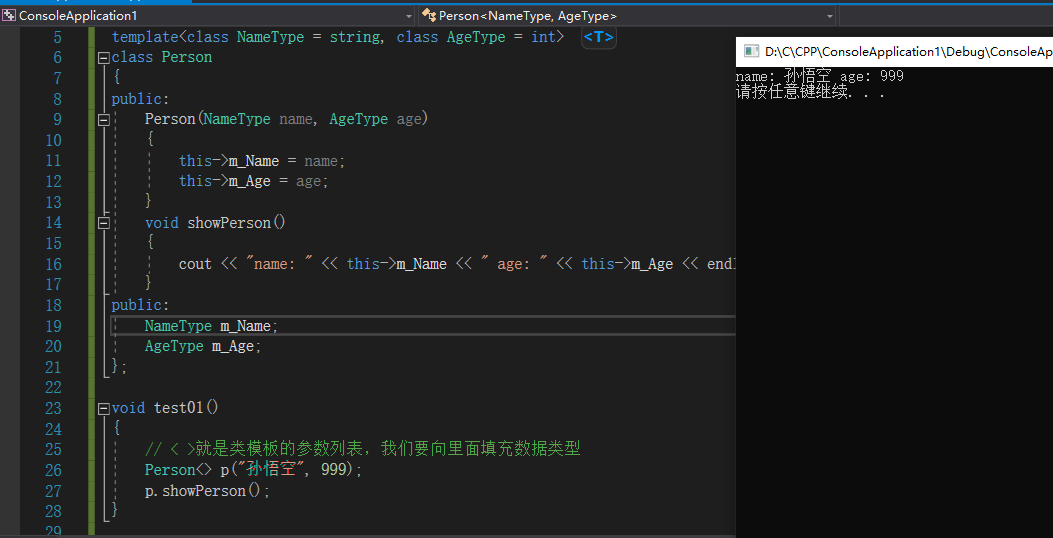
运行,可以看到省略了模板参数列表中的内容,仍然可以实例化对象。
三、类模板中成员函数的创建时机
类模板中成员函数和普通类中成员函数创建时机是有区别的:
①普通类中的成员函数一开始就可以创建
②类模板中的成员函数在调用时才创建
案例:
创建两个普通类Person1和Person2,它们各自有一个成员函数showPerson1和showPerson2。接着创建一个类模板MyClass,含有一个成员变量obj,还含有两个成员函数func1和func2,分别实现调用obj的showPerson1成员函数和showPerson2成员函数。
#include <iostream>
#include <string>
using namespace std;

class Person1
{
public:
	void showPerson1()
	{
		cout << "Person1 show" << endl;
	}
};

class Person2
{
public:
	void showPerson2()
	{
		cout << "Person2 show" << endl;
	}
};

template<class T>
class MyClass
{
public:
	T obj;
	//类模板中的成员函数,并不是一开始就创建的,而是在模板调用时再生成
	void func1() { obj.showPerson1(); }
	void func2() { obj.showPerson2(); }
};

int main()
{
	system("pause");
	return 0;
}
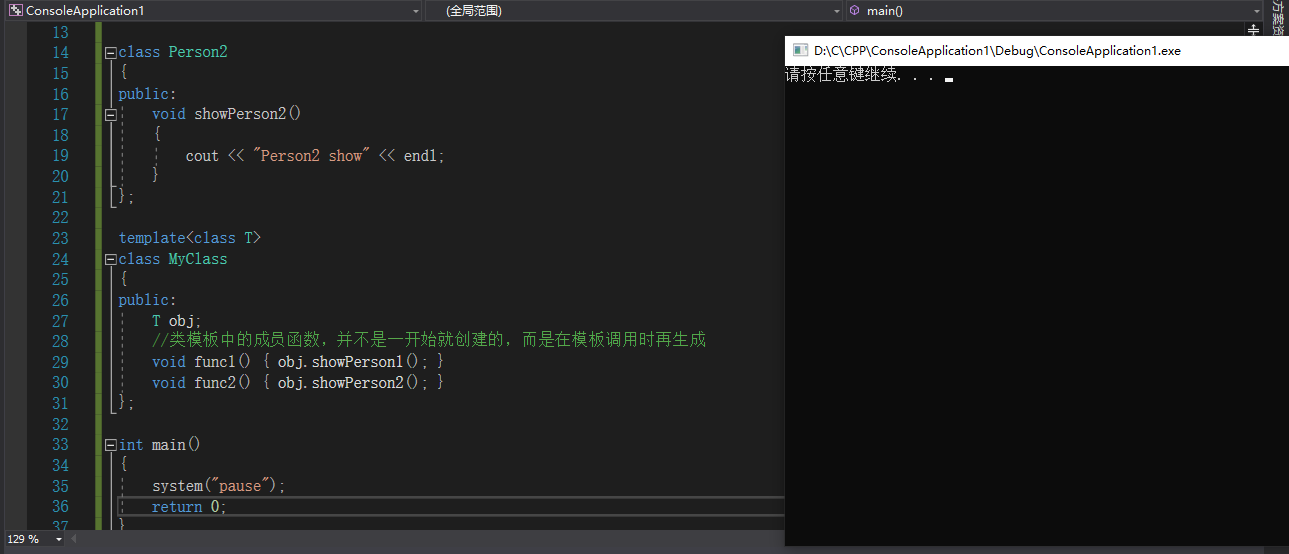
可以看到,虽然看着代码有问题,但是仍然能够通过编译。这是因为在这个类模板中,编译器并不知道这个T是什么数据类型,所以如果要调用obj的成员函数就更不知道去如何调用了。因此,类模板中的成员函数并不是一开始就创建的,而是在模板调用时再生成。
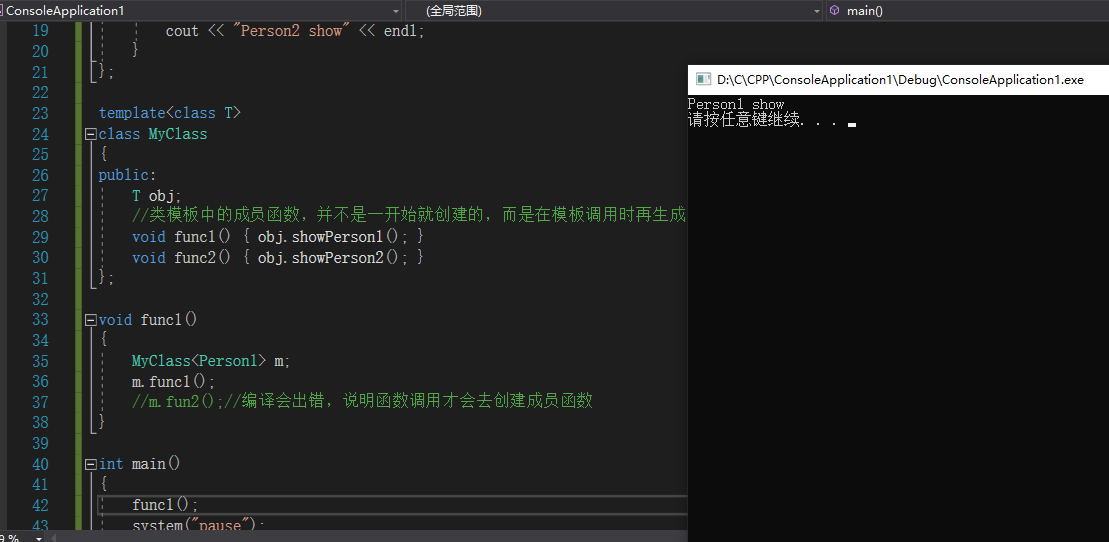
当我们调用类模板实例化对象时,指定T的数据类型为Person1,这时就能够调用成员函数func1。但是不能调用func2,因为showPerson2是Person2的成员函数。
#include <iostream>
#include <string>
using namespace std;

class Person1
{
public:
	void showPerson1()
	{
		cout << "Person1 show" << endl;
	}
};

class Person2
{
public:
	void showPerson2()
	{
		cout << "Person2 show" << endl;
	}
};

template<class T>
class MyClass
{
public:
	T obj;
	//类模板中的成员函数,并不是一开始就创建的,而是在模板调用时再生成
	void func1() { obj.showPerson1(); }
	void func2() { obj.showPerson2(); }
};

void func1()
{
	MyClass<Person1> m;
	m.func1();
	//m.fun2();//编译会出错,说明函数调用才会去创建成员函数
}

int main()
{
	func1();
	system("pause");
	return 0;
}
运行,可以成功调用了。
四、类模板对象做函数参数
类模板实例化出的对象,向函数传参一共有三种传入方式:
①指定传入的类型 ---- 直接显示对象的数据类型
②参数模板化 ---- 将对象中的参数变为模板进行传递
③整个类模板化 ---- 将这个对象类型 模板化进行传递
第1种用得比较广泛。
案例: 创建一个类模板Person,模板参数列表指定为T1和T2,然后实例化出对象,并通过3种不同的方式向函数传参。
#include <iostream>
#include <string>
using namespace std;

template<class T1, class T2>
class Person
{
public:
	Person(T1 name, T2 age)
	{
		m_Name = name;
		m_Age = age;
	}

	void showPerson()
	{
		cout << "name: " << this->m_Name << " age: " << this->m_Age << endl;
	}

	T1 m_Name;
	T2 m_Age;

};

//1、指定传入类型
void printPerson1(Person<string, int>& p)
{
	p.showPerson();
}

//2、参数模板化(类模板 + 函数模板)
template<class T1, class T2>
void printPerson2(Person<T1, T2>& p)
{
	p.showPerson();
	cout << "T1的数据类型: " << typeid(T1).name() << endl;
	cout << "T2的数据类型: " << typeid(T2).name() << endl;
}

//3、整个类模板化(类模板 + 函数模板)
template<class T>
void printPerson3(T &p)
{
	p.showPerson();
	cout << "T的数据类型: " << typeid(T).name() << endl;
}

void test01()
{
	Person<string, int>p1("孙悟空", 100);
	printPerson1(p1);
	Person<string, int>p2("猪八戒", 90);
	printPerson2(p2);
	Person<string, int>p3("唐僧", 30);
	printPerson3(p3);
}

int main()
{
	test01();
	system("pause");

	return 0;
}
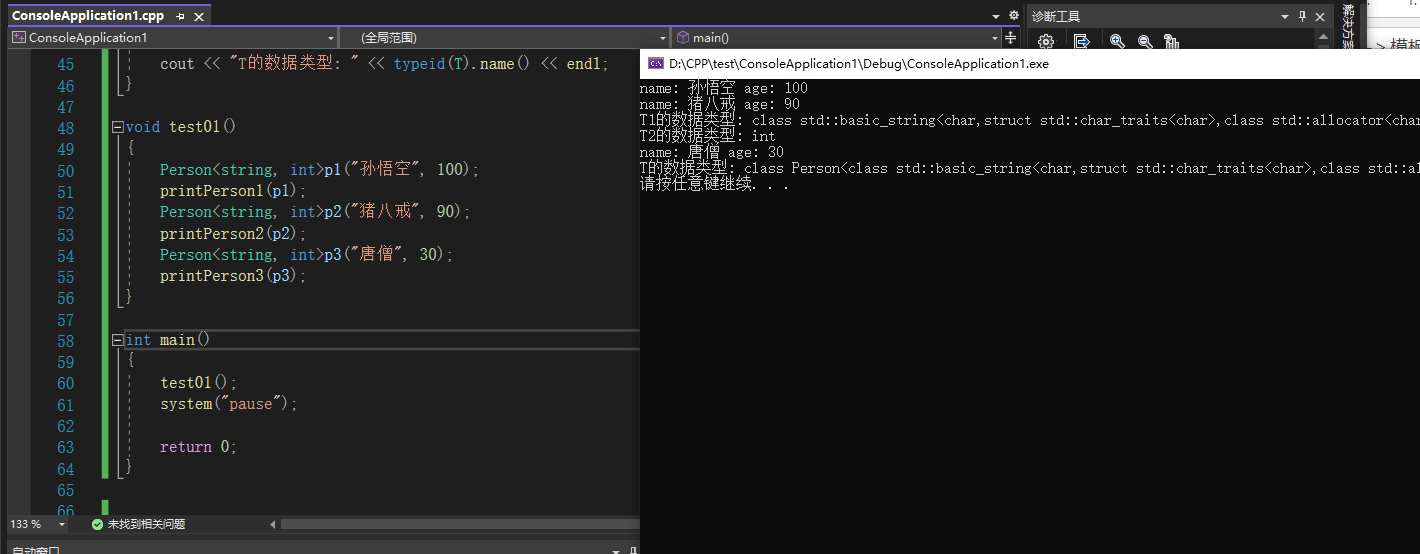
运行,可以看出三张方式都能向函数传递参数。
五、类模板与继承
当类模板碰到继承时,需要注意以下几点:
①当子类继承的父类是一个类模板时,子类在声明的时候,要指定出父类中T的类型
②如果不指定,编译器无法给子类分配内存
③如果想灵活指定出父类中T的类型,子类也需变为类模板
案例: 创建一个类模板Base,模板的数据类型是T。然后创建另外一个类Son1以指定具体模板数据类型的方式去继承这个类模板,创建另外一个类Son2以灵活指定出父类中T的类型的方式去继承这个类模板。
#include <iostream>
#include <string>
using namespace std;

template<class T>
class Base
{
public:
	T m;
};

//继承时,必须知道父类中T的类型才可以向下继承
class Son1 : public Base<int>
{
public:
	Son1()
	{
		cout << typeid(m).name() << endl;
	}
};

//如果想保留父类中T的类型,子类也需要变为类模板。
//这里子类模板没有T类型数据
template<class T1>
class Son2 : public Base<T1>
{
public:
	Son2()
	{
		cout << typeid(T1).name() << endl;
	}
};

//这里子类模板具有T2类型数据,T3继承自父类模板Base。
template<class T2, class T3>
class Son3 : public Base<T3>
{
public:
	Son3()
	{
		cout << typeid(T2).name() << " " << typeid(T3).name() << endl;
	}
};

void test01()
{
	Son1 c1;
	Son2<int> c2;
	Son3<int, char> c3;
}

int main()
{
	test01();
	system("pause");

	return 0;
}
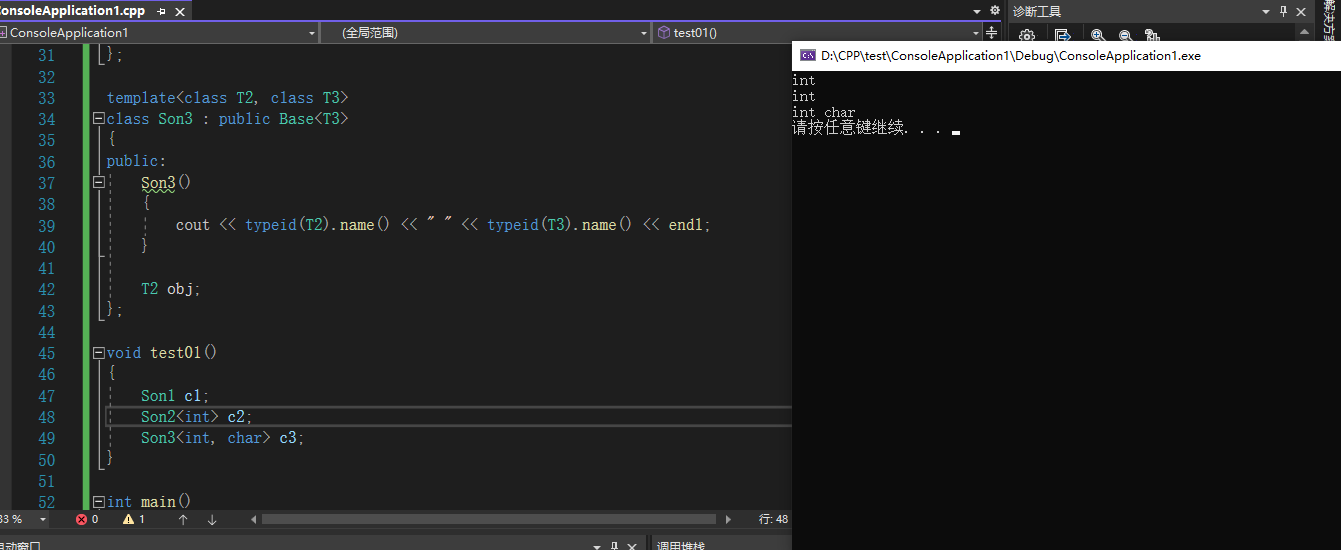
运行,两种继承方式均能够成功继承。
六、类模板成员函数类外实现
类模板中成员函数类外实现时,需要加上模板参数列表。
案例: 创建一个类模板Person,在类模板内部只给出成员函数的声明,在类外实现成员函数的定义。
#include <iostream>
#include <string>
using namespace std;

template<class T1, class T2>
class Person
{
public:
	Person(T1 name, T2 age);
	void showPerson();

public:
	T1 m_Name;
	T2 m_Age;
};

//构造函数类外实现
//类外实现的成员函数需要加上类模板参数列表
template<class T1, class T2>
Person<T1, T2>::Person(T1 name, T2 age)
{
	this->m_Name = name;
	this->m_Age = age;
}

//成员函数类外实现
template<class T1, class T2>
void Person<T1, T2>::showPerson()
{
	cout << "姓名: " << this->m_Name << " 年龄: " << this->m_Age << endl;
}

void test01()
{
	Person<string, int> p("Tom", 20);
	p.showPerson();
}

int main()
{
	test01();
	system("pause");

	return 0;
}
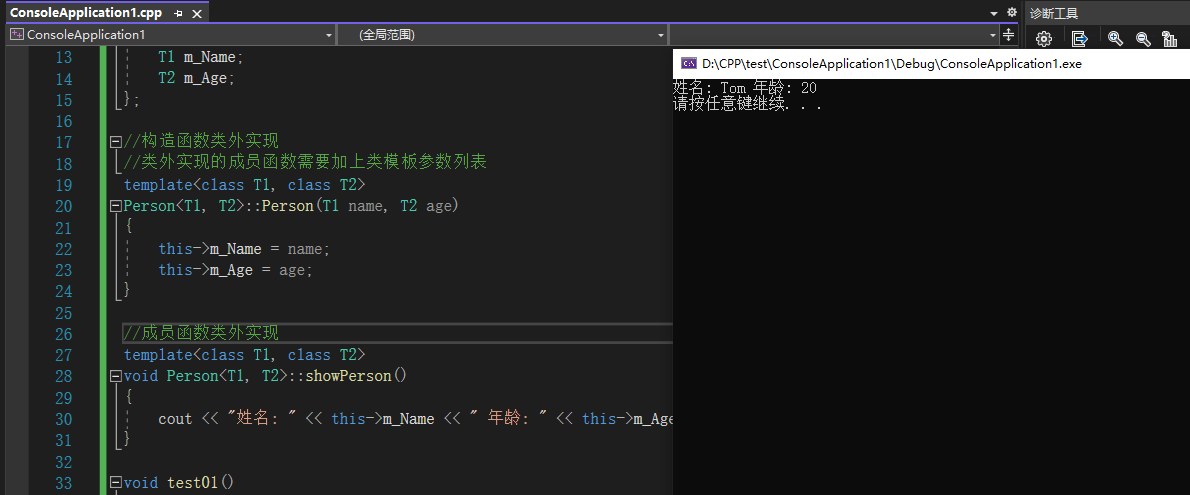
运行,可以看出类模板初始化的对象能够成功调用成员函数。
七、类模板分文件编写
类模板成员函数分文件编写产生的问题以及解决方式
问题:
类模板中成员函数创建时机是在调用阶段,导致分文件编写时链接不到
解决:
①解决方式1:直接包含.cpp源文件
②解决方式2:将声明和实现写到同一个文件中,并更改后缀名为.hpp。hpp是约定的名称,并不是强制
案例:
首先创建一个person.h文件,里面是模板类的定义和成员函数的声明。
#pragma once
#include <iostream>
#include <string>
using namespace std;

template<class T1, class T2>
class Person
{
public:
	Person(T1 name, T2 age);
	void showPerson();

	T1 m_Name;
	T2 m_Age;
};
创建一个person.cpp文件,里面是模板类的成员函数的定义。
#include "person.h"

template<class T1, class  T2>
Person<T1, T2>::Person(T1 name, T2 age)
{
	this->m_Name = name;
	this->m_Age = age;
}

template<class T1, class  T2>
void Person<T1, T2>::showPerson()
{
	cout << "姓名: " << this->m_Name << " 年龄: " << this->m_Age << endl;
}
然后在主函数中先什么都不做,看是否会报错。
#include <iostream>
#include <string>
#include "person.h"
using namespace std;

void test01()
{

}

int main()
{
	test01();
	system("pause");

	return 0;
}
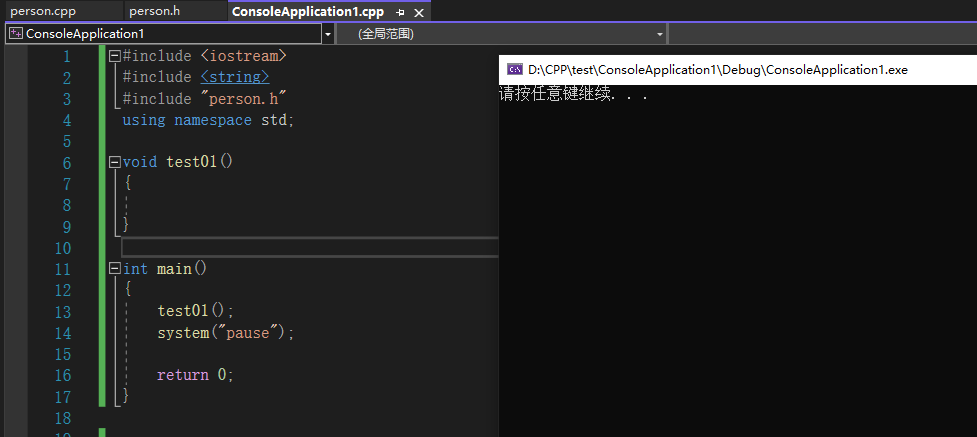
运行,可以看出不使用类模板的成员函数时不会报错。
现在我们来使用类模板的成员函数
#include <iostream>
#include <string>
#include "person.h"
using namespace std;

void test01()
{
	Person<string, int>p("jerry", 18);
	p.showPerson();
}

int main()
{
	test01();
	system("pause");

	return 0;
}
运行,可以看到链接过程会出错,提示无法解析这些成员函数。这是因为主函数只包含了person.h,而person.h中只有类模板成员函数的声明而没有定义。同时,类模板的成员函数一开始是不会创建的,所以主函数在包含person.h的时候,不会生成这两个成员函数。这也导致了编译器看不到person.cpp中对函数模板成员函数的定义,所以在链接阶段找不到这两个成员函数的定义。
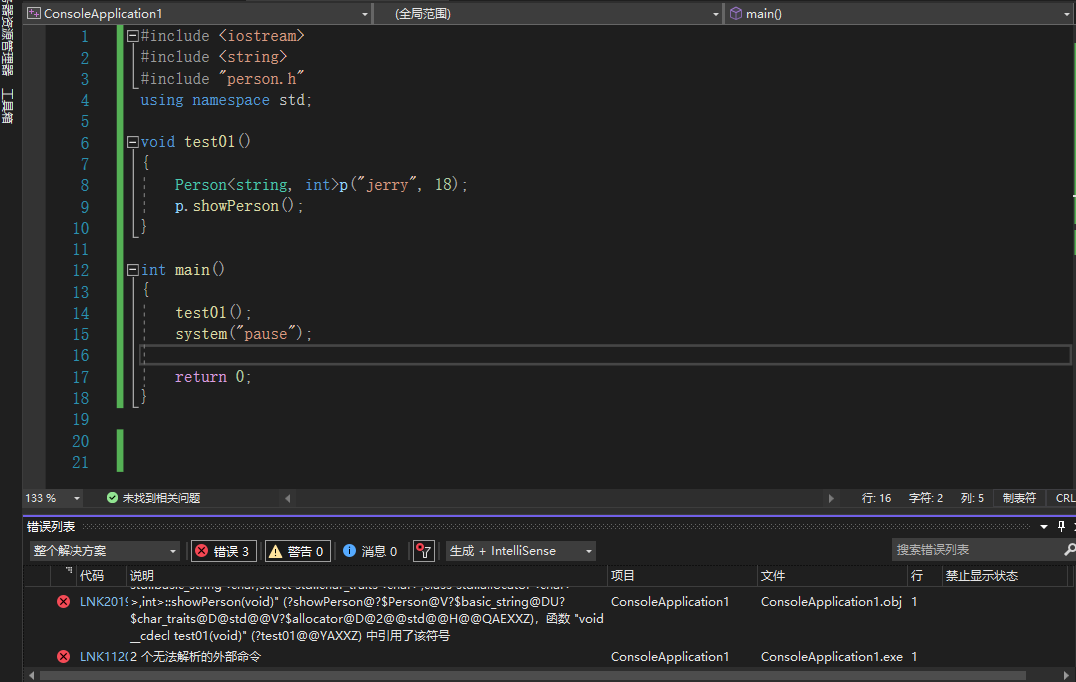
解决方式1:直接包含.cpp源文件。
#include <iostream>
#include <string>
#include "person.cpp"
using namespace std;

void test01()
{
	Person<string, int>p("jerry", 18);
	p.showPerson();
}

int main()
{
	test01();
	system("pause");

	return 0;
}
运行,可以看到不会报错。这是因为person.cpp包含了person.h,所以编译器把类模板成员函数的声明和定义都看了,在链接时就能找到。
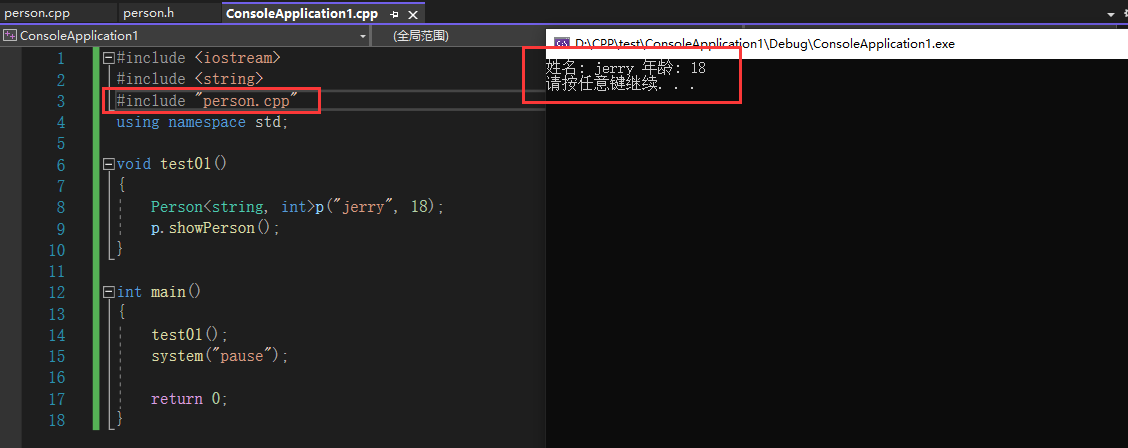
解决方式2:由于一般不将源码暴露出来,所以将声明和实现写到同一个文件中,并更改后缀名为.hpp。hpp是约定的名称,并不是强制,代表类模板成员函数的定义。
#pragma once
#include <iostream>
#include <string>
using namespace std;

template<class T1, class T2>
class Person
{
public:
	Person(T1 name, T2 age);
	void showPerson();

	T1 m_Name;
	T2 m_Age;
};

#include "person.h"

template<class T1, class  T2>
Person<T1, T2>::Person(T1 name, T2 age)
{
	this->m_Name = name;
	this->m_Age = age;
}

template<class T1, class  T2>
void Person<T1, T2>::showPerson()
{
	cout << "姓名: " << this->m_Name << " 年龄: " << this->m_Age << endl;
}
运行,可以看到不报错。
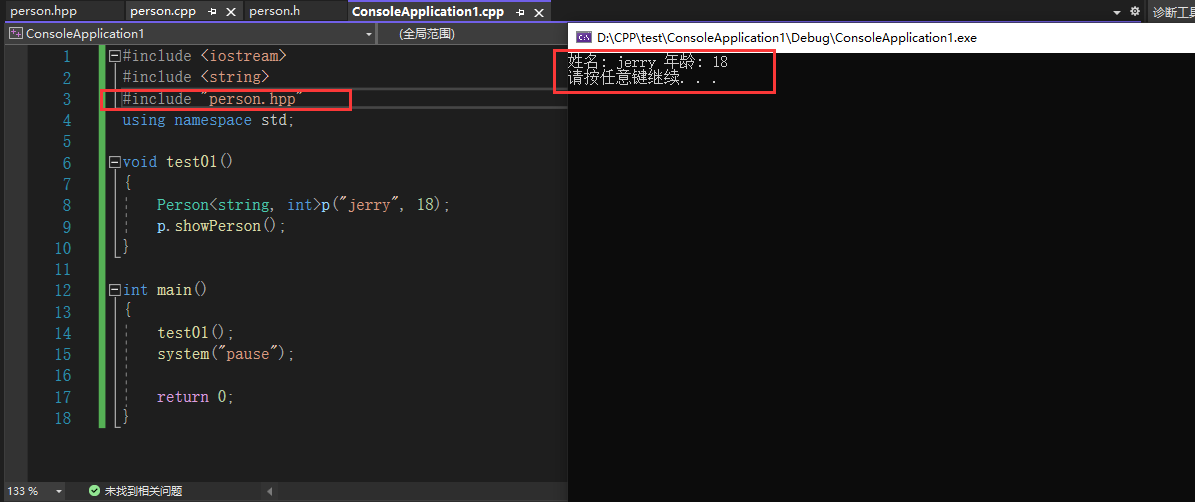
八、类模板与友元
全局函数做友元的类内外实现
①全局函数类内实现 - 直接在类内声明友元即可
②全局函数类外实现 - 需要提前让编译器知道全局函数的存在
建议全局函数做类内实现,用法简单,而且编译器可以直接识别。类外实现比较复杂。
案例: 全局函数类内实现
#include <iostream>
#include <string>
using namespace std;

//通过全局函数 打印Person信息

template<class T1, class T2>
class Person
{
	//1、全局函数做友元 类内实现
	friend void printPerson(Person<T1, T2> p)
	{
		cout << "姓名: " << p.m_Name << " 年龄: " << p.m_Age << endl;
	}

public:
	Person(T1 name, T2 age)
	{
		this->m_Name = name;
		this->m_Age = age;
	}
private:
	T1 m_Name;
	T2 m_Age;
};

//1、全局函数做友元  类内实现
void test01()
{
	Person<string, int>p("Tom", 20);
	printPerson(p);
}

int main()
{
	test01();
	system("pause");

	return 0;
}
运行,可以看到友元函数成功运行。
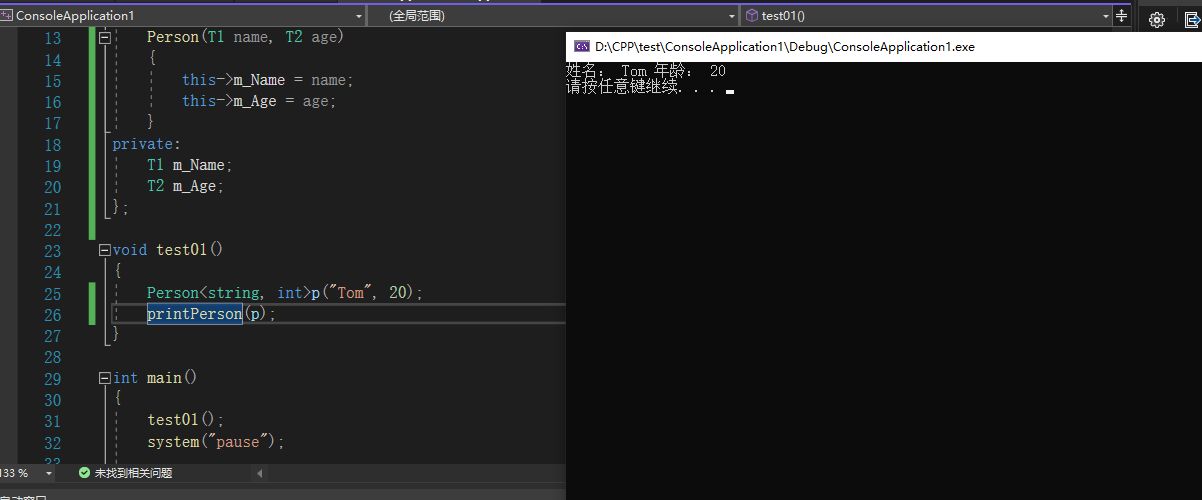
案例: 全局函数类外实现
我们首先按照自己的想法写出相应代码
#include <iostream>
#include <string>
using namespace std;

//通过全局函数 打印Person信息

template<class T1, class T2>
class Person
{
	//2、全局函数做友元 类外实现
	friend void printPerson2(Person<T1, T2> p);
public:
	Person(T1 name, T2 age)
	{
		this->m_Name = name;
		this->m_Age = age;
	}
private:
	T1 m_Name;
	T2 m_Age;
};

//2、全局函数做友元 类外实现
template<class T1, class T2>
void printPerson2(Person<T1, T2> p)
{
	cout << "类外实现----姓名: " << p.m_Name << "----年龄:" << p.m_Age << endl;
}

//2、全局函数做友元  类外实现
void test02()
{
	Person<string, int>p("Tom", 20);
	printPerson2(p);
}

int main()
{
	test02();
	system("pause");

	return 0;
}
运行,可以看到链接阶段报错
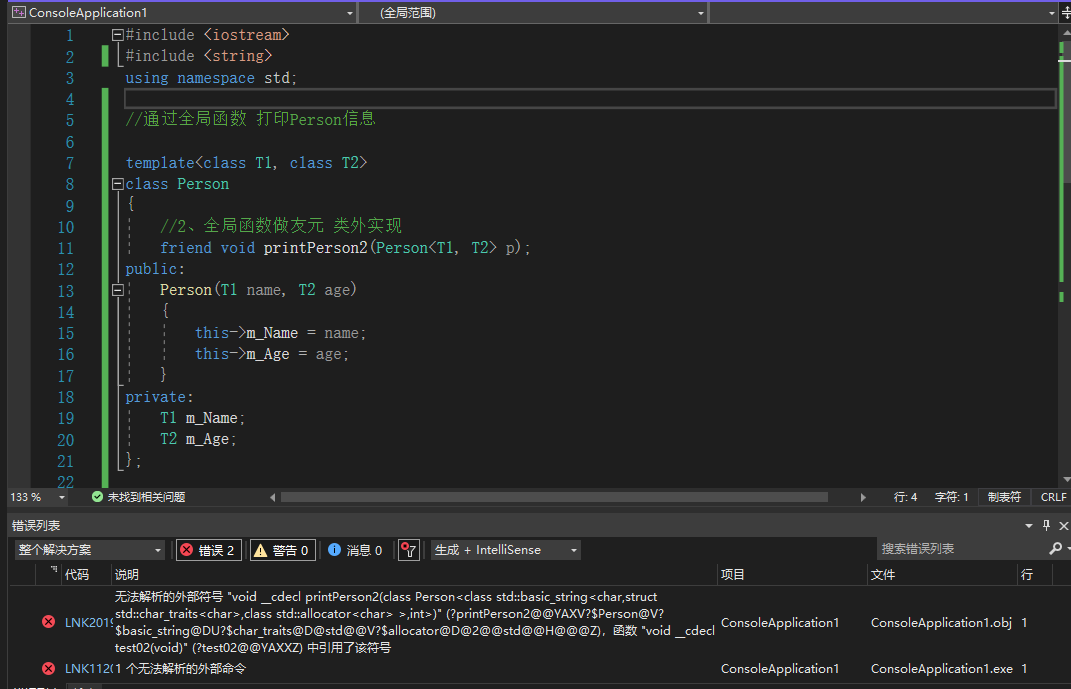
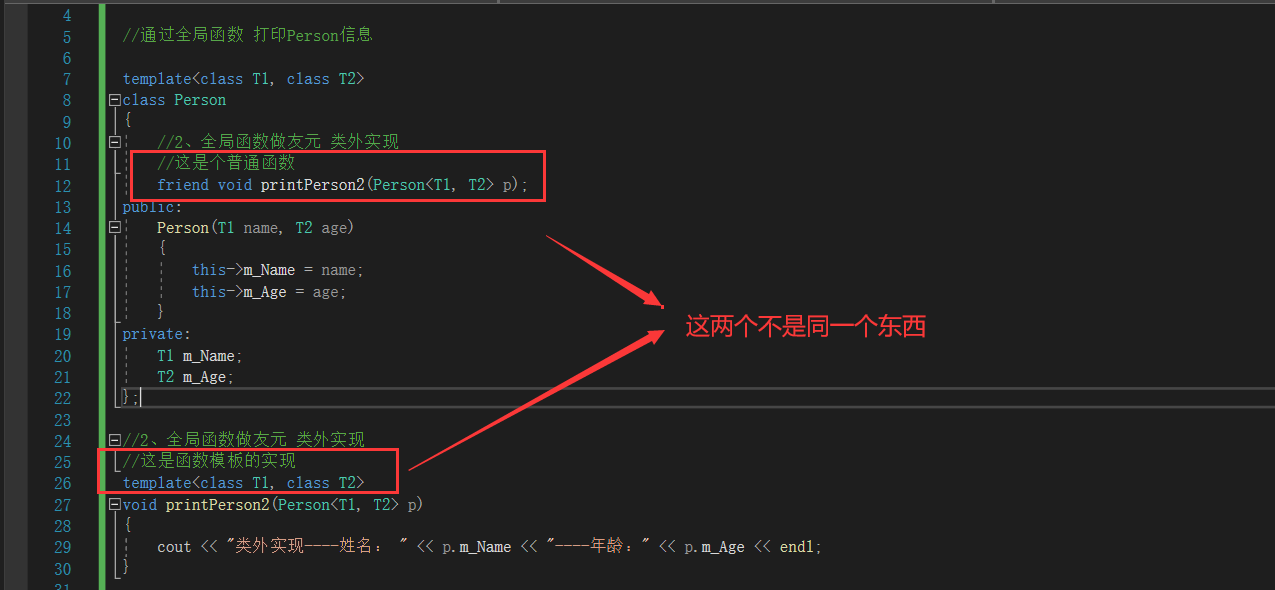
原因分析:这是因为类内的printPerson2和类外的printPerson2不是同一个东西
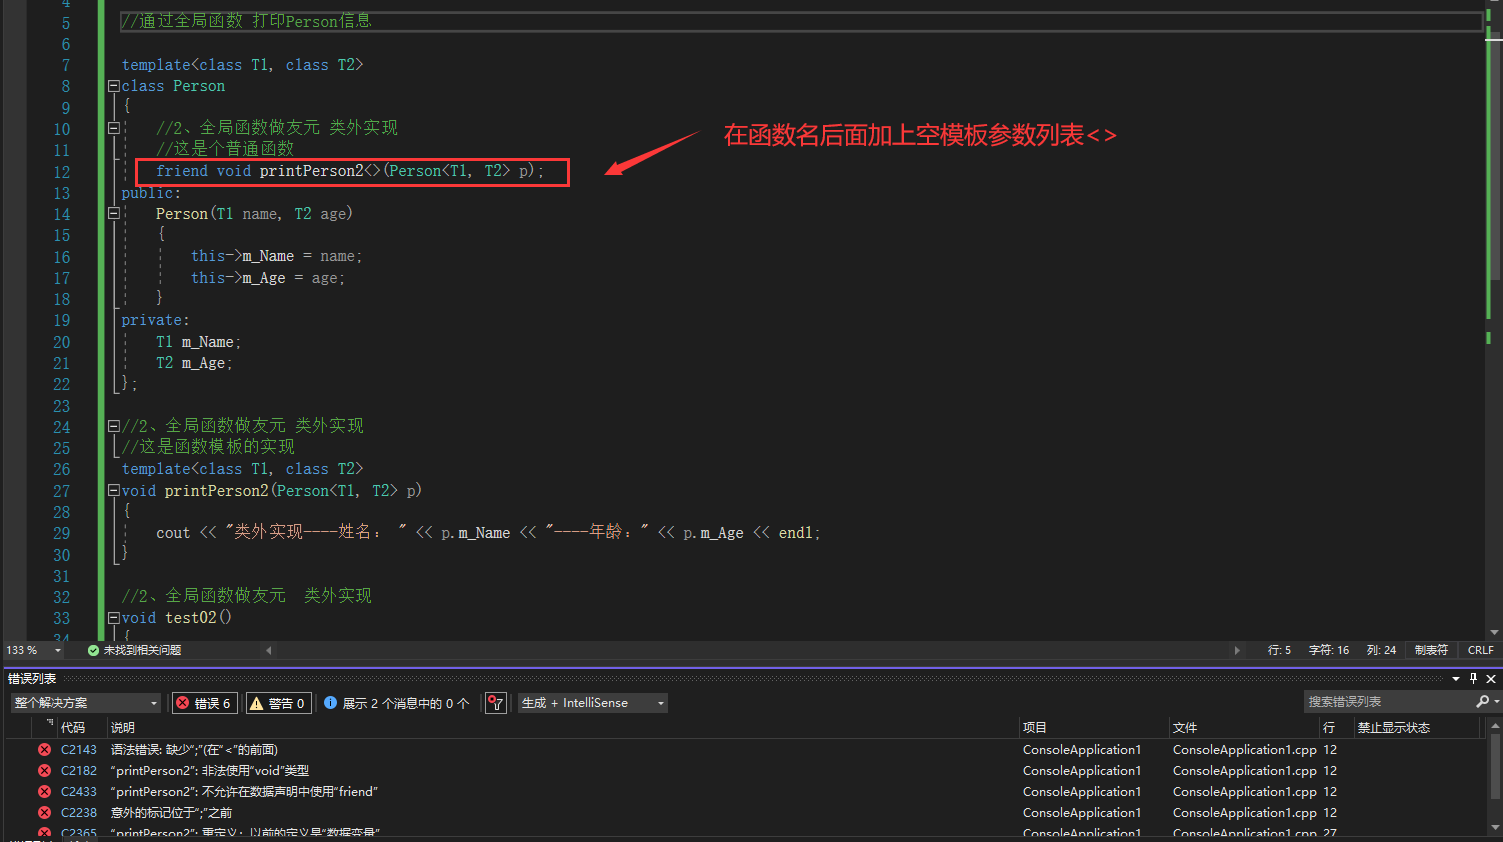
解决方案:在类内的printPerson2函数名后面加上空模板参数列表。运行,可以看到虽然还是报错,但是链接没问题。
解决方案:当全局函数做友元类外实现时,需要让编译器提前知道这个函数存在。所以我们将这个函数的定义剪切到类的前面,可以看到还是有错误。
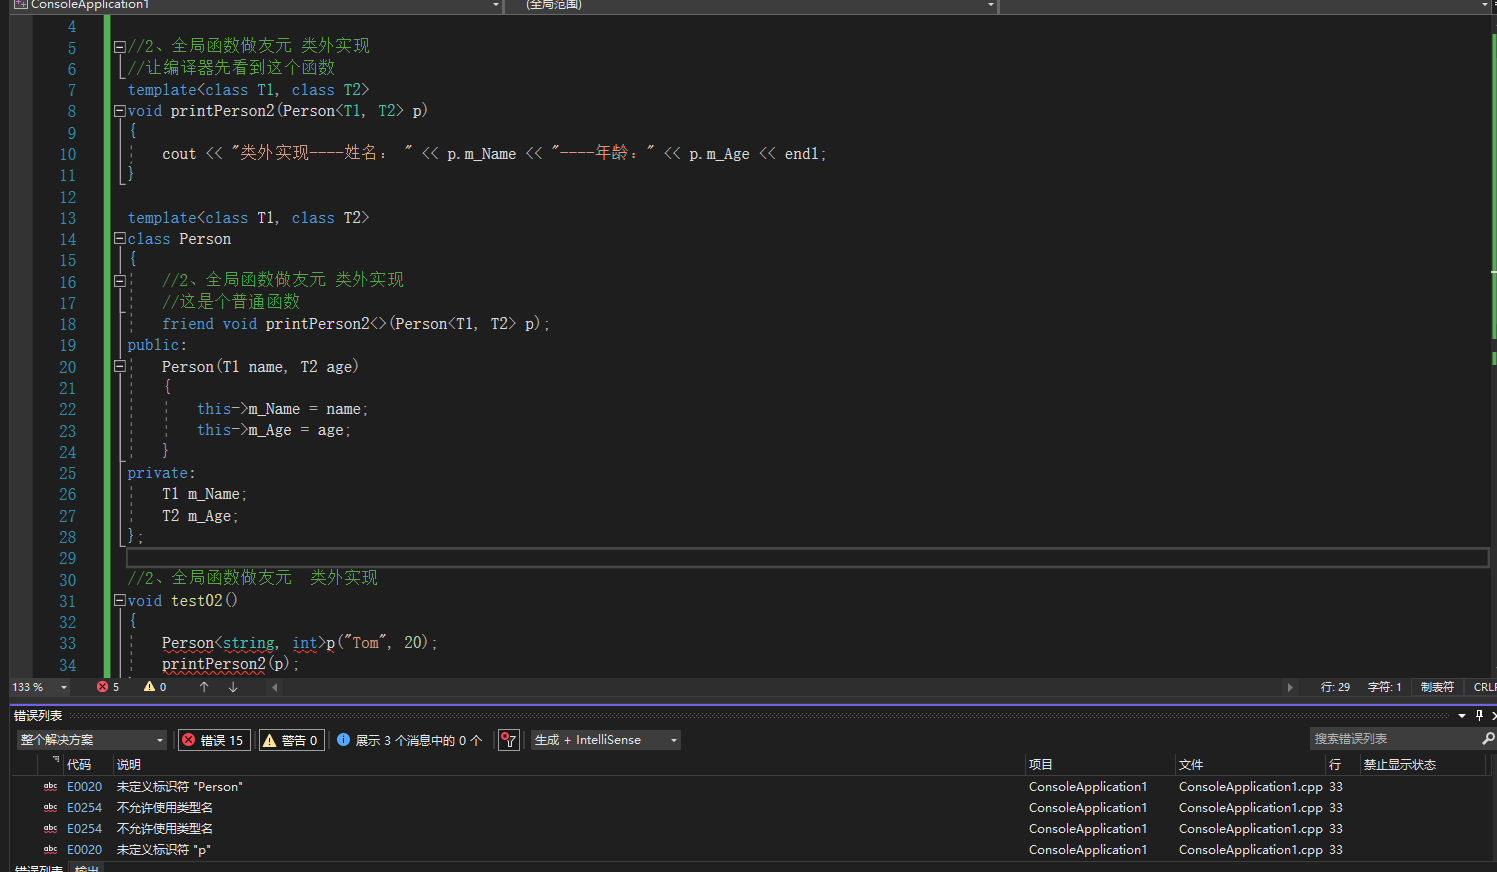
解决方案:这是因为这个友元函数的参数是Person类模板,所有要让编译器先看到这个Person类模板。运行,结果正确。
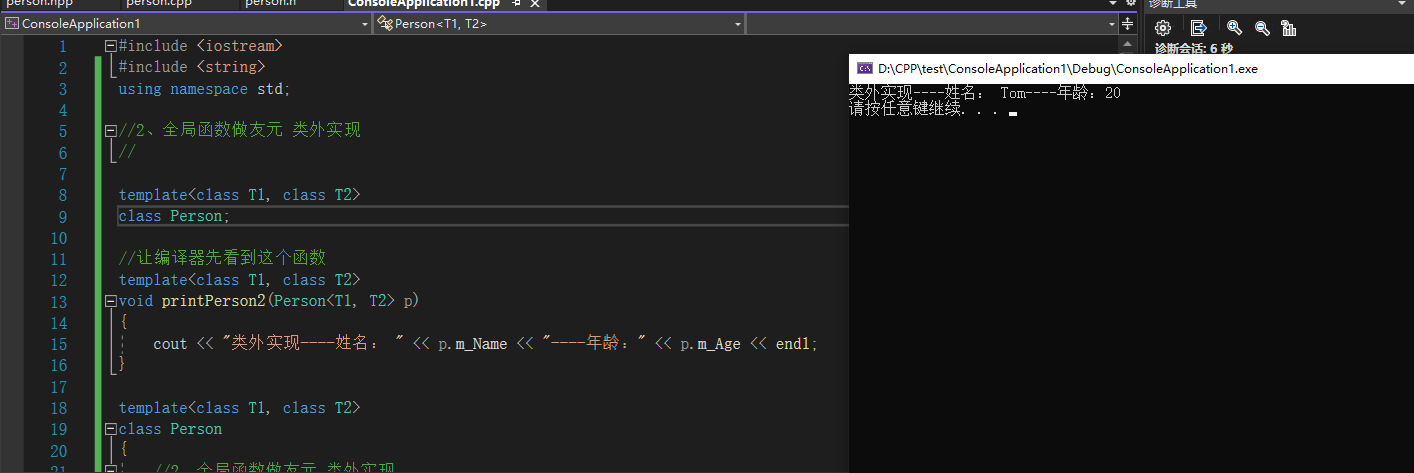
整体代码如下
#include <iostream>
#include <string>
using namespace std;

//2、全局函数做友元 类外实现

//让编译器先看到这个类模板
template<class T1, class T2>
class Person;

//让编译器先看到这个函数
template<class T1, class T2>
void printPerson2(Person<T1, T2> p)
{
	cout << "类外实现----姓名: " << p.m_Name << "----年龄:" << p.m_Age << endl;
}

template<class T1, class T2>
class Person
{
	//2、全局函数做友元 类外实现
	friend void printPerson2<>(Person<T1, T2> p);
public:
	Person(T1 name, T2 age)
	{
		this->m_Name = name;
		this->m_Age = age;
	}
private:
	T1 m_Name;
	T2 m_Age;
};

//2、全局函数做友元  类外实现
void test02()
{
	Person<string, int>p("Tom", 20);
	printPerson2(p);
}

int main()
{
	test02();
	system("pause");

	return 0;
}
九、类模板案例:数组类封装
案例描述
实现一个通用的数组类,要求如下:
①可以对内置数据类型以及自定义数据类型的数据进行存储
②将数组中的数据存储到堆区
③构造函数中可以传入数组的容量
④提供对应的拷贝构造函数以及operator=防止浅拷贝问题
⑤提供尾插法和尾删法对数组中的数据进行增加和删除
⑥可以通过下标的方式访问数组中的元素
⑦可以获取数组中当前元素个数和数组的容量
根据案例描述,对需求进行分析,如下:
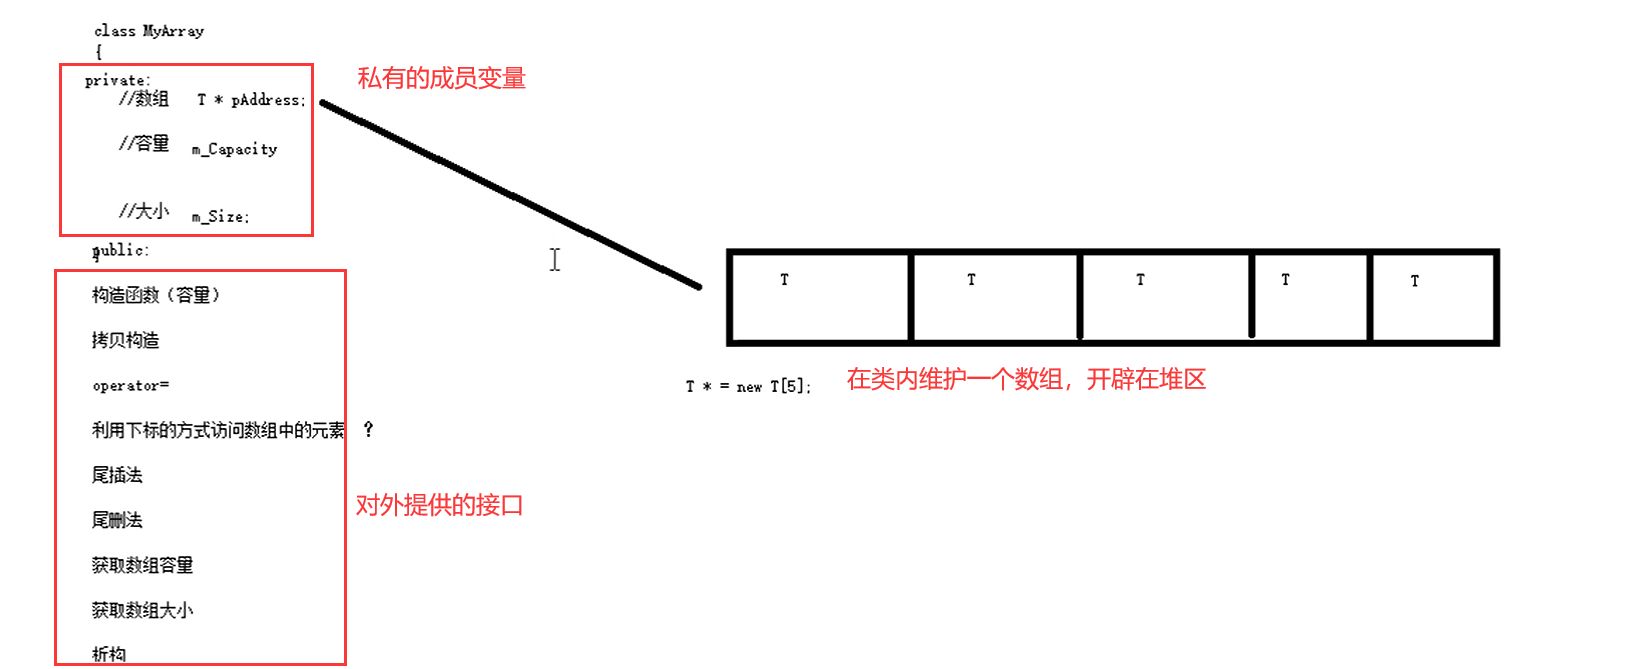
需求①~需求④
我们将功能实现写在MyArray.hpp文件中
#pragma once
#include <iostream>
using namespace std;

//1、通过类模板实现存储内置数据类型和自定义数据类型的数据
//2、在构造函数中在堆区开辟内存,并将数据存储上去
//3、将容量作为有参构造函数的参数进行传入
//4、提供拷贝构造函数时,先将原来对象中的数据清除然后再进行值的拷贝
//4、使用operator重载=时,需要进行深拷贝,同时返回值不能是void,因为需要进行连等

template<class T>
class MyArray
{
public:
	//构造函数
	MyArray(int capacity)
	{
		cout << "MyArray的有参构造调用" << endl;
		this->m_Capacity = capacity;
		this->m_Size = 0;
		this->pAddress = new T[this->m_Capacity];
	}

	//拷贝构造函数(防止浅拷贝)
	MyArray(const MyArray& arr)
	{
		cout << "MyArray的有参构造调用" << endl;
		this->m_Capacity = arr.m_Capacity;
		this->m_Size = arr.m_Size;
		this->pAddress = new T[arr.m_Capacity];//深拷贝
		//将arr中的数据都拷贝过来
		for (int i = 0; i < this->m_Size; i++)
		{
			this->pAddress[i] = arr.pAddress[i];
		}
	}

	//operator=防止浅拷贝问题
	MyArray& operator=(const MyArray& arr)
	{
		cout << "MyArray的operator=调用" << endl;
		//先判断原来堆区是否有数据,如果有先释放
		if (this->pAddress != NULL)
		{
			delete[] this->pAddress;
			this->pAddress = NULL;
			this->m_Capacity = 0;
			this->m_Size = 0;
		}
		//深拷贝
		this->m_Capacity = arr.m_Capacity;
		this->m_Size = arr.m_Size;
		this->pAddress = new T[arr.m_Capacity];
		for (int i = 0; i < this->m_Size; i++)
		{
			this->pAddress[i] = arr.pAddress[i];
		}
		return *this;
	}

	//析构函数
	~MyArray()
	{
		if (this->pAddress != NULL)
		{
			cout << "MyArray的析构函数调用" << endl;
			delete[] this->pAddress;
			this->pAddress = NULL;
		}
	}

private:
	T * pAddress;   //指针指向堆区开辟的真实数组
	int m_Capacity; //数组容量
	int m_Size;     //数组大小
};
然后在主函数中编写测试代码。
#include <iostream>
#include "MyArray.hpp"
using namespace std;

void test01()
{
	MyArray<int>arr1(5);
	MyArray<int>arr2(arr1);
	MyArray<int>arr3(100);
	arr3 = arr1;
}

int main()
{
	test01();
	system("pause");

	return 0;
}
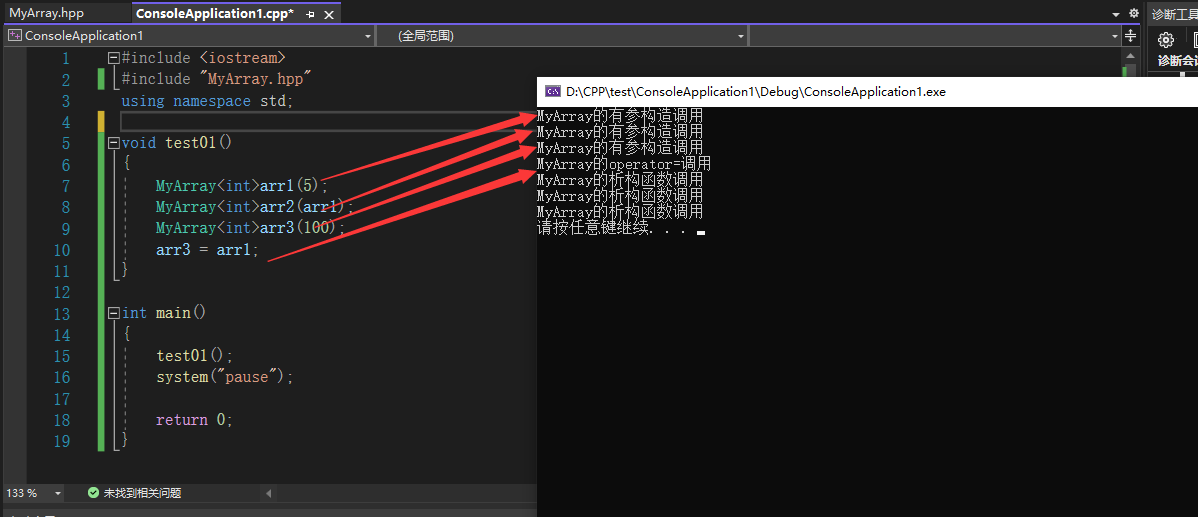
运行,对这些功能进行测试,可以看到这些功能已经实现。
需求⑤~需求⑦
整体功能实现代码MyArray.hpp如下
#pragma once
#include <iostream>
using namespace std;

//1、通过类模板实现存储内置数据类型和自定义数据类型的数据
//2、在构造函数中在堆区开辟内存,并将数据存储上去
//3、将容量作为有参构造函数的参数进行传入
//4、提供拷贝构造函数时,先将原来对象中的数据清除然后再进行值的拷贝
//4、使用operator重载=时,需要进行深拷贝,同时返回值不能是void,因为需要进行连等
//5、使用尾插法和尾删法时要先判断数组数据是否满/是否空
//6、重载[]实现通过下标访问数组中的元素,注意返回值要为引用,因为返回值后续可能会作为左值
//7、获取当前数组中元素个数和容量可以直接返回成员变量m_Size和m_Capacity即可

template<class T>
class MyArray
{
public:
	//构造函数
	MyArray(int capacity)
	{
		cout << "MyArray的有参构造调用" << endl;
		this->m_Capacity = capacity;
		this->m_Size = 0;
		this->pAddress = new T[this->m_Capacity];
	}

	//拷贝构造函数(防止浅拷贝)
	MyArray(const MyArray& arr)
	{
		cout << "MyArray的有参构造调用" << endl;
		this->m_Capacity = arr.m_Capacity;
		this->m_Size = arr.m_Size;
		this->pAddress = new T[arr.m_Capacity];//深拷贝
		//将arr中的数据都拷贝过来
		for (int i = 0; i < this->m_Size; i++)
		{
			this->pAddress[i] = arr.pAddress[i];
		}
	}

	//operator=防止浅拷贝问题
	MyArray& operator=(const MyArray& arr)
	{
		cout << "MyArray的operator=调用" << endl;
		//先判断原来堆区是否有数据,如果有先释放
		if (this->pAddress != NULL)
		{
			delete[] this->pAddress;
			this->pAddress = NULL;
			this->m_Capacity = 0;
			this->m_Size = 0;
		}
		//深拷贝
		this->m_Capacity = arr.m_Capacity;
		this->m_Size = arr.m_Size;
		this->pAddress = new T[arr.m_Capacity];
		for (int i = 0; i < this->m_Size; i++)
		{
			this->pAddress[i] = arr.pAddress[i];
		}
		return *this;
	}

	//尾插法
	void Push_Back(const T & value)
	{
		//判断容量是否等于大小
		if (this->m_Capacity == this->m_Size)
		{
			return;
		}
		this->pAddress[this->m_Size] = value; //在数组末尾插入数据
		this->m_Size++; //更新数组大小
	}

	//尾删法
	void Pop_Back()
	{
		//让用户访问不到最后一个元素即为尾删,逻辑删除
		if (this->m_Size == 0)
		{
			return;
		}
		this->m_Size--;
	}

	//通过下标方式访问数组中的元素,如果返回值想作为左值存在,需要返回一个引用
	T& operator[](int index)
	{
		return this->pAddress[index];
	}

	//返回数组容量
	int getCapacity()
	{
		return this->m_Capacity;
	}

	//返回数组大小
	int getSize()
	{
		return this->m_Size;
	}

	//析构函数
	~MyArray()
	{
		if (this->pAddress != NULL)
		{
			cout << "MyArray的析构函数调用" << endl;
			delete[] this->pAddress;
			this->pAddress = NULL;
		}
	}

private:
	T * pAddress;   //指针指向堆区开辟的真实数组
	int m_Capacity; //数组容量
	int m_Size;     //数组大小
};
我们先来测试内置数据类型
#include <iostream>
#include <string>
#include "MyArray.hpp"
using namespace std;

void printIntArray(MyArray<int>& arr)
{
	for (int i = 0; i < arr.getSize(); i++)
	{
		cout << arr[i] << endl;
	}
}

//测试内置数据类型
void test01()
{
	MyArray<int>arr1(5);
	for (int i = 0; i < 5; i++)
	{
		arr1.Push_Back(i);
	}
	cout << "arr1的打印输出为:" << endl;
	printIntArray(arr1);
	cout << "arr1的容量为:" << arr1.getCapacity() << endl;
	cout << "arr1的大小为:" << arr1.getSize() << endl;
	MyArray<int> arr2(arr1);
	cout << "arr2的打印输出为:" << endl;
	printIntArray(arr1);
	arr2.Pop_Back();
	cout << "arr2尾删后的输出为:" << endl;
	cout << "arr2的容量为:" << arr2.getCapacity() << endl;
	cout << "arr2的大小为:" << arr2.getSize() << endl;
}

int main()
{
	test01();
	system("pause");

	return 0;
}
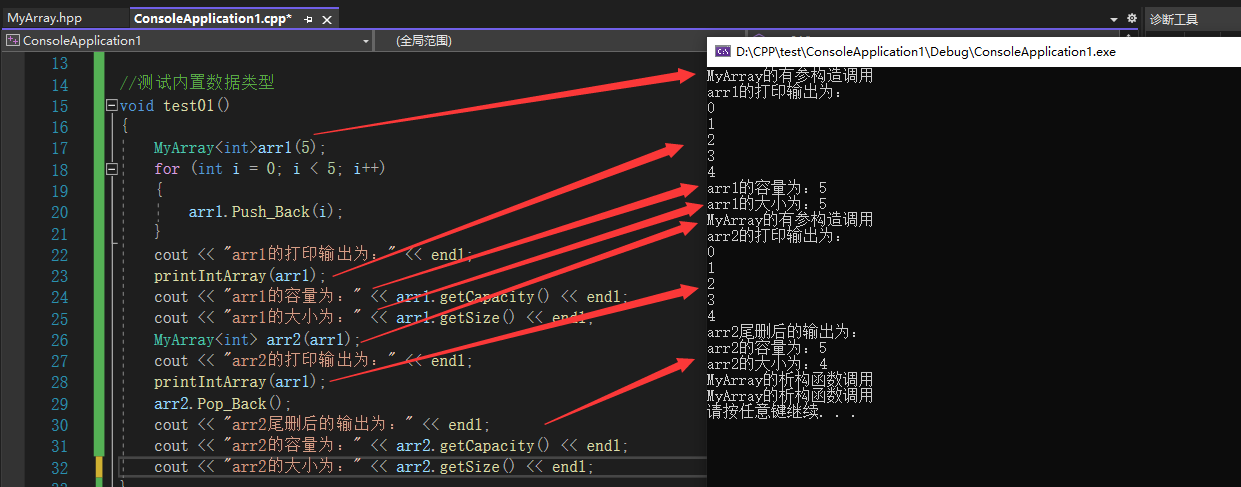
运行,功能都正确实现
我们再来测试自定义数据类型
#include <iostream>
#include <string>
#include "MyArray.hpp"
using namespace std;

//测试自定义数据类型
class Person
{
public:
	Person() {};
	Person(string name, int age)
	{
		this->m_Name = name;
		this->m_Age = age;
	}

	string m_Name;
	int m_Age;
};

void printPersonArray(MyArray<Person>& arr)
{
	for (int i = 0; i < arr.getSize(); i++)
	{
		cout << "姓名: " << arr[i].m_Name << " 年龄: " << arr[i].m_Age << endl;
	}
}

void test02()
{
	MyArray<Person> arr(10);
	Person p1("孙悟空", 999);
	Person p2("韩信", 30);
	Person p3("妲己", 20);
	Person p4("赵云", 25);
	Person p5("安其拉", 27);

	//将数据插入到数组中
	arr.Push_Back(p1);
	arr.Push_Back(p2);
	arr.Push_Back(p3);
	arr.Push_Back(p4);
	arr.Push_Back(p5);

	//打印数组
	printPersonArray(arr);

	//输出容量
	cout << "arr容量为: " << arr.getCapacity() << endl;

	//输出大小
	cout << "arr大小为: " << arr.getSize() << endl;
}

int main()
{
	test02();
	system("pause");

	return 0;
}
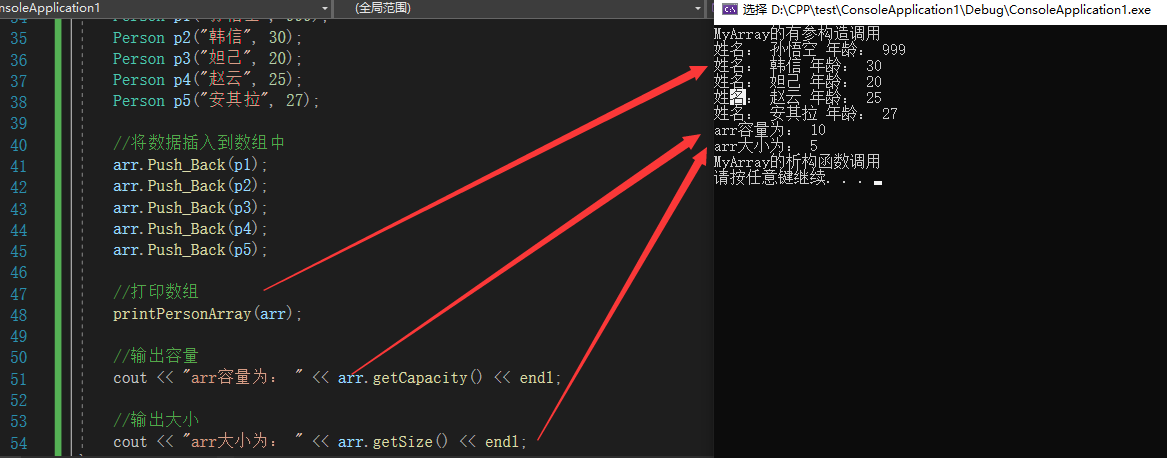
运行,功能都正确实现




 1万+
1万+


 被折叠的 条评论
为什么被折叠?


