


一:简介
最近项目在做了身份证银行卡识别之后,开始实现人脸识别和活体识别,其中人脸识别包括人脸入库、人脸查找、人脸1:N对比、人脸N:N对比,另外活体识别运用在安全登录功能。
大家都熟知的支付宝使用face++ 的服务来实现人脸识别,在实际项目中使用了讯飞的人脸识别SDK进行二次封装来实现活体识别。主要实现了张嘴和摇头两个活体动作的识别。据我所知,讯飞的服务是基于face++,识别率还是很高,并且iOS和Android都对应有封装好的SDK。
在实际运用中,有很多app为了高度保证用户使用的安全问题,除了常规的账号密码登录之外,相继实现了指纹登录,手势登录,第三方登陆(QQ、微信、支付宝)、刷脸登录,接下里我就和大家分享一下如何实现人脸识别的活体检测,这是实现刷脸登录最基础的实现。
另外,这些博文都是来源于我日常开发中的技术总结,在时间允许的情况下,我会针对技术点分别分享iOS、Android两个版本,尽量附上demo以供大家参考,如果有其他技术点需要,可在文章后留言,我会尽全力帮助大家。
二:实现思路分析
1.点击识别按钮,调用相机2.CameraRules类,检测相机权限3.初始化页面,创建摄像页面,创建张嘴数据和摇头数据4.开启识别,脸部框识别5.脸部部位识别,脸部识别判断是否检测到人脸6.检测到人脸之后,判断位置7.位置判断合适,判断是否张嘴8.张嘴判断完毕,验证是否摇头9.摇头判断完毕,3秒倒计时拍照10.拍照完毕,选择重拍或者上传图片11.选择重拍重复5-9步骤,选择上传将图片数据回调12.数据clean三:实现源码分析
根据实现思路分析,一步步进行编码实现:
1. 点击识别按钮,调用相机
if([CameraRules isCapturePermissionGranted]){[self setDeviceAuthorized:YES];}else{dispatch_async(dispatch_get_main_queue(), ^{NSString* info=@"没有相机权限";[self showAlert:info];[self setDeviceAuthorized:NO];});}
2. CameraRules类,检测相机权限
//检测相机权限
+(BOOL)isCapturePermissionGranted{if([AVCaptureDevice respondsToSelector:@selector(authorizationStatusForMediaType:)]){AVAuthorizationStatus authStatus = [AVCaptureDevice authorizationStatusForMediaType:AVMediaTypeVideo];if(authStatus ==AVAuthorizationStatusRestricted || authStatus ==AVAuthorizationStatusDenied){return NO;}else if(authStatus==AVAuthorizationStatusNotDetermined){dispatch_semaphore_t sema = dispatch_semaphore_create(0);__block BOOL isGranted=YES;[AVCaptureDevice requestAccessForMediaType:AVMediaTypeVideo completionHandler:^(BOOL granted) {isGranted=granted;dispatch_semaphore_signal(sema);}];dispatch_semaphore_wait(sema, DISPATCH_TIME_FOREVER);return isGranted;}else{return YES;}}else{return YES;}
}
3. 初始化页面,创建摄像页面,创建张嘴数据和摇头数据
//创建摄像页面,创建张嘴数据和摇头数据[self faceUI];[self faceCamera];[self faceNumber];
4. 开启识别,脸部框识别
float cx = (left+right)/2;float cy = (top + bottom)/2;float w = right - left;float h = bottom - top;float ncx = cy ;float ncy = cx ;CGRect rectFace = CGRectMake(ncx-w/2 ,ncy-w/2 , w, h);if(!isFrontCamera){rectFace=rSwap(rectFace);rectFace=rRotate90(rectFace, faceImg.height, faceImg.width);}BOOL isNotLocation = [self identifyYourFaceLeft:left right:right top:top bottom:bottom];if (isNotLocation==YES) {return nil;}
5. 脸部部位识别,脸部识别判断是否检测到人脸
for(id key in keys){id attr=[landmarkDic objectForKey:key];if(attr && [attr isKindOfClass:[NSDictionary class]]){if(!isFrontCamera){p=pSwap(p);p=pRotate90(p, faceImg.height, faceImg.width);}if (isCrossBorder == YES) {[self delateNumber];return nil;}p=pScale(p, widthScaleBy, heightScaleBy);[arrStrPoints addObject:NSStringFromCGPoint(p)];}}
6. 检测到人脸之后,判断位置动作提醒
if (right - left < 230 || bottom - top < 250) {self.textLabel.text = @"太远了";[self delateNumber];isCrossBorder = YES;return YES;}else if (right - left > 320 || bottom - top > 320) {self.textLabel.text = @"太近了";[self delateNumber];isCrossBorder = YES;return YES;}else{if (isJudgeMouth != YES) {self.textLabel.text = @"请重复张嘴动作";[self tomAnimationWithName:@"openMouth" count:2];if (left < 100 || top < 100 || right > 460 || bottom > 400) {isCrossBorder = YES;isJudgeMouth = NO;self.textLabel.text = @"调整下位置先";[self delateNumber];return YES;}}else if (isJudgeMouth == YES && isShakeHead != YES) {self.textLabel.text = @"请重复摇头动作";[self tomAnimationWithName:@"shakeHead" count:4];number = 0;}else{takePhotoNumber += 1;if (takePhotoNumber == 2) {[self timeBegin];}}isCrossBorder = NO;}
7. 位置判断合适,判断是否张嘴
if (rightX && leftX && upperY && lowerY && isJudgeMouth != YES) {number ++;if (number == 1 || number == 300 || number == 600 || number ==900) {mouthWidthF = rightX - leftX < 0 ? abs(rightX - leftX) : rightX - leftX;mouthHeightF = lowerY - upperY < 0 ? abs(lowerY - upperY) : lowerY - upperY;NSLog(@"%d,%d",mouthWidthF,mouthHeightF);}else if (number > 1200) {[self delateNumber];[self tomAnimationWithName:@"openMouth" count:2];}mouthWidth = rightX - leftX < 0 ? abs(rightX - leftX) : rightX - leftX;mouthHeight = lowerY - upperY < 0 ? abs(lowerY - upperY) : lowerY - upperY;NSLog(@"%d,%d",mouthWidth,mouthHeight);NSLog(@"张嘴前:width=%d,height=%d",mouthWidthF - mouthWidth,mouthHeight - mouthHeightF);if (mouthWidth && mouthWidthF) { if (mouthHeight - mouthHeightF >= 20 && mouthWidthF - mouthWidth >= 15) {isJudgeMouth = YES;imgView.animationImages = nil;}}}
8. 张嘴判断完毕,验证是否摇头
if ([key isEqualToString:@"mouth_middle"] && isJudgeMouth == YES) {if (bigNumber == 0 ) {firstNumber = p.x;bigNumber = p.x;smallNumber = p.x;}else if (p.x > bigNumber) {bigNumber = p.x;}else if (p.x < smallNumber) {smallNumber = p.x;} if (bigNumber - smallNumber > 60) {isShakeHead = YES;[self delateNumber];}}
9. 摇头判断完毕,3秒倒计时拍照
if(timeCount >= 1){self.textLabel.text = [NSStringstringWithFormat:@"%ld s后拍照",(long)timeCount];}else{[theTimer invalidate];theTimer=nil;[self didClickTakePhoto];}
10. 拍照完毕,选择重拍或者上传图片
-(void)didClickPhotoAgain
{[self delateNumber];[self.previewLayer.session startRunning];self.textLabel.text = @"请调整位置";[backView removeFromSuperview];isJudgeMouth = NO;isShakeHead = NO;}
11. 选择重拍重复5-9步骤,选择上传将图片数据回调
-(void)didClickUpPhoto
{//上传照片成功[self.faceDelegate sendFaceImage:imageView.image];[self.navigationController popViewControllerAnimated:YES];
}
12. 数据clean
-(void)delateNumber
{number = 0;takePhotoNumber = 0;mouthWidthF = 0;mouthHeightF = 0;mouthWidth = 0;mouthHeight = 0;smallNumber = 0;bigNumber = 0;firstNumber = 0;imgView.animationImages = nil;imgView.image = [UIImage imageNamed:@"shakeHead0"];
}
四:讯飞SDK下载及配置
1. SDK下载
因为项目中使用到讯飞人脸识别SDK,需要去讯飞开放平台创建应用,下载SDK。

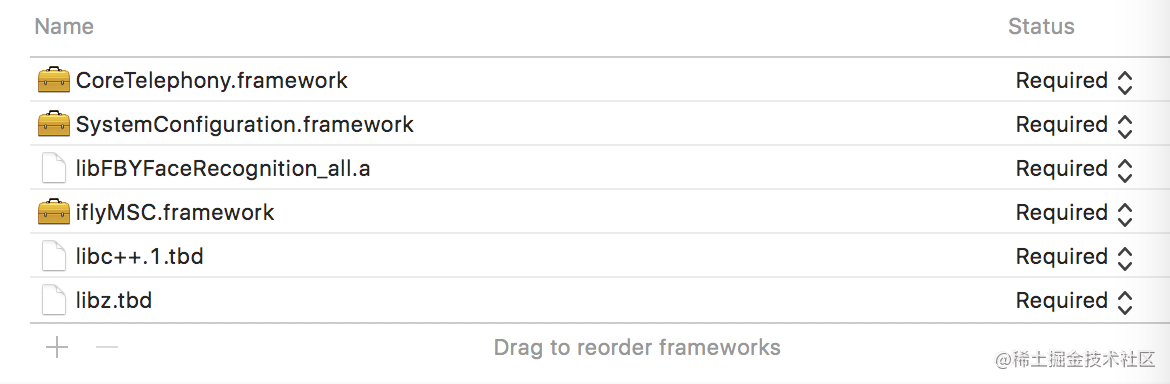
2. 添加系统库
将开发工具包中lib目录下的iflyMSC.framework添加到工程中。同时请将Demo中依赖的其他库也添加到工程中。 按下图示例添加 SDK 所需要的 iOS系统库:
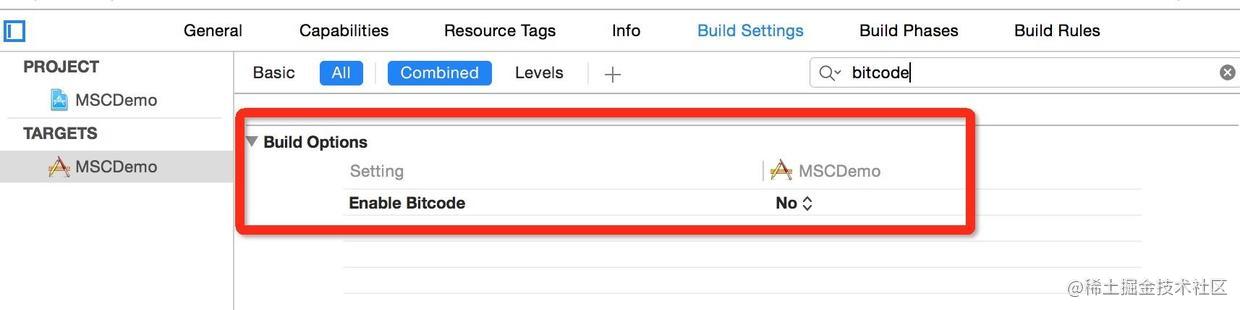
3. 设置Bitcode
在Targets - Build Settings 中搜索Bitcode 即可,找到相应选项,设置为NO,如下图:
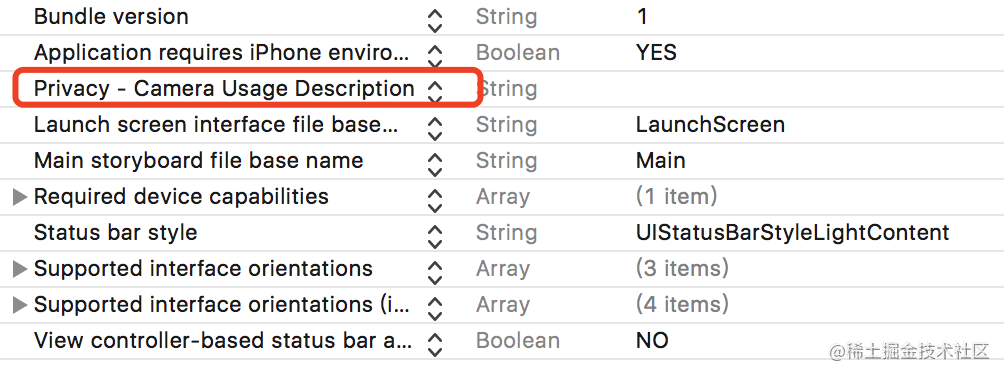
4. 用户隐私权限配置
在Info.plist 中增加下图设置:
五:项目实际使用
1. 下载demo
下载demo,将demo中FBYFaceData文件夹引入项目中。
2. 在项目中引入FBYFaceRecognitionViewController
#import "FBYFaceRecognitionViewController.h"
3. 在项目识别按钮的点击事件中添加代码
-(void)pushToFaceStreamDetectorVC
{FBYFaceRecognitionViewController *faceVC = [[FBYFaceRecognitionViewController alloc]init];faceVC.faceDelegate = self;[self.navigationController pushViewController:faceVC animated:YES];
}
4. 图片回调函数
-(void)sendFaceImage:(UIImage *)faceImage
{NSLog(@"图片上传成功");
}

- (void)sendFaceImageError {NSLog(@"图片上传失败");
}
本篇文章demo源码:
源码Demo获取方法
关注 【网罗开发】微信公众号,回复【人脸识别】便可领取。 网罗天下方法,方便你我开发,所有文档会持续更新,欢迎关注一起成长!
希望可以帮助大家,如有问题可加QQ技术交流群: 668562416
如果哪里有什么不对或者不足的地方,还望读者多多提意见或建议
如需转载请联系我,经过授权方可转载,谢谢
本篇已同步到个人博客:FBY展菲
欢迎关注我的公众号:网罗开发
 ## 最后
## 最后
从时代发展的角度看,网络安全的知识是学不完的,而且以后要学的会更多,同学们要摆正心态,既然选择入门网络安全,就不能仅仅只是入门程度而已,能力越强机会才越多。
因为入门学习阶段知识点比较杂,所以我讲得比较笼统,大家如果有不懂的地方可以找我咨询,我保证知无不言言无不尽,需要相关资料也可以找我要,我的网盘里一大堆资料都在吃灰呢。
干货主要有:
①1000+CTF历届题库(主流和经典的应该都有了)
②CTF技术文档(最全中文版)
③项目源码(四五十个有趣且经典的练手项目及源码)
④ CTF大赛、web安全、渗透测试方面的视频(适合小白学习)
⑤ 网络安全学习路线图(告别不入流的学习)
⑥ CTF/渗透测试工具镜像文件大全
⑦ 2023密码学/隐身术/PWN技术手册大全
如果你对网络安全入门感兴趣,那么你需要的话可以点击这里👉网络安全重磅福利:入门&进阶全套282G学习资源包免费分享!
扫码领取


 6227
6227

 被折叠的 条评论
为什么被折叠?
被折叠的 条评论
为什么被折叠?
 到【灌水乐园】发言


