


目录
一、插件
功能:用于增强Vue
本质:包含install方法的一个对象,install的第一个参数是Vue,第二个以后的参数是插件使用者传递的数据
定义插件:
对象.install = function (Vue, options){
    // 1. 全局过滤器
    Vue.filter(...)

    // 2. 添加全局指令
    Vue.directive(...)

    // 3. 配置全局混入(合)
    Vue.mixin(...)

    // 4. 添加实例方法
    Vue.prototype.$myMethod = function() {...}
    Vue.prototype.$myProperty = xxx
}
使用插件:
Vue.use()采用默认暴露有两种写法
第一种写法:
const obj = {
install(Vue,参数1,参数2,...) {
// 1. 全局过滤器
Vue.filter(...)
// 2. 添加全局指令
Vue.directive(...)
// 3. 配置全局混入(合)
Vue.mixin(...)
// 4. 添加实例方法
Vue.prototype.$myMethod = function() {...}
Vue.prototype.$myProperty = xxx
},
};
export default obj;
第二种写法(简写):
export default {
  install(Vue,参数1,参数2,...) {
        // 1. 全局过滤器
        Vue.filter(...)

        // 2. 添加全局指令
        Vue.directive(...)

        // 3. 配置全局混入(合)
        Vue.mixin(...)

        // 4. 添加实例方法
        Vue.prototype.$myMethod = function() {...}
        Vue.prototype.$myProperty = xxx
    },
};
简单案例练习
plugins.js -- 定义插件
export default {
  install(Vue) {
    // 全局过滤器
    Vue.filter("mySlice", function (value) {
      return value.slice(0, 4);
    });

    // 定义全局指令
    Vue.directive("fbind", {
      bind(element, binding) {
        element.value = binding.value;
      },
      inserted(element, binding) {
        element.focus();
      },
      updated(element, binding) {
        element.value = binding.value;
      },
    });

    // 定义混入
    Vue.mixin({
      data() {
        return {
          x: 1,
          y: 2,
        };
      },
    });

    // 给Vue原型上添加方法 (vm和vc都可以使用)
    Vue.prototype.hello = () => {
      alert("hello world");
    };
  },
};
main.js -- 引入并使用插件(plugins)
// 引入Vue
import Vue from "vue";
// 引入App
import App from "./App.vue";
// 引入插件
import plugins from "./plugins";
// 使用插件
Vue.use(plugins);

Vue.config.productionTip = false;

// 创建vm
new Vue({
  el: "#app",
  render: (h) => h(App),
});
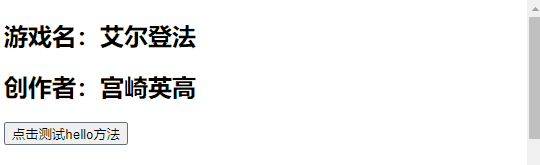
Game.vue -- 使用plugins.js中的全局过滤器和定义的hello方法
<template>
  <div>
    <!-- 使用plugins中全局过滤器 -->
    <h2>游戏名:{{ name | mySlice }}</h2>
    <h2>创作者:{{ creater }}</h2>
    <!-- 使用plugins中hello方法 -->
    <button @click="test">点击测试hello方法</button>
  </div>
</template>

<script>
export default {
  name: "Game",
  data() {
    return {
      name: "艾尔登法环",
      creater: "宫崎英高",
    };
  },
  methods: {
    test() {
      this.hello();
    },
  },
};
</script>

<style></style>
由图可看出,游戏名只截取了前4个字,且点击按钮能够实现弹窗
Player.vue - 使用plugins.js中的全局指令
<template>
  <div>
    <h2>玩家名:{{ name }}</h2>
    <h2>初始身份:{{ status }}</h2>
    <!-- 使用plugins中全局指令 -->
    <input type="text" v-fbind:value="name" />
  </div>
</template>

<script>
export default {
  name: "Player",
  data() {
    return {
      name: "太阳骑士",
      status: "预言家",
    };
  },
};
</script>

<style></style>
由图可看出input框获取到了name值

plugins.js中的定义混入(mixin)体现
由图可看出,Vue实例每一层data数据内都有x和y

二、scoped样式
作用:让样式在局部生效,防止冲突
写法:
<style scoped></style>简单案例练习
让Game组件和Player组件命名相同class,并设置不同背景色
Game.vue
<template>
  <div class="test">
    <h2>游戏名:{{ name }}</h2>
    <h2>创作者:{{ creater }}</h2>
  </div>
</template>

<script>
export default {
  name: "Game",
  data() {
    return {
      name: "艾尔登法环",
      creater: "宫崎英高",
    };
  },
};
</script>

<style lang="less" scoped>
.test {
  background-color: orange;
}
</style>
Player.vue
<template>
  <div class="test">
    <h2>玩家名:{{ name }}</h2>
    <h2 class="status">初始身份:{{ status }}</h2>
  </div>
</template>

<script>
export default {
  name: "Player",
  data() {
    return {
      name: "太阳骑士",
      status: "预言家",
    };
  },
};
</script>

<style lang="less" scoped>
.test {
  background-color: skyblue;
  .status {
    font-size: 40px;
  }
}
</style>
由下方图示可看出,即使class命名相同,添加了scoped样式后,两个组件的样式渲染上处于独立的

而如果没有添加scoped样式,则会出现覆盖的情况。最终展示样式渲染,取决于在App.vue中引入的先后顺序,后面引入组件的在class命名相同的情况下,会覆盖前面引入的组件
App.vue
<template>
  <div>
    <Game></Game>
    <Player></Player>
  </div>
</template>

<script>
import Player from "./components/Player.vue";
import Game from "./components/Game.vue";

export default {
  name: "App",
  components: { Game, Player },
};
</script>

<style></style>
由图示可看出,最终样式背景色渲染取决于Game.vue组件


 2万+
2万+


 被折叠的 条评论
为什么被折叠?
被折叠的 条评论
为什么被折叠?
 到【灌水乐园】发言


