


UITableView
一、概述
- 在iOS中,要实现表格数据展示,最常用的做法就是使用UITableView,类似于微信、QQ、新浪微博等软件基本上随处都是UITableView。
- UITableView继承自UIScrollView,因此支持垂直滚动,而且性能极佳。
二、基本介绍
UITableView有两种风格:UITableViewStylePlain 和 UITableViewStyleGrouped
- UITableViewStylePlain按照普通样式显示
- UITableViewStyleGrouped按分组样式显示前者
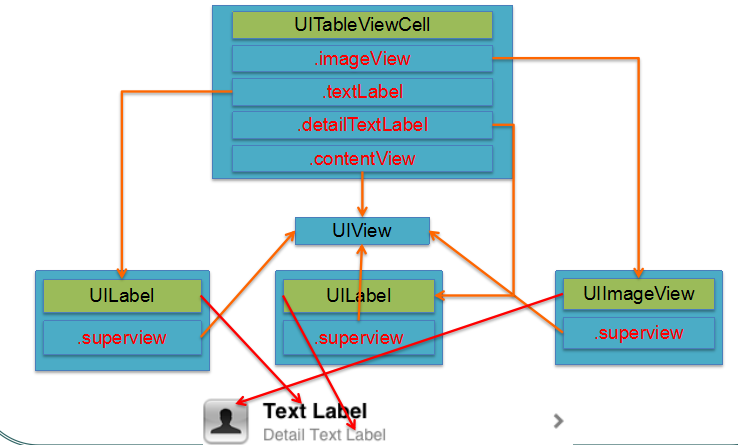
在UITableView中数据只有行的概念,并没有列的概念,因为在手机操作系统中显示多列是不利于操作的。UITableView中每行数据都是一个UITableViewCell,在这个控件中为了显示更多的信息,iOS已经在其内部设置好了多个子控件以供开发者使用。如果我们查看UITableViewCell的声明文件可以发现在内部有一个UIView控件(contentView,作为其他元素的父控件)、两个UILable控件(textLabel、detailTextLabel)、一个UIImage控件(imageView),分别用于容器、显示内容、详情和图片。
三、数据源
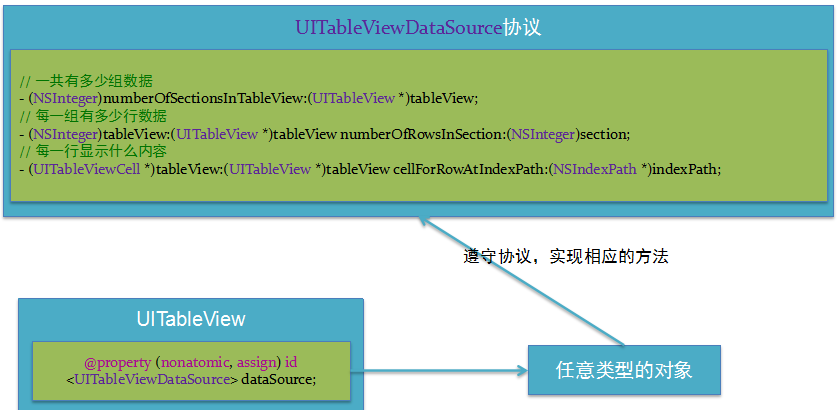
由于iOS是遵循MVC模式设计的,很多操作都是通过代理和外界沟通的,但对于数据源控件除了代理还有一个数据源属性,通过它和外界进行数据交互。 对于UITableView设置完dataSource后需要实现UITableViewDataSource协议,在这个协议中定义了多种数据操作方法
- UITableView需要一个数据源(dataSource)来显示数据
- UITableView会向数据源查询一共有多少行数据以及每一行显示什么数据等
- 凡是遵守UITableViewDataSource协议的OC对象,都可以是UITableView的数据源
1.tableView和数据源
2.tableView展示数据的过程
调用数据源的下面方法得知一共有多少组数据
- (NSInteger)numberOfSectionsInTableView:(UITableView *)tableView;调用数据源的下面方法得知每一组有多少行数据
- (NSInteger)tableView:(UITableView *)tableView numberOfRowsInSection:(NSInteger)section;调用数据源的下面方法得知每一行显示什么内容(每当有一个cell进入视野范围内,就会调用)
- (UITableViewCell *)tableView:(UITableView *)tableView cellForRowAtIndexPath:(NSIndexPath *)indexPath;
3.tableView常用方法
第section组显示怎样的头部标题(概括这一组的作用)
(NSString *)tableView:(UITableView *)tableView titleForHeaderInSection:(NSInteger)section第section组显示怎样的尾部标题(详细描述这一组是干什么用的)
(NSString *)tableView:(UITableView *)tableView titleForFooterInSection:(NSInteger)section
四、代理
UITableView代理方法有很多,例如监听单元格显示周期、监听单元格选择编辑操作、设置是否高亮显示单元格、设置行高等。
1.设置行高
设置分组标题内容高度
-(CGFloat)tableView:(UITableView *)tableView heightForHeaderInSection:(NSInteger)section设置每行高度(每行高度可以不一样)
-(CGFloat)tableView:(UITableView *)tableView heightForRowAtIndexPath:(NSIndexPath *)indexPath设置尾部说明内容高度
-(CGFloat)tableView:(UITableView *)tableView heightForFooterInSection:(NSInteger)section
2.监听点击
五、cell
1. 简介
- UITableView的每一行都是一个UITableViewCell,通过dataSource的tableView:cellForRowAtIndexPath:方法来初始化每一行。
- UITableViewCell内部有个默认的子视图:contentView,contentView是UITableViewCell所显示内容的父视图,可显示一些辅助指示视图。
- 辅助指示视图的作用是显示一个表示动作的图标,可以通过设置UITableViewCell的accessoryType来显示。accessoryType有五种枚举常量:
- UITableViewCellAccessoryNone
- UITableViewCellAccessoryDisclosureIndicator
- UITableViewCellAccessoryDetailDisclosureButton
- UITableViewCellAccessoryCheckmark
- UITableViewCellAccessoryDetailButton
- 还可以通过cell的accessoryView属性来自定义辅助指示视图(比如往右边放一个开关)
cell.accessoryView = [[UISwitch alloc] init];


2. UITableViewCell的背景设置
- 背景设置需要UITableViewCell的两个属性:backgroundView 和 selectedBackgroundView(选中时背景的颜色)。
- backgroundView背景颜色的设置方法 (间接设置)
    UIView *bgView = [[UIView alloc] init];
    bgView.backgroundColor = [UIColor blueColor];
cell.backgroundView = bgView;- selectedBackgroundView背景颜色的设置方法(间接设置)
    UIView *selectedbgView = [[UIView alloc] init];
    selectedbgView.backgroundColor = [UIColor orangeColor];
cell.selectedBackgroundView = selectedbgView;- backgroundView背景图片的设置方法(背景view不用设置尺寸,backgroundView的优先级大于backgroundcolor)
    UIImageView *bgView = [[UIImageView alloc] init];
    bgView.image = [UIImage imageNamed:<#(nonnull NSString *)#> ];
    cell.backgroundView = bgView;
3. UITableViewCell的contentView
- 下默认有3个子视图
- 其中2个是UILabel(通过UITableViewCell的textLabel和detailTextLabel属性访问)
- 第3个是UIImageView(通过UITableViewCell的imageView属性访问)
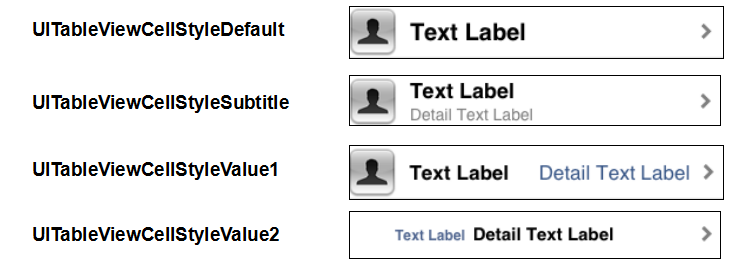
- UITableViewCell还有一个UITableViewCellStyle属性,用于决定使用contentView的哪些子视图,以及这些子视图在contentView中的位置。
4. UITableViewCell结构
六、UITableView的常见属性
- separatorColor(分割线的颜色)
self.tableView.separatorColor = [UIColor colorWithRed:0 green:255/255.0 blue:255/255.0 alpha:200/255.0];- separatorStyle(分割线的格式), 是一个枚举常量,有三种:
self.tableView.separatorStyle = UITableViewCellSeparatorStyleSingleLineEtched
//    UITableViewCellSeparatorStyleNone,
//    UITableViewCellSeparatorStyleSingleLine,
// UITableViewCellSeparatorStyleSingleLineEtched- 显示表格的头部控件(直接显示表格的最顶部)(一般放广告,标志栏)
self.tableView.tableHeaderView = [[UISwitch alloc]init];- 显示表格的尾部控件(直接显示表格的最底部)(一般放 “加载更多”)
self.tableView.tableFooterView = [UIButton buttonWithType:UIButtonTypeContactAdd];七、UITableView的性能优化*
1. Cell的重用原理
UITableView中的单元格cell是在显示到用户可视区域后创建的,那么如果用户往下滚动就会继续创建显示在屏幕上的单元格,如果用户向上滚动返回到查看过的内容时同样会重新创建之前已经创建过的单元格。如此一来即使UITableView的内容不是太多,如果用户反复的上下滚动,内存也会瞬间飙升,更何况很多时候UITableView的内容是很多的(例如微博展示列表,基本向下滚动是没有底限的)。
重用原理:当滚动列表时,部分UITableViewCell会移出窗口,UITableView会将窗口外的UITableViewCell放入一个对象池中,等待重用。当UITableView要求dataSource返回UITableViewCell时,dataSource会先查看这个对象池,如果池中有未使用的UITableViewCell,dataSource会用新的数据配置这个UITableViewCell,然后返回给UITableView,重新显示到窗口中,从而避免创建新对象
还有一个非常重要的问题:有时候需要自定义UITableViewCell(用一个子类继承UITableViewCell),而且每一行用的不一定是同一种UITableViewCell,所以一个UITableView可能拥有不同类型的UITableViewCell,对象池中也会有很多不同类型的UITableViewCell,那么UITableView在重用UITableViewCell时可能会得到错误类型的UITableViewCell
解决方案:UITableViewCell有个NSString *reuseIdentifier属性,可以在初始化UITableViewCell的时候传入一个特定的字符串标识来设置reuseIdentifier(一般用UITableViewCell的类名)。当UITableView要求dataSource返回UITableViewCell时,先通过一个字符串标识到对象池中查找对应类型的UITableViewCell对象,如果有,就重用,如果没有,就传入这个字符串标识来初始化一个UITableViewCell对象
2. 代码实现
// 每当有一个cell进入视野范围内,就会调用
- (UITableViewCell *)tableView:(UITableView *)tableView cellForRowAtIndexPath:(NSIndexPath *)indexPath
{
    // 1.定义一个cell的标识,static修饰局部变量:可以保证局部变量之分配一次存储空间(只初始化一次)
      static NSString *ID = @"mycell";

    // 2.通过一个标识去缓存池中寻找循环利用的cell
    // dequeue:出列(查找)
      UITableViewCell *cell = [tableView dequeueReusableCellWithIdentifier:ID];

    // 3.如果缓存池中没有可循环利用的cell
      if (cell == nil) {
        cell = [[UITableViewCell alloc] initWithStyle:UITableViewCellStyleSubtitle reuseIdentifier:ID];
    }

    // 4.设置cell的属性...

      return cell;
}
八、UITableView简单的应用
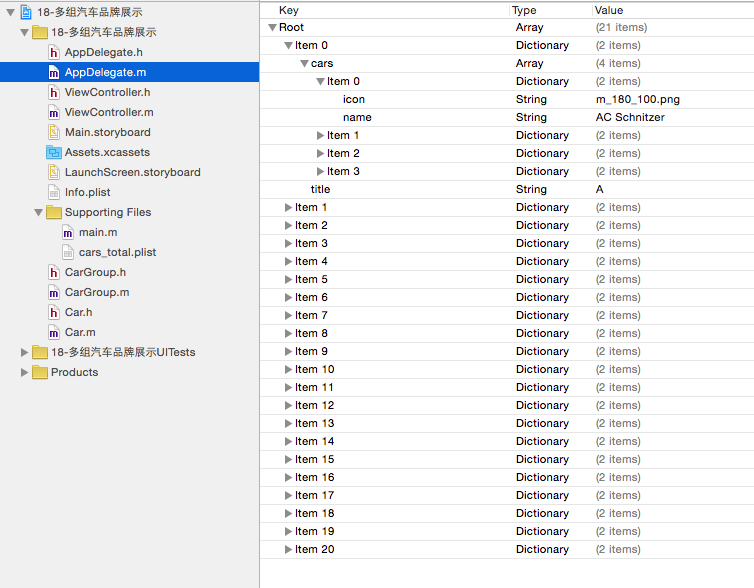
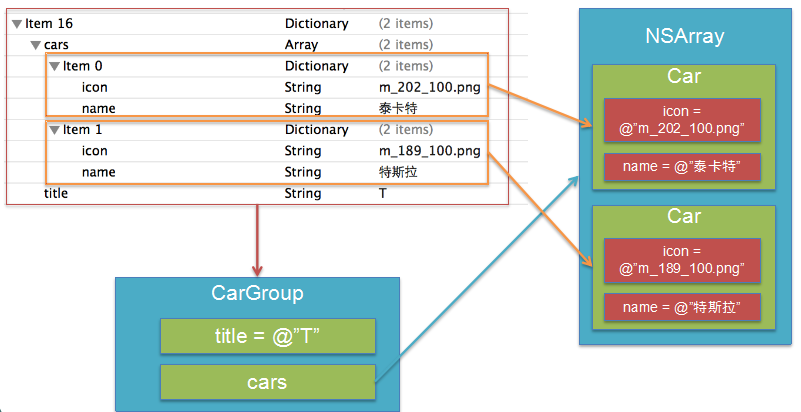
1. 多组汽车品牌展示(模型中嵌套模型)
重点是掌握模型中嵌套模型的设计理念
结构框架
代码实现
// ViewController.m
#import "ViewController.h"
#import "CarGroup.h"
#import "Car.h"
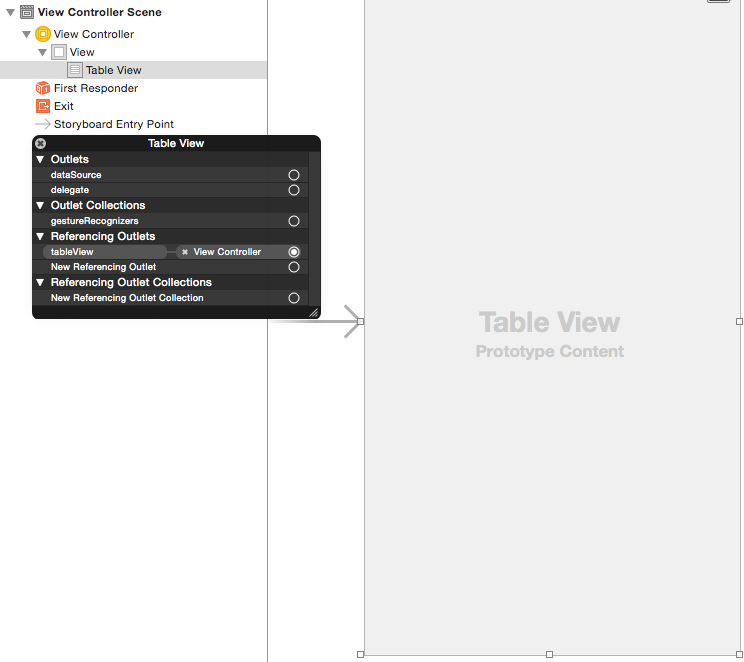
@interface ViewController ()<UITableViewDataSource, UITableViewDelegate>
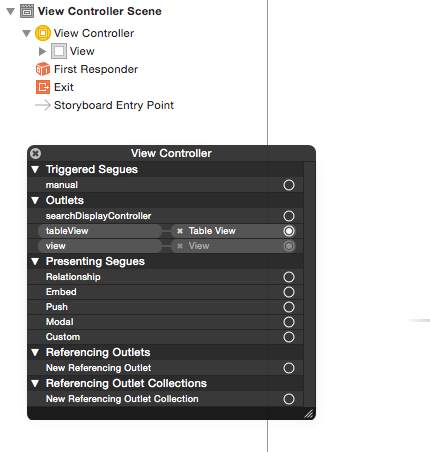
@property (weak, nonatomic) IBOutlet UITableView *tableView;
@property (strong, nonatomic) NSArray *groups;
@end
@implementation ViewController
- (void)viewDidLoad {
[super viewDidLoad];
self.tableView.dataSource = self;
}
- (NSArray *)groups
{
if (_groups == nil) {
// 初始化
// 1.获得plist的全路径
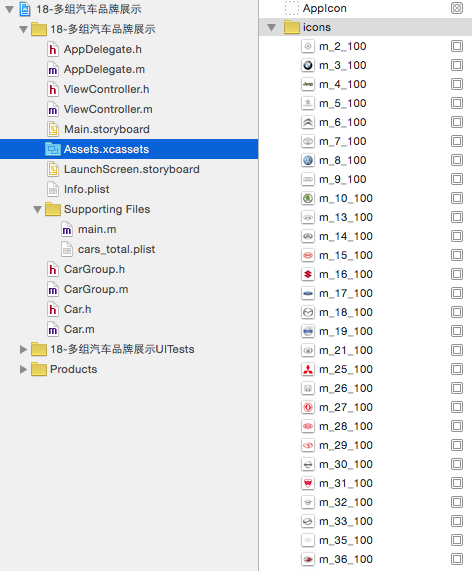
NSString *path = [[NSBundle mainBundle] pathForResource:@"cars_total.plist" ofType:nil];
// 2.加载数组
NSArray *dictArray = [NSArray arrayWithContentsOfFile:path];
// 3.将dictArray里面的所有字典转成模型对象,放到新的数组中
NSMutableArray *groupsArray = [NSMutableArray array];
for (NSDictionary *dict in dictArray) {
// 3.1.创建模型对象
CarGroup *group = [CarGroup groupWithDict:dict];
// 3.2.添加模型对象到数组中
[groupsArray addObject:group];
}
// 4.赋值
_groups = groupsArray;
}
return _groups;
}
#pragma mark - 数据源方法
- (NSInteger)numberOfSectionsInTableView:(UITableView *)tableView{
return self.groups.count;
}
- (NSInteger)tableView:(UITableView *)tableView numberOfRowsInSection:(NSInteger)section{
CarGroup *group = self.groups[section];
return group.cars.count;
}
- (UITableViewCell *)tableView:(UITableView *)tableView cellForRowAtIndexPath:(NSIndexPath *)indexPath{
static NSString *ID = @"car";
UITableViewCell *cell = [tableView dequeueReusableCellWithIdentifier:ID];
if(cell == nil){
cell = [[UITableViewCell alloc] initWithStyle:UITableViewCellStyleDefault reuseIdentifier:ID];
}
CarGroup *group = self.groups[indexPath.section];
Car *car = group.cars[indexPath.row];
cell.imageView.image = [UIImage imageNamed:car.icon];
cell.textLabel.text = car.name;
return cell;
}
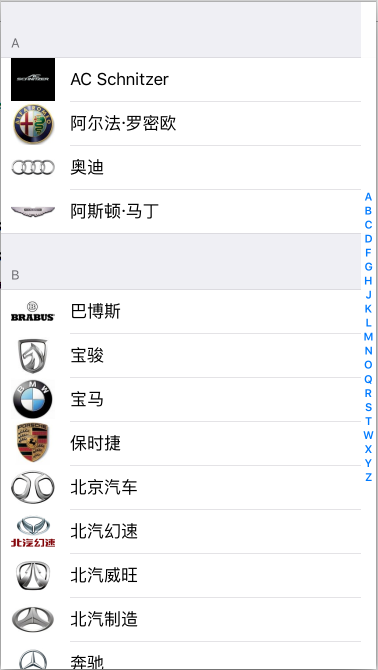
- (NSString *)tableView:(UITableView *)tableView titleForHeaderInSection:(NSInteger)section{
CarGroup *group = self.groups[section];
return group.title;
}
// 返回右边索引条显示的字符串数据
- (NSArray<NSString *> *)sectionIndexTitlesForTableView:(UITableView *)tableView{
return [self.groups valueForKeyPath:@"title"];
}
- (BOOL)prefersStatusBarHidden{
return YES;
}
@end// CarGroup.h
#import <Foundation/Foundation.h>
@interface CarGroup : NSObject
// 这组的标题
@property (copy, nonatomic) NSString *title;
// 存放所有汽车的品牌(里面装的都是Car模型)
@property (strong, nonatomic) NSArray *cars;
+ (instancetype)groupWithDict:(NSDictionary *)dict;
- (instancetype)initWithDict:(NSDictionary *)dict;
@end
//  CarGroup.m
#import "CarGroup.h"
#import "Car.h"

@implementation CarGroup

+ (instancetype)groupWithDict:(NSDictionary *)dict{
    return [[CarGroup alloc] initWithDict:dict];
}

- (instancetype)initWithDict:(NSDictionary *)dict{
    if(self = [super init] ){

        // 赋值标题
        self.title = dict[@"title"];

        // 取出这组里面的字典数组,再转成模型数组
        NSArray *dictArray = dict[@"cars"];
        NSMutableArray *carArray = [[NSMutableArray alloc] init];
        for(NSDictionary *dict in dictArray){
            Car *car = [Car carWithDict:dict];
            [carArray addObject:car];
        }
        self.cars = carArray;
    }
    return self;
}

@end
//  Car.h

#import <Foundation/Foundation.h>

@interface Car : NSObject

// 图标
@property (copy, nonatomic) NSString *icon;
// 名称
@property (copy, nonatomic) NSString *name;

+ (instancetype)carWithDict:(NSDictionary *)dict;
- (instancetype)initWithDict:(NSDictionary *)dict;
@end
//  Car.m
#import "Car.h"

@implementation Car


+ (instancetype)carWithDict:(NSDictionary *)dict{

    return [[Car alloc] initWithDict:dict];
}

- (instancetype)initWithDict:(NSDictionary *)dict{
    if (self = [super init]) {
        [self setValuesForKeysWithDictionary:dict];
    }
    return self;
}
@end
对模型中嵌套模型的理解
效果展示
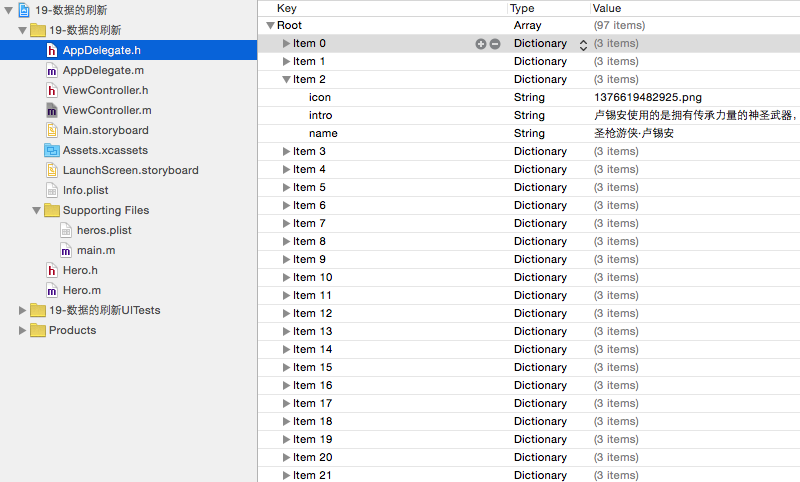
2.数据刷新
数据更新,更新的是模型,MVC模式的设计方式。
结构框架
代码实现
//  ViewController.m
#import "ViewController.h"
#import "Hero.h"

@interface ViewController () <UITableViewDataSource, UITableViewDelegate>
@property (weak, nonatomic) IBOutlet UITableView *tableView;
@property (strong, nonatomic) NSArray *heros;


@end

@implementation ViewController

- (void)viewDidLoad {
    [super viewDidLoad];
    self.tableView.dataSource = self;
    self.tableView.delegate = self;
    self.tableView.rowHeight = 55.0;
}

- (NSArray *)heros {

    if(_heros == nil){
        NSString *path = [[NSBundle mainBundle] pathForResource:@"heros.plist" ofType:nil];
        NSArray *dictArray = [NSArray arrayWithContentsOfFile:path];

        NSMutableArray *heroArray = [[NSMutableArray alloc] init];

        for( NSDictionary *dict in dictArray){
            Hero *hero = [Hero heroWithDict:dict];
            [heroArray addObject:hero];
        }
        _heros = heroArray;
    }
    return _heros;
}

#pragma 数据源方法

- (NSInteger)tableView:(UITableView *)tableView numberOfRowsInSection:(NSInteger)section{
    return self.heros.count;
}

- (UITableViewCell *)tableView:(UITableView *)tableView cellForRowAtIndexPath:(NSIndexPath *)indexPath{
    static NSString *ID = @"hero";
    UITableViewCell *cell = [tableView dequeueReusableCellWithIdentifier:ID];
    if(cell == nil){
        cell = [[UITableViewCell alloc] initWithStyle:UITableViewCellStyleDefault reuseIdentifier:ID];
    }
    Hero *hero = self.heros[indexPath.row];
    cell.imageView.image = [UIImage imageNamed:hero.icon];
    cell.textLabel.text = hero.name;
    cell.detailTextLabel.text = hero.intro;
    return cell;
}

#pragma 代理方法

// 选中cell时执行
- (void)tableView:(UITableView *)tableView didSelectRowAtIndexPath:(NSIndexPath *)indexPath{
    Hero *hero = self.heros[indexPath.row];

    UIAlertController *alertController = [UIAlertController alertControllerWithTitle:@"数据展示" message:nil preferredStyle:UIAlertControllerStyleAlert];
    [alertController addTextFieldWithConfigurationHandler:^(UITextField * _Nonnull textField) {
        textField.text = hero.name;
    }];

    UIAlertAction *cancerAction = [UIAlertAction actionWithTitle:@"取消" style:UIAlertActionStyleCancel handler:nil];
    UIAlertAction *okAction = [UIAlertAction actionWithTitle:@"确定" style:UIAlertActionStyleDefault handler:^(UIAlertAction * _Nonnull action) {
        // 1.取得文本框最后的文字
        NSString *name = alertController.textFields.firstObject.text;

        // 2.修改模型数据
        hero.name = name;

        // 3.告诉tableView重新加载模型数据

        // 全部刷新 [self.tableView reloadData];
        // reloadData:tableView会向数据源重现请求数据
        // 重新调用数据源的tableView:numberOfRowsInSection:获得行数
        // 重新调用数据源的tableView:cellForRowAtIndexPath:得知每一行显示怎样的cell

        // 局部刷新
        // NSIndexPath *path = [NSIndexPath indexPathForRow:<#(NSInteger)#> inSection:<#(NSInteger)#>];
        [self.tableView reloadRowsAtIndexPaths:@[indexPath] withRowAnimation:UITableViewRowAnimationBottom];
        NSLog(@"%@", name);
    }];
    [alertController addAction:cancerAction];
    [alertController addAction:okAction];
    [self presentViewController:alertController animated:YES completion:nil];


}
// 取消选中时执行
- (void)tableView:(UITableView *)tableView didDeselectRowAtIndexPath:(NSIndexPath *)indexPath{

}

- (BOOL)prefersStatusBarHidden{
    return YES;
}
@end
//  Hero.h

#import <Foundation/Foundation.h>

@interface Hero : NSObject
@property (copy, nonatomic) NSString *icon;
@property (copy, nonatomic) NSString *intro;
@property (copy, nonatomic) NSString *name;

+ (instancetype)heroWithDict:(NSDictionary *)dict;
- (instancetype)initWithDict:(NSDictionary *)dict;

@end
//  Hero.m
#import "Hero.h"

@implementation Hero

+ (instancetype)heroWithDict:(NSDictionary *)dict{

    return [[self alloc] initWithDict:dict];
}

- (instancetype)initWithDict:(NSDictionary *)dict{
    if(self = [super init]){
        [self setValuesForKeysWithDictionary:dict];
    }
    return self;
}
@end


 1万+
1万+

 被折叠的 条评论
为什么被折叠?
被折叠的 条评论
为什么被折叠?
 到【灌水乐园】发言


