前言
首先我想解释一下为什么要给这篇博文起这个名字,明明内容讲的是service,跟Thread有什么关系呢?答案是——然并卵,对的,你没有看错,根本就没有任何关系。我这么说,大家肯定会产生怀疑,证据呢?凭什么说没有关系?哈哈哈,就是想让大家这么反问我,由此也引出了我开这篇博文的目的,下面就为大家讲述我对于整个service的理解。
首先我们还是从service的基本用法开始讲起。
service的基本用法
新建一个项目,就叫做serviceTest吧…. 我们通过两个按钮去启动和停止服务。
 <Button
        android:id="@+id/btn_start"
        android:layout_width="match_parent"
        android:layout_height="wrap_content"
        android:text="Start Service"
        android:textAllCaps="false" />

    <Button
        android:id="@+id/btn_stop"
        android:layout_width="match_parent"
        android:layout_height="wrap_content"
        android:text="Stop Service"
        android:textAllCaps="false" />
然后新建一个类MyService继承Service,重写onCreate(),onStartCommand()和onDestory()方法。
public class MyService extends Service {

    @Override
    public void onCreate() {
        super.onCreate();
        Log.d("Shijj---->", "onCreate executed");
    }

    @Override
    public int onStartCommand(Intent intent, int flags, int startId) {
        Log.d("Shijj---->", "onStartCommand() executed");
        return super.onStartCommand(intent, flags, startId);

    }

    @Override
    public void onDestroy() {
        super.onDestroy();
        Log.d("Shijj---->", "onDestroy() executed");
    }

    @Override
    public IBinder onBind(Intent intent) {
        return null;
    }
}
在MainActivity里面,通过两个按钮去启动和停止服务。
public class MainActivity extends Activity implements View.OnClickListener {
    private Button btn_start;
    private Button btn_stop;

    @Override
    protected void onCreate(Bundle savedInstanceState) {
        super.onCreate(savedInstanceState);
        setContentView(R.layout.activity_main);

        btn_start = (Button) findViewById(R.id.btn_start);
        btn_stop = (Button) findViewById(R.id.btn_stop);

        btn_start.setOnClickListener(this);
        btn_stop.setOnClickListener(this);

    }

    @Override
    public void onClick(View v) {
        switch (v.getId()) {
            case R.id.btn_start:
                Intent startIntent = new Intent(MainActivity.this, MyService.class);
                startService(startIntent);
                break;
            case R.id.btn_stop:
                Intent stopIntent = new Intent(MainActivity.this, MyService.class);
                stopService(stopIntent);
                break;
        }

    }
}
在Start Service事件里面,我构建了一个Intent对象,用来启动服务,同样在Stop Service事件里面,构建了一个Intent对象,用来停止服务。
我们将程序运行起来,观察LogCat的打印信息,当我们点击Start按钮时:
从上面打印的信息可以看出,当启动一个服务时,会调用该service中的onCreate()和onStartCommand()方法。
我们再次点击start按钮:
为什么只有onStartCommand()执行了呢?这是因为onCreate()方法在服务第一次被创建的时候会被调用,之后因为已经创建过了,再不管你点多少次启动服务,都只会调用onStartCommand()方法。
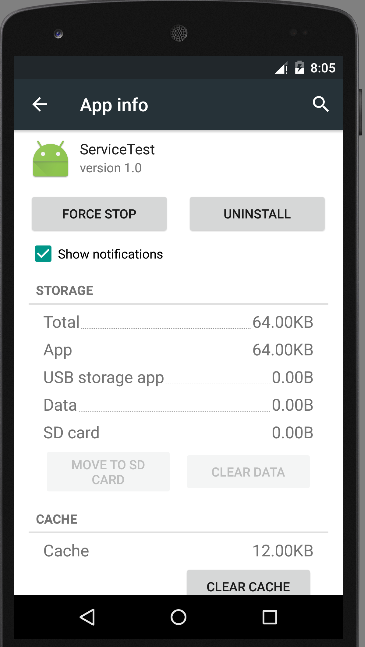
我们可以观察一下手机的应用程序管理界面,看看服务到底有没有被启动
嗯,服务确实被启动了,虽然没有执行任何逻辑代码。然后我们点击stop按钮就可以将服务停止了。
Service和Activity通信
上面的基本用法显然很简单,并不能满足我们在实战中的应用,在onCreate()和onStartCommand()方法中并没有执行任何的逻辑代码,仅仅是由Activity向MyService发送一条命令,“你可以启动了”,但是在service里的做的一些操作并不关Activity的事,这样就显得很郁闷,明明是我让你启动的,我还不能控制你了?小样….. 于是占有欲较强的程序猿们就想到一种方法,我非要让你跟我建立联系,我就要操控你。
观察MyService中的代码,你会发现还有一个onBind()方法没有用到,这个方法其实就是用来和Activity建立联系的。
修改MyService的代码如下:
public class MyService extends Service {

    private MyBinder myBinder = new MyBinder();

    @Override
    public void onCreate() {
        super.onCreate();
        Log.d("Shijj---->", "onCreate executed");
    }

    @Override
    public int onStartCommand(Intent intent, int flags, int startId) {
        Log.d("Shijj---->", "onStartCommand() executed");
        return super.onStartCommand(intent, flags, startId);

    }

    @Override
    public void onDestroy() {
        super.onDestroy();
        Log.d("Shijj---->", "onDestroy() executed");
    }

    @Override
    public IBinder onBind(Intent intent) {
        return myBinder;
    }

    class MyBinder extends Binder {
        public void startDownLoad() {
            Log.d("Shijj---->", "startDownLoad() executed");
                }
        }
}
这里我们新增了一个MyBinder类继承自Binder类,然后在MyBinder中添加了一个startDownLoad()方法用于在后台执行下载任务,当然这里并不是真正地去下载某个东西,只是做个测试,所以startDownLoad()方法只是打印了一行日志。
添加两个按钮到布局中,用于绑定和解绑service
 <Button
        android:id="@+id/btn_bind"
        android:layout_width="match_parent"
        android:layout_height="wrap_content"
        android:text="Bind Service"
        android:textAllCaps="false" />

    <Button
        android:id="@+id/btn_unbind"
        android:layout_width="match_parent"
        android:layout_height="wrap_content"
        android:text="Unbind Service"
        android:textAllCaps="false" />
再来修改MainActivity的代码:
public class MainActivity extends Activity implements View.OnClickListener {
    private Button btn_start;
    private Button btn_stop;
    private Button btn_bind;
    private Button btn_unbind;

    private MyService.MyBinder binder;
    private ServiceConnection connection = new ServiceConnection() {
        @Override
        public void onServiceConnected(ComponentName name, IBinder service) {
            binder = (MyService.MyBinder) service;
            binder.startDownLoad();
        }

        @Override
        public void onServiceDisconnected(ComponentName name) {

        }
    };

    @Override
    protected void onCreate(Bundle savedInstanceState) {
        super.onCreate(savedInstanceState);
        Log.d("Shijj---->", "MainActivity thread id is " + Thread.currentThread().getId());
        setContentView(R.layout.activity_main);

        btn_start = (Button) findViewById(R.id.btn_start);
        btn_stop = (Button) findViewById(R.id.btn_stop);
        btn_bind = (Button) findViewById(R.id.btn_bind);
        btn_unbind = (Button) findViewById(R.id.btn_unbind);

        btn_start.setOnClickListener(this);
        btn_stop.setOnClickListener(this);
        btn_bind.setOnClickListener(this);
        btn_unbind.setOnClickListener(this);


    }

    @Override
    public void onClick(View v) {
        switch (v.getId()) {
            case R.id.btn_start:
                Intent startIntent = new Intent(MainActivity.this, MyService.class);
                startService(startIntent);
                break;
            case R.id.btn_stop:
                Intent stopIntent = new Intent(MainActivity.this, MyService.class);
                stopService(stopIntent);
                break;
            case R.id.btn_bind:
                Intent bindIntent = new Intent(MainActivity.this, MyService.class);
                bindService(bindIntent, connection, BIND_AUTO_CREATE);
                break;
            case R.id.btn_unbind:
                unbindService(connection);
                break;

        }

    }
}
这里我们首先创建了一个ServiceConnection的匿名类,在里面重写了onServiceConnected()方法和onServiceDisconnected()方法,这两个方法分别会在Activity与Service建立关联和解除关联的时候调用。在onServiceConnected()方法中,我们又通过向下转型得到了MyBinder的实例,有了这个实例,Activity和Service之间的关系就变得非常紧密了。现在我们可以在Activity中根据具体的场景来调用MyBinder中的任何public方法,即实现了Activity指挥Service干什么Service就去干什么的功能。
当然,现在Activity和Service其实还没关联起来了呢,这个功能是在Bind Service按钮的点击事件里完成的。可以看到,这里我们仍然是构建出了一个Intent对象,然后调用bindService()方法将Activity和Service进行绑定。bindService()方法接收三个参数,第一个参数就是刚刚构建出的Intent对象,第二个参数是前面创建出的ServiceConnection的实例,第三个参数是一个标志位,这里传入BIND_AUTO_CREATE表示在Activity和Service建立关联后自动创建Service,这会使得MyService中的onCreate()方法得到执行,但onStartCommand()方法不会执行。
然后如何我们想解除Activity和Service之间的关联怎么办呢?调用一下unbindService()方法就可以了,这也是Unbind Service按钮的点击事件里实现的逻辑。
程序运行起来,点击一下Bind Service按钮,LogCat里的打印日志:
另外需要注意,任何一个Service在整个应用程序范围内都是通用的,即MyService不仅可以和MainActivity建立关联,还可以和任何一个Activity建立关联,而且在建立关联时它们都可以获取到相同的MyBinder实例。
如何销毁Service
第一种:点击start,然后点击stop,服务就销毁了:
第二种:那么如果我们是点击的Bind Service按钮呢?由于在绑定Service的时候指定的标志位是BIND_AUTO_CREATE,说明点击Bind Service按钮的时候Service也会被创建,这时应该怎么销毁Service呢?其实也很简单,点击一下Unbind Service按钮,将Activity和Service的关联解除就可以了。
先点击一下Bind Service按钮,再点击一下Unbind Service按钮,打印日志如下所示:
以上这两种销毁的方式都很好理解。那么如果我们既点击了Start Service按钮,又点击了Bind Service按钮会怎么样呢?这个时候你会发现,不管你是单独点击Stop Service按钮还是Unbind Service按钮,Service都不会被销毁,必要将两个按钮都点击一下,Service才会被销毁。也就是说,点击Stop Service按钮只会让Service停止,点击Unbind Service按钮只会让Service和Activity解除关联,一个Service必须要在既没有和任何Activity关联又处理停止状态的时候才会被销毁。
为了证实一下,我们在Stop Service和Unbind Service按钮的点击事件里面加入一行打印日志:
  @Override
    public void onClick(View v) {
        switch (v.getId()) {
            case R.id.btn_start:
                Intent startIntent = new Intent(MainActivity.this, MyService.class);
                startService(startIntent);
                break;
            case R.id.btn_stop:
                Log.d("Shijj---->", "click button stop");
                Intent stopIntent = new Intent(MainActivity.this, MyService.class);
                stopService(stopIntent);
                break;
            case R.id.btn_bind:
                Intent bindIntent = new Intent(MainActivity.this, MyService.class);
                bindService(bindIntent, connection, BIND_AUTO_CREATE);
                break;
            case R.id.btn_unbind:
                Log.d("Shijj---->", "click button unbind");
                unbindService(connection);
                break;

        }

    }
然后重新运行程序,先点击一下Start Service按钮,再点击一下Bind Service按钮,这样就将Service启动起来,并和Activity建立了关联。然后点击Stop Service按钮后Service并不会销毁,再点击一下Unbind Service按钮,Service就会销毁了,打印日志如下所示:
我们应该始终记得在Service的onDestroy()方法里去清理掉那些不再使用的资源,防止在Service被销毁后还会有一些不再使用的对象仍占用着内存。
Service和Thread的关系
现在终于回到开头的那个问题了。为什么开头我会这样说呢?Service和Thread到底有什么关系呢?什么时候应该用Service,什么时候又应该用Thread?答案可能会有点让你吃惊,因为Service和Thread之间没有任何关系!
我们常常把他们联系起来是因为Service的后台概念。Thread我们大家都知道,是用于开启一个子线程,在这里去执行一些耗时操作就不会阻塞主线程的运行。而Service我们最初理解的时候,总会觉得它是用来处理一些后台任务的,一些比较耗时的操作也可以放在这里运行,这就会让人产生混淆了。但是,如果我告诉你Service其实是运行在主线程里的,你还会觉得它和Thread有什么关系吗?我相信你这会正抓着你的秀发说“I can’t believe it”,那好,就让我们一起来颠覆一下以前的想象吧。
在MainActivity的onCreate()方法里加入一行打印当前线程id的语句:
Log.d("Shijj---->", "MainActivity thread id is " + Thread.currentThread().getId());同样在MyService的onCreate()方法里加入一行打印当前线程id的语句:
Log.d("Shijj---->", "MyService thread id is " + Thread.currentThread().getId());
现在重新运行一下程序,并点击Start Service按钮,会看到如下打印日志:
简直亮瞎了我的钛合金狗眼啊!它们的线程id完全是一样的。由此证实了Service确实是运行在主线程里的,也就是说如果你在Service里编写了非常耗时的代码,程序必定会出现ANR的。
你可能会惊呼,这不是坑爹么!?那我要Service又有何用呢?其实大家不要把后台和子线程联系在一起就行了,这是两个完全不同的概念。Android的后台就是指,它的运行是完全不依赖UI的。即使Activity被销毁,或者程序被关闭,只要进程还在,Service就可以继续运行。比如说一些应用程序,始终需要与服务器之间始终保持着心跳连接,就可以使用Service来实现。你可能又会问,前面不是刚刚验证过Service是运行在主线程里的么?在这里一直执行着心跳连接,难道就不会阻塞主线程的运行吗?当然会,但是我们可以在Service中再创建一个子线程,然后在这里去处理耗时逻辑就没问题了。
额,既然在Service里也要创建一个子线程,那为什么不直接在Activity里创建呢?这是因为Activity很难对Thread进行控制,作为程序猿的我们怎么可以容忍自己创建的东西自己控制不了呢?当Activity被销毁之后,就没有任何其它的办法可以再重新获取到之前创建的子线程的实例。而且在一个Activity中创建的子线程,另一个Activity无法对其进行操作。但是Service就不同了,所有的Activity都可以与Service进行关联,然后可以很方便地操作其中的方法,即使Activity被销毁了,之后只要重新与Service建立关联,就又能够获取到原有的Service中Binder的实例。因此,使用Service来处理后台任务,Activity就可以放心地finish,完全不需要担心无法对后台任务进行控制的情况。
一个比较标准的Service就可以写成:
 @Override
    public int onStartCommand(Intent intent, int flags, int startId) {
        Log.d("Shijj---->", "onStartCommand() executed");
        new Thread() {
            @Override
            public void run() {
                super.run();
                Log.d("Shijj---->", "开始执行后台任务");
            }
        }.start();
        return super.onStartCommand(intent, flags, startId);

    }

class MyBinder extends Binder {
        public void startDownLoad() {
            Log.d("Shijj---->", "startDownLoad() executed");
            new Thread() {
                @Override
                public void run() {
                    super.run();

                    Log.d("Shijj---->", "执行具体下载任务");
                }
            }.start();

        }
    }
总结
看到这里,不知道大家对service了解的怎么样了。哟,看下时间快下班了,长话短说了,希望大家看完这篇文章能掌握service的一些基本用法,能够随心所欲地蹂躏…sorry…用词不当,是随心所欲地操作自己创建的service,谢谢大家的阅读。


 51
51

 被折叠的 条评论
为什么被折叠?


