


自定义View的基础
0.View的大家族
先来看一张图,认识认识他们

接着我一个一个介绍
PhoneWindow:
大家都知道每个Activity都包含一个Window对象,而Window对象就是由PhoneWindow实现的,同时PhoneWindow对象中包含了一个东西是整个应用窗口的根View
public class PhoneWindow extends Window implements MenuBuilder.Callback DecorView:
上一节说到,有一个东西是整个应用窗口的跟View,没错就是他,他作为窗口界面的顶级视图,封装了一些窗口操作的通用方法,同时把将要显示的内容呈现在PhoneWindow上,同时所有的事件传递都是通过WMS接受的,并通过Activity对象回调对应监听
public class DecorView extends FrameLayout implements RootViewSurfaceTaker, WindowCallbacks {TitleView ContentView
可以看到接下来的窗口界面,被分为了TitleView和ContentView,大家看到ContentView,应该就熟悉了,他就是我们经常setContentView();的父布局,其实说到这里无论是DecorView还是ContentView都是Framelayout,大家可以猜猜为什么?
而TitileView大家就不明白是啥了? 再看一张图

TitleView就是我们以前头疼不已的ActionBar…..
回到正文,我们实现自定义View应该怎么做呢,继续看
1.实现自定义View的三种方式
1.1 组合控件:
组合控件,顾名思义就是将一些小的控件组合起来形成一个新的控件,这些小的控件多是系统自带的控件。
实例:公用title
1.1.1 创建自定义标题栏的布局文件title_bar.xml
<?xml version="1.0" encoding="utf-8"?>
<RelativeLayout xmlns:android="http://schemas.android.com/apk/res/android"
    android:layout_width="match_parent"
    android:layout_height="wrap_content"
    android:background="#0000ff" >

    <Button
        android:id="@+id/left_btn"
        android:layout_width="wrap_content"
        android:layout_height="wrap_content"
        android:layout_centerVertical="true"
        android:layout_margin="5dp"
        android:background="@drawable/back1_64" />

    <TextView
        android:id="@+id/title_tv"
        android:layout_width="wrap_content"
        android:layout_height="wrap_content"
        android:layout_centerInParent="true"
        android:text="这是标题"
        android:textColor="#ffffff"
        android:textSize="20sp" />

</RelativeLayout>
布局就是一个简单的返回按钮+标题
1.1.2 创建一个类TitleView,继承自RelativeLayout
public class TitleView extends RelativeLayout {

    // 返回按钮控件
    private Button mLeftBtn;
    // 标题Tv
    private TextView mTitleTv;

    public TitleView(Context context, AttributeSet attrs) {
        super(context, attrs);

        // 加载布局
        LayoutInflater.from(context).inflate(R.layout.title_bar, this);

        // 获取控件
        mLeftBtn = (Button) findViewById(R.id.left_btn);
        mTitleTv = (TextView) findViewById(R.id.title_tv);

    }

    // 为左侧返回按钮添加自定义点击事件
    public void setLeftButtonListener(OnClickListener listener) {
        mLeftBtn.setOnClickListener(listener);
    }

    // 设置标题的方法
    public void setTitleText(String title) {
        mTitleTv.setText(title);
    }
}
在TitleView中主要是为自定义的标题栏加载了布局,为返回按钮添加事件监听方法,并提供了设置标题文本的方法
1.1.3 引入自定义View及使用
<LinearLayout xmlns:android="http://schemas.android.com/apk/res/android"
    android:id="@+id/main_layout"
    android:layout_width="match_parent"
    android:layout_height="match_parent"
    android:orientation="vertical" >

    <com.example.test.TitleView
        android:id="@+id/title_bar"
        android:layout_width="match_parent"
        android:layout_height="wrap_content" >
    </com.example.test.TitleView>

</LinearLayout>
//代码中使用

private TitleView mTitleBar;
     mTitleBar = (TitleView) findViewById(R.id.title_bar);

        mTitleBar.setLeftButtonListener(new OnClickListener() {

            @Override
            public void onClick(View v) {
                Toast.makeText(MainActivity.this, "点击了返回按钮", Toast.LENGTH_SHORT)
                        .show();
                finish();
            }
        });
1.2 自绘控件
自绘控件的内容都是自己绘制出来的,在View的onDraw方法中完成绘制
实例:计数器,每点击它一次,计数值就加1并显示出来
1.2.1 创建CounterView类,继承自View,实现OnClickListener接口
public class CounterView extends View implements OnClickListener {

    // 定义画笔
    private Paint mPaint;
    // 用于获取文字的宽和高
    private Rect mBounds;
    // 计数值,每点击一次本控件,其值增加1
    private int mCount;

    public CounterView(Context context, AttributeSet attrs) {
        super(context, attrs);

        // 初始化画笔、Rect
        mPaint = new Paint(Paint.ANTI_ALIAS_FLAG);
        mBounds = new Rect();
        // 本控件的点击事件
        setOnClickListener(this);
    }

    @Override
    protected void onDraw(Canvas canvas) {
        super.onDraw(canvas);

        mPaint.setColor(Color.BLUE);
        // 绘制一个填充色为蓝色的矩形
        canvas.drawRect(0, 0, getWidth(), getHeight(), mPaint);

        mPaint.setColor(Color.YELLOW);
        mPaint.setTextSize(50);
        String text = String.valueOf(mCount);
        // 获取文字的宽和高
        mPaint.getTextBounds(text, 0, text.length(), mBounds);
        float textWidth = mBounds.width();
        float textHeight = mBounds.height();

        // 绘制字符串
        canvas.drawText(text, getWidth() / 2 - textWidth / 2, getHeight() / 2
                + textHeight / 2, mPaint);
    }

    @Override
    public void onClick(View v) {
        mCount ++;

        // 重绘
        invalidate();
    }

}
1.2.2 引入及使用
<LinearLayout xmlns:android="http://schemas.android.com/apk/res/android"
    android:id="@+id/main_layout"
    android:layout_width="match_parent"
    android:layout_height="match_parent"
    android:orientation="vertical" >

    <com.example.test.CounterView
        android:id="@+id/counter_view"
        android:layout_width="100dp"
        android:layout_height="100dp"
        android:layout_gravity="center_horizontal|top"
        android:layout_margin="20dp" />

</LinearLayout>
你只需要在View中点击,即可实现数字+1
1.3 继承控件
就是继承已有的控件,创建新控件,保留继承的父控件的特性,并且还可以引入新特性
实例:支持横向滑动删除列表项的自定义ListView
public class CustomListView extends ListView implements OnTouchListener,
        OnGestureListener {

    // 手势动作探测器
    private GestureDetector mGestureDetector;

    // 删除事件监听器
    public interface OnDeleteListener {
        void onDelete(int index);
    }

    private OnDeleteListener mOnDeleteListener;

    // 删除按钮
    private View mDeleteBtn;

    // 列表项布局
    private ViewGroup mItemLayout;

    // 选择的列表项
    private int mSelectedItem;

    // 当前删除按钮是否显示出来了
    private boolean isDeleteShown;

    public CustomListView(Context context, AttributeSet attrs) {
        super(context, attrs);

        // 创建手势监听器对象
        mGestureDetector = new GestureDetector(getContext(), this);

        // 监听onTouch事件
        setOnTouchListener(this);
    }

    // 设置删除监听事件
    public void setOnDeleteListener(OnDeleteListener listener) {
        mOnDeleteListener = listener;
    }

    // 触摸监听事件
    @Override
    public boolean onTouch(View v, MotionEvent event) {
        if (isDeleteShown) {
            hideDelete();
            return false;
        } else {
            return mGestureDetector.onTouchEvent(event);
        }
    }

    @Override
    public boolean onDown(MotionEvent e) {
        if (!isDeleteShown) {
            mSelectedItem = pointToPosition((int) e.getX(), (int) e.getY());
        }
        return false;
    }

    @Override
    public boolean onFling(MotionEvent e1, MotionEvent e2, float velocityX,
            float velocityY) {
        // 如果当前删除按钮没有显示出来,并且x方向滑动的速度大于y方向的滑动速度
        if (!isDeleteShown && Math.abs(velocityX) > Math.abs(velocityY)) {
            mDeleteBtn = LayoutInflater.from(getContext()).inflate(
                    R.layout.delete_btn, null);

            mDeleteBtn.setOnClickListener(new OnClickListener() {

                @Override
                public void onClick(View v) {
                    mItemLayout.removeView(mDeleteBtn);
                    mDeleteBtn = null;
                    isDeleteShown = false;
                    mOnDeleteListener.onDelete(mSelectedItem);
                }
            });

            mItemLayout = (ViewGroup) getChildAt(mSelectedItem
                    - getFirstVisiblePosition());

            RelativeLayout.LayoutParams params = new RelativeLayout.LayoutParams(
                    LayoutParams.WRAP_CONTENT, LayoutParams.WRAP_CONTENT);
            params.addRule(RelativeLayout.ALIGN_PARENT_RIGHT);
            params.addRule(RelativeLayout.CENTER_VERTICAL);

            mItemLayout.addView(mDeleteBtn, params);
            isDeleteShown = true;
        }

        return false;
    }

    // 隐藏删除按钮
    public void hideDelete() {
        mItemLayout.removeView(mDeleteBtn);
        mDeleteBtn = null;
        isDeleteShown = false;
    }

    public boolean isDeleteShown() {
        return isDeleteShown;
    }

    /**
     * 后面几个方法本例中没有用到
     */
    @Override
    public void onShowPress(MotionEvent e) {

    }

    @Override
    public boolean onSingleTapUp(MotionEvent e) {
        return false;
    }

    @Override
    public boolean onScroll(MotionEvent e1, MotionEvent e2, float distanceX,
            float distanceY) {
        return false;
    }

    @Override
    public void onLongPress(MotionEvent e) {

    }

}
2. 自定义View的几个重要方法

一般来说自定义View 有一个基本步骤:
- 自定义View的属性
- 在View的构造方法中获得我们自定义的属性
- 重写onMesure
- 重写onDraw
2.1 自定义View的属性
在res/values/attr.xml添加属性
<?xml version="1.0" encoding="utf-8"?>
<resources>

    <!--添加一下属性-->
    <declare-styleable name="CustomImageView">
        <attr name="titleText" />
        <attr name="titleTextSize" />
        <attr name="titleTextColor" />
        <attr name="image" />
        <attr name="imageScaleType" />
    </declare-styleable>

</resources>
2.2 在构造中获得我们的自定义属性
/**
     * 初始化所特有自定义类型
     *
     * @param context
     * @param attrs
     * @param defStyle
     */
    public CustomImageView(Context context, AttributeSet attrs, int defStyle)
    {
        super(context, attrs, defStyle);

        TypedArray a = context.getTheme().obtainStyledAttributes(attrs, R.styleable.CustomImageView, defStyle, 0);

        int n = a.getIndexCount();

        for (int i = 0; i < n; i++)
        {
            int attr = a.getIndex(i);

            switch (attr)
            {
            case R.styleable.CustomImageView_image:
                mImage = BitmapFactory.decodeResource(getResources(), a.getResourceId(attr, 0));
                break;
            case R.styleable.CustomImageView_imageScaleType:
                mImageScale = a.getInt(attr, 0);
                break;
            case R.styleable.CustomImageView_titleText:
                mTitle = a.getString(attr);
                break;
            case R.styleable.CustomImageView_titleTextColor:
                mTextColor = a.getColor(attr, Color.BLACK);
                break;
            case R.styleable.CustomImageView_titleTextSize:
                mTextSize = a.getDimensionPixelSize(attr, (int) TypedValue.applyDimension(TypedValue.COMPLEX_UNIT_SP,
                        16, getResources().getDisplayMetrics()));
                break;

            }
        }
        a.recycle();
        rect = new Rect();
        mPaint = new Paint();
        mTextBound = new Rect();
        mPaint.setTextSize(mTextSize);
        // 计算了描绘字体需要的范围
        mPaint.getTextBounds(mTitle, 0, mTitle.length(), mTextBound);

    }
2.3 重写onMeasure
重点来了,就这里估计很多人至今也没弄明白View的测量
测量模式有三种:
EXACTLY(精确模式):
- 当我们把layout_width或layout_height属性都指定为具体数值时。如:android:layout_height=”100dp”
- 指定为match_parent(占据父View的大小)
AT_MOST(最大值模式):
一般是layout_width或layout_height都指定为wrap_content时,控件大小一般随着控件的子控件或内容变化而变化,此时只要不超过父View大小即可
UNSPECIFIED(奇怪模式):
一般不指定大小,View想多大就多大,通常在自定义View的时候使用
回到代码中:
@Override
protected void onMeasure(int widthMeasureSpec, int heightMeasureSpec)
{
    // super.onMeasure(widthMeasureSpec, heightMeasureSpec);

    /**
     * 设置宽度
     */
    int specMode = MeasureSpec.getMode(widthMeasureSpec);
    int specSize = MeasureSpec.getSize(widthMeasureSpec);

    if (specMode == MeasureSpec.EXACTLY)// match_parent , accurate
    {
        Log.e("xxx", "EXACTLY");
        mWidth = specSize;
    } else
    {
        // 由图片决定的宽
        int desireByImg = getPaddingLeft() + getPaddingRight() + mImage.getWidth();
        // 由字体决定的宽
        int desireByTitle = getPaddingLeft() + getPaddingRight() + mTextBound.width();

        if (specMode == MeasureSpec.AT_MOST)// wrap_content
        {
            int desire = Math.max(desireByImg, desireByTitle);
            mWidth = Math.min(desire, specSize);
            Log.e("xxx", "AT_MOST");
        }
    }

    /***
     * 设置高度
     */

    specMode = MeasureSpec.getMode(heightMeasureSpec);
    specSize = MeasureSpec.getSize(heightMeasureSpec);
    if (specMode == MeasureSpec.EXACTLY)// match_parent , accurate
    {
        mHeight = specSize;
    } else
    {
        int desire = getPaddingTop() + getPaddingBottom() + mImage.getHeight() + mTextBound.height();
        if (specMode == MeasureSpec.AT_MOST)// wrap_content
        {
            mHeight = Math.min(desire, specSize);
        }
    }
    setMeasuredDimension(mWidth, mHeight);

}
可以看到如果我们设置的是精确模式,我们是可以拿到具体值得,如果是其他模式的话,我们就必须自己计算宽高了
这里还有一个迷惑众生的问题/面试题
getWidth和getMeasuredWidth的区别:
- getWidth(): View在设定好布局后整个View的宽度。
- getMeasuredWidth(): 对View上的内容进行测量后得到的View内容占据的宽度,前提是你必须在父布局的onLayout()方法或者此View的onDraw()方法里调用measure(0,0);(measure中的参数的值你自己可以定义),否则你得到的结果和getWidth()得到的结果是一样的。
2.4 重写onDraw
@Override
protected void onDraw(Canvas canvas)
{
// super.onDraw(canvas);
/**
* 边框
*/
mPaint.setStrokeWidth(4);
mPaint.setStyle(Paint.Style.STROKE);
mPaint.setColor(Color.CYAN);
canvas.drawRect(0, 0, getMeasuredWidth(), getMeasuredHeight(), mPaint);
rect.left = getPaddingLeft();
rect.right = mWidth - getPaddingRight();
rect.top = getPaddingTop();
rect.bottom = mHeight - getPaddingBottom();
mPaint.setColor(mTextColor);
mPaint.setStyle(Style.FILL);
/**
* 当前设置的宽度小于字体需要的宽度,将字体改为xxx...
*/
if (mTextBound.width() > mWidth)
{
TextPaint paint = new TextPaint(mPaint);
String msg = TextUtils.ellipsize(mTitle, paint, (float) mWidth - getPaddingLeft() - getPaddingRight(),
TextUtils.TruncateAt.END).toString();
canvas.drawText(msg, getPaddingLeft(), mHeight - getPaddingBottom(), mPaint);
} else
{
//正常情况,将字体居中
canvas.drawText(mTitle, mWidth / 2 - mTextBound.width() * 1.0f / 2, mHeight - getPaddingBottom(), mPaint);
}
//取消使用掉的快
rect.bottom -= mTextBound.height();
if (mImageScale == IMAGE_SCALE_FITXY)
{
canvas.drawBitmap(mImage, null, rect, mPaint);
} else
{
//计算居中的矩形范围
rect.left = mWidth / 2 - mImage.getWidth() / 2;
rect.right = mWidth / 2 + mImage.getWidth() / 2;
rect.top = (mHeight - mTextBound.height()) / 2 - mImage.getHeight() / 2;
rect.bottom = (mHeight - mTextBound.height()) / 2 + mImage.getHeight() / 2;
canvas.drawBitmap(mImage, null, rect, mPaint);
}
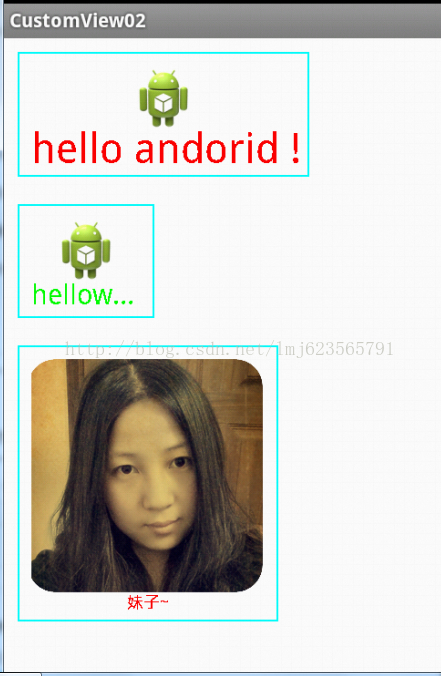
} 2.5 测试结果
<LinearLayout xmlns:android="http://schemas.android.com/apk/res/android"
    xmlns:tools="http://schemas.android.com/tools"
    xmlns:zhy="http://schemas.android.com/apk/res/com.zhy.customview02"
    android:layout_width="match_parent"
    android:layout_height="match_parent"
    android:orientation="vertical" >

    <com.zhy.customview02.view.CustomImageView
        android:layout_width="wrap_content"
        android:layout_height="wrap_content"
        android:layout_margin="10dp"
        android:padding="10dp"
        zhy:image="@drawable/ic_launcher"
        zhy:imageScaleType="center"
        zhy:titleText="hello andorid ! "
        zhy:titleTextColor="#ff0000"
        zhy:titleTextSize="30sp" />

    <com.zhy.customview02.view.CustomImageView
        android:layout_width="100dp"
        android:layout_height="wrap_content"
        android:layout_margin="10dp"
        android:padding="10dp"
        zhy:image="@drawable/ic_launcher"
        zhy:imageScaleType="center"
        zhy:titleText="helloworldwelcome"
        zhy:titleTextColor="#00ff00"
        zhy:titleTextSize="20sp" />

    <com.zhy.customview02.view.CustomImageView
        android:layout_width="wrap_content"
        android:layout_height="wrap_content"
        android:layout_margin="10dp"
        android:padding="10dp"
        zhy:image="@drawable/lmj"
        zhy:imageScaleType="center"
        zhy:titleText="妹子~"
        zhy:titleTextColor="#ff0000"
        zhy:titleTextSize="12sp" />

</LinearLayout>
我特意让显示出现3中情况:
- 1、字体的宽度大于图片,且View宽度设置为wrap_content
- 2、View宽度设置为精确值,字体的长度大于此宽度
- 3、图片的宽度大于字体,且View宽度设置为wrap_content
以上例子参考
Android 自定义View (二) 进阶
3. View的四个构造方法说明时候调用
3.1 属性赋值优先级:
Xml定义 > xml的style定义 > defStyleAttr > defStyleRes> theme直接定义
public class CustomView extends TextView {
    String tag = "customView";
    //C1
    public CustomView(Context context) {
        super(context);
        Log.d(tag,"First Constructor");
    }
    //C2
    public CustomView(Context context, AttributeSet attrs) {
        this(context,attrs,android.R.attr.textViewStyle);
        Log.d(tag,"Second Constructor");
        for(int i=0;i<attrs.getAttributeCount();i++){
            Log.d(tag, attrs.getAttributeName(i)+"   :   "+attrs.getAttributeValue(i));
        }
    }
    //C3
    @TargetApi(Build.VERSION_CODES.LOLLIPOP)
    public CustomView(Context context, AttributeSet attrs, int defStyleAttr) {
        this(context, attrs, defStyleAttr,0);
        Log.d(tag,"Third Constructor");
    }
    //C4
    @RequiresApi(api = Build.VERSION_CODES.LOLLIPOP)
    public CustomView(Context context, AttributeSet attrs, int defStyleAttr, int defStyleRes) {
        super(context, attrs, defStyleAttr,defStyleRes);
        Log.d(tag,"Fourth Constructor");
    }

}
3.2 构造方法使用情况
C1是最简单的一个,如果你只打算用code动态创建一个view而不使用布局文件xml inflate,那么实现C1就可以了。
C2多了一个AttributeSet类型的参数,在通过布局文件xml创建一个view时,这个参数会将xml里设定的属性传递给构造函数。如果你采用xml inflate的方法却没有在code里实现C2,那么运行时就会报错。但是由于编译能顺利通过,对于我这样的菜鸟,这个错误有时不太容易被发现。
C3,在代码比如xml里通过某种方式指定了view的style时,C3在该view被inflate时调用,并将style传入给defStyle。方式大概有两种,一种是在直接在布局文件该view标签里使用style=”@style/customstyle”
来指定,另一种是采用指定theme的方式,在AndroidManifest.xml的application标签里使用android:theme=”@style/customstyle”
C4,可以直接获取传入资源ID,如R.style.purple
详细可以看看 Android View 四个构造函数详解
4.自定义ViewGroup注意的
你首先的要做的要实现一个方法onLayout(),控制子View的显示逻辑
5.事件分发
如果能让我用一句话描述就是:
事件分发属于责任链机制,从上到下,然后冒泡回到起点
还记得我在第一部分说的View的大家族么?
事件就是从上到下一步一步分发下来的,如果父组件不需要拦截,就会继续传下去
在这里View和ViewGroup有点不一样
5.1 View和ViewGroup的区别
ViewGroup有三个方法:
- dispatchTouchEvent:分发TouchEvent
- onInterceptTouchEvent:阻止分发TouchEvent,以下子view都接受不到事件
- onTouchEvent:处理TouchEvent
而View只有两个,少了一个拦截的方法
5.2 详细处理过程
如果dispatchTouchEvent返回true就被该View消费掉了
如果dispatchTouchEvent返回 false
,则交给这个 view 的 interceptTouchEvent 方法来决定是否要拦截这个事件
如果 interceptTouchEvent 返回 true ,也就是拦截掉了,则交给它的 onTouchEvent 来处理
如果 interceptTouchEvent 返回 false ,那么就传递给子 view
由子 view 的 dispatchTouchEvent 再来开始这个事件的分发。如果事件传递到某一层的子 view 的 onTouchEvent 上了,这个方法返回了 false ,那么这个事件会从这个 view 往上传递,都是 onTouchEvent 来接收。而如果传递到最上面的 onTouchEvent 也返回 false 的话,这个事件就会“消失”,而且接收不到下一次事件。
ok,这么说就太空洞了
看看dispatchTouchEvent源码
5.3 dispatchTouchEvent源码探索
public boolean dispatchTouchEvent(MotionEvent event) {
        if (mInputEventConsistencyVerifier != null) {
            mInputEventConsistencyVerifier.onTouchEvent(event, 0);
        }

        if (onFilterTouchEventForSecurity(event)) {
            //noinspection SimplifiableIfStatement
            ListenerInfo li = mListenerInfo;
            if (li != null && li.mOnTouchListener != null && (mViewFlags & ENABLED_MASK) == ENABLED
                    && li.mOnTouchListener.onTouch(this, event)) {
                return true;
            }

            if (onTouchEvent(event)) {
                return true;
            }
        }

        if (mInputEventConsistencyVerifier != null) {
            mInputEventConsistencyVerifier.onUnhandledEvent(event, 0);
        }
        return false;
    }

//onTouchEvent()方法重要代码
boolean onTouchEvent() {
 if (!mHasPerformedLongPress) {
        // This is a tap, so remove the longpress check
        removeLongPressCallback();

        // Only perform take click actions if we were in the pressed state
        if (!focusTaken) {
            // Use a Runnable and post this rather than calling
            // performClick directly. This lets other visual state
            // of the view update before click actions start.
            if (mPerformClick == null) {
                mPerformClick = new PerformClick();
            }
            if (!post(mPerformClick)) {
               performClick();
            }
        }
    }
    }

public boolean performClick() {
        sendAccessibilityEvent(AccessibilityEvent.TYPE_VIEW_CLICKED);

        ListenerInfo li = mListenerInfo;
        if (li != null && li.mOnClickListener != null) {
            playSoundEffect(SoundEffectConstants.CLICK);
            <span style="color:#ff0000;"><strong>li.mOnClickListener.onClick(this);</strong></span>
            return true;
        }

        return false;
    }
从源码中大概可以得出 dispatchTouchEvent要返回true,得满足三个条件
- 是否注册setOnTouchListener(mOnTouchListener是否为空)
- enable
- onTouch=true


 1561
1561

 被折叠的 条评论
为什么被折叠?
被折叠的 条评论
为什么被折叠?
 到【灌水乐园】发言


