


Spring Boot
通过Spring Boot可以快速构建一个基于Spring框架的Java Application,简化配置,自动装配。
javaConfiguration用Java类代替XML的配置方式。
Spring Boot对常用的第三方库提供了配置方案,可以很好的和Spring进行整合,一键式搭建功能完备的java企业级应用。
开箱即用是Spring Boot的特点
Spring Boot的优势:
!不需要任何的XMl文件
!内嵌Tomcat,可以直接部署
!默认支持JSON数据,不需要进行转换
(JSON是一种轻量级的数据交换格式。当我们的服务器和客户端进行数据交换时,一般不会将类对象直接进行传输,而是将类对象转换成JSON格式或者XML格式,再进行数据交换).
!支持RESTful
!配置文件非常简单,支持YAML格式
Spring Boot是一种只需要极少配置就可以快速搭建Spring应用,并且集成了第三方类库,让开发者可以快速的进行企业级应用开发。
Spring Boot 2.x必须基于Spring 5.x,Spring 5.x要求Java版本必须时8以上。
Spring Boot的使用
1.创建Handler
package com.southwind.springboot.controller;

import org.springframework.web.bind.annotation.GetMapping;
import org.springframework.web.bind.annotation.RequestMapping;
import org.springframework.web.bind.annotation.RestController;

@RestController
@RequestMapping("/hello")
public class HelloHandler {

    @GetMapping("/index")
    public String index(){
        return "Hello SpringBoot";
    }
}
2.创建启动类
package com.southwind.springboot;

import org.springframework.boot.SpringApplication;
import org.springframework.boot.autoconfigure.SpringBootApplication;

@SpringBootApplication
public class SpringbootApplication {

    public static void main(String[] args) {
        SpringApplication.run(SpringbootApplication.class, args);
    }

}
启动类必须覆盖所有与业务相关的类:启动类所在的包必须是业务类所在包的同包或者父包,如果没有覆盖,业务类就不会自动装配到IOC容器当中。
Spring Boot 配置文件
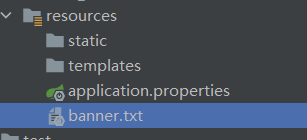
自定义banner(启动过后的图标):

Properties
#端口
server.port=8181
#项目访问路径
server.servlet.context-path=/springboot
#cookie失效时间
server.servlet.session.cookie.max-age=100
#session失效时间
server.servlet.session.timeout=100
#编码格式
server.tomcat.uri-encoding=UTF-8
YAML
YAML 是不同于Properties的另外一种文件格式,同样可以用来写配置文件,Spring Boot默认支持YAML格式,
YAML 的优点在于编写简单,结构清晰,利用缩进的形式来表示层级关系。相比于Properties,YAML可以进一步简化配置文件的编写,更加方便。
server:
  port: 8182
  servlet:
    context-path: /springboot
    session:
      cookie:
        max-age: 100
      timeout: 100
  tomcat:
    uri-encoding: UTF-8
需要注意的是YAML格式书写规范非常严格,属性名和属性值必须至少有一个空格。
如果说是Properties和YAML两种类型的文件格式都存在,Properties的优先级更高。
配置文件除了可以放置在resources还有三个地方可以放置:

优先级顺序如下所示:
1、根路径下的config中的配置文件。
2、根路径下的配置文件
3、resources路径下的config中的配置文件
4、resources路径下的配置文件
可以直接在Handler中读取YAML文件中的数据,比如在业务方法中向客户端返回当前服务的端口信息。
package com.southwind.springboot.controller;

import org.springframework.beans.factory.annotation.Value;
import org.springframework.web.bind.annotation.GetMapping;
import org.springframework.web.bind.annotation.RequestMapping;
import org.springframework.web.bind.annotation.RestController;

@RestController
@RequestMapping("/hello")
public class HelloHandler {

    /**
     * SpEL Spring Expression Language
     */
    @Value("${server.port}")
    private String port;

    @GetMapping("/index")
    public String index(){
        return "当前服务的端口是:"+this.port;
    }
}
@Value注解同样适用于Properties文件。
Spring Boot 整合JSP
Spring Boot 与视图层的整合
!JSP
!Thymeleaf
Java Server Page,是java提供的一种动态网页技术,底层是Servlet,可以直接在HTML中插入Java代码。
JSP的底层原理:
JSP是一种中间层组件,开发者可以在这个组件中将java代码和HTML代码进行整合,由JSP引擎将组件转化为Servlet,再吧开发者定义再组件中的混合代码翻译成Servlet的响应语句,输出给客户端。
1.创建基于Maven的web项目,pom.xml
  <dependencies>

    <dependency>
      <groupId>org.springframework.boot</groupId>
      <artifactId>spring-boot-starter-web</artifactId>
    </dependency>

    <dependency>
      <groupId>org.apache.tomcat.embed</groupId>
      <artifactId>tomcat-embed-jasper</artifactId>
      <version>9.0.45</version>
    </dependency>

  </dependencies>
2.创建Handler
package com.southwind.controlletr;

import org.springframework.stereotype.Controller;
import org.springframework.web.bind.annotation.GetMapping;
import org.springframework.web.bind.annotation.RequestMapping;
import org.springframework.web.servlet.ModelAndView;

@Controller
@RequestMapping("/hello")
public class HelloHandler {

    @GetMapping("/index")
    public ModelAndView index(){
        ModelAndView modelAndView = new ModelAndView();
        modelAndView.setViewName("index");
        modelAndView.addObject("mess","Hello Spring Boot");
        return modelAndView;
    }
}
3.JSP
<html>
<head>
    <title>Title</title>
</head>
<body>
    <h1>Index</h1>
    ${mess}
</body>
</html>
4.application.yml
server:
  port: 8181
spring:
  mvc:
    view:
      prefix: /
      suffix: .jsp
5.Application
package com.southwind;

import org.springframework.boot.SpringApplication;
import org.springframework.boot.autoconfigure.SpringBootApplication;

@SpringBootApplication
public class Application {
    public static void main(String[] args){
        SpringApplication.run(Application.class);
    }
}
看到如下界面说明访问成功

实际应用
JSTL
1、pm.xml
 <dependency>
      <groupId>jstl</groupId>
      <artifactId>jstl</artifactId>
      <version>1.2</version>
    </dependency>

    <dependency>
      <groupId>org.projectlombok</groupId>
      <artifactId>lombok</artifactId>
      <version>1.18.20</version>
    </dependency>
Lombok 的功能是简化实体类代码的编写工作,常用的方法getter,setter,toString,等方法都可以有Lombok自动生成,开发者不需要自己手动编写,Lombok的使用需要安装插件。

2、创建实体类
package com.southwind.entity;
import lombok.AllArgsConstructor;
import lombok.Data;

@Data
@AllArgsConstructor
public class User {
    private Integer id;
    private String name;
}
3、Handler中创建业务方法,返回User对象
@Controller
@RequestMapping("/user")
public class UserHandler {
    @Autowired
    private UserService userService;

    @GetMapping("/findAll")
    public ModelAndView findAll(){
        ModelAndView modelAndView = new ModelAndView();
        modelAndView.setViewName("index");
        modelAndView.addObject("list",userService.findAll());
        return modelAndView;

    }
4、Service
public interface UserService {
    public Collection<User> findAll();
    public User findById(Integer id);
    public void save(User user);
    public void deleteById(Integer id);
    public void update(User user);
}
他的实现类
@Service
public class UserServiceImpl implements UserService {
    @Autowired
    private UserRepository userRepository;

    @Override
    public Collection<User> findAll() {
        return userRepository.findAll();
    }

    @Override
    public User findById(Integer id) {
        return userRepository.findById(id);
    }

    @Override
    public void save(User user) {
        userRepository.save(user);
    }

    @Override
    public void deleteById(Integer id) {
        userRepository.deleteById(id);
    }

    @Override
    public void update(User user) {
        userRepository.update(user);
    }
}
5、RepoRepository
public interface UserRepository {
    public Collection<User> findAll();
    public User findById(Integer id);
    public void save (User user);
    public void deleteById(Integer id);
    public void update(User user);
}
他的实现类
@Repository
public class UserRepositoryImpl  implements UserRepository {
    private static Map<Integer,User> map;
    static {
        map = new HashMap<>();
        map.put(1,new User(1,"张三"));
        map.put(1,new User(2,"李四"));
        map.put(1,new User(3,"王五"));
    }
    @Override
    public Collection<User> findAll() {
        return map.values();
    }

    @Override
    public User findById(Integer id) {
        return map.get(id);
    }

    @Override
    public void save(User user) {
        map.put(user.getId(), user);
    }

    @Override
    public void deleteById(Integer id) {
        map.remove(id);
    }

    @Override
    public void update(User user) {
        map.put(user.getId(),user);
    }
}
6.JSP
index.jsp
<%@ page contentType="text/html;charset=UTF-8" language="java" %>
<%@ page isELIgnored="false" %>
<%@ taglib prefix="c" uri="http://java.sun.com/jsp/jstl/core" %>
<html>
<head>
    <title>Title</title>
</head>
<body>
    <h1>Index</h1>
    <table>
        <tr>
            <th>编号</th>
            <th>姓名</th>
            <th>操作</th>
        </tr>
        <c:forEach items="${list}" var="user">
            <tr>
                <td>${user.id}</td>
                <td>${user.name}</td>
            </tr>
            <td>
                <a href="/user/deleteById/${user.id}">删除</a>
                <a href="/user/findById/${user.id}" >修改</a>
            </td>
        </c:forEach>
    </table>
</body>
</html>
save.jsp
<%@ page contentType="text/html;charset=UTF-8" language="java" %>
<html>
<head>
    <title>Title</title>
    <!-- Bootstrap -->
    <link href="https://cdn.jsdelivr.net/npm/bootstrap@3.3.7/dist/css/bootstrap.min.css" rel="stylesheet">
    <script src="https://cdn.jsdelivr.net/npm/html5shiv@3.7.3/dist/html5shiv.min.js"></script>
    <script src="https://cdn.jsdelivr.net/npm/respond.js@1.4.2/dest/respond.min.js"></script>
    <!-- jQuery (Bootstrap 的所有 JavaScript 插件都依赖 jQuery,所以必须放在前边) -->
    <script src="https://cdn.jsdelivr.net/npm/jquery@1.12.4/dist/jquery.min.js"></script>
    <!-- 加载 Bootstrap 的所有 JavaScript 插件。你也可以根据需要只加载单个插件。 -->
    <script src="https://cdn.jsdelivr.net/npm/bootstrap@3.3.7/dist/js/bootstrap.min.js"></script>
</head>
<body>
   <form action="/user/save" method="post">
       <input type="text" name="id"/><br/>
       <input type="text" name="name"/><br/>
       <input type="submit"/>
   </form>
</body>
</html>
update.jsp
<%@ page contentType="text/html;charset=UTF-8" language="java" %>
<%@ page isELIgnored="false" %>
<html>
<head>
    <title>Title</title>
    <!-- Bootstrap -->
    <link href="https://cdn.jsdelivr.net/npm/bootstrap@3.3.7/dist/css/bootstrap.min.css" rel="stylesheet">
    <script src="https://cdn.jsdelivr.net/npm/html5shiv@3.7.3/dist/html5shiv.min.js"></script>
    <script src="https://cdn.jsdelivr.net/npm/respond.js@1.4.2/dest/respond.min.js"></script>
    <!-- jQuery (Bootstrap 的所有 JavaScript 插件都依赖 jQuery,所以必须放在前边) -->
    <script src="https://cdn.jsdelivr.net/npm/jquery@1.12.4/dist/jquery.min.js"></script>
    <!-- 加载 Bootstrap 的所有 JavaScript 插件。你也可以根据需要只加载单个插件。 -->
    <script src="https://cdn.jsdelivr.net/npm/bootstrap@3.3.7/dist/js/bootstrap.min.js"></script>
</head>
<body>
   <form action="/user/save" method="post">
       <input type="text" name="id" value="${user.id}"/><br/>
       <input type="text" name="name" value="${user.name}"/><br/>
       <input type="submit"/>
   </form>
</body>
</html>
Spring Boot 整合 Thymeleaf
Thymeleaf是目前比较流行的视图层技术,Spring Boot 官方推荐使用Thyseleaf。
什么是Thyseleaf
Thymeleaf是一个支持原生THML文件的Java模板,可以实现前后端分离的交互方式,即视图与业务数据分开响应,它可以直接将服务端返回的数据生成HTML文件,同时也可以处理C4XML、javaScript、CSS等格式。
Thymeleaf最大的特点是既可以再浏览器打开(静态方式),也可以结合服务端将业务数据填充到HTML之后动态生成的页面(动态方法),Spring Boot 支持Thymeleaf,使用起来非常方便。
1、创建Maven 工程,不需要创建web工程,pom中添加相关的依赖。
<parent>
        <artifactId>spring-boot-starter-parent</artifactId>
        <groupId>org.springframework.boot</groupId>
        <version>2.4.5</version>
    </parent>
    <dependencies>
        <dependency>
            <groupId>org.springframework.boot</groupId>
            <artifactId>spring-boot-starter-web</artifactId>
        </dependency>
        <dependency>
            <groupId>org.springframework.boot</groupId>
            <artifactId>spring-boot-starter-thymeleaf</artifactId>
            <version>2.4.5</version>
        </dependency>
    </dependencies>
2、创建application.yml
spring:
  thymeleaf:
    prefix: classpath/templates/     #模板路径
    suffix: .html                    #模板后缀
    servlet:
      content-type: text/html         #设置content-type
    encoding: UTF-8                   #编码格式
    mode: HTML5                       #校验H5 格式
    cache: false                      #关闭缓存,再开发过程中可以立即看到页面修改的结果
3、创建Handler
@Controller
@RequestMapping("/hello")
public class HelloHandler {
    @GetMapping("/index")
    public ModelAndView index(){
        ModelAndView modelAndView = new ModelAndView();
        modelAndView.setViewName("index");
        modelAndView.addObject("name","张安");
        return modelAndView;
    }
}
4、启动类
@SpringBootApplication
public class Application {
    public static void main(String[] args) {
        SpringApplication.run(Application.class,args);
    }
}
5、HTML
<!DOCTYPE html>
<html lang="en">
<html xmlns:th="http://www.thymeleaf.org">
<head>
    <meta charset="UTF-8">
    <title>Title</title>
</head>
<body>
  <h1>Index</h1>
  <p th:text="${name}">Hello World</p>
</body>
</html>
如果需要加载后台返回的业务数据,则需要再HTML页面中使用Thymeleaf模板标签来完成
1、需要引入模板标签
<html xmlns:th="http://www.thymeleaf.org">
2、通特点的标签完成操作。
<p th:text="${name}">Hello World</p>
Thymeleaf模板标签不同于JSTL,Thymeleaf模板标签是直接嵌入到HTML原生标签内部。
Thymeleaf常用标签
!th:text
th:text用于文本的显示,将业务数据的值填充到HTML标签中。
!th:if
th:if用于条件判断,对业务数据的值进行判断,如果条件成立,则显示内容,否则不显示,具体的使用如下案例所示:
    @GetMapping("/if")
    public ModelAndView ifTest(){
        ModelAndView modelAndView = new ModelAndView();
        modelAndView.setViewName("test");
        modelAndView.addObject("score",90);
        return modelAndView;
    }
<p th:if="${score>=90}">优秀</p>
<p th:if="${score<90}">良好</p>
!th:unless
th:unless 也用作条件判断,逻辑与th:if恰好相反,如果条件不成立则显示,否则不显示。
    @GetMapping("/unless")
    public ModelAndView unlessTest(){
        ModelAndView modelAndView = new ModelAndView();
        modelAndView.setViewName("test");
        modelAndView.addObject("score",90);
        return modelAndView;

    }
<p th:unless="${score>=90}">优秀</p>
<p th:unless="${score}<90">良好</p>
!th:swithch th:case
th:switch
it:case 两个结合起来使用,用作多条件等值判断,逻辑与Java中的switch-case一致,当switch中的业务数据等于某个case时,就显示该case对应的内容。
    @GetMapping("switch")
    public ModelAndView switchTest(){
        ModelAndView modelAndView = new ModelAndView();
        modelAndView.setViewName("test");
        modelAndView.addObject("studentId",1);
        return modelAndView;
    }
<div th:switch="${studentId}">
    <p th:case="1">张三</p>
    <p th:case="2">李四</p>
    <p th:case="3">王五</p>
</div>
!th:action
用来指定请求的URL,相当于form的action属性
写死:
<form th:action="@{/hello/login}" method="post">
    <input type="submit">
</form>
   @GetMapping("/redirect/{url}")
    public String redirect(@PathVariable("url") String url, Model model){
        model.addAttribute("url","/hello/login");
        return url;
    }
从后端传
<form th:action="${url}" method="post">
    <input type="submit">
</form>
如果action的值直接写在HTML中,则需要@{},如果是从后台传来的数据,则使用${}。
!th:each
用来遍历集合
pom.xml
        <dependency>
            <groupId>org.projectlombok</groupId>
            <artifactId>lombok</artifactId>
        </dependency>
User类
@Data
@AllArgsConstructor
public class User {
    private Integer id;
    private String name;

}
    @GetMapping("/each")
    public ModelAndView each(){
       List<User> list = Arrays.asList(
         new User(1,"张三"),
         new User(2,"李四"),
               new User(3,"王五")
       );
       ModelAndView modelAndView = new ModelAndView();
       modelAndView.setViewName("test");
       modelAndView.addObject("list",list);
       return modelAndView;
    }
HTML
<table>
    <tr>
        <th>编号</th>
        <th>姓名</th>
    </tr>
    <tr th:each="user:${list}">
        <td th:text="${user.id}"></td>
        <td th:text="${user.name}"></td>
    </tr>
</table>
!th:value
用来给标签赋值。
    @GetMapping("/value")
    public ModelAndView value(){
        ModelAndView modelAndView = new ModelAndView();
        modelAndView.setViewName("test");
        modelAndView.addObject("value","springboot");
        return modelAndView;
    }
<!--value-->
<input type="text" th:value="${value}"/>
!th:src
用来引入静态资源,相当于HTML原生标签img、srcipt的scr属性。
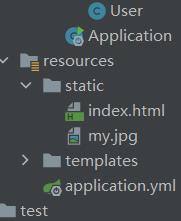
图片,css,js,静态加载的html都需要放置在resources/static文件中
    @GetMapping("/src")
    public ModelAndView src(){

        ModelAndView   modelAndView = new ModelAndView();
        modelAndView.setViewName("test");
        modelAndView.addObject("src","/my.jpn");
        return modelAndView;
    }
<img th:src="${src}"/>
如果scr的值是直接写在HTML中
<img th:src="@{/my.jpg}"/>
如果不走后台直接访问,结果如下所示

!th:href
用作设置超链接的href
    @GetMapping("/href")
    public ModelAndView href(){
        ModelAndView modelAndView = new ModelAndView();
        modelAndView.setViewName("test");
        modelAndView.addObject("href","https://www.baidu.com");
        return modelAndView;
    }
<a th:href="${href}">百度</a>
!th:selected
用作给HTML元素设置选中,如果条件成立则选择,否则不选中。
@GetMapping("select")
    public ModelAndView select(){
        List<User> list = Arrays.asList(
                new User(1,"张三"),
                new User(2,"李四"),
                new User(3,"王五")

        );
        ModelAndView modelAndView = new ModelAndView();
        modelAndView.setViewName("test");
        modelAndView.addObject("list",list);
        modelAndView.addObject("name","李四");
        return modelAndView;

    }
结合th:each来使用,首先先遍历list集合动态创建option元素,根据每次遍历出的user.name也业务数据中的name是否相等来决定是否要选择。
!th:attr
给HTML标签的任意属性赋值。
  @GetMapping("/attr")
    public ModelAndView attr(){
        ModelAndView modelAndView = new ModelAndView();
        modelAndView.setViewName("test");
        modelAndView.addObject("attr","Spring Boot");
        return modelAndView;

    }
<!--attr-->
<input th:attr="value=${attr}"/><br/>
<input th:value="${attr}"/>
Thymeleaf对象
Thymeleaf支持直接访问Servlet Web 元素资源,HttpServlet,HttpServletRepose,HttpSession,Swrvletontext.
#request:获取HttpServletRequest对象
#response:获取HttpServletRepose对象
#session:获取Httpssion对象
#servletContext:获取ServletContext对象
    @GetMapping("/servlet")
    public String servlet(HttpServletRequest request){

        request.setAttribute("value","request");
        request.getSession().setAttribute("value","session");
        request.getServletContext().setAttribute("value","servletContext");
        return "test";
    }
<!--servlet -->
<p th:text="${#request.getAttribute('value')}"></p>
<p th:text="${#session.getAttribute('value')}"></p>
<p th:text="${#servletContext.getAttribute('value')}"><+/p>
<p th:text="${#request}"></p>
Thymeleaf支持直接访问session,KaTeX parse error: Expected '}', got '#' at position 2: {#̲request.getAttr…{name}。
@GetMapping("/servlet2")
    public ModelAndView servlet2(HttpSession session){
        session.setAttribute("name","李四");
        ModelAndView modelAndView = new ModelAndView();
        modelAndView.setViewName("test");
        modelAndView.addObject("name","张三");
        return modelAndView;
    }
Thymeleaf内置对象
!dates:日期格式化
!calendrs:日期格式化
!numbers:数字格式化
!strings:字符串格式化
!bools:boolean
!arrays:数组内置对象
!lists:List集合内置对象
!sets:Set集合对象
!maps:Map集合内置对象
    @GetMapping("/unility")
    public ModelAndView unility(){
        ModelAndView modelAndView = new ModelAndView();
        modelAndView.setViewName("test");
        modelAndView.addObject("date",new Date());
        Calendar calendar = Calendar .getInstance();
        calendar.set(2020,1,1);
        modelAndView.addObject("calendar",calendar);
        modelAndView.addObject("number",0.08);
        modelAndView.addObject("string","StringBoot");
        modelAndView.addObject("boolean",true);
        modelAndView.addObject("array",Arrays.asList("张三","李四","王五"));
        List<User> list = new ArrayList<>();
        list.add(new User(1,"张三"));
        list.add(new User(2,"李四"));
        modelAndView.addObject("list",list);
        Set<User> set = new HashSet<>();
        set.add(new User(1,"张三"));
        set.add(new User(2,"李四"));
        modelAndView.addObject("set",set);
        Map<Integer,User> map = new HashMap<>();
        map.put(1,new User(1,"张三"));
        map.put(2,new User(2,"李四"));
        modelAndView.addObject("map",map);
        return modelAndView;
date格式化:<span th:text="${#dates.format(date,'yyyy-MM-dd')}"></span><br/>
当前日期:<span th:text="${#dates.createToday()}"></span><br/>
当前时间:<span th:text="${#dates.createNow()}"></span><br/>
Calendar格式化:<span th:text="${#calendars.format(calendar,'yyyy-MM-dd')}"></span><br/>
number百分比格式:<span th:text="${#numbers.formatPercent(number,2,2)}"></span><br/>
name是否为空:<span th:text="${#strings.isEmpty(string)}"></span><br/>
name的长度:<span th:text="${#strings.length(string)}"></span><br/>
name拼接操作:<span th:text="${#strings.concat('Good',string)}"></span><br/>
boolean是否为true:<span th:text="${#bools.isTrue(boolean)}"></span><br/>
arrays的长度:<span th:text="${#arrays.length(array)}"></span><br/>
arrays是否包含张三: <span th:text="${#arrays.contains(array,'张三')}"></span><br/>
List是否为空: <span th:text="${#lists.isEmpty(list)}"></span><br/>
List的长度: <span th:text="${#lists.size(list)}"></span><br/>
Set是否为空: <span th:text="${#sets.isEmpty(set)}"></span><br/>
Map受否为空: <span th:text="${#maps.isEmpty(map)}"></span><br/>
Map的长度: <span th:text="${#maps.size(map)}"></span><br/>

Spring Boot 整合持久层
Spring Boot整合jdbcTemplate
jdbcTemplate 是Spring Boot自带的JDBC模板组件,底层是西安了对JDBC的封装,用法与MyBatis类似,需要开发者自定义SQL语句,jdbcTemplate帮我我们完成数据库的连接,SQL的执行,已经结果集的封装。
不足之处是灵活性不如MyBatis,因为MyBatis的SQL语句定义在XML中,更有利于维护可扩展,jdbcTemplate以硬编码的方式将SQL直接写在Java代码中,不利于扩展维护。
1、pom.xml
<groupId>com.wdzl</groupId>
    <artifactId>SpringBoot-1</artifactId>
    <version>1.0-SNAPSHOT</version>

    <parent>
        <artifactId>spring-boot-starter-parent</artifactId>
        <groupId>org.springframework.boot</groupId>
        <version>2.4.5</version>
    </parent>

    <dependencies>
        <dependency>
            <groupId>org.springframework.boot</groupId>
            <artifactId>spring-boot-starter-web</artifactId>
            <version>2.4.5</version>
        </dependency>

        <dependency>
            <groupId>org.springframework.boot</groupId>
            <artifactId>spring-boot-starter-jdbc</artifactId>
        </dependency>

        <dependency>
            <groupId>mysql</groupId>
            <artifactId>mysql-connector-java</artifactId>
            <version>8.0.23</version>
        </dependency>
        <dependency>
            <groupId>org.projectlombok</groupId>
            <artifactId>lombok</artifactId>
            <version>1.18.20</version>
        </dependency>
    </dependencies>
1、创建实体类
@Data
public class User {
    private String id;
    private String sex;
    private String address;
    private String username;
}
3、创建UserRepositiory
public interface UserRepository {
    public List<User> findAll();
    public User findById(String id);
    public int save(User user);
    public int update(User user);
    public int deleteById(String id);
}
4、创建实现类
@SpringBootApplication
public class Application {
    public static void main(String[] args) {
        SpringApplication.run(Application.class,args);
    }
}
5、Handler
@RestController
@RequestMapping("/user")
public class UserHandler {

    @Autowired
    private UserRepositoryImpl userRepository;

    @GetMapping("/findAll")
    public List<User> findAll(){
        return userRepository.findAll();
    }

    @GetMapping("/findById/{id}")
    public User findById(@PathVariable("id") String id){
        return userRepository.findById(id);
    }

    @PostMapping("/save")
    public int save(@RequestBody User user){
        return userRepository.save(user);
    }

    @PostMapping("/update")
    public int update(@RequestBody User user){
        return userRepository.update(user);
    }

    @DeleteMapping("/deleteById/{id}")
    public int delete(@PathVariable("id") String id){
        return userRepository.deleteById(id);
    }
}
query方法
!query(String sql,RowMapper rowMapper)
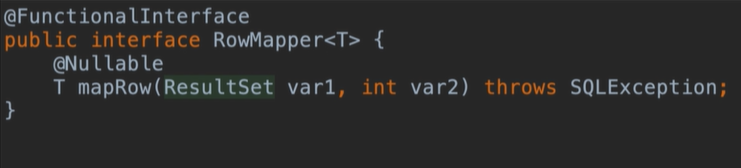
RowMapper是一个接口,作用是解析结果集,将JDBC查询出的ResultSet对象准换成对应的POJO。
queryForObject(String sql,Object[] args,RowMapper rowMapper)
该方法用来查询一条数据,并将结果封装成一个POJO。
Spring Boot整合MyBatis
1、pom.xml依赖
    <dependencies>

        <dependency>
            <groupId>org.mybatis.spring.boot</groupId>
            <artifactId>mybatis-spring-boot-starter</artifactId>
            <version>2.1.4</version>
        </dependency>
        <dependency>
            <groupId>org.springframework.boot</groupId>
            <artifactId>spring-boot-starter-web</artifactId>
            <version>2.4.5</version>
        </dependency>

        <dependency>
            <groupId>org.springframework.boot</groupId>
            <artifactId>spring-boot-starter-jdbc</artifactId>
        </dependency>

        <dependency>
            <groupId>mysql</groupId>
            <artifactId>mysql-connector-java</artifactId>
            <version>8.0.23</version>
        </dependency>
        <dependency>
            <groupId>org.projectlombok</groupId>
            <artifactId>lombok</artifactId>
            <version>1.18.20</version>
        </dependency>

    </dependencies>
2、实体类
@Data
public class User {
    private String id;
    private String sex;
    private String address;
    private String username;
}
3、创建UserRepository
public interface UserRepository {
    public List<User> findAll();
    public User findById(String id);
    public int save(User user);
    public int update(User user);
    public int deleteById(String id);
}
4、在repository/mapping创建UserRepository.xml
    <select id="findAll" resultType="com.southwind.entity.User">
        select * from user
    </select>

    <select id="findById" parameterType="java.lang.String" resultType="com.southwind.entity.User">
        select * from user where id=#{id}
    </select>

    <insert id="save" parameterType="com.southwind.entity.User">
        insert into user(username,id,sex,address) values (#{username},#{id},#{sex},#{address})
    </insert>

    <update id="update" parameterType="com.southwind.entity.User">
        update user set username=#{username},sex=#{sex},address=#{address},id=#{id}
    </update>

    <delete id="deleteById" parameterType="java.lang.String">
        delete from user where id=#{id}
    </delete>
5、创建Handler
package com.southwind.controller.mybatis;

import com.southwind.entity.User;
import com.southwind.mybatis.repository.UserRepository;
import org.springframework.beans.factory.annotation.Autowired;
import org.springframework.web.bind.annotation.*;

import java.util.List;

@RestController
@RequestMapping("/user")
public class UserHandler {

    @Autowired
    private UserRepository userRepository;

    @GetMapping("/findAll")
    public List<User> findAll(){
        return userRepository.findAll();
    }

    @RequestMapping("findById/{id}")
    public User findById(@PathVariable("id") String id){
        return userRepository.findById(id);
    }

    @PostMapping("save")
    public int save (@RequestBody User user){
        return userRepository.save(user);
    }

    @PutMapping("/update")
    public int update(@RequestBody User user){
        return userRepository.update(user);
    }

    @DeleteMapping("/deleteById/{id}")
    public int deleteById(@PathVariable("id") String id){
        return userRepository.deleteById(id);
    }


}
6、配置文件
spring:
  datasource:
    driver-class-name: com.mysql.cj.jdbc.Driver
    username: root
    password: 123456
    url: jdbc:mysql://localhost:3306/mybatis?useUnicode=true&characterEncoding=UTF-8
mybatis:
  mapper-locations: classpath:/mapping/*.xml
  typ
Spring Boot整合Spring Data JPA
Spring Data JPA 是Spring Data大家族的一员
JPA 和 Spring Data JPA的关系
JPA(Java Persistence API)Java持久层规范,定义了一系列ORM接口,它本身是不能直接使用,接口必须实现才能使用,Hibernate框架就是一个实现了JPA规范的框架。
Spring Data JPA是Spring框架提供的对JPA规范的抽象,通过约定的命名规范完成持久层接口的编写,在不需要实现接口的情况下就可以完成对数据库的操作。
简单理解:通过Spring Data JPA只需要定义接口而不需要去实现就能完成CRUD操作。
Spring Data JPA本身并不是一个具体的实现,它只是一个抽现场层,底层还是需要Hibernate这样的JPA来提供支持。
Spring Data JPA和Sping JdbcTemplate的关系
Sping JdbcTemplate是Spring 框架提供打得一套操作数据库的模板,Spring Data JPA是JPA的抽象。
1、在pom.xml中添加依赖
        <dependency>
            <groupId>org.springframework.boot</groupId>
            <artifactId>spring-boot-starter-data-jpa</artifactId>
        </dependency>
2、实体类
@Data
@Entity(name = "student")
public class User {
    @Id
    @GeneratedValue(strategy = GenerationType.AUTO)
    private Integer id;
    @Column
    private String sex;
    @Column
    private String address;
    @Column
    private String username;
    @Column
    private Date birthday;
}
!@Entity 将实体类与数据表进行映射
!Id将实体类中的成员变量与数据表的主键进行映射,一般都是id
! @GeneratedValue表示自动生成主键,strategy 为主键选择生成策略
!@Column将实体类中的成员变量与数据表的普通字段进行映射。
3、创建UserRepository
package com.southwind.controller.jap.repository;

import com.southwind.controller.jpa.entity.User;
import org.springframework.data.jpa.repository.JpaRepository;

public interface UserRepository extends JpaRepository<User,Integer> {
}
4、创建Handler
@RestController("/jpaHandler")
@RequestMapping("/use")
public class UserHandler {
    @Autowired
    private JpaUserRepository userRepository;

    @GetMapping("/findAll")
    public List<User> findAll(){
        return userRepository.findAll();
    }

    @GetMapping("findById/{id}")
    public User findById(@PathVariable("id") Integer id){
        return userRepository.findById(id).get();
    }

    @PostMapping("/save")
    public void save(@RequestBody User user){
        userRepository.save(user);
    }

    @PutMapping("/update")
    public void update(@RequestBody User user){
        userRepository.save(user);
    }

    @DeleteMapping("/deleteById{id}")
    public void delete(@PathVariable("id") Integer id){
        userRepository.deleteById(id);
    }
}
5、application.yml
spring:
  datasource:
    driver-class-name: com.mysql.cj.jdbc.Driver
    username: root
    password: 123456
    url: jdbc:mysql://localhost:3306/mybatis?useUnicode=true&characterEncoding=UTF-8
  jpa:
    show-sql: true

    properties:
      hibernate:
        format_sql: true
mybatis:
  mapper-locations: classpath:/mapping/*.xml
  type-aliases-package: com.southwind.entity
当你想实现JpaRepository接口里没有的方法,比如:findByName
你只需在JpaUserRepository接口中定义这个方法即可,不需要做映射。
1、JpaUserRepository
public interface JpaUserRepository extends JpaRepository<User,Integer> {
    public User findByUsername(String username);
}
2、UserHandler
   @GetMapping("/findByUsername/{username}")
    public User findByUsername(@PathVariable("username") String username){
        return userRepository.findByUsername(username);
    }
Spring Boot整合Spring Security
1、创建一个Maven工程,在pom.xml中添加相关的依赖
 <parent>
        <artifactId>spring-boot-starter-parent</artifactId>
        <groupId>org.springframework.boot</groupId>
        <version>2.4.5</version>
    </parent>
    <dependencies>
        <dependency>
            <groupId>org.springframework.boot</groupId>
            <artifactId>spring-boot-starter-web</artifactId>
        </dependency>

        <dependency>
            <groupId>org.springframework.boot</groupId>
            <artifactId>spring-boot-starter-thymeleaf</artifactId>
        </dependency>

        <dependency>
            <groupId>org.springframework.boot</groupId>
            <artifactId>spring-boot-starter-security</artifactId>
        </dependency>

2、Handler
@Controller
public class SecurityHandler {

    @GetMapping("/index")
    public String index(){
        return "index";
    }
}
3、HTML
<!DOCTYPE html>
<html lang="en">
<head>
    <meta charset="UTF-8">
    <title>Title</title>
</head>
<body>
  <p>index</p>
<form method="post" action="/login">
    <input type="submit" value="退出"/>
</form>
</body>
</html>
4、application.yml
spring:
  thymeleaf:
    suffix: .html
    prefix: classpath:/templates/
5、启动类
@SpringBootApplication
public class Application {
    public static void main(String[] args) {
        SpringApplication.run(Application.class,args);
    }
}
输入用户名、密码才可以继续访问,默认的用户名是user,密码是程序启动时,Spring security自动随机生成的随机密码。

自定义用户密码
spring:
  thymeleaf:
    suffix: .html
    prefix: classpath:/templates/
  security:
    user:
      name: tangkang
      password: 666666
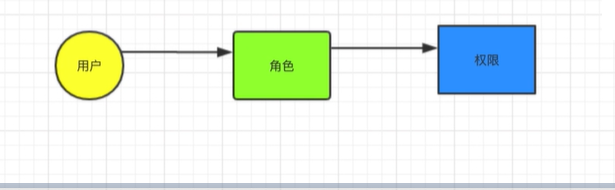
权限管理
定义两个资源
!index.html
!admin.html
定义两个角色
!ADMIN 访问index.html和admin.html
! USER 访问index.html
1、创建一个SecurityConfig类
package com.southwind.config;

import org.springframework.context.annotation.Configuration;
import org.springframework.context.annotation.EnableAspectJAutoProxy;
import org.springframework.security.config.annotation.authentication.builders.AuthenticationManagerBuilder;
import org.springframework.security.config.annotation.web.builders.HttpSecurity;
import org.springframework.security.config.annotation.web.builders.WebSecurity;
import org.springframework.security.config.annotation.web.configuration.WebSecurityConfigurerAdapter;

@Configuration//代表设施配置类
@EnableWebSecurity//开启基于web的安全验证
public class SecurityConfig extends WebSecurityConfigurerAdapter {

    /**
     * 角色和资源的关系
     * @param http
     * @throws Exception
     */
    @Override
    protected void configure(HttpSecurity http) throws Exception {
        http.authorizeRequests()
                .antMatchers("/admin").hasRole("ADMIN")
                .antMatchers("index").access("hasRole('ADMIN') or hasRole('USER')")
                .anyRequest().authenticated()
                .and()
                .formLogin()
                .loginPage("/login")
                .permitAll()
                .and()
                .logout()
                .permitAll()
                .and()
                .csrf()
                .disable();
    }

    /**
     * 用户和角色的关系
     * @param auth
     * @throws Exception
     */
    @Override
    protected void configure(AuthenticationManagerBuilder auth) throws Exception {
        auth.inMemoryAuthentication().passwordEncoder(new MyPassWord()).withUser("user").password(new MyPassWord()
          .encode("000")).roles("USER")
                .and()
                .withUser("admin").password(new MyPassWord()
        .encode("123")).roles("ADMIN","USER");
    }
}
2、自定义一个MyPassWord类
public class MyPassWord implements PasswordEncoder {
    @Override
    public String encode(CharSequence charSequence) {
        return charSequence.toString();
    }

    @Override
    public boolean matches(CharSequence charSequence, String s) {
        return s.equals(charSequence.toString());
    }
}
3、Handler
@Controller
public class SecurityHandler {

    @GetMapping("/index")
    public String index(){
        return "index";
    }

    @GetMapping("/admin")
    public String admin(){
        return "admin";
    }

    @GetMapping("/login")
    public String login(){
        return "login";
    }
}
4、login.html
<!DOCTYPE html>
<html lang="en">
<html xmlns:th="http://www.thymeleaf.org">
<head>
    <meta charset="UTF-8">
    <title>Title</title>
</head>
<body>
  <p th:if="${param.error}">
      用户名或密码错误
  </p>
   <form th:action="@{/login}" method="post">
       用户名:<input type="text" name="username"/><br/>
       密码: <input type="password" name="password"/><br/>
       <input type="submit" value="登录">
   </form>
</body>
</html
5、index.html
<!DOCTYPE html>
<html lang="en">
<head>
    <meta charset="UTF-8">
    <title>Title</title>
</head>
<body>
  <p>COME BACK!</p>
<form method="post" action="/login">
    <input type="submit" value="退出"/>
</form>
</body>
</html>
6、admin.html
<!DOCTYPE html>
<html lang="en">
<head>
    <meta charset="UTF-8">
    <title>Title</title>
</head>
<body>
  <p>后台管理系统</p>
  <form method="post" action="/login">
      <input type="submit" value="退出"/>
  </form>
</body>
</html>


 192
192


 被折叠的 条评论
为什么被折叠?
被折叠的 条评论
为什么被折叠?
 到【灌水乐园】发言


