


一. 前言
1. nacos相关文章
- Nacos配置中心使用
- Nacos注册中心使用 (本文)
- Nacos配置中心源码浅析
- Nacos注册中心源码浅析 (待出)
2. 说明
- 本文业务项目为SpringBoot项目, 采用spring-boot-starter-web版本为2.2.5.RELEASE
- 本文spring-cloud-starter-alibaba-nacos-discovery采用版本为2.2.5.RELEASE
- 本文远程调用使用spring-cloud-starter-openfeign, 采用的版本为2.2.6.RELEASE
- 本文nacos服务端不使用数据库的表存储
- 本文使用idea工具启动项目
- 如有疑问, 请查看官方文档: https://nacos.io/zh-cn/docs/what-is-nacos.html
- nacos源码: https://github.com/alibaba/nacos/releases
二. 启动nacos服务器
1. 启动服务端
启动服务端, 访问控制台
http://localhost:8848/nacos/index.html
2. 新建命名空间dev
也可不创建, 直接使用默认的public命名空间
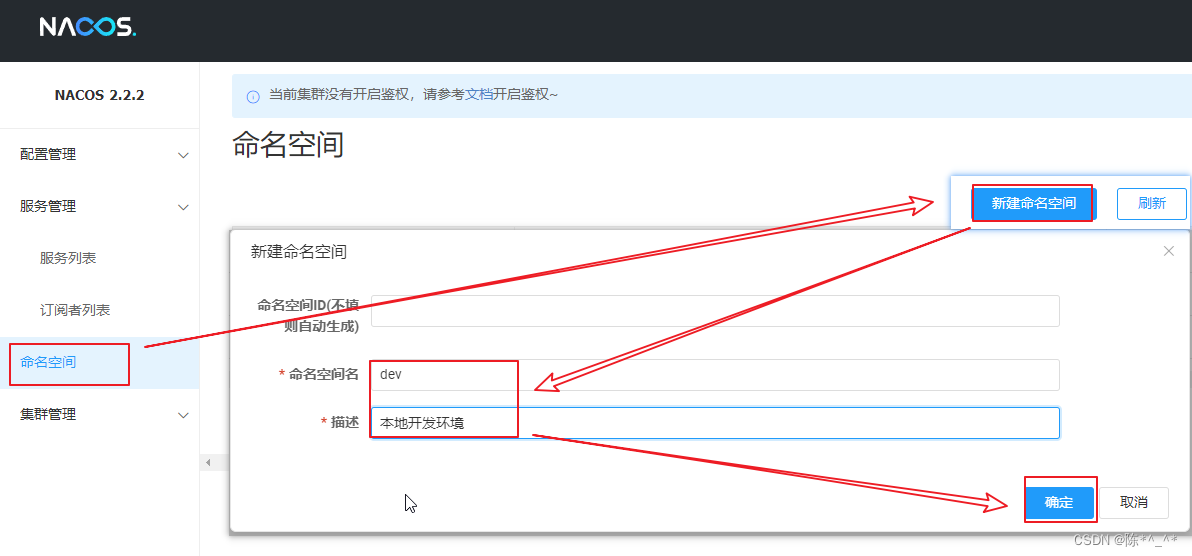
创建好命名空间后, 可以在服务管理可以进行命名空间切换

创建的dev命名空间id为 013f54f2-582f-4921-a998-46fdabeb0542. 后续会使用到
三. 创建父项目
1. 创建父项目nacos-discovery-study
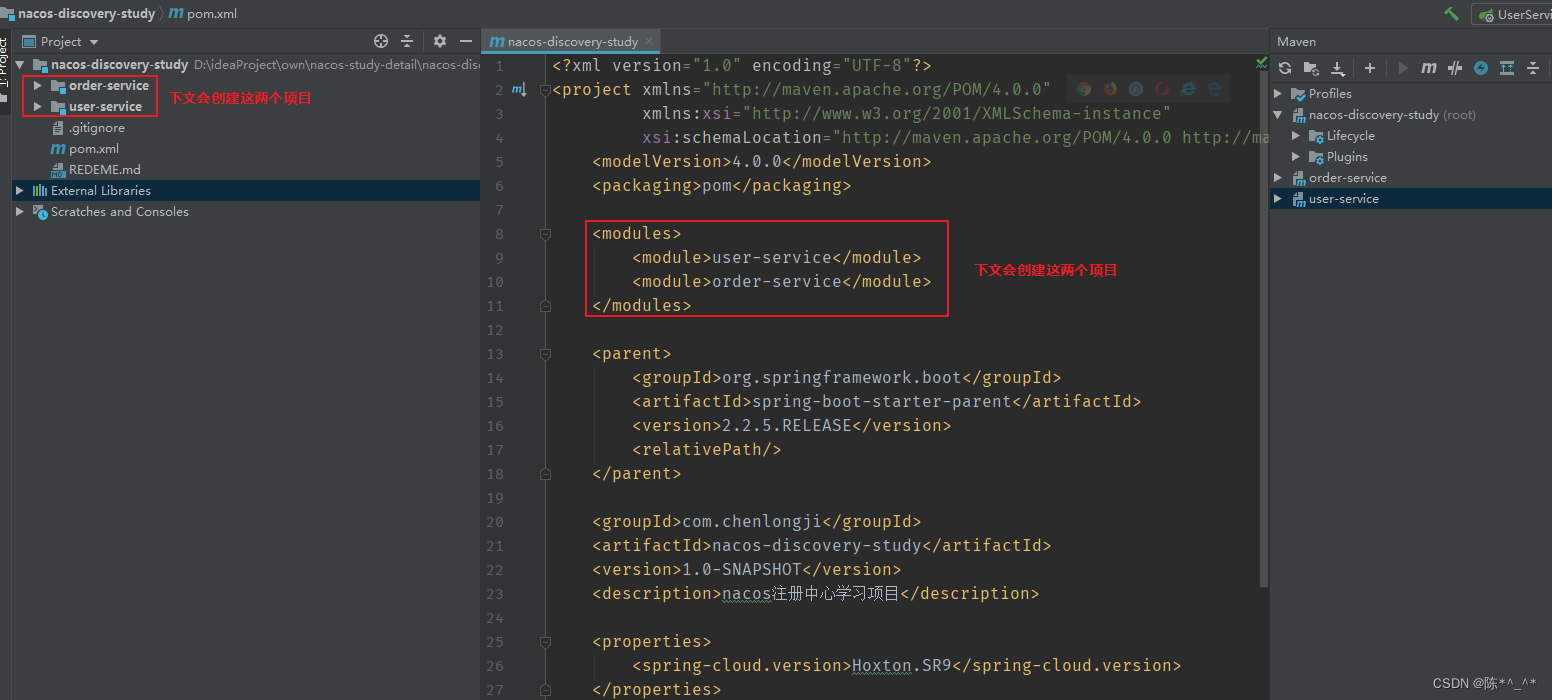
2. 添加依赖管理
nacos-discovery-study的pom.xml如下
<?xml version="1.0" encoding="UTF-8"?>
<project xmlns="http://maven.apache.org/POM/4.0.0"
         xmlns:xsi="http://www.w3.org/2001/XMLSchema-instance"
         xsi:schemaLocation="http://maven.apache.org/POM/4.0.0 http://maven.apache.org/xsd/maven-4.0.0.xsd">
    <modelVersion>4.0.0</modelVersion>
    <packaging>pom</packaging>

    <modules>
        <module>user-service</module>
        <module>order-service</module>
    </modules>

    <parent>
        <groupId>org.springframework.boot</groupId>
        <artifactId>spring-boot-starter-parent</artifactId>
        <version>2.2.5.RELEASE</version>
        <relativePath/>
    </parent>

    <groupId>com.chenlongji</groupId>
    <artifactId>nacos-discovery-study</artifactId>
    <version>1.0-SNAPSHOT</version>
    <description>nacos注册中心学习项目</description>

    <properties>
        <spring-cloud.version>Hoxton.SR9</spring-cloud.version>
    </properties>

    <dependencyManagement>
        <dependencies>
            <!-- spring-cloud-alibaba的管理依赖 -->
            <dependency>
                <groupId>com.alibaba.cloud</groupId>
                <artifactId>spring-cloud-alibaba-dependencies</artifactId>
                <version>2.2.5.RELEASE</version>
                <type>pom</type>
                <scope>import</scope>
            </dependency>

            <!-- spring-cloud的管理依赖 -->
            <dependency>
                <groupId>org.springframework.cloud</groupId>
                <artifactId>spring-cloud-dependencies</artifactId>
                <version>${spring-cloud.version}</version>
                <type>pom</type>
                <scope>import</scope>
            </dependency>
        </dependencies>
    </dependencyManagement>

</project>
说明:
- 父项目后续会管理order-service和user-service两个子项目(后面会提及)
- 添加parent为 spring-boot-starter-parent
管理了本文子项目中spring-boot-starter-web的版本 (2.2.5.RELEASE)- 添加spring-cloud-alibaba的依赖版本管理spring-cloud-alibaba-dependencies
管理了本文子项目中 spring-cloud-starter-alibaba-nacos-discovery的版本 (2.2.5.RELEASE)- 添加spring-cloud的依赖版本管理spring-cloud-dependencies
管理了本文子项目中 spring-cloud-starter-openfeign的版本 (2.2.6.RELEASE)
四. 创建生产者
1. 创建order-service的SpringBoot项目

2. pom.xml添加依赖
<?xml version="1.0" encoding="UTF-8"?>
<project xmlns="http://maven.apache.org/POM/4.0.0" xmlns:xsi="http://www.w3.org/2001/XMLSchema-instance"
         xsi:schemaLocation="http://maven.apache.org/POM/4.0.0 https://maven.apache.org/xsd/maven-4.0.0.xsd">
    <modelVersion>4.0.0</modelVersion>
    <parent>
        <groupId>com.chenlongji</groupId>
        <artifactId>nacos-discovery-study</artifactId>
        <version>1.0-SNAPSHOT</version>
    </parent>

    <artifactId>order-service</artifactId>
    <name>order-service</name>
    <description>订单服务</description>

    <dependencies>
        <!-- web依赖 -->
        <dependency>
            <groupId>org.springframework.boot</groupId>
            <artifactId>spring-boot-starter-web</artifactId>
        </dependency>

        <!-- nacos客户端依赖包(配置中心) -->
        <dependency>
            <groupId>com.alibaba.cloud</groupId>
            <artifactId>spring-cloud-starter-alibaba-nacos-discovery</artifactId>
        </dependency>
    </dependencies>

    <build>
        <plugins>
            <!-- SpringBoot项目的打包命令(本演示没使用到) -->
            <plugin>
                <groupId>org.springframework.boot</groupId>
                <artifactId>spring-boot-maven-plugin</artifactId>
            </plugin>
        </plugins>
    </build>

</project>
说明:
- 添加spring-boot-starter-web依赖, 使该项目变成一个web应用
- 添加spring-cloud-starter-alibaba-nacos-discovery依赖, 用于服务注册发现
- spring-boot-maven-plugin为SpringBoot项目的打包命令. 本文演示中没使用到
3. 启动类
package com.chenlongji.orderservice;

import org.springframework.boot.SpringApplication;
import org.springframework.boot.autoconfigure.SpringBootApplication;

/**
 * @author clj
 * 注解@EnableDiscoveryClient说明:
 *    新版Spring Cloud不在需要@EnableDiscoveryClient注解
 *    Dalston.SR4版本及之前主函数上需要添加该注解.
 *    (拓展)可以添加DiscoveryClient的实现到类路径中,这种SpringBoot应用就可以注册到服务发现服务器中
 */

@SpringBootApplication
//@EnableDiscoveryClient
public class OrderServiceApplication {

    public static void main(String[] args) {
        SpringApplication.run(OrderServiceApplication.class, args);
    }

}
说明:
- 新版的SpringCloud不再需要使用@EnableDiscoveryClient (Dalston.SR4版本及之前主函数上需要添加该注解)
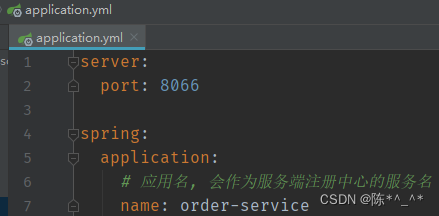
4. application.yml配置
server:
  port: 8055

spring:
  application:
    # 应用名, 会作为服务端注册中心的服务名
    name: order-service
  cloud:
    nacos:
      discovery:
        # nacos服务端地址
        server-addr: localhost:8848
        # 命名空间 (不配置则使用默认命名空间public)
        namespace: 013f54f2-582f-4921-a998-46fdabeb0542
        # 分组 (不配置则使用默认的分组DEFAULT_GROUP)
        group: STUDY_GROUP
说明:
- spring.application.name的应用名会作为服务端注册中心的服务名
- 必须指定nacos服务端的地址 (spring.cloud.nacos.discovery.server-addr)
- 可以设置命名空间 (spring.cloud.nacos.discovery.namespace). 不配置则使用默认命名空间public
- 可以设置分组 (spring.cloud.nacos.discovery.group). 不配置则使用默认的分组DEFAULT_GROUP
5. 添加微服务内部接口
这里演示的为正常微服务调用方式
(更规范的做法是微服务分api项目和impl项目, 微服务仅引用api的依赖)
(若仅做演示, 可直接使用Controller提供服务)
添加api接口
package com.chenlongji.orderservice.api;

import org.springframework.web.bind.annotation.PostMapping;
import org.springframework.web.bind.annotation.RequestMapping;
import org.springframework.web.bind.annotation.RequestParam;
import org.springframework.web.bind.annotation.RestController;

import java.util.Map;

/**
 * @author clj
 * Description: 订单服务api
 */
@RequestMapping("/order")
@RestController
public interface OrderServiceApi {
    /**
     * 创建订单
     * @param userName 用户名
     * @return 返回值
     */
    @PostMapping("/createOrder")
    Map<String, String> createOrder(@RequestParam String userName);

}
添加api接口实现
package com.chenlongji.orderservice.impl;

import com.chenlongji.orderservice.api.OrderServiceApi;
import org.springframework.beans.factory.annotation.Value;
import org.springframework.stereotype.Service;

import java.util.HashMap;
import java.util.Map;

/**
 * @author clj
 */
@Service
public class OrderServiceApiImpl implements OrderServiceApi {
    @Value("${server.port}")
    private String port;

    @Override
    public Map<String, String> createOrder(String userName) {
        Map<String, String> result = new HashMap<>(2);
        result.put("serverPort", port);
        result.put("userName", userName);
        System.out.println("订单服务:" + port + " 创建了订单, userName=" + userName);
        return result;
    }

}
6. 启动项目
调用com.chenlongji.orderservice.OrderServiceApplication#main, 启动生产者order-service (端口号为8055)
nacos界面如下:
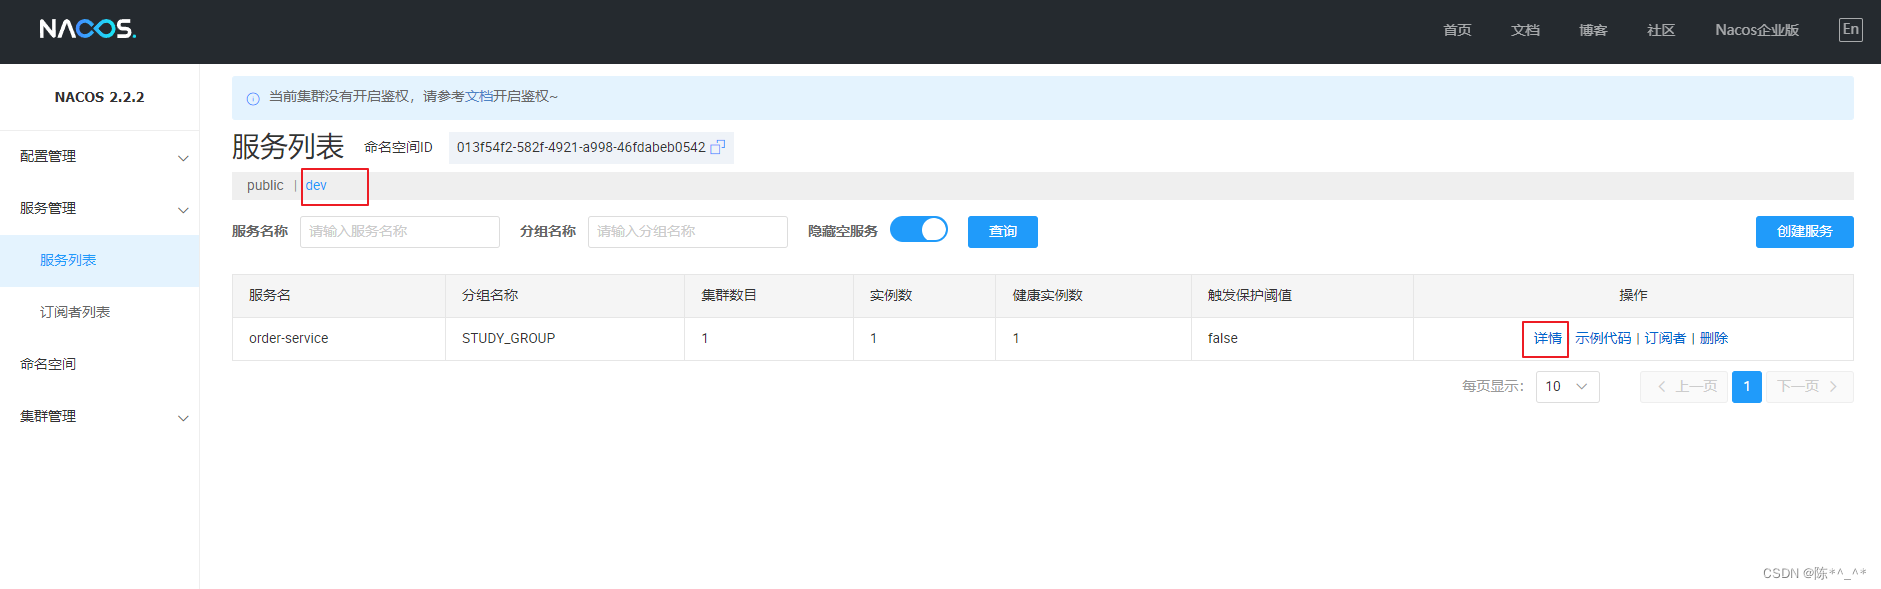
点击详情

说明:
- 由于本文使用了命名空间, 可以看到 order-service服务是在指定的命名空间下的
- 控制台可以为order-service服务的实例指定 权重, 这样不同实例的调用就会使用到不同权重(默认权重为1, 即所有实例轮询调用)
- 控制台可以指定某个实例上线或下线
五. 创建消费者
1. 创建user-service的SpringBoot项目

2. pom.xml添加依赖
<?xml version="1.0" encoding="UTF-8"?>
<project xmlns="http://maven.apache.org/POM/4.0.0" xmlns:xsi="http://www.w3.org/2001/XMLSchema-instance"
xsi:schemaLocation="http://maven.apache.org/POM/4.0.0 https://maven.apache.org/xsd/maven-4.0.0.xsd">
<modelVersion>4.0.0</modelVersion>
<parent>
<groupId>com.chenlongji</groupId>
<artifactId>nacos-discovery-study</artifactId>
<version>1.0-SNAPSHOT</version>
</parent>
<artifactId>user-service</artifactId>
<name>user-service</name>
<description>用户服务</description>
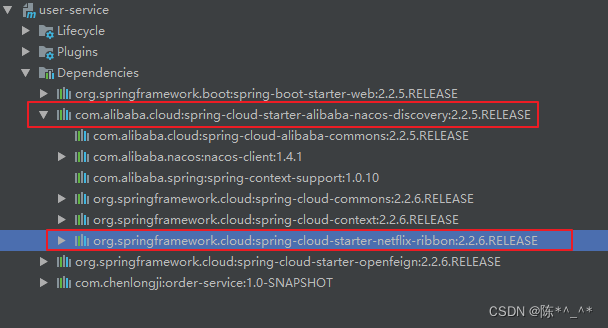
<dependencies>
<!-- web依赖 -->
<dependency>
<groupId>org.springframework.boot</groupId>
<artifactId>spring-boot-starter-web</artifactId>
</dependency>
<!-- nacos客户端依赖包(配置中心) -->
<dependency>
<groupId>com.alibaba.cloud</groupId>
<artifactId>spring-cloud-starter-alibaba-nacos-discovery</artifactId>
</dependency>
<!-- openfeign 运用OpenFeign进行远程调用 -->
<dependency>
<groupId>org.springframework.cloud</groupId>
<artifactId>spring-cloud-starter-openfeign</artifactId>
</dependency>
<!-- order-service依赖 -->
<dependency>
<groupId>com.chenlongji</groupId>
<artifactId>order-service</artifactId>
<version>1.0-SNAPSHOT</version>
</dependency>
</dependencies>
<build>
<plugins>
<!-- SpringBoot项目的打包命令(本演示没使用到) -->
<plugin>
<groupId>org.springframework.boot</groupId>
<artifactId>spring-boot-maven-plugin</artifactId>
</plugin>
</plugins>
</build>
</project>
说明:
- 添加spring-boot-starter-web依赖, 使该项目变成一个web应用
- 添加spring-cloud-starter-alibaba-nacos-discovery依赖, 用于服务注册发现
- 添加spring-cloud-starter-openfeign用于远程调用
- (非必须) 添加order-service进行微服务调用(方便使用微服务的类)
- spring-boot-maven-plugin为SpringBoot项目的打包命令. 本文演示中没使用到
3. 启动类
package com.chenlongji.userservice;

import org.springframework.boot.SpringApplication;
import org.springframework.boot.autoconfigure.SpringBootApplication;
import org.springframework.cloud.openfeign.EnableFeignClients;

/**
 * @author clj
 * 注解@EnableDiscoveryClient说明:
 *    新版Spring Cloud不在需要@EnableDiscoveryClient注解
 *    Dalston.SR4版本及之前主函数上需要添加该注解.
 *    (拓展)可以添加DiscoveryClient的实现到类路径中,这种SpringBoot应用就可以注册到服务发现服务器中
 */
@SpringBootApplication
@EnableFeignClients
//@EnableDiscoveryClient
public class UserServiceApplication {
    public static void main(String[] args) {
        SpringApplication.run(UserServiceApplication.class, args);
    }
}
说明:
- 新版的SpringCloud不再需要使用@EnableDiscoveryClient (Dalston.SR4版本及之前主函数上需要添加该注解)
- 添加@EnableFeignClients注解开启feign功能
4. application.yml配置
server:
  port: 8011

spring:
  application:
    # 应用名, 会作为服务端注册中心的服务名
    name: user-service
  cloud:
    nacos:
      discovery:
        # nacos服务端地址
        server-addr: localhost:8848
        # 命名空间 (不配置则使用默认命名空间public)
        namespace: 013f54f2-582f-4921-a998-46fdabeb0542
        # 分组 (不配置则使用默认的分组DEFAULT_GROUP)
        group: STUDY_GROUP
5. 添加微服务调用的client接口
package com.chenlongji.userservice.client;

import com.chenlongji.orderservice.api.OrderServiceApi;
import org.springframework.cloud.openfeign.FeignClient;

/**
 * @author clj
 * 生产使用 @FeignClient(value = "order-service", url = "http://localhost:8077", contextId = "UserService-OrderServiceClient")
 */
@FeignClient(value = "order-service")
public interface OrderServiceClient extends OrderServiceApi {

}
说明:
- 这里创建的client直接继承需要调用服务的接口, 非常简洁
- @FeignClient的value为需要调用的微服务在注册中心的服务名, 可以使用url配置路径用于本地开发时调用. contextId为feign创建bean的唯一标识
- @FeignClient的详细使用请看: @FeignClient使用详解
6. 添加Controller
package com.chenlongji.userservice.controller;
import com.chenlongji.userservice.client.OrderServiceClient;
import org.springframework.beans.factory.annotation.Autowired;
import org.springframework.web.bind.annotation.GetMapping;
import org.springframework.web.bind.annotation.RequestMapping;
import org.springframework.web.bind.annotation.RestController;
import java.util.Map;
/**
* @author clj
*/
@RestController
@RequestMapping("/user")
public class UserController {
@Autowired
private OrderServiceClient orderServiceClient;
/**
* 请求路径: http://localhost:8011/user/test
*/
@GetMapping("/test")
public String test (){
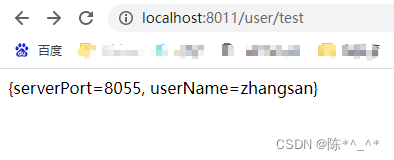
Map<String, String> result = orderServiceClient.createOrder("zhangsan");
return result.toString();
}
}
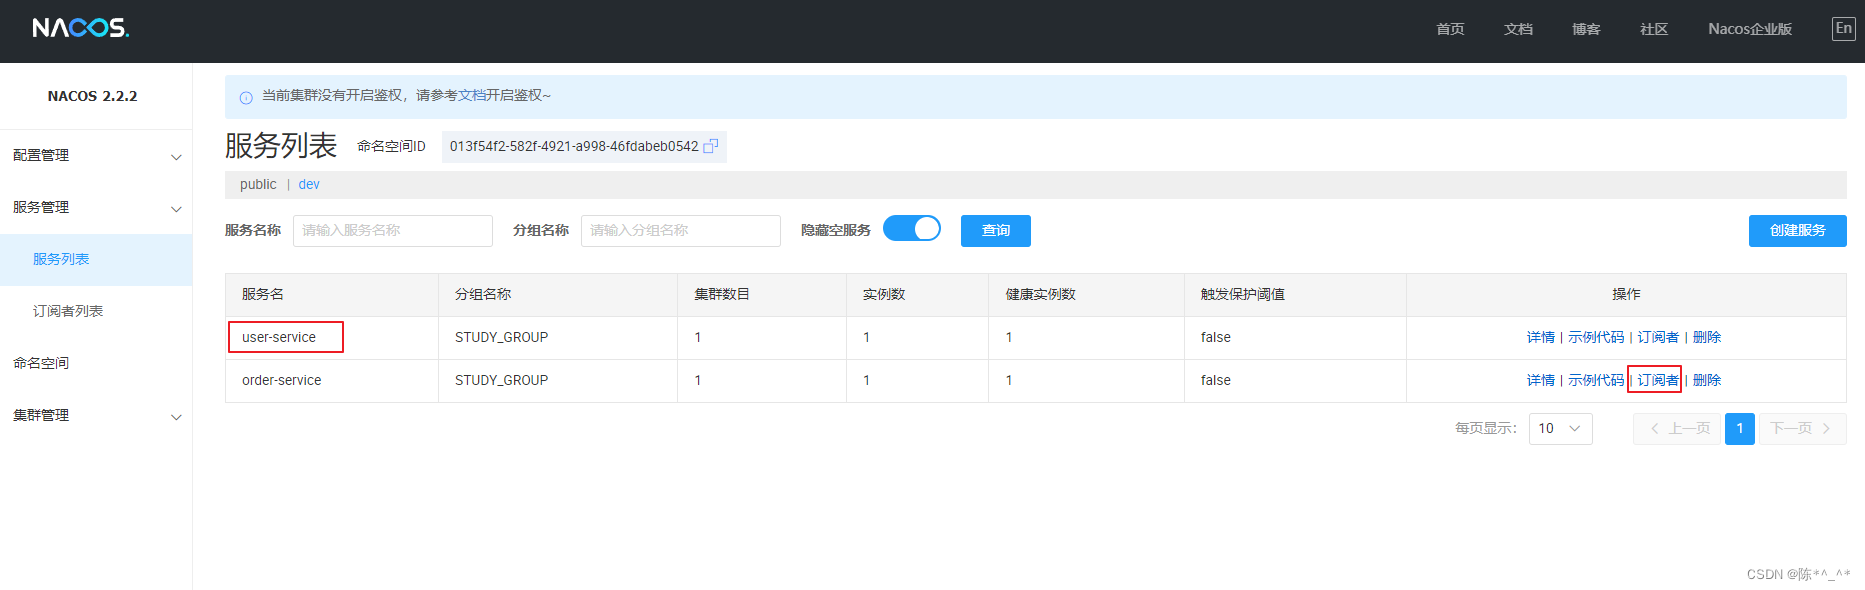
7. 启动项目
调用com.chenlongji.userservice.UserServiceApplication#main, 启动生产者user-service (端口号为8011)
nacos界面如下:
六. 调用测试
调用user-service的接口http://localhost:8011/user/test
查看order-service的控制台日志

到这里注册中心的简单使用就结束了
七. 更多
1. feign + ribbon实现负载均衡
spring-cloud-starter-alibaba-nacos-discovery依赖会导入ribbon的依赖, 搭配feign实现负载均衡
再启动一个order-service服务进行验证
保持之前的order-service和user-service服务运行
修改order-service的端口为8066
修改OrderServiceApplication允许并行运行

再启动一次OrderServiceApplication

查看nacos控制台, 发现order-service有两个实例
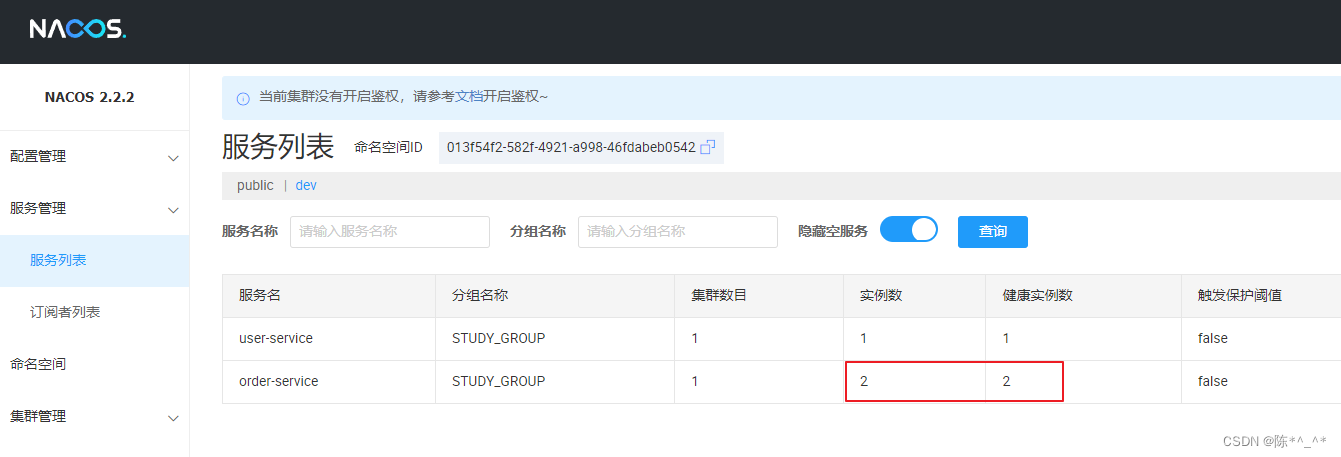
调用两次user-service的接口http://localhost:8011/user/test. 结果如下

由于order-service两个实例的权重为1, 出现了轮询调用


 942
942


 被折叠的 条评论
为什么被折叠?
被折叠的 条评论
为什么被折叠?
 到【灌水乐园】发言


