


Thymeleaf现代的Java模板引擎
Thymeleaf is a modern server-side Java template engine for both web
and standalone environments.Thymeleaf’s main goal is to bring elegant natural templates to your
development workflow — HTML that can be correctly displayed in
browsers and also work as static prototypes, allowing for stronger
collaboration in development teams.With modules for Spring Framework, a host of integrations with your
favourite tools, and the ability to plug in your own functionality,
Thymeleaf is ideal for modern-day HTML5 JVM web development — although
there is much more it can do.
Thymeleaf使用:
引入Starter:
<dependency>
    <groupId>org.springframework.boot</groupId>
    <artifactId>spring-boot-starter-thymeleaf</artifactId>
</dependency>
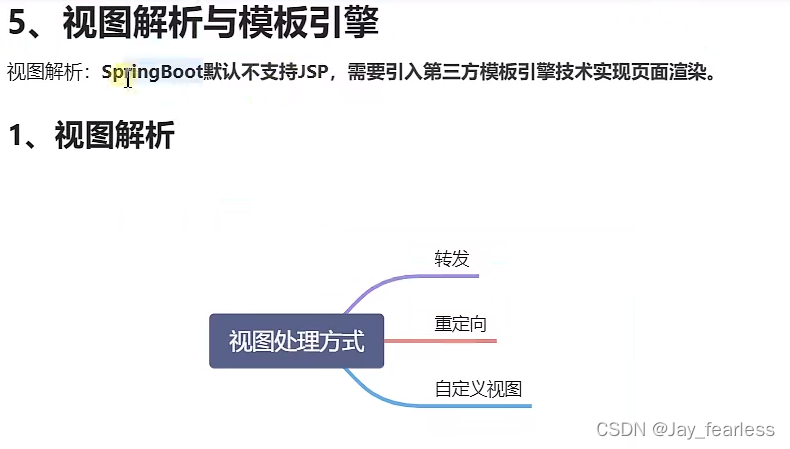
自动配置的策略
- 所有thymeleaf的配置值都在 ThymeleafProperties
- 配置好了 SpringTemplateEngine
- 配好了 ThymeleafViewResolver
- 我们只需要直接开发页面
1.创建一个新的项目
2.配置资源
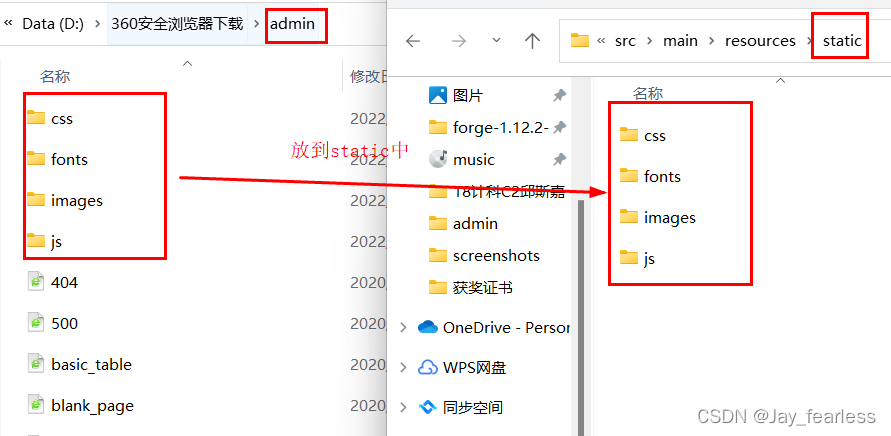
首先下载admin压缩文件(密码:2xc3)并解压:
将文件夹中的资源都放入resources的static包中:
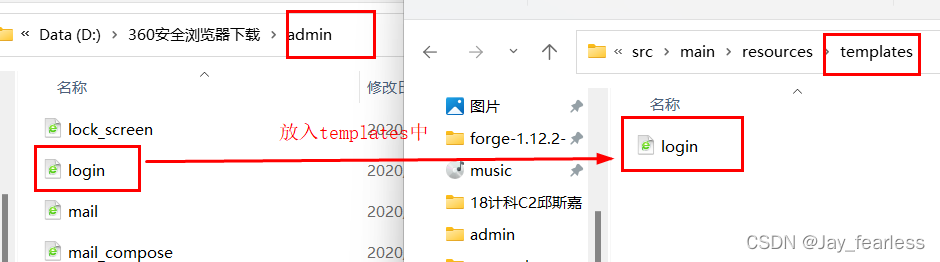
将页面放入templates中:
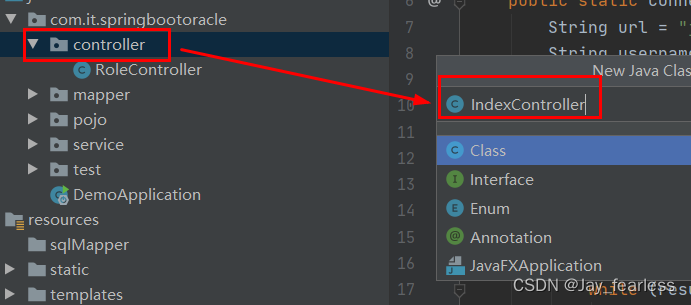
3.在controller包中新建一个IndexController.java作为登录页面的控制层:
package com.it.springbootoracle.controller;

import org.springframework.stereotype.Controller;
import org.springframework.web.bind.annotation.GetMapping;
import org.springframework.web.bind.annotation.PostMapping;

@Controller
public class IndexController {
    /**
     * 来登录页 设置当进入localhost时跳转到登录界面
     * @return
     */
    @GetMapping(value = {"/","/login"})
    public String loginPage(){

        return "login";
    }

//    @PostMapping("/login")
//    public String main(User user, HttpSession session, Model model){ //RedirectAttributes
//
//        if(StringUtils.hasLength(user.getUserName()) && "123456".equals(user.getPassword())){
//            //把登陆成功的用户保存起来
//            session.setAttribute("loginUser",user);
//            //登录成功重定向到main.html;  重定向防止表单重复提交
//            return "redirect:/main.html";
//        }else {
//            model.addAttribute("msg","账号密码错误");
//            //回到登录页面
//            return "login";
//        }
//    }
//
//    /**
//     * 去main页面
//     * @return
//     */
//    @GetMapping("/main.html")
//    public String mainPage(HttpSession session, Model model){
//
//        //最好用拦截器,过滤器
//        Object loginUser = session.getAttribute("loginUser");
//        if(loginUser != null){
//            return "main";
//        }else {
//            //session过期,没有登陆过
//            //回到登录页面
//            model.addAttribute("msg","请重新登录");
//            return "login";
//        }
//    }

}
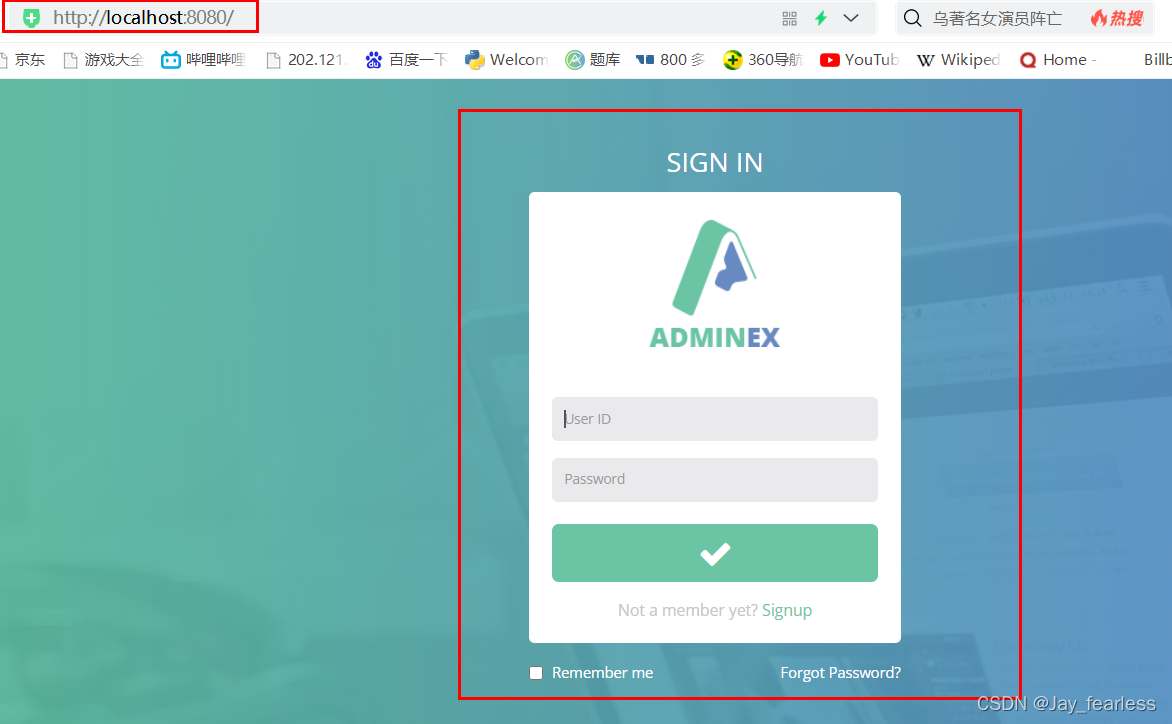
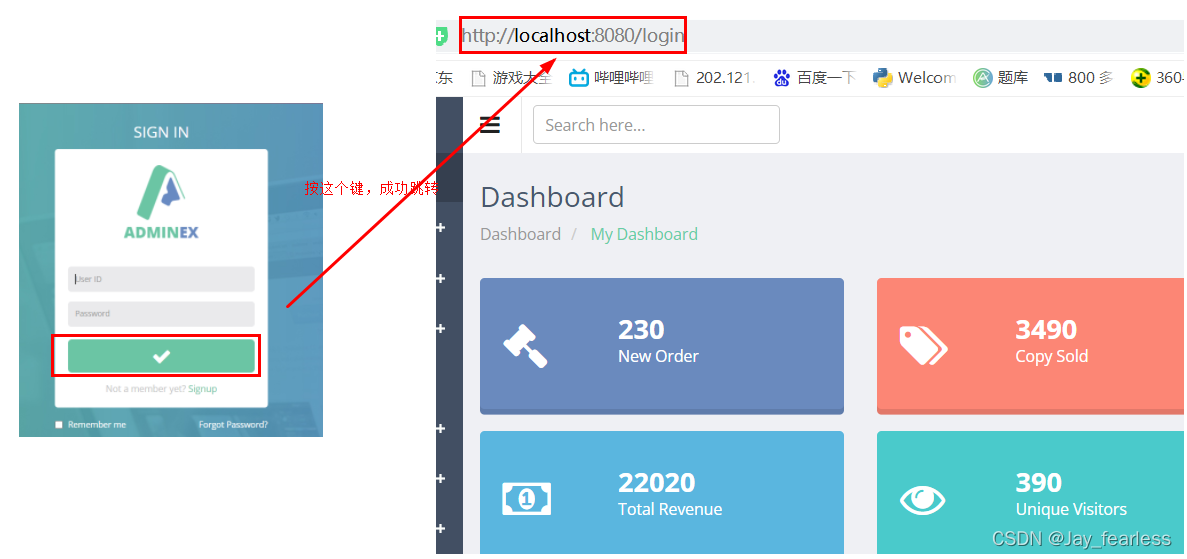
4.运行项目,输入http://localhost:8080/,成功登录访问页面:
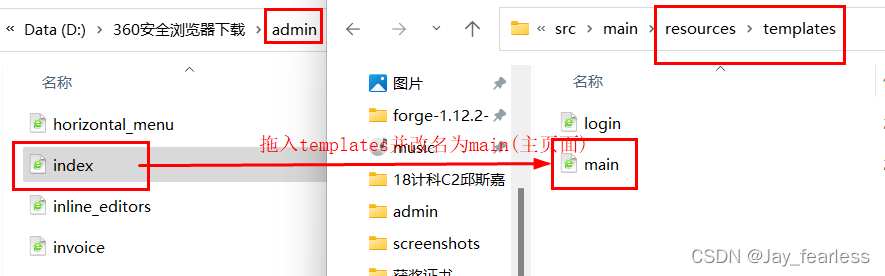
5.之后进行主页面的编辑(登录页面后跳转的页面就是主页面)
首先将index页面放入templates并改名为main:
找到之前的login.html:
lang="en"后添加xmlns:th="http://www.thymeleaf.org
action="index.html"后添加th语句:method="post" th:action="@{/login}"
<!DOCTYPE html>
<html lang="en" xmlns:th="http://www.thymeleaf.org">
<head>
<meta charset="utf-8">
<meta name="viewport" content="width=device-width, initial-scale=1.0, maximum-scale=1.0">
<meta name="description" content="">
<meta name="author" content="ThemeBucket">
<link rel="shortcut icon" href="#" type="image/png">
<title>Login</title>
<link href="css/style.css" rel="stylesheet">
<link href="css/style-responsive.css" rel="stylesheet">
<!-- HTML5 shim and Respond.js IE8 support of HTML5 elements and media queries -->
<!--[if lt IE 9]>
<script src="js/html5shiv.js"></script>
<script src="js/respond.min.js"></script>
<![endif]-->
</head>
<body class="login-body">
<div class="container">
<form class="form-signin" action="index.html" method="post" th:action="@{/login}">
<div class="form-signin-heading text-center">
<h1 class="sign-title">Sign In</h1>
<img src="images/login-logo.png" alt=""/>
</div>
<div class="login-wrap">
<input type="text" class="form-control" placeholder="User ID" autofocus>
<input type="password" class="form-control" placeholder="Password">
<button class="btn btn-lg btn-login btn-block" type="submit">
<i class="fa fa-check"></i>
</button>
<div class="registration">
Not a member yet?
<a class="" href="registration.html">
Signup
</a>
</div>
<label class="checkbox">
<input type="checkbox" value="remember-me"> Remember me
<span class="pull-right">
<a data-toggle="modal" href="#myModal"> Forgot Password?</a>
</span>
</label>
</div>
<!-- Modal -->
<div aria-hidden="true" aria-labelledby="myModalLabel" role="dialog" tabindex="-1" id="myModal" class="modal fade">
<div class="modal-dialog">
<div class="modal-content">
<div class="modal-header">
<button type="button" class="close" data-dismiss="modal" aria-hidden="true">×</button>
<h4 class="modal-title">Forgot Password ?</h4>
</div>
<div class="modal-body">
<p>Enter your e-mail address below to reset your password.</p>
<input type="text" name="email" placeholder="Email" autocomplete="off" class="form-control placeholder-no-fix">
</div>
<div class="modal-footer">
<button data-dismiss="modal" class="btn btn-default" type="button">Cancel</button>
<button class="btn btn-primary" type="button">Submit</button>
</div>
</div>
</div>
</div>
<!-- modal -->
</form>
</div>
<!-- Placed js at the end of the document so the pages load faster -->
<!-- Placed js at the end of the document so the pages load faster -->
<script src="js/jquery-1.10.2.min.js"></script>
<script src="js/bootstrap.min.js"></script>
<script src="js/modernizr.min.js"></script>
</body>
</html>
6.在IndexController中添加一下跳转页面语句:
    @PostMapping("/login")
    public String main(String username,String password){
        return "main";
    }
启动项目,测试启动情况
7.为进一步测试,在bean包下新建一个User类:
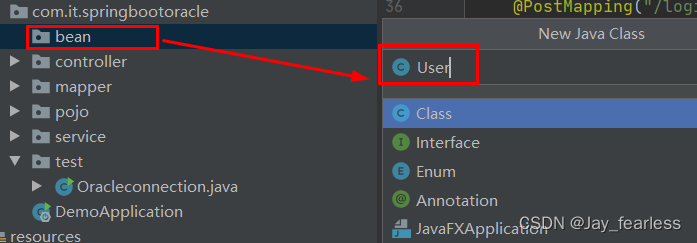
User.java
package com.it.springbootoracle.bean;

import lombok.Data;

@Data
public class User {
    private String userName;
    private String password;

	public String getUserName() {
        return userName;
    }

    public String getPassword() {
        return password;
    }
}
进入到login.html -> 在30行左右找到div class="login-wrap"字段,在其下方添加:
        <div class="login-wrap">
        	<label style="color: red" th:text="${msg}"></label>
            <input type="text" name="userName" class="form-control" placeholder="User ID" autofocus>
            <input type="password" name="password" class="form-control" placeholder="Password">
回到IndexController.java:
package com.it.springbootoracle.controller;

import com.it.springbootoracle.bean.User;
import org.springframework.stereotype.Controller;
import org.springframework.ui.Model;
import org.springframework.util.StringUtils;
import org.springframework.web.bind.annotation.GetMapping;
import org.springframework.web.bind.annotation.PostMapping;

import javax.servlet.http.HttpSession;
@Controller
public class IndexController {
    /**
     * 来登录页
     * @return
     */
    @GetMapping(value = {"/","/login"})
    public String loginPage(){

        return "login";
    }

    @PostMapping("/login")
    public String main(User user, HttpSession session, Model model){ //RedirectAttributes

        if(StringUtils.hasLength(user.getUserName()) && "123456".equals(user.getPassword())){
            //把登陆成功的用户保存起来
            session.setAttribute("loginUser",user);
            //登录成功重定向到main.html;  重定向防止表单重复提交
            return "redirect:/main.html";
        }else {
            model.addAttribute("msg","账号密码错误");
            //回到登录页面
            return "login";
        }
    }

    /**
     * 去main页面
     * @return
     */
    @GetMapping("/main.html")
    public String mainPage(HttpSession session, Model model){

        //最好用拦截器,过滤器
        Object loginUser = session.getAttribute("loginUser");
        if(loginUser != null){
            return "main";
        }else {
            //session过期,没有登陆过
            //回到登录页面
            model.addAttribute("msg","请重新登录");
            return "login";
        }
    }

}
测试登录的各种情况:

修改主页用户名
在main.html中找到John Doe名称(370行左右),用Thymeleaf的行内命名法进行替换
<a href="#" class="btn btn-default dropdown-toggle" data-toggle="dropdown">
    <img src="images/photos/user-avatar.png" alt="" />
        [[${session.loginUser.userName}]]
    <span class="caret"></span>
</a>
ctrl+F9刷新html文件
进入到主界面,发现名称已经更新。


 1942
1942


 被折叠的 条评论
为什么被折叠?
被折叠的 条评论
为什么被折叠?
 到【灌水乐园】发言


