


3. 实验内容
3.1 Nginx安装和部署
Nginx 是一款轻量级的 Web 服务器/反向代理服务器及电子邮件(IMAP/POP3)代理服务器。
本实验要求安装和部署 web 服务器 Nginx,实现最基本的静态网页和动态网页访问。网页内容不限。
参考资料:
https://nginx.org/en/download.html
https://blog.csdn.net/qq_33454884/article/details/89212702
3.2 Apache安装和部署
Apache 是最流行的 Web 服务器端软件之一。它快速、稳定。
本实验要求安装和部署 web 服务器 Apache,实现最基本的静态网页和动态网页访问。网页内容不限。
参考资料:
https://www.apache.org/
https://blog.csdn.net/weixin_42709659/article/details/81938176
4、实验结果与分析
4.1 Nginx安装和部署
4.1.1 安装Nginx
4.1.1.1 添加源
默认情况Centos7中无Nginx的源,要执行以下命令添加源
rpm -Uvh http://nginx.org/packages/centos/7/noarch/RPMS/nginx-release-centos-7-0.el7.ngx.noarch.rpm

4.1.1.2 安装Nginx
通过以下命令查看是否加源成功
yum search nginx
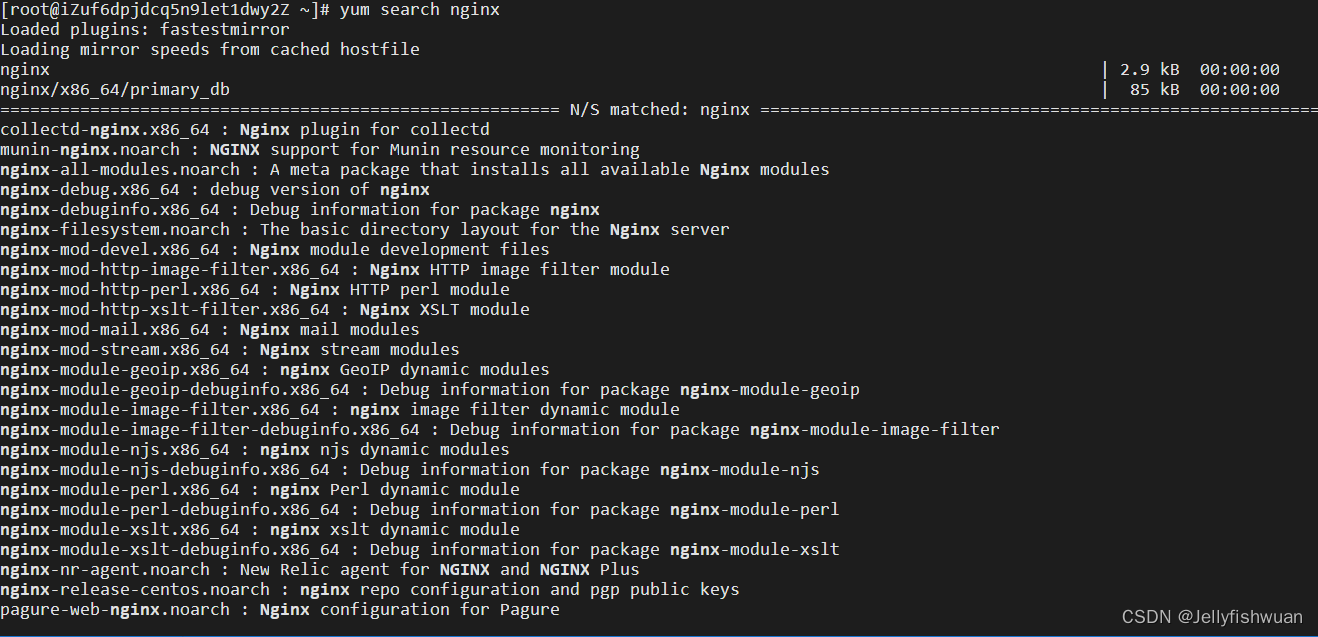
下载nginx
yum install -y nginx

4.1.2 检测Nginx是否安装成功
nginx -t
![[外链图片转存失败,源站可能有防盗链机制,建议将图片保存下来直接上传(img-o3ihRqcm-1686213812676)(C:\Users\ASUS\AppData\Roaming\Typora\typora-user-images\image-20230606123723661.png)]](https://img-blog.csdnimg.cn/a29194fb0741440a8be714a2e6ff28a2.png)
4.1.3 启动nginx
sudo systemctl start nginx
出现报错
Job for nginx.service failed because the control process exited with error code. See "systemctl status nginx.service" and "journalctl -xe" for details.
输入命令,查看服务状态。
systemctl status nginx.service
由输出的状态日志(即下图画黄色框的部分)可知,80端口被占用导致启动失败

4.1.3.1 查看80端口被哪些程序所占用,输入如下命令
netstat -nap | grep 80
4.1.3.2 杀掉被占用的端口进程号,再次查看80端口是否有被占用,输入如下命令
kill -9 pid//pid为具体端口号
![[外链图片转存失败,源站可能有防盗链机制,建议将图片保存下来直接上传(img-pZawQLDq-1686213812677)(C:\Users\ASUS\AppData\Roaming\Typora\typora-user-images\image-20230606125545408.png)]](https://img-blog.csdnimg.cn/ec6d8067991d4a788bb9137496a62ce8.png)
4.1.3.3 重启nginx服务,报错消失,再查看nginx服务状态显示successful。
systemctl start nginx

systemctl status nginx.service
![[外链图片转存失败,源站可能有防盗链机制,建议将图片保存下来直接上传(img-EF7MoBg2-1686213812678)(C:\Users\ASUS\AppData\Roaming\Typora\typora-user-images\image-20230606125646234.png)]](https://img-blog.csdnimg.cn/93292cef9dff437291149a4bcf65f7be.png)
4.1.4 浏览查看效果
执行命令,curl后面加上阿里云的ECS公网地址,若出现如下界面,则安装成功。

4.1.5 修改配置文件
4.1.5.1 切换至nginx服务的默认配置文件目录
cd /etc/nginx/conf.d
4.1.5.2 修改default.conf文件
vim default.conf

修改配置,项目指向到自己的自定义项目目录下

4.1.5 自定义项目网页
4.1.5.1 在刚刚修改的目录root/web下创建自定义html文件
mkdir /root/web
cd /root/web
vim index.html
![[外链图片转存失败,源站可能有防盗链机制,建议将图片保存下来直接上传(img-2oNWQ0xf-1686213812679)(C:\Users\ASUS\AppData\Roaming\Typora\typora-user-images\image-20230607205328824.png)]](https://img-blog.csdnimg.cn/670d818f1e59456f8b9f9639d6ad3e07.png)
4.1.5.2 重启服务
service nginx restart
![[外链图片转存失败,源站可能有防盗链机制,建议将图片保存下来直接上传(img-2XVxPuI7-1686213812679)(C:\Users\ASUS\AppData\Roaming\Typora\typora-user-images\image-20230607204232467.png)]](https://img-blog.csdnimg.cn/9fbc80b2d1ad4ab0bcaacf80f0108264.png)
(1)运行之后结果出现403报错
![[外链图片转存失败,源站可能有防盗链机制,建议将图片保存下来直接上传(img-U5aCLI3z-1686213812680)(C:\Users\ASUS\AppData\Roaming\Typora\typora-user-images\image-20230607204356749.png)]](https://img-blog.csdnimg.cn/184cffcf1d124636a12d6a6d3a9bd5a8.png)
(2)查看root权限
ll
![[外链图片转存失败,源站可能有防盗链机制,建议将图片保存下来直接上传(img-oT5EuPgH-1686213812680)(C:\Users\ASUS\AppData\Roaming\Typora\typora-user-images\image-20230607204850663.png)]](https://img-blog.csdnimg.cn/9043fa9c19aa42dcb103b9ce46e78c2a.png)
(3)修改文件权限
chmod 777 /root
![[外链图片转存失败,源站可能有防盗链机制,建议将图片保存下来直接上传(img-Y5OMZjz1-1686213812681)(C:\Users\ASUS\AppData\Roaming\Typora\typora-user-images\image-20230607205019405.png)]](https://img-blog.csdnimg.cn/171859a836fb4806b259df02cf32f58d.png)
4.1.5.3 再次重启服务,运行命令成功访问界面。
curl 139.224.232.155
![[外链图片转存失败,源站可能有防盗链机制,建议将图片保存下来直接上传(img-ObWPfaXY-1686213812683)(C:\Users\ASUS\AppData\Roaming\Typora\typora-user-images\image-20230607205408229.png)]](https://img-blog.csdnimg.cn/6a508499c8944c3aba12ad013996554f.png)
4.2 Apache安装和部署
4.2.1 安装Apache
4.2.1.1下载Apache
yum install httpd -y

4.2.1.2 安装 Apache HTTP Server 的手册文档
yum install httpd-manual

4.2.1.3 启动Apache HTTP服务器
systemctl start httpd
systemctl enable httpd
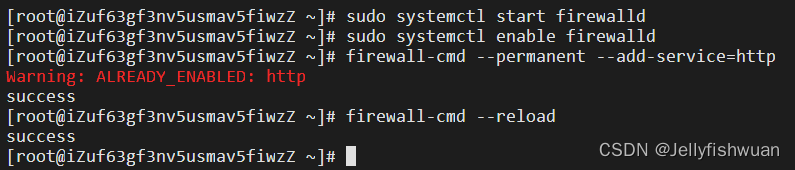
4.2.2 在防火墙中永久性地添加HTTP服务的规则
4.2.2.1 启动防火墙服务
sudo systemctl start firewalld
sudo systemctl enable firewalld
4.2.2.2 设置火墙永久允许http通过
firewall-cmd --permanent --add-service=http
4.2.2.3 使用以下命令来使规则生效:
firewall-cmd --reload
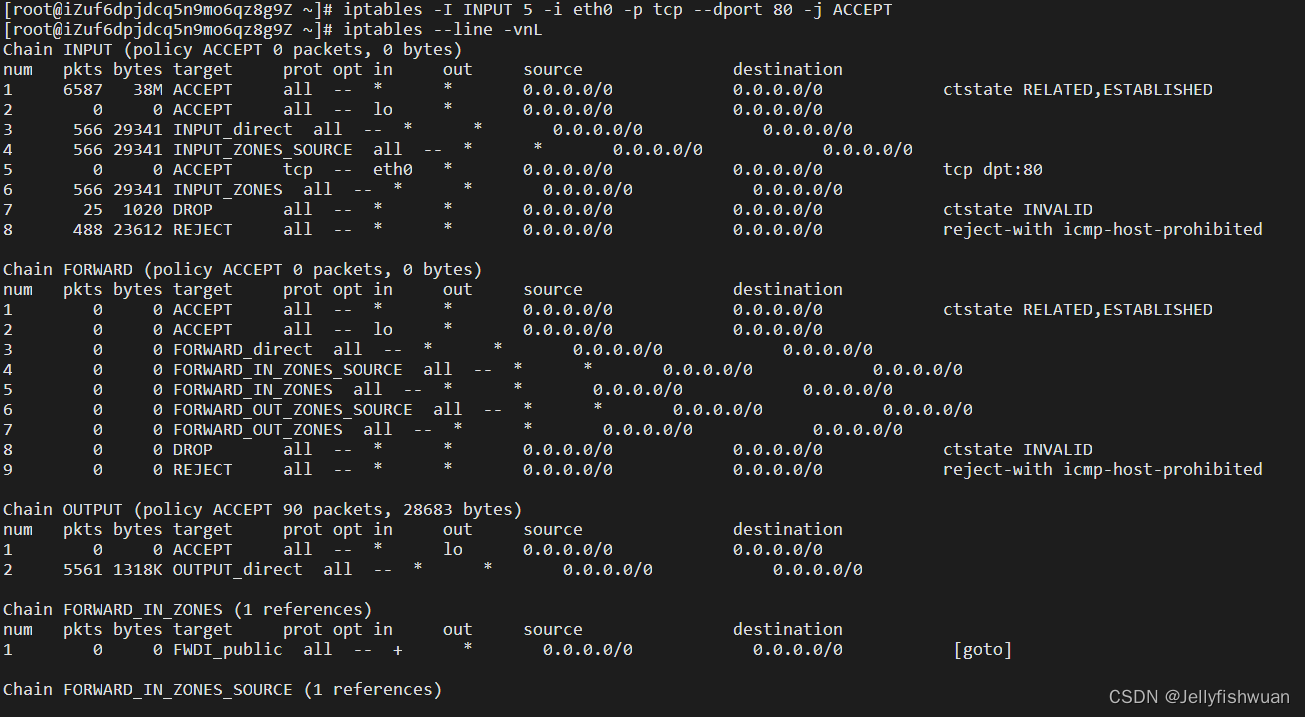
4.2.2.4 修改系统防火墙配置文件,在第五行配置中增加允许80端口监听外来ip
iptables -I INPUT 5 -i eth0 -p tcp --dport 80 -j ACCEPT
4.2.2.5 查看配置文件的内容
iptables --line -vnL
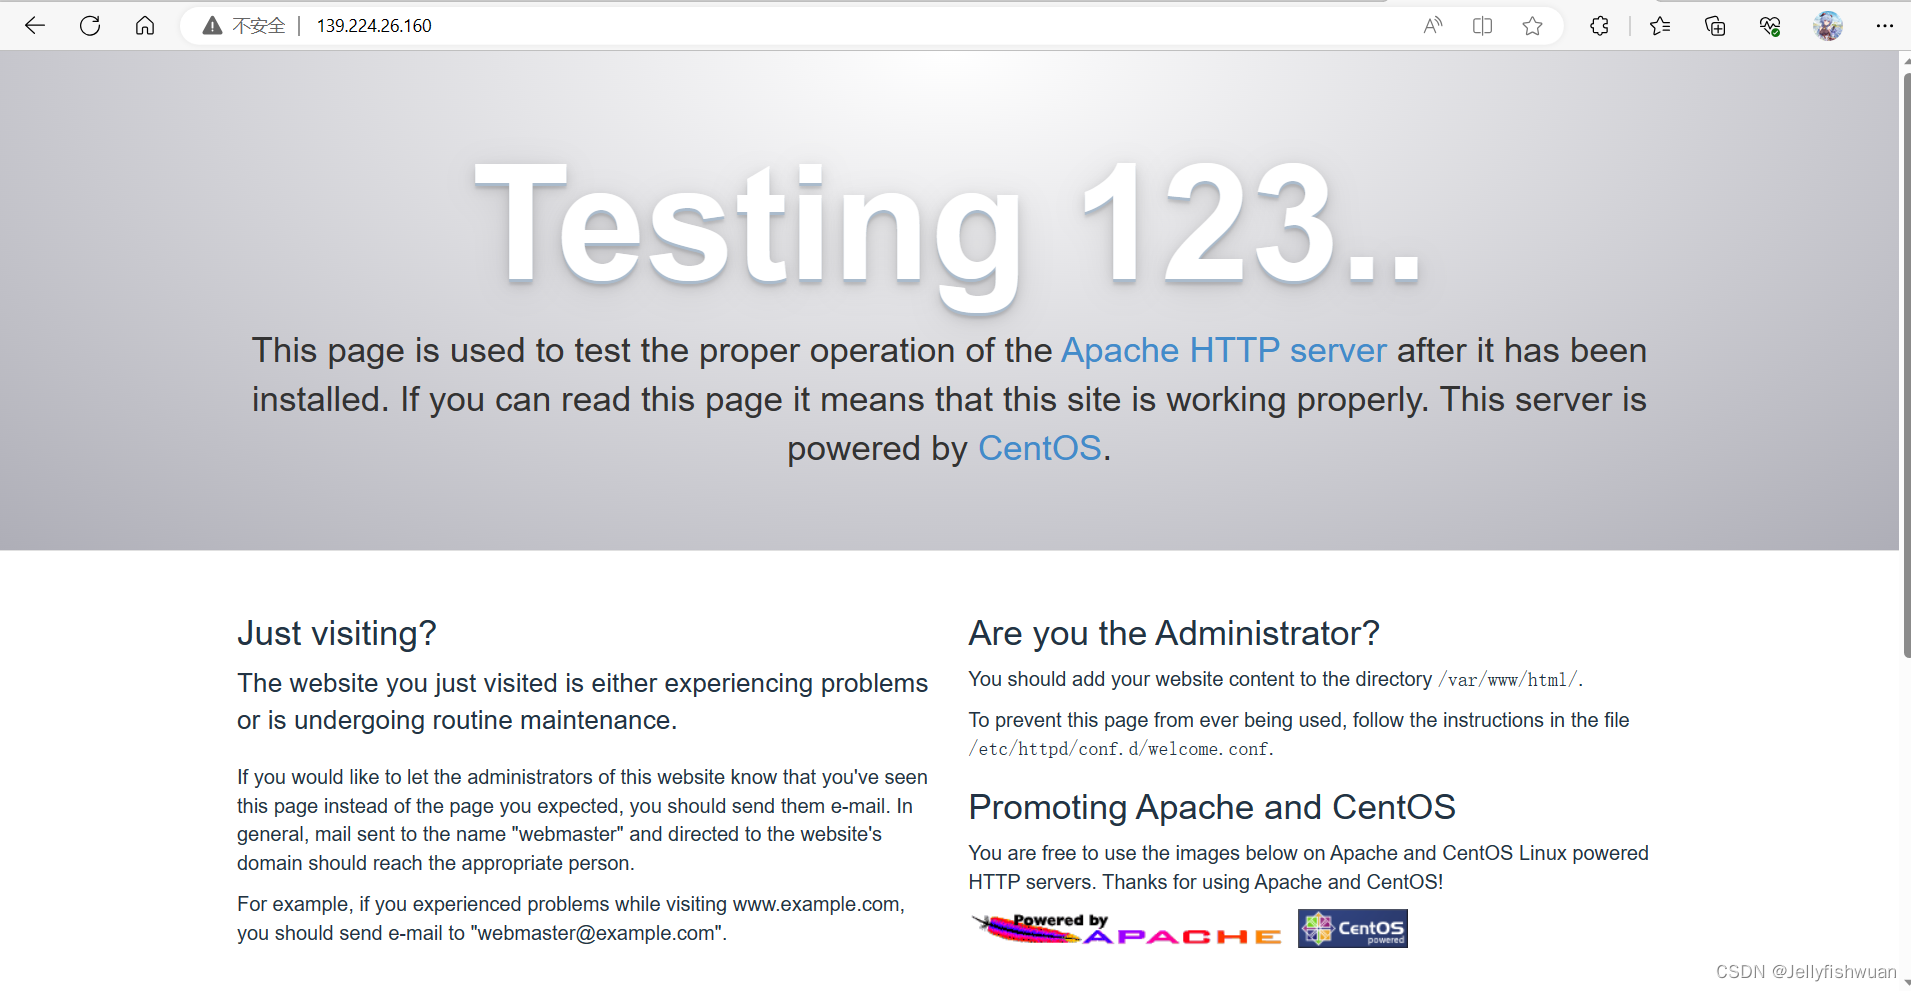
4.2.3 浏览查看效果
执行命令,curl后面加上阿里云的ECS公网地址,若出现如下界面,则安装成功。
或者在浏览器中输入阿里云ECS公网地址,若出现如下界面,则安装启动成功。
4.2.4 修改配置文件
将DocumentRoot参数修改为/home/wwwroot,再把/var/www修改为/home/wwwroot
vim /etc/httpd/conf/httpd.conf

修改配置,项目指向到自己的自定义项目目录下

4.2.5 自定义项目网页
4.2.5.1 在刚刚修改的目录root/web下创建自定义html文件
mkdir /home/wwwroot
 echo "Hello World"> /home/wwwroot/index.html
![[外链图片转存失败,源站可能有防盗链机制,建议将图片保存下来直接上传(img-efN5ASCr-1686213812684)(C:\Users\ASUS\AppData\Roaming\Typora\typora-user-images\image-20230608162453642.png)]](https://img-blog.csdnimg.cn/515a79517c0244abbd770e2897cfc33f.png)
4.2.5.2 重启服务
systemctl restart httpd
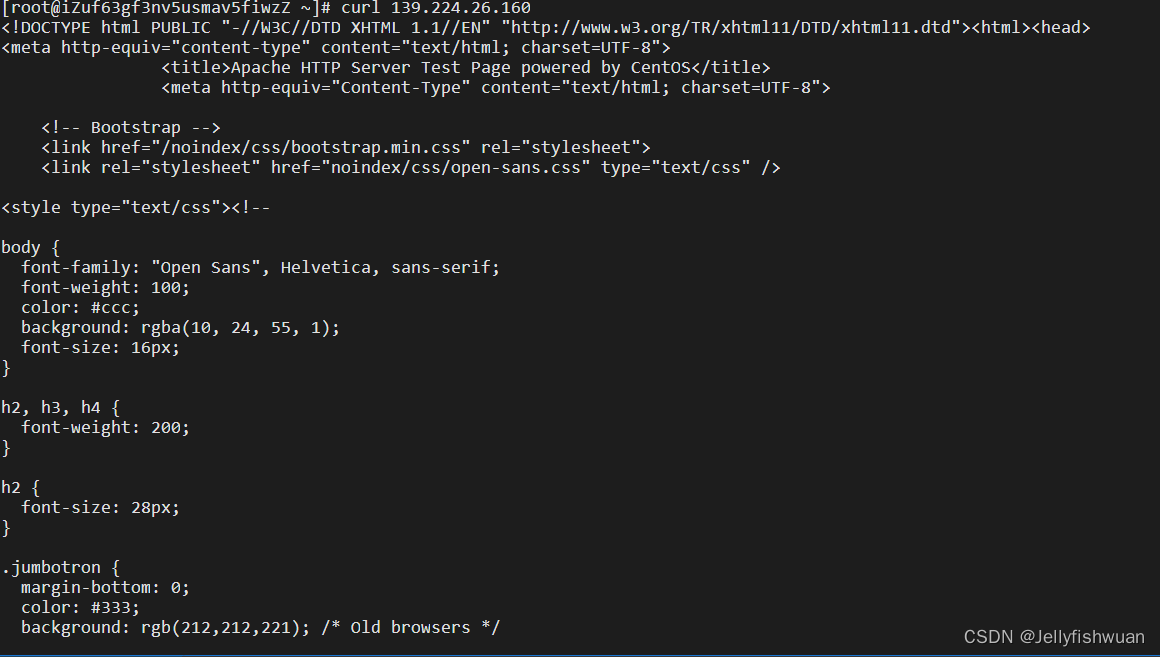
4.2.5.3 运行命令,成功访问界面
curl 139.224.26.160
![[外链图片转存失败,源站可能有防盗链机制,建议将图片保存下来直接上传(img-aoBt7Oyd-1686213812684)(C:\Users\ASUS\AppData\Roaming\Typora\typora-user-images\image-20230608162739477.png)]](https://img-blog.csdnimg.cn/54aac8ca2efd4d289dac64945d883866.png)
PS:在本次实验中我只用nginx和apache部署了静态界面,动态界面的部署遇到了困难,请大佬救救。


 2884
2884


 被折叠的 条评论
为什么被折叠?
被折叠的 条评论
为什么被折叠?
 到【灌水乐园】发言


