


本文是在已大致了解tvm功能和架构的基础上,根据官方文档,在x86-64 Ubuntu 18.04,GPU,Pytorch1.8.0上安装TVM的流程。
参考文档
1.下载源代码
从tvm官网下载源代码(建议),或者可通过github下载
git clone --recursive https://github.com/apache/incubator-tvm tvm
2.构建依赖库
统一tvm所需要的环境,包括Python,gcc,cmake等,有则更新无则下载(此步可省略,运行时如果报错缺失包再安装)
sudo apt-get update
sudo apt-get install -y python3 python3-dev python3-setuptools gcc libtinfo-dev zlib1g-dev build-essential cmake libedit-dev libxml2-dev
3.构建
3.1复制并更改编译参数
从tvm/cmake/文件夹下复制config.cmake到新创建的build目录(tvm子目录)下
mkdir build
cp cmake/config.cmake build

3.2下载llvm
3.2.1下载/编译
从官网下载对应的,已经构建好的(Pre-Built Binaries)的版本,我下载的是llvm9.0.0的Ubuntu18.04版本

解压
xz -d clang+llvm-xxx.tar.xz
tar -xf clang+llvm-xxx.tar
一些平台的型号并不在llvm pre-built列表中(如x64-redhat,安装不匹配版本执行会出现segmentation fault),此时需要下载llvm的源码进行编译安装,过程也比较简单,记录如下(需要提前安装clang):
wget https://github.com/llvm/llvm-project/releases/download/llvmorg-9.0.1/llvm-9.0.1.src.tar.xz
xz -d llvm-9.0.1.src.tar.xz
tar -xf llvm-9.0.1.src.tar
cd llvm-9.0.1.src/
mkdir build
cmake -DCMAKE_BUILD_TYPE=DEBUG -DLLVM_TARGETS_TO_BUILD="X86" -DLLVM_ENABLE_PROJECTS="clang"  -DLLVM_OPTIMIZED_TABLEGEN=ON -DLLVM_INCLUDE_TESTS=OFF ..
make
make install
3.2.2添加路径
tvm目录下build目录下的config.cmake文件的set(USE_LLVM OFF)改为set(USE_LLVM path)
path是llvm文件下bin文件下llvm_config的路径,例如
set(USE_LLVM /path/to/your/llvm/bin/llvm-config)
3.3构建运行(tvm目录下)
cd build
cmake ..
make -j64
如果遇到gcc/g++版本不匹配的问题(一般需要cstd-17)需要安装新版本的gcc/g++,并且在CMakeLists.txt中指定编译器
set(CMAKE_C_COMPILER /pathtogcc/bin/gcc)
set(CMAKE_CXX_COMPILER /pathtogcc/bin/g++)
3.4修改Python环境
修改Python环境,加入tvm路径
在根目录下的.bashrc文件末尾,加入如下两行
export TVM_HOME=/path/to/tvm # 你的TVM的绝对路径
export PYTHONPATH=$TVM_HOME/python:${PYTHONPATH}
3.5加入c++ test(tvm目录下,不必需,可省略)
git clone https://github.com/google/googletest
cd googletest
mkdir build
cd build
cmake ..
make
sudo make install
4测试tutorial
可以运行tvm目录下自带的tutorials文件中,与自身硬件相匹配的程序(我选的是from_onnx.py从onnx中导出模型)。必须使用python3,如果有模块未安装,使用pip3
5.遇到问题汇总
make -j4过程遇到
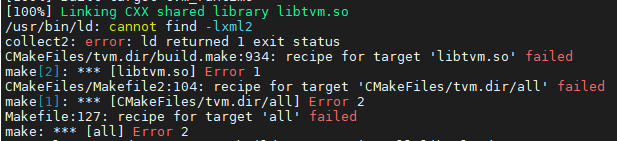
解决:缺啥装啥,安装xml2-dev
apt-get install libxml2-dev
此外还有
apt-get install libtinfo-dev #缺linfo
apt-get install zlib1g-dev   #缺lz
- Python导入不进来

python3.7以上版本才能用,
wget https://www.python.org/ftp/python/3.7.0/Python-3.7.0.tgz
tar -zxvf Python-3.7.0.tgz
mkdir /usr/local/python3_7
cd Python-3.7.0
./configure --prefix=/usr/local/python3_7
make && make install
ln -s /usr/local/python3_7/bin/python3.7 /usr/bin/python3_7
ln -s /usr/local/python3_7/bin/pip3.7 /usr/bin/pip3
- No module named ‘_ctypes’
apt-get install libffi-dev
重新编译Python(./configure make&& make install)
- numpy装不上
报错:Could not fetch URL
解决方案:更改镜像源
pip3 install --upgrade pip -i http://pypi.douban.com/simple --trusted-host pypi.douban.com
pip3 install numpy -i http://pypi.douban.com/simple --trusted-host pypi.douban.com
pip3 install decorator -i http://pypi.douban.com/simple --trusted-host pypi.douban.com
pip install xgboost==1.5.0 -i http://pypi.douban.com/simple --trusted-host pypi.douban.com # TVM调优时会用到xgboost模型,版本建议1.5.0
pip3 install torch==1.8.0 -i http://pypi.douban.com/simple --trusted-host pypi.douban.com
pip3 install scipy -i http://pypi.douban.com/simple --trusted-host pypi.douban.com
pip3 install attrs -i http://pypi.douban.com/simple --trusted-host pypi.douban.com
pip3 install Pillow -i http://pypi.douban.com/simple --trusted-host pypi.douban.com
此外还有
http://mirrors.aliyun.com/pypi/simple/ 阿里云

https://pypi.mirrors.ustc.edu.cn/simple/  中国科技大学

http://pypi.douban.com/simple/  豆瓣

https://pypi.tuna.tsinghua.edu.cn/simple/ 清华大学
- autotuning时遇到
RuntimeError: Cannot find any valid schedule for xxx
问题是没有安装cloudpickle包
在使用cmake编译工具的时候,报错
CMake Error at /path/to/cmake/share/cmake-3.20/Modules/CMakeTestCCompiler.cmake:66 (message):
  The C compiler

    "/usr/bin/cc"

  is not able to compile a simple test program.
解决方法:
cmake后面加入下面两个选项
-DCMAKE_CXX_COMPILER=KaTeX parse error: Double subscript at position 22: … g++) -DCMAKE_C_̲COMPILER=(which gcc)
import tvm
import pytorch
free(): invalid pointer
已放弃 (核心已转储)
原因:PyTorch中的LLVM与TVM中的LLVM版本不匹配,只需将TVM中的LLVM动态链接取消即可
解决方案:在config.cmake中修改添加:
set(USE_LLVM "path-to-llvm/bin/llvm-config --link-static")
set(HIDE_PRIVATE_SYMBOLS ON)


 1402
1402


 被折叠的 条评论
为什么被折叠?
被折叠的 条评论
为什么被折叠?
 到【灌水乐园】发言


