


准备训练数据
使用darknet训练自己的YOLO模型需要将数据转成darknet需要的格式,每张图片对应一个.txt的label文件,文件格式如下:
<object-class> <x> <y> <width> <height>object-class是类的索引,后面的4个值都是相对于整张图片的比例。
x是ROI中心的x坐标,y是ROI中心的y坐标,width是ROI的宽,height是ROI的高。
我需要用到Pascal VOC、MSCOCO、ImageNet和自己标记的一些图片。
混用这些数据集有一个严重的问题,有一些需要标记的物体没有被标记。
如ImageNet的200种物体中有iPod并做了标记,而MSCOCO中有一些图片中有iPod却没有标记出来,这会导致模型的精度下降。该问题可以通过对这部分图片重新标记来解决(工作量很大);也可以修改损失函数,对不同数据集的image计算不同的损失,同时针对不同数据集中的数据使用不同的object_scale和noobject_scale。
整合这些数据集首先要准备一个list,list中列出了要识别的物体。
如paul_list.txt
0,ambulance
1,apple
2,automat
3,backpack
4,baggage
5,banana
6,baseball
7,basketball
8,bed
9,bench
转换Pascal VOC
darknet作者提供了voc_label.py脚本来实现该功能,我们只需修改脚本中的classes为我们需要的classes即可,然后在VOCdevkit的父目录执行voc_label.py即可。
classes = ["ambulance", "apple", "automat", "backpack", "baggage", "banana", "baseball", "basketball", "bed","bench"]转换MSCOCO
查看coco的80种物体有哪些是我们需要的,制作coco_list.txt,格式为,。如:
1,apple
3,backpack
5,banana
8,bed
9,bench 安装MSCOCO提供的Python API库,然后执行coco_label.py。
coco_label.py见github。
https://github.com/PaulChongPeng/darknet/blob/master/tools/coco_label.py
执行脚本前需要修改dataDir和classes为自己的COCO数据集路径和coco_list.txt路径
# coding=utf-8
# 使用说明
# 需要先安装coco tools
# git clone https://github.com/pdollar/coco.git
# cd coco/PythonAPI
# make install(可能会缺少相关依赖,根据提示安装依赖即可)
# 执行脚本前需在train2014和val2014目录下分别创建JPEGImages和labels目录,并将原来train2014和val2014目录下的图片移到JPEGImages下
# COCO数据集的filelist目录下会生成图片路径列表
# COCO数据集的子集的labels目录下会生成yolo需要的标注文件


from pycocotools.coco import COCO
import shutil
import os


# 将ROI的坐标转换为yolo需要的坐标
# size是图片的w和h
# box里保存的是ROI的坐标(x,y的最大值和最小值)
# 返回值为ROI中心点相对于图片大小的比例坐标,和ROI的w、h相对于图片大小的比例
def convert(size, box):
    dw = 1. / size[0]
    dh = 1. / size[1]
    x = box[0] + box[2] / 2.0
    y = box[1] + box[3] / 2.0
    w = box[2]
    h = box[3]
    x = x * dw
    w = w * dw
    y = y * dh
    h = h * dh
    return (x, y, w, h)


# 获取所需要的类名和id
# path为类名和id的对应关系列表的地址(标注文件中可能有很多类,我们只加载该path指向文件中的类)
# 返回值是一个字典,键名是类名,键值是id
def get_classes_and_index(path):
    D = {}
    f = open(path)
    for line in f:
        temp = line.rstrip().split(',', 2)
        print("temp[0]:" + temp[0] + "\n")
        print("temp[1]:" + temp[1] + "\n")
        D[temp[1]] = temp[0]
    return D


dataDir = '/mnt/large4t/pengchong_data/Data/COCO'  # COCO数据集所在的路径
dataType = 'train2014'  # 要转换的COCO数据集的子集名
annFile = '%s/annotations/instances_%s.json' % (dataDir, dataType)  # COCO数据集的标注文件路径
classes = get_classes_and_index('/mnt/large4t/pengchong_data/Tools/Yolo_paul/darknet/data/coco_list.txt')

# labels 目录若不存在,创建labels目录。若存在,则清空目录
if not os.path.exists('%s/%s/labels/' % (dataDir, dataType)):
    os.makedirs('%s/%s/labels/' % (dataDir, dataType))
else:
    shutil.rmtree('%s/%s/labels/' % (dataDir, dataType))
    os.makedirs('%s/%s/labels/' % (dataDir, dataType))

# filelist 目录若不存在,创建filelist目录。
if not os.path.exists('%s/filelist/' % dataDir):
    os.makedirs('%s/filelist/' % dataDir)

coco = COCO(annFile)  # 加载解析标注文件
list_file = open('%s/filelist/%s.txt' % (dataDir, dataType), 'w')  # 数据集的图片list保存路径

imgIds = coco.getImgIds()  # 获取标注文件中所有图片的COCO Img ID
catIds = coco.getCatIds()  # 获取标注文件总所有的物体类别的COCO Cat ID

for imgId in imgIds:
    objCount = 0  # 一个标志位,用来判断该img是否包含我们需要的标注
    print('imgId :%s' % imgId)
    Img = coco.loadImgs(imgId)[0]  # 加载图片信息
    print('Img :%s' % Img)
    filename = Img['file_name']  # 获取图片名
    width = Img['width']  # 获取图片尺寸
    height = Img['height']  # 获取图片尺寸
    print('filename :%s, width :%s ,height :%s' % (filename, width, height))
    annIds = coco.getAnnIds(imgIds=imgId, catIds=catIds, iscrowd=None)  # 获取该图片对应的所有COCO物体类别标注ID
    print('annIds :%s' % annIds)
    for annId in annIds:
        anns = coco.loadAnns(annId)[0]  # 加载标注信息
        catId = anns['category_id']  # 获取该标注对应的物体类别的COCO Cat ID
        cat = coco.loadCats(catId)[0]['name']  # 获取该COCO Cat ID对应的物体种类名
        # print 'anns :%s' % anns
        # print 'catId :%s , cat :%s' % (catId,cat)

        # 如果该类名在我们需要的物体种类列表中,将标注文件转换为YOLO需要的格式
        if cat in classes:
            objCount = objCount + 1
            out_file = open('%s/%s/labels/%s.txt' % (dataDir, dataType, filename[:-4]), 'a')
            cls_id = classes[cat]  # 获取该类物体在yolo训练中的id
            box = anns['bbox']
            size = [width, height]
            bb = convert(size, box)
            out_file.write(str(cls_id) + " " + " ".join([str(a) for a in bb]) + '\n')
            out_file.close()

    if objCount > 0:
        list_file.write('%s/%s/JPEGImages/%s\n' % (dataDir, dataType, filename))

list_file.close()
转换ImageNet
我使用的是ILSVRC2016的数据,查看200种物体中有哪些是我们需要的,然后制作imagenet_list.txt。
需要注意,ImageNet的标注文件中的object name使用的物体的WordNetID,所以imagenet_list.txt中需要使用WordNetID,如:
1,n07739125
3,n02769748
5,n07753592
6,n02799071
7,n02802426
9,n02828884
为了方便获取WordNetID在ImageNet中的物体名词(paul_list.txt中的名词未必和ImageNet中的一致),可以制作一个imagenet_map.txt,如:
1,apple,n07739125
3,backpack,n02769748
5,banana,n07753592
6,baseball,n02799071
7,basketball,n02802426
9,bench,n02828884
制作imagenet_list.txt和imagenet_map.txt需要知道WordNetID和名词间的映射关系,有两个办法。
离线版:
从ImageNet下载words.txt(WordNetID和名词间的映射)和gloss.txt(WordNetID对应的名词的定义),然后查询。如果没有梯子,国内访问ImageNet龟速,文件被我备份在GitHub。
https://github.com/PaulChongPeng/darknet/blob/32dddd8509de4bf57cad0aa330160d57d33d0c66/data/words.txt
https://github.com/PaulChongPeng/darknet/blob/32dddd8509de4bf57cad0aa330160d57d33d0c66/data/gloss.txt
在线版:
访问 http://image-net.org/challenges/LSVRC/2015/browse-det-synsets 。请自备梯子,不然慢的令人发指。
点击需要查询的名词,如Volleyball,会跳转到对应的网页,我们需要的是网页地址后的wnid。如 http://imagenet.stanford.edu/synset?wnid=n04540053 。
制作好list后,将imagenet_to_yolo.py放在ILSVRC2016/bject_detection/ILSVRC目录下,并将Data文件夹重命名为JPEGImages(因为darknet找图片对应的标记文件是直接替换JPEGImages为labels,图片后缀名替换为txt)。修改classes为自己的list路径后直接运行脚本即可。
imagenet_to_yolo.py 我放在了GitHub上:
https://github.com/PaulChongPeng/darknet/blob/master/tools/imagenet_to_yolo.py
# coding=utf-8

# 使用说明
# 将该文件放在ILSVRC2016/bject_detection/ILSVRC目录下,并将Data文件夹重命名为JPEGImages
# 执行该工具,Lists目录下会生成图片路径列表
# labels目录下会生成yolo需要的标注文件

import xml.etree.ElementTree as ET
import pickle
import os
from os import listdir, getcwd
from os.path import join
import shutil


# 获取所有包含标注文件的的目录路径
def get_dirs():
    dirs = ['DET/train/ILSVRC2014_train_0006', 'DET/train/ILSVRC2014_train_0005', 'DET/train/ILSVRC2014_train_0004',
            'DET/train/ILSVRC2014_train_0003', 'DET/train/ILSVRC2014_train_0002', 'DET/train/ILSVRC2014_train_0001',
            'DET/train/ILSVRC2014_train_0000', 'DET/val']
    dirs_2013 = os.listdir('JPEGImages/DET/train/ILSVRC2013_train/')
    for dir_2013 in dirs_2013:
        dirs.append('DET/train/ILSVRC2013_train/' + dir_2013)
    return dirs


# 获取所需要的类名和id
# path为类名和id的对应关系列表的地址(标注文件中可能有很多类,我们只加载该path指向文件中的类)
# 返回值是一个字典,键名是类名,键值是id
def get_classes_and_index(path):
    D = {}
    f = open(path)
    for line in f:
        temp = line.rstrip().split(',', 2)
        D[temp[1]] = temp[0]
    return D


# 将ROI的坐标转换为yolo需要的坐标
# size是图片的w和h
# box里保存的是ROI的坐标(x,y的最大值和最小值)
# 返回值为ROI中心点相对于图片大小的比例坐标,和ROI的w、h相对于图片大小的比例
def convert(size, box):
    dw = 1. / size[0]
    dh = 1. / size[1]
    x = (box[0] + box[1]) / 2.0
    y = (box[2] + box[3]) / 2.0
    w = box[1] - box[0]
    h = box[3] - box[2]
    x = x * dw
    w = w * dw
    y = y * dh
    h = h * dh
    return (x, y, w, h)


# 将labelImg 生成的xml文件转换为yolo需要的txt文件
# image_dir 图片所在的目录的路径
# image_id图片名
def convert_annotation(image_dir, image_id):
    in_file = open('Annotations/%s/%s.xml' % (image_dir, image_id))
    obj_num = 0  # 一个标志位,用来判断该img是否包含我们需要的标注
    tree = ET.parse(in_file)
    root = tree.getroot()
    size = root.find('size')
    w = int(size.find('width').text)
    h = int(size.find('height').text)

    for obj in root.iter('object'):
        cls = obj.find('name').text
        if cls not in classes:
            continue
        obj_num = obj_num + 1
        if obj_num == 1:
            out_file = open('labels/%s/%s.txt' % (image_dir, image_id), 'w')
        cls_id = classes[cls]  # 获取该类物体在yolo训练中的id
        xmlbox = obj.find('bndbox')
        b = (float(xmlbox.find('xmin').text), float(xmlbox.find('xmax').text), float(xmlbox.find('ymin').text),
             float(xmlbox.find('ymax').text))
        bb = convert((w, h), b)
        out_file.write(str(cls_id) + " " + " ".join([str(a) for a in bb]) + '\n')

    if obj_num > 0:
        list_file = open('Lists/%s.txt' % image_dir.split('/')[-1], 'a')  # 数据集的图片list保存路径
        list_file.write('%s/JPEGImages/%s/%s.JPEG\n' % (wd, image_dir, image_id))
        list_file.close()


def IsSubString(SubStrList, Str):
    flag = True
    for substr in SubStrList:
        if not (substr in Str):
            flag = False

    return flag


# 获取FindPath路径下指定格式(FlagStr)的文件名(不包含后缀名)列表
def GetFileList(FindPath, FlagStr=[]):
    import os
    FileList = []
    FileNames = os.listdir(FindPath)
    if (len(FileNames) > 0):
        for fn in FileNames:
            if (len(FlagStr) > 0):
                if (IsSubString(FlagStr, fn)):
                    FileList.append(fn[:-4])
            else:
                FileList.append(fn)

    if (len(FileList) > 0):
        FileList.sort()

    return FileList


classes = get_classes_and_index('/mnt/large4t/pengchong_data/Tools/Yolo_paul/darknet/data/imagenet_list.txt')
dirs = get_dirs()

wd = getcwd()

# Lists 目录若不存在,创建Lists目录。若存在,则清空目录
if not os.path.exists('Lists/'):
    os.makedirs('Lists/')
else:
    shutil.rmtree('Lists/')
    os.makedirs('Lists/')

for image_dir in dirs:
    if not os.path.exists('JPEGImages/' + image_dir):
        print("JPEGImages/%s dir not exist" % image_dir)
        continue
    # labels 目录若不存在,创建labels目录。若存在,则清空目录
    if not os.path.exists('labels/%s' % (image_dir)):
        os.makedirs('labels/%s' % (image_dir))
    else:
        shutil.rmtree('labels/%s' % (image_dir))
        os.makedirs('labels/%s' % (image_dir))
    image_ids = GetFileList('Annotations/' + image_dir, ['xml'])
    for image_id in image_ids:
        print(image_id)
        convert_annotation(image_dir, image_id)
转换自己的数据
我使用的labelImg工具做的图像标注,标记格式大体和VOC一致。
工具地址见GitHub: https://github.com/tzutalin/labelImg
只需要简单修改voc_label.py就可以转换自己的数据。修改后的脚本命名为lableImg_voc_to_yolo.py。我放在了GitHub上:
https://github.com/PaulChongPeng/darknet/blob/master/tools/lableImg_voc_to_yolo.py
# coding=utf-8

# 使用说明

# 要转换的数据集目录结构为:
# Paul/time/class/annotations/xml文件
# Paul/time/class/images/jpg文件
# Paul/time/class/labels/即将生成的yolo需要的txt文件

# 该文件需放在Paul目录下,该目录下将会生成名为“日期”的txt文件,文件内容为日期文件夹下所有图片的路径

# 有多少个日期的文件夹,就将多少个文件夹的名字加入sets

# 需要生成多少种物体的标签,就将多少种物体加入classes
# labels目录下生成的txt文件中的第一个数字就是物体种类在classes中的索引


import xml.etree.ElementTree as ET
import pickle
import os
from os import listdir, getcwd
from os.path import join
import shutil

sets = ['20170401', '20170414']


# 获取所需要的类名和id
# path为类名和id的对应关系列表的地址(标注文件中可能有很多类,我们只加载该path指向文件中的类)
# 返回值是一个字典,键名是类名,键值是id
def get_classes_and_index(path):
    D = {}
    f = open(path)
    for line in f:
        temp = line.rstrip().split(',', 2)
        print("temp[0]:" + temp[0] + "\n")
        print("temp[1]:" + temp[1] + "\n")
        D[temp[1].replace(' ', '')] = temp[0]
    return D


# 将ROI的坐标转换为yolo需要的坐标
# size是图片的w和h
# box里保存的是ROI的坐标(x,y的最大值和最小值)
# 返回值为ROI中心点相对于图片大小的比例坐标,和ROI的w、h相对于图片大小的比例
def convert(size, box):
    dw = 1. / size[0]
    dh = 1. / size[1]
    x = (box[0] + box[1]) / 2.0
    y = (box[2] + box[3]) / 2.0
    w = box[1] - box[0]
    h = box[3] - box[2]
    x = x * dw
    w = w * dw
    y = y * dh
    h = h * dh
    return (x, y, w, h)


# 将labelImg 生成的xml文件转换为yolo需要的txt文件
# path到类名一级的目录路径
# image_id图片名
def convert_annotation(path, image_id):
    in_file = open('%s/annotations/%s.xml' % (path, image_id))
    out_file = open('%s/labels/%s.txt' % (path, image_id), 'w')
    tree = ET.parse(in_file)
    root = tree.getroot()
    size = root.find('size')
    w = int(size.find('width').text)
    h = int(size.find('height').text)

    for obj in root.iter('object'):
        cls = obj.find('name').text.replace(' ', '')
        # 如果该类物体不在我们的yolo训练列表中,跳过
        if cls not in classes:
            continue
        cls_id = classes[cls]  # 获取该类物体在yolo训练列表中的id
        xmlbox = obj.find('bndbox')
        b = (float(xmlbox.find('xmin').text), float(xmlbox.find('xmax').text), float(xmlbox.find('ymin').text),
             float(xmlbox.find('ymax').text))
        bb = convert((w, h), b)
        out_file.write(str(cls_id) + " " + " ".join([str(a) for a in bb]) + '\n')


def IsSubString(SubStrList, Str):
    flag = True
    for substr in SubStrList:
        if not (substr in Str):
            flag = False

    return flag


# 获取FindPath路径下指定格式(FlagStr)的文件名(不包含后缀名)列表
def GetFileList(FindPath, FlagStr=[]):
    import os
    FileList = []
    FileNames = os.listdir(FindPath)
    if (len(FileNames) > 0):
        for fn in FileNames:
            if (len(FlagStr) > 0):
                if (IsSubString(FlagStr, fn)):
                    FileList.append(fn[:-4])
            else:
                FileList.append(fn)

    if (len(FileList) > 0):
        FileList.sort()

    return FileList


# 获取目录下子目录的目录名列表
def get_dirs(time):
    dirs = []
    dirs_temp = os.listdir(time)
    for dir_name in dirs_temp:
        dirs.append(time + '/' + dir_name)
    return dirs


wd = getcwd()

classes = get_classes_and_index('/raid/pengchong_data/Tools/Paul_YOLO/data/Paul_list.txt')

for time in sets:
    dirs = get_dirs(time)
    list_file = open('%s.txt' % time, 'w')  # 数据集的图片list保存路径
    for path in dirs:
        print(path)
        if not os.path.exists('%s/annotations/' % path):
            os.makedirs('%s/annotations/' % path)
        if not os.path.exists('%s/labels/' % path):
            os.makedirs('%s/labels/' % path)
        else:
            shutil.rmtree('%s/labels/' % path)
            os.makedirs('%s/labels/' % path)
        image_ids = GetFileList(path + '/annotations/', ['xml'])
        for image_id in image_ids:
            print(image_id)
            list_file.write('%s/%s/images/%s.jpg\n' % (wd, path, image_id))
            convert_annotation(path, image_id)
    list_file.close()
将各个数据集的标注文件转换成YOLO需要的格式后,将脚本生成的图像地址list的内容全部拷贝到paul.txt中,然后使用partial.py脚本随机分割为train,val,test data。脚本已上传至GitHut,可根据自己的需要进行修改。
https://github.com/PaulChongPeng/darknet/blob/master/tools/partial.py
数据准备工作到此就算结束了。
准备配置文件
在cfg目录下添加paul.data,内容如下:
classes=10                                                      要识别物体的种类数
train  = data/paul_train.txt                                    训练集图片list
valid = data/paul_val.txt                                       验证集图片list
names = data/paul.names                                         要识别的物体list
backup = /mnt/large4t/pengchong_data/Tools/darknet/backup/      训练时权重文件备份路径
在cfg目录下添加yolo-paul.cfg文件,该文件内容复制自默认的yolo-voc.cfg,根据自己的训练集和机器配置做修改,具体参数意义可以参考我之前的文章:
我修改的内容如下:
[net]
batch=27                       每27张图更新一次权重,subdivisions=1时占用GPU memory 15.6G左右
......
......
learning_rate=0.00001           学习率大了容易发散
max_batches = 500000
......
......
[convolutional]
......
......
filters=75                      最后一个卷积层输出的特征图数为5*(10+5)
......
......
[region]
......
......
classes=10                      训练十种物体
......
......
在data目录下增加paul.names,内容如下:
ambulance
apple
automat
backpack
baggage
banana
baseball
basketball
bed
bench
修改Makefile
GPU=1
CUDNN=1
编译
make clean
make -j8
训练
首先准备ImageNet的预训练权重文件
curl -O https://pjreddie.com/media/files/darknet19.weights
使用前23层的权重
./darknet partial cfg/darknet19_448.cfg darknet19_448.weights darknet19_448.conv.23 23
partial命令可以分割权重文件,fine-tune的时候也会用到。
开始训练
./darknet detector train cfg/paul.data cfg/yolo-paul.cfg darknet19_448.conv.23 2>1 | tee paul_train_log.txt
剩下的就是等待了。
需要注意的是,如果学习率设置的比较大,训练结果很容易发散,训练过程输出的log会有nan字样,需要减小学习率后再进行训练。
多GPU训练技巧
darknet支持多GPU,使用多GPU训练可以极大加速训练速度。据我测试在DGX-1上使用8块Tesla P100同时训练的速度是在外星人上使用1块GTX1080的130多倍。
单GPU与多GPU的切换技巧
在darknet上使用多GPU训练需要一定技巧,盲目使用多GPU训练会悲剧的发现损失一直在下降、recall在上升,然而Obj几乎为零,最终得到的权重文件无法预测出bounding box。
使用多GPU训练前需要先用单GPU训练至Obj有稳定上升的趋势后(我一般在obj大于0.1后切换)再使用backup中备份的weights通过多GPU继续训练。一般情况下使用单GPU训练1000个迭代即可切换到多GPU。
./darknet detector train cfg/paul.data cfg/yolo-paul.cfg backup/yolo-paul_1000.weights -gpus 0,1,2,3,4,5,6,7 2>1 | tee paul_train_log.txt
0,1,2,3,4,5,6,7是指定的GPU的ID,通过
nvidia-smi
命令可以查询:
+-----------------------------------------------------------------------------+
| NVIDIA-SMI 375.20                 Driver Version: 375.20                    |
|-------------------------------+----------------------+----------------------+
| GPU  Name        Persistence-M| Bus-Id        Disp.A | Volatile Uncorr. ECC |
| Fan  Temp  Perf  Pwr:Usage/Cap|         Memory-Usage | GPU-Util  Compute M. |
|===============================+======================+======================|
|   0  Tesla P100-SXM2...  On   | 0000:06:00.0     Off |                    0 |
| N/A   52C    P0   270W / 300W |  15887MiB / 16308MiB |     99%      Default |
+-------------------------------+----------------------+----------------------+
|   1  Tesla P100-SXM2...  On   | 0000:07:00.0     Off |                    0 |
| N/A   55C    P0   247W / 300W |  15887MiB / 16308MiB |     97%      Default |
+-------------------------------+----------------------+----------------------+
|   2  Tesla P100-SXM2...  On   | 0000:0A:00.0     Off |                    0 |
| N/A   54C    P0   252W / 300W |  15887MiB / 16308MiB |     98%      Default |
+-------------------------------+----------------------+----------------------+
|   3  Tesla P100-SXM2...  On   | 0000:0B:00.0     Off |                    0 |
| N/A   51C    P0   242W / 300W |  15887MiB / 16308MiB |     97%      Default |
+-------------------------------+----------------------+----------------------+
|   4  Tesla P100-SXM2...  On   | 0000:85:00.0     Off |                    0 |
| N/A   53C    P0   227W / 300W |  15887MiB / 16308MiB |     98%      Default |
+-------------------------------+----------------------+----------------------+
|   5  Tesla P100-SXM2...  On   | 0000:86:00.0     Off |                    0 |
| N/A   58C    P0   245W / 300W |  15887MiB / 16308MiB |     97%      Default |
+-------------------------------+----------------------+----------------------+
|   6  Tesla P100-SXM2...  On   | 0000:89:00.0     Off |                    0 |
| N/A   59C    P0   245W / 300W |  15887MiB / 16308MiB |     97%      Default |
+-------------------------------+----------------------+----------------------+
|   7  Tesla P100-SXM2...  On   | 0000:8A:00.0     Off |                    0 |
| N/A   52C    P0   228W / 300W |  15887MiB / 16308MiB |     97%      Default |
+-------------------------------+----------------------+----------------------+

+-----------------------------------------------------------------------------+
| Processes:                                                       GPU Memory |
|  GPU       PID  Type  Process name                               Usage      |
|=============================================================================|
|    0     50064    C   ./darknet                                    15887MiB |
|    1     50064    C   ./darknet                                    15887MiB |
|    2     50064    C   ./darknet                                    15887MiB |
|    3     50064    C   ./darknet                                    15887MiB |
|    4     50064    C   ./darknet                                    15887MiB |
|    5     50064    C   ./darknet                                    15887MiB |
|    6     50064    C   ./darknet                                    15887MiB |
|    7     50064    C   ./darknet                                    15887MiB |
+-----------------------------------------------------------------------------+
使用多GPU时的学习率
使用多GPU训练时,学习率是使用单GPU训练的n倍,n是使用GPU的个数
可视化训练过程的中间参数
等待训练结束后(有时候没等结束我们的模型就开始发散了),我们需要检查各项指标(如loss)是否达到了我们期望的数值,如果没有,要分析为什么。可视化训练过程的中间参数可以帮助我们分析问题。
可视化中间参数需要用到训练时保存的log文件paul_train_log.txt
训练log中各参数的意义
Region Avg IOU:平均的IOU,代表预测的bounding box和ground truth的交集与并集之比,期望该值趋近于1。
Class:是标注物体的概率,期望该值趋近于1.
Obj:期望该值趋近于1.
No Obj:期望该值越来越小但不为零.
Avg Recall:期望该值趋近1
avg:平均损失,期望该值趋近于0
使用train_loss_visualization.py脚本可以绘制loss变化曲线。
脚本已上传至GitHub(使用前需安装依赖):
https://github.com/PaulChongPeng/darknet/blob/master/tools/train_loss_visualization.py
import pandas as pd
import numpy as np
import matplotlib.pyplot as plt

lines =1878760
result = pd.read_csv('S:/Tools/Paul_YOLO/paul_train_log_new.txt', skiprows=[x for x in range(lines) if ((x%10!=9) |(x<1000))] ,error_bad_lines=False, names=['loss', 'avg', 'rate', 'seconds', 'images'])
result.head()

result['loss']=result['loss'].str.split(' ').str.get(1)
result['avg']=result['avg'].str.split(' ').str.get(1)
result['rate']=result['rate'].str.split(' ').str.get(1)
result['seconds']=result['seconds'].str.split(' ').str.get(1)
result['images']=result['images'].str.split(' ').str.get(1)
result.head()
result.tail()

#print(result.head())
# print(result.tail())
# print(result.dtypes)

print(result['loss'])
print(result['avg'])
print(result['rate'])
print(result['seconds'])
print(result['images'])

result['loss']=pd.to_numeric(result['loss'])
result['avg']=pd.to_numeric(result['avg'])
result['rate']=pd.to_numeric(result['rate'])
result['seconds']=pd.to_numeric(result['seconds'])
result['images']=pd.to_numeric(result['images'])
result.dtypes


fig = plt.figure()
ax = fig.add_subplot(1, 1, 1)
ax.plot(result['avg'].values,label='avg_loss')
#ax.plot(result['loss'].values,label='loss')
ax.legend(loc='best')
ax.set_title('The loss curves')
ax.set_xlabel('batches')
fig.savefig('avg_loss')
#fig.savefig('loss')
脚本使用说明:
使用命令
2>1 | tee paul_train_log.txt
保存log时会生成两个文件,文件1里保存的是网络加载信息和checkout点保存信息,paul_train_log.txt中保存的是训练信息。
1、删除log开头的三行:
0,1,2,3,4,5,6,7
yolo-paul
Learning Rate: 1e-05, Momentum: 0.9, Decay: 0.0005
2、删除log的结尾几行,使最后一行为batch的输出,如:
497001: 0.863348, 0.863348 avg, 0.001200 rate, 5.422251 seconds, 107352216 images
3、执行extract_log.py脚本,格式化log。脚本代码见GitHub:
https://github.com/PaulChongPeng/darknet/blob/master/tools/extract_log.py
# coding=utf-8
# 该文件用来提取训练log,去除不可解析的log后使log文件格式化,生成新的log文件供可视化工具绘图

import random

f = open('paul_train_log.txt')
train_log = open('paul_train_log_new.txt', 'w')

for line in f:
    # 去除多gpu的同步log
    if 'Syncing' in line:
        continue
    # 去除除零错误的log
    if 'nan' in line:
        continue
    train_log.write(line)

f.close()
train_log.close()
最终log格式:
Loaded: 5.588888 seconds
Region Avg IOU: 0.649881, Class: 0.854394, Obj: 0.476559, No Obj: 0.007302, Avg Recall: 0.737705,  count: 61
Region Avg IOU: 0.671544, Class: 0.959081, Obj: 0.523326, No Obj: 0.006902, Avg Recall: 0.780000,  count: 50
Region Avg IOU: 0.525841, Class: 0.815314, Obj: 0.449031, No Obj: 0.006602, Avg Recall: 0.484375,  count: 64
Region Avg IOU: 0.583596, Class: 0.830763, Obj: 0.377681, No Obj: 0.007916, Avg Recall: 0.629214,  count: 89
Region Avg IOU: 0.651377, Class: 0.908635, Obj: 0.460094, No Obj: 0.008060, Avg Recall: 0.753425,  count: 73
Region Avg IOU: 0.571363, Class: 0.880554, Obj: 0.341659, No Obj: 0.007820, Avg Recall: 0.633663,  count: 101
Region Avg IOU: 0.585424, Class: 0.935552, Obj: 0.358635, No Obj: 0.008192, Avg Recall: 0.644860,  count: 107
Region Avg IOU: 0.599972, Class: 0.832793, Obj: 0.382910, No Obj: 0.009005, Avg Recall: 0.650602,  count: 83
497001: 0.863348, 0.863348 avg, 0.000012 rate, 5.422251 seconds, 107352216 images
4、修改train_loss_visualization.py中lines为log行数,并根据需要修改要跳过的行数。
skiprows=[x for x in range(lines) if ((x%10!=9) |(x<1000))]
运行train_loss_visualization.py会在脚本所在路径生成avg_loss.png。
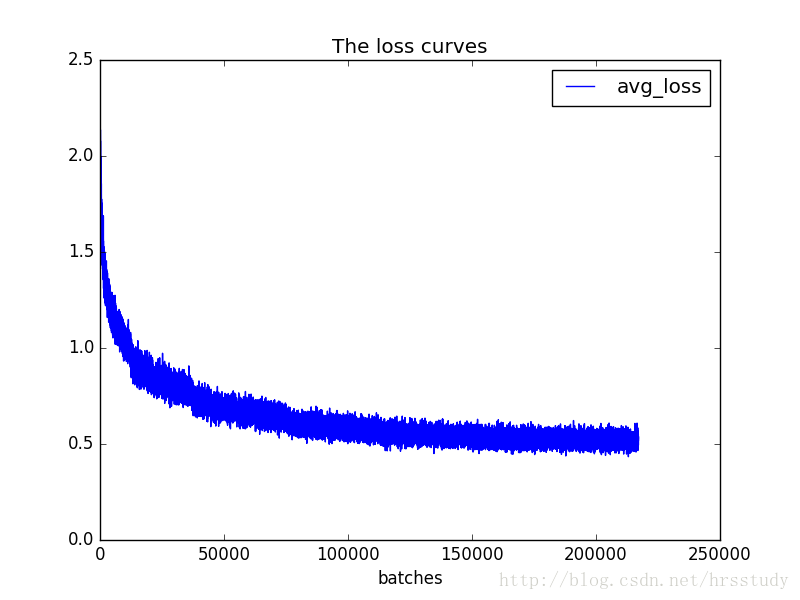
从损失变化曲线可以看出,模型在100000万次迭代后损失下降速度非常慢,几乎没有下降。结合log和cfg文件发现,我自定义的学习率变化策略在十万次迭代时会减小十倍,十万次迭代后学习率下降到非常小的程度,导致损失下降速度降低。修改cfg中的学习率变化策略,10万次迭代时不改变学习率,30万次时再降低。
我使用迭代97000次时的备份的checkout点来继续训练。
./darknet detector train cfg/paul.data cfg/yolo-paul.cfg backup/yolo-paul_97000.weights 2>1 | tee paul_train_log.txt
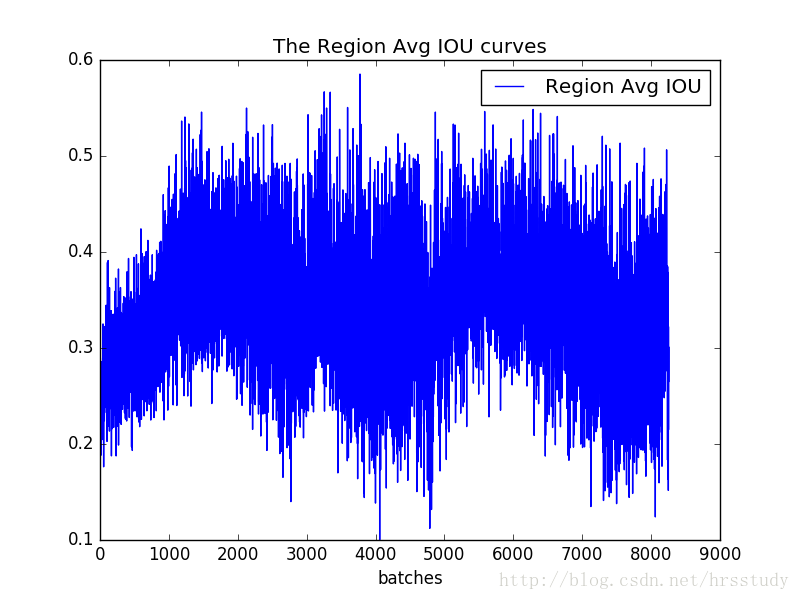
除了可视化loss,还可以可视化Avg IOU,Avg Recall等参数。
可视化’Region Avg IOU’, ‘Class’, ‘Obj’, ‘No Obj’, ‘Avg Recall’,’count’这些参数可以使用脚本train_iou_visualization.py,使用方式和train_loss_visualization.py相同。脚本已上传至GitHub:https://github.com/PaulChongPeng/darknet/blob/master/tools/train_iou_visualization.py
import pandas as pd
import numpy as np
import matplotlib.pyplot as plt

lines =525990
result = pd.read_csv('S:/Tools/Paul_YOLO/paul_train_log_new.txt', skiprows=[x for x in range(lines) if (x%10==0 or x%10==9) ] ,error_bad_lines=False, names=['Region Avg IOU', 'Class', 'Obj', 'No Obj', 'Avg Recall','count'])
result.head()

result['Region Avg IOU']=result['Region Avg IOU'].str.split(': ').str.get(1)
result['Class']=result['Class'].str.split(': ').str.get(1)
result['Obj']=result['Obj'].str.split(': ').str.get(1)
result['No Obj']=result['No Obj'].str.split(': ').str.get(1)
result['Avg Recall']=result['Avg Recall'].str.split(': ').str.get(1)
result['count']=result['count'].str.split(': ').str.get(1)
result.head()
result.tail()

#print(result.head())
# print(result.tail())
# print(result.dtypes)
print(result['Region Avg IOU'])

result['Region Avg IOU']=pd.to_numeric(result['Region Avg IOU'])
result['Class']=pd.to_numeric(result['Class'])
result['Obj']=pd.to_numeric(result['Obj'])
result['No Obj']=pd.to_numeric(result['No Obj'])
result['Avg Recall']=pd.to_numeric(result['Avg Recall'])
result['count']=pd.to_numeric(result['count'])
result.dtypes

fig = plt.figure()
ax = fig.add_subplot(1, 1, 1)
#ax.plot(result['Region Avg IOU'].values,label='Region Avg IOU')
#ax.plot(result['Class'].values,label='Class')
#ax.plot(result['Obj'].values,label='Obj')
#ax.plot(result['No Obj'].values,label='No Obj')
ax.plot(result['Avg Recall'].values,label='Avg Recall')
#ax.plot(result['count'].values,label='count')
ax.legend(loc='best')
#ax.set_title('The Region Avg IOU curves')
ax.set_title('The Avg Recall curves')
ax.set_xlabel('batches')
#fig.savefig('Avg IOU')
fig.savefig('Avg Recall')
使用验证集评估模型
评估模型可以使用命令valid(只有预测结果,没有评价预测是否正确)或recall,这两个命令都无法满足我的需求,我实现了category命令做性能评估。
valid:
在paul.data末尾添加
eval = imagenet #有voc、coco、imagenet三种模式
修改Detector.c文件validate_detector函数,修改阈值(默认.005)
float thresh = .1;
重新编译然后执行命令
./darknet detector valid cfg/paul.data cfg/yolo-paul.cfg backup/yolo-paul_final.weights
results目录下会生成预测结果,格式如下:
1 1 0.431522 235.186066 77.746033 421.808258 348.950012
1 1 0.186538 161.324097 270.221497 187.429535 321.382141
1 14 0.166257 284.207947 364.423889 465.995056 454.305603
2 30 0.287718 274.455719 290.674194 343.506256 352.656433
2 30 0.582356 293.578918 294.799438 350.478088 327.216614
2 1 0.599921 138.686981 314.705231 352.362152 588.235962
3 59 0.251553 193.290497 183.707275 277.655273 349.782410
3 59 0.107120 209.172287 269.722626 330.998718 342.530914
3 62 0.162954 0.000000 278.525543 457.739563 480.000000
4 6 0.617184 38.155792 31.496445 434.091705 527.705811
4 1 0.101005 358.778351 238.540756 395.645050 289.902283
4 6 0.813770 75.790985 282.521210 459.018585 564.883545
4 3 0.114561 32.667072 407.288025 142.561798 506.885498
4 3 0.104120 87.489151 337.674896 446.883728 584.356689
5 1 0.106601 235.460571 0.707840 265.958740 34.851868
5 1 0.134753 310.776398 1.273307 344.392303 31.028347
5 1 0.146177 349.860596 0.445604 385.901550 29.931465
5 1 0.129790 388.831177 3.721551 419.852844 30.414955
5 1 0.146747 369.672150 0.000000 441.490387 45.012733
5 1 0.339233 7.567236 0.000000 53.692001 97.718735
如果想要查看recall可以使用recall命令。
修改费Detector.c文件的validate_detector_recall函数:
1、修改阈值:
float thresh = .25;
2、修改验证集路径:
list *plist = get_paths("/mnt/large4t/pengchong_data/Data/Paul/filelist/val.txt");
3、增加Precision
//fprintf(stderr, "%5d %5d %5d\tRPs/Img: %.2f\tIOU: %.2f%%\tRecall:%.2f%%\n", i, correct, total, (float)proposals/(i+1), avg_iou*100/total, 100.*correct/total);
fprintf(stderr, "ID:%5d Correct:%5d Total:%5d\tRPs/Img: %.2f\tIOU: %.2f%%\tRecall:%.2f%%\t", i, correct, total, (float)proposals/(i+1), avg_iou*100/total, 100.*correct/total);
fprintf(stderr, "proposals:%5d\tPrecision:%.2f%%\n",proposals,100.*correct/(float)proposals);
重新编译然后执行命令
./darknet detector recall cfg/paul.data cfg/yolo-paul.cfg backup/yolo-paul_final.weights
结果格式如下:
ID:    0 Correct:    1 Total:   22  RPs/Img: 2.00   IOU: 7.59%  Recall:4.55%    proposals:    2 Precision:50.00%
ID:    1 Correct:    2 Total:   28  RPs/Img: 2.00   IOU: 8.90%  Recall:7.14%    proposals:    4 Precision:50.00%
ID:    2 Correct:    3 Total:   39  RPs/Img: 1.67   IOU: 7.91%  Recall:7.69%    proposals:    5 Precision:60.00%
ID:    3 Correct:    3 Total:   42  RPs/Img: 2.00   IOU: 7.42%  Recall:7.14%    proposals:    8 Precision:37.50%
ID:    4 Correct:    9 Total:   58  RPs/Img: 5.00   IOU: 15.96% Recall:15.52%   proposals:   25 Precision:36.00%
ID:    5 Correct:   10 Total:   70  RPs/Img: 4.50   IOU: 14.99% Recall:14.29%   proposals:   27 Precision:37.04%
ID:    6 Correct:   12 Total:   72  RPs/Img: 4.00   IOU: 16.51% Recall:16.67%   proposals:   28 Precision:42.86%
ID:    7 Correct:   14 Total:   76  RPs/Img: 3.75   IOU: 17.60% Recall:18.42%   proposals:   30 Precision:46.67%
ID:    8 Correct:   16 Total:   81  RPs/Img: 3.78   IOU: 19.15% Recall:19.75%   proposals:   34 Precision:47.06%
ID:    9 Correct:   20 Total:   96  RPs/Img: 3.80   IOU: 20.40% Recall:20.83%   proposals:   38 Precision:52.63%
ID:   10 Correct:   22 Total:  103  RPs/Img: 3.82   IOU: 21.09% Recall:21.36%   proposals:   42 Precision:52.38%
category命令评估模型针对每种物体检测的性能
代码已提交至GitHub:https://github.com/PaulChongPeng/darknet/blob/master/src/detector.c
void print_category(FILE **fps, char *path, box *boxes, float **probs, int total, int classes, int w, int h, float thresh, float iou_thresh)
{
    int i, j;

    char labelpath[4096];
    find_replace(path, "images", "labels", labelpath);
    find_replace(labelpath, "JPEGImages", "labels", labelpath);
    find_replace(labelpath, ".jpg", ".txt", labelpath);
    find_replace(labelpath, ".JPEG", ".txt", labelpath);

    int num_labels = 0;
    box_label *truth = read_boxes(labelpath, &num_labels);

    for(i = 0; i < total; ++i){
        int class_id = max_index(probs[i],classes);
        float prob = probs[i][class_id];
        if (prob < thresh)continue;

        float best_iou = 0;
        int best_iou_id = 0;
        int correct = 0;
        for (j = 0; j < num_labels; ++j) {
            box t = {truth[j].x*w, truth[j].y*h, truth[j].w*w, truth[j].h*h};
            float iou = box_iou(boxes[i], t);
            //fprintf(stderr, "box p: %f, %f, %f, %f\n", boxes[i].x, boxes[i].y, boxes[i].w, boxes[i].h);
            //fprintf(stderr, "box t: %f, %f, %f, %f\n", t.x, t.y, t.w, t.h);
            //fprintf(stderr, "iou : %f\n", iou);
            if(iou > best_iou){
                best_iou = iou;
                best_iou_id = j;
            }
        }

        if(best_iou > iou_thresh && truth[best_iou_id].id == class_id){
            correct = 1;
        }

        float xmin = boxes[i].x - boxes[i].w/2.;
        float xmax = boxes[i].x + boxes[i].w/2.;
        float ymin = boxes[i].y - boxes[i].h/2.;
        float ymax = boxes[i].y + boxes[i].h/2.;

        if (xmin < 0) xmin = 0;
        if (ymin < 0) ymin = 0;
        if (xmax > w) xmax = w;
        if (ymax > h) ymax = h;

        fprintf(fps[class_id], "%s, %d, %d, %f, %f, %f, %f, %f, %f\n", path, class_id, correct, prob, best_iou, xmin, ymin, xmax, ymax);

    }
}


void validate_detector_category(char *datacfg, char *cfgfile, char *weightfile, char *outfile)
{
    int j;
    list *options = read_data_cfg(datacfg);
    char *valid_images = option_find_str(options, "valid", "data/train.list");
    char *name_list = option_find_str(options, "names", "data/names.list");
    char *prefix = option_find_str(options, "results", "results");
    char **names = get_labels(name_list);
    char *mapf = option_find_str(options, "map", 0);
    int *map = 0;
    if (mapf) map = read_map(mapf);

    network net = parse_network_cfg(cfgfile);
    if(weightfile){
        load_weights(&net, weightfile);
    }
    set_batch_network(&net, 1);
    fprintf(stderr, "Learning Rate: %g, Momentum: %g, Decay: %g\n", net.learning_rate, net.momentum, net.decay);
    srand(time(0));

    list *plist = get_paths(valid_images);
    char **paths = (char **)list_to_array(plist);

    layer l = net.layers[net.n-1];
    int classes = l.classes;

    char buff[1024];
    FILE **fps = 0;
    if(!outfile) outfile = "paul_";
    fps = calloc(classes, sizeof(FILE *));
    for(j = 0; j < classes; ++j){
        snprintf(buff, 1024, "%s/%s%s.txt", prefix, outfile, names[j]);
        fps[j] = fopen(buff, "w");
    }


    box *boxes = calloc(l.w*l.h*l.n, sizeof(box));
    float **probs = calloc(l.w*l.h*l.n, sizeof(float *));
    for(j = 0; j < l.w*l.h*l.n; ++j) probs[j] = calloc(classes, sizeof(float *));

    int m = plist->size;
    int i=0;
    int t;

    float thresh = .25;
    float iou_thresh = .5;
    float nms = .45;

    int nthreads = 4;
    image *val = calloc(nthreads, sizeof(image));
    image *val_resized = calloc(nthreads, sizeof(image));
    image *buf = calloc(nthreads, sizeof(image));
    image *buf_resized = calloc(nthreads, sizeof(image));
    pthread_t *thr = calloc(nthreads, sizeof(pthread_t));

    load_args args = {0};
    args.w = net.w;
    args.h = net.h;
    args.type = IMAGE_DATA;

    for(t = 0; t < nthreads; ++t){
        args.path = paths[i+t];
        args.im = &buf[t];
        args.resized = &buf_resized[t];
        thr[t] = load_data_in_thread(args);
    }
    time_t start = time(0);
    for(i = nthreads; i < m+nthreads; i += nthreads){
        fprintf(stderr, "%d\n", i);
        for(t = 0; t < nthreads && i+t-nthreads < m; ++t){
            pthread_join(thr[t], 0);
            val[t] = buf[t];
            val_resized[t] = buf_resized[t];
        }
        for(t = 0; t < nthreads && i+t < m; ++t){
            args.path = paths[i+t];
            args.im = &buf[t];
            args.resized = &buf_resized[t];
            thr[t] = load_data_in_thread(args);
        }
        for(t = 0; t < nthreads && i+t-nthreads < m; ++t){
            char *path = paths[i+t-nthreads];
            float *X = val_resized[t].data;
            network_predict(net, X);
            int w = val[t].w;
            int h = val[t].h;
            get_region_boxes(l, w, h, thresh, probs, boxes, 0, map, .5);
            if (nms) do_nms_sort(boxes, probs, l.w*l.h*l.n, classes, nms);
            print_category(fps, path, boxes, probs, l.w*l.h*l.n, classes, w, h, thresh, iou_thresh);
            free_image(val[t]);
            free_image(val_resized[t]);
        }
    }
    for(j = 0; j < classes; ++j){
        if(fps) fclose(fps[j]);
    }
    fprintf(stderr, "Total Detection Time: %f Seconds\n", (double)(time(0) - start));
}

void run_detector(int argc, char **argv)
{
    char *prefix = find_char_arg(argc, argv, "-prefix", 0);
    float thresh = find_float_arg(argc, argv, "-thresh", .24);
    float hier_thresh = find_float_arg(argc, argv, "-hier", .5);
    int cam_index = find_int_arg(argc, argv, "-c", 0);
    int frame_skip = find_int_arg(argc, argv, "-s", 0);
    if(argc < 4){
        fprintf(stderr, "usage: %s %s [train/test/valid] [cfg] [weights (optional)]\n", argv[0], argv[1]);
        return;
    }
    char *gpu_list = find_char_arg(argc, argv, "-gpus", 0);
    char *outfile = find_char_arg(argc, argv, "-out", 0);
    int *gpus = 0;
    int gpu = 0;
    int ngpus = 0;
    if(gpu_list){
        printf("%s\n", gpu_list);
        int len = strlen(gpu_list);
        ngpus = 1;
        int i;
        for(i = 0; i < len; ++i){
            if (gpu_list[i] == ',') ++ngpus;
        }
        gpus = calloc(ngpus, sizeof(int));
        for(i = 0; i < ngpus; ++i){
            gpus[i] = atoi(gpu_list);
            gpu_list = strchr(gpu_list, ',')+1;
        }
    } else {
        gpu = gpu_index;
        gpus = &gpu;
        ngpus = 1;
    }

    int clear = find_arg(argc, argv, "-clear");

    char *datacfg = argv[3];
    char *cfg = argv[4];
    char *weights = (argc > 5) ? argv[5] : 0;
    char *filename = (argc > 6) ? argv[6]: 0;
    if(0==strcmp(argv[2], "test")) test_detector(datacfg, cfg, weights, filename, thresh, hier_thresh);
    else if(0==strcmp(argv[2], "train")) train_detector(datacfg, cfg, weights, gpus, ngpus, clear);
    else if(0==strcmp(argv[2], "valid")) validate_detector(datacfg, cfg, weights, outfile);
    else if(0==strcmp(argv[2], "recall")) validate_detector_recall(cfg, weights);
    else if(0==strcmp(argv[2], "category"))validate_detector_category(datacfg, cfg, weights, outfile);
    else if(0==strcmp(argv[2], "demo")) {
        list *options = read_data_cfg(datacfg);
        int classes = option_find_int(options, "classes", 20);
        char *name_list = option_find_str(options, "names", "data/names.list");
        char **names = get_labels(name_list);
        demo(cfg, weights, thresh, cam_index, filename, names, classes, frame_skip, prefix, hier_thresh);
    }
}
执行命令
./darknet detector category cfg/paul.data cfg/yolo-paul.cfg backup/yolo-paul_final.weights
result目录下会生成各类物体的val结果,有多少种物体,就会生成多少个txt文件,每个txt文件中有path, class_id, correct, prob, best_iou, xmin, ymin, xmax, ymax信息。
使用evalute.py工具可以解析这些txt文件做一个总结性的评估。
工具已上传到GitHub:https://github.com/PaulChongPeng/darknet/blob/master/tools/evalute.py
# coding=utf-8
# 本工具和category命令结合使用
# category是在detector.c中新增的命令,主要作用是生成每类物体的evalute结果
# 执行命令 ./darknet detector category cfg/paul.data cfg/yolo-paul.cfg backup/yolo-paul_final.weights
# result目录下会生成各类物体的val结果,将本工具放在result目录下执行,会print出各种物体的evalute结果,包括
# id,avg_iou,avg_correct_iou,avg_precision,avg_recall,avg_score
# result目录下会生成low_list和high_list,内容分别为精度和recall未达标和达标的物体种类


import os
from os import listdir, getcwd
from os.path import join
import shutil

# 共有多少类物体
class_num = 97


# 每类物体的验证结果
class CategoryValidation:
    id = 0  # Category id
    path = ""  # path
    total_num = 0  # 标注文件中该类bounding box的总数
    proposals_num = 0  # validate结果中共预测了多少个该类的bounding box
    correct_num = 0  # 预测正确的bounding box(与Ground-truth的IOU大于0.5且种类正确)的数量
    iou_num = 0  # 所有大于0.5的IOU的数量
    iou_sum = 0  # 所有大于0.5的IOU的IOU之和
    correct_iou_sum = 0  # 预测正确的bounding box的IOU之和
    score_sum = 0  # 所有正确预测的bounding box的概率之和
    avg_iou = 0  # 无论预测的bounding box的object的种类是否正确,所有bounding box 与最吻合的Ground-truth求出IOU,对大于0.5的IOU求平均值:avg_iou = iou_sum/iou_num
    avg_correct_iou = 0  # 对预测正确的bounding box的IOU求平均值:avg_correct_iou = correct_iou_sum/correct_num
    avg_precision = 0  # avg_precision = correct_num/proposals_num
    avg_recall = 0  # avg_recall = correct_num/total_num
    avg_score = 0  # avg_score=score_sum/correct_num

    def __init__(self, path, val_cat_num):
        self.path = path
        f = open(path)

        for line in f:
            temp = line.rstrip().replace(' ', '').split(',', 9)
            temp[1] = int(temp[1])
            self.id = temp[1]
            self.total_num = val_cat_num[self.id]
            if (self.total_num):
                break

        for line in f:
            # path, class_id, correct, prob, best_iou, xmin, ymin, xmax, ymax
            temp = line.rstrip().split(', ', 9)
            temp[1] = int(temp[1])
            temp[2] = int(temp[2])
            temp[3] = float(temp[3])
            temp[4] = float(temp[4])
            self.proposals_num = self.proposals_num + 1.00
            if (temp[2]):
                self.correct_num = self.correct_num + 1.00
                self.score_sum = self.score_sum + temp[3]
                self.correct_iou_sum = self.correct_iou_sum + temp[4]
            if (temp[4] > 0.5):
                self.iou_num = self.iou_num + 1
                self.iou_sum = self.iou_sum + temp[4]

        self.avg_iou = self.iou_sum / self.iou_num
        self.avg_correct_iou = self.correct_iou_sum / self.correct_num
        self.avg_precision = self.correct_num / self.proposals_num
        self.avg_recall = self.correct_num / self.total_num
        self.avg_score = self.score_sum / self.correct_num

        f.close()

    # 导出识别正确的图片列表
    def get_correct_list(self):
        f = open(self.path)
        new_f_name = "correct_list_" + self.id + ".txt"
        new_f = open(new_f_name, 'w')
        for line in f:
            temp = line.rstrip().split(', ', 9)
            if (temp[2]):
                new_f.write(line)
        f.close()

    # 导出识别错误的图片列表
    def get_error_list(self):
        f = open(self.path)
        new_f_name = "error_list_" + self.id + ".txt"
        new_f = open(new_f_name, 'w')
        for line in f:
            temp = line.rstrip().split(', ', 9)
            if (temp[2] == 0):
                new_f.write(line)
        f.close()

    def print_eva(self):
        print("id=%d, avg_iou=%f, avg_correct_iou=%f, avg_precision=%f, avg_recall=%f, avg_score=%f \n" % (self.id,
                                                                                                           self.avg_iou,
                                                                                                           self.avg_correct_iou,
                                                                                                           self.avg_precision,
                                                                                                           self.avg_recall,
                                                                                                           self.avg_score))


def IsSubString(SubStrList, Str):
    flag = True
    for substr in SubStrList:
        if not (substr in Str):
            flag = False

    return flag


# 获取FindPath路径下指定格式(FlagStr)的文件名列表
def GetFileList(FindPath, FlagStr=[]):
    import os
    FileList = []
    FileNames = os.listdir(FindPath)
    if (len(FileNames) > 0):
        for fn in FileNames:
            if (len(FlagStr) > 0):
                if (IsSubString(FlagStr, fn)):
                    FileList.append(fn)
            else:
                FileList.append(fn)

    if (len(FileList) > 0):
        FileList.sort()

    return FileList


# 获取所有物体种类的ROI数目
# path是图片列表的地址
# 返回值是一个list,list的索引是物体种类在yolo中的id,值是该种物体的ROI数量
def get_val_cat_num(path):
    val_cat_num = []
    for i in range(0, class_num):
        val_cat_num.append(0)

    f = open(path)
    for line in f:
        label_path = line.rstrip().replace('images', 'labels')
        label_path = label_path.replace('JPEGImages', 'labels')
        label_path = label_path.replace('.jpg', '.txt')
        label_path = label_path.replace('.JPEG', '.txt')
        label_list = open(label_path)
        for label in label_list:
            temp = label.rstrip().split(" ", 4)
            id = int(temp[0])
            val_cat_num[id] = val_cat_num[id] + 1.00
        label_list.close()
    f.close()
    return val_cat_num


# 获取物体名list
# path是物体名list文件地址
# 返回值是一个列表,列表的索引是类的id,值为该类物体的名字
def get_name_list(path):
    name_list = []
    f = open(path)
    for line in f:
        temp = line.rstrip().split(',', 2)
        name_list.append(temp[1])
    return name_list


wd = getcwd()
val_result_list = GetFileList(wd, ['txt'])
val_cat_num = get_val_cat_num("/raid/pengchong_data/Data/filelists/val.txt")
name_list = get_name_list("/raid/pengchong_data/Tools/Paul_YOLO/data/paul_list.txt")
low_list = open("low_list.log", 'w')
high_list = open("high_list.log", 'w')
for result in val_result_list:
    cat = CategoryValidation(result, val_cat_num)
    cat.print_eva()
    if ((cat.avg_precision < 0.3) | (cat.avg_recall < 0.3)):
        low_list.write("id=%d, name=%s, avg_precision=%f, avg_recall=%f \n" % (cat.id, name_list[cat.id], cat.avg_precision, cat.avg_recall))
    if ((cat.avg_precision > 0.6) & (cat.avg_recall > 0.6)):
        high_list.write("id=%d, name=%s, avg_precision=%f, avg_recall=%f \n" % (cat.id, name_list[cat.id], cat.avg_precision, cat.avg_recall))

low_list.close()
high_list.close()
将本工具放在result目录下执行,会print出各种物体的evalute结果,包括
id,avg_iou,avg_correct_iou,avg_precision,avg_recall,avg_score。
id=1, avg_iou=0.807394, avg_correct_iou=0.810435, avg_precision=0.473983, avg_recall=0.283531, avg_score=0.661014

id=2, avg_iou=0.824890, avg_correct_iou=0.826227, avg_precision=0.812950, avg_recall=0.824818, avg_score=0.772828

id=3, avg_iou=0.748561, avg_correct_iou=0.756006, avg_precision=0.401891, avg_recall=0.146048, avg_score=0.568196

id=4, avg_iou=0.821225, avg_correct_iou=0.822419, avg_precision=0.779621, avg_recall=0.798544, avg_score=0.773700

id=5, avg_iou=0.722905, avg_correct_iou=0.721078, avg_precision=0.391119, avg_recall=0.255361, avg_score=0.552248

id=6, avg_iou=0.814797, avg_correct_iou=0.814427, avg_precision=0.731707, avg_recall=0.612245, avg_score=0.833531

id=7, avg_iou=0.713375, avg_correct_iou=0.702796, avg_precision=0.739336, avg_recall=0.715596, avg_score=0.691065

id=8, avg_iou=0.785120, avg_correct_iou=0.797686, avg_precision=0.582267, avg_recall=0.594216, avg_score=0.734099

id=9, avg_iou=0.744355, avg_correct_iou=0.752729, avg_precision=0.523982, avg_recall=0.241049, avg_score=0.650683

id=10, avg_iou=0.736755, avg_correct_iou=0.744951, avg_precision=0.621368, avg_recall=0.382028, avg_score=0.651450
同时result目录下会生成low_list和high_list,内容分别为精度和recall未达标和达标的物体种类。


 1551
1551

 被折叠的 条评论
为什么被折叠?
被折叠的 条评论
为什么被折叠?
 到【灌水乐园】发言


