


注解源码
1.Spring的注解可以分为两类,一个是类上的注解,如@Component; 一个是类内部的注解,如@Autowired;Spring对两种形式的注解的处理是不同的,在Spring的初始化周期中注解生效的时间也不同。
2.使用实例来分析一下(至于项目搭建的步骤见系列第一部分,源码梳理(一))
App.java
package com.mycompany.app;

import org.springframework.stereotype.Component;

/**
 * Hello world!
 *
 */
@Component
public class App
{
	public String appString = "This is App";
}
God.java
package com.mycompany.app;

import org.springframework.beans.factory.annotation.Autowired;
import org.springframework.context.ApplicationContext;
import org.springframework.context.support.ClassPathXmlApplicationContext;
import org.springframework.stereotype.Component;

@Component
public class God {
	@Autowired
	public App app;

	public void godSay(){
		System.out.println("God.godSay():"+app.appString);
	}
	@SuppressWarnings("resource")
	public static void main(String[] args) {
	     ApplicationContext applicationContext = new ClassPathXmlApplicationContext("SpringBean.xml");
	     God god = (God)applicationContext.getBean("god");
	     god.godSay();
	}

}
SpringBean.xml
<?xml version="1.0" encoding="UTF-8"?>
<beans xmlns="http://www.springframework.org/schema/beans"
    xmlns:xsi="http://www.w3.org/2001/XMLSchema-instance" xmlns:context="http://www.springframework.org/schema/context"
    xmlns:mybatis-spring="http://mybatis.org/schema/mybatis-spring"
    xmlns:tx="http://www.springframework.org/schema/tx" xmlns:jee="http://www.springframework.org/schema/jee"
    xsi:schemaLocation="http://www.springframework.org/schema/beans http://www.springframework.org/schema/beans/spring-beans-3.2.xsd
        http://www.springframework.org/schema/context http://www.springframework.org/schema/context/spring-context-3.2.xsd
        http://www.springframework.org/schema/jee http://www.springframework.org/schema/jee/spring-jee-3.2.xsd
        http://mybatis.org/schema/mybatis-spring http://mybatis.org/schema/mybatis-spring-1.2.xsd
        http://www.springframework.org/schema/tx http://www.springframework.org/schema/tx/spring-tx-3.2.xsd">

    <context:component-scan base-package="com.mycompany.app" />

</beans>
pom.xml
<project xmlns="http://maven.apache.org/POM/4.0.0" xmlns:xsi="http://www.w3.org/2001/XMLSchema-instance"
xsi:schemaLocation="http://maven.apache.org/POM/4.0.0 http://maven.apache.org/maven-v4_0_0.xsd">
<modelVersion>4.0.0</modelVersion>
<groupId>com.mycompany.app</groupId>
<artifactId>myapp</artifactId>
<packaging>jar</packaging>
<version>1.0-SNAPSHOT</version>
<name>myapp</name>
<url>http://maven.apache.org</url>
<properties>
<project.build.sourceEncoding>UTF-8</project.build.sourceEncoding>
<spring.version>4.3.0.RELEASE</spring.version>
</properties>
<dependencies>
<dependency>
<groupId>org.springframework</groupId>
<artifactId>spring-core</artifactId>
<version>${spring.version}</version>
</dependency>
<dependency>
<groupId>org.springframework</groupId>
<artifactId>spring-tx</artifactId>
<version>${spring.version}</version>
</dependency>
<dependency>
<groupId>org.springframework</groupId>
<artifactId>spring-web</artifactId>
<version>${spring.version}</version>
</dependency>
<dependency>
<groupId>org.springframework</groupId>
<artifactId>spring-context-support</artifactId>
<version>${spring.version}</version>
</dependency>
<dependency>
<groupId>org.springframework</groupId>
<artifactId>spring-context</artifactId>
<version>${spring.version}</version>
</dependency>
<dependency>
<groupId>org.springframework</groupId>
<artifactId>spring-webmvc</artifactId>
<version>${spring.version}</version>
</dependency>
<dependency>
<groupId>org.springframework</groupId>
<artifactId>spring-jdbc</artifactId>
<version>${spring.version}</version>
</dependency>
</dependencies>
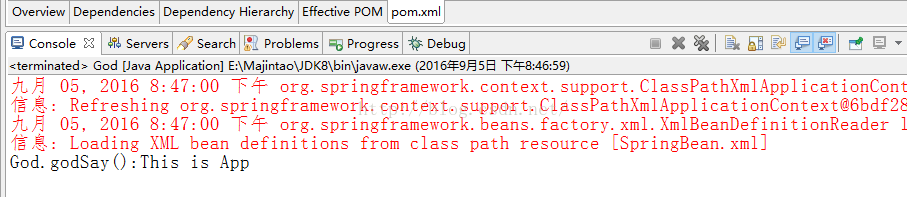
</project>运行God.java,得到的结果是:
3.首先可以做以下猜想
1)对于上面的两种注解,Spring读取相关的字节码文件,然后找到相关的关键字;针对关键字做处理。
2)对于类注解,直接注册类信息,放入DefinitionMap;对于类内部的注解,如何把信息注入进去的?有两种猜测
A:之前的源码分析中提到了,BeanFactoryPostProcessor,它也被称作容器的后置处理器,因为它是在Spring容器加载完所有的Bean信息之后(是加载Bean,不是初始化)调用的处理器。 所以猜测注解可能是由BeanFactoryPostProcessor来实现的。
B:之前的源码分析中也提到了BeanPostProcessor,它包括了两个方法:postProcessBeforeInitialization和postProcessAfterInitialization;它们分别被称为Bean的前置和后置处理器;因为它们分别在Bean的初始化前后调用。所以猜测注解也可能是这两个方法来实现的。
4.调试,对代码进行分析
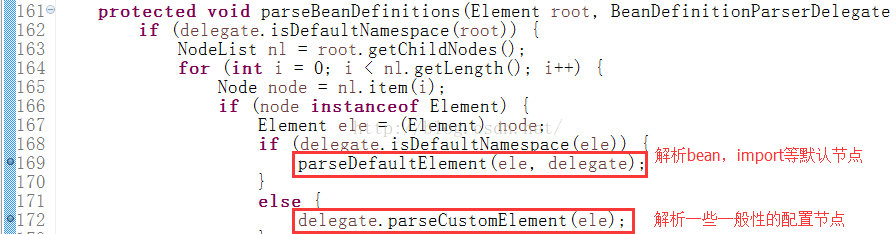
1)首先通过加载配置文件然后解析相关类的过程是在BeanFacroty的初始化过程中;所以我们分析的是obtainFreshBeanFactory方法:

一直debug到前面文章讲到过的parseBeanDefinitions方法:
我们的context节点属于一般性的配置节点,进入parseCustomElement方法:
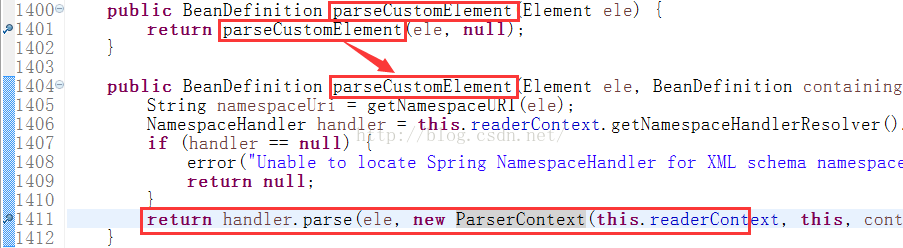
然后进入parse方法:
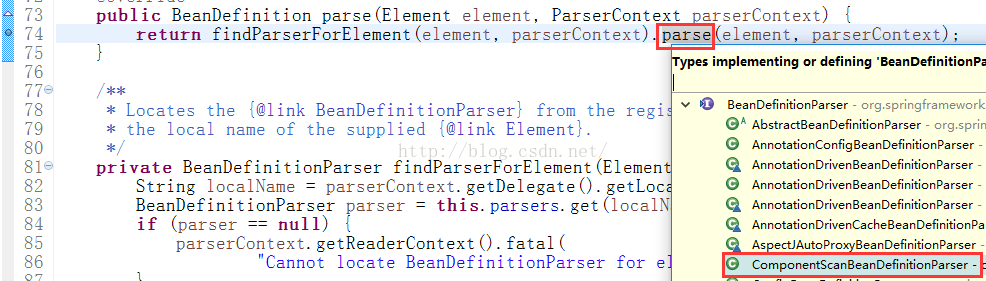
它有多个实现类,我们的配置文件中的一个配置是<context: componentScan/>,所以我们进入ComponentScanBeanDefinitionParser方法:
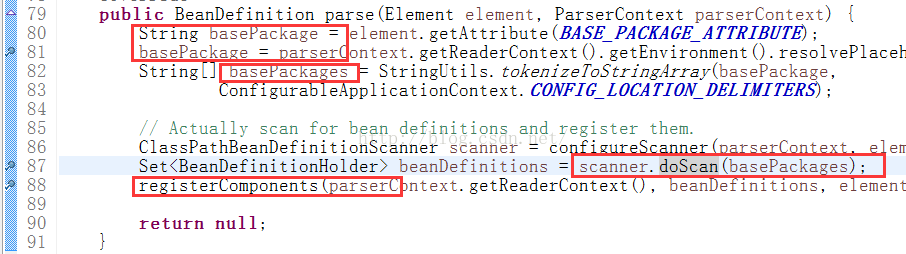
basePackage指的是我们要扫描package,basepackages指的是package下面的java类; doScan方法对其中每一个java类进行扫描(包括类上的和类内部的注解),进入doScan方法:
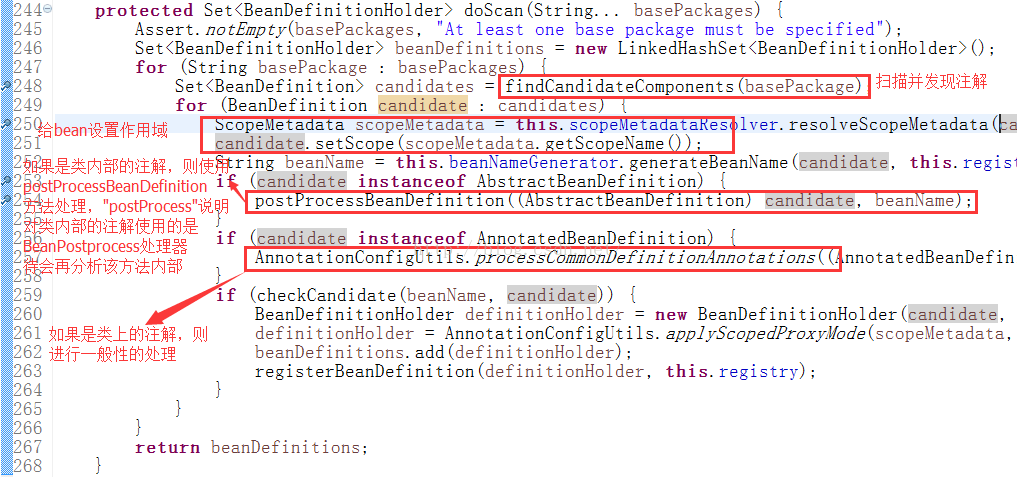
2)然后顺着findCandidateComponents方法


3)通过一点点分析postProcessBeanDefinition方法,发现实际上它是在beanDefinition中设置相关的属性, 通过设置自动注入的属性(从而在注册bean处理器时发现它,使它继承AutowiredAnnotationBeanPostProcessor接口),然后在初始化时,在Bean的后置处理方法中开始注入。这就说明猜想2中的B是正确的,而且注入实际上是bean后置处理器实现的,既postProcessAfterInitialization。
至于processCommonDefinitionAnnotations方法,就是对类上的bean进行处理, 然后设置beanDefinition中的属性, 最后在初始化的时候对类进行初始化(没有注册BeanPostProcessor的过程),也证实猜想1是正确的。
总结如图:
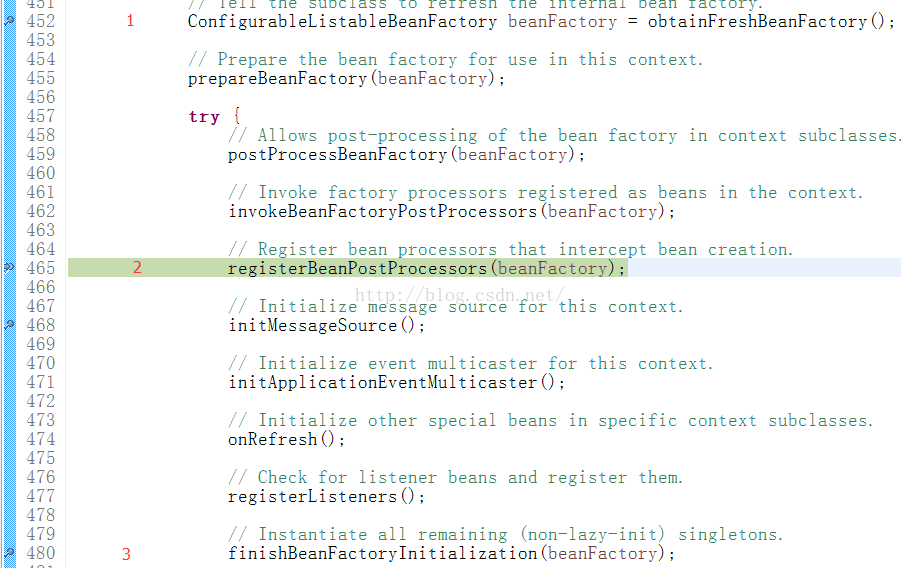
类内的注解经过了1,2,3三个方法,而类上的注解经过了1,3两个方法。 分析到此,注解生效的整个生命周期就很清楚了。


 1214
1214


 被折叠的 条评论
为什么被折叠?
被折叠的 条评论
为什么被折叠?
 到【灌水乐园】发言


