


Activity的启动流程相对复杂一些,涉及到了Activity中的生命周期方法,涉及到了Android体系的CS模式,涉及到了Android中进程通讯Binder机制等等。
前言
我们先看一下源码中对Activity的描述,如下:
An activity is a single, focused thing that the user can do.  Almost all activities interact with the user, so the Activity class takes
care of creating a window for you in which you can place your UI with {@link #setContentView}.  While activities are often presented to
the user as full-screen windows, they can also be used in other ways: as floating windows (via a theme with {@link
android.R.attr#windowIsFloating} set) or embedded inside of another activity (using {@link ActivityGroup}).
Sometimes an Activity may need to do a long-running operation that exists independently of the activity lifecycle itself.  An example
may be a camera application that allows you to upload a picture to a web site.  The upload may take a long time, and the application
should allow the user to leave the application while it is executing.  To accomplish this, your Activity should start a {@link Service}
in which the upload takes place.  This allows the system to properly prioritize your process (considering it to be more important than
other non-visible applications) for the duration of the upload, independent of whether the original activity is paused, stopped, or
finished.
在介绍Activity的启动流程之前,我们先介绍几个概念:
Activity的生命周期
protected void onCreate(Bundle savedInstanceState);
protected void onRestart();
protected void onStart();
protected void onResume();
protected void onPause();
protected void onStop();
protected void onDestory(); Activity的启动模式
使用android:launchMode属性可以配置Activity的启动模式;主要有四种模式:standard标准模式,singleTop(Task栈顶单例模式),singleTask(Task内单例模式),singleInstance(全局单例模式)。
Android采用Task来管理Activity,当启用一个应用时,Android会为之创建一个Task,Task以栈的形式管理Activity,先启动的Activity保存到Task栈底,后启动的Activity放在Task栈顶。
standard标准模式:创建一个新的目标Activity实例,并添加到当前Task栈中。
singleTop(Task栈顶单例模式):与standard模式类似,但是当要启动的目标Activity已经位于Task栈顶时,系统不会创建目标Activity的实例,而是直接复用已有的Activity实例。
singleTask(Task内单例模式):Task内只有一个实例。
(1)、如果将要启动的目标Activity不存在,创建目标Activity的实例,并将它加入Task栈顶;
(2)、如果将要启动的目标Activity已经位于栈顶,与singleTop类似,不再创建新的Activity实例,直接复用已有的Activity;
(3)、如果将要启动的目标Activity已经存在,但没有位于栈顶,系统将把位于该Activity上面的所有Activity移出Task栈,从而使目标Activity位于栈顶。
singleInstance(全局单例模式):系统无论从哪个Task中启动Activity,只会创建一个目标Activity实例,并会使用一个新的Task栈来加载该Activity实例。
(1)、如果要启动的目标Activity实例不存在,系统会先创建一个全新的Task,再创建目标Activity实例,并将它加入Task栈顶;
(2)、如果要启动的 目标Activity已经存在,无论它位于哪个应用程序中、位于哪个Task中,系统都会把它所在的Task转到前台,从而使Activity显示出来。Activity的启动进程
在AndroidManifest.xml中定义Activity的时候,Activity默认是属于进程名称为包名的进程的,当然这时候是可以指定Activity的启动进程(android:process),所以在Activity启动时首先会检测当前Activity所属的进程是否已经启动,若进程没有启动,则首先会启动该进程,并在该进程启动之后才会执行Activity的启动过程。
Intent启动Activity的方式
有两种方式启动一个Activity,一是在Launcher中点击应用的图标;二是在应用内部,通过函数调用启动Activity。
Intent启动Activity分为两种方式,即显式启动和隐式启动。
显式启动就是在初始化Intent对象的时候,直接引用需要启动的Activity的字节码。显式启动的好处就是直接告诉Intent对象要启动的Activity对象,不需要执行IntentFilter索引需要启动哪一个Activity,但是显式启动不能启动其他进程的Activity对象,因为无法获取其他进程的Activity对象的字节码。隐式启动则可以通过配置IntentFilter启动其他进程的Activity对象。
在应用内,一般都是使用显式启动的方式启动Activity;而如果需要启动其他应用的Activity时,一般使用隐式启动的方式。
Android framework层的CS模式
我们知道Android系统在启动过程中会执行这样的逻辑:Zygote进程 –> SystemServer进程 –> 各种系统服务 –> 应用进程。
在Actvity启动过程中,其实是应用进程与SystemServer进程相互配合启动Activity的过程,其中应用进程主要用于执行具体的Activity的启动过程,回调生命周期方法等操作,而SystemServer进程则主要是调用其中的各种服务,将Activity保存在栈中,协调各种系统资源等操作。
流程简要分析
这里先看下大致的流程图,如下:
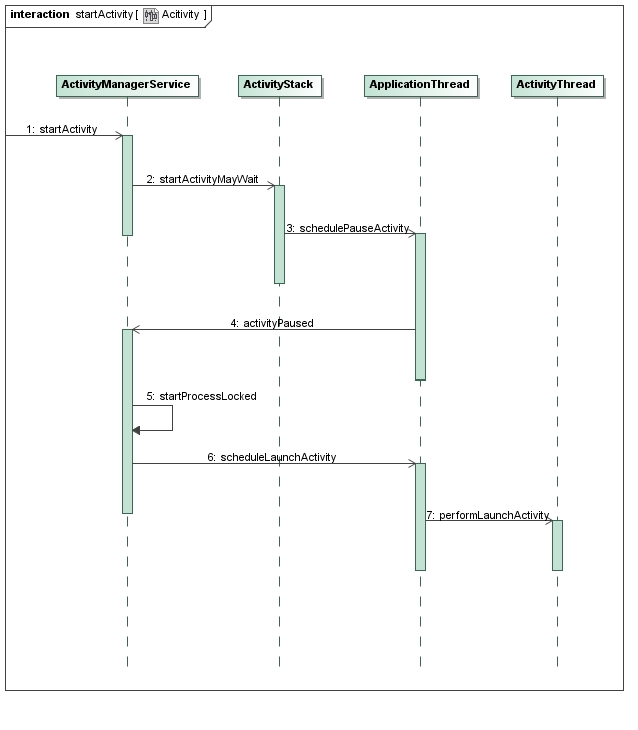
在这个图中,ActivityManagerService和ActivityStack位于同一个进程中,而ApplicationThread和ActivityThread位于另一个进程中。其中,ActivityManagerService是负责管理Activity的生命周期的,AMS还借助ActivityStack是来把所有的Activity按照后进先出的顺序放在一个堆栈中;对于每一个应用程序来说,都有一个ActivityThread来表示应用程序的主进程,而每一个ActivityThread都包含一个ApplicationThread实例,它是一个Binder对象,负责和其他进程进行通信。
下面简要介绍一下启动的流程:
1. 无论是通过Launcher来启动Activity,还是通过Activity内部调用startActivity接口来启动新的Activity,都通过Binder进程间通信进入到ActivityManagerService进程中,并且调用AMS.startActivity()方法;
2. AMS调用ActivityStack.startActivityMayWait()方法来做准备要启动的Activity的相关信息;
3. ActivityStack通知ApplicationThread要进行Activity启动调度了;这里的ApplicationThread代表的是调用ActivityManagerService.startActivity()方法的进程,对于通过点击应用程序图标的情景来说,这个进程就是Launcher了,而对于通过在Activity内部调用startActivity的情景来说,这个进程就是这个Activity所在的进程了;
4. ApplicationThread不执行真正的启动操作,它通过调用AMS.activityPaused()方法进入到AMS进程中,看看是否需要创建新的进程来启动Activity;
5. 对于通过点击应用程序图标来启动Activity的情景来说,AMS在这一步中,会调用startProcessLocked()方法来创建一个新的进程;而对于通过在Activity内部调用startActivity()方法来启动新的Activity来说,这一步是不需要执行的,因为新的Activity就在原来的Activity所在的进程中进行启动;
6. AMS调用ApplicationThread.scheduleLaunchActivity()方法,通知相应的进程执行启动Activity的操作;
7. ApplicationThread把这个启动Activity的操作转发给ActivityThread,ActivityThread通过ClassLoader导入相应的Activity类,然后把它启动起来。
开始请求执行启动Activity
上面简要介绍了Android应用程序的Activity的启动过程。在Android系统中,应用程序是由Activity组成的,因此,应用程序的启动过程实际上就是应用程序中的默认Activity的启动过程,我们下面将详细分析应用程序框架层的源代码,了解Android应用程序的启动过程。这一节主要分析在Launcher界面通过点击应用程序图标的情景,在应用程序内部通过startActivity()方法的情景后面再学习,下面进入主题。
1. Launcher.startActivitySafely
在Android系统中,应用程序是由Launcher启动起来的,其实,Launcher本身也是一个应用程序,其它的应用程序安装后,就会Launcher的界面上出现一个相应的图标,点击这个图标时,Launcher就会把对应的应用程序启动起来。
负责启动其它应用程序的源代码实现在src/com/android/launcher3/Launcher.java文件中:
/**
* Default launcher application.
*/
public final class Launcher extends Activity
		implements View.OnClickListener, OnLongClickListener, LauncherModel.Callbacks, AllAppsView.Watcher {

	......

	/**
	* Launches the intent referred by the clicked shortcut.
	*
	* @param v The view representing the clicked shortcut.
	*/
	public void onClick(View v) {
		Object tag = v.getTag();
		if (tag instanceof ShortcutInfo) {
			// Open shortcut
			final Intent intent = ((ShortcutInfo) tag).intent;
			int[] pos = new int[2];
			v.getLocationOnScreen(pos);
			intent.setSourceBounds(new Rect(pos[0], pos[1],
				pos[0] + v.getWidth(), pos[1] + v.getHeight()));
			startActivitySafely(intent, tag);
		} else if (tag instanceof FolderInfo) {
			......
		} else if (v == mHandleView) {
			......
		}
	}

	void startActivitySafely(Intent intent, Object tag) {
		intent.addFlags(Intent.FLAG_ACTIVITY_NEW_TASK);//默认添加Intent.FLAG_ACTIVITY_NEW_TASK标记
		try {
			startActivity(intent);
		} catch (ActivityNotFoundException e) {
			......
		} catch (SecurityException e) {
			......
		}
	}

	......

}2. Activity.startActivity
在Step 1中,我们看到,Launcher继承于Activity类,而Activity类实现了startActivity函数,因此,这里就调用了Activity.startActivity函数,它实现在frameworks/base/core/java/android/app/Activity.java文件中:
@Override
    public void startActivity(Intent intent) {
        this.startActivity(intent, null);
    }
@Override
public void startActivity(Intent intent, @Nullable Bundle options) {//options为null
if (options != null) {
startActivityForResult(intent, -1, options);
} else {
// Note we want to go through this call for compatibility with
// applications that may have overridden the method.重写这个方法来兼容应用程序
startActivityForResult(intent, -1);
}
}
由于上一步中传递的Bundle对象为空,所以这里我们执行的是else分支的逻辑,所以这里调用了startActivityForResult方法,并且传递的参数为intent和-1。
注意:通过这里的代码可以发现,我们调用startActivity方法时,在其内部也是调用startActivityForResult()方法的。那么为什么调用startActivityForResult方法可以在Activity中回调onActivityResult(),而调用startActivity()则不可以呢?可以发现其主要区别是,在startActivity()方法内部调用startActivityForResult()方法时,传递给startActivityForResult()的requestCode参数的值是-1。也就是说,我们在Activity中调用startActivityForResult()方法时,传递的requestCode值为-1的话,那么onActivityResult()方法是不起作用的。实际上,经测试requestCode的值小于0的时候都是不起作用的,所以当我们调用startActivityForResult的时候需要注意这一点。
3. Activity.startActivityForResult
这个函数也是实现在frameworks/base/core/java/android/app/Activity.java文件中:
    public void startActivityForResult(@RequiresPermission Intent intent, int requestCode) {
        startActivityForResult(intent, requestCode, null);//requestCode=-1
    }
public void startActivityForResult(@RequiresPermission Intent intent, int requestCode,
@Nullable Bundle options) {//requestCode=-1,options为null
if (mParent == null) {//第一次启动Activity,mParent为null;表面该Activity是否由父Activity启动
options = transferSpringboardActivityOptions(options);
Instrumentation.ActivityResult ar =
mInstrumentation.execStartActivity(
this, mMainThread.getApplicationThread(), mToken, this,
intent, requestCode, options);//Instrumentation类用来监控应用程序和系统的交互
if (ar != null) {
mMainThread.sendActivityResult(
mToken, mEmbeddedID, requestCode, ar.getResultCode(),
ar.getResultData());//mMainThread代表主线程(Launcher应用程序允许的进程)
}
if (requestCode >= 0) {//这就是判断requestCode的逻辑,只有当requestCode>=0时,onActivityResult才会被回调。
// If this start is requesting a result, we can avoid making如果请求一个返回结果,可以在结果返回之前使Activity不可见。
// the activity visible until the result is received. Setting
// this code during onCreate(Bundle savedInstanceState) or onResume() will keep the
// activity hidden during this time, to avoid flickering.在onCreate或onResume方法内设置这个值,保持Activity隐藏,避免闪烁
// This can only be done when a result is requested because
// that guarantees we will get information back when the
// activity is finished, no matter what happens to it.只有在请求结果时才允许这样做
mStartedActivity = true;
}
cancelInputsAndStartExitTransition(options);
// TODO Consider clearing/flushing other event sources and events for child windows.
} else {
if (options != null) {
mParent.startActivityFromChild(this, intent, requestCode, options);
} else {
// Note we want to go through this method for compatibility with
// existing applications that may have overridden it.
mParent.startActivityFromChild(this, intent, requestCode);
}
}
}第一次启动Activity时,if分支成立;mInstrumentation是Activity类的成员变量,类型是Instrumentation,用来监控应用程序和系统的交互,Activity、Service等都是通过它来与系统交互。mMainThread类型是ActivityThread,代表应用程序的主线程,这里通过mMainThread.getApplicationThread获得它里面的ApplicationThread成员变量,他是一个Binder对象,AMS会使用它来和ActivityThread进行进程间通信。
mToken是一个Binder对象的远程接口。在AMS中,每个Activity组件都对应一个ActivityRecord对象,AMS以ActivityRecord类型来管理Activity组件。AMS为了将自己内部管理的ActivityRecord实例与某个Activity组件对应起来,就使用一个IBinder实例来作为桥梁,对Activity和ActivityRecord进行关联。所以,AMS通过传入的Activity::mToken对象就可以在它内部找到这个Activity对应的ActivityRecord实例了。
4. Instrumentation.execStartActivity
这个函数定义在frameworks/base/core/java/android/app/Instrumentation.java文件中:
    public ActivityResult execStartActivity(
            Context who, IBinder contextThread, IBinder token, Activity target,
            Intent intent, int requestCode, Bundle options) {
        android.util.SeempLog.record_str(377, intent.toString());
        IApplicationThread whoThread = (IApplicationThread) contextThread;//Launcher组件的主线程
        Uri referrer = target != null ? target.onProvideReferrer() : null;
        if (referrer != null) {
            intent.putExtra(Intent.EXTRA_REFERRER, referrer);
        }
        if (mActivityMonitors != null) {
            ......
        }
        try {
            intent.migrateExtraStreamToClipData();
            intent.prepareToLeaveProcess(who);//即将离开的进程是Launcher进程
            int result = ActivityManagerNative.getDefault()
                .startActivity(whoThread, who.getBasePackageName(), intent,
                        intent.resolveTypeIfNeeded(who.getContentResolver()),
                        token, target != null ? target.mEmbeddedID : null,
                        requestCode, 0, null, options);//调用到AMS的startActivity方法
            checkStartActivityResult(result, intent);
        } catch (RemoteException e) {
            throw new RuntimeException("Failure from system", e);
        }
        return null;
}5. ActivityManagerProxy.startActivity
这个函数定义在frameworks/base/core/java/android/app/ActivityManagerNative.java文件中:
class ActivityManagerProxy implements IActivityManager
{

	......

	public int startActivity(IApplicationThread caller, Intent intent,
			String resolvedType, Uri[] grantedUriPermissions, int grantedMode,
			IBinder resultTo, String resultWho,
			int requestCode, boolean onlyIfNeeded,
			boolean debug) throws RemoteException {
		Parcel data = Parcel.obtain();
		Parcel reply = Parcel.obtain();
		data.writeInterfaceToken(IActivityManager.descriptor);
		......
		mRemote.transact(START_ACTIVITY_TRANSACTION, data, reply, 0);
		reply.readException();
		int result = reply.readInt();
		reply.recycle();
		data.recycle();
		return result;
	}

	......

}6. ActivityManagerService.startActivity
它定义在frameworks/base/services/java/com/android/server/am/ActivityManagerService.java文件中:
    @Override
    public final int startActivity(IApplicationThread caller, String callingPackage,
            Intent intent, String resolvedType, IBinder resultTo, String resultWho, int requestCode,
            int startFlags, ProfilerInfo profilerInfo, Bundle bOptions) {
        return startActivityAsUser(caller, callingPackage, intent, resolvedType, resultTo,
                resultWho, requestCode, startFlags, profilerInfo, bOptions,
                UserHandle.getCallingUserId());
    }
@Override
public final int startActivityAsUser(IApplicationThread caller, String callingPackage,
Intent intent, String resolvedType, IBinder resultTo, String resultWho, int requestCode,
int startFlags, ProfilerInfo profilerInfo, Bundle bOptions, int userId) {
enforceNotIsolatedCaller("startActivity");
userId = mUserController.handleIncomingUser(Binder.getCallingPid(), Binder.getCallingUid(),
userId, false, ALLOW_FULL_ONLY, "startActivity", null);
// TODO: Switch to user app stacks here.
return mActivityStarter.startActivityMayWait(caller, -1, callingPackage, intent,
resolvedType, null, null, resultTo, resultWho, requestCode, startFlags,
profilerInfo, null, null, bOptions, false, userId, null, null);
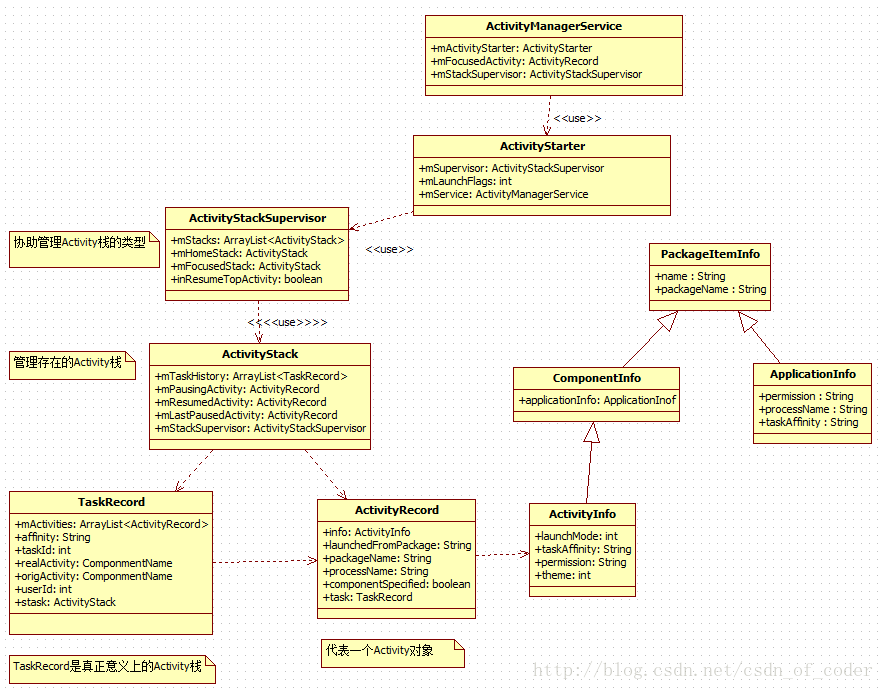
}ActivityStarter是AMS启动Activity的一个管理类,我们这里先看一下AMS在启动Activity过程中,引入的一些辅助类,如下:
7. ActivityStarter.startActivityMayWait
它定义在frameworks/base/services/java/com/android/server/am/ActivityStarter.java文件中,该函数较长,我们分为三个部分进行分析:
第一部分
    final int startActivityMayWait(IApplicationThread caller, int callingUid,
            String callingPackage, Intent intent, String resolvedType,
            IVoiceInteractionSession voiceSession, IVoiceInteractor voiceInteractor,
            IBinder resultTo, String resultWho, int requestCode, int startFlags,
            ProfilerInfo profilerInfo, IActivityManager.WaitResult outResult, Configuration config,
            Bundle bOptions, boolean ignoreTargetSecurity, int userId,
            IActivityContainer iContainer, TaskRecord inTask) {
        // Refuse possible leaked file descriptors
        if (intent != null && intent.hasFileDescriptors()) {
            throw new IllegalArgumentException("File descriptors passed in Intent");
        }
        mSupervisor.mActivityMetricsLogger.notifyActivityLaunching();
        boolean componentSpecified = intent.getComponent() != null;//判断是否指定了组件名

        // Save a copy in case ephemeral needs it保存副本,以备临时所需
        final Intent ephemeralIntent = new Intent(intent);
        // Don't modify the client's object!创建一个新的intent对象,方便改动
        intent = new Intent(intent);

        ResolveInfo rInfo = mSupervisor.resolveIntent(intent, resolvedType, userId);//通过PMS根据intent获取需要启动的组件的更多信息
        if (rInfo == null) {//从Launcher启动时,ResolveInfo不会为null
            ......
        }
        // Collect information about the target of the Intent.
        ActivityInfo aInfo = mSupervisor.resolveActivity(intent, rInfo, startFlags, profilerInfo);//获取Activity组件信息保存到aInfo

        ActivityOptions options = ActivityOptions.fromBundle(bOptions);//得到options,其中可能指定了Activity要加入的Task
        ActivityStackSupervisor.ActivityContainer container =
                (ActivityStackSupervisor.ActivityContainer)iContainer;
        synchronized (mService) {
            if (container != null && container.mParentActivity != null &&
                    container.mParentActivity.state != RESUMED) {//如果通过am命令启动Activity,父Activity为null
                // Cannot start a child activity if the parent is not resumed.父Activity没有恢复,子Activity不能启动
                return ActivityManager.START_CANCELED;//从一个Activity启动另一个Activity,要求父Activity已经执行过onResume方法
            }
            final int realCallingPid = Binder.getCallingPid();
            final int realCallingUid = Binder.getCallingUid();
            int callingPid;
            if (callingUid >= 0) {
                callingPid = -1;
            } else if (caller == null) {//caller不为null
                callingPid = realCallingPid;
                callingUid = realCallingUid;
            } else {
                callingPid = callingUid = -1;
            }

            final ActivityStack stack;//Activity启动时的Task栈
            if (container == null || container.mStack.isOnHomeDisplay()) {//am指令启动,或home来启动Activity
                stack = mSupervisor.mFocusedStack;//stack为前台栈
            } else {
                stack = container.mStack;//从一个Activity启动另一个Activity时,Stack为父Activity的task栈
            }
            stack.mConfigWillChange = config != null && mService.mConfiguration.diff(config) != 0;//am指令启动时config为null
            if (DEBUG_CONFIGURATION) Slog.v(TAG_CONFIGURATION,
                    "Starting activity when config will change = " + stack.mConfigWillChange);

            final long origId = Binder.clearCallingIdentity();

            if (aInfo != null &&
                    (aInfo.applicationInfo.privateFlags
                            & ApplicationInfo.PRIVATE_FLAG_CANT_SAVE_STATE) != 0) {//heavy-weight进程处理逻辑
                // This may be a heavy-weight process!  Check to see if we already
                // have another, different heavy-weight process running.
                ......
            }
从上面代码来看,startActivityMayWait()在第一阶段最主要的工作其实就是:
1、解析出与intent相匹配的ActivityInfo;
2、得到启动该Activity的Task,即父Activity的Task或前台Task。
第二部分
            final ActivityRecord[] outRecord = new ActivityRecord[1];
            int res = startActivityLocked(caller, intent, ephemeralIntent, resolvedType,
                    aInfo, rInfo, voiceSession, voiceInteractor,
                    resultTo, resultWho, requestCode, callingPid,
                    callingUid, callingPackage, realCallingPid, realCallingUid, startFlags,
                    options, ignoreTargetSecurity, componentSpecified, outRecord, container,
                    inTask);//调用startActivityLocked方法继续处理Activity启动流程

            Binder.restoreCallingIdentity(origId);

            if (stack.mConfigWillChange) {
                // If the caller also wants to switch to a new configuration,
                // do so now.  This allows a clean switch, as we are waiting
                // for the current activity to pause (so we will not destroy
                // it), and have not yet started the next activity.
                mService.enforceCallingPermission(android.Manifest.permission.CHANGE_CONFIGURATION,
                        "updateConfiguration()");
                stack.mConfigWillChange = false;
                if (DEBUG_CONFIGURATION) Slog.v(TAG_CONFIGURATION,
                        "Updating to new configuration after starting activity.");
                mService.updateConfigurationLocked(config, null, false);
}在这一部分主要是调用了startActivityLocked()方法来继续处理Activity的启动流程,当该函数成功执行完毕后,Activity将会被启动,并形成对应的ActivityRecord被AMS统一管理。
第三部分
            if (outResult != null) {//outResult不为null,表示等待启动结果;
                outResult.result = res;//目标Activity要运行在一个新的应用进程中,因此需要等到应用进程正常启动并处理相关请求
                if (res == ActivityManager.START_SUCCESS) {
                    mSupervisor.mWaitingActivityLaunched.add(outResult);
                    do {
                        try {
                            mService.wait();//一直等待,直到outResult显示Activity对应的task为前台栈
                        } catch (InterruptedException e) {
                        }
                    } while (outResult.result != START_TASK_TO_FRONT
                            && !outResult.timeout && outResult.who == null);
                    if (outResult.result == START_TASK_TO_FRONT) {
                        res = START_TASK_TO_FRONT;
                    }
                }
                if (res == START_TASK_TO_FRONT) {//Activity对应的task栈拉到前台后,一直要等待该界面被加载
                    ActivityRecord r = stack.topRunningActivityLocked();
                    if (r.nowVisible && r.state == RESUMED) {
                        outResult.timeout = false;
                        outResult.who = new ComponentName(r.info.packageName, r.info.name);
                        outResult.totalTime = 0;
                        outResult.thisTime = 0;
                    } else {
                        outResult.thisTime = SystemClock.uptimeMillis();
                        mSupervisor.mWaitingActivityVisible.add(outResult);
                        do {
                            try {
                                mService.wait();
                            } catch (InterruptedException e) {
                            }
                        } while (!outResult.timeout && outResult.who == null);
                    }
                }
            }

            final ActivityRecord launchedActivity = mReusedActivity != null
                    ? mReusedActivity : outRecord[0];
            mSupervisor.mActivityMetricsLogger.notifyActivityLaunched(res, launchedActivity);
            return res;
}8.ActivityStarter.startActivityLocked
它定义在frameworks/base/services/java/com/android/server/am/ActivityStarter.java文件中:
    final int startActivityLocked(IApplicationThread caller, Intent intent, Intent ephemeralIntent,
            String resolvedType, ActivityInfo aInfo, ResolveInfo rInfo,
            IVoiceInteractionSession voiceSession, IVoiceInteractor voiceInteractor,
            IBinder resultTo, String resultWho, int requestCode, int callingPid, int callingUid,
            String callingPackage, int realCallingPid, int realCallingUid, int startFlags,
            ActivityOptions options, boolean ignoreTargetSecurity, boolean componentSpecified,
            ActivityRecord[] outActivity, ActivityStackSupervisor.ActivityContainer container,
            TaskRecord inTask) {
        int err = ActivityManager.START_SUCCESS;//err用于保存错误信息

        ProcessRecord callerApp = null;//用于保存启动Activity的进程信息
        if (caller != null) {//如果参数中调用者不为空,则从AMS中找到对应的ProcessRecord,目的是得到调用者的pid和uid;am拉起Activity,caller为null
            callerApp = mService.getRecordForAppLocked(caller);
            if (callerApp != null) {
                callingPid = callerApp.pid;
                callingUid = callerApp.info.uid;
            } else {
                Slog.w(TAG, "Unable to find app for caller " + caller
                        + " (pid=" + callingPid + ") when starting: "
                        + intent.toString());
                err = ActivityManager.START_PERMISSION_DENIED;
            }
        }

        final int userId = aInfo != null ? UserHandle.getUserId(aInfo.applicationInfo.uid) : 0;

        if (err == ActivityManager.START_SUCCESS) {
            Slog.i(TAG, "START u" + userId + " {" + intent.toShortString(true, true, true, false)
                    + "} from uid " + callingUid
                    + " on display " + (container == null ? (mSupervisor.mFocusedStack == null ?
                    Display.DEFAULT_DISPLAY : mSupervisor.mFocusedStack.mDisplayId) :
                    (container.mActivityDisplay == null ? Display.DEFAULT_DISPLAY :
                            container.mActivityDisplay.mDisplayId)));
        }

        ActivityRecord sourceRecord = null;//用于保存父Activity的信息
        ActivityRecord resultRecord = null;//用于保存接收启动结果的Activity的信息
        if (resultTo != null) {//对startActivityForResult()才有意义
            sourceRecord = mSupervisor.isInAnyStackLocked(resultTo);//判断是否有resultTo对应的ActivityRecord
            if (DEBUG_RESULTS) Slog.v(TAG_RESULTS,//隐含条件是resultTo的对象就是父Activity
                    "Will send result to " + res
最低0.47元/天 解锁文章


 2万+
2万+


 被折叠的 条评论
为什么被折叠?
被折叠的 条评论
为什么被折叠?
 到【灌水乐园】发言


