


小程序
学习连接
https://uniapp.dcloud.net.cn/
//哔哩哔哩
https://www.bilibili.com/video/BV1vh411B7Sb?share_source=copy_pc
//腾讯课堂
https://ke.qq.com/course/3169971#term_id=103296764
页面调用接口
https://uniapp.dcloud.net.cn/tutorial/page.html#%E9%A1%B5%E9%9D%A2%E8%B0%83%E7%94%A8%E6%8E%A5%E5%8F%A3
vue教程
https://learning.dcloud.io/#/
v-命令是vue的指令,连接
https://uniapp.dcloud.net.cn/tutorial/vue-api.html#%E6%A8%A1%E6%9D%BF%E6%8C%87%E4%BB%A4
css教程
https://www.w3school.com.cn/css/index.asp
Css各个属性
https://www.runoob.com/cssref/css3-pr-align-items.html
命名规范
https://mp.weixin.qq.com/s/8Ts3qXffORHffxRejAsfDg
全局变量和方法
https://ask.dcloud.net.cn/article/35021
Vue中常用变量 标准内置对象 (数组、字典、字符串等 )的操作 字典就是对象啊啊啊
https://developer.mozilla.org/zh-CN/docs/Web/JavaScript/Reference/Global_Objects
1.v-bind:class= 简写为:class
<text v-bind:class=“title” @tap=“openNext”>hhhh
可以绑定一个style,title是data中定义的数据变量,或者写成一个表达式
如果是一个变量,可以通过改变变量为另一种style来改变控件的样式。
可一次绑定多个class,有相同属性的按照最后一个clas的显示
<template>
	<view>
		对象语法
		可以传给 v-bind:class 一个对象,实现动态地切换 class。
		也可以在对象中传入更多字段来动态切换多个 class。此外,v-bind:class 指令也可以与普通的 class 共存。
		<!-- class -->
		<view class="static" :class="{ active: isActive}">111</view>
		<view class="static active">111</view>
		<view>哈哈哈</view>
		<view class="static" :class="{ active: isActive, 'text-danger': hasError }">222</view>
		<!-- style -->
		<view v-bind:style="{ color: activeColor, fontSize: fontSize + 'px' }">333</view>

		<view>
			数组语法
			可以把一个数组传给 v-bind:class,以应用一个 class 列表。
			<!-- class -->
			<view class="static" :class="[activeClass,errorClass]">111</view>
			<view class="static" v-bind:class="[isActive ? activeClass : '', errorClass]">222</view><!-- 三元表达式 -->
			<view class="static" v-bind:class="[{ active: isActive }, errorClass]">333</view>
			<!-- style -->
			<view v-bind:style="[{ color: activeColor, fontSize: fontSize + 'px' }]">444</view>
			<!-- 在class中使用变量 -->
			<view class="variableClass" :style="{'--useMineColor':mineColor,'--useMineBackColor':mineBackColor}">
				在class中使用变量</view>

		</view>
	</view>
</template>
<script>
	export default {
		data() {
			return {
				isActive: true,
				hasError: false,
				activeColor: "green",
				fontSize: 50,
				activeClass: 'active',
				errorClass: 'text-danger',
				kkkkk: '#DD524D',

				mineColor: 'red',
				mineBackColor: '#0A84FF',
			}
		}
	}
</script>
<style>
	.static {
		color: #2C405A;
		font-size: 30rpx;
		/* background-color: #DD524D; */
	}

	.active {
		background-color: #007AFF;
	}

	.text-danger {
		color: #DD524D;
	}

	.text-danger {
		font-size: 60rpx;
		color: #DD524D;
	}

	.variableClass {
		/* 在class中使用变量 */
		color: var(--useMineColor);
		position: absolute;
		background-color: var(--useMineBackColor);
	}
</style>
2.绑定事件
@tap=“openNext”
v-on:click=“openNext” 简写成 @click=“openNext”
3.v-model
绑定变量kk到输入框,在表单控件或者组件上创建双向绑定4.v-if= v-else-if= v-else
条件判断,决定某个内容或控件是否挂载,v-show 条件判断是否显示
<view v-if="false">kkkk</view>
<view v-else>ssss</view>
5. 绑定事件
@click @click.stop,可以阻止事件穿透,也就是说点击子级不会响应父级事件。
<view @click=‘show’>
父级:{{father}}
<view @click.stop=‘showSub’>子级:{{sub}}
6.自定义组件
组件中对数据的处理要放到mounted方法中,以避免微信小程序不兼容
https://uniapp.dcloud.net.cn/tutorial/vue-components.html#%E6%A6%82%E5%BF%B5
<template>
	<view>
		<!-- 传递固定值 -->
		<cellNew textOne="嘿嘿"></cellNew>
		<!-- 传递变量 -->
		<cellNew v-bind:textOne="textO"></cellNew>
		<!--  向组件中传一个data中的变量 >
		<cellNew :textOne="showText" ref="firstOne"></cellNew>
		<!-- 组件中使用循环的值 -->
		<view v-for="(item,index) in showList" :key="item.name">
			<cellNew :textOne="showText" :textTwo="item.name"></cellNew>
		</view>

		<!-- 绑定事件 -->
		<cellNew @myClick='clickCell' textOne="点击" ></cellNew>

		<!-- ref 为子组件赋予一个 ID 引用,在vue的js中可通过this.$refs.XXX来获取到组件对象 -->
		<cellNew textOne="嘿嘿" ref="firstOne"></cellNew>
	</view>
</template>

<script>
	export default {
		data() {
			return {
				textO: '哈哈哈',
				showText:’’变量值,
			}
		},
		methods: {
			clickCell() {
				/* firstOne 唯一标识;textOne 取到的对象中的变量 */
				console.log(this.$refs.firstOne.textOne)
			}
		}
	}
</script>
7.组件生命周期
只有beforeCreate方法执行时props里的值不存在,其它方法都有
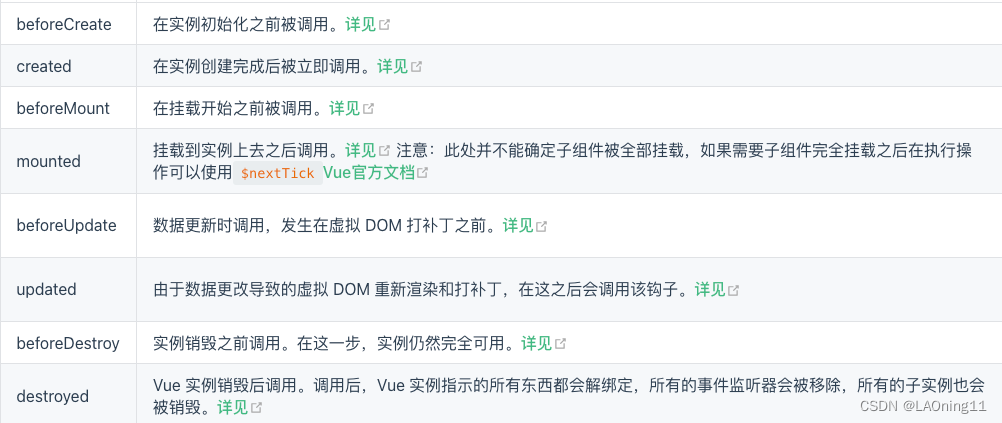
https://uniapp.dcloud.net.cn/tutorial/page.html#componentlifecycle
8.定时器
// 定时器 取消定时器
var timeIDD = setTimeout(function(){
	console.log('wwww');
}, 1000);
clearTimeout(timeIDD);

setTimeout(this.openNext(), 10);

setTimeout(() => {
	this.openNext();
}, 5000)
9.样式和页面布局 iconfont使用
https://uniapp.dcloud.net.cn/tutorial/syntax-css.html#%E9%A1%B5%E9%9D%A2%E6%A0%B7%E5%BC%8F%E4%B8%8E%E5%B8%83%E5%B1%80
css布局
https://www.w3school.com.cn/css/css_boxmodel.asp
https://www.w3school.com.cn/css/css_positioning.asp
Flexbox display: flex; 重点啊
https://www.w3school.com.cn/css/css3_flexbox.asp
CSS 框模型
所有 HTML 元素都可以视为方框。在 CSS 中,在谈论设计和布局时,会使用术语“盒模型”或“框模型”。
CSS 框模型实质上是一个包围每个 HTML 元素的框。它包括:外边距、边框、内边距以及实际的内容。下图展示了框模型:

对不同部分的说明:
- 内容 - 框的内容,其中显示文本和图像。
- 内边距 - 清除内容周围的区域。内边距是透明的。
- 边框 - 围绕内边距和内容的边框。
- 外边距 - 清除边界外的区域。外边距是透明的。
框模型允许我们在元素周围添加边框,并定义元素之间的空间。
元素框的最内部分是实际的内容,直接包围内容的是内边距。内边距呈现了元素的背景。内边距的边缘是边框。边框以外是外边距,外边距默认是透明的,因此不会遮挡其后的任何元素。
提示:背景应用于由内容和内边距、边框组成的区域。
内边距、边框和外边距都是可选的,默认值是零。但是,许多元素将由用户代理样式表设置外边距和内边距。可以通过将元素的 margin 和 padding 设置为零来覆盖这些浏览器样式。这可以分别进行,也可以使用通用选择器对所有元素进行设置: - {
margin: 0;
padding: 0;
}
在 CSS 中,width 和 height 指的是内容区域的宽度和高度。增加内边距、边框和外边距不会影响内容区域的尺寸,但是会增加元素框的总尺寸。
假设框的每个边上有 10 个像素的外边距和 5 个像素的内边距。如果希望这个元素框达到 100 个像素,就需要将内容的宽度设置为 70 像素,请看下图:
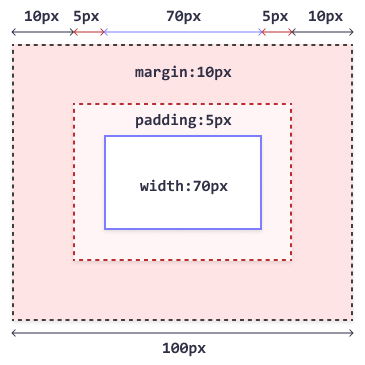
#box {
width: 70px;
margin: 10px;
padding: 5px;
}
提示:内边距、边框和外边距可以应用于一个元素的所有边,也可以应用于单独的边。
提示:外边距可以是负值,而且在很多情况下都要使用负值的外边距。
实例
演示框模型:
div {
width: 300px;
border: 15px solid green;
padding: 50px;
margin: 20px;
}
亲自试一试
元素的宽度和高度
为了在所有浏览器中正确设置元素的宽度和高度,您需要了解框模型如何工作。
重要提示:使用 CSS 设置元素的 width 和 height 属性时,只需设置内容区域的宽度和高度。要计算元素的完整大小,还必须把内边距、边框和外边距加起来。
实例
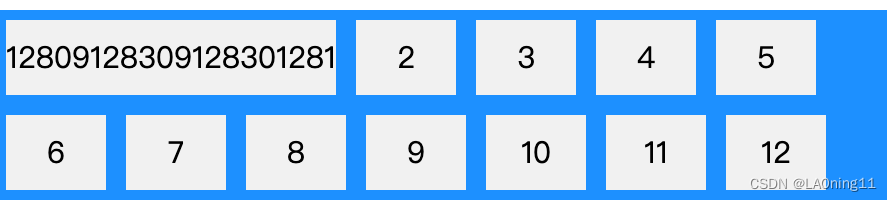
10.v-for
<view v-for="(item,index) in showList" :key="item.name"> </view>
**注意:**需要绑定:key="”,否则会报错 (Emitted value instead of an instance of Error) <v-uni-view v-for="item…
11. 某一页去掉导航条
{
“path”: “pages/LogInControll/LogInControll”,
“style”: {
“enablePullDownRefresh”: false,
“navigationBarTitleText”: “😝”,
//配置下面这个可以隐藏当前页面导航条
“navigationStyle”:“custom”,
}
},
12. Less
less 官网
https://less.bootcss.com/
https://less.bootcss.com/usage/#developing-less
首先需要安装less插件,然后根据提示进行配置
示例:
<style lang="less">
	@bgColor : #999;
.demo {
		position: fixed;
		top: 700rpx;
		background: red;
		width: 400rpx;
/* 想使用test1 外面必须有一个view并且class是demo包裹起来 */
		.test1 {
			width: 300rpx;
			font-size: 12px;
			background: @bgColor;
		}
	}
</style>
使用:想使用test1 外面必须有一个view并且class是demo包裹起来**
<view class="demo">
			demo
			<view class="test1">生效</view>
		</view>
		<view class="test1">
			不生效
		</view>
13.CSS Position(定位)
https://www.runoob.com/css/css-positioning.html
①static 定位
HTML 元素的默认值,即没有定位,遵循正常的文档流对象。
静态定位的元素不会受到 top, bottom, left, right影响。
②fixed 定位
元素的位置相对于浏览器窗口是固定位置。
即使窗口是滚动的它也不会移动:
③relative 定位
相对定位元素的定位是相对其正常位置。
④absolute 定位
绝对定位的元素的位置相对于最近的已定位父元素,如果元素没有已定位的父元素,那么它的位置相对于:
⑤sticky 定位
sticky 英文字面意思是粘,粘贴,所以可以把它称之为粘性定位。
position: sticky; 基于用户的滚动位置来定位。
粘性定位的元素是依赖于用户的滚动,在 position:relative 与 position:fixed 定位之间切换。
它的行为就像 position:relative; 而当页面滚动超出目标区域时,它的表现就像 position:fixed;,它会固定在目标位置。
元素定位表现为在跨越特定阈值前为相对定位,之后为固定定位。
这个特定阈值指的是 top, right, bottom 或 left 之一,换言之,指定 top, right, bottom 或 left 四个阈值其中之一,才可使粘性定位生效。否则其行为与相对定位相同。
⑥重叠的元素
元素的定位与文档流无关,所以它们可以覆盖页面上的其它元素
z-index属性指定了一个元素的堆叠顺序(哪个元素应该放在前面,或后面)
一个元素可以有正数或负数的堆叠顺序:
img
{
position:absolute;
left:0px;
top:0px;
z-index:-1;
}
14.接口调用
uni.request({
				/* 官方示例
				 https://uniapp.dcloud.net.cn/api/request/request.html
				 */
				url: 'https://unidemo.dcloud.net.cn/api/news',
				method:'GET',
				data: {
					//参数
				},
				header: {

				},
				fail: (res) => {
				// 正确写法  失败回调
				},
				success: (res) => {
					// 正确写法  成功回调
				},

				/*
				调用接口时成功和失败的回调不能写成下面形式
				虽然可以获取到数据但是赋值后并不能更新页面内容
				success(res) {
					// 错误写法
					this.allMesArr = res.data.data;
				},
				fail(res) {
				// 错误写法
				}, */
				complete: (res) => {
					console.log('complete');
				}
			});
15. style= :style= 后绑定变量 变量
:style=“{height:heightNew+‘rpx’}” heightNew变量
:style=“[{height:heightNew+‘rpx’}]” heightNew变量
:style=“{background: showNoDataView ? ‘#0A84FF’ : ‘#fc001b’,height:heightNew+‘rpx’}” 变量
style=“height:100%” 常量
<template>
	<view>
		方法
		<view class="backStyle" style="border-radius:18rpx 18rpx 18rpx 0rpx;height: 100rpx;">
			style 使用常量 直接写就行
		</view>

		方法
		*注意:此种写法不支持微信小程序!!!*
		<view class="backStyle" :style="borderRadius=bordeRadiusStyle">
			:style 使用变量 相当于是当成对像使用了
			设置border-radius,要把中间的-去掉,第二个单词首字母大写
		</view>
		方法
		<view>
			一个单词
			<view class="backStyle_Yellow" :style="{height:heightNew+'rpx',borderRadius:bordeRadiusStyleTwo}">
				:style 使用变量 只是使用后面的表达式
				只有一个单词的写法
			</view>
			多个单词
			<view class="backStyle" :style="{borderRadius:bordeRadiusStyleTwo}">
				:style 使用变量 只是使用后面的表达式
				设置border-radius,要把中间的-去掉,第二个单词首字母大写,
				并且对应变量内容里需要去掉 border-radius:
			</view>
			同时设置多个样式
			<view class="backStyle_Yellow" :style="{height:heightNew+'rpx',borderRadius:bordeRadiusStyleTwo}">
				:style 使用变量 只是使用后面的表达式
				同时设置多个样式
			</view>
			样式中 使用表达式
			<view class="backStyle_Yellow" :style="{height:heightNew+'rpx',background: true ? '#0A84FF' : '#fc001b',}">
				:style 使用变量 只是使用后面的表达式
				样式中 使用表达式
			</view>
		</view>
	</view>
</template>

<script>
	export default {
		data() {
			return {
				bordeRadiusStyle: 'border-radius: 18rpx 0rpx 18rpx 0rpx',
				bordeRadiusStyleTwo: '28rpx 28rpx 18rpx 0rpx',
				heightNew: 100,
			}
		},
		methods: {

		}
	}
</script>

<style>
	.backStyle {
		background-color: red;
		display: flex;
		word-break: break-all; ///换行
		//圆角是 顺时针过来的 左上 右上 右下 左下
		// border-radius: 18rpx 0rpx 18rpx 0rpx;
	}

	.backStyle_Yellow {
		background-color: red;
		display: flex;
		word-break: break-all; ///换行
		//圆角是 顺时针过来的 左上 右上 右下 左下
		// border-radius: 18rpx 0rpx 18rpx 0rpx;
	}
</style>
16. 如何在style中使用变量 不推荐 用15
mineBackColor 自定义变量名称
–useMineColor style中使用名称 --必须有否则不生效
color: var(–useMineColor); 使用方式 --必须有否则不生效
<template>
	<view class="variableClass" :style="{'--useMineColor':mineColor,'--useMineBackColor':mineBackColor}">hsswel11lo</view>
</template>

<script>
	export default {
		data() {
			return {
				mineColor: 'red',
				mineBackColor: '#0A84FF',
			}
		}
	}
</script>
<style lang="scss" scoped>
	.variableClass {
		color: var(--useMineColor);
		position: absolute;
		background-color: var(--useMineBackColor);
	}
</style>
17、如何使用变量对字典(object)取值
<script>
	export default {
		data() {
			return {
				willShowInfoTwo: {
					leftName: '333',
					rightName1: '444',
				},
				descr: "备注",
				keyString: 'leftName',
			}
		},
		created() {
			this.test();
		},
		methods: {
			test() {
				this.descr = this.willShowInfoTwo[this.keyString];
			},
		}
	}
</script>
18.Invalid prop: custom validator check failed for prop “confirmType”
<!-- 配置 confirmType="done  以避免出现下面错误信息
					Invalid prop: custom validator check failed for prop "confirmType". -->
					<u-textarea autoHeight placeholder="请输入内容" height="22" confirmType="done"></u-textarea>
19.Vue中常用变量 标准内置对象 (数组、字典、字符串等 )的操作
字典就是对象啊啊啊
官网连接
https://developer.mozilla.org/zh-CN/docs/Web/JavaScript/Reference/Global_Objects
Hbuilderx
https://uniapp.dcloud.net.cn/tutorial/syntax-uts.html#find
/*  新对象 = {...对象1,...对象2,...对象3} 合并两个对象 如果有相同内容,最后面的会保留*/
			var oneDic = {
				'相同的': 'one',
				'会将': '222'
			};
			var twoDic = {
				'相同的': 'two',
				'是是是': '少时诵诗书'
			};
			var threeDic = {
				...oneDic,
				...twoDic
			};
			var fourDic =

				console.log(threeDic);
			/*结果是
			{
			    "相同的": "two",
			    "会将": "222",
			    "是是是": "少时诵诗书"
			} */


			/* 合并数组 */
			var oneArr = ['pme'];
			var twoArr = ['jjjj', 'pme'];
			var fourArr = oneArr.concat(twoArr);
			/* 结果是
			[
			    "pme",
			    "jjjj",
			    "pme"
			]
			 */
			console.log(fourArr);
findIndex() 方法返回数组中满足提供的测试函数的第一个元素的索引。若没有找到对应元素则返回-1。
find()方法返回数组中满足提供的测试函数的第一个元素的值。
这两个后面跟的都是表达式
let number = 2;
			const arr = [0, 1, 2, 3];
			let one = arr.findIndex(item => number == item);//查找item等于number的元素的位置 值为2
			let two = arr.findIndex(item => number < item);//查找item小于number的元素的位置  值为0
			let three = arr.findIndex(item => 5 < item);//查找item小于number的元素的位置  值为-1,找不到就是-1
20.样式中计算 style 使用全局变量
height: calc(100% - 140rpx);
<style lang="scss" scoped>
.withOutBottomView {
		background-color: yellow;
		position: relative;
		margin-bottom: 240rpx;
		margin-top: 22rpx;
		overflow-y: auto;
		height: calc(100% - 140rpx);
		/* $page-margin-left}   定义的全局变量*/
width: calc(100% - #{$page-margin-left} - #{$page-margin-left} - 40rpx);
	}
</style>
21.!important 增加比重
使用uni-icons时,绑定class,class中直接写color并不能改变图标颜色,加上!important可生效。
<uni-icons class="iconSameStyle" custom-prefix="ioticons" type="iot-circle-checked"></uni-icons>

.iconSameStyle {
				margin-right: 20rpx;
				color: red !important;
			}
22.设置元素居中
https://www.runoob.com/cssref/css3-pr-align-items.html
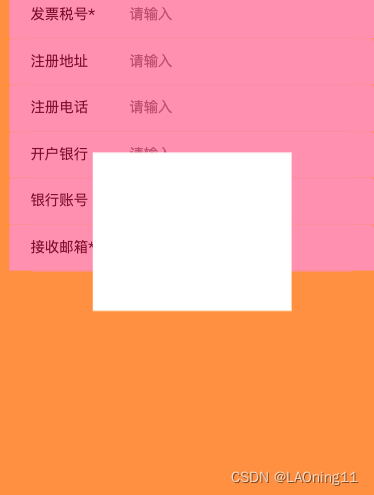
<view class="alertSureView">
			<view class="showInfoBackView">

			</view>
		</view>


//样式
	.alertSureView {
		position: absolute;
		display: flex;
		background-color: rgba(255, 30, 93, 0.5);
		z-index: 999;
		left: 0%;
		right: 0%;
		top: 0%;
		bottom: 0%;

		align-items: center;
		justify-content: center;

		.showInfoBackView {
			position: relative;
			background-color: white;
			height: 300rpx;
			width: 50%;

		}

		.topTitleView {}
	}
23.两个元素一左一右显示
<view class="smsNumberContainer">
			<view class="leftTitleView">
				<input value="购买短信语音条数" disabled="true" style="background-color: bisque;">
			</view>
			<view class="rightNubmerView">
				<input type="number" placeholder='1条起' placeholder-style="color:rgba(180, 180, 180, 1)"
					style="background-color: aqua;">
			</view>
		</view>


<style lang="scss" scoped>
/*  实现一行一左一右布局*/
	.smsNumberContainer {
		background-color: white;
		position: relative;
		display: flex;
		justify-content: space-between; //两个元素时左右显示
		margin-top: 20rpx;
		padding: 24rpx 40rpx;

		color: $item-title-color;
		font-size: 30rpx;

		.leftTitleView {
			width: 60%;
		}

		.rightNubmerView {
			text-align: right;
			width: 35%;
		}
	}
</style>
24苹果日期时间显示nan解决方法
// 苹果显示nan解决方法
					let endTime_Old = new Date();
					var year = Number(endTime_Old.getFullYear() + item.code);
					var month = Number(endTime_Old.getMonth() + 1);
					var date = Number(endTime_Old.getDate());

					return year + '-' + month + '-' + date;
// 时间戳转换成时间timestamp毫秒值
var time = new Date(timestamp);
25.父组件主动调用子组件方法,
https://jingyan.baidu.com/article/e52e36158892b501c60c51b5.html
<template>
	<view class="_abbr">
		<tab-family-message ref="tabFamilyMessage" v-if='loginAppSysType === "home"'></tab-family-message>
	</view>
</template>

<script>
	import tabbarMethods from '@/libs/minx/tabbar.js'
	import {
		mapGetters
	} from 'vuex'
	export default {
		mixins: [tabbarMethods],
		data() {
			return {

			}
		},
		computed: {
			...mapGetters(['loginAppSysType'])
		},
		onPullDownRefresh() {
			console.log('onPullDownRefresh');
			/* 注意  getMessageList 必须是method中的方法 */
			this.$refs.tabFamilyMessage.getMessageList();
		},
	}
26.使用非全局组件
- 创建正常的vue文件,然后添加name,就是使用时的组件名字
<script>
	export default {
		name: 'building-control-place-home',
		data() {
			return {

			}
		},
		methods: {

		}
	}
</script>
- 在需要使用的地方导入此文件
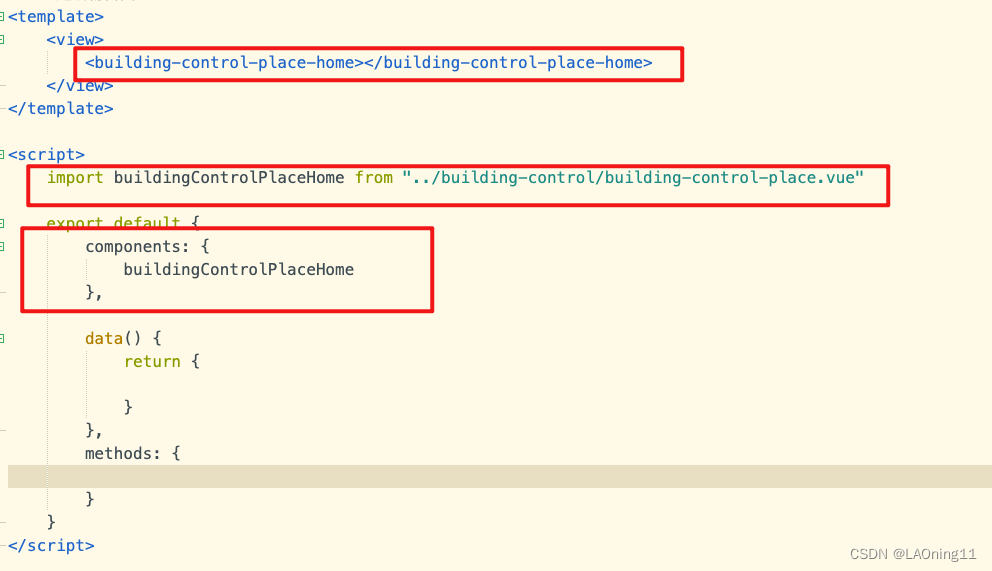
注意:子组件中name对应的名字要和导入时的名称保持一致,‘-’后面的首字母大写
例如,子组件 name: ‘building-control-place-home’,
对应使用时导入为 import buildingControlPlaceHome from “…/building-control/building-control-place.vue”
27 数据更新了,但是页面不渲染的问题
第一种情况:就是在初始化的时候没有这个属性,是动态添加的属性。这个时候不会引起vue自动渲染机制。
this.$set(object, key, data);
object:目标对象。key:需要添加的属性名。data:属性值。
第二种情况:在操作数组的时候,要用push 或者 splice 等 可以改变这种方法改变原数组。而不是用下标 this.mydata[0] = ‘改变的值’。这样也会引起不渲染。
如果情况比较复杂,所有方法都试过了还没有解决,用 v-if 强制重新渲染更新。
28 文字配置
文字超出范围显示省略号不换行
overflow: hidden;
white-space: nowrap;
text-overflow: ellipsis;
display: inline-block;
width: 100%;
配置文字没有上下距离,就是font是多少就是多高
设置line-height:1
29、map使用
A:标记点markers设置本地图片路径:
iconPath: '/…/…/…/static/ic_green_point.png’注意最前面的/
iconPath: '/static/ic_green_point.png’//这样写也行
B:显示用户当前位置=== :show-location=‘true’
30、对函数添加注释
自定义快捷方法
//添加函数注释、说明信息
"funDescr": {
	"prefix": "fundescr",
	"body": [
		"/**",
		" * ${1:functionDescr}",
		" * @param {${2:type}} ${3:name} ${4:descr}",
		" */"
	],
	"triggerAssist": false,
	"description": "函数说明"
}
31、导node_modules、axios
进入对应项目,执行npm install
进入对应项目,导入、安装axios 执行 npm install axios
32、页面设置height 100%不生效
在App.vue文件中添加全局配置,如下
<style>
	/*每个页面公共css */

	/* 设置整个项目的背景色,设置完直接生效 */
	page {
		width: 100%;
		height: 100%;
		background-color: #F5F8FBFF;
	}
</style>
然后再需要的页面直接设置即可,如
<template>
	<view style="background-color: red;height: 100%;">
	</view>
</template>
33、添加特殊字体
在app.vue文件
/* 添加特殊字体 如果需要添加另一个只需要在写一个@font-face{} */
	@font-face {
		font-family: "DIN-BlackItalic";
		src: url('~@/static/DIN-BlackItalic.otf');
	}
使用时引入即可:
font-family: ‘DIN-BlackItalic’;
34、flex布局占满剩余空间
设置子元素 flex:1;
35、字符串包含、字典判断是否有内容
If (‘12345’.includes(‘’xxxx)){
//包含
}else{//不包含}
!! 不能直接用.length 判断
// 定义一个空字典
let dict = {};
// 判断字典是否为空
if (Object.keys(dict).length > 0) {
console.log(‘字典不为空’);
} else {
console.log(‘字典为空’);
}


 4427
4427


 被折叠的 条评论
为什么被折叠?
被折叠的 条评论
为什么被折叠?
 到【灌水乐园】发言


