


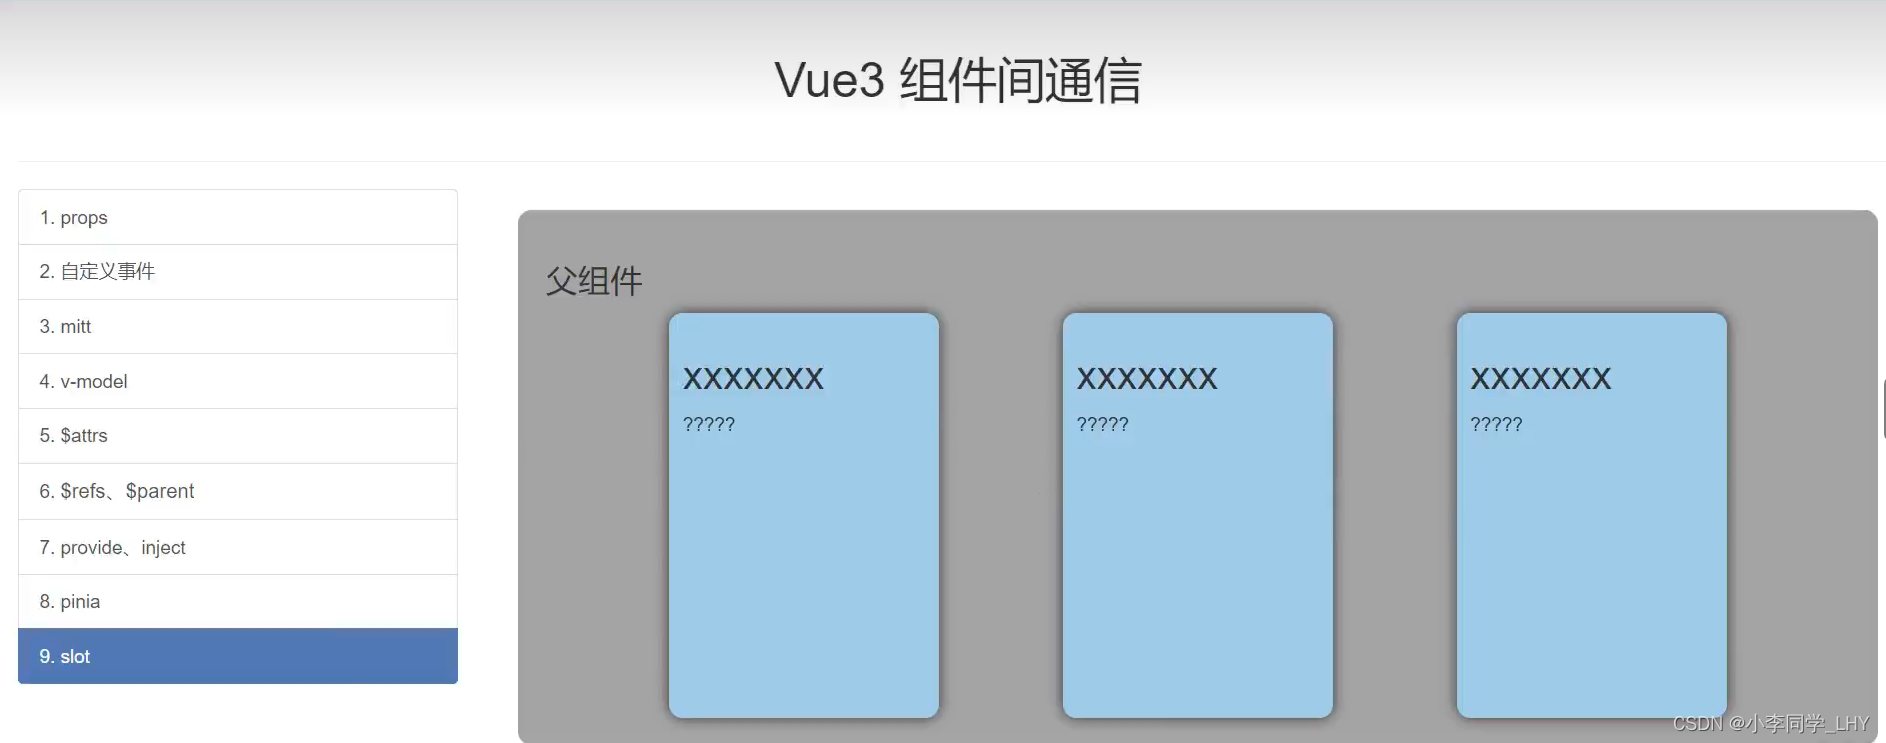
slot_默认插槽的概念:
在Vue中,插槽(slot)是一种用于在组件中插入内容的特殊技术。默认插槽是其中一种类型的插槽,它允许你在组件的模板中指定一个位置,以便在使用组件时插入自定义的内容。
想象一下你有一个组件,它有一些固定的结构和内容,但你希望在使用这个组件时,能够灵活地插入额外的内容。这就像是你有一个模板,但你希望能够在特定的位置插入自己的文本或元素。
默认插槽就是为了满足这个需求而设计的。在组件的模板中,你可以使用 <slot></slot> 标签来标记一个位置,表示这里可以插入额外的内容。当你在使用组件时,可以将自定义的内容放置在这个位置,这样它们就会被插入到组件的对应位置上。
以一个简单的卡片组件为例,卡片的主体部分是固定的,但你希望在卡片的底部插入自己的文本或按钮。你可以在组件的模板中定义一个默认插槽,使用 <slot></slot> 标签表示插入位置。然后,在使用组件时,你可以在对应的位置插入自己的内容。
默认插槽允许你以一种灵活的方式定制组件的部分内容,使组件能够适应不同的使用场景和需求。通过使用默认插槽,你可以将一些组件的部分交给使用者来灵活控制,增加了组件的可定制性和复用性。
但需要注意的是,默认插槽可以有默认内容,即当没有提供自定义内容时,会显示默认内容。你可以在 <slot></slot> 标签中添加默认的文本或元素,这样当没有插入自定义内容时,会显示默认内容。
1_slot_默认插槽
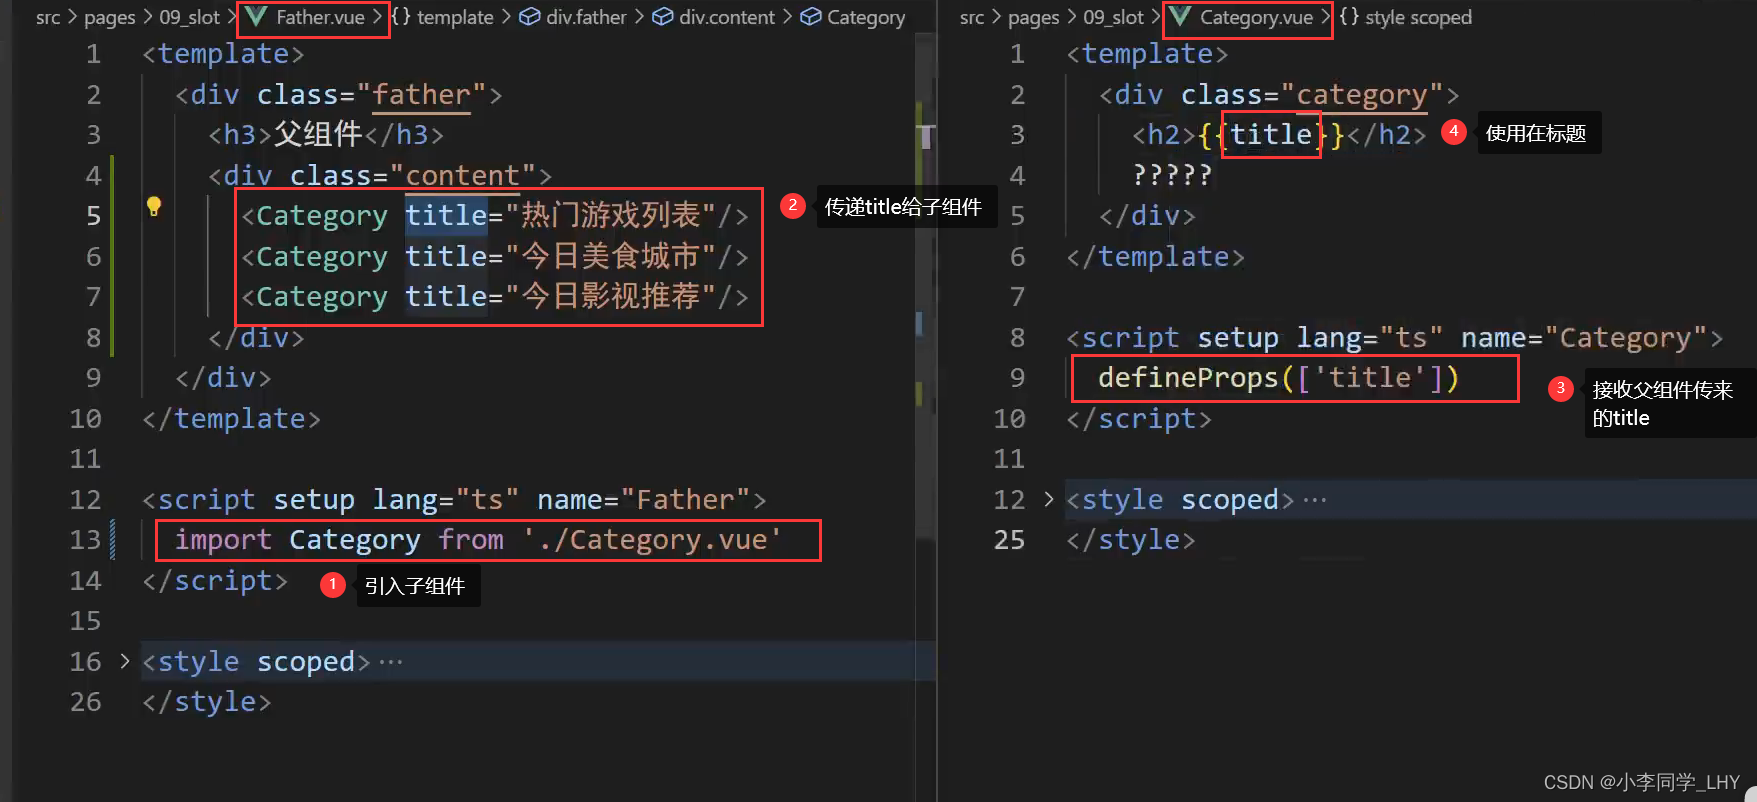
1.准备一个父组件(Father.vue)

2.子组件 Category.vue

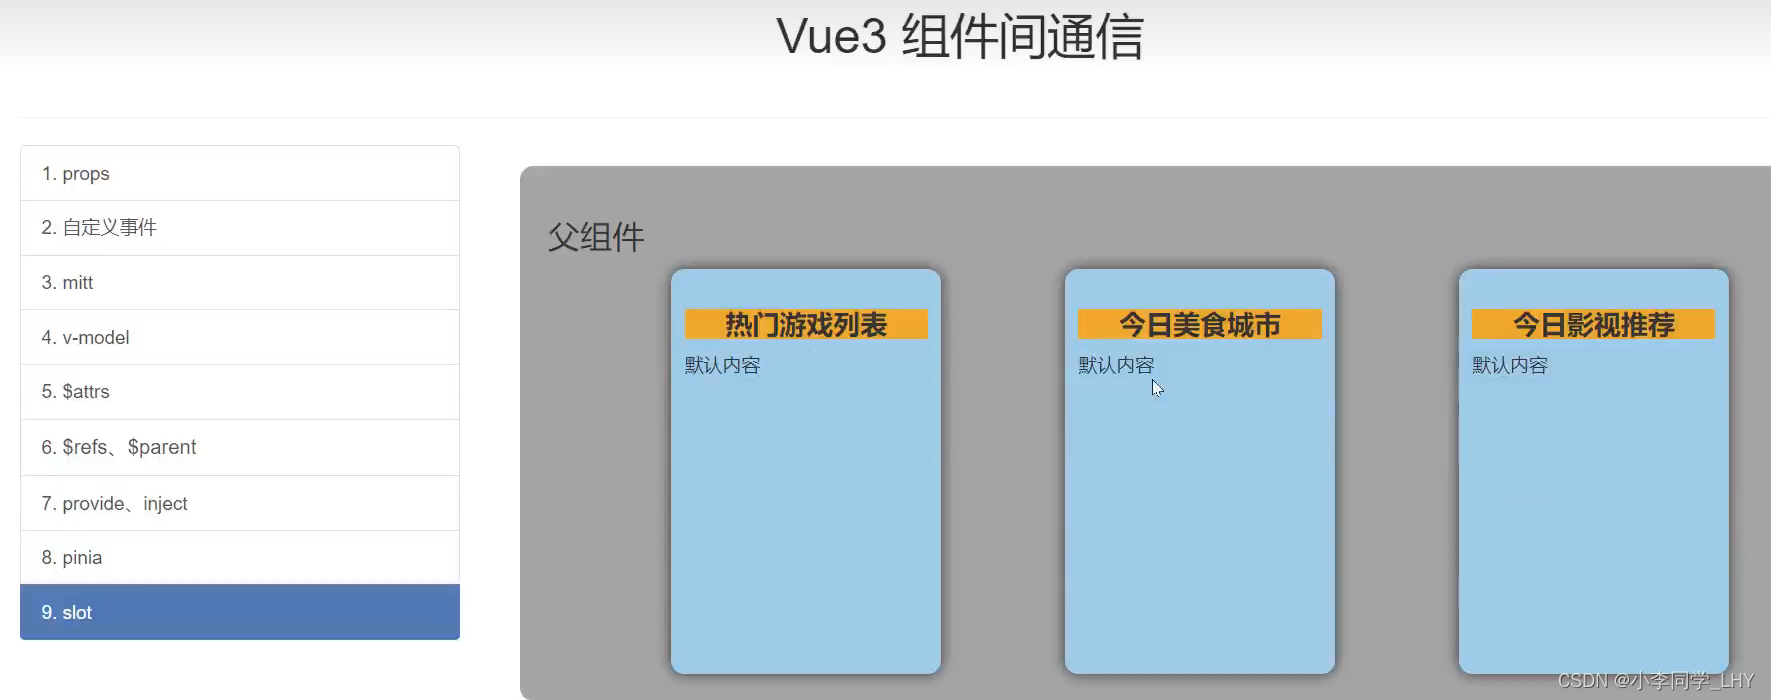
整体展示:
1.父组件给子组件传标题title
展示:

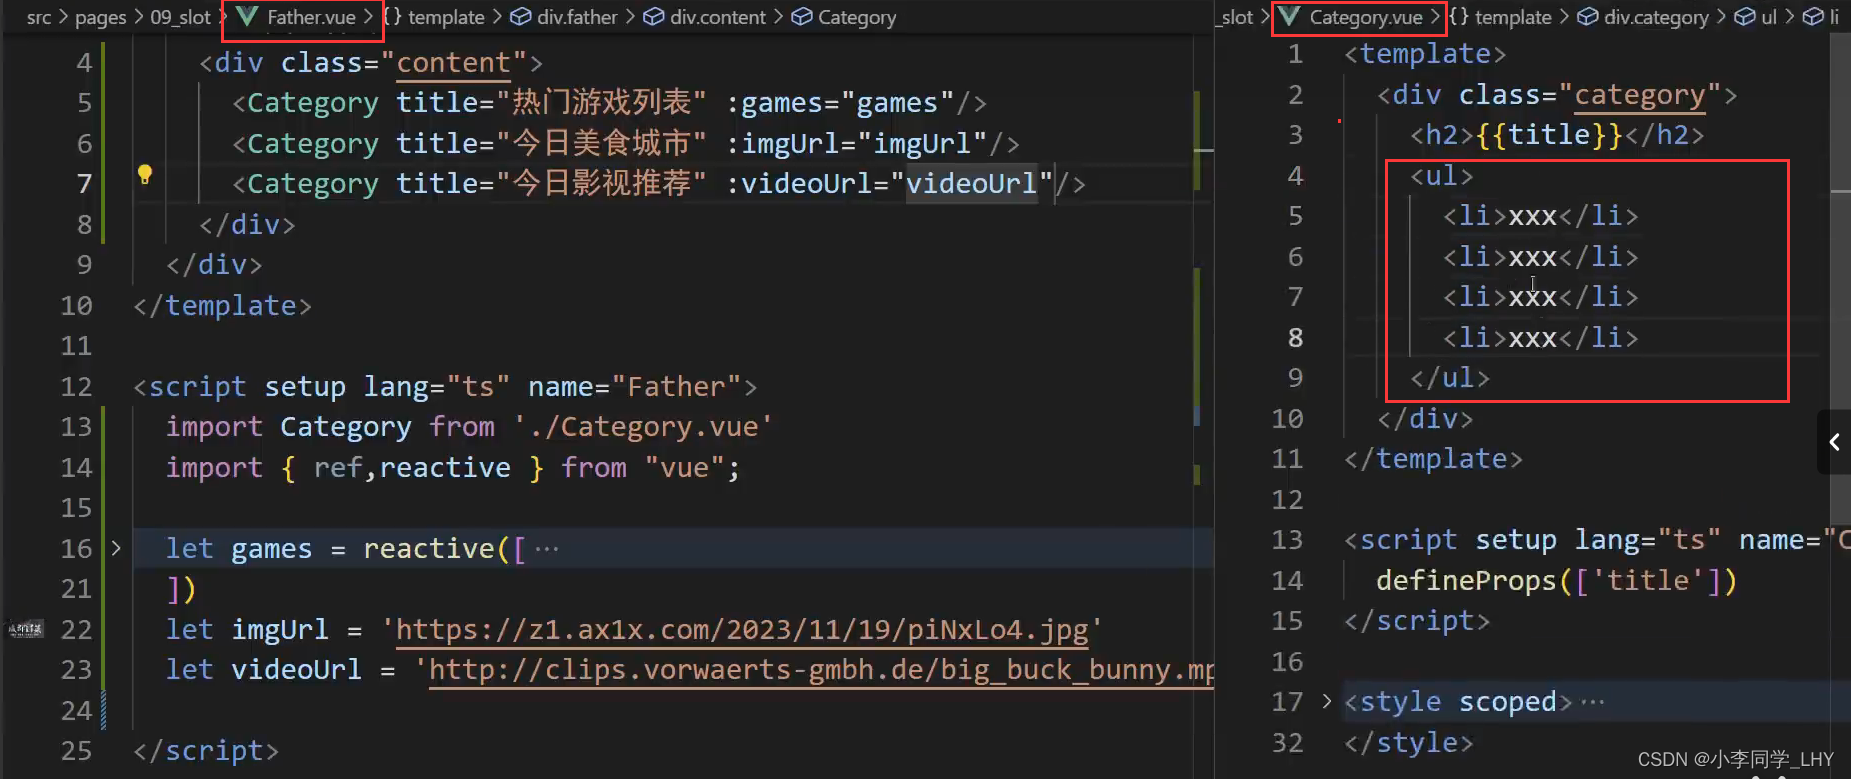
2.在父组件定义数据,分别放入到不同标题下的内容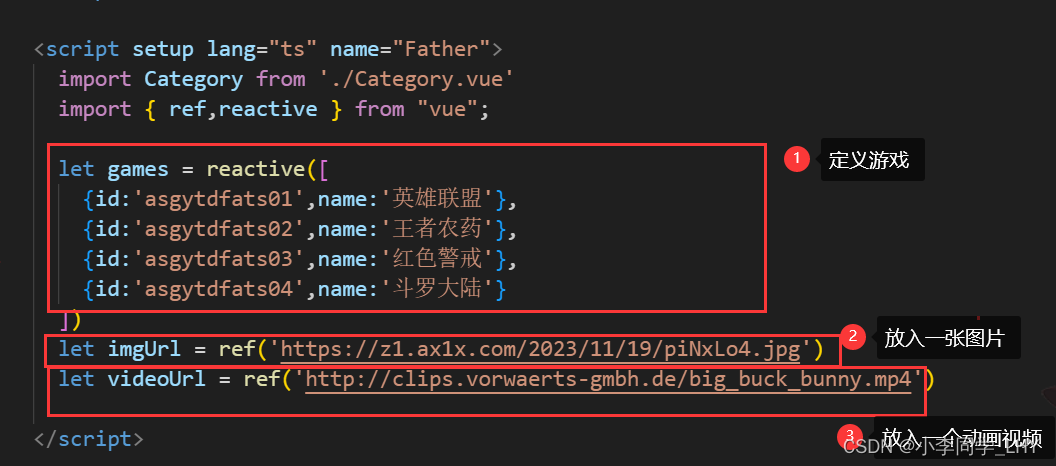
3.用双组件,把每块要传入的数据会放在slot之间

展示:

补充:
为什么要用slot插槽呢 ?
因为可以渲染不同的内容,游戏是数组,美食是图片,影视是视频
你如何把他们分别呈现在对应标题下呢,就可以用slot插槽了(其实用v-if/show也可以,但插槽更好)
不然你看下面:

Father.vue代码:
<template>
  <div class="father">
    <h3>父组件</h3>
    <div class="content">
      <Category>
          <ul>
            <li v-for="g in games" :key="g.id">{{ g.name }}</li>
          </ul>

          <h2>热门游戏列表</h2>
      </Category>

      <Category>

          <img :src="imgUrl" alt="">
          <h2>今日美食城市</h2>
      </Category>

      <Category>
          <video video :src="videoUrl" controls></video>
          <h2>今日影视推荐</h2>
      </Category>
    </div>
  </div>
</template>

<script setup lang="ts" name="Father">
  import Category from './Category.vue'
  import { ref,reactive } from "vue";

  let games = reactive([
    {id:'asgytdfats01',name:'英雄联盟'},
    {id:'asgytdfats02',name:'王者农药'},
    {id:'asgytdfats03',name:'红色警戒'},
    {id:'asgytdfats04',name:'斗罗大陆'}
  ])
  let imgUrl = ref('https://z1.ax1x.com/2023/11/19/piNxLo4.jpg')
  let videoUrl = ref('http://clips.vorwaerts-gmbh.de/big_buck_bunny.mp4')

</script>

<style scoped>
  .father {
    background-color: rgb(165, 164, 164);
    padding: 20px;
    border-radius: 10px;
  }
  .content {
    display: flex;
    justify-content: space-evenly;
  }
  img,video {
    width: 100%;
  }
  h2 {
    background-color: orange;
    text-align: center;
    font-size: 20px;
    font-weight: 800;
  }
</style>
Category.vue代码:
<template>
  <div class="category">
    <slot>默认内容</slot>

  </div>
</template>

<script setup lang="ts" name="Category">

</script>

<style scoped>
  .category {
    background-color: skyblue;
    border-radius: 10px;
    box-shadow: 0 0 10px;
    padding: 10px;
    width: 200px;
    height: 300px;
  }
</style>
2_slot_具名插槽
slot_具名插槽的概念:和默认插槽没什么区别 ,只是给插槽起了个名字。
如果给 插槽起个名,
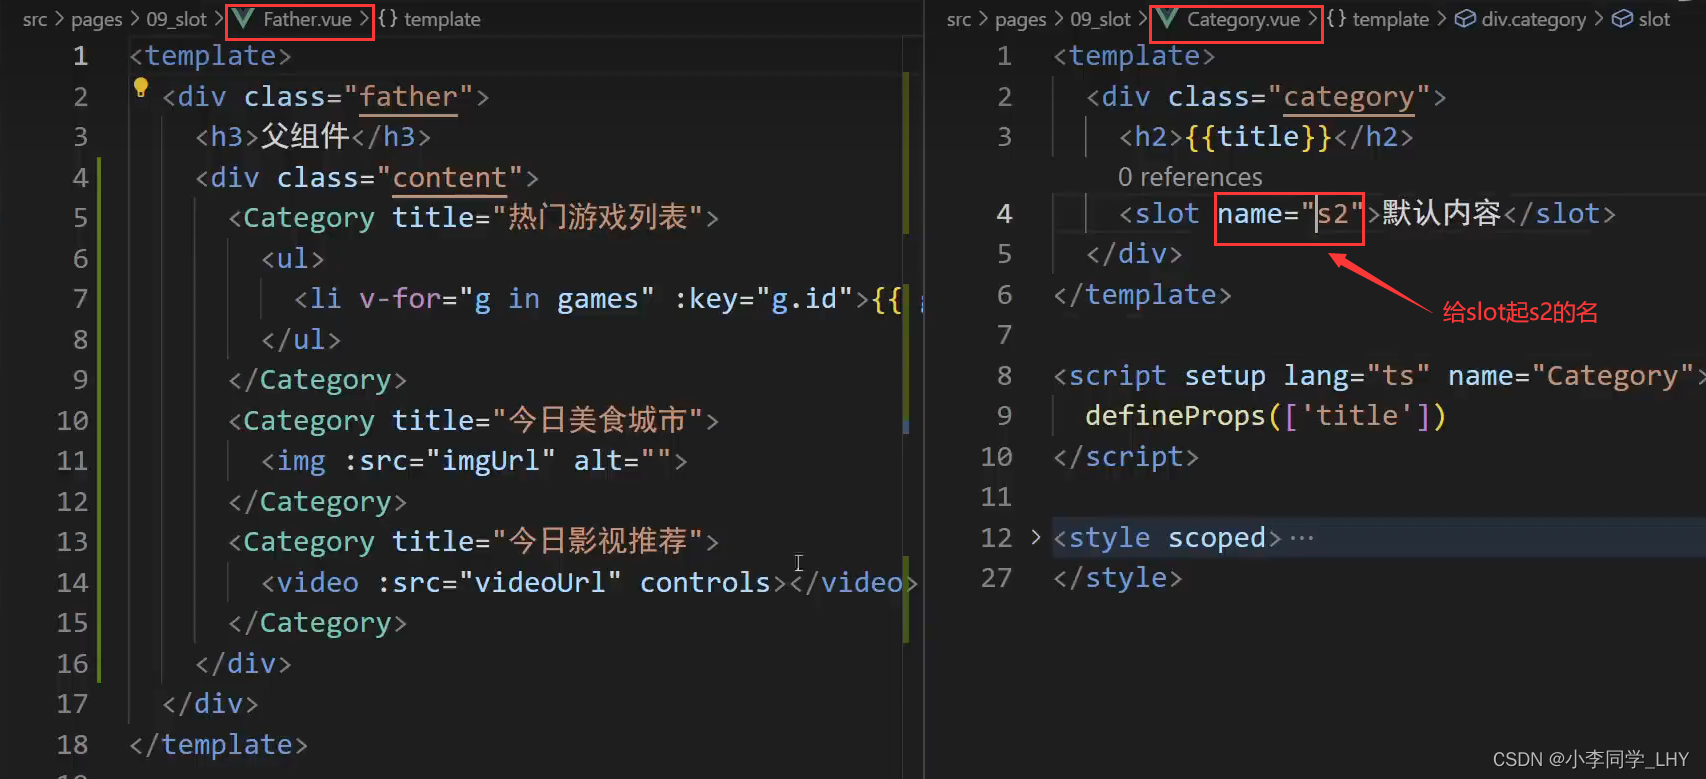
 此时<Category>没有引用s2,所以去寻找默认插槽,找不到名为s2的插槽,所以不呈现。
那如何引用呢?
1.用v-slot指令
2.将v-slot指令放在<template>中

呈现:
也可以通过具名插槽来对数据进行自己想要排放好的顺序。

补充:
v-slot指令可以用“#”来代替
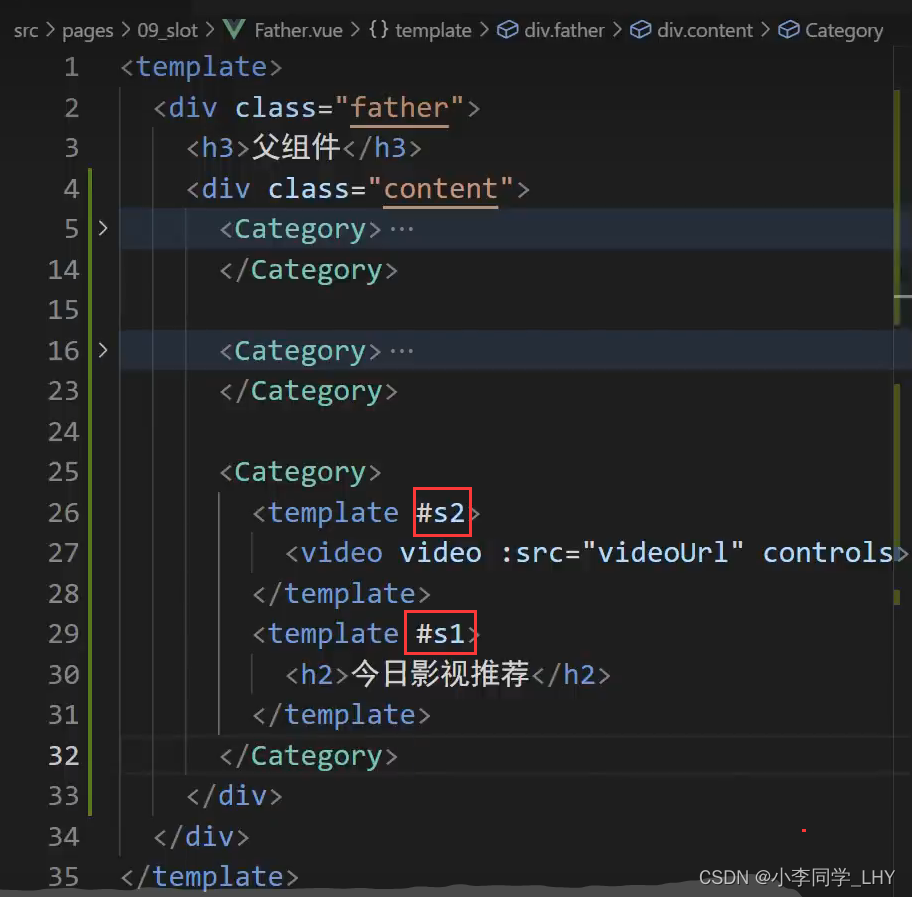
Father.vue代码:
<template>
  <div class="father">
    <h3>父组件</h3>
    <div class="content">
      <Category>
        <template v-slot:s2>
          <ul>
            <li v-for="g in games" :key="g.id">{{ g.name }}</li>
          </ul>
        </template>
        <template v-slot:s1>
          <h2>热门游戏列表</h2>
        </template>
      </Category>

      <Category>
        <template v-slot:s2>
          <img :src="imgUrl" alt="">
        </template>
        <template v-slot:s1>
          <h2>今日美食城市</h2>
        </template>
      </Category>

      <Category>
        <template #s2>
          <video video :src="videoUrl" controls></video>
        </template>
        <template #s1>
          <h2>今日影视推荐</h2>
        </template>
      </Category>
    </div>
  </div>
</template>

<script setup lang="ts" name="Father">
  import Category from './Category.vue'
  import { ref,reactive } from "vue";

  let games = reactive([
    {id:'asgytdfats01',name:'英雄联盟'},
    {id:'asgytdfats02',name:'王者农药'},
    {id:'asgytdfats03',name:'红色警戒'},
    {id:'asgytdfats04',name:'斗罗大陆'}
  ])
  let imgUrl = ref('https://z1.ax1x.com/2023/11/19/piNxLo4.jpg')
  let videoUrl = ref('http://clips.vorwaerts-gmbh.de/big_buck_bunny.mp4')

</script>

<style scoped>
  .father {
    background-color: rgb(165, 164, 164);
    padding: 20px;
    border-radius: 10px;
  }
  .content {
    display: flex;
    justify-content: space-evenly;
  }
  img,video {
    width: 100%;
  }
  h2 {
    background-color: orange;
    text-align: center;
    font-size: 20px;
    font-weight: 800;
  }
</style>
Category.vue代码:
<template>
  <div class="category">
    <slot name="s1">默认内容</slot>
    <slot name="s2">默认内容</slot>

  </div>
</template>

<script setup lang="ts" name="Category">

</script>

<style scoped>
  .category {
    background-color: skyblue;
    border-radius: 10px;
    box-shadow: 0 0 10px;
    padding: 10px;
    width: 200px;
    height: 300px;
  }
</style>
3_slot_作用域插槽
slot_作用域插槽的概念:
在Vue中,作用域插槽(scoped slot)是一种特殊的插槽技术,它允许你向组件传递数据,并在插槽内部使用这些数据。
想象一下你有一个组件,它有一个插槽,你希望能够向插槽内部传递一些数据,并在插槽内部根据这些数据进行一些处理或显示。这就像是你给一个盒子里面放入了一些物品,并允许别人在盒子里对这些物品进行操作。
作用域插槽就是为了满足这个需求而设计的。在组件的模板中,你可以使用 <slot> 标签,并在标签中添加一个特殊的属性,比如 v-slot,来定义作用域插槽。通过这个属性,你可以向插槽内部传递数据。
当你在使用组件时,可以在组件的标签中使用特殊的语法,比如 v-slot 或 slot-scope,来接收传递给插槽的数据。然后,在插槽内部,你可以使用这些数据进行一些处理、显示或其他操作。
要想讲好作用域插槽 ,先对组件进行部分修改
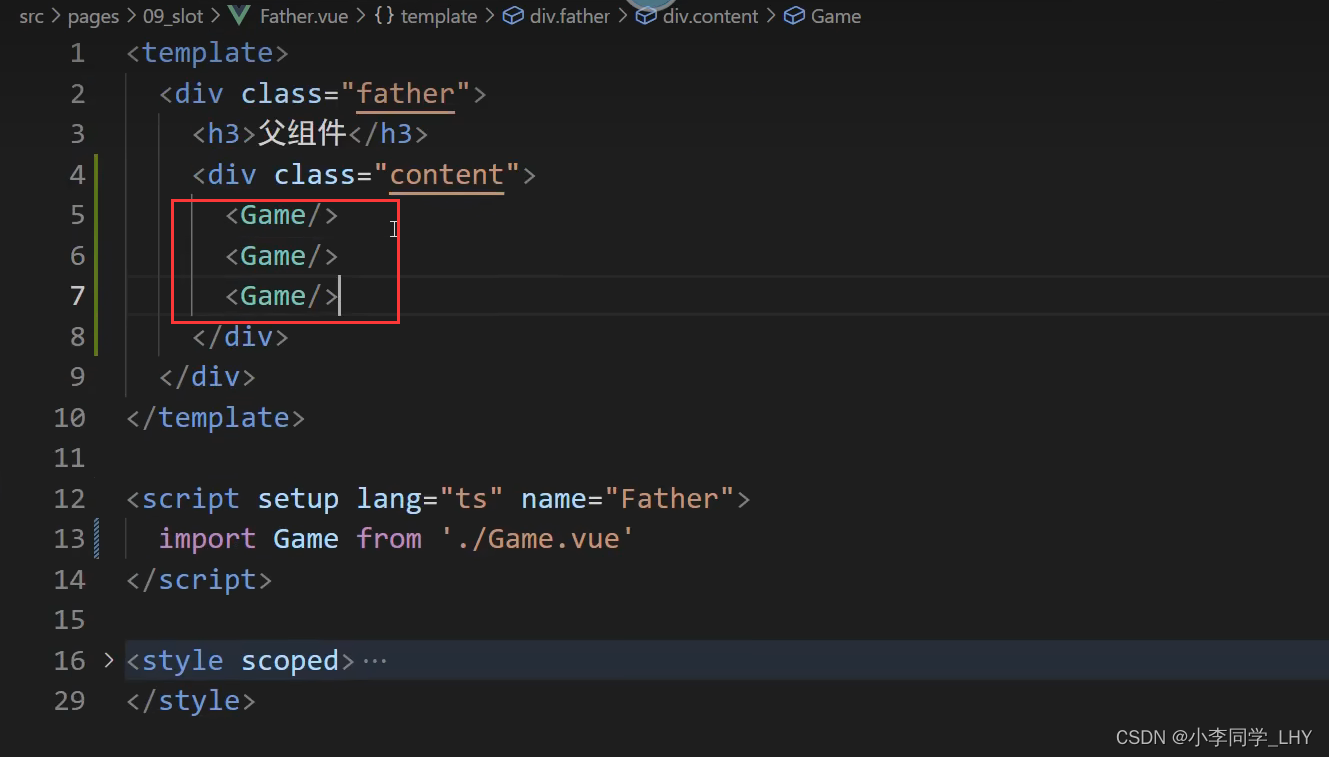
1.将Category.vue组件替换成Game.vue组件
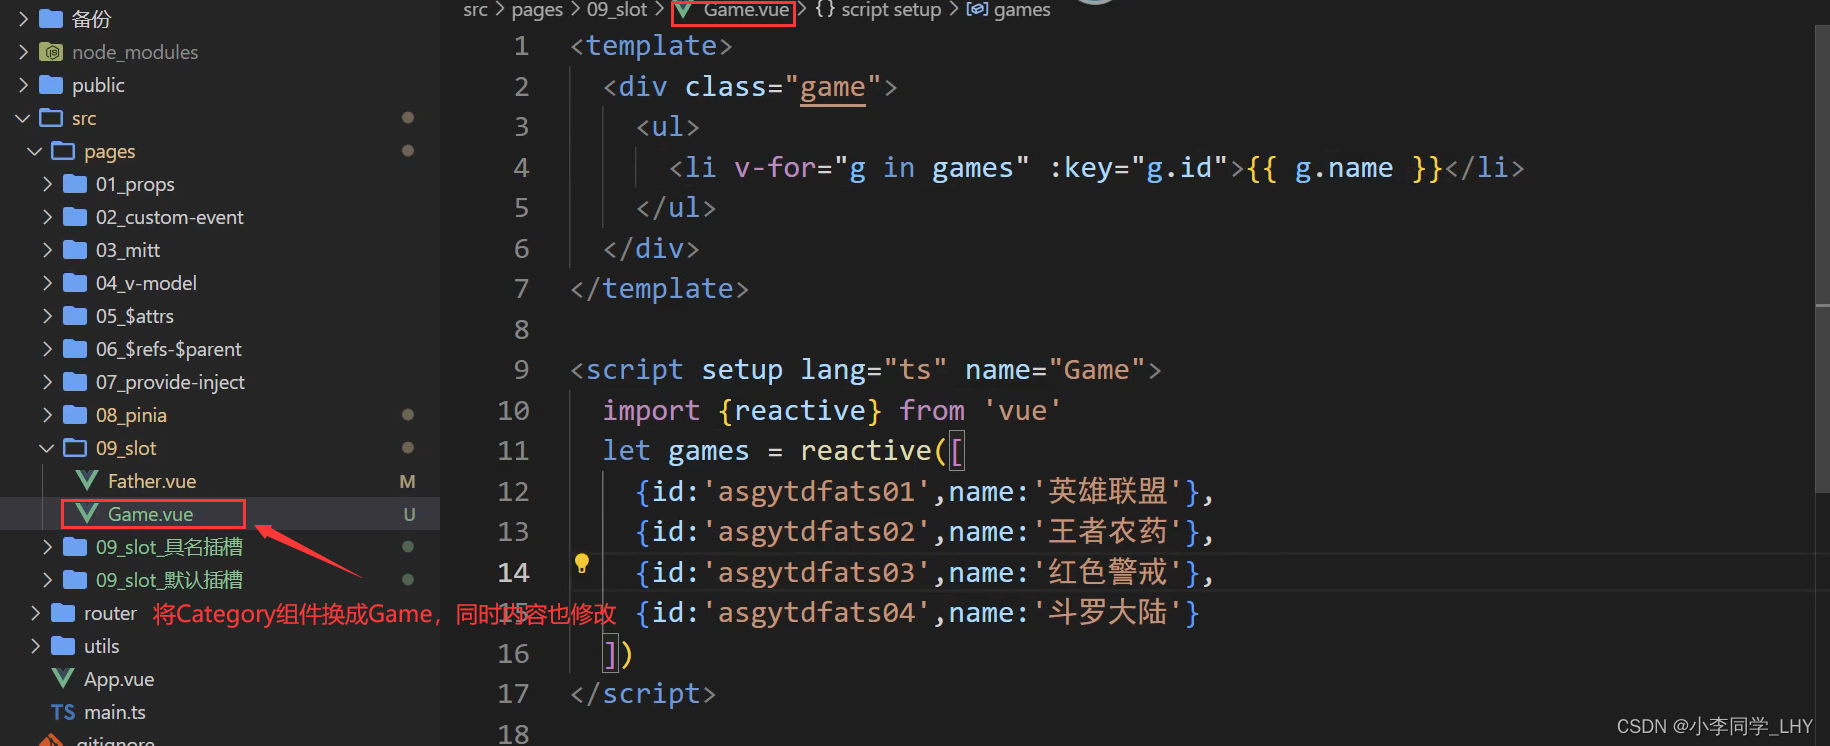
2.父组件(Father.vue)调用三次子组件(Game.vue)
展示:
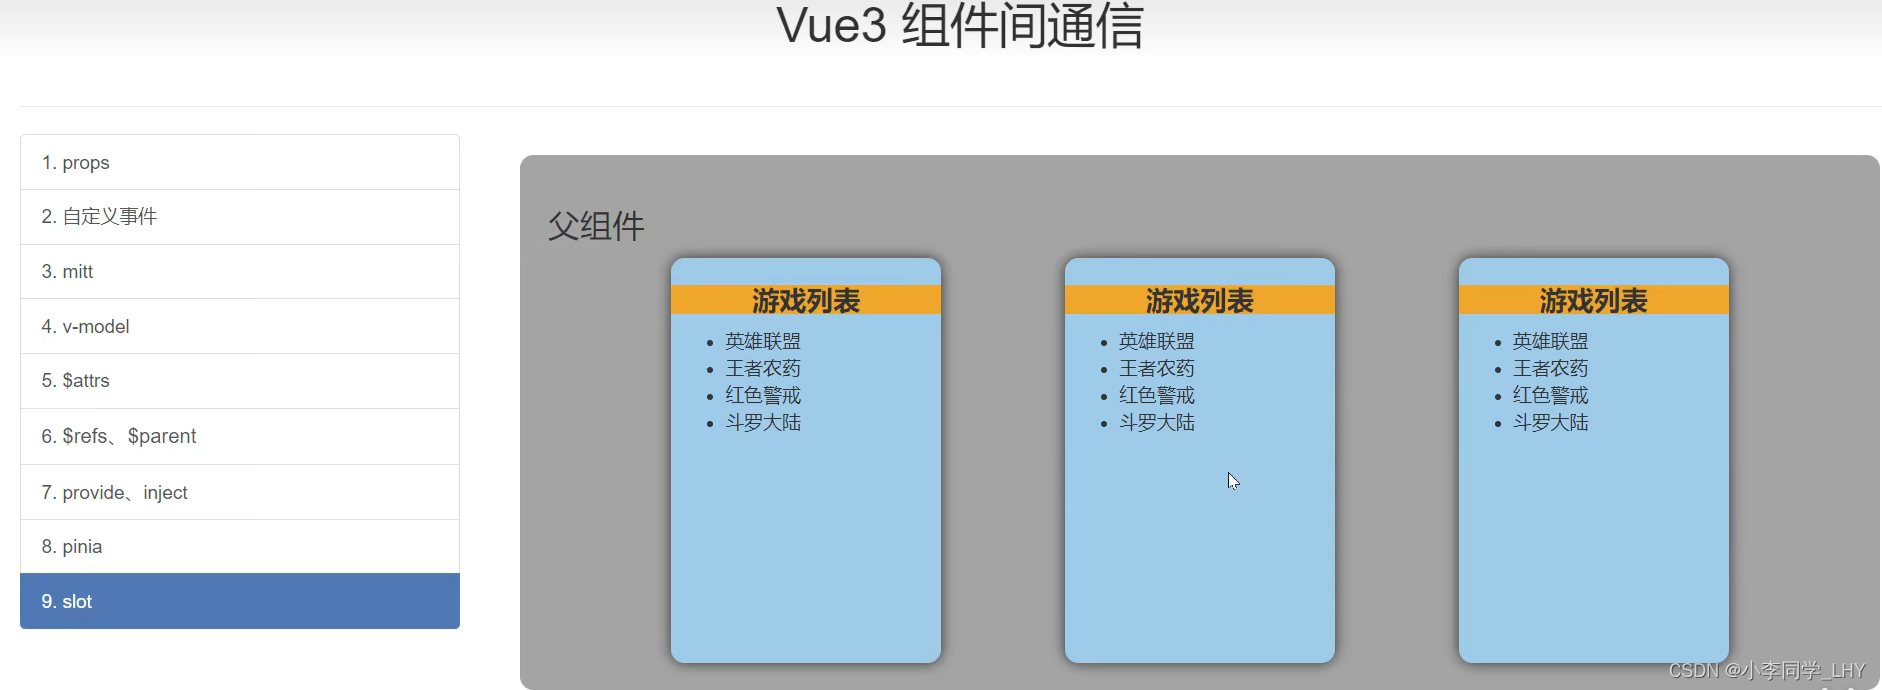
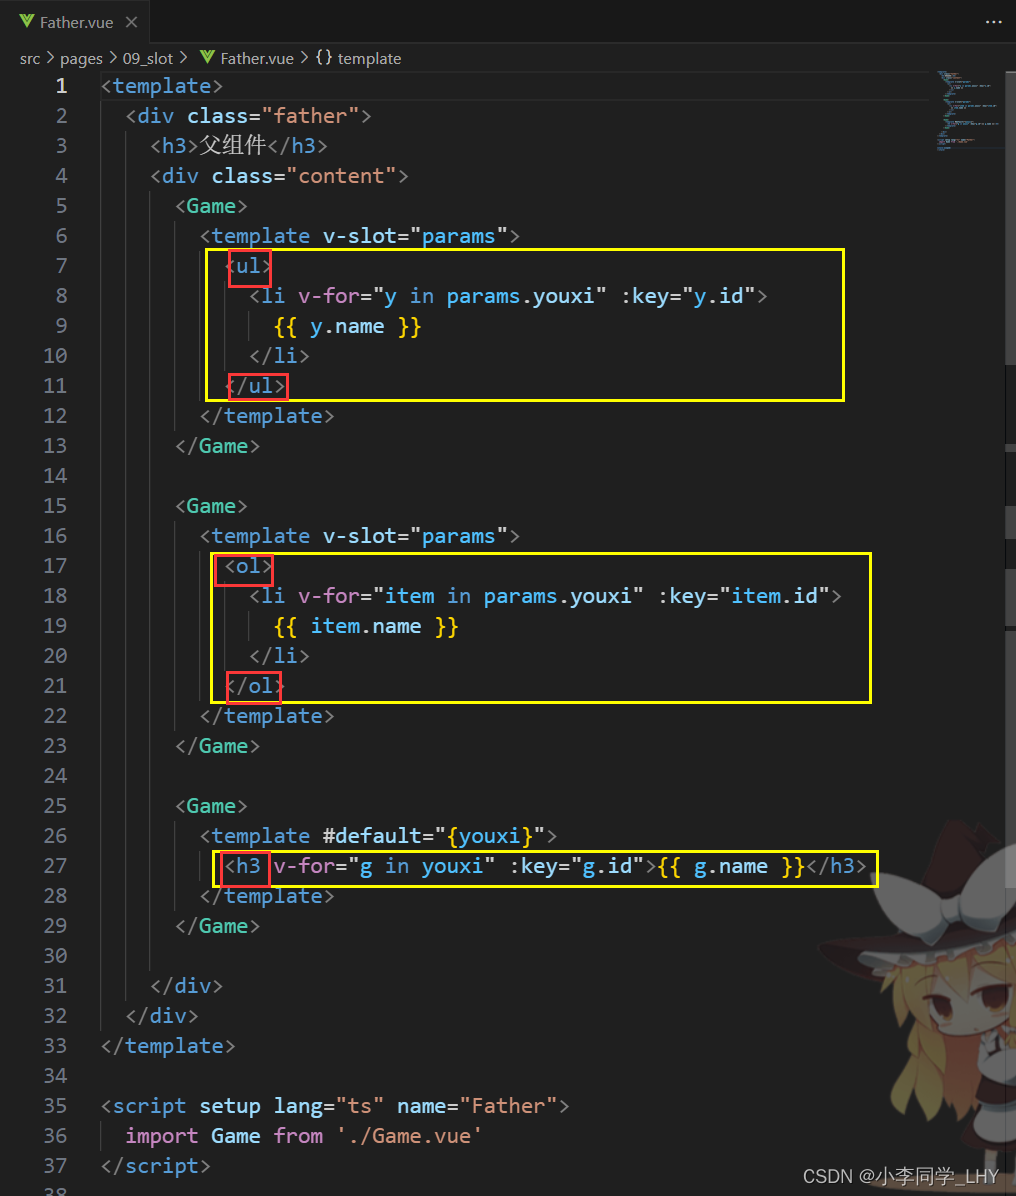
3.现在,我要将标题下的游戏内容进行如下修改
1.第一个是无序列表
2.第二个是有序列表
3.第三个不是列表,是h3标签表示
数据在子组件这里,但是根据数据生成的结构,却由父组件来决定。但是父组件不能直接拿到子组件的数据,这就涉及到作用域的问题,我们可以用作用域插槽来解决这个问题。

补充:
大部分作用域插槽都是应用在UI库中,就好像UI库的作者在子组件写好了数据,你直接拿来决定数据的结构,嘿嘿嘿。
Father.vue代码:
<template>
  <div class="father">
    <h3>父组件</h3>
    <div class="content">
      <Game>
        <template v-slot="params">
          <ul>
            <li v-for="y in params.youxi" :key="y.id">
              {{ y.name }}
            </li>
          </ul>
        </template>
      </Game>

      <Game>
        <template v-slot="params">
          <ol>
            <li v-for="item in params.youxi" :key="item.id">
              {{ item.name }}
            </li>
          </ol>
        </template>
      </Game>

      <Game>
        <template #default="{youxi}">
          <h3 v-for="g in youxi" :key="g.id">{{ g.name }}</h3>
        </template>
      </Game>

    </div>
  </div>
</template>

<script setup lang="ts" name="Father">
  import Game from './Game.vue'
</script>

<style scoped>
  .father {
    background-color: rgb(165, 164, 164);
    padding: 20px;
    border-radius: 10px;
  }
  .content {
    display: flex;
    justify-content: space-evenly;
  }
  img,video {
    width: 100%;
  }
</style>
Category.vue代码:
<template>
  <div class="game">
    <h2>游戏列表</h2>
    <slot :youxi="games"></slot>
  </div>
</template>

<script setup lang="ts" name="Game">
  import {reactive} from 'vue'
  let games = reactive([
    {id:'asgytdfats01',name:'英雄联盟'},
    {id:'asgytdfats02',name:'王者农药'},
    {id:'asgytdfats03',name:'红色警戒'},
    {id:'asgytdfats04',name:'斗罗大陆'}
  ])
</script>

<style scoped>
  .game {
    width: 200px;
    height: 300px;
    background-color: skyblue;
    border-radius: 10px;
    box-shadow: 0 0 10px;
  }
  h2 {
    background-color: orange;
    text-align: center;
    font-size: 20px;
    font-weight: 800;
  }
</style>
总结:
总结起来,Vue中的插槽分为三种类型:默认插槽(Default Slot)、作用域插槽(Scoped Slot)和具名插槽(Named Slot)。
-
默认插槽(Default Slot):允许在组件中指定一个位置,用于插入自定义内容。可以提供默认内容,当没有自定义内容时,显示默认内容。默认插槽增加了组件的可复用性和灵活性。
-
作用域插槽(Scoped Slot):允许向组件传递数据,并在插槽内部使用这些数据进行处理或显示。通过作用域插槽,使用者可以将数据从组件传递到插槽内部,实现高级的定制功能。
-
具名插槽(Named Slot):允许在组件中定义多个命名的插槽,并通过名称来指定要插入的内容。使用具名插槽,我们可以在组件的模板中为每个插槽指定特定的名称,并在使用组件时通过特殊的语法将内容插入到指定的插槽中。


 226
226


 被折叠的 条评论
为什么被折叠?
被折叠的 条评论
为什么被折叠?
 到【灌水乐园】发言


