


提示:之前写过一篇如何将自己训练的yolo模型转化为tensorrt相关的模型,该yolo模型采用的是原始的网络结构,没有做任何改变,所以相关的转换过程只需要按部就班就行,改一些固定参数就行,详情可参考链接:https://blog.csdn.net/LJ1120142576/article/details/127614612,今天写的方法是在之前的基础上进行,是对优化之后的yolo模型,特别是网络结构和激活函数都有一定改变的yolo模型,下面开始介绍具体的方法(以yolov3-tiny模型的优化为主)
1. yolov3-tiny优化的关键点
1)将leaky激活函数改为mish
注意:但是tensorrt不支持mish激活函数,所以后面需要想办法实现mish激活函数
2)在yolov3-tiny的网络中添加1x1卷积网络,增加深度的同时减少计算量
详细的网络结构图可参考下图
该图是通过netron软件打开.cfg文件实现的,netron网页版链接:https://netron.app/

2. 对优化的yolov3-tiny进行tensorrt相关模型(.trt)转换
1)将yolov3-tiny.pt转换为.wts模型
该步骤和https://blog.csdn.net/LJ1120142576/article/details/127614612中的内容一样,没有任何改变,可参考该篇内容进行操作
2)将.wts模型转换为.trt模型
该部分的操作和https://blog.csdn.net/LJ1120142576/article/details/127614612的步骤也一致,但是在执行这些步骤之前需要对yolov3-tiny.cpp文件进行修改,主要修改激活函数和网络结构那一部分,下面我一步一步说明
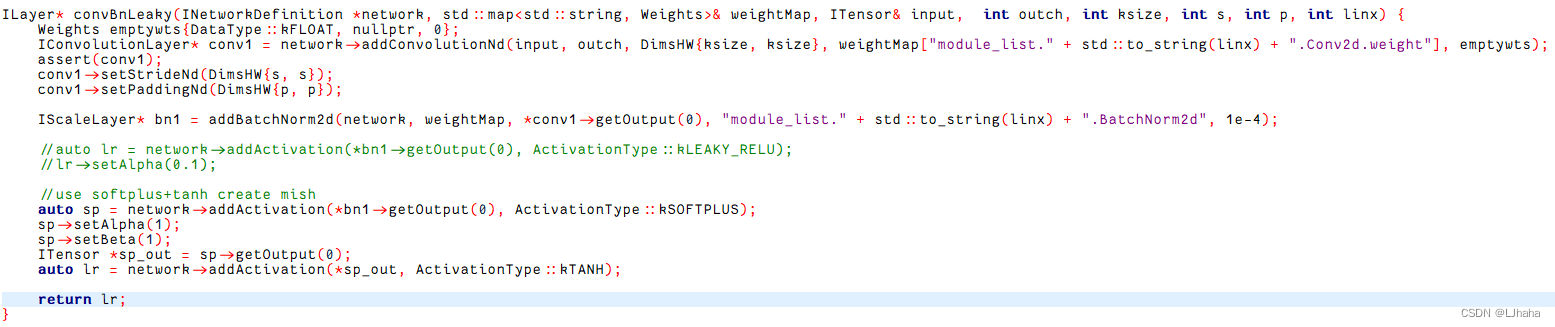
①激活函数mish的实现
由下图可以看到tensorrt并不支持mish函数,那么如何实现mish函数呢
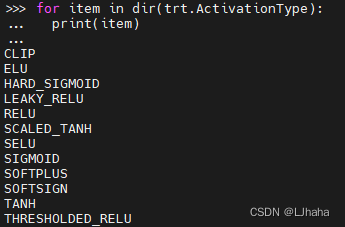
主要有两个方法,具体实现过程可参考链接:https://zhuanlan.zhihu.com/p/410707154。这篇文章讲的很详细,当时看完受益颇深,希望对大家都有用哈哈哈,这一块在yolov3-tiny.cpp文件的具体位置如下图所示:
②模型结构的改变
模型结构一旦改变,在构建.trt文件的时候会出现不识别网络层的问题,所以需要根据自己的.cfg文件在yolov3-tiny.cpp文件中的createEngine类中进行修改
ICudaEngine* createEngine(unsigned int maxBatchSize, IBuilder* builder, IBuilderConfig* config, DataType dt) {

    INetworkDefinition* network = builder->createNetworkV2(0U);
    // Create input tensor of shape {3, INPUT_H, INPUT_W} with name INPUT_BLOB_NAME
    ITensor* data = network->addInput(INPUT_BLOB_NAME, dt, Dims3{3, INPUT_H, INPUT_W});
    assert(data);

    std::map<std::string, Weights> weightMap = loadWeights("../yolov3-tiny-DIY.wts");
    Weights emptywts{DataType::kFLOAT, nullptr, 0};

    auto lr0 = convBnLeaky(network, weightMap, *data, 16, 3, 1, 1, 0); //cfg25-31
    auto pool1 = network->addPoolingNd(*lr0->getOutput(0), PoolingType::kMAX, DimsHW{2, 2});//cfg33-35
    pool1->setStrideNd(DimsHW{2, 2});
    auto lr2 = convBnLeaky(network, weightMap, *pool1->getOutput(0), 32, 3, 1, 1, 2);//cfg37-43
    auto pool3 = network->addPoolingNd(*lr2->getOutput(0), PoolingType::kMAX, DimsHW{2, 2});//cfg45-47
    pool3->setStrideNd(DimsHW{2, 2});
    // add conv1*1
    auto lr4 = convBnLeaky(network, weightMap, *pool3->getOutput(0), 32, 1, 1, 0, 4);//cfg50-56
    auto lr5 = convBnLeaky(network, weightMap, *lr4->getOutput(0), 64, 3, 1, 1, 5);//cfg58-64
    auto pool6 = network->addPoolingNd(*lr5->getOutput(0), PoolingType::kMAX, DimsHW{2, 2});//cfg66-68
    pool6->setStrideNd(DimsHW{2, 2});
    auto lr7 = convBnLeaky(network, weightMap, *pool6->getOutput(0), 64, 1, 1, 0, 7);//cfg71-77
    auto lr8 = convBnLeaky(network, weightMap, *lr7->getOutput(0), 128, 3, 1, 1, 8);//cfg80-86
    auto pool9 = network->addPoolingNd(*lr8->getOutput(0), PoolingType::kMAX, DimsHW{2, 2});//cfg88-90
    pool9->setStrideNd(DimsHW{2, 2});
    auto lr10 = convBnLeaky(network, weightMap, *pool9->getOutput(0), 128, 1, 1, 0, 10);//cfg93-99
    auto lr11 = convBnLeaky(network, weightMap, *lr10->getOutput(0), 256, 3, 1, 1, 11);//cfg101-107
    auto pool12 = network->addPoolingNd(*lr11->getOutput(0), PoolingType::kMAX, DimsHW{2, 2});//cfg109-111
    pool12->setStrideNd(DimsHW{2, 2});
    auto lr13 = convBnLeaky(network, weightMap, *pool12->getOutput(0), 256, 1, 1, 0, 13);//cfg114-120
    auto lr14 = convBnLeaky(network, weightMap, *lr13->getOutput(0), 512, 3, 1, 1, 14);//cfg122-128
    auto pad15 = network->addPaddingNd(*lr14->getOutput(0), DimsHW{0, 0}, DimsHW{1, 1});//这一步还没有搞明白为什么要填充,但是不填充会报错,所以根据之前的yolov3-tiny模型我就照样填充了
    auto pool15 = network->addPoolingNd(*pad15->getOutput(0), PoolingType::kMAX, DimsHW{2, 2});//cfg130-132
    pool15->setStrideNd(DimsHW{1, 1});
    auto lr16 = convBnLeaky(network, weightMap, *pool15->getOutput(0), 512, 1, 1, 0, 16);//cfg135-141
    auto lr17 = convBnLeaky(network, weightMap, *lr16->getOutput(0), 1024, 3, 1, 1, 17);//cfg143-149
    auto lr18 = convBnLeaky(network, weightMap, *lr17->getOutput(0), 256, 1, 1, 0, 18);//cfg153-159
    auto lr19 = convBnLeaky(network, weightMap, *lr18->getOutput(0), 512, 3, 1, 1, 19);//cfg161-167
    IConvolutionLayer* conv20 = network->addConvolutionNd(*lr19->getOutput(0), 3*(Yolo::CLASS_NUM + 5), DimsHW{1, 1}, weightMap["module_list.20.Conv2d.weight"], weightMap["module_list.20.Conv2d.bias"]);
    //cfg169-174 21 is yolo
    auto lr22 = lr18;
    auto lr23 = convBnLeaky(network, weightMap, *lr22->getOutput(0), 128, 1, 1, 0, 23);//cfg191-197
    float *deval = reinterpret_cast<float*>(malloc(sizeof(float) * 128 * 2 * 2));
    for (int i = 0; i < 128 * 2 * 2; i++) {
        deval[i] = 1.0;
    }
    //cfg199-200
    Weights deconvwts24{DataType::kFLOAT, deval, 128 * 2 * 2};
    IDeconvolutionLayer* deconv24 = network->addDeconvolutionNd(*lr23->getOutput(0), 128, DimsHW{2, 2}, deconvwts24, emptywts);
    assert(deconv24);
    deconv24->setStrideNd(DimsHW{2, 2});
    deconv24->setNbGroups(128);
    weightMap["deconv24"] = deconvwts24;
    //cfg202-203
    ITensor* inputTensors[] = {deconv24->getOutput(0), lr10->getOutput(0)};
    auto cat25 = network->addConcatenation(inputTensors, 2);
    auto lr26 = convBnLeaky(network, weightMap, *cat25->getOutput(0), 256, 3, 1, 1, 26);//cfg205-211
    IConvolutionLayer* conv27 = network->addConvolutionNd(*lr26->getOutput(0), 3 * (Yolo::CLASS_NUM + 5), DimsHW{1, 1}, weightMap["module_list.27.Conv2d.weight"], weightMap["module_list.27.Conv2d.bias"]);
    //  cfg213-218  28 is yolo

    auto creator = getPluginRegistry()->getPluginCreator("YoloLayer_TRT", "1");
    const PluginFieldCollection* pluginData = creator->getFieldNames();
    IPluginV2 *pluginObj = creator->createPlugin("yololayer", pluginData);
    ITensor* inputTensors_yolo[] = {conv20->getOutput(0), conv27->getOutput(0)};
    auto yolo = network->addPluginV2(inputTensors_yolo, 2, *pluginObj);

	yolo->getOutput(0)->setName(OUTPUT_BLOB_NAME);
    network->markOutput(*yolo->getOutput(0));

    // Build engine
    builder->setMaxBatchSize(maxBatchSize);
    config->setMaxWorkspaceSize(16 * (1 << 20));  // 16MB
#ifdef USE_FP16
    config->setFlag(BuilderFlag::kFP16);
#endif
    std::cout << "Building engine, please wait for a while..." << std::endl;
    ICudaEngine* engine = builder->buildEngineWithConfig(*network, *config);
    std::cout << "Build engine successfully!" << std::endl;

    // Don't need the network any more
    network->destroy();

    // Release host memory
    for (auto& mem : weightMap)
    {
        free((void*) (mem.second.values));
    }

    return engine;
}
注意:这一部分的内容在写的时候一定要比照网络结构.cfg文件权重系数.pt文件进行修改,可以避免出现问题,快速写对。此外在写这一部分的时候我还遇到了一个问题,这让我对之前的知识也算是一个修正,在cfg文件中pad=1不是指填充的数字是1,而是填充kernel_size/2,所以在写模型的时候注意参数的含义,cfg文件参数的详细理解可以参考链接:https://zhuanlan.zhihu.com/p/352494414
至此,基本就改完了,按照之前的步骤就可以实现模型的顺利转换了!!如有不对的地方,还请大家不吝赐教!谢谢


 1万+
1万+


 被折叠的 条评论
为什么被折叠?
被折叠的 条评论
为什么被折叠?
 到【灌水乐园】发言


