


步骤1:Redis
步骤2:运行 Redis 服务器
步骤3:基于前面的知识点
步骤4:先运行,看到效果,再学习
步骤5:模仿和排错
步骤6:改动
步骤7:pom.xml
步骤8:application.properties
步骤9:Application
步骤10:RedisConfig.java
步骤11:Page4Navigator
步骤12:CategoryService
步骤13:CategoryServiceImpl
步骤14:CategoryController
步骤 1 : Redis
Redis 是一套 key-value 高性能数据库。
关于 Redis 如何安装,运用有专门的教程,在这里就不展开了。
Redis 教程
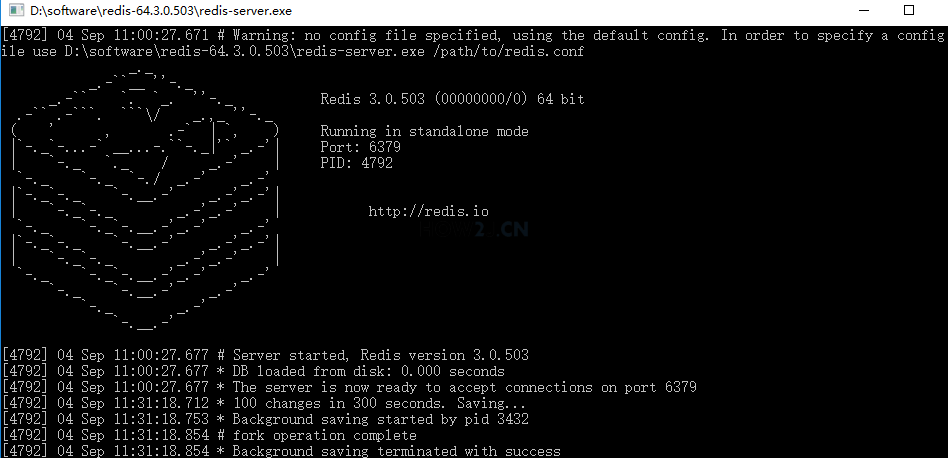
步骤 2 : 运行 Redis 服务器
按照 Redis 如何运行 中的做法,把 Redis 服务器先跑起来,这个不跑起来,本教程就没法撸了。
步骤 3 : 基于前面的知识点
本教程在前面的知识点:SPRINGBOOT使用JPA实现完整的CRUD和分页 的基础上进行扩展。 所以没有撸前面的同学,请先撸了,不然这里也撸不出来,因为数据库怎么建立都是在前面写的,你没做,后面也没法做的。
步骤 4 : 先运行,看到效果,再学习
老规矩,先下载下载区(点击进入)的可运行项目,配置运行起来,确认可用之后,再学习做了哪些步骤以达到这样的效果。
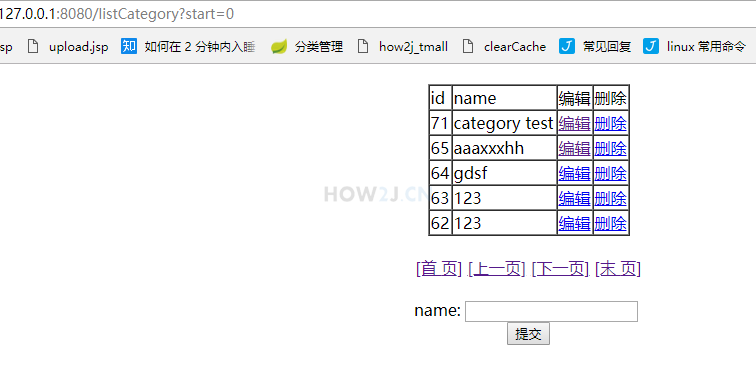
启动后,访问如下地址
|
|
可以看到如图所示的 CRUD 和分页的效果。
虽然,在使用效果上,看起来和 SPRINGBOOT使用JPA实现完整的CRUD和分页 没有任何分别,但是在后台,已经把数据都撸到 Redis 里面缓存起来了。
步骤 5 : 模仿和排错
在确保可运行项目能够正确无误地运行之后,再严格照着教程的步骤,对代码模仿一遍。
模仿过程难免代码有出入,导致无法得到期望的运行结果,此时此刻通过比较正确答案 ( 可运行项目 ) 和自己的代码,来定位问题所在。
采用这种方式,学习有效果,排错有效率,可以较为明显地提升学习速度,跨过学习路上的各个槛。
推荐使用diffmerge软件,进行文件夹比较。把你自己做的项目文件夹,和我的可运行项目文件夹进行比较。
这个软件很牛逼的,可以知道文件夹里哪两个文件不对,并且很明显地标记出来
这里提供了绿色安装和使用教程:diffmerge 下载和使用教程
步骤 6 : 改动
接下来,就一条条地说,在原来项目的基础上做了什么改动,以达到这样的效果
步骤 7 : pom.xml
增加对 Redis 支持的包
|
|
步骤 8 : application.properties
增加redis相关配置
同时让hibernate的sql语句显示出来,这样才知道到底是通过 Redis 取到的数据,还是依然是从数据库取到的数据
|
|
|
|
步骤 9 : Application
增加注解,以开启缓存
|
|
|
|
步骤 10 : RedisConfig.java
Redis 缓存配置类。
这个配置,一个作用: 让保存到 Redis 里的 key 和 value 都转换为可读的 json 格式。 否则会是二进制格式,通过RedisClient 工具也无法识别。
|
|
步骤 11 : Page4Navigator
创建一个工具类 Page4Navigator 用以替换 原本分页查询要返回的 org.springframework.data.domain.Page 类。 原因是 Page 类对json 还原不支持,在放如 Redis 之后,再拿出来,就会报错失败。
使用 Page4Navigator 对其包裹,就解决了这个问题了。
|
|
步骤 12 : CategoryService
增加 Service接口。 注意: list 返回的是 Page4Navigator 而不是 Page 类型。
|
|
步骤 13 : CategoryServiceImpl
实现类CategoryServiceImp 做了一下工作:
1. 实现 CategoryService 接口,提供 crud
2. 在相应方法实现的时候,都是通过调用 dao 实现的
3. CacheConfig,表示 分类数据在 redis 中都放在 category 这个分组里。
|
|
4. list方法讲解:
先说注解
|
|
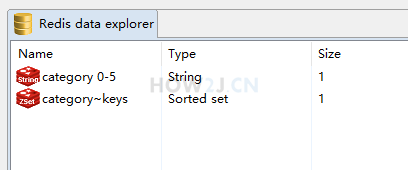
假如是第一页,即offset=0,pageSize=5,那么会创建一个 key: "category 0-5"
首先根据这个key 到 redis中查询数据。 第一次是不会有数据的,那么就会从数据库中取到这5条数据,然后以这个 key: "category 0-5" 保存到 redis 数据库中。
下一次再次访问的时候,根据这个key,就可以从 redis 里取到数据了。
5. get 方法讲解
先说注解:
|
|
假如是获取id=71的数据,那么
就会以 key= "category 71" 到reids中去获取,如果没有就会从数据库中拿到,然后再以 key= "category 71" 这个值存放到 redis 当中。
下一次再次访问的时候,根据这个key,就可以从 redis 里取到数据了。
6. add 方法讲解
先说注解:
|
|
可以看到,本来有个 CachePut,但是被注释掉了。 按理说,本来是应该用这个的。 这样会到在,在增加数据之后,就会在Redis 中以 key= "category 71" 缓存一条数据。 但是为什么被注释掉不用呢?
因为加入这样做了,那么 list 对应的数据,在缓存在对应的数据,并没有发生变化呀? 因为 list 对应的数据是这样的 key: "category 0-5"。 如果用这种方式,就会导致数据不同步,即,虽然增加了,并且也增加到缓存中了,但是因为 key 不一样,通过查询拿到的数据,是不会包含新的这一条的。
所以,才会使用CacheEvict 这个注解,这个注解就表示清除掉缓存。 allEntries= true 是表示清除掉 category 分组 下所有的keys. 注意看截图,里面有一个 category~keys ,里面就表明了都有哪些 keys,都会被清除掉。
假如这个时候,还有一个分组 cacheNames="product", 那么它下面对应的缓存,都是不会被影响到的。 这样就保证了,只清楚当前分组下的缓存,而不是清除 redis 所有的数据了。
7. delete 方法讲解
先说注解:
|
|
这个道理和 add 是一样的,仅仅删除 key= "category 71" ,没有什么意义, key: "category 0-5" 里面的数据没有影响呀。 所以还是通过 CacheEvict删除掉所有的缓存就好了。
|
|
步骤 14 : CategoryController
由原来直接从 dao 获取,变为从 Service 获取了
|
|
更多内容,点击了解: https://how2j.cn/k/springboot/springboot-redis/1789.html


 620
620


 被折叠的 条评论
为什么被折叠?
被折叠的 条评论
为什么被折叠?
 到【灌水乐园】发言


