


【Hystrix】【源码+图解】【六】统计功能metrics
目录
11. 降级处理
11.1 工作原理
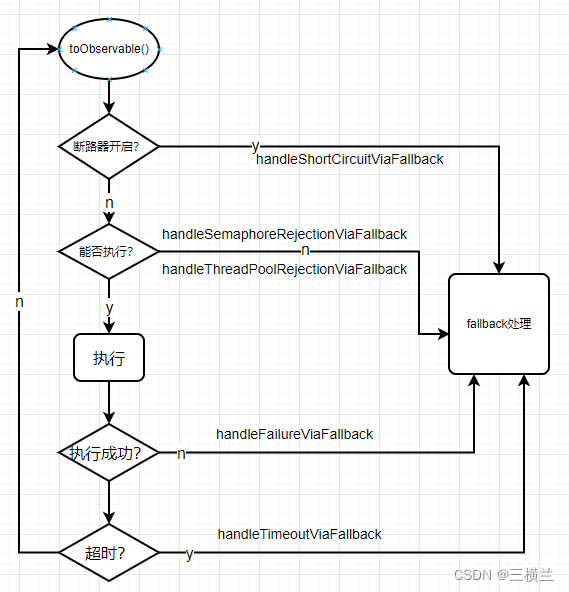
图中的fallback最终都会调用AbstractCommand.getFallbackOrThrowException我们分析下源码
// AbstractCommand
	private Observable<R> getFallbackOrThrowException(......) {
        .......
        // ExceptionNotWrappedByHystrix类异常直接向上抛出
        if (shouldNotBeWrapped(originalException)){
            ......
            return Observable.error(e);
        // StackOverflowError、VirtualMachineError、ThreadDeath、LinkageError包装成HystrixRuntimeException向上抛出
        } else if (isUnrecoverable(originalException)) {
            ......
            return Observable.error(new HystrixRuntimeException(...));
        } else {
            ......
            // fallback.enabled是否开启
            if (properties.fallbackEnabled().get()) {
                ......
                // 获取semaphore,最大并发量为fallback.isolation.semaphore.maxConcurrentRequests,默认10
                final TryableSemaphore fallbackSemaphore = getFallbackSemaphore();
                ......
                if (fallbackSemaphore.tryAcquire()) {
                    ......
                        // 利用反射执行fallback函数,详细代码不再分析
                            fallbackExecutionChain = getFallbackObservable();
                    ......
                    return fallbackExecutionChain
                            .doOnEach(setRequestContext)
                            .lift(new FallbackHookApplication(_cmd))
                            .lift(new DeprecatedOnFallbackHookApplication(_cmd))
                            .doOnNext(markFallbackEmit)
                            .doOnCompleted(markFallbackCompleted)
                            .onErrorResumeNext(handleFallbackError)
                            .doOnTerminate(singleSemaphoreRelease)
                            .doOnUnsubscribe(singleSemaphoreRelease);
                } else {
                   return handleFallbackRejectionByEmittingError();
                }
            } else {
                return handleFallbackDisabledByEmittingError(originalException, failureType, message);
            }
        }
    }
11.2 参数设置
    @HystrixCommand(fallbackMethod = "yourFallbackMethod",
            commandProperties = {
                    @HystrixProperty(name = "fallback.enabled", value = "true"),
                    @HystrixProperty(name = "fallback.isolation.semaphore.maxConcurrentRequests", value = "10")
            })
    public void fallback() {

    }
12. 请求合并
先看下合并请求的实际应用
    @HystrixCollapser(
            // 默认方法名
            collapserKey = "myCollapserKey"
            // 该项是必须的
            , batchMethod = "myBatchMethod"
            // REQUEST, GLOBAL。默认REQUEST
            , scope = Scope.GLOBAL
            // 其他参数,更多可参考HystrixCollapserProperties类
            , collapserProperties = {
                    // 最大合并数,默认Integer.MAX_VALUE
                    @HystrixProperty(name = "maxRequestsInBatch", value = "100")
                    // 多长时间发送一次batch请求,默认10毫秒
                    , @HystrixProperty(name = "timerDelayInMilliseconds", value = "10000")
                    // 是否开启合并缓存,默认true。虽然默认开启缓存,但是因为HystrixCollapser的getCacheKey()默认返回null,
                    // 所以缓存即使开启也不会有缓存作用,如果想要缓存则需要重写HystrixCollapser的getCacheKey()方法
                    , @HystrixProperty(name = "requestCache.enabled", value = "true")
            })
    // 注意,@HystrixCollapser注解的方法参数有且只能一个,否则会报错
    public String collapser(String id) {
        return null;
    }

    // 合并方法必须@HystrixCommand,否则报错;合并方法必须在该类中存在,否则会报错
    @HystrixCommand
    public List<String> myBatchMethod(List<String> ids) {
        System.out.println("ids.size: " + ids.size());
         List<String> result = new ArrayList<>();
         result.add("result1");
         result.add("result2");
         return result;
    }
@HystrixCollapser的工作过程大致与@HystrixCommand类似,具体的不再分析,只分析toObservable()
// HystrixCollapser`
	public Observable<ResponseType> toObservable(Scheduler observeOn) {
        return Observable.defer(new Func0<Observable<ResponseType>>() {
            @Override
            public Observable<ResponseType> call() {
                ......
                // 先从缓存取,缓存存在则直接返回
                if (isRequestCacheEnabled) {
                    ......
                }

                // 缓存不存在则创新新的
                RequestCollapser<BatchReturnType, ResponseType, RequestArgumentType> requestCollapser = collapserFactory.getRequestCollapser(collapserInstanceWrapper);
                // (1)提交请求
                Observable<ResponseType> response = requestCollapser.submitRequest(getRequestArgument());

                // 更新缓存
                if (isRequestCacheEnabled && cacheKey != null) {
                    ......
                }
                return response;
            }
        });
    }
@HystrixCollapser的toObservable()相对比较简单,最关键的在于(1)处,为了方便理解中间过程先用流程图展示,然后再对于关键地方进行源码分析,其它就不详细看了,看下图
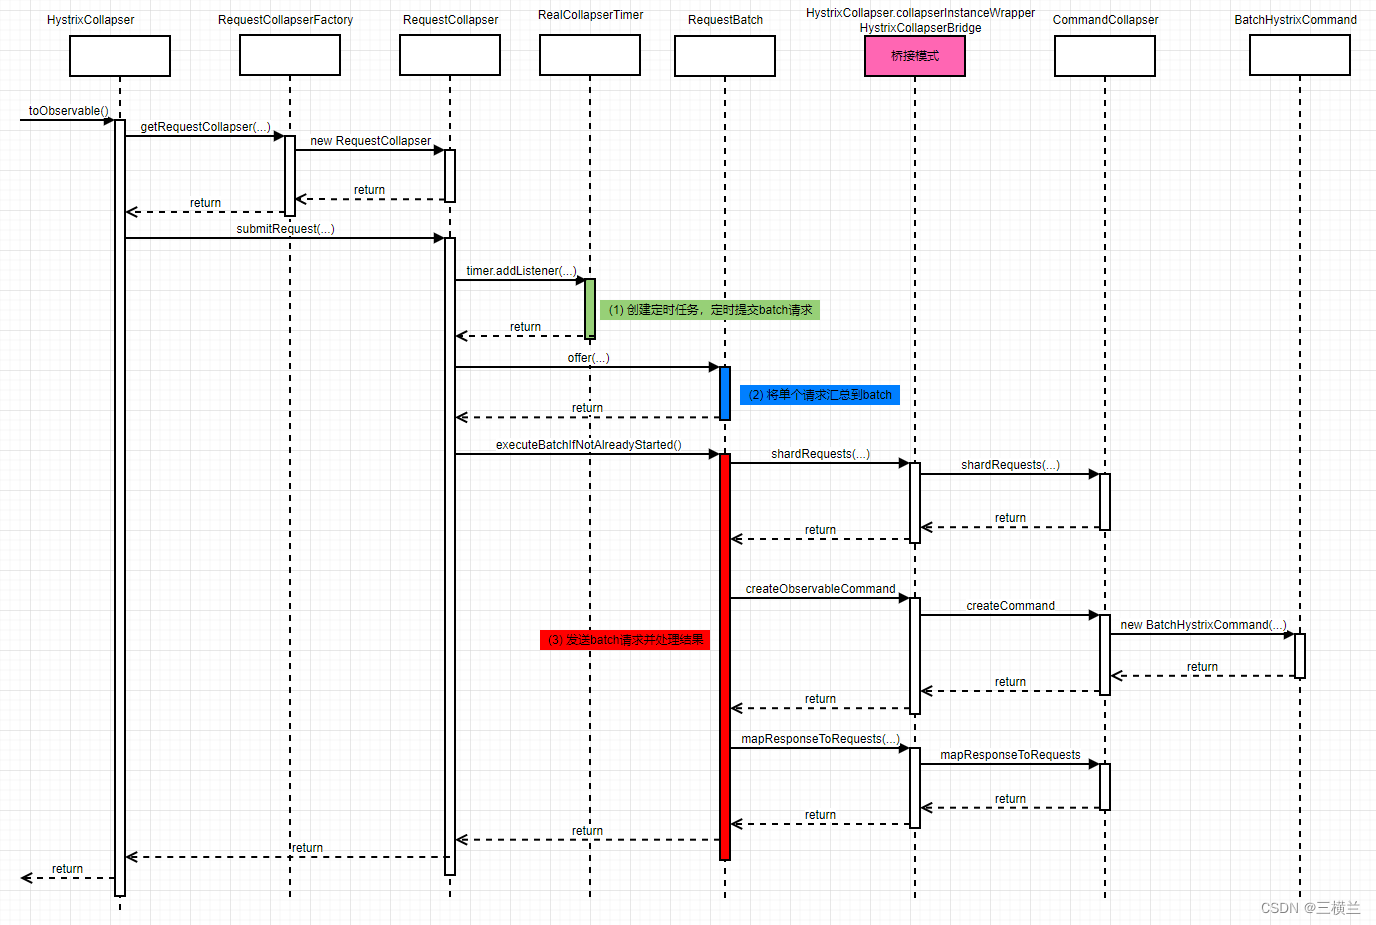
submitRequest的过程分位三步
- 创建定时任务,定时提交batch请求,也即每隔
timerDelayInMilliseconds发送batch请求 - 将单个请求汇总到batch
- 发送batch请求并处理结果
后面会按照这个步骤逐个分析相应的源码
此外,过程中用到了HystrixCollapserBridge,也即桥接模式,后面会分析为何要使用它
12.1 定时任务
这里关键的地方就在于HystrixTimer.addTimerListener方法,看下源码
// HystrixTimer
	public Reference<TimerListener> addTimerListener(final TimerListener listener) {
        // 初始化线程池
        startThreadIfNeeded();
        // 创建定时任务
        Runnable r = new Runnable() {

            @Override
            public void run() {
                try {
                    listener.tick();
                } catch (Exception e) {
                    logger.error("Failed while ticking TimerListener", e);
                }
            }
        };

        // 设置定时时间,开启定时任务
        ScheduledFuture<?> f = executor.get().getThreadPool().scheduleAtFixedRate(r, listener.getIntervalTimeInMilliseconds(), listener.getIntervalTimeInMilliseconds(), TimeUnit.MILLISECONDS);
        return new TimerReference(listener, f);
    }
为了简便依旧先看看整体过程,再具体分析关键处代码
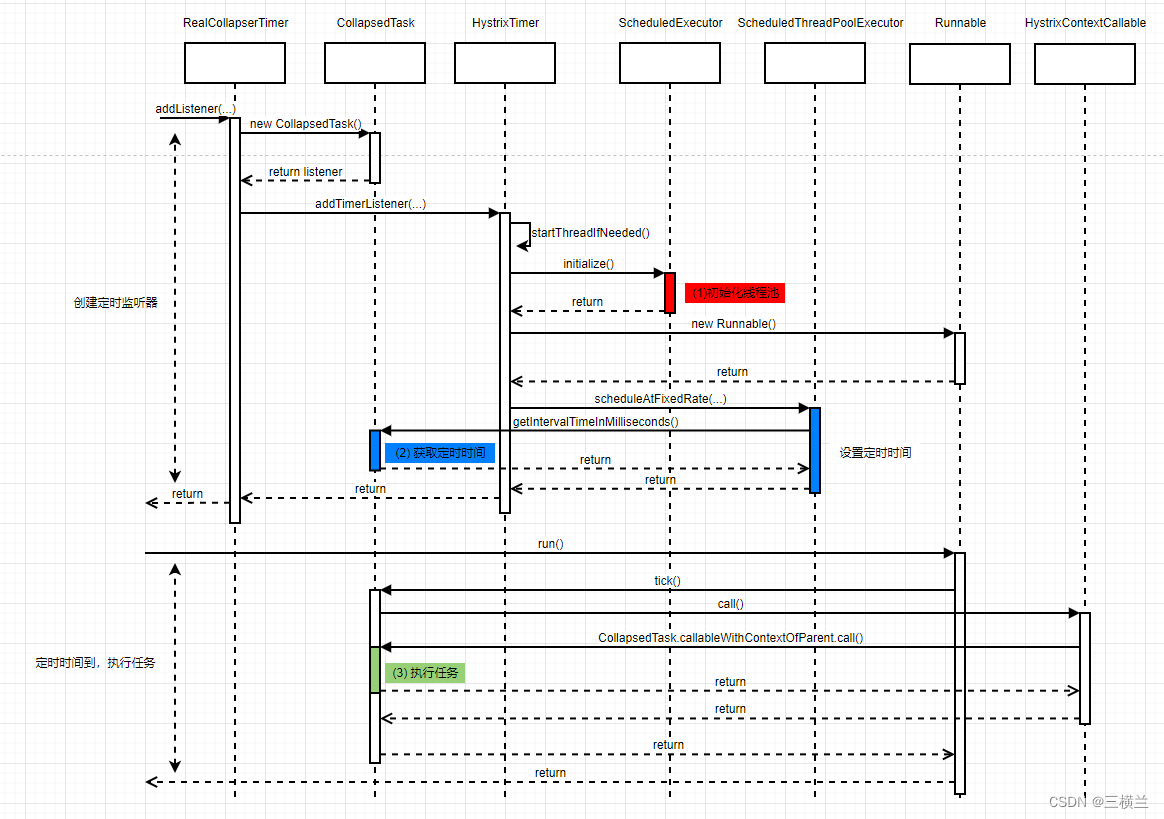
后面继续具体分析每一步的内容
初始化线程池
// ScheduledExecutor
		public void initialize() {

            HystrixPropertiesStrategy propertiesStrategy = HystrixPlugins.getInstance().getPropertiesStrategy();
            // 获取核心数,核心数为当前运行环境的CPU个数
            int coreSize = propertiesStrategy.getTimerThreadPoolProperties().getCorePoolSize().get();

            ThreadFactory threadFactory = null;
            ......
            // 创建定时线程池
            executor = new ScheduledThreadPoolExecutor(coreSize, threadFactory);
            initialized = true;
        }
获取定时时间
// CollapsedTask
		@Override
        public int getIntervalTimeInMilliseconds() {
            // 通过设置timerDelayInMilliseconds可得
            return properties.timerDelayInMilliseconds().get();
        }
执行任务
// CollapsedTask
				@Override
                public Void call() throws Exception {
                    try {
                        RequestBatch<BatchReturnType, ResponseType, RequestArgumentType> currentBatch = batch.get();
                        // 判断当前是否已经堆积任务,有再执行
                        if (currentBatch != null && currentBatch.getSize() > 0) {
                            createNewBatchAndExecutePreviousIfNeeded(currentBatch);
                        }
                    } catch (Throwable t) {
                        ......
                    }
                    return null;
                }
// RequestCollapser
	private void createNewBatchAndExecutePreviousIfNeeded(RequestBatch<BatchReturnType, ResponseType, RequestArgumentType> previousBatch) {
        if (previousBatch == null) {
            throw new IllegalStateException("Trying to start null batch which means it was shutdown already.");
        }
        // 多线程,判断是否已经有另一个线程在执行任务
        if (batch.compareAndSet(previousBatch, new RequestBatch<BatchReturnType, ResponseType, RequestArgumentType>(properties, commandCollapser, properties.maxRequestsInBatch().get()))) {
            // 当前线程获得执行权,开始执行任务。后文再详细分析12.3
            previousBatch.executeBatchIfNotAlreadyStarted();
        }
    }
12.2 汇总单个请求
// RequestBatch
	// arg即为函数的请求参数,它是一个Object[]
    // 如 public String getId(String id)
	// 调用方法getId(11)
    // 则arg = [11]
    public Observable<ResponseType> offer(RequestArgumentType arg) {
        // 判断是否有另一个线程在添加
        if (batchStarted.get()) {
            return null;
        }

        if (batchLock.readLock().tryLock()) {
            try {
                // 双重检查
                if (batchStarted.get()) {
                    return null;
                }

                // 当前请求数量已超过maxBatchSize,拒绝添加
                if (argumentMap.size() >= maxBatchSize) {
                    return null;
                } else {
                    // 创建合并请求,将单次请求绑定到batch
                    CollapsedRequestSubject<ResponseType, RequestArgumentType> collapsedRequest =
                            new CollapsedRequestSubject<ResponseType, RequestArgumentType>(arg, this);
                    final CollapsedRequestSubject<ResponseType, RequestArgumentType> existing = (CollapsedRequestSubject<ResponseType, RequestArgumentType>) argumentMap.putIfAbsent(arg, collapsedRequest);
                    // 多线程,判断是否有其他线程已经添加
                    if (existing != null) {
                        // 请求重复
                        boolean requestCachingEnabled = properties.requestCacheEnabled().get();
                        // 判断是否开启缓存
                        if (requestCachingEnabled) {
                            // 如果开启缓存,只保留一个,返回之前的请求观察对象,使得重复的请求订阅相同的观察对象
                            return existing.toObservable();
                        } else {
                            // 如果不开启,则返回错误给重复的请求
                            return Observable.error(new IllegalArgumentException(...));
                        }
                    } else {
                        // 首次请求,返回新创建的请求观察对象collapsedRequest
                        return collapsedRequest.toObservable();
                    }

                }
            } finally {
                batchLock.readLock().unlock();
            }
        } else {
            return null;
        }
    }
这里涉及到两个参数,maxBatchSize和requestCachingEnabled,那么实践中怎么设置呢?看下面的例子
    @HystrixCollapser(
            collapserProperties = {
                    // 默认Integer.MAX_VALUE
                    @HystrixProperty(name = "maxRequestsInBatch", value = "100")
                    // 默认为true
                    , @HystrixProperty(name = "requestCache.enabled", value = "false")
            },
            batchMethod = "getIds"
            , scope = Scope.GLOBAL)
    public String getId(String id) {
        return null;
    }
12.3 提交batch并处理结果
// RequestBatch
	public void executeBatchIfNotAlreadyStarted() {
        // 多线程环境,判断当前线程是否获得执行权
        if (batchStarted.compareAndSet(false, true)) {
            // 获得执行权,上锁
            batchLock.writeLock().lock();

            try {
                // (1) 将batch分片成更小的batch
                Collection<Collection<CollapsedRequest<ResponseType, RequestArgumentType>>> shards = commandCollapser.shardRequests(argumentMap.values());
                // for each shard execute its requests
                for (final Collection<CollapsedRequest<ResponseType, RequestArgumentType>> shardRequests : shards) {
                    try {
                        // (2) create a new command to handle this batch of requests
                        Observable<BatchReturnType> o = commandCollapser.createObservableCommand(shardRequests);
                        // (3) 合并结果映射回单个请求的结果
                        commandCollapser.mapResponseToRequests(o, shardRequests).doOnError(...).doOnCompleted(...)
                            .subscribe(); // 即时订阅,发出batch请求,也就是调用batchMethod获取结果

                    } catch (Exception e) {
                        ......
                    }
                }

            } catch (Exception e) {
                ......
            } finally {
                batchLock.writeLock().unlock();
            }
        }
    }
中间的数据结果比较复杂,可以结合着下面的图看下执行过程

shardRequests
// HystrixCollapser
	// 默认将所有请求当成一个batch,如果有需要可以重写覆盖此逻辑,将请求再次划分为更小的batch单元
    protected Collection<Collection<CollapsedRequest<ResponseType, RequestArgumentType>>> shardRequests(Collection<CollapsedRequest<ResponseType, RequestArgumentType>> requests) {
        return Collections.singletonList(requests);
    }
createObservableCommand
// CommandCollapser
	@Override
    // 创建一个BatchHystrixCommand,通过前面的学习我们知道,最终会调用toObservable()创建观察对象,当被订阅的时候执行batchMethod方法返回结果,这里不再做过多分析
    protected HystrixCommand<List<Object>> createCommand(
            Collection<CollapsedRequest<Object, Object>> collapsedRequests) {
       return new BatchHystrixCommand(HystrixCommandBuilderFactory.getInstance().create(metaHolder, collapsedRequests));
    }
mapResponseToRequests
// CommandCollapser
	@Override
    protected void mapResponseToRequests(List<Object> batchResponse,
                                         Collection<CollapsedRequest<Object, Object>> collapsedRequests) {
        if (batchResponse.size() < collapsedRequests.size()) {
            throw new RuntimeException(createMessage(collapsedRequests, batchResponse));
        }
        int count = 0;
        // 一一映射结果
        for (CollapsedRequest<Object, Object> request : collapsedRequests) {
            request.setResponse(batchResponse.get(count++));
        }
    }
桥接模式
图中粉色部分其实用到了桥接模式,这里是为了使HystrixCollapser类中protected修饰的createCommand、shardRequests、mapResponseToRequests这三个方法能够在其他package的RequestCollapser类使用
Hystrix的解读至此结束!!!!!!
Eureka的源码学习即将开始,欢迎关注公众号三横兰


 1740
1740


 被折叠的 条评论
为什么被折叠?
被折叠的 条评论
为什么被折叠?
 到【灌水乐园】发言


