


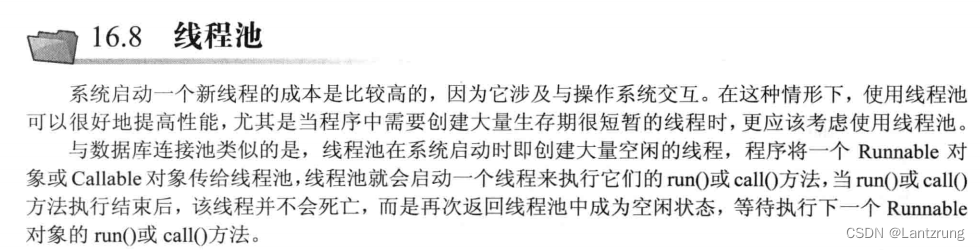
线程池
线程池
常用的阻塞队列:
–ArrayBlockingQueue【数组】
–LinkedBlockingQueue【链表】 阻塞队列中提供put()和take()方法【put添加、take获取】
–当put操作时,队列已满则会阻塞当前线程
–当take操作时,队列已空则会阻塞当前线程
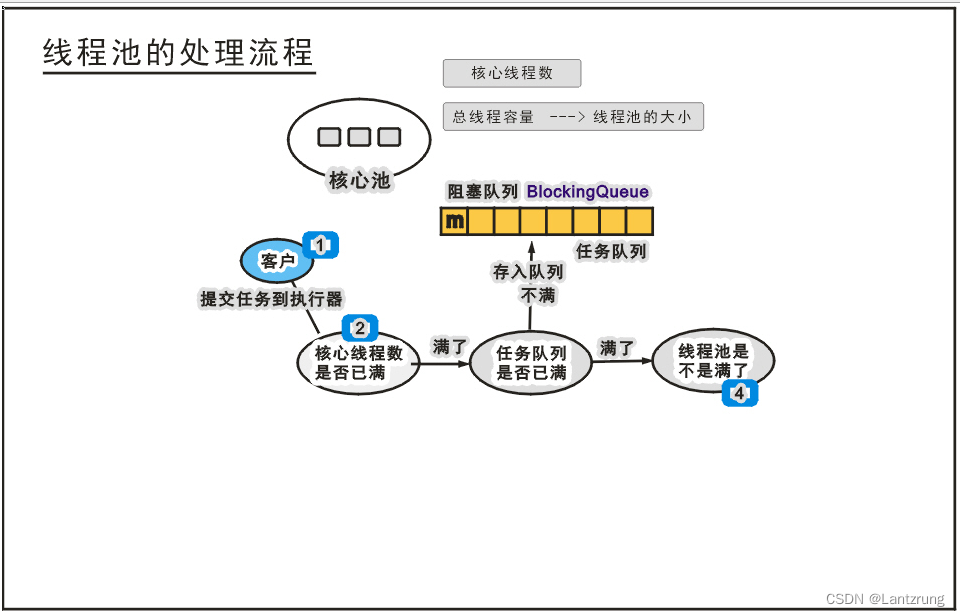
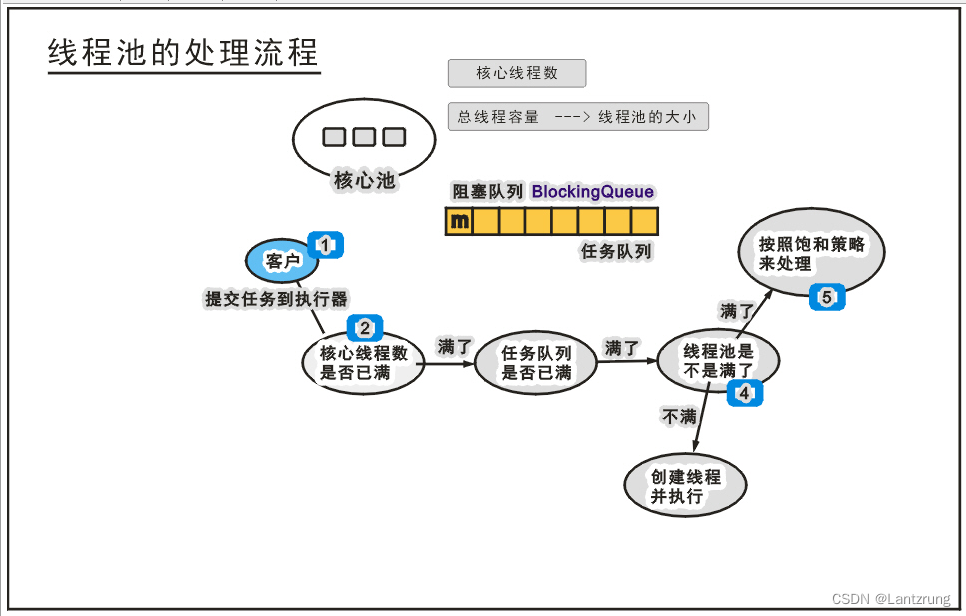
1、线程池的创建【重点】
–核心线程池大小
–最大池的大小
–时间单位
–存活时间
package Day0808;

import java.util.concurrent.*;

/**
 * @author Lantzrung
 * @create 2022-08-08
 * @Description
 */
// 线程池存放的线程并执行任务
public class ExcuterPoolDemo {
    public static void main(String[] args) {
        // 提供工作队列  【存储任务】
        // ArrayBlockingQueue workQueue = new ArrayBlockingQueue<>();
        ArrayBlockingQueue workQueue = new ArrayBlockingQueue<>(2);//初始化长度为2
        //  1、 corePoolSize 核心线程大小    maximumPoolSize 最大池大小   keepAliveTime 存活时间   unit 时间单位  workQueue 任务说明
        //  ExecutorService executor = new ThreadPoolExecutor(corePoolSize, maximumPoolSize, keepAliveTime, unit, workQueue);
        ExecutorService executor = new ThreadPoolExecutor(1, 2, 100, TimeUnit.SECONDS, workQueue);
        // 2、定义一个任务  【使用匿名内部类进行操作】
        Runnable task = new Runnable() {
            @Override
            public void run() {
                System.out.println("去市场买菜!");
                // 睡眠
                try {
                    Thread.sleep(2000);
                } catch (InterruptedException e) {
                    throw new RuntimeException(e);
                }
                System.out.println("结束!");
            }
        };
        // 2、执行任务
        executor.submit(task);// 注意:执行完任务后线程不会关闭,线程而是进入了空闲状态 要是关闭线程则要关闭整个线程池进行操作
        // 3、关闭线程池
        executor.shutdown();
    }
}
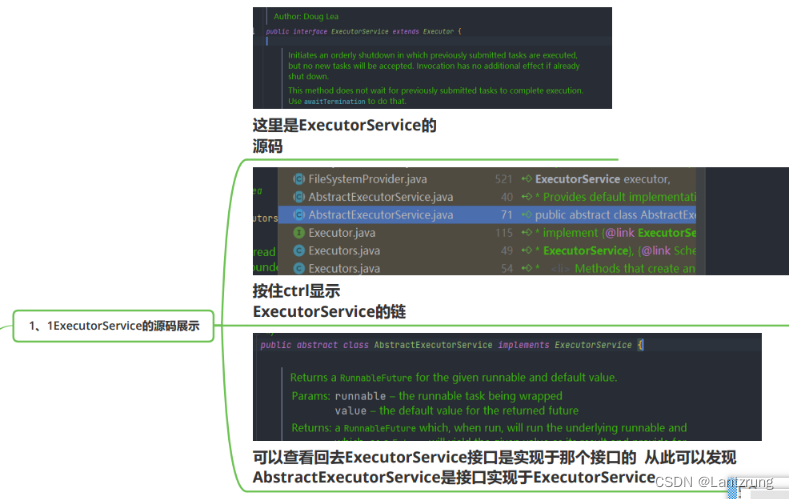
2、ExecutorService的源码展示
3、线程池的工作流程、原理

package Day0808;
import java.util.concurrent.*;
/**
* @author Lantzrung
* @create 2022-08-08
* @Description
*/
public class ExcuterPoolDemo01 {
public static void main(String[] args) {
ArrayBlockingQueue workQueue = new ArrayBlockingQueue<>(1);//初始化长度为1
// 这里核心池数量为1 最大池为2(实际上就是为2) 再加上 任务队列的1 就是3个任务队列 线程池中的4无法执行
// 再注意顺序 1和 3是进入了最大池中 2是进入了任务队列中进行操作
// 然后再发现出现了异常,线程池并没有结束关闭执行
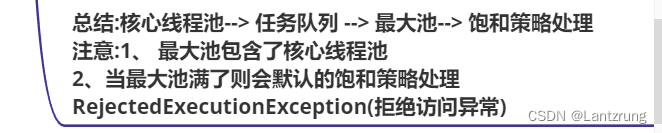
// 先看核心线程池满了没有 --> 然后再看任务队列 --> 再看最大池(包含了核心线程池) --> 再看饱和策略处理(RejectedExecutionException拒绝执行异常)
// 注意: 核心线程池--> 任务队列 --> 最大池--> 饱和策略处理 注意: 最大池包含了核心线程池
// 拒绝执行的异常 当最大池满了则会默认的饱和策略处理【抛出RejectedExecutionException拒绝执行的异常】
// Exception in thread "main" java.util.concurrent.RejectedExecutionException
// 去市场买菜1!
// 去市场买菜3!
// 结束3!
// 结束1!
// 去市场买菜2!
// 结束2!
ExecutorService executor = new ThreadPoolExecutor(1, 2, 100, TimeUnit.SECONDS, workQueue);
Runnable task1 = new Runnable() {
@Override
public void run() {
System.out.println("去市场买菜1!");
// 睡眠
try {
Thread.sleep(2000);
} catch (InterruptedException e) {
throw new RuntimeException(e);
}
System.out.println("结束1!");
}
};
Runnable task2 = new Runnable() {
@Override
public void run() {
System.out.println("去市场买菜2!");
// 睡眠
try {
Thread.sleep(2000);
} catch (InterruptedException e) {
throw new RuntimeException(e);
}
System.out.println("结束2!");
}
};
Runnable task3 = new Runnable() {
@Override
public void run() {
System.out.println("去市场买菜3!");
// 睡眠
try {
Thread.sleep(2000);
} catch (InterruptedException e) {
throw new RuntimeException(e);
}
System.out.println("结束3!");
}
};
Runnable task4 = new Runnable() {
@Override
public void run() {
System.out.println("去市场买菜4!");
// 睡眠
try {
Thread.sleep(2000);
} catch (InterruptedException e) {
throw new RuntimeException(e);
}
System.out.println("结束4!");
}
};
// 2、执行任务
executor.submit(task1);
executor.submit(task2);
executor.submit(task3);
executor.submit(task4);// 当最大池满了则会默认的饱和策略处理【抛出RejectedExecutionException的拒绝访问的异常】
// 3、关闭线程池
executor.shutdown();
}
}
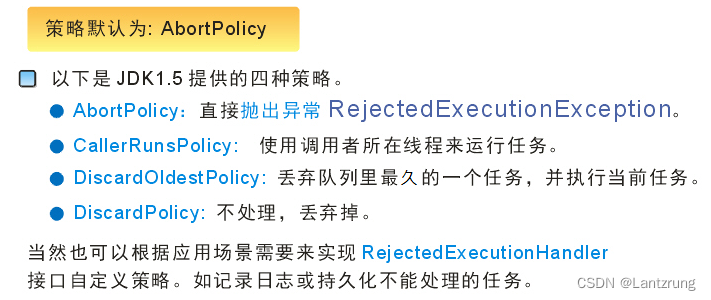
4、饱和策略:当前线程池处于饱和状态,需要有一套策略来处理新提交的任务【消化】
package Day0808;
import java.util.concurrent.*;
/**
* @author Lantzrung
* @create 2022-08-08
* @Description
*/
public class ExcuterPoolDemo02 {
public static void main(String[] args) {
// 1、饱和策略的处理器
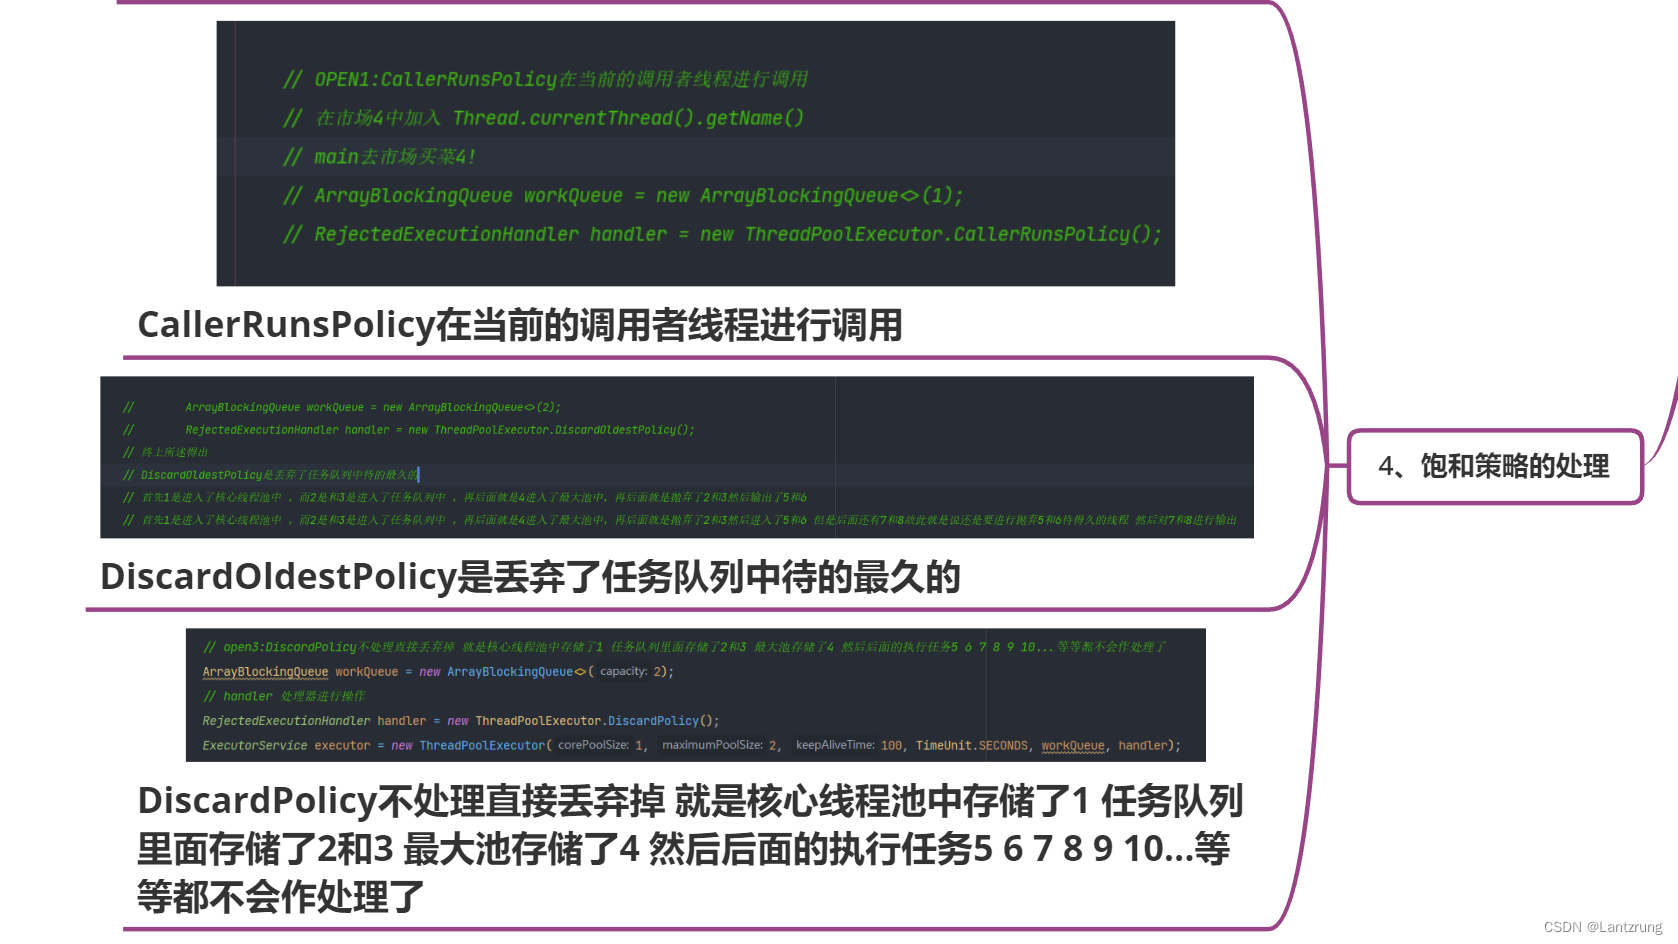
// OPEN1:CallerRunsPolicy在当前的调用者线程进行调用
// 在市场4中加入 Thread.currentThread().getName()
// main去市场买菜4!
// ArrayBlockingQueue workQueue = new ArrayBlockingQueue<>(1);
// RejectedExecutionHandler handler = new ThreadPoolExecutor.CallerRunsPolicy();
// OPEN2:
// DiscardOldestPolicy是丢弃了任务队列中待的最久的
// 通过测试多个执行任务 推断出结论
// 比如说 我设置了开启线程1到6 任务队列是为2 核心线程池是1 最大池是2 抛弃最旧的线程
// 去市场买菜1!
// pool-1-thread-2去市场买菜4!
// 结束4!
// 结束1!
// pool-1-thread-2去市场买菜5!
// pool-1-thread-1去市场买菜6!
// 结束6!
// 结束5!
// 比如说 我设置了开启线程1到8 任务队列是为2 核心线程池是1 最大池是2 抛弃最旧的线程
// 去市场买菜1!
// pool-1-thread-2去市场买菜4!
// 结束4!
// 结束1!
// pool-1-thread-2去市场买菜7!
// pool-1-thread-1去市场买菜8!
// 结束8!
// 结束7!
// ArrayBlockingQueue workQueue = new ArrayBlockingQueue<>(2);
// RejectedExecutionHandler handler = new ThreadPoolExecutor.DiscardOldestPolicy();
// 终上所述得出
// DiscardOldestPolicy是丢弃了任务队列中待的最久的
// 首先1是进入了核心线程池中 ,而2是和3是进入了任务队列中 ,再后面就是4进入了最大池中,再后面就是抛弃了2和3然后输出了5和6
// 首先1是进入了核心线程池中 ,而2是和3是进入了任务队列中 ,再后面就是4进入了最大池中,再后面就是抛弃了2和3然后进入了5和6 但是后面还有7和8故此就是说还是要进行抛弃5和6待得久的线程 然后对7和8进行输出
// open3:DiscardPolicy不处理直接丢弃掉 就是核心线程池中存储了1 任务队列里面存储了2和3 最大池存储了4 然后后面的执行任务5 6 7 8 9 10...等等都不会作处理了
ArrayBlockingQueue workQueue = new ArrayBlockingQueue<>(2);
// handler 处理器进行操作
RejectedExecutionHandler handler = new ThreadPoolExecutor.DiscardPolicy();
ExecutorService executor = new ThreadPoolExecutor(1, 2, 100, TimeUnit.SECONDS, workQueue, handler);
// 先执行2然后再执行3 先执行3然后再执行5
Runnable task1 = new Runnable() {
@Override
public void run() {
System.out.println("去市场买菜1!");
// 睡眠
try {
Thread.sleep(2000);
} catch (InterruptedException e) {
throw new RuntimeException(e);
}
System.out.println("结束1!");
}
};
Runnable task2 = new Runnable() {
@Override
public void run() {
System.out.println("去市场买菜2!");
// 睡眠
try {
Thread.sleep(2000);
} catch (InterruptedException e) {
throw new RuntimeException(e);
}
System.out.println("结束2!");
}
};
Runnable task3 = new Runnable() {
@Override
public void run() {
System.out.println("去市场买菜3!");
// 睡眠
try {
Thread.sleep(2000);
} catch (InterruptedException e) {
throw new RuntimeException(e);
}
System.out.println("结束3!");
}
};
Runnable task4 = new Runnable() {
@Override
public void run() {
// OPEN1:
System.out.println(Thread.currentThread().getName() + "去市场买菜4!");
// 睡眠
try {
Thread.sleep(2000);
} catch (InterruptedException e) {
throw new RuntimeException(e);
}
System.out.println("结束4!");
}
};
Runnable task5 = new Runnable() {
@Override
public void run() {
// OPEN1:
System.out.println(Thread.currentThread().getName() + "去市场买菜5!");
// 睡眠
try {
Thread.sleep(2000);
} catch (InterruptedException e) {
throw new RuntimeException(e);
}
System.out.println("结束5!");
}
};
Runnable task6 = new Runnable() {
@Override
public void run() {
// OPEN1:
System.out.println(Thread.currentThread().getName() + "去市场买菜6!");
// 睡眠
try {
Thread.sleep(2000);
} catch (InterruptedException e) {
throw new RuntimeException(e);
}
System.out.println("结束6!");
}
};
Runnable task7 = new Runnable() {
@Override
public void run() {
// OPEN1:
System.out.println(Thread.currentThread().getName() + "去市场买菜7!");
// 睡眠
try {
Thread.sleep(2000);
} catch (InterruptedException e) {
throw new RuntimeException(e);
}
System.out.println("结束7!");
}
};
Runnable task8 = new Runnable() {
@Override
public void run() {
// OPEN1:
System.out.println(Thread.currentThread().getName() + "去市场买菜8!");
// 睡眠
try {
Thread.sleep(2000);
} catch (InterruptedException e) {
throw new RuntimeException(e);
}
System.out.println("结束8!");
}
};
Runnable task9 = new Runnable() {
@Override
public void run() {
// OPEN1:
System.out.println(Thread.currentThread().getName() + "去市场买菜9!");
// 睡眠
try {
Thread.sleep(2000);
} catch (InterruptedException e) {
throw new RuntimeException(e);
}
System.out.println("结束9!");
}
};
Runnable task10 = new Runnable() {
@Override
public void run() {
// OPEN1:
System.out.println(Thread.currentThread().getName() + "去市场买菜10!");
// 睡眠
try {
Thread.sleep(2000);
} catch (InterruptedException e) {
throw new RuntimeException(e);
}
System.out.println("结束10!");
}
};
// 2、执行任务
executor.submit(task1);
executor.submit(task2);
executor.submit(task3);
executor.submit(task4);
executor.submit(task5);
executor.submit(task6);
executor.submit(task7);
// executor.submit(task8);
// executor.submit(task9);
// executor.submit(task10);
// 3、关闭线程池
executor.shutdown();
}
}
5、线程池的新API 【newFixedThreadPool】
–线程池的新API【了解-newFixedThreadPool】
package Day0808;

import java.util.concurrent.ExecutorService;
import java.util.concurrent.Executors;

/**
 * @author Lantzrung
 * @create 2022-08-08
 * @Description
 */
public class NewFixedThreadPoolDemo {
    public static void main(String[] args) {
        // 创建一个具有固定的线程数量的(6)的线程池
        ExecutorService executor = Executors.newFixedThreadPool(6);

        Runnable pool = new Runnable() {
            @Override
            public void run() {
                for (int i = 0; i <= 100; i++) {
                    System.out.println(Thread.currentThread().getName() + "i的值为:" + i);
                }
            }
        };
        executor.submit(pool);
        executor.submit(pool);
        // 关闭
        executor.shutdown();
        // 由结果可以看出这个线程池是可重用的,拥有固定的数据
        // pool-1-thread-1i的值为:0
        //pool-1-thread-2i的值为:0
        //pool-1-thread-1i的值为:1
        //pool-1-thread-2i的值为:1
        //pool-1-thread-1i的值为:2
        //pool-1-thread-2i的值为:2
        //pool-1-thread-1i的值为:3
        //pool-1-thread-2i的值为:3
    }
}
6、线程的局部变量【了解】ThreadLocal
ThreadLocal是每个线程都独立创建的一个变量副本,可以用于避免多线程并发访问的安全问题。

1、ThreadLocal-线程共享资源的分析
package Day0808;

/**
 * @author Lantzrung
 * @create 2022-08-08
 * @Description
 */
// 要是一个数据更改的话会影响一个线程当前的数据
// 多线程在共享资源时,数据更改之后,会影响其他线程的资源访问
// 局部变量
public class ThreadLocalDemo {
    public static void main(String[] args) {
        // 创建Acount
        Acount acount = new Acount("账号a");
        // 创建两个线程
        AcountThread t1 = new AcountThread("甲", acount);
        AcountThread t2 = new AcountThread("乙", acount);
        // 启动线程操作
        t1.start();
        t2.start();
    }
}

// 账号
class Acount {
    public String name;

    public Acount(String name) {
        this.name = name;
    }

    public Acount() {
    }

    @Override
    public String toString() {
        return "Acount[name=" + name + "]";
    }
}

// 使用Acount的线程
class AcountThread extends Thread {
    // 账号依赖
    Acount acount;

    public AcountThread(String name, Acount acount) {
        super(name);
        this.acount = acount;
    }

    public AcountThread() {
        super();
    }

    // 修改Acount的数据
    @Override
    public void run() {
        for (int i = 1; i <= 10; i++) {
            // 当i==5时,修改acount.name
            if (i == 5) {
                acount.name = acount.name + this.getName() + i;// 这是原来的名称加上现在的账号名称
            }
            // 睡眠0.1秒
            try {
                Thread.sleep(100);
            } catch (InterruptedException e) {
                throw new RuntimeException(e);
            }
            System.out.println(acount.name + "---当前的i的值:" + i);
        }
    }
}
2、ThreadLocal-的使用
package Day0808;

/**
 * @author Lantzrung
 * @create 2022-08-08
 * @Description
 */

// 为什么是null 因为在多线程中ThreadLocal是独立的线程  是和其他的值是互不干扰的
public class ThreadLocalDemo01 {
    public static void main(String[] args) {
        // 定义Thread
        ThreadLocal<String> name = new ThreadLocal<>();
        name.set("账号a");
        // 创建Acount
        Acount acount = new Acount(name);
        // 创建两个线程
        AcountThread t1 = new AcountThread("甲", acount);
        AcountThread t2 = new AcountThread("乙", acount);
        // 启动线程操作
        t1.start();
        t2.start();
    }
}

class Acount {
    // 定义为ThreadLocal类型
    public ThreadLocal<String> name;

    public Acount(ThreadLocal<String> name) {
        this.name = name;
    }

    public Acount() {
        super();
    }

    @Override
    public String toString() {
        return "Acount{" + "name=" + name + '}';
    }
}

// 使用Acount的线程 【数据互不干扰--数据隔离】
// 就是线程A改了内容  线程B也不会改变  意思就是相互独立的互不更改
class AcountThread extends Thread {
    // 账号依赖
    Acount acount;

    public AcountThread(String name, Acount acount) {
        super(name);
        this.acount = acount;
    }

    public AcountThread(Acount acount) {
        this.acount = acount;
    }

    // run
    @Override
    public void run() {
        for (int i = 1; i <= 10; i++) {
            // 当i==5时,修改acount.name
            if (i == 5) {
                String value = acount.name.get() + this.getName() + i;
//                修改acount.name
                acount.name.set(value);;
            }
            try {
                Thread.sleep(100);
            } catch (InterruptedException e) {
                throw new RuntimeException(e);
            }
            // 输出当前线程的结果和当前i的值
            System.out.println(acount.name.get() + "-----当前线程" + this.getName() + "--当前的i的值" + i);
        }
    }
}


 3286
3286


 被折叠的 条评论
为什么被折叠?
被折叠的 条评论
为什么被折叠?
 到【灌水乐园】发言


