


minist数据集训练
训练方法:利用pytorch来实现minist数据集的分类模型训练
训练模型如下图所示
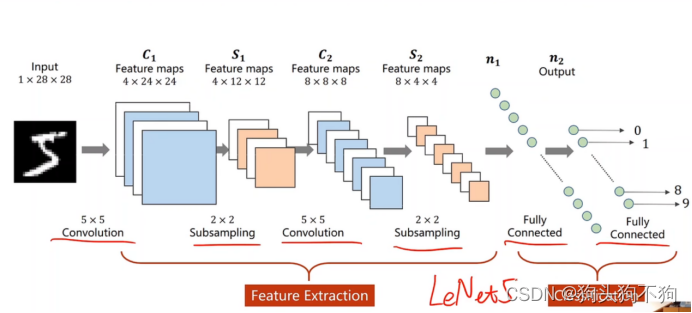
模型代码:
import torch
from torch import nn
from torch.nn import Flatten


class Net(nn.Module):
    def __init__(self):
        super().__init__()
        self.module = nn.Sequential(
            nn.Conv2d(1,4,5,1,0),
            nn.MaxPool2d(2),
            nn.Conv2d(4,8,5,1,0),
            nn.MaxPool2d(2),# torch.Size([8, 4, 4])
            Flatten(),# torch.Size([64, 128])
            nn.Linear(8*16,16),# torch.Size([64, 16])
            nn.Linear(16, 10) #torch.Size([64, 10])
        )

    def forward(self, x):
        x = self.module(x)
        return x


if '__name__' == '__mian__':
    net = Net()
    input = torch.ones((64,1, 28, 28))
    output = net(input)
    print(output.shape)
现在开始编写代码训练模型
基本思路:
- 读取数据集并整理
- 将数据集放入模型中训练,每次记录训练的损失loss以及准确率
实测训练大概10轮后,正确率能达到98%以上
import torch.optim
import  torchvision
from torch.utils.data import DataLoader
from torch.utils.tensorboard import  SummaryWriter
from module import *
dataset_transform = torchvision.transforms.Compose([torchvision.transforms.ToTensor()])

train_set = torchvision.datasets.MNIST(root='../dataset_MNIST',train=True,transform=dataset_transform,download=True)
test_set = torchvision.datasets.MNIST(root='../dataset_MNIST',train=False,transform=dataset_transform,download=True)


print('训练数据集size{}'.format(len(train_set)))
print('测试数据集size{}'.format(len(test_set)))

train_loader = DataLoader(dataset=train_set, batch_size=64)
test_loader = DataLoader(dataset=test_set,batch_size=64)

# for data in train_loader:
#     imgs,target = data
#     print('imgs',imgs.shape) # torch.Size([64, 1, 28, 28])
#     print('target',target)
#     break

writer = SummaryWriter('../p10')
cuda_available = torch.cuda.is_available()

net = Net()
if cuda_available:
    net = net.cuda()

# 定义损失函数
loss_fn = nn.CrossEntropyLoss()
if cuda_available:
    loss_fn = loss_fn.cuda()

# 优化器
learning_rate = 0.01
optimizer = torch.optim.SGD(net.parameters(), lr=learning_rate)

# 设置训练参数
# 训练次数
total_train_step = 0
total_test_step = 0
# 训练轮数
epoch = 10

for i in range(10):
    print('------------第{}轮训练开始------------'.format(i))
    net.train()
    for data in train_loader:
        imgs,targets = data
        if cuda_available:
            imgs = imgs.cuda()
            targets = targets.cuda()
        outputs = net(imgs)
        loss = loss_fn(outputs,targets)

        #优化器优化模型
        optimizer.zero_grad()
        loss.backward()
        optimizer.step()
        total_train_step += 1
        if total_train_step % 100 == 0:
            print('训练次数:{} loss:{}'.format(total_train_step, loss.item()))

    # 开始测试
    net.eval()
    total_test_loss = 0
    total_accuracy = 0
    with torch.no_grad():
        for data in test_loader:
            imgs,targets = data
            if cuda_available:
                imgs = imgs.cuda()
                targets = targets.cuda()
            outputs = net(imgs)
            loss = loss_fn(outputs, targets)
            total_test_loss += loss.item()
            accuracy = (outputs.argmax(1) == targets).sum()
            total_accuracy += accuracy
    print("整体测试集的Loss:{}".format(total_test_loss))
    writer.add_scalar("test_loss", total_test_loss, total_test_step)
    total_test_step += 1
    print("整体测试集的正确率:{}".format(total_accuracy / len(test_set)))
    if i == 9:
        torch.save(net, "train_model_{}.pth".format(i))
        print('模型已保存')

writer.close()
上面已经将最后一次训练的的模型保存了,那么现在就可以用一个图片来测试一下这个模型
from module import *
import torchvision.transforms
from PIL import  Image
dataset_transform = torchvision.transforms.Compose([torchvision.transforms.ToTensor()])
test_set = torchvision.datasets.MNIST('../dataset_MNIST',train=False,transform=dataset_transform,download=False)

model = torch.load("train_model_9.pth")
model.eval()
for i in range(10):
    img, target = test_set[i]
    print('--------------第{}张图片--------------'.format(i))
    print("图片尺寸",img.shape)
    print("标签",target)
    img = torch.reshape(img,(1,1,28,28))
    img = img.cuda()
    with torch.no_grad():
        output = model(img)
    print(output)
    print(output.argmax(1))
这里要注意的一点是,因为训练模型时使用了nvida的cuda驱动,那么在使用模型的时候,也需要将图片进行一点修改,具体是
img = img.cuda()
测试结果如下:
--------------第0张图片--------------
图片尺寸 torch.Size([1, 28, 28])
标签 7
tensor([[  0.1551,  -2.2232,   5.1375,   3.1896,  -9.0812,  -3.7413, -16.3016,
          16.5437,  -2.3190,   2.7608]], device='cuda:0')
tensor([7], device='cuda:0')
--------------第1张图片--------------
图片尺寸 torch.Size([1, 28, 28])
标签 2
tensor([[  8.5477,   6.7017,  15.3023,   6.9958, -12.9011,  -3.1987,   2.8130,
         -12.9218,   4.8305, -17.2936]], device='cuda:0')
tensor([2], device='cuda:0')
--------------第2张图片--------------
图片尺寸 torch.Size([1, 28, 28])
标签 1
tensor([[-1.4329,  9.1416,  0.7603, -2.0579,  1.7856, -3.9744,  0.1253,  2.0046,
         -0.6214, -2.1419]], device='cuda:0')
tensor([1], device='cuda:0')
--------------第3张图片--------------
图片尺寸 torch.Size([1, 28, 28])
标签 0
tensor([[13.5426, -6.6119,  1.1040, -5.3236, -6.8938,  2.2850,  3.4611, -2.5504,
         -0.0393, -0.4295]], device='cuda:0')
tensor([0], device='cuda:0')
--------------第4张图片--------------
图片尺寸 torch.Size([1, 28, 28])
标签 4
tensor([[-2.2200, -3.2653, -3.9221, -7.7044, 12.9432, -5.3840, -0.3826,  1.3231,
         -2.7672,  6.4946]], device='cuda:0')
tensor([4], device='cuda:0')
--------------第5张图片--------------
图片尺寸 torch.Size([1, 28, 28])
标签 1
tensor([[-2.1054, 10.7492, -0.0951, -2.4075,  3.1492, -5.6566, -1.9704,  4.0755,
         -0.5151, -0.8886]], device='cuda:0')
tensor([1], device='cuda:0')
--------------第6张图片--------------
图片尺寸 torch.Size([1, 28, 28])
标签 4
tensor([[-7.6890,  0.1027, -5.0862, -4.9066, 10.8449, -1.0489, -2.3638,  2.8111,
          4.3393,  3.6312]], device='cuda:0')
tensor([4], device='cuda:0')
--------------第7张图片--------------
图片尺寸 torch.Size([1, 28, 28])
标签 9
tensor([[-7.3084, -1.4986, -1.5550,  2.7101,  2.4086,  2.5202, -7.5940,  0.3350,
          2.0277,  7.9211]], device='cuda:0')
tensor([9], device='cuda:0')
--------------第8张图片--------------
图片尺寸 torch.Size([1, 28, 28])
标签 5
tensor([[ -0.5667, -15.0522,  -2.6193,  -2.5653,  -1.2110,  13.1138,   5.9642,
          -7.2953,   4.0217,   1.9577]], device='cuda:0')
tensor([5], device='cuda:0')
--------------第9张图片--------------
图片尺寸 torch.Size([1, 28, 28])
标签 9
tensor([[-2.5326, -8.8390, -2.7222, -2.3805,  2.1510, -1.2283, -7.7543,  5.7798,
          5.2312, 11.3871]], device='cuda:0')
tensor([9], device='cuda:0')

Process finished with exit code 0
s
说明准确率都还挺高的,这么模型训练的还可以
好了,这就是minist数据集训练了
写完这个就算是入门了
b站上有一个pytorch很好的入门视频
讲的很不错的,学完就能入门了


 3652
3652

 被折叠的 条评论
为什么被折叠?
被折叠的 条评论
为什么被折叠?
 到【灌水乐园】发言


